- Products

- Developers
- User stories
- Blog
- Pricing

Build a realtime Instagram clone — Part 2: Connecting the UI with GraphQL data
Introduction
This is part 2 of a 4 part tutorial. You can find part 1 here, part 3 here and part 4 here.
In the last part, of this series, we set up the UI for our React Instagram clone. If you haven’t already, you can read up on it here. In this part, we are going to take a look at how to connect the UI to GraphQL Data
Prerequisites
- Should have read the first part of the series
- Basic knowledge of JavaScript
- Node installed on your machine
- NPM installed on your machine
Set up the server
To allow us to serve data to the UI, let’s create an API server for the application. The server will be built using NodeJS and GraphQL.
What is GraphQL
GraphQL allows you to describe how to ask for data. With GraphQL, the client specifies the exact resources it needs instead of making requests to REST Endpoints that return everything. The GraphQL API has three main building blocks which are queries, schema, and resolvers.
To get started, create a server directory in the project root of the react-instagram-clone app. Here’s a link to the Github repository for more reference.
mkdir server
Initialize a new Node project and install the following modules:
1cd server 2 npm init 3 npm install --save express graphql express-graphql cors
Create a server.js file in the server/ directory:
touch server.js
Now, edit the server.js file as follows. First, import the necessary node modules:
1// server/server.js 2 3 let express = require("express"); 4 let graphqlHTTP = require("express-graphql"); 5 let { buildSchema } = require("graphql"); 6 let cors = require("cors"); 7 8 [...]
Next thing is to construct a schema. In GraphQL, schemas are constructed using GraphQL Schema Language.
1// server/server.js 2 [...] 3 4 let schema = buildSchema(` 5 type User { 6 id : String! 7 nickname : String! 8 avatar : String! 9 } 10 type Post { 11 id: String! 12 user: User! 13 caption : String! 14 image : String! 15 } 16 type Query{ 17 user(id: String) : User! 18 post(user_id: String, post_id: String) : Post! 19 posts(user_id: String) : [Post] 20 } 21 `); 22 23 [...]
In specifying the schema, above, we also added a query**.** Query fields also allow you to add arguments which we will need in this case to display specific data.
Next thing to do is to add some stock data for the application. Add the following to your server.js file:
1// server/server.js 2 [...] 3 // Maps id to User object 4 let userslist = { 5 a: { 6 id: "a", 7 nickname: "Chris", 8 avatar: "https://www.laravelnigeria.com/img/chris.jpg" 9 }, 10 [...] 11 }; 12 let postslist = { 13 a: { 14 a: { 15 id: "a", 16 user: userslist["a"], 17 caption: "Moving the community!", 18 image: "https://pbs.twimg.com/media/DOXI0IEXkAAkokm.jpg" 19 }, 20 b: { 21 id: "b", 22 user: userslist["a"], 23 caption: "Angular Book :)", 24 image: 25 "https://cdn-images-1.medium.com/max/1000/1*ltLfTw87lE-Dqt-BKNdj1A.jpeg" 26 }, 27 c: { 28 id: "c", 29 user: userslist["a"], 30 caption: "Me at Frontstack.io", 31 image: "https://pbs.twimg.com/media/DNNhrp6W0AAbk7Y.jpg:large" 32 }, 33 d: { 34 id: "d", 35 user: userslist["a"], 36 caption: "Moving the community!", 37 image: "https://pbs.twimg.com/media/DOXI0IEXkAAkokm.jpg" 38 } 39 } 40 }; 41 [...]
The data is truncated for brevity. You can fetch the complete data from the server.js file on Github.
Now that this is specified, the next thing to do is to specify the resolver function for the API. The resolver ****tells your server how to handle an incoming query telling it where to get the data for a given field. Add the resolver to the server.js file that looks like this:
1// server/server.js 2 [...] 3 // The root provides a resolver function for each API endpoint 4 let root = { 5 user: function({ id }) { 6 return userslist[id]; 7 }, 8 post: function({ user_id , post_id }) { 9 return postslist[user_id][post_id]; 10 }, 11 posts: function({ user_id }){ 12 return Object.values(postslist[user_id]); 13 } 14 }; 15 [...]
Here the functions user and post return data that matches the criteria specified above. posts returns all the posts created by a specific user. Now that this is all done, let’s create an Express app and have the server listen for incoming requests:
1// server/server.js 2 [...] 3 let app = express(); 4 app.use(cors()); 5 app.use( 6 "/graphql", 7 graphqlHTTP({ 8 schema: schema, 9 rootValue: root, 10 graphiql: true 11 }) 12 ); 13 // set application port 14 app.listen(4000);
GraphQL also comes with an interactive console that could be displayed to allow developers get familiar with GraphQL queries. The grapgiql: true option specifies that this should also be mounted on the /graphql route of the express server.
Now, when you run the server.js file, your server will be hosted at http://localhost:4000/graphql.
node server
When you visit the URL in the browser, you get the following:
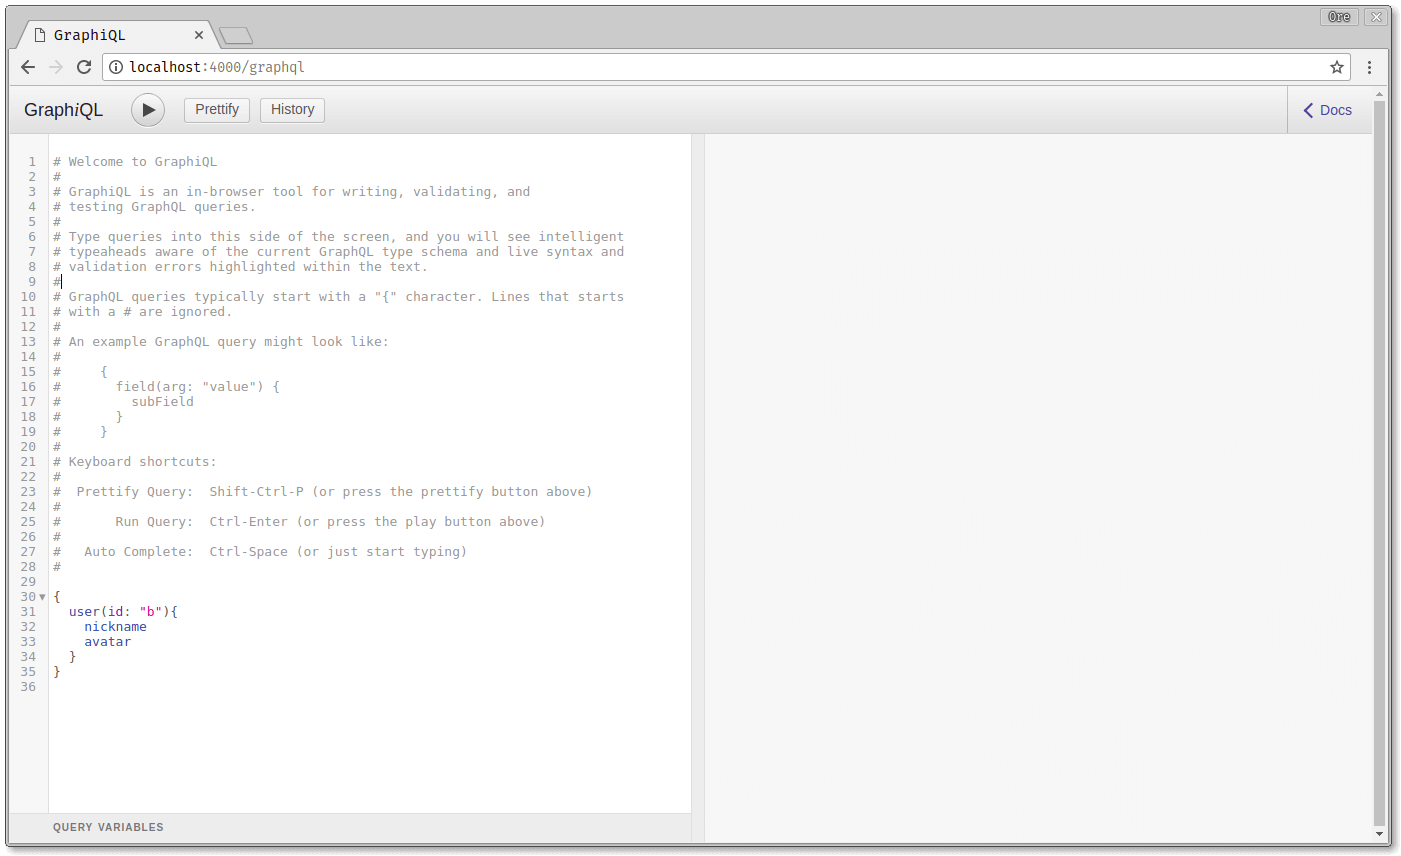
You can test it out by pasting this query into the GraphiQL console:
1{ 2 user(id: "a"){ 3 nickname, 4 } 5 }
When you hit the run button, you can get the result:

This is the query in the above screenshot, with one modification:
1{ 2 user(id: "a"){ 3 nickname, 4 avatar 5 } 6 }
As you can see in the result below, all that needs to be changed is the description of what you want from the server.
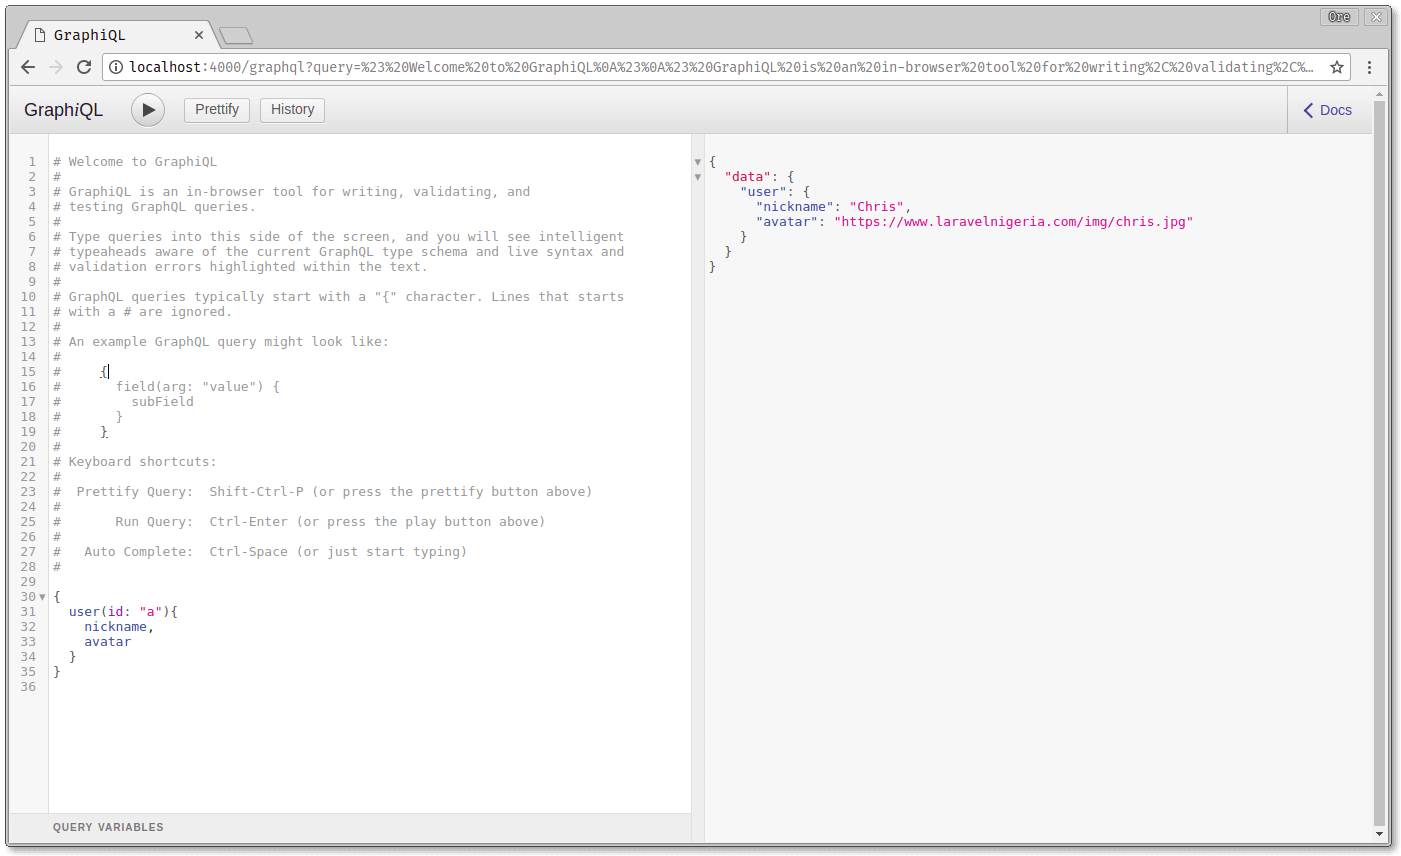
From the screenshots above, you can see that the server only returns the data that was requested of it. Nothing more, nothing less.
Connect the React client to the GraphQL server
Now, let’s see how to connect the server to our React UI that was created in the part of this series. To do this, we are going to make use of Apollo.
Getting set up with Apollo
First, let’s install the necessary packages in the root folder of the react project.
1cd react-instagram-clone 2 npm install apollo-boost react-apollo graphql-tag graphql --save
Now that the installations are complete, create a new Apollo Client in the src/app.js file:
1// src/app.js 2 [...] 3 import ApolloClient from 'apollo-boost'; 4 5 const client = new ApolloClient({ 6 uri : "http://localhost:4000" 7 }) 8 [...]
The uri used above is that of the GraphQL server that was created earlier.
Connecting the Apollo Client to React
Then wrap the content of the App component in an ApolloProvider passing the created client as one of the props.
1// src/app.js 2 [...] 3 import { ApolloProvider } from "react-apollo"; 4 5 const client = new ApolloClient({ 6 uri: "http://localhost:4000/graphql" 7 }); 8 9 const App = () => { 10 return ( 11 <ApolloProvider client={client}> 12 <div className="App"> 13 <Header /> 14 <section className="App-main"> 15 <Post /> 16 </section> 17 </div> 18 </ApolloProvider> 19 ); 20 }; 21 export default App;
This allows us to use the created client all through the different components of our application without having to create a new Apollo Client every time.
Render server-provisioned data
Now, let’s begin to make queries to render posts from the GraphQL server created earlier on. To do this, you’ll have to tweak the src/components/Post/index.js as follows:
Import the necessary modules that would be needed to construct queries:
1// src/components/Post/index.js 2 import { Query } from "react-apollo"; 3 import gql from "graphql-tag"; 4 5 [...]
Now, make query inside the Post component like this:
1// src/components/Post/index.js 2 const Post = () => { 3 return ( 4 <Query 5 query={gql` 6 { 7 post(user_id: "a", post_id: "a") { 8 image 9 caption 10 user { 11 nickname 12 avatar 13 } 14 } 15 } 16 `} 17 > 18 // handle result of the query 19 [...] 20 </Query> 21 ) 22 }
We are going to replace the dots with the query handler but first let’s understand how query itself. The code above creates a GraphQL query that will be executed. When this query is run using the GraphiQL UI this result is obtained.
You can paste this query in your GraphiQL:
1{ 2 post(user_id: "a", post_id: "a") { 3 image 4 caption 5 user { 6 nickname 7 avatar 8 } 9 } 10 }
When you run it, you get the result below:

Now, let’s handle the result as follows:
1// src/components/Post/index.js 2 [...] 3 {({ loading, error, data }) => { 4 if (loading) return <p>Loading Post...</p>; 5 if (error) return <p>Error loading Post:(</p>; 6 let image = data.post.image; 7 let caption = data.post.caption; 8 let user = data.post.user; 9 10 // return JSX to be rendered 11 [...]
Checks are made to see if the query is executed successfully. If it is, the data returned from the query is obtained and the result is handled as follows:
1// src/components/Post/index.js 2 [...] 3 return ( 4 <article className="Post" ref="Post"> 5 <header> 6 <div className="Post-user"> 7 <div className="Post-user-avatar"> 8 <img src={user.avatar} alt={user.nickname} /> 9 </div> 10 <div className="Post-user-nickname"> 11 <span>{user.nickname}</span> 12 </div> 13 </div> 14 </header> 15 <div className="Post-image"> 16 <div className="Post-image-bg"> 17 <img alt={caption} src={image} /> 18 </div> 19 </div> 20 <div className="Post-caption"> 21 <strong>{user.nickname}</strong> {caption} 22 </div> 23 </article> 24 ); 25 }} 26 </Query> 27 ); 28 }; 29 30 export default Post;
Now, when you run the react app using the command:
yarn start # or npm start -- based on the package manager of choice
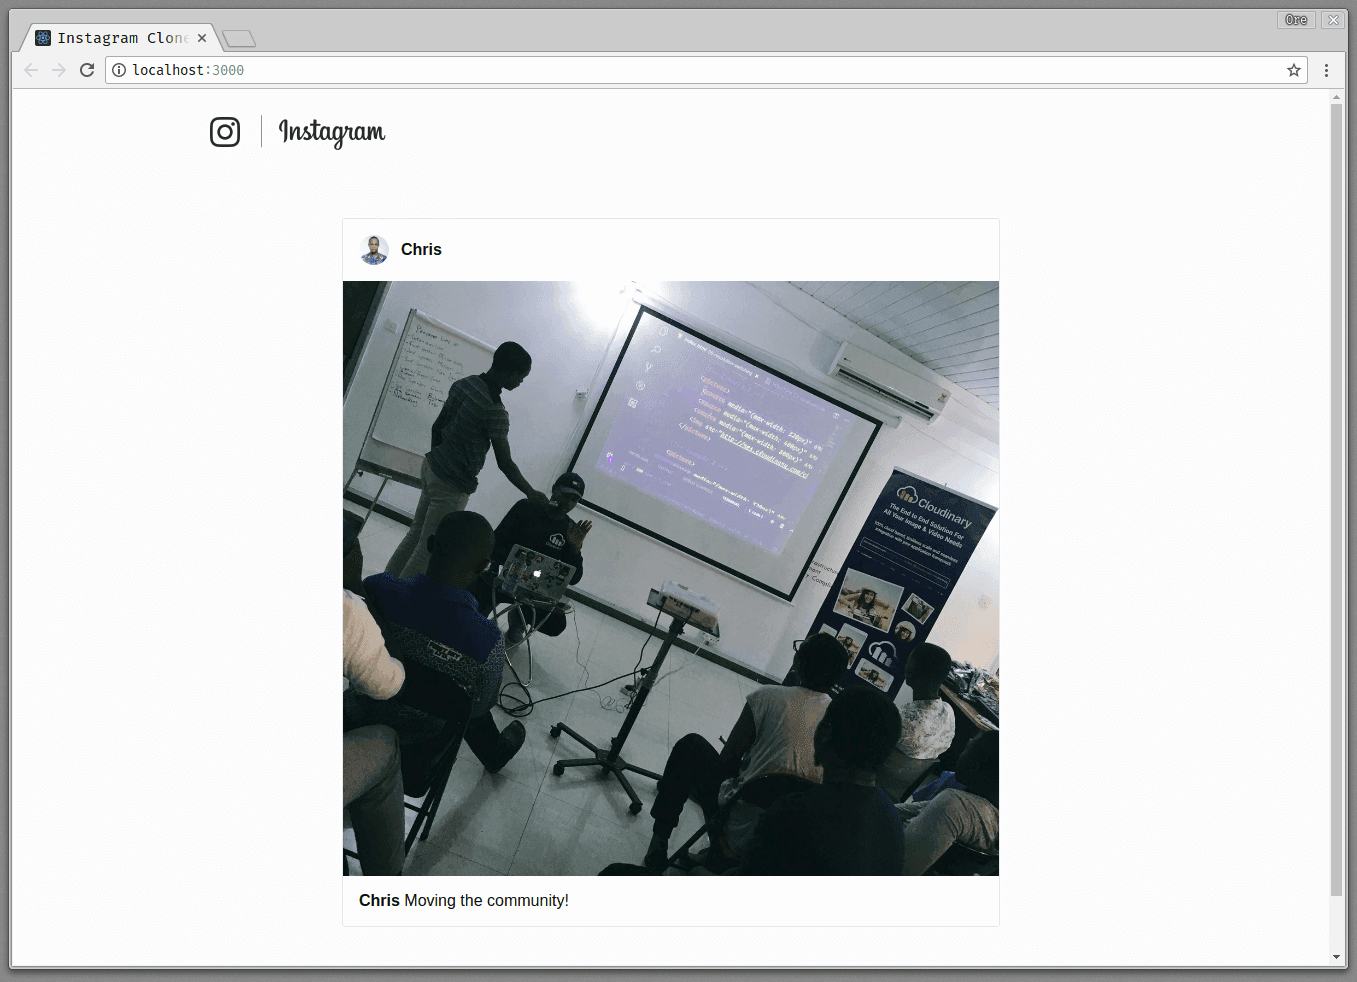
the application is loaded on http://localhost:3000/ and the following view is obtained:
Make sure that the GraphQL server is still running
Fetching and displaying multiple posts
In a real life scenario, you don’t expect to only have one post showing on your version of Instagram . What needs to be done now is that a new Posts component needs to be created to allow for dynamic queries and display of multiple posts. Let’s see how to do this.
Create a new Posts folder in the /src/components directory
mkdir Posts && cd Posts
Create an index.js file in the Posts folder:
touch index.js
Let’s edit the Posts/index.js file to look like this:
First, import the necessary node modules:
1// src/components/Posts/index.js 2 import React from "react"; 3 import "./Posts.css"; 4 import { Query } from "react-apollo"; 5 import gql from "graphql-tag"; 6 import Post from "../Post"; 7 [...]
Then make Query for all the posts in the Posts component:
1// src/components/Posts/index.js 2 [...] 3 const Posts = () => { 4 return ( 5 <Query 6 query={gql` 7 { 8 posts(user_id: "a"){ 9 id 10 user{ 11 nickname 12 avatar 13 } 14 image 15 caption 16 } 17 } 18 `} 19 > 20 [...]
Now, let’s handle the results of the Query like we did earlier on:
1// src/components/Posts/index.js 2 [...] 3 {({loading, error, data}) => { 4 if (loading) return <p>Loading Posts...</p>; 5 if (error) return <p>Error Fetching Posts...</p>; 6 let posts = data.posts; 7 8 return <div className="Posts"> 9 {posts.map(post => <Post nickname={post.user.nickname} avatar={post.user.avatar} image={post.image} caption={post.caption} key={post.id}/>)} 10 </div>; 11 }} 12 </Query> 13 ); 14 } 15 16 export default Posts;
Notice how the Post component was used above. Let’s tweak the Post component to allow for this. Edit the src/components/Post/index.js to look as follows:
1import React, { Component } from "react"; 2 import "./Post.css"; 3 class Post extends Component { 4 render() { 5 const nickname = this.props.nickname; 6 const avatar = this.props.avatar; 7 const image = this.props.image; 8 const caption = this.props.caption; 9 return ( 10 <article className="Post" ref="Post"> 11 <header> 12 <div className="Post-user"> 13 <div className="Post-user-avatar"> 14 <img src={avatar} alt={nickname} /> 15 </div> 16 <div className="Post-user-nickname"> 17 <span>{nickname}</span> 18 </div> 19 </div> 20 </header> 21 <div className="Post-image"> 22 <div className="Post-image-bg"> 23 <img alt={caption} src={image} /> 24 </div> 25 </div> 26 <div className="Post-caption"> 27 <strong>{nickname}</strong> {caption} 28 </div> 29 </article> 30 ); 31 } 32 } 33 34 export default Post;
As seen above, the Post component has the nickname, avatar, image and caption which are dynamically added for each post that is fetched from the GraphQL server.
Recall in the src/components/Posts/index.js we did this:
1// src/components/Posts/index.js 2 return 3 <div className="Posts"> 4 { 5 posts.map( 6 post => <Post nickname={post.user.nickname} avatar={post.user.avatar} image={post.image} caption={post.caption} key={post.id}/> 7 ) 8 } 9 </div>;
What happened here is that all the posts received from the GraphQL server were mapped to Post components with the necessary data properties.
Create a Posts.css file in the src/components/Posts directory that will contain any styling you wish to add to the Posts component:
touch Posts.css
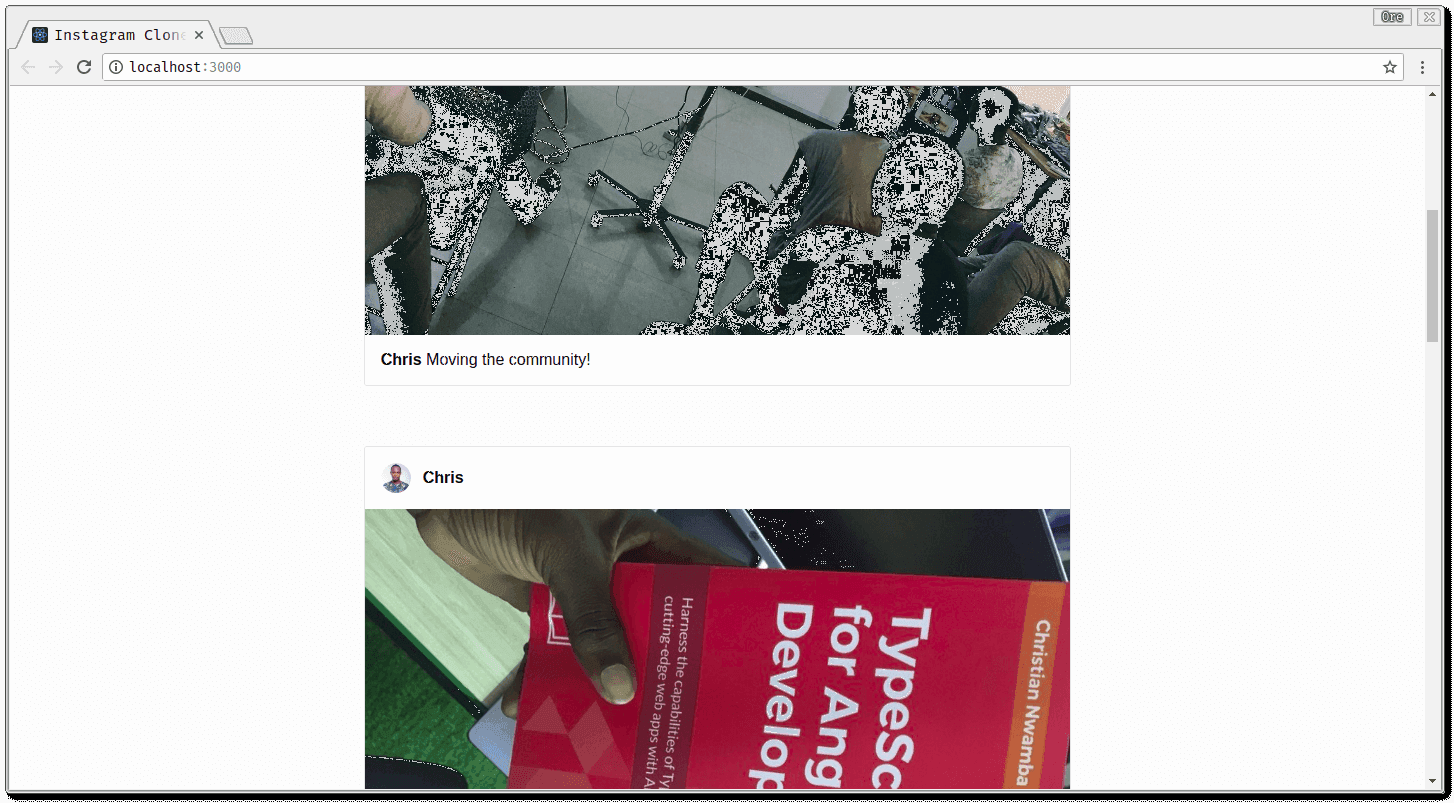
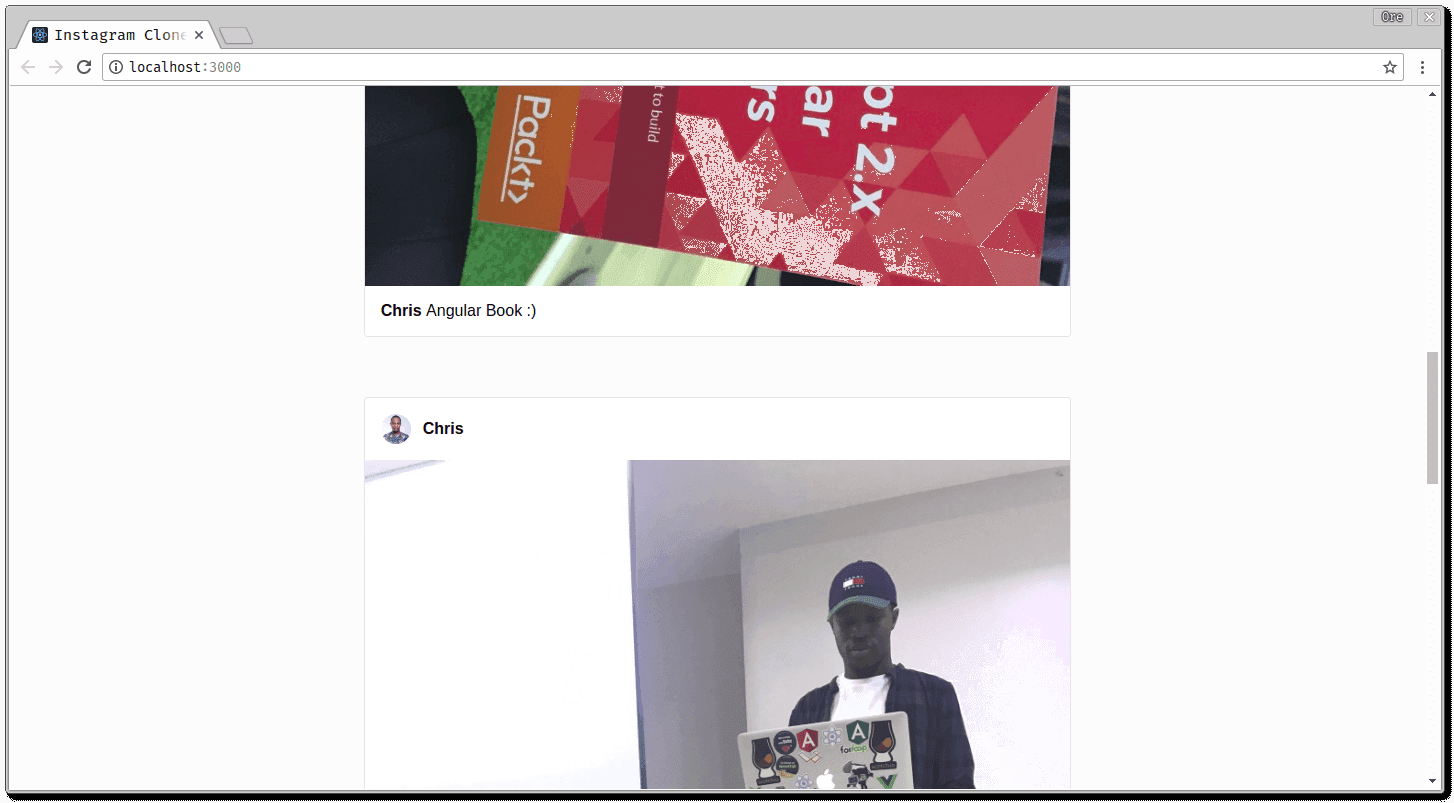
Now, when you visit your application at http://localhost:3000/ you get the following:
Ensure that your GraphQL server is still running
Conclusion
In this part of the series, we took a look at GraphQL and how to create a GraphQL server. We also saw how to link our existing React UI to the GraphQL server using the Apollo Client. In the next part of the series, we are going to look at how to add realtime feed updates to the Instagram clone application using Pusher. Here’s a link to the full Github repository if you’re interested.


© 2026 Pusher Ltd. All rights reserved.
Pusher Limited is a company registered in England and Wales (No. 07489873) whose registered office is at MessageBird UK Limited, 3 More London Riverside, 4th Floor, London, United Kingdom, SE1 2AQ.