- Products

- Developers
- User stories
- Blog
- Pricing

First steps with Flutter- Part 1: Exploring widgets
Introduction
This is a three-part series. You can find the other parts here:
- First steps with Flutter - Part 2: Building layouts
- First steps with Flutter - Part 3: Responding to user input
Introduction
Many people say that Flutter has a steep learning curve. If you have seen Flutter UI layout code like below (simplified from here), you may be inclined to agree with them.
WARNING: Incomprehensible code block ahead. Scroll past and keep reading.
1Widget build(BuildContext context) { 2 ThemeData themeData = Theme.of(context); 3 return new Scaffold( 4 body: new Padding( 5 padding: const EdgeInsets.all(10.0), 6 child: 7 new Column( 8 mainAxisAlignment: MainAxisAlignment.spaceBetween, 9 children: <Widget>[ 10 new Expanded( 11 child: new Align( 12 alignment: FractionalOffset.center, 13 child: new AspectRatio( 14 aspectRatio: 1.0, 15 child: new Stack( 16 children: <Widget>[ 17 new Positioned.fill( 18 child: new AnimatedBuilder( 19 animation: _controller, 20 builder: (BuildContext context, Widget child) { 21 return new CustomPaint( 22 painter: new ProgressPainter( 23 animation: _controller, 24 color: themeData.indicatorColor, 25 backgroundColor: Colors.white, 26 ), 27 ); 28 } 29 ), 30 ), 31 ], 32 ), 33 ), 34 ), 35 ), 36 new Container( 37 margin: new EdgeInsets.all(10.0), 38 child: new Row( 39 mainAxisAlignment: MainAxisAlignment.spaceEvenly, 40 children: <Widget>[ 41 new FloatingActionButton( 42 child: new AnimatedBuilder( 43 animation: _controller, 44 builder: (BuildContext context, Widget child) { 45 return new Icon( 46 _controller.isAnimating 47 ? Icons.pause 48 : Icons.play_arrow 49 ); 50 }, 51 ), 52 ), 53 ], 54 ), 55 ), 56 ], 57 ), 58 ), 59 ); 60 } 61 }
Mountains are only steep if you climb straight up. And the Flutter learning curve is only hard if you try to do too much at once. Just as hiking trails with switchbacks makes a mountain climb more manageable, in this tutorial I will give you an opportunity to take some easy first steps to mastering Flutter. You are going to discover that it's a lot easier than you thought.
One of the first concepts that you encounter in Flutter are widgets, so we will be looking at what they are and how to use them. Most importantly, there will be lots of examples that you will be able to experiment with yourself. I encourage you to actually run the examples and make changes to them as you go through the tutorial. This will greatly improve your rate of learning and help solidify your understanding of the topics.
I hear and I forget.
I see and I remember.
I do and I understand.
Attributed to Confucius (even though he didn't really say it like that)
Prerequisites
I don't expect you to know much. That's the point of this tutorial. However, you should have already set up your development environment. Some people prefer Android Studio. Others like Visual Studio Code because it's more lightweight. The fact is that both work fine. I'm writing the text of this tutorial using Visual Studio Code and running the code for the examples below in Android Studio with Flutter 1.0.
If you haven't set up the Flutter development environment yet, then I highly recommend following the directions in the Flutter documentation. Unlike a lot of documentation, the Flutter docs are very thorough and easy to follow. You should have finished at least the first three steps below (but I highly recommend Step 4 as well).
Also feel free to check out the previous Pusher Blog tutorials Getting started with Flutter Part 1 and Part 2.
What are widgets?
Widgets are just pieces of your user interface. Text is a widget. Buttons are widgets. Check boxes are widgets. Images are widgets. And the list goes on. In fact, everything in the UI is a widget. Even the app itself is a widget!
If you are familiar with Android or iOS development (no problem if you aren't), then you will make the immediate connection to views (for Android) and UIViews (for iOS). This is a good comparison to make and you will do fine to start your journey with this mindset. A more accurate way to think, though, is that a widget is a blueprint. Flutter uses these blueprints to build the view elements under the hood and render them to the screen.
When you understand that widgets are almost anything that affects how the UI looks and behaves, then it makes sense that there are a lot more widgets than just structural elements like buttons, text, and images. For example, padding is a widget. Layout columns are widgets. Styles are widgets. Even gesture detectors are widgets.
This is your first step on the way to mastering Flutter. But if you think of widgets as simple blueprints, then this first step shouldn't be a hard one.
Widget trees
We are not going to go into how to make a layout in this lesson, but it's helpful to know that widgets are arranged into a tree of parent and child widgets. The entire widget tree is what forms the layout that you see on the screen. For example, here is the widget tree for the default demo app when you start a new project. The visible widgets are marked with red lines. (The other widgets in this tree are used for layout and adding functionality.)
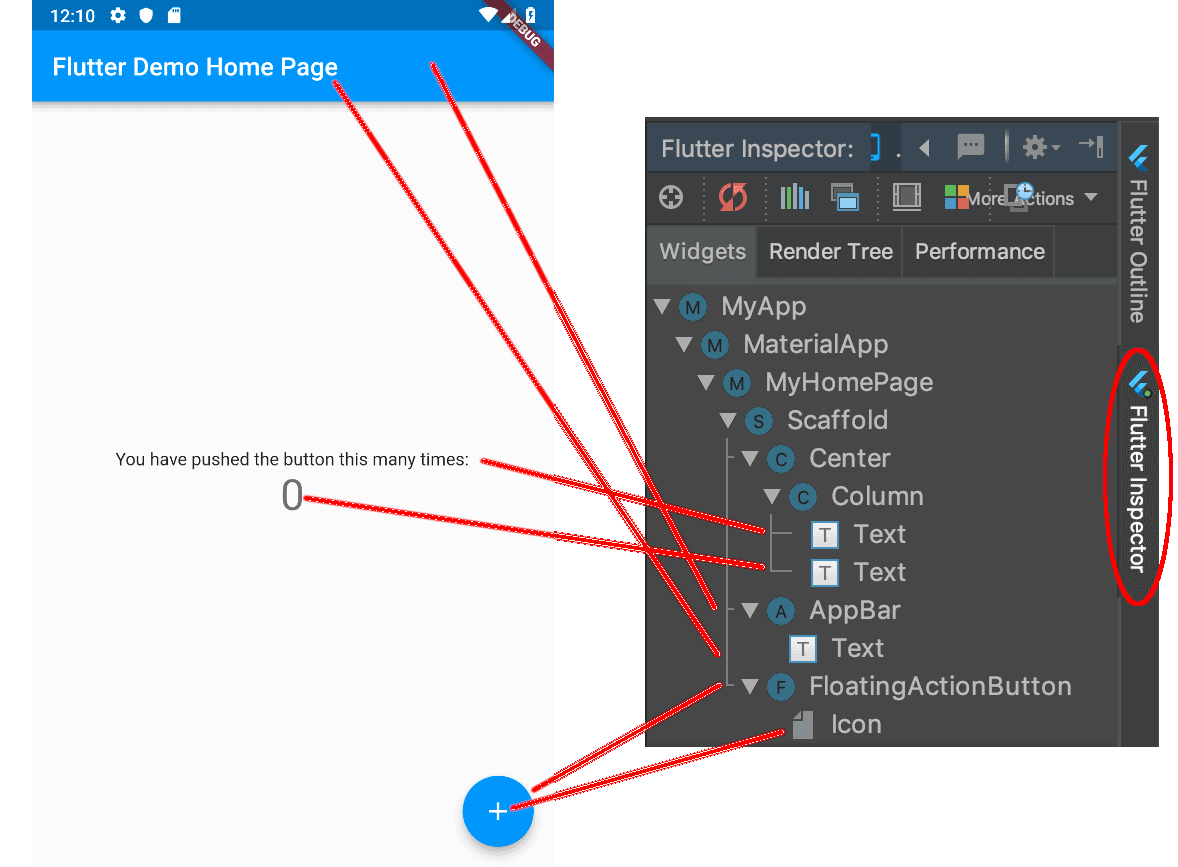
NOTE: You can view any project's widget tree by using the Flutter Inspector tool. In Android Studio it's a vertical tab on the far right near the top. In Visual Studio Code you can find it by running the command Flutter: Inspect Widget when running the app in debugging mode.
Types of widgets
Widgets are immutable. That is, they cannot be changed. Any properties that they contain are final and can only be set when when the widget is initialized. This keeps them lightweight so that it's inexpensive to recreate them when the widget tree changes.
There are two types of widgets: stateless and stateful. Stateless widgets are widgets that don't store any state. That is, they don't store values that might change. For example, an Icon is stateless; you set the icon image when you create it and then it doesn't change any more. A Text widget is also stateless. You might say, "But wait, you can change the text value." True, but if you want to change the text value, you just create a whole new widget with new text. The Text widget doesn't store a text property that can be changed.
The second type of widget is called a stateful widget. That means it can keep track of changes and update the UI based on those changes. Now you might say, "But you said that widgets are immutable! How can they keep track of changes?" Yes, the stateful widget itself is immutable, but it creates a State object that keeps track of the changes. When the values in the State object change, it creates a whole new widget with the updated values. So the lightweight widget (blueprint) gets recreated but the state persists across changes.
A stateful widget is useful for something like a checkbox. When a user clicks it, the check state is updated. Another example is an Image widget. The image asset may not be available when the widget is created (like if it is being downloaded), so a stateless widget isn't an option. Once the image is available, it can be set by updating the state.
If this section was too much for you, then don't worry about it. It isn't necessary at all for today's tutorial. But if you would like to learn more, then check out the Flutter widgets 101 YouTube videos from the Flutter team or read the core principles in the docs. If you want to do some deeper research then I recommend watching Flutter's Rendering Pipeline and Flutter's Layered Design.
Examples
Next we are going get our hands dirty with some easy examples of common widgets. Again, I highly recommend that you follow along and run the code in your editor.
Setup
-
Start a new Flutter application project. I called my project
flutter_widget_examples, but you can call yours whatever you want. -
Open the
main.dartfile. It's in thelibfolder in your project outline.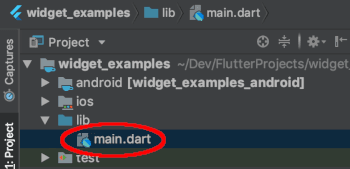
-
Delete all the text in this file and replace it with
void main() {}
If you hot reload your app now it should be a blank screen. The main() function is the starting point for every Flutter app. Right now ours does nothing, but in each of the examples below we will be testing a different Flutter widget here.
Container widget
The first widget we are going to play with is called a Container. As you might have guessed from the name, it's a holder for other widgets. But we aren't going to put anything else in it to start with. We will just play with its color property.
Replace all the code in main.dart with the following:
1// importing this package gives us the dart widgets 2 // as well as the Material Theme widgets 3 import 'package:flutter/material.dart'; 4 5 // the main() function is the starting point for every Flutter project 6 void main() { 7 8 // calling this method (you guessed it) runs our app 9 runApp( 10 11 // runApp() takes any widget as an argument. 12 // This widget will be used as the layout. 13 // We will give it a Container widget this time. 14 Container( 15 color: Colors.green, // <-- change this 16 ), 17 18 ); 19 }
NOTE: You may have noticed the commas (
,) at the ends of some lines in Dart (the programming language that we write Flutter apps in). These commas are used for formatting lines. You could remove them but then the text would be written on a single line when auto-formatted.
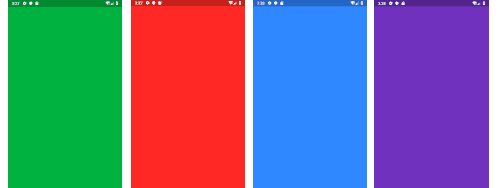
Restart the app and see what you get. Then replace Colors.green with other values. You will notice that if you try to do a hot reload nothing happens. We will fix that soon. For now just restart the app between every change.
Colors.redColors.blueAccentColors.deepPurple
This step was pretty easy, wasn't it? Now you know how to change property values in Flutter widgets.
Text widget
Probably every single app that you make will have text, so the Text widget is definitely one that we need to look at.
I added some boilerplate code with explanations. You don't have to pay too much attention to it, though. I was going to leave it out, but using the MaterialApp widget makes the app look nicer and makes the rest of the code simpler. Also, having the build() method lets us use hot reload to update after changes.
Replace all the code in main.dart with the following code. Pay special attention to the myWidget() method at the bottom. We will use it to return the Text widget that we are playing with here. In following examples you will only need to replace this method.
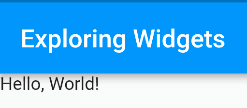
1import 'package:flutter/material.dart'; 2 3 void main() { 4 // runApp() is a builtin method that initializes the app layout 5 // MyApp() (see below) is a widget that will be the root of our application. 6 runApp(MyApp()); 7 } 8 9 // the root widget of our application 10 class MyApp extends StatelessWidget { 11 12 // The build method rebuilds the widget tree if there are any changes 13 // and allows hot reload to work. 14 @override 15 Widget build(BuildContext context) { 16 17 // This time instead of using a Container we are using the MaterialApp 18 // widget, which is setup to make our app have the Material theme. 19 return MaterialApp( 20 21 // The Scaffold widget lays out our home page for us 22 home: Scaffold( 23 24 // We will pass an AppBar widget to the appBar property of Scaffold 25 appBar: AppBar( 26 // The AppBar property takes a Text widget for its title property 27 title: Text("Exploring Widgets"), 28 ), 29 30 // The body property of the Scaffold widget is the main content of 31 // our screen. Instead of directly giving it a widget we are going 32 // to break it out into another method so that things don't get 33 // too messy here. 34 body: myWidget(), 35 36 ), 37 ); 38 } 39 } 40 41 // This is where we will play with the Text widget 42 Widget myWidget() { 43 return Text( 44 "Hello, World!", 45 ); 46 }
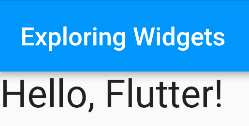
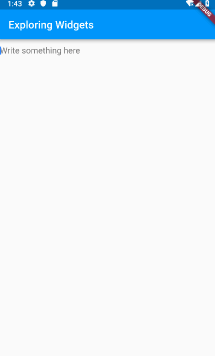
You should see the following:
Change the text from "Hello, World!" to "Hello, Flutter!" and then do a hot reload.

If you want to increase the font size, you can add a TextStyle widget to the style property of Text. Replace the myWidget() method above with the following:
1Widget myWidget() { 2 return Text( 3 "Hello, Flutter!", 4 style: TextStyle( 5 fontSize: 30.0 6 ), 7 ); 8 }
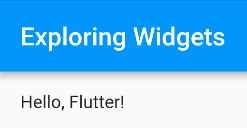
There are lots of other changes you can make with the TextStyle widget, like color, font, shadows, and spacing to name a few.
If you want to add padding, you don't change a property. Instead, you wrap the Text widget with a Padding widget. In Flutter lots of layout related tasks use widgets instead of setting properties. Remember, a widget is a blueprint that affects how the UI looks.
Replace the myWidget() method with the following:
1Widget myWidget() { 2 return Padding( 3 // Set the padding using the EdgeInsets widget. 4 // The value 16.0 means 16 logical pixels. This is resolution 5 // independent, so you don't need to worry about converting 6 // to the density of the user's device. 7 padding: EdgeInsets.all(16.0), 8 // When wrapping one widget with another widget, 9 // you use the child property. 10 child: Text( 11 "Hello, Flutter!", 12 ), 13 ); 14 }
Button widget
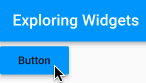
If you have been doing the code along with me, your confidence should be increasing. It really isn't that hard to make widgets, is it? Buttons are another common need and Flutter has several types of button widgets. Although we are not doing anything in response to the button click in this tutorial, you can see in the code below where you could do something.
1Widget myWidget() { 2 return RaisedButton( 3 child: const Text('Button'), 4 color: Colors.blue, 5 elevation: 4.0, 6 splashColor: Colors.yellow, 7 onPressed: () { 8 // do something 9 }, 10 ); 11 }
We used a RaisedButton here. The elevation affects the shadow under the button. The splash color is what you see when the button is clicked.
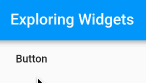
You can use a FlatButton widget if you don't want the elevation.
1Widget myWidget() { 2 return FlatButton( 3 child: const Text('Button'), 4 splashColor: Colors.green, 5 onPressed: () { 6 // do something 7 }, 8 ); 9 }
TextField widget
For accepting user text input you use a TextField widget. Now that you already have experience with the widgets above, this one is simple. You just click in the TextField and the system keyboard automatically pops up. (If it is not popping up on the iOS simulator press Command + Shift + K.)
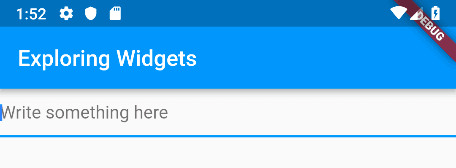
1Widget myWidget() { 2 return TextField( 3 decoration: InputDecoration( 4 border: InputBorder.none, 5 hintText: 'Write something here' 6 ), 7 ); 8 }
Remove border: InputBorder.none, and run it again. Now there is a blue input border at the bottom of the TextField.
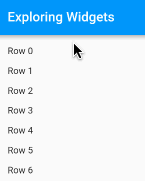
ListView widget
The most common way to display lots of data is with a ListView. Now, I have done lists before with Android RecyclerViews and iOS TableViews and I have to say that Flutter is way too easy. The stories that you have heard about Flutter having a steep learning curve may have been overrated.
1Widget myWidget() { 2 return ListView.builder( 3 padding: EdgeInsets.all(16.0), 4 // spacing of the rows 5 itemExtent: 30.0, 6 // provides an infinite list 7 itemBuilder: (BuildContext context, int index) { 8 return Text('Row $index'); 9 }, 10 ); 11 }
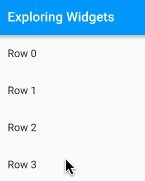
What if you want the rows to respond to user taps? Then fill the rows with a ListTile widget instead of a plain Text widget. This also adds nice spacing, so we can take out the extra padding and item extent from the code above.
1Widget myWidget() { 2 return ListView.builder( 3 itemBuilder: (BuildContext context, int index) { 4 return ListTile( 5 title: Text('Row $index'), 6 onTap: () { 7 // do something 8 }, 9 ); 10 }, 11 ); 12 }
If you have done native development on Android or iOS before, you can see how much easier this is. And if you haven't, take my word for it. It's easier. Pat yourself on the back for choosing Flutter. This is going to save you so much time.
Conclusion
Widgets are the basic building blocks of Flutter apps. You can think of them like blueprints for telling Flutter how you want the UI to look. In this lesson we looked at some of the most common structural widgets. You can see that making these widgets wasn't that hard when you take small steps one at a time. Everything I did here you can continue to do using the documentation. Find the widget that you want to study in the widget catalog, cut and paste a minimal example, and then start playing around with it.
You probably don't need it, but the code for this tutorial is available on GitHub.
Oh, and regarding that incomprehensible block of code at the beginning of the tutorial, the solution is to break complex layouts into smaller pieces by using variables, methods, or classes. I’ll talk about that more next time when we explore layouts. Before you know it programming in Flutter will be second nature to you! In the meantime check out the resources below.
Further study


© 2026 Pusher Ltd. All rights reserved.
Pusher Limited is a company registered in England and Wales (No. 07489873) whose registered office is at MessageBird UK Limited, 3 More London Riverside, 4th Floor, London, United Kingdom, SE1 2AQ.