- Products

- Developers
- User stories
- Blog
- Pricing

Build a WebRTC signaling chat app with JavaScript
Introduction
Pusher is perfect for instantaneously distributing messages amongst people and devices. This is exactly why Pusher is a great choice for signalling in WebRTC, the act of introducing two devices in realtime so they can make their own peer-to-peer connection.
Getting started
Making your own peer-to-peer chat application using WebRTC is incredibly simple thanks to DataChannel.js and the Pusher API.
Let's take a look at how to get everything up and running.
To complete your peer-to-peer chat app you'll need some credentials from Pusher. It's worth creating a free account now so you have them prepared for later on in the guide. It only takes a minute to do and it'll save you time later on.
Preparation
The first thing you'll do is to get the HTML document set up, referencing the stylesheets and scripts that you require. These are:
- Bootstrap for general layout and styling
- Zepto for JavaScript nicities and AJAX requests (or jQuery)
- Pusher for singalling via realtime WebSockets
- DataChannel.js for WebRTC abstraction
We won't worry about the styling in this guide so feel free to check out the defaults or make your own.
1<!-- public/index.html --> 2 3<!DOCTYPE html> 4<html> 5<head> 6<title>Pusher WebRTC DataChannel Demo</title> 7<!-- Bootstrap for general layout and styling --> 8<link rel="stylesheet" href="//maxcdn.bootstrapcdn.com/bootstrap/3.2.0/css/bootstrap.min.css"> 9 10<!-- Our WebRTC application styling --> 11<link rel="stylesheet" type="text/css" href="style/datachannel-demo.css"> 12</head> 13<body> 14 <!-- Zepto for AJAX --> 15 <script src="//cdnjs.cloudflare.com/ajax/libs/zepto/1.1.3/zepto.min.js"></script> 16 17 <!-- Pusher for WebRTC signalling --> 18 <script src="//js.pusher.com/2.2/pusher.js"></script> 19 20 <!-- DataChannel.js for WebRTC functionality --> 21 <script src="//webrtc-experiment.com/DataChannel.js"></script> 22 23 <!-- Our WebRTC application --> 24 <script src="js/datachannel-demo.js"></script> 25</body> 26</html>
This won't look like much yet, though you'll get to that later. For now, let's move on to setting up WebRTC.
Pusher and DataChannel.js setup
Now you've got the basic HTML document prepared you can look at setting up the fundamentals for DataChannel.js and Pusher.
The first thing you need to do is to initialise DataChannel.js and store a reference to it in a variable. From there you can set a unique ID for the local user as per the one generated by DataChannel.js in window.userid.
1// public/js/datachannel-demo.js 2 3 // Initialise DataChannel.js 4 var datachannel = new DataChannel(); 5 6 // Set the userid based on what has been defined by DataChannel 7 // https://github.com/muaz-khan/WebRTC-Experiment/tree/master/DataChannel#use-custom-user-ids 8 datachannel.userid = window.userid;
That's nearly all you need for setting up DataChannel.js, though you'll add a couple more things later on. For now, it's time to set up Pusher. If you haven't already, create a free account and get your application credentials ready as you'll be needing them.
All you need to do here is initialise a new connection to Pusher using your application key and monitoring the connection state to store a reference to the WebSocket connection ID for the local user.
If you want to debug what Pusher is doing then you can uncomment the Pusher.log function and everything will be displayed in your browser console. Otherwise, there are a variety of ways to further debug things.
1// public/js/datachannel-demo.js 2 // Open a connection to Pusher 3 var pusher = new Pusher("PUSHER_APP_KEY"); 4 5 // Storage of Pusher connection socket ID 6 var socketId; 7 8 // Pusher.log = function(message) { 9 // if (window.console && window.console.log) { 10 // window.console.log(message); 11 // } 12 // }; 13 14 // Monitor Pusher connection state 15 pusher.connection.bind("state_change", function(states) { 16 switch (states.current) { 17 case "connected": 18 socketId = pusher.connection.socket_id; 19 break; 20 case "disconnected": 21 case "failed": 22 case "unavailable": 23 break; 24 } 25 });
At this point you have a connection to Pusher but it doesn't know about DataChannel.js or what to do with it. Let's change that.
WebRTC signaller - client
A peer-to-peer WebRTC connection cannot happen without devices knowing who to connect to - this is known as signalling. For devices to know about each other their details need to be shared via a separate system, which is where Pusher comes in.
By using Pusher you're able to share details between devices easily and in realtime, all without having to get your hands dirty with low-level WebRTC APIs or complex communication mechanisms. Using Pusher also means you don't have to write your own signalling server, in fact you barely have to do anything on your server at all. Nifty!
Creating a new signaller for DataChannel.js can be achieved by overwriting the openSignalingChannel method with one of your own. In this case, you're going to write a Pusher-specific one.
1// Set custom Pusher signalling channel 2// https://github.com/muaz-khan/WebRTC-Experiment/blob/master/Signaling.md 3datachannel.openSignalingChannel = function(config) { 4 var channel = config.channel || this.channel || "default-channel"; 5 var xhrErrorCount = 0; 6 7 var socket = { 8 send: function(message) { 9 $.ajax({ 10 type: "POST", 11 url: "/message", 12 data: { 13 socketId: socketId, 14 channel: channel, 15 message: message 16 }, 17 timeout: 1000, 18 success: function(data) { 19 xhrErrorCount = 0; 20 }, 21 error: function(xhr, type) { 22 // Increase XHR error count 23 xhrErrorCount++; 24 25 // Stop sending signaller messages if it's down 26 if (xhrErrorCount > 5) { 27 console.log("Disabling signaller due to connection failure"); 28 datachannel.transmitRoomOnce = true; 29 } 30 } 31 }); 32 }, 33 channel: channel 34 }; 35 36 // Subscribe to Pusher signalling channel 37 var pusherChannel = pusher.subscribe(channel); 38 39 // Call callback on successful connection to Pusher signalling channel 40 pusherChannel.bind("pusher:subscription_succeeded", function() { 41 if (config.callback) config.callback(socket); 42 }); 43 44 // Proxy Pusher signaller messages to DataChannel 45 pusherChannel.bind("message", function(message) { 46 config.onmessage(message); 47 }); 48 49 return socket; 50};
The first 2 things you do in openSignalingChannel is to store a reference to the channel name that you want to monitor for other devices, as well as creating a variable to count any connection errors.
The most important part of the signaller is the socket object which contains the send method and channel reference. This is the core part of the signaller and is used to send messages from the local user.
In this case, you're using an AJAX POST request to the /message endpoint on your server. The AJAX request contains the socketId from Pusher that you stored earlier, as well as the channel and message to be sent to that channel. Passing the socketId means that you can make sure the local user isn't sent their own messages. You'll create the /message endpoint later on.
Everything else in the AJAX request is handling errors, effectively preventing the signaller from continuously trying and failing to send messages when there's no Internet connection.
After the socket object you set up the Pusher-specific bits and pieces, like subscribing to the signalling channel and setting up en event listener for a successful subscription. At which point you call the callback to notify DataChannel.js that everything is ready.
The last Pusher-related bit is to set up a listener for incoming signalling messages from other devices. This is achieved by using Pusher's bind method and attaching it to the message event. Within the event handler you pass through the messages to the DataChannel.js onmessage method.
WebRTC signaller - server
To complete the signalling process you need to set up a small server-side handler for the /message endpoint. All this does is take received messages and proxy them to other devices through Pusher's realtime WebSocket network.
You can do this on any server-side platform that Pusher supports, though Node.js is being used here as an example.
1// server.js 2 3var express = require("express"); 4var bodyParser = require("body-parser"); 5var errorHandler = require("errorhandler"); 6 7var app = express(); 8var root = __dirname + "/public"; 9 10// ------------------------------------------------------------- 11// SET UP PUSHER 12// ------------------------------------------------------------- 13var Pusher = require("pusher"); 14var pusher = new Pusher({ 15 appId: "PUSHER_APP_ID", 16 key: "PUSHER_APP_KEY", 17 secret: "PUSHER_APP_SECRET" 18}); 19 20// ------------------------------------------------------------- 21// SET UP EXPRESS 22// ------------------------------------------------------------- 23 24// Parse application/json and application/x-www-form-urlencoded 25app.use(bodyParser.urlencoded({ 26 extended: true 27})); 28app.use(bodyParser.json()); 29 30// Simple logger 31app.use(function(req, res, next){ 32 console.log("%s %s", req.method, req.url); 33 console.log(req.body); 34 next(); 35}); 36 37// Error handler 38app.use(errorHandler({ 39 dumpExceptions: true, 40 showStack: true 41})); 42 43// Serve static files from directory 44app.use(express.static(root)); 45 46// Message proxy 47app.post("/message", function(req, res) { 48 var socketId = req.body.socketId; 49 var channel = req.body.channel; 50 var message = req.body.message; 51 52 pusher.trigger(channel, "message", message, socketId); 53 54 res.send(200); 55}); 56 57// Open server on specified port 58console.log("Starting Express server"); 59app.listen(process.env.PORT || 5001);`</pre>
Of all the code, the app.post("/message", function(req, res) {...}); part is the only bit you need to worry about. This is the message proxy from your AJAX requests to Pusher's realtime API. The socketId is used here to make sure the message isn't sent to the user who sent the AJAX request.
This is all you need to do on the server-side so let's take a moment to see if everything is working ok.
Manually testing WebRTC
Now you've got the main WebRTC functionality connected up it's time to test that you can actually make a connection using it. The first thing to do is spin up whatever server you're using and load up your WebRTC page in a browser.
If you're using the Node.js example then you'd run something like the following in your terminal of choice:
1$ cd /path/to/your/app 2$ node server.js
From here you'll want to load the app in your browser and then open the developer console:
- Chrome — View -> Developer -> JavaScript Console
- Firefox — Tools -> Web Developer -> Web Console
The datachannel object in your app is available globally so you can access it from the developer console. Let's prepare a WebRTC connection using the datachannel.open() method:
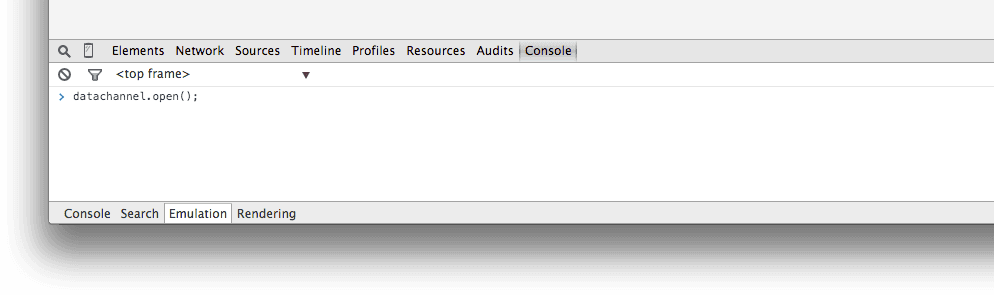
This will prepare a WebRTC connection and monitor the Pusher signalling server for other devices that connect. You'll not see any output yet but the next step will show us if everything worked or not.
Without closing the current page, load up the app in a new tab and open the developer console for it. This time you want to use the datachannel.connect() method to look for other devices wanting to open a WebRTC connection:
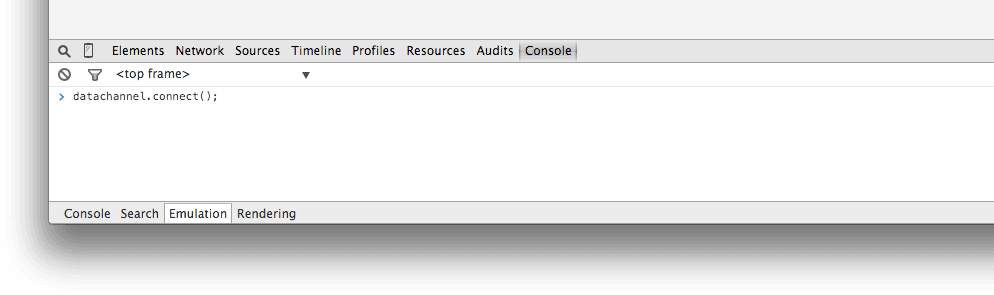
This will prepare a WebRTC connection and look for open channels via the signalling server. Seeing as you opened one previously, you should now begin to see a flood of messages in the developer console:
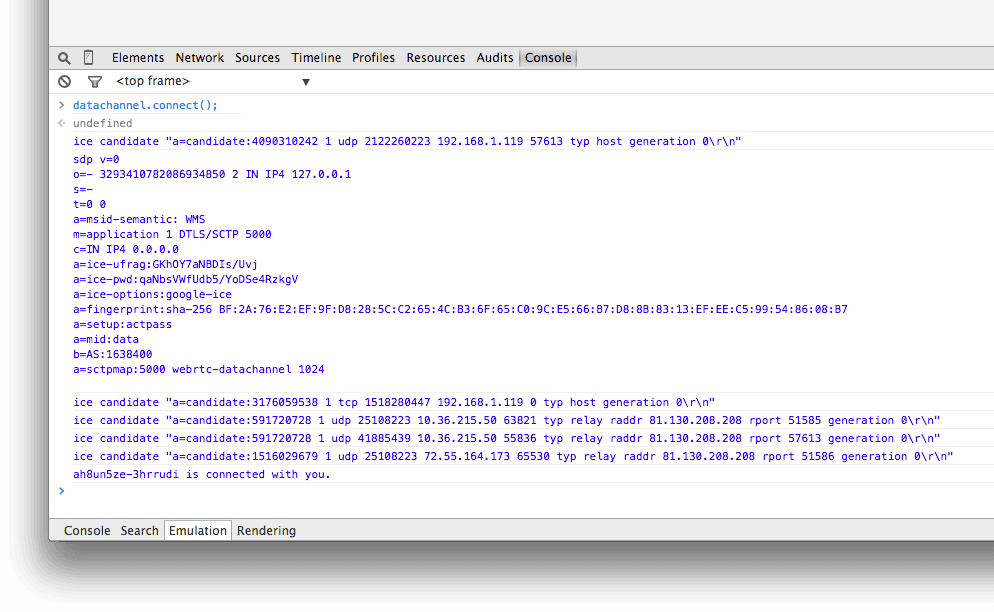
These messages, shared via the signalling server, contain all the necessary details for making a peer-to-peer connection between 2 devices. It's not important to fully understand them but you can read more about them should you wish.
At this point you have a fully functional peer-to-peer connection between your browser tabs using WebRTC! If you don't, then you'll want to check your Pusher Debug Console to see if the messages went through:
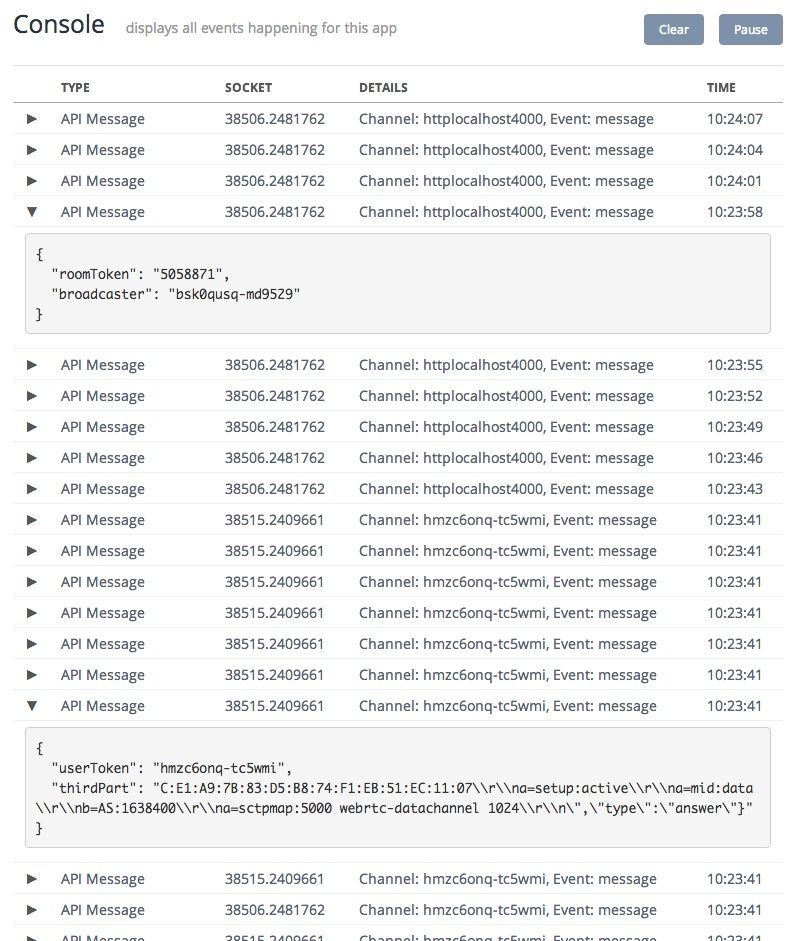
If they didn't, it's time to uncomment the Pusher.log method and dig into the problem.
Adding chat HTML
Now that you know the WebRTC connection works it's time to put together the chat interface:
1<!-- public/index.html --> 2<!-- Chat demo --> 3<div class="demo"> 4 <div class="demo-connect"> 5 <input type="text" class="demo-chat-channel-input form-control" placeholder="Channel name"></input> 6 <button class="demo-chat-create btn btn-primary">Create</button> 7 <button class="demo-chat-join btn btn-warning">Join</button> 8 </div> 9 <div class="demo-chat inactive"> 10 <div class="demo-chat-input"> 11 <input name="message" class="demo-chat-message-input form-control" placeholder="Message"></input> 12 <button class="demo-chat-send btn btn-primary">Send</button> 13 </div> 14 <ul class="demo-chat-messages list-group"> 15 <li class="list-group-item" data-remove="true">No chat messages available</li> 16 </ul> 17</div> 18<footer> 19 <a href="http://pusher.com">Pusher</a> powered peer-to-peer chat 20 </footer> 21</div> 22<!-- / Chat demo -->
It should be relatively straight forward if you know much about HTML. The main thing to point out is that you're splitting the chat app into 2 panels; demo-connect for connecting to a chat, and demo-chat for the actual chat interface. The demo-chat panel is hidden with CSS until you're ready to show it after a successful WebRTC connection.
Connection logic
The chat interface is pretty useless right now, it doesn't actually do anything if you click the buttons. The only way to make a connection is to manually trigger it via the developer console. Let's change that:
1// public/js/datachannel-demo.js 2var onCreateChannel = function() { 3 var channelName = cleanChannelName(channelInput.value); 4 5 if (!channelName) { 6 console.log("No channel name given"); 7 return; 8 } 9 10 disableConnectInput(); 11 12 datachannel.open(channelName); 13}; 14 15var onJoinChannel = function() { 16 var channelName = cleanChannelName(channelInput.value); 17 18 if (!channelName) { 19 console.log("No channel name given"); 20 return; 21 } 22 23 disableConnectInput(); 24 25 // Search for existing data channels 26 datachannel.connect(channelName); 27}; 28 29var cleanChannelName = function(channel) { 30 return channel.replace(/(\W)+/g, "-").toLowerCase(); 31}; 32 33var disableConnectInput = function() { 34 channelInput.disabled = true; 35 createChannelBtn.disabled = true; 36 joinChannelBtn.disabled = true; 37}; 38 39// Demo DOM elements 40var channelInput = document.querySelector(".demo-chat-channel-input"); 41var createChannelBtn = document.querySelector(".demo-chat-create"); 42var joinChannelBtn = document.querySelector(".demo-chat-join"); 43 44// Set up DOM listeners 45createChannelBtn.addEventListener("click", onCreateChannel); 46joinChannelBtn.addEventListener("click", onJoinChannel);`</pre>
It looks like a lot but really there are 2 main things happening here; you can create a new chat room by typing a name and clicking create (eg. demochannel.open()), or you can connect to an existing channel by typing the name and clicking join (eg. demochannel.connect()).
Aside from the core event listeners for the buttons, the rest is mainly logic to clean up channel names and disable input while creating a WebRTC connection.
Messaging logic
As with the connect buttons the chat interface itself currently doesn't do anything special, which is pretty useless. The following code will turn the interface into something that reacts when you type messages and will display incoming messages from others:
1// public/js/datachannel-demo.js 2var onSendMessage = function() { 3 var message = messageInput.value; 4 5 if (!message) { 6 console.log("No message given"); 7 return; 8 } 9 10 datachannel.send(message); 11 addMessage(message, window.userid, true); 12 13 messageInput.value = ""; 14}; 15 16var onMessageKeyDown = function(event) { 17 if (event.keyCode == 13){ 18 onSendMessage(); 19} 20}; 21 22var addMessage = function(message, userId, self) { 23 var messages = messageList.getElementsByClassName("list-group-item"); 24 25 // Check for any messages that need to be removed 26 var messageCount = messages.length; 27 for (var i = 0; i < messageCount; i++) { 28 var msg = messages[i]; 29 30 if (msg.dataset.remove === "true") { 31 messageList.removeChild(msg); 32 } 33 }; 34 35 var newMessage = document.createElement("li"); 36 newMessage.classList.add("list-group-item"); 37 38 if (self) { 39 newMessage.classList.add("self"); 40 newMessage.innerHTML = "<span class='badge'>You</span><p>" + message + "</p>"; 41 } else { 42 newMessage.innerHTML = "<span class='badge'>" + userId + "</span><p>" + message + "</p>" 43 } 44 45 messageList.appendChild(newMessage); 46}; 47 48var messageInput = document.querySelector(".demo-chat-message-input"); 49var sendBtn = document.querySelector(".demo-chat-send"); 50var messageList = document.querySelector(".demo-chat-messages"); 51 52sendBtn.addEventListener("click", onSendMessage); 53messageInput.addEventListener("keydown", onMessageKeyDown);
Like what you did with the connect buttons, the majority of code here is setting up event listeners for the chat input and send button. The onSendMessage method handles the sending of your messages after clicking the send button, and the addMessage method handles adding received messages to the message interface. The only other thing is the onMessageKeyDown method which is used to check for the return key being pressed when typing a message and using that to send it without having to click the send button.
Tying everything together
Although pretty much everything is done now, the chat interface won't actually display yet. To do this you need to hook up the DataChannel.js events for successfully connecting via WebRTC, and for receiving messages over WebRTC:
1// public/js/datachannel-demo.js 2// Set up DataChannel handlers 3datachannel.onopen = function (userId) { 4 document.querySelector(".demo-connect").classList.add("inactive"); 5 document.querySelector(".demo-chat").classList.remove("inactive"); 6 messageInput.focus(); 7}; 8 9datachannel.onmessage = function (message, userId) { 10 addMessage(message, userId); 11};
This should already make sense to you, though all that's really happening is that you hide the connect panel and show the chat panel when a WebRTC connection is detected (datachannel.onopen), and you call addMessage on the chat interface when a new message is received (datachannel.onmessage).
Wrapping up
In this tutorial you learnt how to put together your own WebRTC chat application using Pusher as a signalling server. We covered setting up a WebRTC connection using DataChannel.js and connecting that up to a chat UI using simple JavaScript.
From here you can take things further and explore more complex chat applications by adding in better message security, private messages, multi-user chat rooms, and more!


© 2025 Pusher Ltd. All rights reserved.
Pusher Limited is a company registered in England and Wales (No. 07489873) whose registered office is at MessageBird UK Limited, 3 More London Riverside, 4th Floor, London, United Kingdom, SE1 2AQ.