- Products

- Developers
- User stories
- Blog
- Pricing

Re-engage offline users with notification fallbacks Part 3: Receiving Beams notifications
- Introduction
- Adding Beams
- Adding a service worker
- Setting up an authentication endpoint
- Initialising the Beams client
- Adding Beams to the client app
- Initialising Beams
- Check notification permissions
- Disabling notifications for users who are logged out
- Triggering a test notification from the debug console
- Falling back to Beams
- Adding the trigger endpoint
- Adding a connection status icon and disconnection button
- Adding the trigger form
- Publishing a notification and fall back to Beams
- Deploy to Heroku quickstart
- Where next?
Introduction
This tutorial series explores how the new Pusher Channels publish with info API extension makes it easy to determine when a user is offline, and then fallback to notifications via Beams so that they are kept up to date and you can bring them back to your app.
If you have missed the first part of this tutorial series and would like to start from the beginning, please refer to Part 1. Setting up your environment and building authentication with GitHub SSO.
Adding Beams
Note: Although Beams does provide Safari support for this tutorial you will need to use Chrome or Firefox.
We have now got Channels up and running. But what if the user closes their browser tab? They will stop receiving messages via Channels. We can use Beams to easily deploy web push notifications to re-engage users when they are not actively connected to Channels. By the end of this section you will be able to receive web push notifications by associating your GitHub User ID using Beams authenticated users.
Adding a service worker
The browser Push API requires that you handle incoming browser notifications in a Service Worker hosted on your site. To do this create a new file called service-worker.js to public and add the following:
importScripts("https://js.pusher.com/beams/service-worker.js");
Setting up an authentication endpoint
Similarly to Channels, we need to setup an authentication endpoint for Beams. In your server.js file the first thing to do is initialise the Beams server SDK. Again we already installed the dependency as part of our app setup so we just need to add the following line under our import section:
1//Imports 2const PushNotifications = require('@pusher/push-notifications-server');
If you do need to install the Beams server SDK in future you can do so by running npm install @pusher/push-notifications-server.
Initialising the Beams client
We then need to initialise the Beams client. Firstly we need to process the instanceId and secretKey we added to our .env file earlier and then we can initialise a new instance of the Beams SDK:
1//Beams config 2let instanceId = process.env.INSTANCE_ID 3let secretKey = process.env.BEAMS_SECRET_KEY 4let beamsauthEndpoint='/pusher/beams-auth' 5 6const beamsclientConfig = { 7 instanceId, 8 secretKey, 9} 10 11const beamsClient = new PushNotifications(beamsclientConfig);
Similarly to the Channels auth endpoint the Beams endpoint requires us to associate our GitHub userid with the userid passed in as a query parameter from our client app. This means we need an authentication endpoint that can do the following:
- Check that when a user makes an authentication request that the user has a valid authentication token. We can use the
ensureAuthenticatedfunction we implemented earlier to check that the GitHub token that will be passed in as part of the request to this endpoint is valid. - We also need to ensure that if the query parameter supplied as a userId matches the userId that corresponds with the session token. This checks that not only does the user have a valid token but they are also the user requesting to be authorised. If we committed this check any user with a valid session token could associate themselves to any user topic.
- Beams authentication requests are made using a get request, so our Beams authentication endpoint should expect a get request.
Taking all these requirements into account add the following under //Beams Auth:
1//Beams Auth 2app.get('/pusher/beams-auth', ensureAuthenticated, function(req, res) { 3 // Do your normal auth checks here. Return forbidden if session token is invalid 🔒 4 const userId = req.user.username; // Get user id from auth system based on session token 5 const userIDInQueryParam = req.query['user_id']; 6 if (userId != userIDInQueryParam) { 7 res.status(401).send('Inconsistent request'); 8 } else { 9 const beamsToken = beamsClient.generateToken(userId); 10 res.status(200).send(JSON.stringify(beamsToken)); 11 } 12});
The final thing we need to do is make some of the Beams config available to our client app, and we can do this by passing this to our render function from earlier. Update it as follows:
1//Render 2app.get('/', ensureAuthenticated, function(req, res){ 3 res.render('index', { 4 user: req.user.username, 5 key, 6 cluster, 7 channelsauthEndpoint, 8 instanceId, 9 beamsauthEndpoint, 10 }) 11});
You can now restart the server.
Adding Beams to the client app
Returning to our index.hbs file the first thing we will do is import the Beams javascript SDK into our app. Under the <!--Imports--> section add:
1<!--Imports--> 2<script src="https://js.pusher.com/beams/1.0/push-notifications-cdn.js"></script>
In most modern browsers there is a requirement (and it is generally good practice) to have a call to action for enabling web push notifications; so for example a button press to enable notifications. This helps users understand why they are accepting web push notifications and will mean they are less likely to dismiss the popup as spam. This being said uncomment out the line under <!-- divButton --> to add a enable notifications button:
1<!-- divButton --> 2<div class="divButton"> 3 <button id="beams-notification-button" disabled>Loading...</button> 4 <button id="logout-button">Logout {{ user }}</button> 5</div>
Initialising Beams
To initialise Beams in our JavaScript we need to firstly set our config variables; by using the config passed in to our template by the render function:
1//Constants 2const instanceId = "{{ instanceId }}" 3const beamsauthEndpoint = "{{ beamsauthEndpoint }}"
The next thing to do is intialise the Beams client SDK by adding the following under //Beams Initialisation. At this point we will also check if the browser is supported which we will use shortly to run an activation sequence:
1//Beams Initialisation 2const beamsTokenProvider = new PusherPushNotifications.TokenProvider({ 3 url: beamsauthEndpoint, 4}) 5let beamsSupported = true; 6let beamsClient; 7try { 8 let config = { instanceId } 9 beamsClient = new PusherPushNotifications.Client(config) 10}catch(err){ 11 if(err.message.includes("Pusher Beams does not support this browser version")){ 12 beamsSupported = false 13 } 14 throw err 15}
Check notification permissions
The next step is to add the Beams functions to help us check if a user has given permission for Push notifications, enable the button to enable/disable push notifications and start and stop the Beams client and register or unregister with the Beams API. Under //Beams functions add:
1//Beams functions 2 3function configureButton(message, disabled, onclick){ 4 let button = document.getElementById("beams-notification-button") 5 button.innerText = message 6 if (onclick) { 7 button.onclick = ()=> { 8 button.disabled = true; 9 onclick() 10 } 11 } 12 button.disabled = disabled 13 } 14 15function updateButtonState(){ 16 beamsClient.getRegistrationState() 17 .then(state => { 18 let states = PusherPushNotifications.RegistrationState 19 switch(state) { 20 case states.PERMISSION_DENIED: { 21 configureButton("Notifications blocked", true) 22 break 23 } 24 case states.PERMISSION_GRANTED_REGISTERED_WITH_BEAMS: { 25 beamsClient.getUserId() 26 .then(user => { 27 if (user===userId) { 28 configureButton("Disable notifications", false, disableNotifications) 29 } else { 30 configureButton("Enable notifications", false, enableNotifications) 31 } 32 }) 33 break 34 } 35 case states.PERMISSION_GRANTED_NOT_REGISTERED_WITH_BEAMS:{ 36 configureButton("Enable notifications", false, enableNotifications) 37 break 38 } 39 case states.PERMISSION_PROMPT_REQUIRED: { 40 configureButton("Enable notifications", false, enableNotifications) 41 break 42 } 43 } 44 }) 45 .catch(console.error) 46} 47 48function enableNotifications(){ 49 beamsClient 50 .start() 51 .then(() => beamsClient.setUserId(userId, beamsTokenProvider)) 52 .finally(updateButtonState) 53 .catch(console.error) 54} 55 56function disableNotifications(){ 57 beamsClient.stop() 58 .finally(updateButtonState) 59 .catch(console.err) 60}
Although this may look impenetrable all we are doing in the updateButton function is checking for the current state of both the Beams SDK and whether the browser has permission to receive web push notifications. Refer to the Beams states and actions docs.
Depending on whether the browser has permission for web push notifications or has already registered with Beams will then call the configureButton() function the button message and the onClick() action. For example if the state is PERMISSION_PROMPT_REQUIRED (which means the Beams SDK is unregistered with the Beams API and the web browser needs permission from the user to enable web push) the Beams button we added earlier will display the message “Enable notifications”. Clicking the button will call the enableNotifications() function.
The final element to the above is the enableNotifications() and disableNotifications() functions. The enableNotifications() function will try and get the user to allow web push notifications and if so register our userId with the Beams API. Similarly to channels this will trigger an authentication callback. The button state will then be updated so clicking it again will disableNotifications().
This function will disassociate our userId with Beams and unregister the web browser with Beams, as well as updating our Beams button so we could enable notifications again.
Disabling notifications for users who are logged out
It is also good practice to disable notifications when a user logs out. So we can update the logout function we added earlier to call disableNotifications() when the logout button is pressed:
1//Logout function 2async function logout(){ 3 await beamsClient.stop(); 4 await fetch('/logout', { 5 method: 'GET', 6 mode: 'same-origin', 7 cache: 'no-cache', 8 credentials: 'same-origin', 9 redirect: 'follow', 10 referrerPolicy: 'no-referrer' 11 }); 12 window.location = "/login"; 13};
The final step is to call the updateButtonState() function if Beams is supported which can be done by adding the following under //Beams is supported check
1//Beams is supported check 2if(!beamsSupported){ 3 configureButton("Browser not supported", true) 4} else { 5 updateButtonState() 6}
Triggering a test notification from the debug console
Finally to test that this is all working as expected, open up a web browser and navigate to your index page. You should now be able to click the button to Enable notifications:

In another tab open up the Beams debug console by logging into the Dashboard, finding your Beams instance and selecting the the Debug console. Be sure to switch to the Authenticated Users tab and send a notification as follows:

After pressing Publish notification you should receive a web push notification!
Falling back to Beams
If you have got this far you have now been able to successfully send messages via Channels and web push notifications via Beams!
But how can you detect when a user is offline in Channels and actively fallback to using Beams (or another mechanism) to notify your users that something urgent is happening?
This section will show you how to add a button to disconnect from Channels to simulate a user going offline and how we can trigger notifications via our server from a simple client side notifications widget. On the server side we will use the Channels publish with info feature to see if a Channels has any subscribers at publish time and if not we will automatically fallback to Beams for high priority notifications.
Adding the trigger endpoint
The first thing to do is to add an endpoint to our server that will do the following:
- Accept a POST request with a notification that we want to send
- Send a message to our
private-userchannel-<userid>channel using the publish with info option - Receive the number of subscribers in the channel in the publish response
- If the number of subscribers in the channel is 0 and the notification body to our trigger endpoint contained
highPriority===truesend a Beams notification to our GitHub user
Under //Trigger notification add the following:
1app.use(express.json()); 2app.post('/trigger', ensureAuthenticated, function(req, res) { 3 const userId = req.user.username; 4 var priorityNotification=false; 5 if (req.body.highPriority===true){ 6 priorityNotification=true; 7 } 8 const data=JSON.stringify(req.body); 9 //Only post to channel related to authenticated user 10 const channelName = 'private-userchannel-'+userId; 11 const beamsUser = userId; 12 13channelsClient 14 .trigger(channelName, "notification", data, { info: "subscription_count" }) 15 .then(response => { 16 if (response.status !== 200) { 17 throw Error("unexpected status") 18 } 19 // Parse the response body as JSON 20 return response.json() 21 }) 22 .then(body => { 23 const channelsInfo = body.channels 24 if(channelsInfo[channelName].subscription_count===0 && priorityNotification){ 25 beamsClient.publishToUsers([userId], { 26 web: { 27 notification: { 28 title: req.body.notificationTitle, 29 body: req.body.notificationText, 30 deep_link: req.body.origin 31 } 32 } 33 }) 34 .catch((error) => { 35 console.log('Error:', error); 36 res.status(500).send() 37 }); 38 } 39 40 res.status(200).send(); 41 }) 42 .catch(error => { 43 console.log('Error:', error) 44 res.status(500).send() 45 }) 46 47});
Note: The trigger function will only accept requests from your own authenticated session. Relax access with care as the example input is not well sanitised and will only work reliably with the example form.
Calling out a few important lines in the above:
- This checks if the request to the /trigger endpoint contains a variable called highPriority set to true:
1if (req.body.highPriority===true){ 2 priorityNotification=true; 3 }
- This triggers a channels notification to our
private-notification-<userid>channel with an event name of “notification”. Also included is the the info option for subscription count which means the channel subscription count will be included in the response:
1channelsClient 2 .trigger(channelName, "notification", data, { info: "subscription_count" })
- Finally the response body is parsed and the subscription count is checked. If the subscription count is 0 a Beams notification is sent on our
userIdauthenticated users topic:
1if(channelsInfo[channelName].subscription_count===0 && priorityNotification){ 2 beamsClient.publishToUsers([userId], { 3 web: { 4 notification: { 5 title: req.body.notificationTitle, 6 body: req.body.notificationText, 7 deep_link: 'https://127.0.0.1:3000/' 8 } 9 } 10 })
At this point you can restart the server again.
Adding a connection status icon and disconnection button
The next thing we will do is add a connection status icon and disconnection button that will make it easy to simulate a user going offline and online so we can easily switch between sending a message via Channels and Beams.
The pusher-js SDK makes it very simple to disconnect and reconnect from the websocket API and also bind to connection state changes and take action as you would with more regular messages.
In the HTML section in our index file add the following to add a connection toggle button under <!-- Connection state button --> :
1<!-- Connection state --> 2<div class="divConnection"> 3 <button id="channels-connection-toggle" disabled>Disabled</button> 4 <div id="channels-connection-status" class="connecting" disabled>connecting</div> 5</div>
Then to the script section add a connect and disconnect function under //Channels connection change.
1//Channels connection change 2function channelsConnect(){ 3 pusher.connect(); 4} 5 6function channelsDisconnect(){ 7 pusher.disconnect(); 8}
Next add the following under //Connection states:
1function stateUpdate(states){ 2 var connectionToggle = document.getElementById("channels-connection-toggle"); 3 var connectionStatus = document.getElementById("channels-connection-status"); 4 if (states.current === "connected"){ 5 connectionToggle.innerText="Disconnect"; 6 connectionToggle.disabled = false; 7 connectionToggle.removeEventListener("click", channelsConnect) 8 connectionToggle.addEventListener("click", channelsDisconnect) 9 connectionStatus.innerText = states.current; 10 connectionStatus.classList.remove(states.previous); 11 connectionStatus.classList.add(states.current); 12 } 13 else if (states.current === "disconnected"){ 14 connectionToggle.innerText="Connect"; 15 connectionToggle.disabled = false; 16 connectionToggle.removeEventListener("click", channelsDisconnect) 17 connectionToggle.addEventListener("click", channelsConnect) 18 connectionStatus.innerText = states.current; 19 connectionStatus.classList.remove(states.previous); 20 connectionStatus.classList.add(states.current); 21 } 22 else if (states.current === "connecting"){ 23 connectionToggle.innerText="Connect"; 24 connectionToggle.disabled = true; 25 connectionStatus.innerText = states.current; 26 connectionStatus.classList.remove(states.previous); 27 connectionStatus.classList.add(states.current); 28 } 29 else { 30 connectionToggle.innerText="Disabled"; 31 connectionToggle.disabled = true; 32 connectionStatus.innerText = "Error" 33 connectionStatus.classList.remove(states.previous); 34 connectionStatus.classList.add("error") 35 } 36}
Again although this may look a little complex essentially the function takes the latest state update from the connection listener which we will add shortly. Then depending on the state; connected, disconnected, connection or other it will take different actions. For example if the state goes to connected:
- The connection toggle button will be enabled and clicking it will call the disconnect function
- The connection status indicator will change to connected and the color will change to green. This happens by updating the css class for the status indicator
Finally to complete setup a connection listener by binding to the ‘state_change’ event emitted by the pusher sdk under Bind to state changes. When the connection state changes it will call the stateupdates function we just created above.
1//Bind to state changes 2pusher.connection.bind('state_change', function(states){ 3 stateUpdate(states); 4});
If you now navigate to your app index page you will be able to toggle the connection state button from connected → disconnected and vice versa.


Adding the trigger form
The final element to add is a form that will allow you to easily publish a notification to the /trigger endpoint we created earlier.
Firstly in the HTML section of your index file add the form under <!-- Trigger Form --> :
1<div class="divForm"> 2 <form id="triggerForm"> 3 <label for="notification_title">Notification Title</label> 4 <input type="text" id="notification_title_data" name="notificationTitle" placeholder="Title.." maxlength="50" required="required"> 5 6 <label for="notification_text">Notification Message</label> 7 <input type="text" id="notification_text_data" name="notificationText" placeholder="Message.." maxlength="50" required="required"> 8 9 <label for="high_priority">High Priority</label> 10 <input type="checkbox" id="high_priority_data" name="highPriority"> 11 12 <input type="submit" value="Submit"> 13 </form> 14</div>
Next in the Javascript section add a the sendData function that will parse the form when the submit button is clicked and make a POST request to our /trigger endpoint. Add the function under //Triggerform:
1function sendData(event) { 2 var highPriority = false; 3 var notificationTitle="Hello"; 4 var notificationText="Hello World"; 5 6 if (document.getElementById('high_priority_data').checked) { 7 highPriority = true; 8 } 9 10 if (typeof document.getElementById('notification_title_data') !== 'undefined' && document.getElementById('notification_title_data').value != '') { 11 notificationTitle = document.getElementById('notification_title_data').value; 12 } 13 14 if (typeof document.getElementById('notification_text_title') !== 'undefined' && document.getElementById('notification_title_data').value != '') { 15 notificationText = document.getElementById('notification_text_data').value; 16 } 17 18 const data = 19 { 20 notificationTitle: notificationTitle, 21 notificationText: notificationText, 22 highPriority: highPriority 23 } 24 25 fetch('/trigger', { 26 method: 'POST', 27 mode: 'same-origin', 28 cache: 'no-cache', 29 credentials: 'same-origin', 30 headers: { 31 'Content-Type': 'application/json' 32 }, 33 redirect: 'follow', 34 referrerPolicy: 'no-referrer', 35 body: JSON.stringify(data) 36 }); 37}
The final thing to do is add a button listener that will call the sendData function when the form submit button is clicked. Under //Trigger button listener add:
1//Trigger button listener 2const form = document.getElementById( "triggerForm" ); 3form.addEventListener( "submit", function ( event ) { 4 event.preventDefault(); 5 sendData(event); 6});
Publishing a notification and fall back to Beams
Congratulations on completing the tutorial. You are now in a position to try publishing some notifications and falling back to Beams!
Navigate to http://127.0.0.1:3000 and authenticate with GitHub if you don’t have a current session.
It's also important you only have one browser window/tab open on this page to ensure your user channel is completely vacated when simulating a user going offline with our connections status toggle.
After you have navigated to this page you should see something as follows:
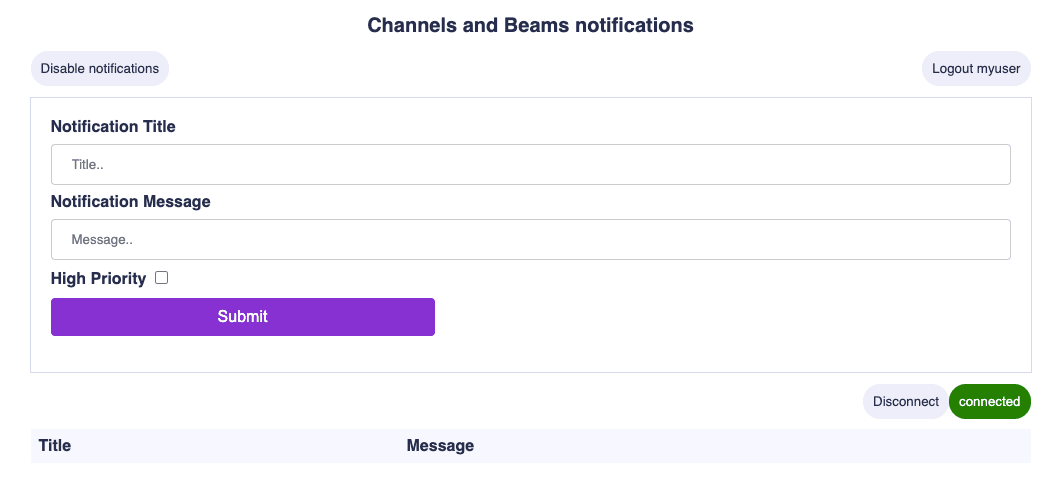
Try the following:
-
With connection status as “connected” send a message with high priority unchecked. You should see a new message in the message table with a green indicator.
-
With connection status as “connected” send a message with high priority checked. You should see a new messages in the table with a red indicator.
-
Ensure that you have “Enabled notifications”. Click disconnect and with connection status as “disconnected” send a message with high priority unchecked. You should see no new message in the table and wont receive a push notification.
-
Ensuring that you have “Enabled notifications”, click disconnect and with connection status as “disconnected” send a message with high priority checked. You should see no new message in the table but should receive a push notification!
Deploy to Heroku quickstart
If you want to quickly get up and running to see this in action, firstly make sure you have a Heroku account and then click the link below:
This will deploy the fully completed tutorial to Heroku for you. You will be prompted to fill in a form with the relevant environment variables which you should have noted in the prerequisite section.
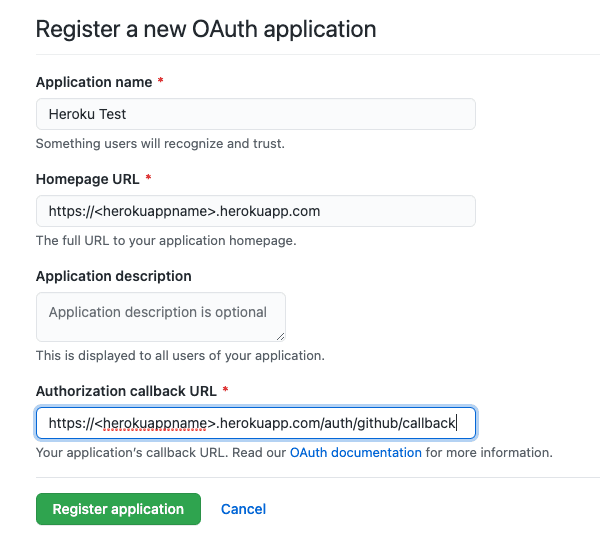
Once you have selected an available name for your Heroku app you will need to update your GitHub OAuth settings or create a new app assuming a homepage of "https://
Where next?
This tutorial has shown the power of using Channels and Beams together, to detect when your users are online and alert them when they are not. We have other great features that can help you extend this functionality even further.
For example you can use Channels channel existence webhooks to notify you when a channel is created or vacated. You can use this to build large presence functions.
You can also extend Beams push notifications to other platforms quickly using our getting started guides for Android and iOS, or try adding Safari support.
Check out the rest of this tutorial series to refresh your knowledge:
Part 1. Setting up your environment and building authentication with GitHub SSO


© 2025 Pusher Ltd. All rights reserved.
Pusher Limited is a company registered in England and Wales (No. 07489873) whose registered office is at MessageBird UK Limited, 3 More London Riverside, 4th Floor, London, United Kingdom, SE1 2AQ.