- Products

- Developers
- User stories
- Blog
- Pricing

Re-engage offline users with notification fallbacks Part 2: Subscribe to private channels through authentication endpoints
Introduction
This tutorial series explores how Pusher Channels publish with info API extension makes it easy to determine when a user is offline, and then fallback to notifications via Beams so that they are kept up to date and you can bring them back to your app.
If you have missed the first part of this tutorial series and would like to start from the beginning, please refer to Part 1. Setting up your environment and building authentication with GitHub SSO.
Adding Channels
The next thing we are going to do is add a Channels capability to our app. By the end of this section you will have an authentication endpoint running on your server that will allow your app to subscribe to a private-channel.
You will then be able to trigger notifications to this channel from the Pusher debug console and this will update a table with a new notifications.
Set up an authentication endpoint on your server
Initialise Channels server SDK
In your server.js file the first thing to do is initialise the Channels server SDK. We already installed the dependency as part of our app setup so we just need to add the following line under our import section (If you do need to install the Channels server SDK in future you can do so by running npm install pusher):
1//Imports 2const ChannelsNotifications = require('pusher');
Setting up a new Channels client
We then need to setup a new Channels client. The Channels client requires an appId, key, secret and cluster which we set in our .env file earlier. We will also add a variable for the relative path to the channels auth endpoint which we will use shortly. Add the following config under //Channels config and then declare a new channelsClient:
1//Channels config 2 3let appId = process.env.APP_ID 4let key = process.env.APP_KEY 5let secret = process.env.CHANNELS_SECRET_KEY 6let cluster = process.env.CLUSTER 7let channelsauthEndpoint='/pusher/channels-auth' 8 9const channelsclientConfig = { 10 appId, 11 key, 12 secret, 13 cluster, 14} 15 16const channelsClient = new ChannelsNotifications(channelsclientConfig);
In our client app we will associate a user to a Channels channel with the following naming convention private-userchannel-<userId>. This means we need an authentication endpoint that can do the following:
- Check that when a user makes an authentication request that the user has a valid authentication token. We can use the
ensureAuthenticatedfunction we implemented earlier to check that the GitHub token that will be passed in as part of the request to this endpoint is valid. - We also need to ensure that if the channel name starts with
private-userchannelthat the userId suffix in the channel name matches the userId that corresponds with the session token. This checks that not only does the user have a valid token but they are also authorised to join the requested channel based on theiruserid. If we committed this check any user with a valid session token could join any user channel. - Channels authentication requests are made using a post request, so our channels authentication endpoint should expect a post request.
Taking all these requirements into account add the following under Channels Auth:
1//Channels Auth 2app.post('/pusher/channels-auth', ensureAuthenticated, function(req, res) { 3 // Do your normal auth checks here. Return forbidden if session token is invalid 🔒 4 const userId = req.user.username; // Get user id from auth system based on session token 5 const channelName = req.body.channel_name; 6 const socketId = req.body.socket_id; 7 var isUserChannel=false; 8 if (channelName.startsWith('private-userchannel')){ 9 isUserChannel=true; 10 } 11 if (isUserChannel && channelName !== 'private-userchannel-'+userId) { 12 res.status(401).send('Inconsistent request'); //If userid does not m 13 } else { 14 const channelsToken = channelsClient.authenticate(socketId, channelName); 15 res.send(channelsToken); 16} 17});
The first thing the auth endpoint does is check the session token is valid with the ensureAuthenticated step. The userId is determined by the user profile returned from this step and accessible through req.user.username. We then check if the channel name is a userchannel and if it is if the channel name doesn’t match the format of private-userchannel-userid we reject the request.
The final thing we need to do is make some of the channels config available to our client app, and we can do this by passing this to our render function from earlier. Update it as follows:
1//Render 2app.get('/', ensureAuthenticated, function(req, res){ 3 res.render('index', { 4 user: req.user.username, 5 key, 6 cluster, 7 channelsauthEndpoint, 8 }) 9});
You can now restart the server.
Add Pusher Channels to the client app
Returning to our index.hbs file the first thing we will do is import pusher-js into our app. Under the <!--Imports--> section add:
1<!--Imports--> 2<script src="https://js.pusher.com/7.0.3/pusher.min.js"></script>
We will then add a simple html table. We will add a row to the table each time we get a new channels message received on our private-userchannel
The first thing to do is to add the following to the html body under <!-- Channels table-->:
1<!--Channels table--> 2<table id="channelsnotifications"> 3 <tr> 4 <th>Title</th> 5 <th>Message</th> 6 </tr> 7</table>
Currently this will just display a heading row on our homepage. The next thing to do is add the following JavaScript function that we can call to add a row to the table. We will call this function each time we get a new Channels message shortly.
For now the function will find the table by the html id, insert a row after the heading (so newest messages will always be the top row) and insert a cell for the notification title and notification text. Additionally we will style the row with a red indicator if the message is tagged as high priority. We will use this information in our fallback mechanism later.
1// Notification table 2function tableUpdate(data){ 3 var table = document.getElementById('channelsnotifications'); 4 var row = table.insertRow(1); 5 var cell1 = row.insertCell(0); 6 if (data.highPriority === true) { 7 cell1.id='highPriority'; 8 }else{ 9 cell1.id='lowPriority'; 10 } 11 var cell2 = row.insertCell(1); 12 cell2.id='noPriority'; 13 cell1.innerHTML = data.notificationTitle; 14 cell2.innerHTML = data.notificationText; 15}
Initialising a Channels client
To initialise channels in our JavaScript we need to firstly set our config variables; by using the config passed in to our template by the render function we modified above:
1// Constants 2const userId="{{ user }}" 3const appKey = "{{ key }}" 4const cluster = "{{ cluster }}" 5const channelsauthEndpoint = "{{ channelsauthEndpoint }}"
We can then initialise a new Channels client. This will initiate a new websocket connection to the cluster where our app is located.
1// Channels Initialisation 2 3const pusher = new Pusher(appKey, { 4 cluster: cluster, 5 authEndpoint: channelsauthEndpoint 6});
Under this we need to subscribe to a channel and then bind to messages that contain the event name “notification”:
1//Subscribe channel and bind to event 2 const channel = pusher.subscribe('private-userchannel-'+userId); 3 channel.bind('notification', function(data) { 4 tableUpdate(data); 5 });
What happens here is that calling pusher.subscribe will start subscription request to your userid channel. Because the channel is prefixed with ‘private’ this will automatically perform an authentication callback to your authentication endpoint that we setup earlier. If the authentication request is successful the client will pass an authentication token to the Channels API and the Channels API will complete the subscription request. Any messages then sent to the channel will be delivered to the client.
The channel.bind step is important, because if the client doesn’t explicitly bind to messages by the event name the messages will just be unprocessed. By binding to the ‘notification’ event name any messages with that event name will be processed. In this case for each message received the tableUpdate function will be called and the message will be added as a new row in our table.
Trigger a test notification on the debug console
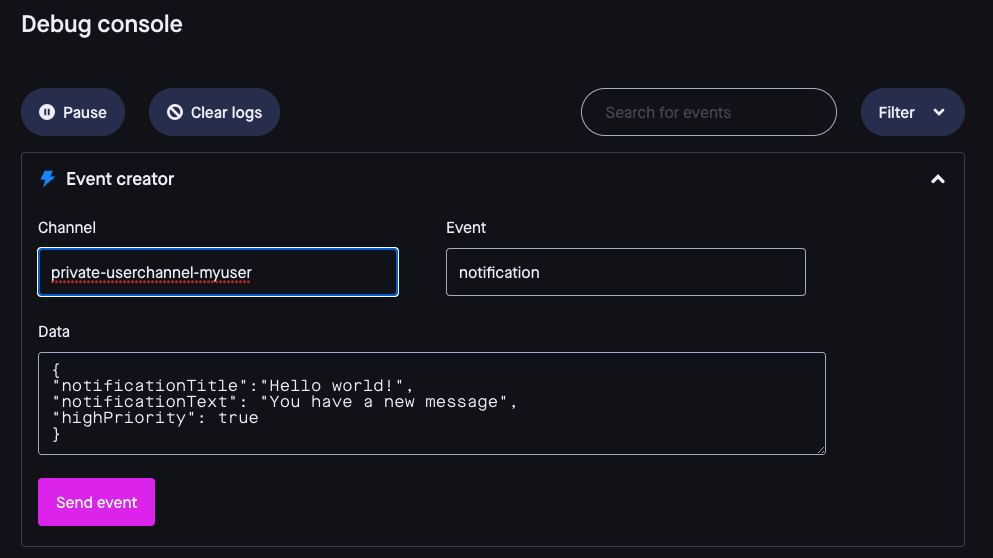
Finally to test that this is all working as expected, open up a web browser and navigate to your index page. In another tab open up the Channels debug console, by logging into the Channels dashboard, finding your channels app and selecting the the Debug console. Then send a notification as follows:
Channel: private-userchannel-<userid>
userid should be your GitHub username and should be the id shown on the logout button created earlier
Event: notification
Data:
1{ 2"notificationTitle":"Hello world!", 3"notificationText": "You have a new message", 4"highPriority": true 5}
This should look as follows:
Finally hit Send event and return to the index page. You should see the following.

Congratulations you are now sending realtime messages!
If you send another message with highPriority: false what happens?
Continue to the final part of this tutorial series to learn how to receive web push notifications by associating your GitHub User ID using Beams authenticated users, and re-engage offline users.


© 2026 Pusher Ltd. All rights reserved.
Pusher Limited is a company registered in England and Wales (No. 07489873) whose registered office is at MessageBird UK Limited, 3 More London Riverside, 4th Floor, London, United Kingdom, SE1 2AQ.