- Products

- Developers
- User stories
- Blog
- Pricing

Sending push notifications from Dart to Android and iOS
- Introduction
- Introduction
- Prerequisites
- Pusher Beams overview
- Interests
- Authenticated users
- Implementation plan
- Android user app
- Interest notifications
- Authenticated user notifications
- iOS user app
- Interest notifications
- Authenticated user notifications
- Admin app
- iOS version of the admin app
- Dart server
- Dependencies
- Testing
- Aqueduct Dart server
- Admin app
- User apps
- Putting it all together
- Conclusion
Introduction
Introduction
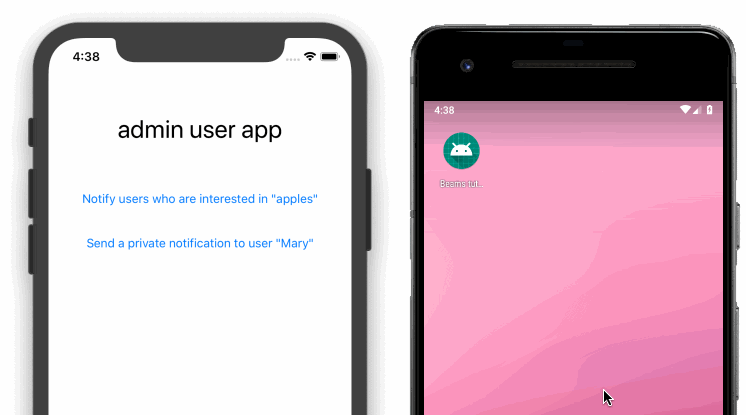
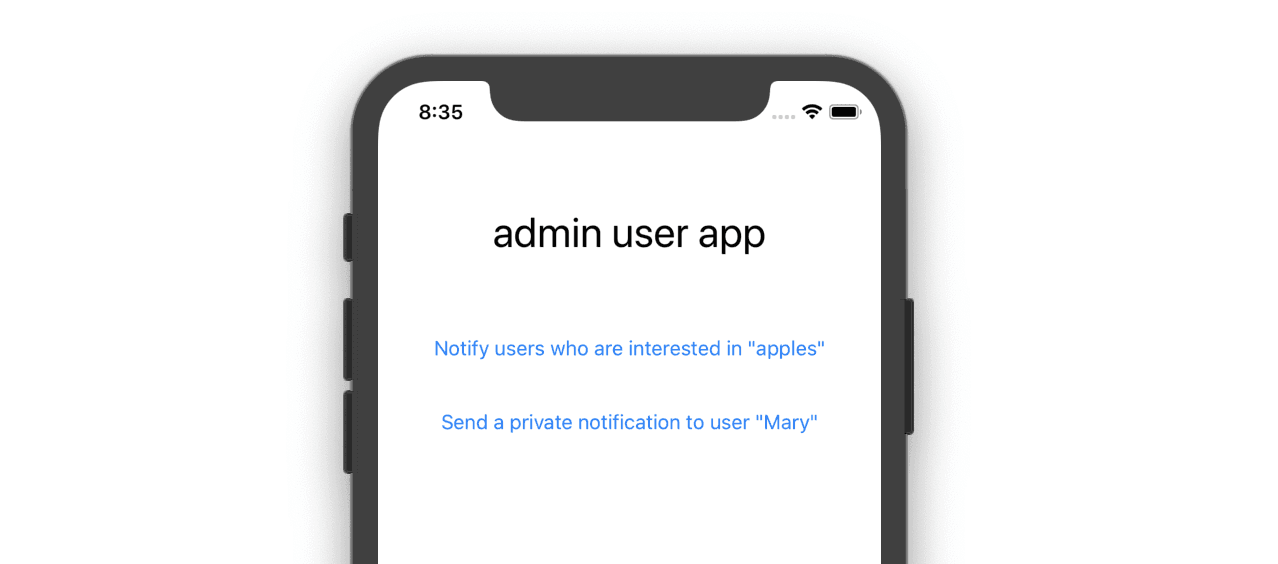
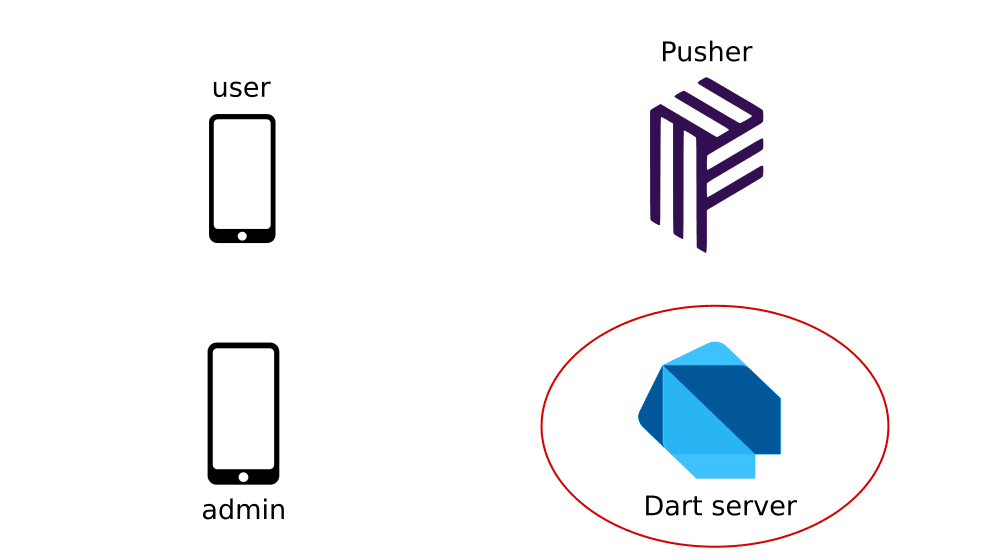
In today's tutorial we will learn how to send push notifications from a Dart server to Android and iOS using Pusher Beams. To trigger events in the server, we'll make a simple admin user app. The final result will look like this:
When the admin user presses a button, the admin app contacts the Dart server. The Dart server then tells Pusher to send a push notification to users. The first button notifies all users who have subscribed to a Device Interest. The second button notifies a single authenticated user.
Prerequisites
I'm assuming you have some familiarity with Server Side Dart, but if not, no problem. Check out these tutorials first:
- Becoming a backend developer - Part 1: Foundational concepts
- Becoming a backend developer - Part 2: Building the server (Dart section)
- Becoming a backend developer Part 3: Connecting to the server from a mobile app
- Authentication with Server Side Dart
Required software:
If you don't want to make both an Android app and an iOS app at this time, you can choose just one. I’m assuming you are already familiar with mobile app development.
This tutorial was made using Dart 2.2, Android Studio 3.4, and Xcode 10.2.
Pusher Beams overview
Beams is a service from Pusher to simplify sending push notifications to users. It allows you to send notifications to groups of users who have all subscribed to a certain topic, which Pusher calls Device Interests. You can also send private push notifications to individual users.
Let me describe what we will be doing today.
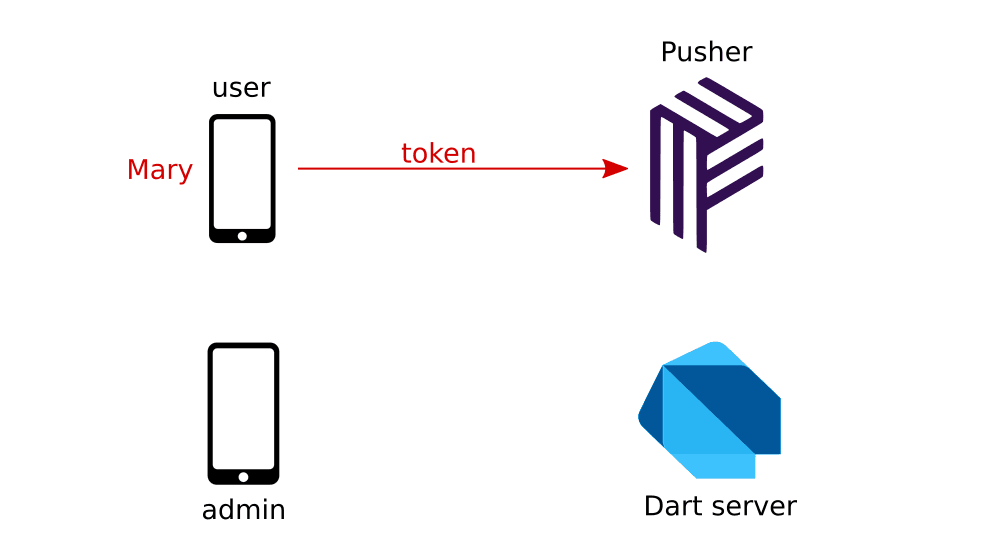
Interests
The user client app (Android or iOS) tells Pusher that they are interested in some topic. Lets say it's apples. Pusher makes note of it.
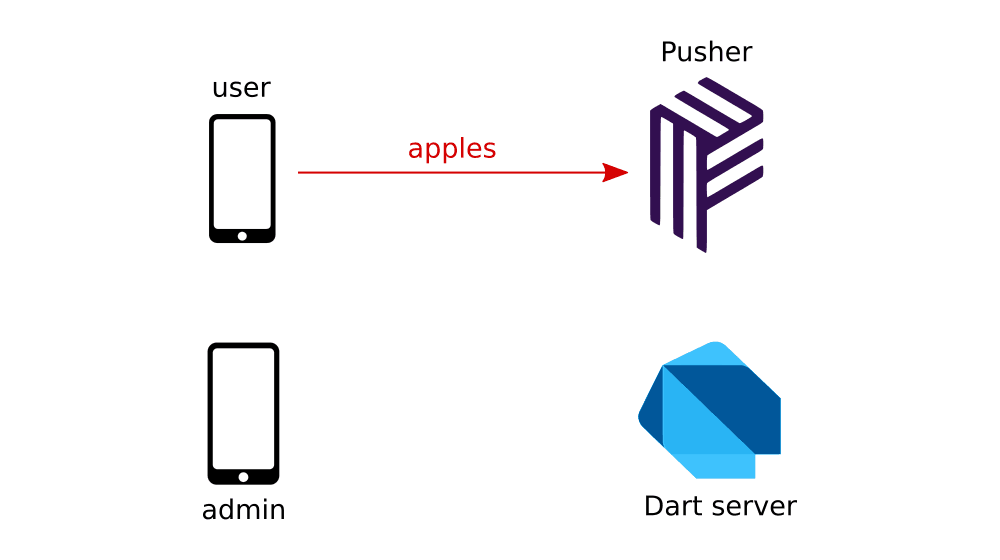
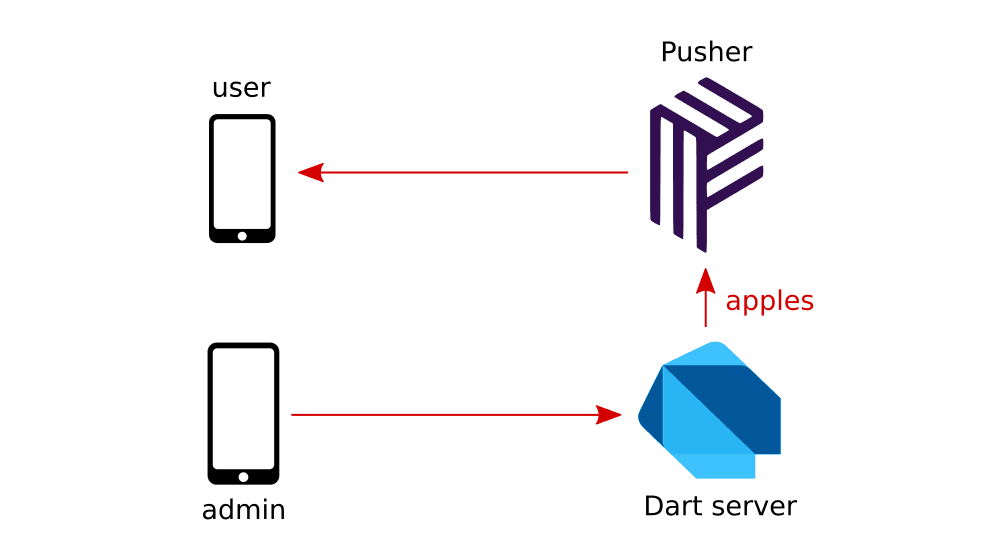
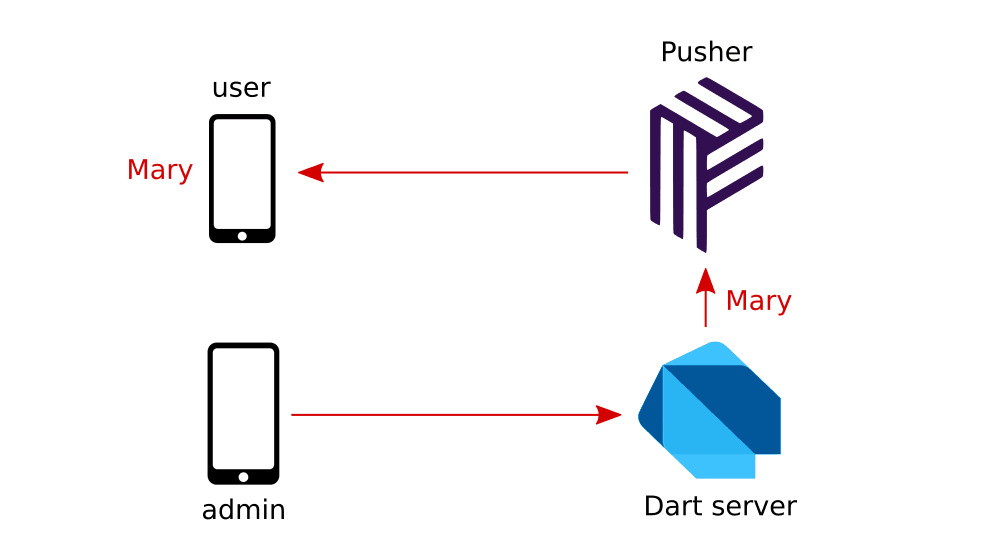
The app admin wants to tell everyone who is interested in apples that they are on sale. So the admin tells the Dart server. Dart doesn't know who is interested in apples, but Pusher does, so Dart tells Pusher. Finally, Pusher sends a push notification to every user that is interested in apples.
Authenticated users
Sometimes a user (let's call her Mary) may want to get personalized notifications. To do that she has to prove who she is by authenticating her username and password on the Dart server. In return, the Dart server gives her a token.
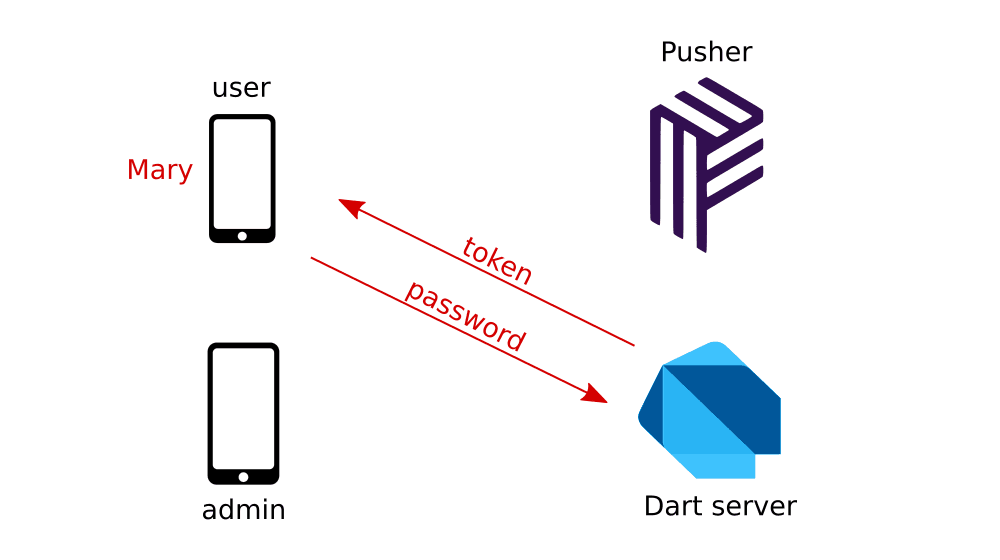
Mary gives the token to Pusher, and since the token proves she really is Mary, Pusher makes a note of it.
Now Mary ordered some apples a couple days ago, and the company admin wants to let Mary know that they will be arriving today. The admin tells the Dart server, the server tells Pusher, and Pusher tells Mary. Pusher doesn't tell any other user, just Mary.
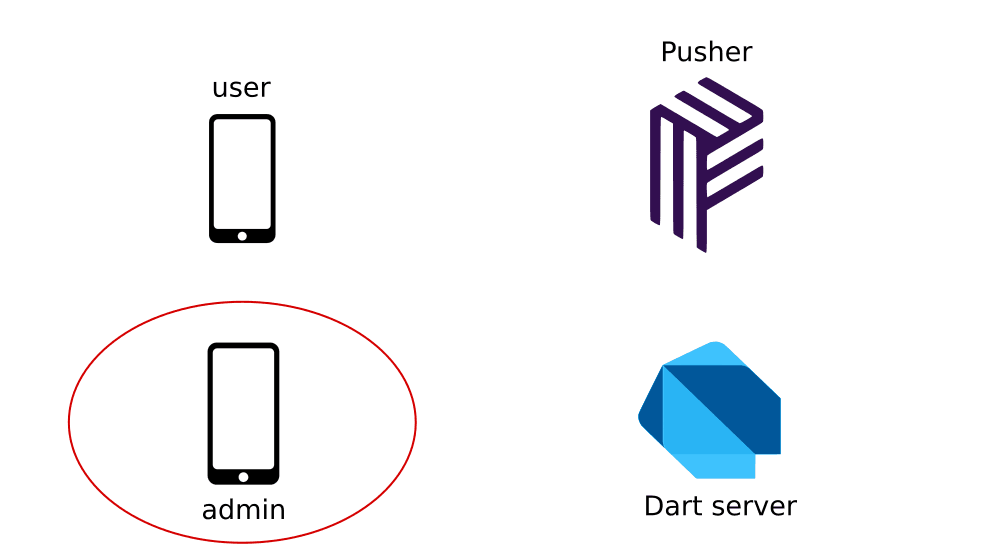
Implementation plan
So that is how device interests and user push notifications work. In order to implement this we have four tasks to do. We have to create an Android user app, an iOS user app, an admin app, and the Dart server. Feel free to make only one user app rather than both the Android and the iOS one, though.
Android user app

Create a new Android app. (I'm using Kotlin and calling my package name com.example.beamstutorial.) Then set it up as described in the Pusher Beams documentation. Make sure that you can receive the basic "Hello world" notification. I won't repeat those directions here, but there are a couple of things to note:
- If you notice a version conflict error with the
appcompatsupport inbuild.gradle, see this solution. - Your app should be minimized in order to receive push notifications.
Now you should have a Pusher Beams account, a Firebase account, and an Android app that receives push notifications.
Interest notifications
Let's modify the app to tell Pusher that the user is interested in "apples" instead of "hello".
In the MainActivity, update the following line:
PushNotifications.addDeviceInterest("apples")
That's all we need to do to tell Pusher that this user is interested in apples.
Authenticated user notifications
In order to receive personalized messages from Pusher we need to get a token from the Dart server (which we will be building soon).
We’re going to add an AsyncTask to make the request. Update the MainActivity to look like the following:
1// app/src/main/java/com/example/beamstutorial/MainActivity.kt 2 3 package com.example.beamstutorial 4 5 import android.os.AsyncTask 6 import android.support.v7.app.AppCompatActivity 7 import android.os.Bundle 8 import android.util.Base64 9 import android.util.Log 10 import com.pusher.pushnotifications.BeamsCallback 11 import com.pusher.pushnotifications.PushNotifications 12 import com.pusher.pushnotifications.PusherCallbackError 13 import com.pusher.pushnotifications.auth.AuthData 14 import com.pusher.pushnotifications.auth.AuthDataGetter 15 import com.pusher.pushnotifications.auth.BeamsTokenProvider 16 17 class MainActivity : AppCompatActivity() { 18 19 override fun onCreate(savedInstanceState: Bundle?) { 20 super.onCreate(savedInstanceState) 21 setContentView(R.layout.activity_main) 22 23 // TODO replace this instance ID with your own 24 val instanceId = "your_instance_id_here" 25 PushNotifications.start(getApplicationContext(), instanceId) 26 27 // Interests 28 PushNotifications.addDeviceInterest("apples") 29 30 // Authenticated user 31 RegisterMeWithPusher().execute() 32 } 33 34 class RegisterMeWithPusher : AsyncTask<Void, Void, Void>() { 35 override fun doInBackground(vararg params: Void): Void? { 36 37 // hardcoding the username and password both here and on the server 38 val username = "Mary" 39 val password = "mypassword" 40 val text = "$username:$password" 41 val data = text.toByteArray() 42 val base64 = Base64.encodeToString(data, Base64.NO_WRAP) 43 44 // get the token from the Dart server 45 val serverUrl = "http://10.0.2.2:8888/token" 46 val tokenProvider = BeamsTokenProvider( 47 serverUrl, 48 object: AuthDataGetter { 49 override fun getAuthData(): AuthData { 50 return AuthData( 51 headers = hashMapOf( 52 "Authorization" to "Basic $base64" 53 ) 54 ) 55 } 56 } 57 ) 58 59 // send the token to Pusher 60 PushNotifications.setUserId( 61 username, 62 tokenProvider, 63 object : BeamsCallback<Void, PusherCallbackError> { 64 override fun onFailure(error: PusherCallbackError) { 65 Log.e("BeamsAuth", 66 "Could not login to Beams: ${error.message}") 67 } 68 override fun onSuccess(vararg values: Void) { 69 Log.i("BeamsAuth", "Beams login success") 70 } 71 } 72 ) 73 74 return null 75 } 76 } 77 }
Don’t forget to replace the instance ID with your own from the Pusher dashboard.
In the manifest, add the INTERNET permission:
<uses-permission android:name="android.permission.INTERNET" />
And since we are using a clear text HTTP connection in this tutorial, we need to also update the manifest to include the following:
1<application 2 android:usesCleartextTraffic="true" 3 ... 4 >
You should not include this in a production app. Instead, use an HTTPS connection (see this tutorial for more explanation).
That's all we can do for now until the server is running. You can skip the iOS user app section if you like and go on to the admin app section.
iOS user app

Create a new iOS app. (I'm calling my package name com.example.beamstutorial.) Then set it up as described in the Pusher Beams documentation. Make sure that you can receive the basic "Hello world" notification. I won't repeat those directions here, but there are a couple of things to note:
- At the time of this writing, the Cocoa Pods installation had a deprecated API for the Beams
PushNotifications. The Carthage installation is up-to-date, though. See this tutorial for help with Carthage. - You need to add "remote-notification" to the list of your supported
UIBackgroundModesin yourInfo.plistfile. Rather than editing it directly, you can make the change in Targets > your app Capabilities > Background Modes (see this for help). - You can't receive push notifications in the iOS simulator. You have to use a real device.
- Your app should be minimized in order to receive the push notifications.
Now you should have a Pusher Beams account, APNs configured, and an iOS app installed on a real device that receives push notifications.
Interest notifications
Let's modify the app to tell Pusher that the user is interested in "apples" instead of "hello".
In AppDelegate.swift, update the following line:
try? self.pushNotifications.addDeviceInterest(interest: "apples")
That's all we need to do to tell Pusher that this user is interested in apples.
Authenticated user notifications
In order to receive personalized messages from Pusher, we need to get a token from the Dart server (which we will be making soon).
Open ViewController.swift and replace it with the following code:
1// beamstutorial/ViewController.swift
2
3 import UIKit
4 import PushNotifications
5
6 class ViewController: UIViewController {
7
8 let beamsClient = PushNotifications.shared
9
10 // hardcoding the username and password both here and on the server
11 let userId = "Mary"
12 let password = "mypassword"
13
14 // TODO: As long as your iOS device and development machine are on the same wifi
15 // network, change the following IP to the wifi router IP address where your
16 // Dart server will be running.
17 let serverIP = "192.168.1.3"
18
19 override func viewDidLoad() {
20 super.viewDidLoad()
21
22 // get the token from the server
23 let serverUrl = "http://\(serverIP):8888/token"
24 let tokenProvider = BeamsTokenProvider(authURL: serverUrl) { () -> AuthData in
25 let headers = ["Authorization": self.authHeaderValueForMary()]
26 let queryParams: [String: String] = [:]
27 return AuthData(headers: headers, queryParams: queryParams)
28 }
29
30 // send the token to Pusher
31 self.beamsClient.setUserId(userId,
32 tokenProvider: tokenProvider,
33 completion:{ error in
34 guard error == nil else {
35 print(error.debugDescription)
36 return
37 }
38 print("Successfully authenticated with Pusher Beams")
39 })
40 }
41
42 func authHeaderValueForMary() -> String {
43 guard let data = "\(userId):\(password)".data(using: String.Encoding.utf8)
44 else { return "" }
45 let base64 = data.base64EncodedString()
46 return "Basic \(base64)"
47 }
48 }
Since we are using a clear text HTTP connection in this tutorial, we need to also update the Info.plist file to include the following:
1<key>NSAppTransportSecurity</key>
2 <dict>
3 <key>NSAllowsArbitraryLoads</key>
4 <true/>
5 </dict>

You should not include this in a production app. Instead, use an HTTPS connection (see this tutorial for more explanation).
It's extra tricky getting a real device talking to the Dart server that will be running on our development machine. We can't just connect to localhost like we can when we use the iOS simulator. As I noted in the comments above, if your iPhone and development machine are sharing a wifi network, you can use the router IP address of your development machine. So if you haven't already, update that in the code above. For help finding the IP address, check out the following links:
That's all we can do for now until the server is running.
Admin app
We need a means to trigger the Dart server to talk to Pusher and send the push notifications. I'm going to make a simple iOS app running on the simulator, but you can do it another way if you like. You could user curl, Postman, or an Android app. If you choose one of those, this is the REST API you will need to set up.
1// send push notification to interests 2 POST http://localhost:8888/admin/interests 3 4 // send push notification to user 5 POST http://localhost:8888/admin/users
The authorization header for both of these should be Basic with a username of admin and the password as password123. Base64 encoded, this would be:
Authorization: Basic YWRtaW46cGFzc3dvcmQxMjM=
iOS version of the admin app
In a new Xcode project, create a simple layout with two buttons:
Note: This admin app does not send the actual device interest or username in the body of the HTTP request. The reason for that was to keep this tutorial as short as possible by avoiding the need to serialize and deserialize JSON. The push notifications are hardcoded on the server. Simply sending a POST request to the proper route will make the server send the push notifications.
Replace ViewController.swift with the following code:
1// beams_admin_app/ViewController.swift
2
3 import UIKit
4
5 class ViewController: UIViewController {
6
7 // hardcoding the username and password both here and on the Dart server
8 let username = "admin"
9 let password = "password123"
10
11 // using localhost is ok since this app will be running on the simulator
12 let host = "http://localhost:8888"
13
14 // tell server to send a notification to device interests
15 @IBAction func onInterestsButtonTapped(_ sender: UIButton) {
16
17 // set up request
18 guard let url = URL(string: "\(host)/admin/interests") else {return}
19 var request = URLRequest(url: url)
20 request.httpMethod = "POST"
21 request.setValue(authHeaderValue(), forHTTPHeaderField: "Authorization")
22
23 // send request
24 let task = URLSession.shared.dataTask(with: request) {
25 (data, response, error) in
26 guard let statusCode = (response as? HTTPURLResponse)?.statusCode
27 else {return}
28 guard let body = data
29 else {return}
30 guard let responseString = String(data: body, encoding: .utf8)
31 else {return}
32
33 print("POST result: \(statusCode) \(responseString)")
34 }
35 task.resume()
36 }
37
38 // Returns the Auth header value for Basic authentication with the username
39 // and password encoded with Base64. In a real app these values would be obtained
40 // from user input.
41 func authHeaderValue() -> String {
42 guard let data = "\(username):\(password)".data(using: .utf8) else {
43 return ""
44 }
45 let base64 = data.base64EncodedString()
46 return "Basic \(base64)" // "Basic YWRtaW46cGFzc3dvcmQxMjM="
47 }
48
49 // tell server to send notification to authenticated user
50 @IBAction func onUserButtonTapped(_ sender: UIButton) {
51
52 // set up request
53 guard let url = URL(string: "\(host)/admin/users") else {return}
54 var request = URLRequest(url: url)
55 request.httpMethod = "POST"
56 request.setValue(authHeaderValue(), forHTTPHeaderField: "Authorization")
57
58 // send request
59 let task = URLSession.shared.dataTask(with: request) {
60 (data, response, error) in
61 guard let statusCode = (response as? HTTPURLResponse)?.statusCode
62 else {return}
63 guard let body = data
64 else {return}
65 guard let responseString = String(data: body, encoding: .utf8)
66 else {return}
67
68 print("POST result: \(statusCode) \(responseString)")
69 }
70 task.resume()
71 }
72 }
Remember to hook up the buttons to the IBAction methods.
As before, since we are using a clear text HTTP connection in this tutorial, we need to also update the Info.plist file to include the following:
1<key>NSAppTransportSecurity</key>
2 <dict>
3 <key>NSAllowsArbitraryLoads</key>
4 <true/>
5 </dict>

That's it for now. Let's make the Dart server.
Dart server
Create a new Aqueduct server project:
aqueduct create dart_server
Dependencies
At the time of this writing Pusher does not officially support Dart servers, so I created a Dart server SDK based on the API docs. It is available on Pub here. In your server's pubspec.yaml file, add the dependency:
1dependencies: 2 pusher_beams_server: ^0.1.4
We'll set up three routes in channel.dart. Open that file and replace it with the following code.
1// dart_server/lib/channel.dart 2 3 import 'package:dart_server/controllers/auth.dart'; 4 import 'package:dart_server/controllers/token.dart'; 5 import 'package:dart_server/controllers/interests.dart'; 6 import 'package:dart_server/controllers/users.dart'; 7 import 'dart_server.dart'; 8 9 class DartServerChannel extends ApplicationChannel { 10 11 // These middleware validators will check the username 12 // and passwords before allowing them to go on. 13 BasicValidator normalUserValidator; 14 AdminValidator adminValidator; 15 16 @override 17 Future prepare() async { 18 logger.onRecord.listen( 19 (rec) => print("$rec ${rec.error ?? ""} ${rec.stackTrace ?? ""}")); 20 normalUserValidator = BasicValidator(); 21 adminValidator = AdminValidator(); 22 } 23 24 @override 25 Controller get entryPoint { 26 final router = Router(); 27 28 // user app will get a Pusher auth token here 29 router 30 .route('/token') 31 .link(() => Authorizer.basic(normalUserValidator)) 32 .link(() => TokenController()); 33 34 // admin app will send push notifications for device interests here 35 router 36 .route('/admin/interests') 37 .link(() => Authorizer.basic(adminValidator)) 38 .link(() => InterestsController()); 39 40 // admin app will send push notifications to authenticated users here 41 router 42 .route('/admin/users') 43 .link(() => Authorizer.basic(adminValidator)) 44 .link(() => UsersController()); 45 46 return router; 47 } 48 }
Create a controllers folder in lib. Make a file name auth.dart where we will put the username and password validation middleware. Paste in the following code:
1// dart_server/lib/controllers/auth.dart 2 3 import 'dart:async'; 4 import 'package:aqueduct/aqueduct.dart'; 5 6 // Hardcoding username and passwords both here and in the client apps 7 // admin: password123 8 // Mary: mypassword 9 // hash generated with AuthUtility.generatePasswordHash() 10 // A production app would store these in a database. 11 final Map<String, User> adminUsers = { 12 'admin': User( 13 username: 'admin', 14 saltedPasswordHash: 'ntQLWWIu/nubfZhCEy9sXgwRijuBV+d9ZN2Id3hTLbs=', 15 salt: 'mysalt1'), 16 }; 17 final Map<String, User> normalUsers = { 18 'Mary': User( 19 username: 'Mary', 20 saltedPasswordHash: 'JV0R5CH9mnA6rcOGnkzSvIeGkHUvtnnvUCuFBc3XD+4=', 21 salt: 'mysalt2'), 22 }; 23 24 class User { 25 User({this.username, this.saltedPasswordHash, this.salt}); 26 String username; 27 String saltedPasswordHash; 28 String salt; 29 } 30 31 class BasicValidator implements AuthValidator { 32 33 final _requireAdminPriveleges = false; 34 35 @override 36 FutureOr<Authorization> validate<T>( 37 AuthorizationParser<T> parser, T authorizationData, 38 {List<AuthScope> requiredScope}) { 39 40 // Get the parsed username and password from the basic 41 // authentication header. 42 final credentials = authorizationData as AuthBasicCredentials; 43 44 // check if user exists 45 User user; 46 if (_requireAdminPriveleges) { 47 user = adminUsers[credentials.username]; 48 } else { 49 user = normalUsers[credentials.username]; 50 } 51 if (user == null) { 52 return null; 53 } 54 55 // check if password matches 56 final hash = AuthUtility.generatePasswordHash(credentials.password, user.salt); 57 if (user.saltedPasswordHash == hash) { 58 return Authorization(null, null, this, credentials: credentials); 59 } 60 61 // causes a 401 Unauthorized response 62 return null; 63 } 64 65 // This is for OpenAPI documentation. Ignoring for now. 66 @override 67 List<APISecurityRequirement> documentRequirementsForAuthorizer( 68 APIDocumentContext context, Authorizer authorizer, 69 {List<AuthScope> scopes}) { 70 return null; 71 } 72 } 73 74 class AdminValidator extends BasicValidator { 75 @override 76 bool get _requireAdminPriveleges => true; 77 }
Next make a file named tokens.dart (in controllers) to handle when the user app needs to get a Pusher Beams auth token so that it can receive personalized push notifications. Paste in the following code:
1// dart_server/lib/controllers/token.dart 2 3 import 'dart:async'; 4 import 'package:aqueduct/aqueduct.dart'; 5 import 'package:pusher_beams_server/pusher_beams_server.dart'; 6 import 'package:dart_server/config.dart'; 7 8 class TokenController extends ResourceController { 9 PushNotifications beamsClient; 10 11 @Operation.get() 12 Future<Response> generateBeamsTokenForUser() async { 13 14 // get the username from the already authenticated credentials 15 final username = request.authorization.credentials.username; 16 17 // generate the token for the user 18 beamsClient ??= PushNotifications(Properties.instanceId, Properties.secretKey); 19 final token = beamsClient.generateToken(username); 20 21 // return the token to the user 22 return Response.ok({'token':token}); 23 } 24 }
Also in the controllers folder, create a file called interests.dart. When requested by the admin app, it will tell Pusher to send notifications to users who have subscribed the apples interest. Paste in the following code:
1// dart_server/lib/controllers/interests.dart 2 3 import 'dart:async'; 4 import 'dart:io'; 5 import 'package:aqueduct/aqueduct.dart'; 6 import 'package:pusher_beams_server/pusher_beams_server.dart'; 7 import 'package:dart_server/config.dart'; 8 9 class InterestsController extends ResourceController { 10 PushNotifications beamsClient; 11 12 // send push notifications to users who are subscribed to the interest 13 @Operation.post() 14 Future<Response> notifyInterestedUsers() async { 15 beamsClient ??= PushNotifications(Properties.instanceId, Properties.secretKey); 16 17 const title = 'Sale'; 18 const message = 'Apples are 50% off today!'; 19 20 final fcm = { 21 'notification': { 22 'title': title, 23 'body': message, 24 } 25 }; 26 final apns = { 27 'aps': { 28 'alert': { 29 'title': title, 30 'body': message, 31 } 32 } 33 }; 34 final response = await beamsClient.publishToInterests( 35 ['apples'], 36 apns: apns, 37 fcm: fcm, 38 ); 39 40 return Response.ok(response.body)..contentType = ContentType.text; 41 } 42 }
And again in the controllers folder, create a file called users.dart. When requested by the admin app, it will tell Pusher to send a personal notification the user Mary. Paste in the following code:
1// dart_server/lib/controllers/users.dart 2 3 import 'dart:async'; 4 import 'dart:io'; 5 import 'package:aqueduct/aqueduct.dart'; 6 import 'package:pusher_beams_server/pusher_beams_server.dart'; 7 import 'package:dart_server/config.dart'; 8 9 class UsersController extends ResourceController { 10 PushNotifications beamsClient; 11 12 // send push notification to Mary 13 @Operation.post() 14 Future<Response> notifyAuthenticatedUsers() async { 15 beamsClient ??= PushNotifications(Properties.instanceId, Properties.secretKey); 16 17 const title = 'Purchase'; 18 const message = 'Hello, Mary. Your purchase of apples will be delivered shortly.'; 19 20 final apns = { 21 'aps': { 22 'alert': { 23 'title': title, 24 'body': message, 25 } 26 } 27 }; 28 final fcm = { 29 'notification': { 30 'title': title, 31 'body': 32 message, 33 } 34 }; 35 final response = await beamsClient.publishToUsers( 36 ['Mary'], 37 apns: apns, 38 fcm: fcm, 39 ); 40 41 return Response.ok(response.body)..contentType = ContentType.text; 42 } 43 }
In order not to expose the secret key in GitHub, let’s put it in a configuration file and add that file to .gitignore. Create a file called config.dart in the lib folder.
1// dart_server/lib/config.dart 2 3 // Include this file in .gitignore 4 class Properties { 5 // exchange these values with valid ones from your Beams dashboard 6 static const instanceId = 'your_instance_id_here'; 7 static const secretKey = 'your_secret_key_here'; 8 }
Don't forget to add the filename to .gitignore and also to replace the instanceId and secretKey with your own (from the Pusher dashboard.
Save all of your changes. We're finally ready to test everything out.
Testing
Set everything up as follows:
Aqueduct Dart server
Start the Aqueduct server in the terminal with the following command:
aqueduct serve
Admin app
Start the admin app in the iOS simulator. (Or use Postman or curl or your own Android implementation. See the admin app section above for notes about that.)
User apps
Depending on what you made, prepare the Android or iOS user app (or both):
- Install the Android user app on an Android emulator.
- Install the iOS user app on a real device connected to the same wifi network as your Aqueduct server. Remember to update the router IP of the server in your app.
Minimize the user app so that it is in the background.
Putting it all together
- Press the first button on the admin app to notify users interested in "apples". You should see a notification pop up on the user app.
- Press the second button on the admin app to notify the user "Mary". You should see a notification pop up on the user app.
Hopefully it worked for you. If it didn’t check the logs, and make sure you remembered to do the following tasks:
- You are using the correct instance ID in the iOS
AppDelegate.swift, the AndroidMainActivity.kt, and the Dartconfig.dart. - You hooked up the buttons to the code in the iOS admin app.
- You iOS user app is on the same wifi network as your Dart server and has the correct router IP for the Dart server.
Conclusion
Today we learned how to send push notifications from a Dart server to Android and iOS.
In our contrived example, we sent a message to a single user who was interested in "apples". If there had been a hundred or even a thousand users who were all interested in apples, the message would have gone out to all of them. Users can subscribe to different interests and you can use this to target your notification messages to appropriate groups of users.
We also sent a personalized message to an authenticated user. This ability allows us to send private updates to users for things that only apply to them.
You’ve got the technical know-how now. Now use your imagination to build something amazing! (Or at least don’t make something annoying . . . like an app that spams its users with push notifications 20 times a day. I borrowed my mom’s iPhone to make this tutorial and she was wondering why she keeps getting notifications about apples. And who’s Mary anyway? Oops.)
The source code for the projects in this tutorial are available on GitHub. Also check out the Pusher Beams Dart server SDK documentation.


© 2026 Pusher Ltd. All rights reserved.
Pusher Limited is a company registered in England and Wales (No. 07489873) whose registered office is at MessageBird UK Limited, 3 More London Riverside, 4th Floor, London, United Kingdom, SE1 2AQ.