- Products

- Developers
- User stories
- Blog
- Pricing

Build a login approval system - Part 2: Building the backend
Introduction
In the previous part of this series, we set up the Laravel application and in the application, we added a login page of the application so we would be able to log in to the app. However, we did not implement any functionality.
In this part, we will be adding the logic to make logging in work. We will also be completing the dashboard using the same template we downloaded in the first part.
Requirements
To build this system, we need the following requirements:
- Xcode 10.x installed on your local machine.
- Knowledge of the Xcode IDE.
- Laravel v5.x installed on your local machine.
- Knowledge of the Laravel PHP framework.
- Knowledge of the Swift programming language.
- A Pusher Beams application. Create one here.
- A Pusher Channels application. Create one here.
If you have these requirements, let’s get started.
Making login work
The first thing we want to do is make the login work. From the first part, we attached a script that used Axios to send the login request to a different endpoint /login/confirm. Let us implement the logic for this route.
Open the LoginController in the app/Http/Controllers/Auth directory. Update the class as seen below:
1<?php 2 // File: ./app/Http/Controllers/Auth/LoginController.php 3 // [...] 4 5 use Illuminate\Support\Str; 6 use Illuminate\Http\Request; 7 use Illuminate\Support\Facades\Hash; 8 use App\Events\LoginAuthorizationRequested; 9 10 // [...] 11 12 class LoginController extends Controller 13 { 14 // [...] 15 16 public function confirmLogin(Request $request) 17 { 18 $this->validateLogin($request); 19 20 if ($this->hasTooManyLoginAttempts($request)) { 21 $this->fireLockoutEvent($request); 22 return $this->sendLockoutResponse($request); 23 } 24 25 if ($this->guard()->validate($this->credentials($request))) { 26 $username = $request->get($this->username()); 27 $hashKey = sha1($username . '_' . Str::random(32)); 28 $unhashedLoginHash = $hashKey . '.' . Str::random(32); 29 30 // Store the hash for 5 minutes... 31 $mins = now()->addMinutes(5); 32 $key = "{$hashKey}_login_hash"; 33 cache()->put($key, Hash::make($unhashedLoginHash), $mins); 34 35 event(new LoginAuthorizationRequested($unhashedLoginHash, $username)); 36 37 return ['status' => true]; 38 } 39 40 $this->incrementLoginAttempts($request); 41 42 return $this->sendFailedLoginResponse($request); 43 } 44 }
In the above, we are adding the confirmLogin method that we specified in the routes file. In this method we are doing the following:
- Validating the request
- Checking for excessive login attempts
- Validating the login credentials without logging in
- Creating and storing a hash for five minutes
- Triggering an event to broadcast that the login needs authorization
- Returning a true status so the client knows a request for authorization has been issued
Creating login events and listeners
We do not currently have this event we triggered so let’s create it. In your terminal, run the following command:
$ php artisan make:event LoginAuthorizationRequested
Next, open this app/Events/LoginAuthorizationRequested.php file and replace the contents with the following:
1<?php 2 // File: ./app/Events/LoginAuthorizationRequested.php 3 4 namespace App\Events; 5 6 use Illuminate\Broadcasting\Channel; 7 use Illuminate\Queue\SerializesModels; 8 use Illuminate\Foundation\Events\Dispatchable; 9 use Illuminate\Broadcasting\InteractsWithSockets; 10 use Illuminate\Contracts\Broadcasting\ShouldBroadcast; 11 12 class LoginAuthorizationRequested implements ShouldBroadcast 13 { 14 use Dispatchable, InteractsWithSockets, SerializesModels; 15 16 public $hash; 17 public $email; 18 19 public function __construct(string $hash, string $email) 20 { 21 $this->hash = $hash; 22 $this->email = $email; 23 } 24 25 public function broadcastOn() 26 { 27 return new Channel('auth-request'); 28 } 29 30 public function broadcastAs() 31 { 32 return 'key-dispatched'; 33 } 34 }
You can learn more about Laravel’s event system.
Very important to note above, we are implementing the ShouldBroadcast interface which will instruct the event to be broadcasted using the driver set in the .env file. Open the .env file and set the BROADCAST_DRIVER to pusher.
1# File: ./.env 2 3 # [...] 4 5 BROADCAST_DRIVER=pusher 6 7 # [...]
Also in this .env file, update the PUSHER_* keys to match the values you have in your Pusher dashboard. Below the PUSHER_* keys, add and update the following keys:
1PUSHER_BEAMS_SECRET_KEY= 2 PUSHER_BEAMS_INSTANCE_ID=
Next, let’s register the event we just created and attach a listener to it. The listener will automatically be fired when the event is triggered. We will use this listener to send push notifications through Pusher Beams to the user’s device as well.
In your terminal, run the following command:
$ php artisan make:listener SendLoginAuthorization
Now open this file app/Listeners/SendLoginAuthorization.php and replace the contents with the following:
1<?php 2 // File: ./app/Listeners/SendLoginAuthorization.php 3 4 namespace App\Listeners; 5 6 use Illuminate\Queue\InteractsWithQueue; 7 use Illuminate\Contracts\Queue\ShouldQueue; 8 use App\Events\LoginAuthorizationRequested; 9 use Pusher\PushNotifications\PushNotifications; 10 11 class SendLoginAuthorization implements ShouldQueue 12 { 13 use InteractsWithQueue; 14 15 protected $beams; 16 17 public function __construct(PushNotifications $pushNotifications) 18 { 19 $this->beams = $pushNotifications; 20 } 21 22 public function handle(LoginAuthorizationRequested $event) 23 { 24 $payload = [ 25 'title' => 'Dashboard', 26 'body' => 'Dashboard just sent a new approval request', 27 ]; 28 29 // Interest: auth-janedoe-at-pushercom 30 $interests = ['auth-' . str_slug($event->email)]; 31 32 $this->beams->publishToInterests($interests, [ 33 'apns' => [ 34 'aps' => [ 35 'alert' => $payload, 36 'category' => 'LoginActions', 37 'payload' => ['hash' => $event->hash, 'email' => $event->email], 38 ], 39 ], 40 ]); 41 } 42 }
In this listener, we are basically triggering a push notification using the Pusher Beams SDK for PHP. In this notification, we pass the hash so the client can use that when authorizing the login.
To register the listener, open the app/Providers/EventServiceProvider.php and add the following array to the listeners property:
1\App\Events\LoginAuthorizationRequested::class => [ 2 \App\Listeners\SendLoginAuthorization::class, 3 ],
Finally, go to your config/app.php file and uncomment the BroadcastServiceProvider from the list of providers.
Installing the Pusher PHP SDKs
Right now we have not installed any of the Pusher PHP SDKs. In your terminal, run the following code to install them:
$ composer require pusher/pusher-php-server pusher/pusher-push-notifications
Configuring the Pusher push notifications SDK for Laravel
Now that we have the packages installed, let’s add a class to the Laravel service container so that when we pass the PushNotifications class, it will go through the service container. Open the app/Providers/AppServiceProvider.php and in the register add the following:
1<?php 2 // File: ./app/Providers/AppServiceProvider.php 3 4 // [...] 5 6 class AppServiceProvider extends ServiceProvider { 7 8 // [...] 9 10 public function register() { 11 // [...] 12 13 $this->app->bind(PushNotifications::class, function () { 14 $config = config('broadcasting.connections.pusher.beams'); 15 16 return new PushNotifications([ 17 'secretKey' => $config['secret_key'] ?? '', 18 'instanceId' => $config['instance_id'] ?? '', 19 ]); 20 }); 21 22 // [...] 23 } 24 25 // [...] 26 }
You need to also import the push notifications class at the top of the file:
use Pusher\PushNotifications\PushNotifications;
Next, let’s create the configuration items that we referenced in the code above. Open the config/broadcasting.php file and update as seen below:
1<?php 2 // File: ./config/broadcasting.php 3 4 return [ 5 6 // [...] 7 8 'connections' => [ 9 'pusher' => [ 10 // [...] 11 12 'beams' => [ 13 'secret_key' => env('PUSHER_BEAMS_SECRET_KEY'), 14 'instance_id' => env('PUSHER_BEAMS_INSTANCE_ID'), 15 ] 16 ], 17 ], 18 19 // [...] 20 ];
Now, let’s run the application to see if we get the right results. In your terminal, run the following command to start the PHP server:
$ php artisan serve
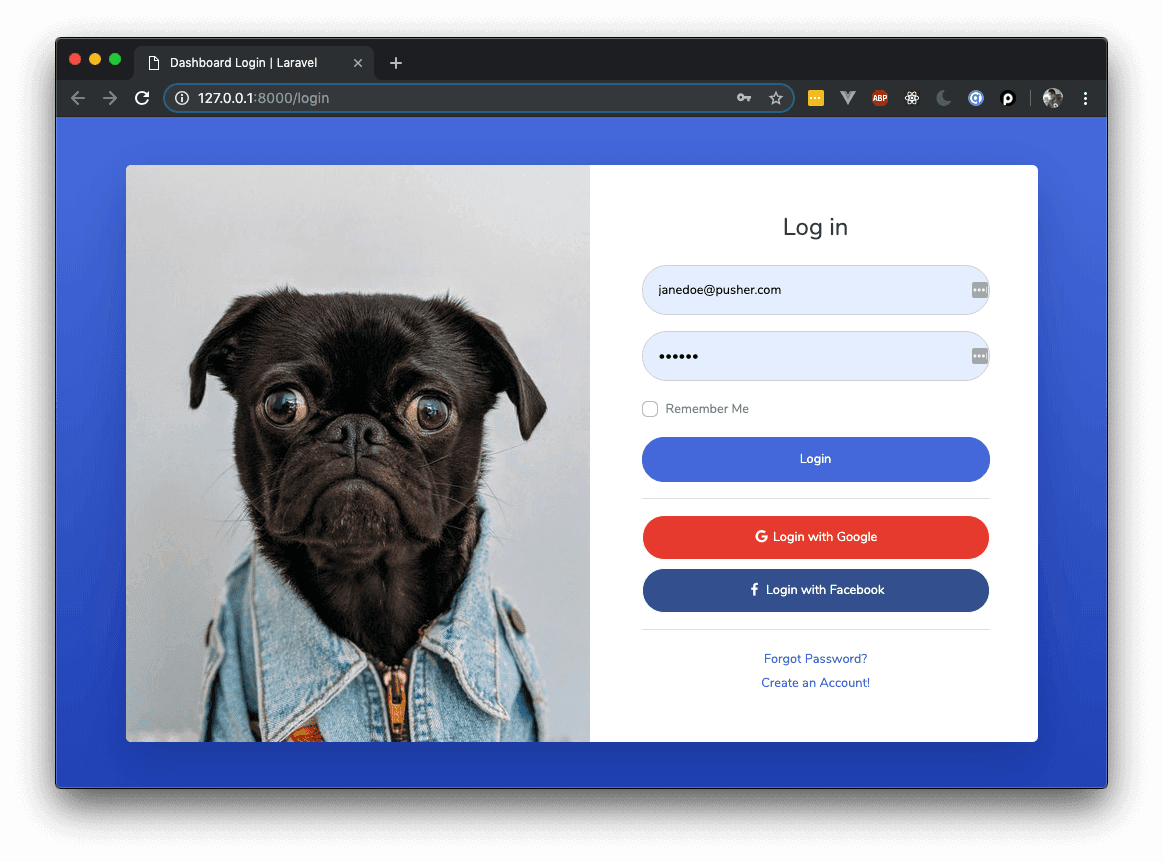
Now when you go to http://127.0.0.1:8000 you should see the login page as before. However, if you try to log in using the credentials below:
- Username: janedoe@pusher.com
- Password: secret
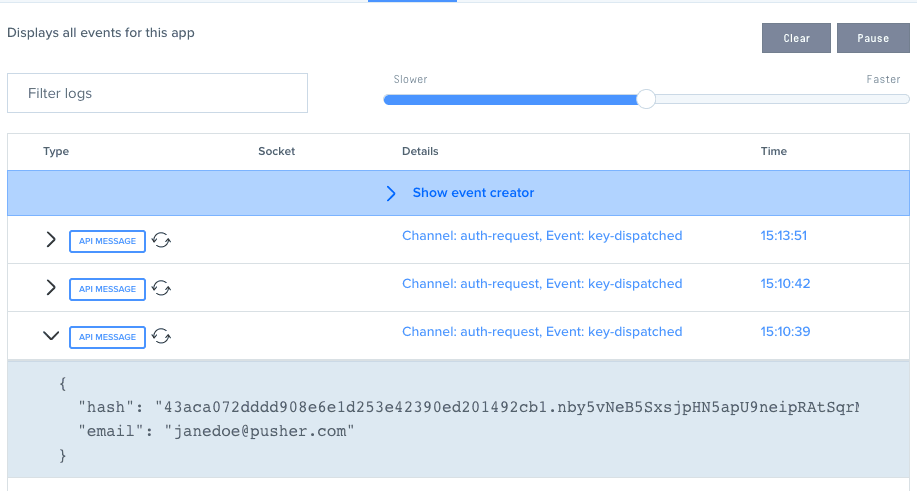
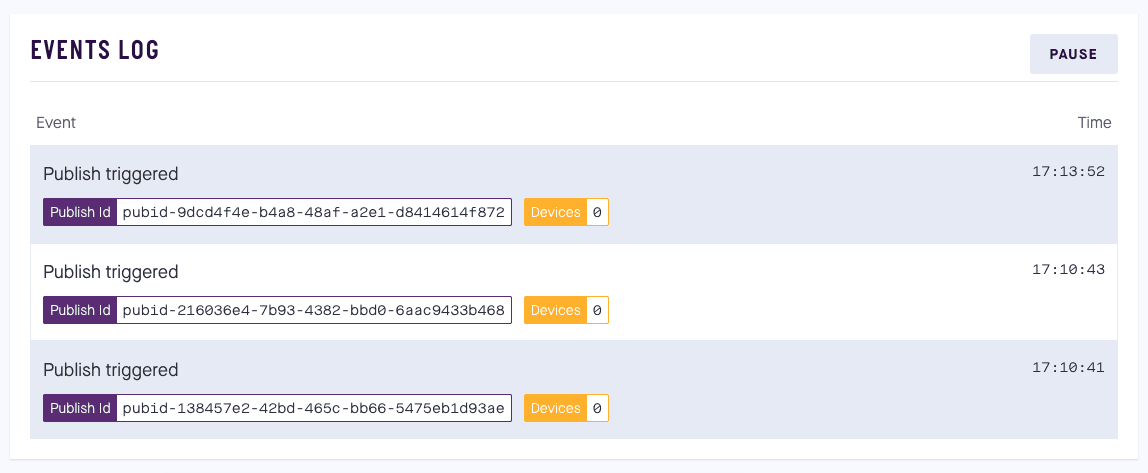
You should see the new screen that shows you that approval has been requested. Also if you check your Pusher Beams & Channels debug console, you should see the events and notification has been triggered.
Adding other login endpoints
Now that we have the login working, let us add some additional endpoints as defined in the routes file. Open the app/Http/Controllers/LoginController.php file and add the following methods:
1<?php 2 // File: ./app/Http/Controllers/LoginController.php 3 // [...] 4 5 use App\Events\LoginAuthorized; 6 7 // [...] 8 9 class LoginController extends Controller 10 { 11 // [...] 12 13 public function clientAuthorized(Request $request) 14 { 15 $request->validate(['hash' => 'required|string']); 16 17 $sentHash = $request->get('hash'); 18 [$hashKey] = explode('.', $sentHash); 19 $storedHash = cache()->get($hashKey . '_login_hash'); 20 21 if (!Hash::check($sentHash, $storedHash)) { 22 abort(422); 23 } 24 25 event(new LoginAuthorized($sentHash)); 26 27 return ['status' => true]; 28 } 29 30 public function authorizeLogin(Request $request) 31 { 32 $request->validate([ 33 'hash' => 'required|string', 34 'password' => 'required|string', 35 $this->username() => 'required|string', 36 ]); 37 38 $sentHash = $request->get('hash'); 39 [$hashKey] = explode('.', $sentHash); 40 $storedHash = cache()->get($hashKey . '_login_hash'); 41 42 if (!Hash::check($sentHash, $storedHash) || !$this->attemptLogin($request)) { 43 abort(422); 44 } 45 46 return ['status' => true]; 47 } 48 }
The first method will be the logic fired when the client has authorized the login. The second one will be called by the login script in the login.blade.php.
In these two methods, we validate the hash sent and make sure it matches the one stored in the cache. If for any reason the user does not validate in five minutes, the cache will expire and they would have to start the process again.
In the first method, we see that there is another event LoginAuthorized fired when the client authorizes the login. In this event, we will trigger an event that will be received on the web login page. When the web login receives this event, it will send a request to the authorizeLogin method above and the process will be complete. Let’s create this event.
In your terminal, run the following command:
$ php artisan make:event LoginAuthorized
In the event file generated, replace the content with the following:
1<?php 2 // File: ./app/Events/LoginAuthorized.php 3 4 namespace App\Events; 5 6 use Illuminate\Broadcasting\Channel; 7 use Illuminate\Queue\SerializesModels; 8 use Illuminate\Foundation\Events\Dispatchable; 9 use Illuminate\Broadcasting\InteractsWithSockets; 10 use Illuminate\Contracts\Broadcasting\ShouldBroadcast; 11 12 class LoginAuthorized implements ShouldBroadcast 13 { 14 use Dispatchable, InteractsWithSockets, SerializesModels; 15 16 public $hash; 17 18 public function __construct($hash) 19 { 20 $this->hash = $hash; 21 } 22 23 public function broadcastOn() 24 { 25 return new Channel('auth-request'); 26 } 27 28 public function broadcastAs() 29 { 30 return 'approval-granted'; 31 } 32 }
That’s all. We have a working login system that sends push notifications and Channel events to the Pusher API. Now we just need an iOS client that will receive these events and make it possible for the user to authorize logins.
Adding a sample dashboard for logged in users
One last thing we want to add is the dashboard that will show when a user is logged in. This dashboard will not be functional though, just a sample. Open the home.blade.php file inside the resources/views directory and replace the contents with the following code:
1{{-- File: ./resources/views/home.blade.php --}} 2 @extends('layouts.app') 3 4 @section('content') 5 <div class="container-fluid"> 6 <div class="d-sm-flex align-items-center justify-content-between mb-4"> 7 <h1 class="h3 mb-0 text-gray-800">Dashboard</h1> 8 <a href="#" class="d-none d-sm-inline-block btn btn-sm btn-primary shadow-sm"><i class="fas fa-download fa-sm text-white-50"></i> Generate Report</a> 9 </div> 10 11 <div class="row"> 12 <div class="col-xl-3 col-md-6 mb-4"> 13 <div class="card border-left-primary shadow h-100 py-2"> 14 <div class="card-body"> 15 <div class="row no-gutters align-items-center"> 16 <div class="col mr-2"> 17 <div class="text-xs font-weight-bold text-primary text-uppercase mb-1">Earnings (Monthly)</div> 18 <div class="h5 mb-0 font-weight-bold text-gray-800">$40,000</div> 19 </div> 20 <div class="col-auto"> 21 <i class="fas fa-calendar fa-2x text-gray-300"></i> 22 </div> 23 </div> 24 </div> 25 </div> 26 </div> 27 28 <div class="col-xl-3 col-md-6 mb-4"> 29 <div class="card border-left-success shadow h-100 py-2"> 30 <div class="card-body"> 31 <div class="row no-gutters align-items-center"> 32 <div class="col mr-2"> 33 <div class="text-xs font-weight-bold text-success text-uppercase mb-1">Earnings (Annual)</div> 34 <div class="h5 mb-0 font-weight-bold text-gray-800">$215,000</div> 35 </div> 36 <div class="col-auto"> 37 <i class="fas fa-dollar-sign fa-2x text-gray-300"></i> 38 </div> 39 </div> 40 </div> 41 </div> 42 </div> 43 <div class="col-xl-3 col-md-6 mb-4"> 44 <div class="card border-left-info shadow h-100 py-2"> 45 <div class="card-body"> 46 <div class="row no-gutters align-items-center"> 47 <div class="col mr-2"> 48 <div class="text-xs font-weight-bold text-info text-uppercase mb-1">Tasks</div> 49 <div class="row no-gutters align-items-center"> 50 <div class="col-auto"> 51 <div class="h5 mb-0 mr-3 font-weight-bold text-gray-800">50%</div> 52 </div> 53 <div class="col"> 54 <div class="progress progress-sm mr-2"> 55 <div class="progress-bar bg-info" role="progressbar" style="width: 50%" aria-valuenow="50" aria-valuemin="0" aria-valuemax="100"></div> 56 </div> 57 </div> 58 </div> 59 </div> 60 <div class="col-auto"> 61 <i class="fas fa-clipboard-list fa-2x text-gray-300"></i> 62 </div> 63 </div> 64 </div> 65 </div> 66 </div> 67 <div class="col-xl-3 col-md-6 mb-4"> 68 <div class="card border-left-warning shadow h-100 py-2"> 69 <div class="card-body"> 70 <div class="row no-gutters align-items-center"> 71 <div class="col mr-2"> 72 <div class="text-xs font-weight-bold text-warning text-uppercase mb-1">Pending Requests</div> 73 <div class="h5 mb-0 font-weight-bold text-gray-800">18</div> 74 </div> 75 <div class="col-auto"> 76 <i class="fas fa-comments fa-2x text-gray-300"></i> 77 </div> 78 </div> 79 </div> 80 </div> 81 </div> 82 </div> 83 <div class="row"> 84 <div class="col-xl-8 col-lg-7"> 85 <div class="card shadow mb-4"> 86 <div class="card-header py-3 d-flex flex-row align-items-center justify-content-between"> 87 <h6 class="m-0 font-weight-bold text-primary">Earnings Overview</h6> 88 <div class="dropdown no-arrow"> 89 <a class="dropdown-toggle" href="#" role="button" id="dropdownMenuLink" data-toggle="dropdown" aria-haspopup="true" aria-expanded="false"> 90 <i class="fas fa-ellipsis-v fa-sm fa-fw text-gray-400"></i> 91 </a> 92 <div class="dropdown-menu dropdown-menu-right shadow animated--fade-in" aria-labelledby="dropdownMenuLink"> 93 <div class="dropdown-header">Dropdown Header:</div> 94 <a class="dropdown-item" href="#">Action</a> 95 <a class="dropdown-item" href="#">Another action</a> 96 <div class="dropdown-divider"></div> 97 <a class="dropdown-item" href="#">Something else here</a> 98 </div> 99 </div> 100 </div> 101 <!-- Card Body --> 102 <div class="card-body"> 103 <div class="chart-area"> 104 <canvas id="myAreaChart"></canvas> 105 </div> 106 </div> 107 </div> 108 </div> 109 <div class="col-xl-4 col-lg-5"> 110 <div class="card shadow mb-4"> 111 <div class="card-header py-3 d-flex flex-row align-items-center justify-content-between"> 112 <h6 class="m-0 font-weight-bold text-primary">Revenue Sources</h6> 113 <div class="dropdown no-arrow"> 114 <a class="dropdown-toggle" href="#" role="button" id="dropdownMenuLink" data-toggle="dropdown" aria-haspopup="true" aria-expanded="false"> 115 <i class="fas fa-ellipsis-v fa-sm fa-fw text-gray-400"></i> 116 </a> 117 <div class="dropdown-menu dropdown-menu-right shadow animated--fade-in" aria-labelledby="dropdownMenuLink"> 118 <div class="dropdown-header">Dropdown Header:</div> 119 <a class="dropdown-item" href="#">Action</a> 120 <a class="dropdown-item" href="#">Another action</a> 121 <div class="dropdown-divider"></div> 122 <a class="dropdown-item" href="#">Something else here</a> 123 </div> 124 </div> 125 </div> 126 <div class="card-body"> 127 <div class="chart-pie pt-4 pb-2"> 128 <canvas id="myPieChart"></canvas> 129 </div> 130 <div class="mt-4 text-center small"> 131 <span class="mr-2"> 132 <i class="fas fa-circle text-primary"></i> Direct 133 </span> 134 <span class="mr-2"> 135 <i class="fas fa-circle text-success"></i> Social 136 </span> 137 <span class="mr-2"> 138 <i class="fas fa-circle text-info"></i> Referral 139 </span> 140 </div> 141 </div> 142 </div> 143 </div> 144 </div> 145 146 <div class="row"> 147 <div class="col-lg-6 mb-4"> 148 <div class="card shadow mb-4"> 149 <div class="card-header py-3"> 150 <h6 class="m-0 font-weight-bold text-primary">Projects</h6> 151 </div> 152 <div class="card-body"> 153 <h4 class="small font-weight-bold">Server Migration <span class="float-right">20%</span></h4> 154 <div class="progress mb-4"> 155 <div class="progress-bar bg-danger" role="progressbar" style="width: 20%" aria-valuenow="20" aria-valuemin="0" aria-valuemax="100"></div> 156 </div> 157 <h4 class="small font-weight-bold">Sales Tracking <span class="float-right">40%</span></h4> 158 <div class="progress mb-4"> 159 <div class="progress-bar bg-warning" role="progressbar" style="width: 40%" aria-valuenow="40" aria-valuemin="0" aria-valuemax="100"></div> 160 </div> 161 <h4 class="small font-weight-bold">Customer Database <span class="float-right">60%</span></h4> 162 <div class="progress mb-4"> 163 <div class="progress-bar" role="progressbar" style="width: 60%" aria-valuenow="60" aria-valuemin="0" aria-valuemax="100"></div> 164 </div> 165 <h4 class="small font-weight-bold">Payout Details <span class="float-right">80%</span></h4> 166 <div class="progress mb-4"> 167 <div class="progress-bar bg-info" role="progressbar" style="width: 80%" aria-valuenow="80" aria-valuemin="0" aria-valuemax="100"></div> 168 </div> 169 <h4 class="small font-weight-bold">Account Setup <span class="float-right">Complete!</span></h4> 170 <div class="progress"> 171 <div class="progress-bar bg-success" role="progressbar" style="width: 100%" aria-valuenow="100" aria-valuemin="0" aria-valuemax="100"></div> 172 </div> 173 </div> 174 </div> 175 176 <div class="row"> 177 <div class="col-lg-6 mb-4"> 178 <div class="card bg-primary text-white shadow"> 179 <div class="card-body"> 180 Primary 181 <div class="text-white-50 small">#4e73df</div> 182 </div> 183 </div> 184 </div> 185 <div class="col-lg-6 mb-4"> 186 <div class="card bg-success text-white shadow"> 187 <div class="card-body"> 188 Success 189 <div class="text-white-50 small">#1cc88a</div> 190 </div> 191 </div> 192 </div> 193 <div class="col-lg-6 mb-4"> 194 <div class="card bg-info text-white shadow"> 195 <div class="card-body"> 196 Info 197 <div class="text-white-50 small">#36b9cc</div> 198 </div> 199 </div> 200 </div> 201 <div class="col-lg-6 mb-4"> 202 <div class="card bg-warning text-white shadow"> 203 <div class="card-body"> 204 Warning 205 <div class="text-white-50 small">#f6c23e</div> 206 </div> 207 </div> 208 </div> 209 <div class="col-lg-6 mb-4"> 210 <div class="card bg-danger text-white shadow"> 211 <div class="card-body"> 212 Danger 213 <div class="text-white-50 small">#e74a3b</div> 214 </div> 215 </div> 216 </div> 217 <div class="col-lg-6 mb-4"> 218 <div class="card bg-secondary text-white shadow"> 219 <div class="card-body"> 220 Secondary 221 <div class="text-white-50 small">#858796</div> 222 </div> 223 </div> 224 </div> 225 </div> 226 227 </div> 228 229 <div class="col-lg-6 mb-4"> 230 <div class="card shadow mb-4"> 231 <div class="card-header py-3"> 232 <h6 class="m-0 font-weight-bold text-primary">Illustrations</h6> 233 </div> 234 <div class="card-body"> 235 <div class="text-center"> 236 <img class="img-fluid px-3 px-sm-4 mt-3 mb-4" style="width: 25rem;" src="img/undraw_posting_photo.svg" alt=""> 237 </div> 238 <p>Add some quality, svg illustrations to your project courtesy of <a target="_blank" rel="nofollow" href="https://undraw.co/">unDraw</a>, a constantly updated collection of beautiful svg images that you can use completely free and without attribution!</p> 239 <a target="_blank" rel="nofollow" href="https://undraw.co/">Browse Illustrations on unDraw →</a> 240 </div> 241 </div> 242 <div class="card shadow mb-4"> 243 <div class="card-header py-3"> 244 <h6 class="m-0 font-weight-bold text-primary">Development Approach</h6> 245 </div> 246 <div class="card-body"> 247 <p>SB Admin 2 makes extensive use of Bootstrap 4 utility classes in order to reduce CSS bloat and poor page performance. Custom CSS classes are used to create custom components and custom utility classes.</p> 248 <p class="mb-0">Before working with this theme, you should become familiar with the Bootstrap framework, especially the utility classes.</p> 249 </div> 250 </div> 251 252 </div> 253 </div> 254 255 </div> 256 @endsection
Conclusion
In this part, we have been able to make the login system work and also push different events to the Pusher API for consumption. In the next part, we will create the iOS application and consume the events that are sent.
The source code to the application is available on GitHub.


© 2026 Pusher Ltd. All rights reserved.
Pusher Limited is a company registered in England and Wales (No. 07489873) whose registered office is at MessageBird UK Limited, 3 More London Riverside, 4th Floor, London, United Kingdom, SE1 2AQ.