- Products

- Developers
- User stories
- Blog
- Pricing

Build an Instagram clone with Ionic: Part 3 - Adding data dynamically and enabling realtime functionality
- Introduction
- Prerequisites
- Uploading posts from the application
- Registering the new page
- Navigating from the HomePage to the CreatePostPage
- Update the HomePage to navigate to the CreatePostPage
- Adding functionality to the CreatePostPage
- Using the Cloudinary Upload Widget to upload images
- Uploading comments on user posts
- Enabling realtime functionality for posts and comments
- Creating a web server that triggers events
- Creating a Pusher service
- Triggering and displaying posts in realtime
- Triggering and displaying comments in realtime
- Conclusion
Introduction
The first part of this series focused on building the interface of the application, and the second part on connecting the application to dynamic data in the GraphQL server. This part of this series will walk through creating functionality that enables you to feed data into the data store of the application using GraphQL mutations and allowing users to see posts and comments in realtime.
Prerequisites
- You should have followed through the earlier parts of the series.
- Basic knowledge of JavaScript.
- Node installed on your machine (v10.13.0)
- Node Package Manager installed on your machine (v 6.4.1)
- Cordova installed on your machine (v 8.1.2)
- Docker installed on your machine. (version 18.09.2) Download here.
Uploading posts from the application
At the moment, the homepage of the application looks like this:
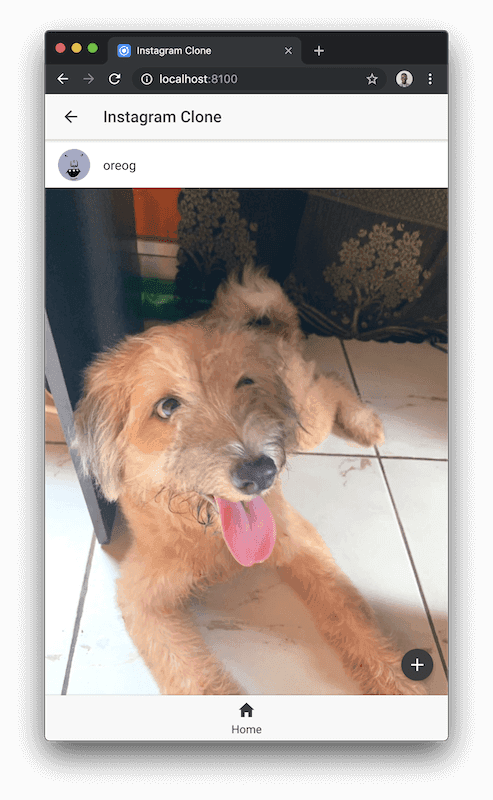
The + button at the bottom right has no functionality attached to it. Let’s make the button trigger the addition of new posts. Create a new page that we will take the user to when they click the button.
1ionic generate page CreatePost
Registering the new page
Go ahead to add the CreatePostPage to the declarations and entryComponents in the src/app/app.module.ts:
1// src/app/app.module.ts 2 // [...] 3 import { CreatePostPage } from '../pages/create-post/create-post'; 4 // [...] 5 6 @NgModule({ 7 declarations: [ 8 // [...] 9 CreatePostPage 10 ], 11 // [...] 12 entryComponents: [ 13 // [...] 14 CreatePostPage 15 ], 16 // [...] 17 }) 18 19 export class AppModule { 20 // [...] 21 }
Navigating from the HomePage to the CreatePostPage
Now that we have that set, update the src/pages/home/home.ts with the createPost function to navigate to the CreatePostPage:
1// src/pages/home/home.ts 2 [...] 3 import { CreatePostPage } from '../create-post/create-post'; 4 5 @Component({ 6 selector: 'page-home', 7 templateUrl: 'home.html', 8 entryComponents: [ProfilePage, CommentPage, CreatePostPage] 9 }) 10 11 export class HomePage implements OnInit { 12 //[...] 13 14 public createPost() { 15 // this function will redirect the user to the createPost page 16 this.navCtrl.push( 17 CreatePostPage, 18 new NavParams({ user_id: "USER_ID_FETCHED_FROM_GRAPHQL_SERVER" }) 19 ); 20 } 21 }
Note: Currently, the
user_idis hardcoded. If you want to get yours, navigate to your GraphQL server http://localhost:4466. Run the query to fetch all your users and then pick anidof your choice:
1# GraphQL query on the console to fetch users 2 query{ 3 users{ 4 id 5 username 6 followers 7 following 8 } 9 }
Update the HomePage to navigate to the CreatePostPage
On the home.html page, update the view to trigger the createPost() method. Now update your home.html to look like this:
1<!-- src/pages/home/home.html --> 2 <ion-header> 3 <ion-navbar> 4 <ion-title>Instagram Clone</ion-title> 5 </ion-navbar> 6 </ion-header> 7 8 <ion-content> 9 <!-- this is where the posts will be --> 10 <div *ngFor="let post of posts"> 11 <ion-card class="single-post-home"> 12 <ion-item (click)="toProfilePage(post.user.id)"> 13 <ion-avatar item-start> 14 <img [src]="post.user.avatar"> 15 </ion-avatar> 16 <h2>{{post.user.username}}</h2> 17 </ion-item> 18 19 <img [src]="post.image_url"> 20 21 <ion-card-content> 22 <p> 23 <strong>{{post.user.username}}</strong> {{post.description}}</p> 24 </ion-card-content> 25 26 <ion-row> 27 <ion-col> 28 <button ion-button icon-start clear small (click)="likePost()"> 29 <ion-icon name="heart"></ion-icon> 30 <div>{{post.likes}} likes</div> 31 </button> 32 </ion-col> 33 <ion-col> 34 <button ion-button icon-start clear small (click)="toCommentSection(post)"> 35 <ion-icon name="text"></ion-icon> 36 <div>{{post.comments.length}} Comments</div> 37 </button> 38 </ion-col> 39 </ion-row> 40 41 </ion-card> 42 </div> 43 44 <ion-fab bottom right> 45 <button ion-fab mini (click)="createPost()"> 46 <ion-icon name="add"></ion-icon> 47 </button> 48 </ion-fab> 49 </ion-content>
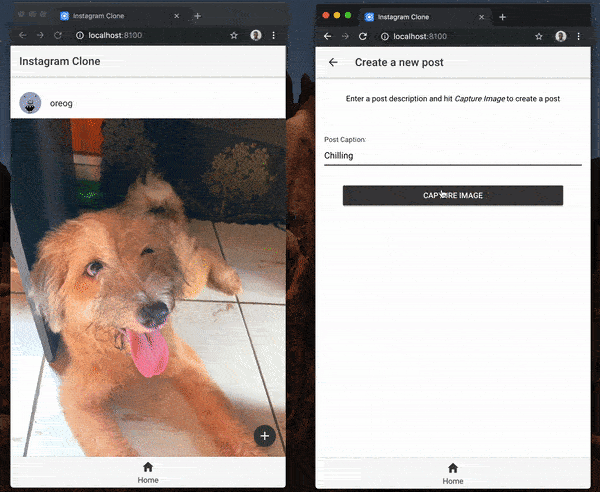
Adding functionality to the CreatePostPage
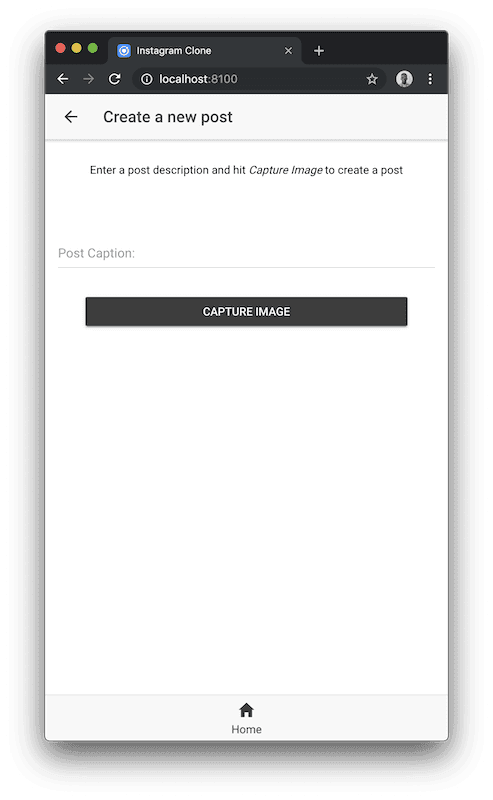
Edit your create-post.html page to look like this:
1<!-- src/pages/create-post/create-post.html 2 <ion-header> 3 <ion-navbar> 4 <ion-title>Create a new post</ion-title> 5 </ion-navbar> 6 </ion-header> 7 8 <ion-content> 9 <div style="text-align:center; padding: 16px"> 10 <p>Enter a post description and hit <em>Capture Image</em> to create a post</p> 11 </div> 12 13 <div style="display: flex;justify-content: center;align-items: center;flex-direction: column;"> 14 <ion-item style="padding:16px"> 15 <ion-label floating>Post Caption:</ion-label> 16 <ion-input [(ngModel)]="description" type="text"></ion-input> 17 </ion-item> 18 19 <button style="width:80%; margin-top:20px" ion-button (click)="loadWidget()"> 20 Capture Image 21 </button> 22 </div> 23 24 </ion-content>
Using the Cloudinary Upload Widget to upload images
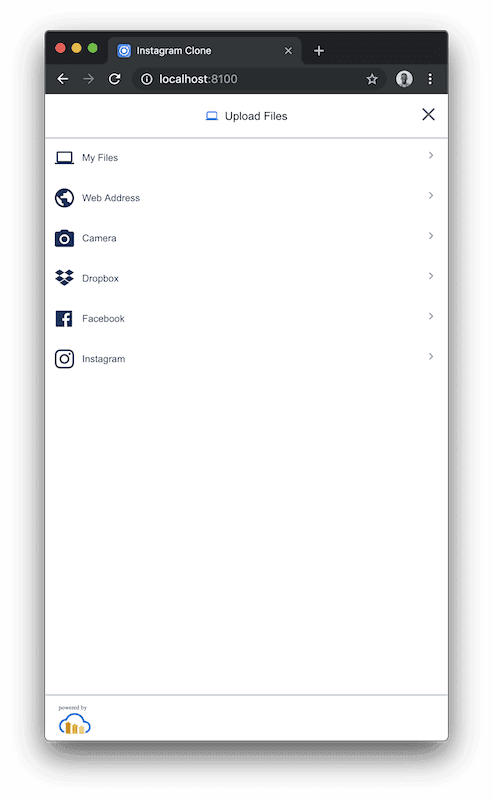
To allow image uploads in the application, let’s use the Cloudinary Upload Widget. Cloudinary is a media full stack that enables you to easily handle image and video storage/manipulations in your applications. The best part about the Upload Widget is that it also allows your users to upload images from multiple sources which include: camera, device storage, web address, Dropbox, Facebook, and Instagram.
To get started with Cloudinary first sign up for a free account here. After creating an account, you will need to set up an upload preset that will help you upload to Cloudinary with ease.
Note your Cloudinary
CLOUD_NAMEand CloudinaryUPLOAD_PRESETfor use later in this article.
Include the Cloudinary Widget JavaScript file in the <head> of your index.html:
1<!-- src/index.html --> 2 <!DOCTYPE html> 3 <html lang="en" dir="ltr"> 4 5 <head> 6 <!-- other includes --> 7 <!-- include cloudinary javascript --> 8 <script src="https://widget.cloudinary.com/v2.0/global/all.js" type="text/javascript"></script> 9 </head> 10 <body> 11 <!-- --> 12 </body> 13 </html>
Now, you’re ready to use Cloudinary in your application. Edit the create-post.ts as follows. First include the necessary modules and declare cloudinary for use in the application:
1// src/pages/create-post/create-post.ts 2 import { Component } from '@angular/core'; 3 import { IonicPage, NavController, NavParams, AlertController } from 'ionic-angular'; 4 import { Apollo } from 'apollo-angular'; 5 import gql from 'graphql-tag'; 6 import { HomePage } from '../home/home'; 7 import { HttpClient } from '@angular/common/http'; 8 9 declare var cloudinary; 10 11 //[...]
Let’s create a new mutation that will be responsible for creating a post on the GraphQL server we have running:
1// src/pages/create-post/create-post.ts 2 //[...] 3 4 // mutation to create a new post 5 const createUserPost = gql` 6 mutation createPost($image_url: String!, $description: String, $likes: Int, $postedAt: DateTime!, 7 $user: UserCreateOneWithoutPostsInput!){ 8 createPost(data: {image_url: $image_url, description: $description, likes: $likes, postedAt: $postedAt, user: $user}){ 9 id 10 image_url 11 description 12 likes 13 user{ 14 id 15 username 16 avatar 17 } 18 comments { 19 id 20 } 21 } 22 } 23 `; 24 25 // [...]
Now we update the create-post.ts have the functionality for the page:
1//src/pages/create-post/create-post.ts 2 // [...] 3 4 @IonicPage() 5 @Component({ 6 selector: 'page-create-post', 7 templateUrl: 'create-post.html', 8 }) 9 10 export class CreatePostPage { 11 user_id: string; 12 uploadWidget: any; 13 posted_at: string; 14 image_url: string; 15 description: string; 16 17 constructor(public navCtrl: NavController, public navParams: NavParams, private apollo: Apollo, 18 public alertCtrl: AlertController, public http: HttpClient) { 19 // get the user id of the user about to make post 20 this.user_id = this.navParams.get('user_id'); 21 22 let self = this; 23 this.uploadWidget = cloudinary.createUploadWidget({ 24 cloudName: 'CLOUDINARY_CLOUD_NAME', 25 uploadPreset: 'CLOUDINARY_UPLOAD_PRESET', 26 }, (error, result) => { 27 if (!error && result && result.event === "success") { 28 console.log('Done! Here is the image info: ', JSON.stringify(result.info)); 29 // image link 30 self.posted_at = result.info.created_at; 31 self.image_url = result.info.secure_url; 32 self.uploadPost(); 33 } 34 }) 35 } 36 37 [...]
Be sure to replace the
CLOUDINARY_CLOUD_NAMEandCLOUDINARY_UPLOAD_PRESETwith your credentials.
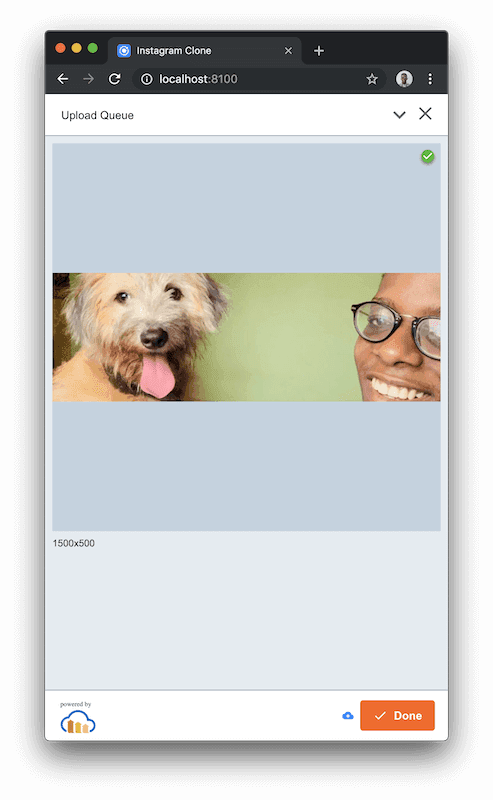
The constructor of the class gets the user_id from the navigation parameters and then creates the Cloudinary Upload Widget. We specify the cloudName, the uploadPreset and the functionality to execute when the image has been successfully uploaded to Cloudinary.
On successful upload, Cloudinary returns a result object. From it, we obtain the secure_url, created_at for the image and then trigger the uploadPost() method.
Now, add the other class methods to the CreatePostPage class:
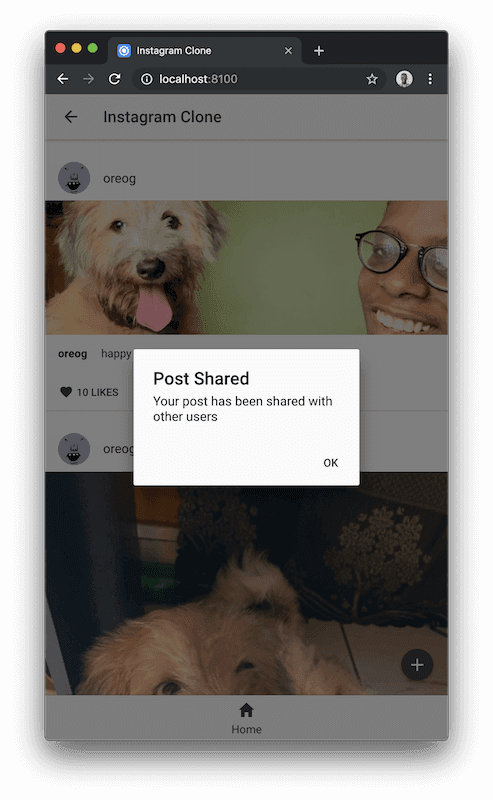
1// src/pages/create-post/create-post.ts 2 3 [...] 4 public uploadPost() { 5 this.apollo.mutate({ 6 mutation: createUserPost, 7 variables: { 8 image_url: this.image_url, 9 description: this.description, 10 likes: 10, 11 postedAt: this.posted_at, 12 user: { "connect": { "id": this.user_id } } 13 } 14 }).subscribe((data) => { 15 console.log('uploaded successfuly'); 16 // after sucessful upload, trigger pusher event 17 this.showAlert('Post Shared', 'Your post has been shared with other users'); 18 this.navCtrl.push(HomePage); 19 }, (error) => { 20 this.showAlert('Error', 'There was an error sharing your post, please retry'); 21 }) 22 } 23 24 public showAlert(title: string, subTitle: string) { 25 const alert = this.alertCtrl.create({ 26 title: title, 27 subTitle: subTitle, 28 buttons: ['OK'] 29 }); 30 alert.present(); 31 } 32 33 public loadWidget() { 34 this.uploadWidget.open(); 35 } 36 }
The loadWidget() method, displays the upload widget to the user to upload their image. The uploadPost() method makes the mutation to the GraphQL server and when that’s complete take the user back to the home page.
Now, your run your application using the command:
ionic serve -c
Navigate to localhost:``8100 on your browser. Now, when you navigate to create a post, you should get a view that looks like this:
Uploading comments on user posts
Earlier in the series, we went through fetching comments on posts from the GraphQL server. Now, let’s walk through how to upload comments on posts to your GraphQL server.
Add the following mutation to your comment.ts file:
1// src/pages/comment/comment.ts 2 3 import { Component } from '@angular/core'; 4 import { IonicPage, NavController, NavParams, AlertController } from 'ionic-angular'; 5 import { Apollo } from 'apollo-angular'; 6 import gql from 'graphql-tag'; 7 import { HomePage } from '../home/home'; 8 import { HttpClient } from '@angular/common/http'; 9 10 const makeComment = gql` 11 mutation createComment($message: String, $postedAt: DateTime!, $user: UserCreateOneWithoutCommentsInput!, 12 $post: PostCreateOneWithoutCommentsInput!){ 13 createComment(data: {message: $message, postedAt: $postedAt, user: $user, post: $post}){ 14 id 15 message 16 user { 17 avatar 18 username 19 } 20 } 21 } 22 `; 23 24 @IonicPage() 25 @Component({ 26 selector: 'page-comment', 27 templateUrl: 'comment.html' 28 }) 29 30 export class CommentPage { 31 // [...]
Afterward, add the postComment to the method CommentPage class that is responsible for sending the comment to the GraphQL server:
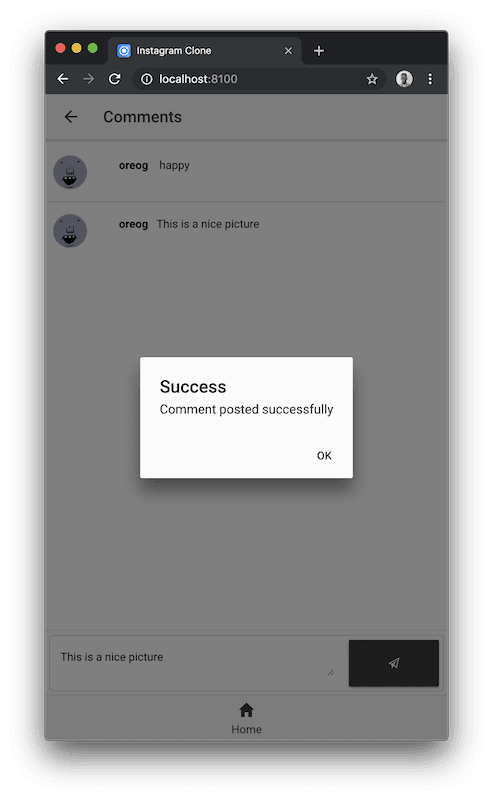
1// src/pages/comment/comment.ts 2 // [...] 3 4 export class CommentPage { 5 // [...] other class variables 6 7 post_id : string; 8 user_comment: string = ""; 9 10 constructor( 11 public navCtrl: NavController, 12 public navParams: NavParams, 13 private apollo: Apollo, 14 public alertCtrl: AlertController, 15 public http: HttpClient, 16 ) { 17 this.loadComments(this.post_id); 18 } 19 20 // [...] other methods 21 22 public postComment() { 23 this.apollo.mutate({ 24 mutation: makeComment, 25 variables: { 26 message: this.user_comment, 27 postedAt: (new Date()).toISOString(), 28 user: { connect: { id: "USER_ID_FETCHED_FROM_GRAPHQL_SERVER" } }, 29 post: { connect: { id: this.post_id } } 30 } 31 }).subscribe((data) => { 32 this.showAlert('Success', 'Comment posted successfully'); 33 }, (error) => { 34 this.showAlert('Error', 'Error posting comment'); 35 }); 36 } 37 public showAlert(title: string, subTitle: string) { 38 const alert = this.alertCtrl.create({ 39 title: title, 40 subTitle: subTitle, 41 buttons: ['OK'] 42 }); 43 alert.present(); 44 } 45 }
Note: The user ID was hardcoded to mimic a signed-in user making a comment.
The postComment method gathers the variables and makes the mutation. Afterwards, a modal is shown to the user to notify them of their successful post.
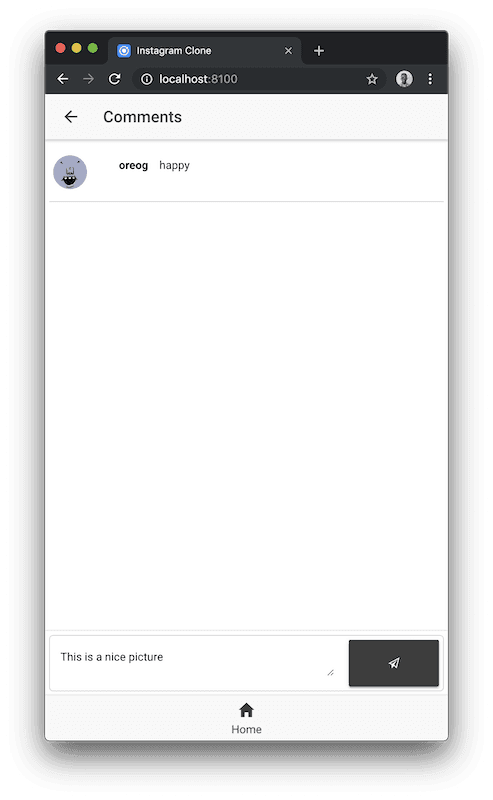
Finally, in your comment.html, bind the comment text field to the user_comment variable and let the button trigger the postComment method. Update the <ion-footer> in your comment.html file to look like this:
1<!-- app/pages/comment/comment.html --> 2 <!-- --> 3 4 <ion-footer> 5 <ion-grid> 6 <ion-row class="comment-area"> 7 <ion-col col-9> 8 <ion-textarea placeholder="Enter your comment..." [(ngModel)]="user_comment"></ion-textarea> 9 </ion-col> 10 <ion-col col-3> 11 <button ion-button class="comment-button" (click)="postComment()"> 12 <ion-icon name="paper-plane"></ion-icon> 13 </button> 14 </ion-col> 15 </ion-row> 16 </ion-grid> 17 </ion-footer>
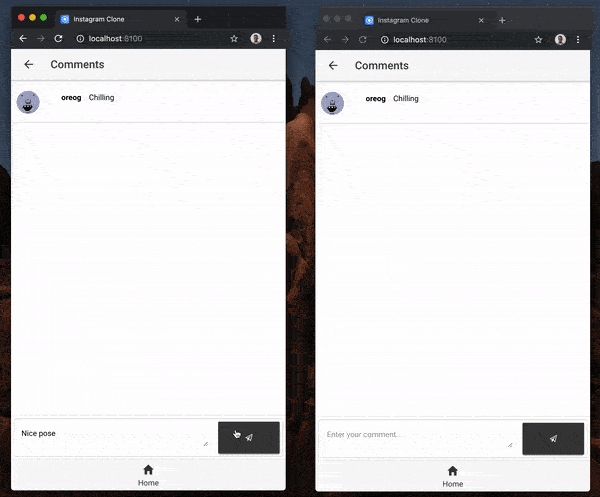
Now, the comment section of your application will look like this:
Enabling realtime functionality for posts and comments
Currently, new posts and comments are not updated on all the user devices in real time. This means that other users will have to physically reload their application to see when new posts/comments are made. For a social application, seeing posts and comments as they are made is very important. To add this functionality, let’s use Pusher. Pusher allows you add realtime functionality in your applications with ease.
To get started, sign up for a free Pusher account if you don’t have one yet. Go ahead and create a new Pusher project and then note your PUSHER_APP_ID, PUSHER_APP_KEY, PUSHER_APP_SECRET, PUSHER_CLUSTER.
Creating a web server that triggers events
Let’s create a simple web server that will trigger events using Pusher when users create new posts and when users add new comments. In your server directory, initialize an empty Node project:
1cd server 2 npm init -y
Afterward, install the necessary node modules:
npm install body-parser express pusher
expresswill power the web serverbody-parserto handle incoming requestspusherto add realtime functionality
Now, create a new server.js file in the server directory:
touch server.js
Update your server.js to look like this:
1// server/server.js 2 const express = require('express') 3 const bodyParser = require('body-parser') 4 const Pusher = require('pusher'); 5 6 const app = express(); 7 8 let pusher = new Pusher({ 9 appId: 'PUSHER_APP_ID', 10 key: 'PUSHER_APP_KEY', 11 secret: 'PUSHER_APP_SECRET', 12 cluster: 'PUSHER_APP_CLUSTER', 13 encrypted: true 14 }); 15 16 app.use(bodyParser.json()); 17 app.use(bodyParser.urlencoded({ extended: false })); 18 app.use((req, res, next) => { 19 res.header('Access-Control-Allow-Origin', '*'); 20 res.header( 21 'Access-Control-Allow-Headers', 22 'Origin, X-Requested-With, Content-Type, Accept' 23 ); 24 next(); 25 }); 26 27 [...]
This includes the necessary libraries we need and creates a Pusher object using your Pusher credentials obtained earlier and then defines some middleware to handle incoming requests.
The event server will have two routes:
/trigger-post-event- trigger a new post event on the post channel/trigger-comment-event- trigger a new comment event on the comment channel
When a user makes a new post, our mobile application makes a request to the /trigger-post-event of the web server. The web server will then trigger a new-post event in the post-channel.
Also, when a new comment is added, our mobile application makes a request to the /trigger-comment-event of the web server. The web server also triggers a new-comment event in the comment-channel.
Later in this tutorial, we will walk through how to listen for
new-postandnew-commentevents on thepost-channelandcomment-channelrespectively.
Add the following to your server.js file:
1// server/server.js 2 [...] 3 4 app.post('/trigger-post-event', (req, res) => { 5 // trigger a new post event via pusher 6 pusher.trigger('post-channel', 'new-post', { 7 'post': req.body.post 8 }) 9 res.json({ 'status': 200 }); 10 }); 11 12 app.post('/trigger-comment-event', (req, res) => { 13 // trigger a new comment event via pusher 14 pusher.trigger('comment-channel', 'new-comment', { 15 'comment': req.body.comment 16 }); 17 res.json({ 'status': 200 }); 18 }) 19 20 let port = 3128; 21 app.listen(port, () => { 22 console.log('App listening on port ' + port); 23 });
Now that the events server is created, you can run it by entering the command:
node server.js
Your server will be available on localhost:3128 as defined in the script. Now, let’s look at how to make requests to the web server from the mobile application.
Creating a Pusher service
To use Pusher in our Ionic application, let’s install the Pusher library:
npm install pusher-js
Afterward, let’s create a simple Pusher service provider that will handle our connection with Pusher:
ionic generate provider pusher-service
In the pusher-service.ts we create a new Pusher object in the constructor by specifying the PUSHER_APP_KEY, PUSHER_APP_CLUSTER. Edit your pusher-service.ts file to look like this:
1// src/providers/pusher-service/pusher-service.ts 2 import { Injectable } from '@angular/core'; 3 import Pusher from 'pusher-js'; 4 5 @Injectable() 6 export class PusherServiceProvider { 7 pusher: any; 8 constructor() { 9 this.pusher = new Pusher('PUSHER_APP_KEY', { 10 cluster: 'PUSHER_APP_CLUSTER', 11 forceTLS: true 12 }); 13 } 14 15 postChannel() { 16 return this.pusher.subscribe('post-channel'); 17 } 18 19 commentChannel() { 20 return this.pusher.subscribe('comment-channel'); 21 } 22 }
The constructor method for the class creates a new Pusher object. The postChannel and commentChannel methods subscribe to and return the post-channel and comment-channel respectively. Earlier in the article, we looked at how to push events from the web server to the post-channel and comment-channel. Here we subscribe to those channels so we can listen for events later on.
Now, go ahead to register the PusherServiceProvider in the app.module.ts. At this point, your app.module.ts should look like this:
1// src/app/app.module.ts 2 3 import { NgModule, ErrorHandler } from '@angular/core'; 4 import { BrowserModule } from '@angular/platform-browser'; 5 import { IonicApp, IonicModule, IonicErrorHandler } from 'ionic-angular'; 6 import { MyApp } from './app.component'; 7 8 // import modules for apollo client 9 import { HttpClientModule } from '@angular/common/http'; 10 import { ApolloModule, Apollo } from 'apollo-angular'; 11 import { HttpLinkModule, HttpLink } from 'apollo-angular-link-http'; 12 import { InMemoryCache } from 'apollo-cache-inmemory'; 13 // import other pages 14 import { HomePage } from '../pages/home/home'; 15 import { TabsPage } from '../pages/tabs/tabs'; 16 import { ProfilePage } from '../pages/profile/profile'; 17 import { CommentPage } from '../pages/comment/comment'; 18 import { CreatePostPage } from '../pages/create-post/create-post'; 19 20 import { StatusBar } from '@ionic-native/status-bar'; 21 import { SplashScreen } from '@ionic-native/splash-screen'; 22 // import pusher sevice provider 23 import { PusherServiceProvider } from '../providers/pusher-service/pusher-service'; 24 25 @NgModule({ 26 declarations: [ 27 MyApp, 28 HomePage, 29 TabsPage, 30 ProfilePage, 31 CommentPage, 32 CreatePostPage 33 ], 34 imports: [ 35 HttpClientModule, 36 ApolloModule, 37 HttpLinkModule, 38 BrowserModule, 39 IonicModule.forRoot(MyApp), 40 ], 41 bootstrap: [IonicApp], 42 entryComponents: [ 43 MyApp, 44 HomePage, 45 TabsPage, 46 ProfilePage, 47 CommentPage, 48 CreatePostPage 49 ], 50 providers: [ 51 StatusBar, 52 SplashScreen, 53 { provide: ErrorHandler, useClass: IonicErrorHandler }, 54 PusherServiceProvider 55 ] 56 }) 57 58 export class AppModule { 59 constructor(apollo: Apollo, httpLink: HttpLink) { 60 apollo.create({ 61 link: httpLink.create({ uri: 'http://localhost:4466' }), // uri specifies the endpoint for our graphql server 62 cache: new InMemoryCache() 63 }) 64 } 65 }
Now that the PusherServiceProvider has been registered, we can then use it in our application to fetch posts in realtime.
Triggering and displaying posts in realtime
In the uploadPost method of the CreatePostPage, after a post is created, the user is shown a success alert letting them know the upload is successful. Now, update the uploadPost method to send a POST request to the event server before displaying the success alert:
1// src/pages/create-post/create-post.ts 2 3 [...] 4 5 public uploadPost() { 6 this.apollo.mutate({ 7 mutation: createUserPost, 8 variables: { 9 image_url: this.image_url, 10 description: this.description, 11 likes: 10, 12 postedAt: this.posted_at, 13 user: { "connect": { "id": this.user_id } } 14 } 15 }).subscribe((data) => { 16 // after sucessful upload, trigger pusher event 17 let post_response: any = data; 18 this.http.post('http://localhost:3128/trigger-post-event', post_response.data.createPost) 19 .subscribe(() => { 20 this.showAlert('Post Shared', 'Your post has been shared with other users'); 21 this.navCtrl.push(HomePage); 22 }); 23 }, (error) => { 24 this.showAlert('Error', 'There was an error sharing your post, please retry'); 25 console.log('there was an error sending :the query', error); 26 }) 27 } 28 29 [...]
Now that the event is being triggered, the next thing we need to do is to update the HomePage with new posts in realtime for all users. Add update your home.ts file to include the following:
1// app/src/pages/home/home.ts 2 3 // [...] other imports 4 import { PusherServiceProvider } from '../../providers/pusher-service/pusher-service'; 5 6 // [...] 7 8 export class HomePage implements OnInit { 9 // [...] 10 11 post_channel: any; 12 13 constructor( 14 public navCtrl: NavController, 15 private apollo: Apollo, 16 private pusher: PusherServiceProvider) { 17 // [...] 18 this.initializeRealtimePosts(); 19 } 20 21 initializeRealtimePosts() { 22 this.post_channel = this.pusher.postChannel(); 23 let self = this; 24 this.post_channel.bind('new-post', function (data) { 25 let posts_copy = [data.post]; 26 self.posts = posts_copy.concat(self.posts); 27 }) 28 } 29 30 // [...] 31 32 }
Now, your HomePage is ready to display new user posts in realtime. Navigate your application in the browser (localhost:8100) and create a new post:
Triggering and displaying comments in realtime
In the postComment method of the CommentPage, let’s make a request to the event server to after the comment is added to a post. Update the postComment method in the comment.ts as follows:
1// src/page/comment/comment.ts 2 3 [...] 4 public postComment() { 5 this.apollo.mutate({ 6 mutation: makeComment, 7 variables: { 8 message: this.user_comment, 9 postedAt: (new Date()).toISOString(), 10 user: { connect: { id: "USER_ID_FETCHED_FROM_GRAPHQL_SERVER" } }, 11 post: { connect: { id: this.post_id } } 12 } 13 }).subscribe((data) => { 14 let post_response: any = data; 15 // after successful upload, trigger new comment event 16 this.http.post('http://localhost:3128/trigger-comment-event', post_response.data.createComment) 17 .subscribe(() => { 18 this.showAlert('Success', 'Comment posted successfully'); 19 this.navCtrl.push(HomePage); 20 }); 21 }, (error) => { 22 this.showAlert('Error', 'Error posting comment'); 23 }); 24 } 25 26 [...]
Note: Get a user ID for the user you want to post the comment for from the GraphQL server. In the previous article in the series, we looked at querying the data store for all users. Pick a user id you want to use.
To see the comments in realtime after they have been pushed to the comment-channel via the web server, we create a initializeRealtimeComments method in the CommentPage that gets the comment-channel from the PusherServiceProvider. We then bind the new-comment event to the comment-channel. When a new-comment event occurs, the comments on the page are the updated automatically.
Update the comment.ts file to include the following:
1// src/app/pages/comment/comment.ts 2 // [...] other imports 3 import { PusherServiceProvider } from '../../providers/pusher-service/pusher-service'; 4 5 // [...] 6 7 export class CommentPage { 8 comments: any; 9 username: string; 10 post_desc: string; 11 user_avatar: string; 12 post_id: string; 13 14 user_comment: string = ""; 15 comment_channel: any; 16 17 constructor( 18 public navCtrl: NavController, public navParams: NavParams, private apollo: Apollo, public alertCtrl: AlertController, public http: HttpClient, private pusher: PusherServiceProvider 19 ) { 20 // [...] 21 22 this.initializeRealtimeComments(); 23 } 24 25 initializeRealtimeComments() { 26 this.comment_channel = this.pusher.commentChannel(); 27 28 let self = this; 29 this.comment_channel.bind('new-comment', function (data) { 30 let comment_copy = self.comments; 31 self.comments = comment_copy.concat(data.comment);; 32 }) 33 } 34 35 // [...] 36 }
Now, when you open your browser and you navigate to localhost:8100. Here’s what happens when you create a new comment:
You can see the application rendering new comments in realtime without any other action from other users.
Conclusion
In this part of the series, we went through in detail how upload images from multiple sources seamlessly using Cloudinary, how to make mutations to your GraphQL server using the Apollo Client and also enabling realtime functionality for posts and comments using Pusher. Here’s a link to the GitHub repository for reference. Notice that through the series, you have been viewing your application on the browser. In the next part of the series, we will walk through steps to take to testing your Ionic application on mobile devices.


© 2026 Pusher Ltd. All rights reserved.
Pusher Limited is a company registered in England and Wales (No. 07489873) whose registered office is at MessageBird UK Limited, 3 More London Riverside, 4th Floor, London, United Kingdom, SE1 2AQ.