- Products

- Developers
- User stories
- Blog
- Pricing

Build an Instagram clone with Ionic: Part 2 - Connecting to GraphQL servers using Apollo client
- Introduction
- Pre-requisites
- Building the GraphQL server
- What is GraphQL?
- Creating a new user
- Fetching the list of users
- Creating a new post
- Rendering data in our application
- Installing the Apollo client
- Configuring the Apollo client
- Fetching and rendering posts on home page
- Fetching and rendering data on the profile page
- Fetching and rendering and creating comments on the comments page
- Conclusion
Introduction
In the previous part of this series, we looked at how to set up the interface for our Instagram clone application. One thing though, was that we used static data to populate the application. In this part of the series, we will create the backend server for the application that will serve data to the application.
Pre-requisites
- You should have followed through the first part of the series.
- Basic knowledge of JavaScript.
- Node installed on your machine (v10.13.0)
- Node Package Manager installed on your machine (v 6.4.1)
- Cordova installed on your machine (v 8.1.2)
- Docker installed on your machine. (version 18.09.2) Download here.
Building the GraphQL server
The backend server will be responsible for serving the data that we will render in the application. By now, you have probably heard about GraphQL and wondered about how it all works, let’s go through a brief introduction and see what the buzz is all about
What is GraphQL?
GraphQL is a query language that helps speed up development by enabling developers to query exactly the data they need from the client without having to fetch other excess data. It was developed by Facebook and was open-sourced in 2015. Since then, it has been used in production by companies like Twitter and GitHub.
The query language is largely based on two major concepts, queries and mutations. Queries are used to fetch data from your data source and mutations are used to edit the existing data source.
As we progress through this series, we will take a deeper look at understanding what queries and mutations are and how to write them.
The only caveat though is that creating and managing a GraphQL server seems like a herculean task to people who are new to it. So, in this part of the series, we are going to see how to use Prisma to automatically turn your database into a GraphQL API thus enabling us to read and write to the application’s database using GraphQL queries and mutations. To read more about Prisma features, head over here.
To get started, install the Prisma CLI on your machine:
1#install using brew (if you have a mac) 2 brew tap prisma/prisma 3 brew install prisma 4 5 # or install with npm 6 npm install -g prisma
Next we need to create a Docker compose file in the server directory for your project that will configure the Prisma server and let it know what database to connect to. In your instagram-ionic project, create a folder server that will house the Prisma service:
1mkdir server 2 cd server 3 touch docker-compose.yml
Edit the docker-compose file to look like this:
1version: '3' 2 services: 3 prisma: 4 image: prismagraphql/prisma:1.31 5 restart: always 6 ports: 7 - "4466:4466" 8 environment: 9 PRISMA_CONFIG: | 10 port: 4466 11 databases: 12 default: 13 connector: mysql 14 host: mysql 15 port: 3306 16 user: root 17 password: prisma 18 migrations: true 19 mysql: 20 image: mysql:5.7 21 restart: always 22 environment: 23 MYSQL_ROOT_PASSWORD: prisma 24 volumes: 25 - mysql:/var/lib/mysql 26 volumes: 27 mysql:
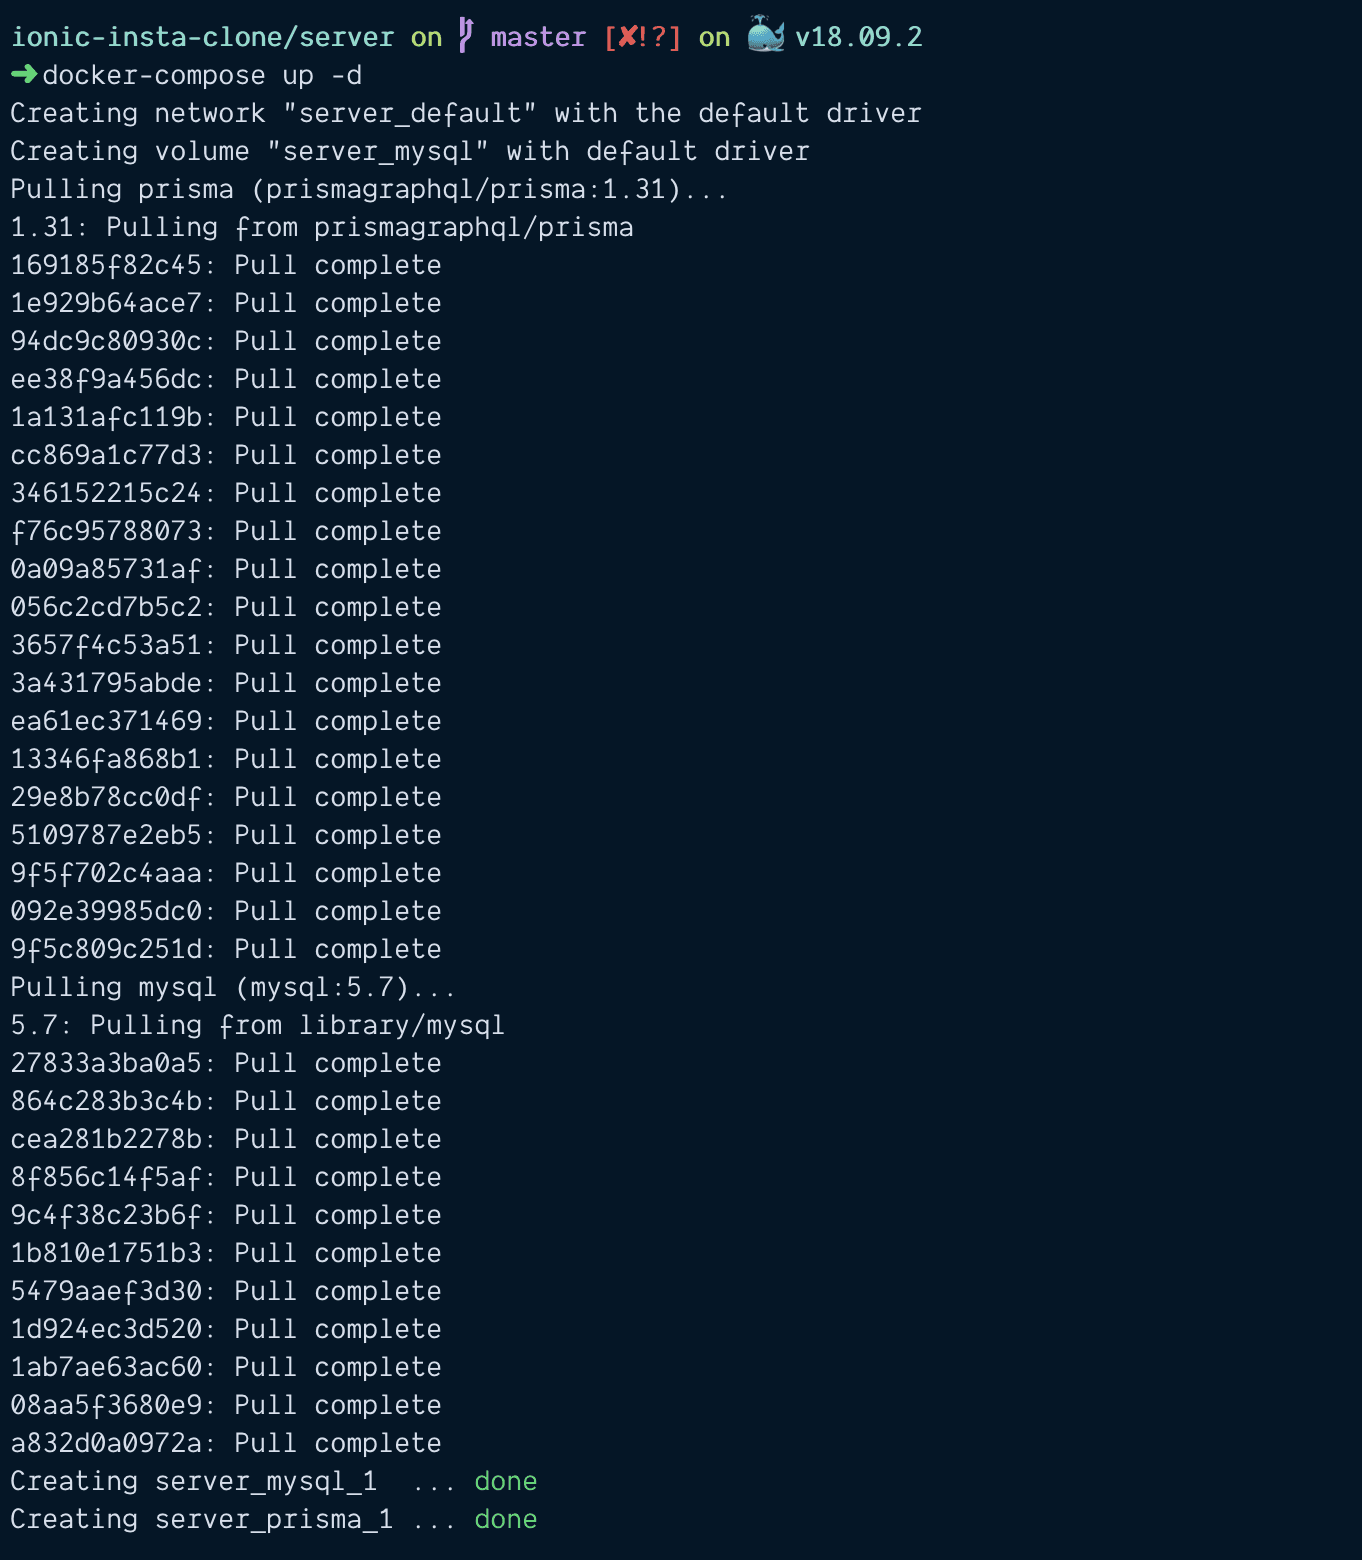
Now, go ahead and start your Prisma server and the database by running the command:
docker-compose up -d
You should get a prompt that looks like this:
Now, the Prisma server is up and running, let’s create a simple Prisma service in the server directory:
1cd server 2 prisma init --endpoint http://localhost:4466
http://localhost:4466represents the port your local Prisma service is running on. To confirm the port, run the commanddocker ps. All the created containers will be listed for you to find the port your container will run on.
Initializing the Prisma service creates two files in the server directory:
prisma.ymldefines some config for the Prisma servicedatamodel.prismaspecifies the data model our database will be based on.
Let’s edit the data model to meet what we need for our Instagram clone application. Update your datamodel.prisma to look like this:
1# server/datamodel.prisma 2 type User { 3 id: ID! @unique @id 4 username: String! @unique 5 fullname: String! 6 avatar: String! 7 bio: String! 8 followers: Int! 9 following: Int! 10 posts: [Post!]! @relation(name: "UserPosts") 11 comments: [Comment!]! @relation(name: "UserComments") 12 } 13 14 type Comment{ 15 id: ID! @unique @id 16 message: String 17 postedAt: DateTime! 18 user: User! @relation(name: "UserComments") 19 post: Post! @relation(name: "PostComments") 20 } 21 22 type Post{ 23 id: ID! @unique @id 24 image_url: String! 25 description: String, 26 likes: Int @default(value: 0) 27 postedAt: DateTime! 28 user: User! @relation(name: "UserPosts") 29 comments: [Comment!]! @relation(name: "PostComments") 30 }
The data model above specifies that our application has the main models with relationships with one another. The data model is written in GraphQL Schema Definition Language which is largely based on two concepts of types and fields. Head over here to learn more about writing in the GraphQL SDL.
The prisma.yml file looks like this:
1endpoint: http://localhost:4466 2 datamodel: datamodel.prisma
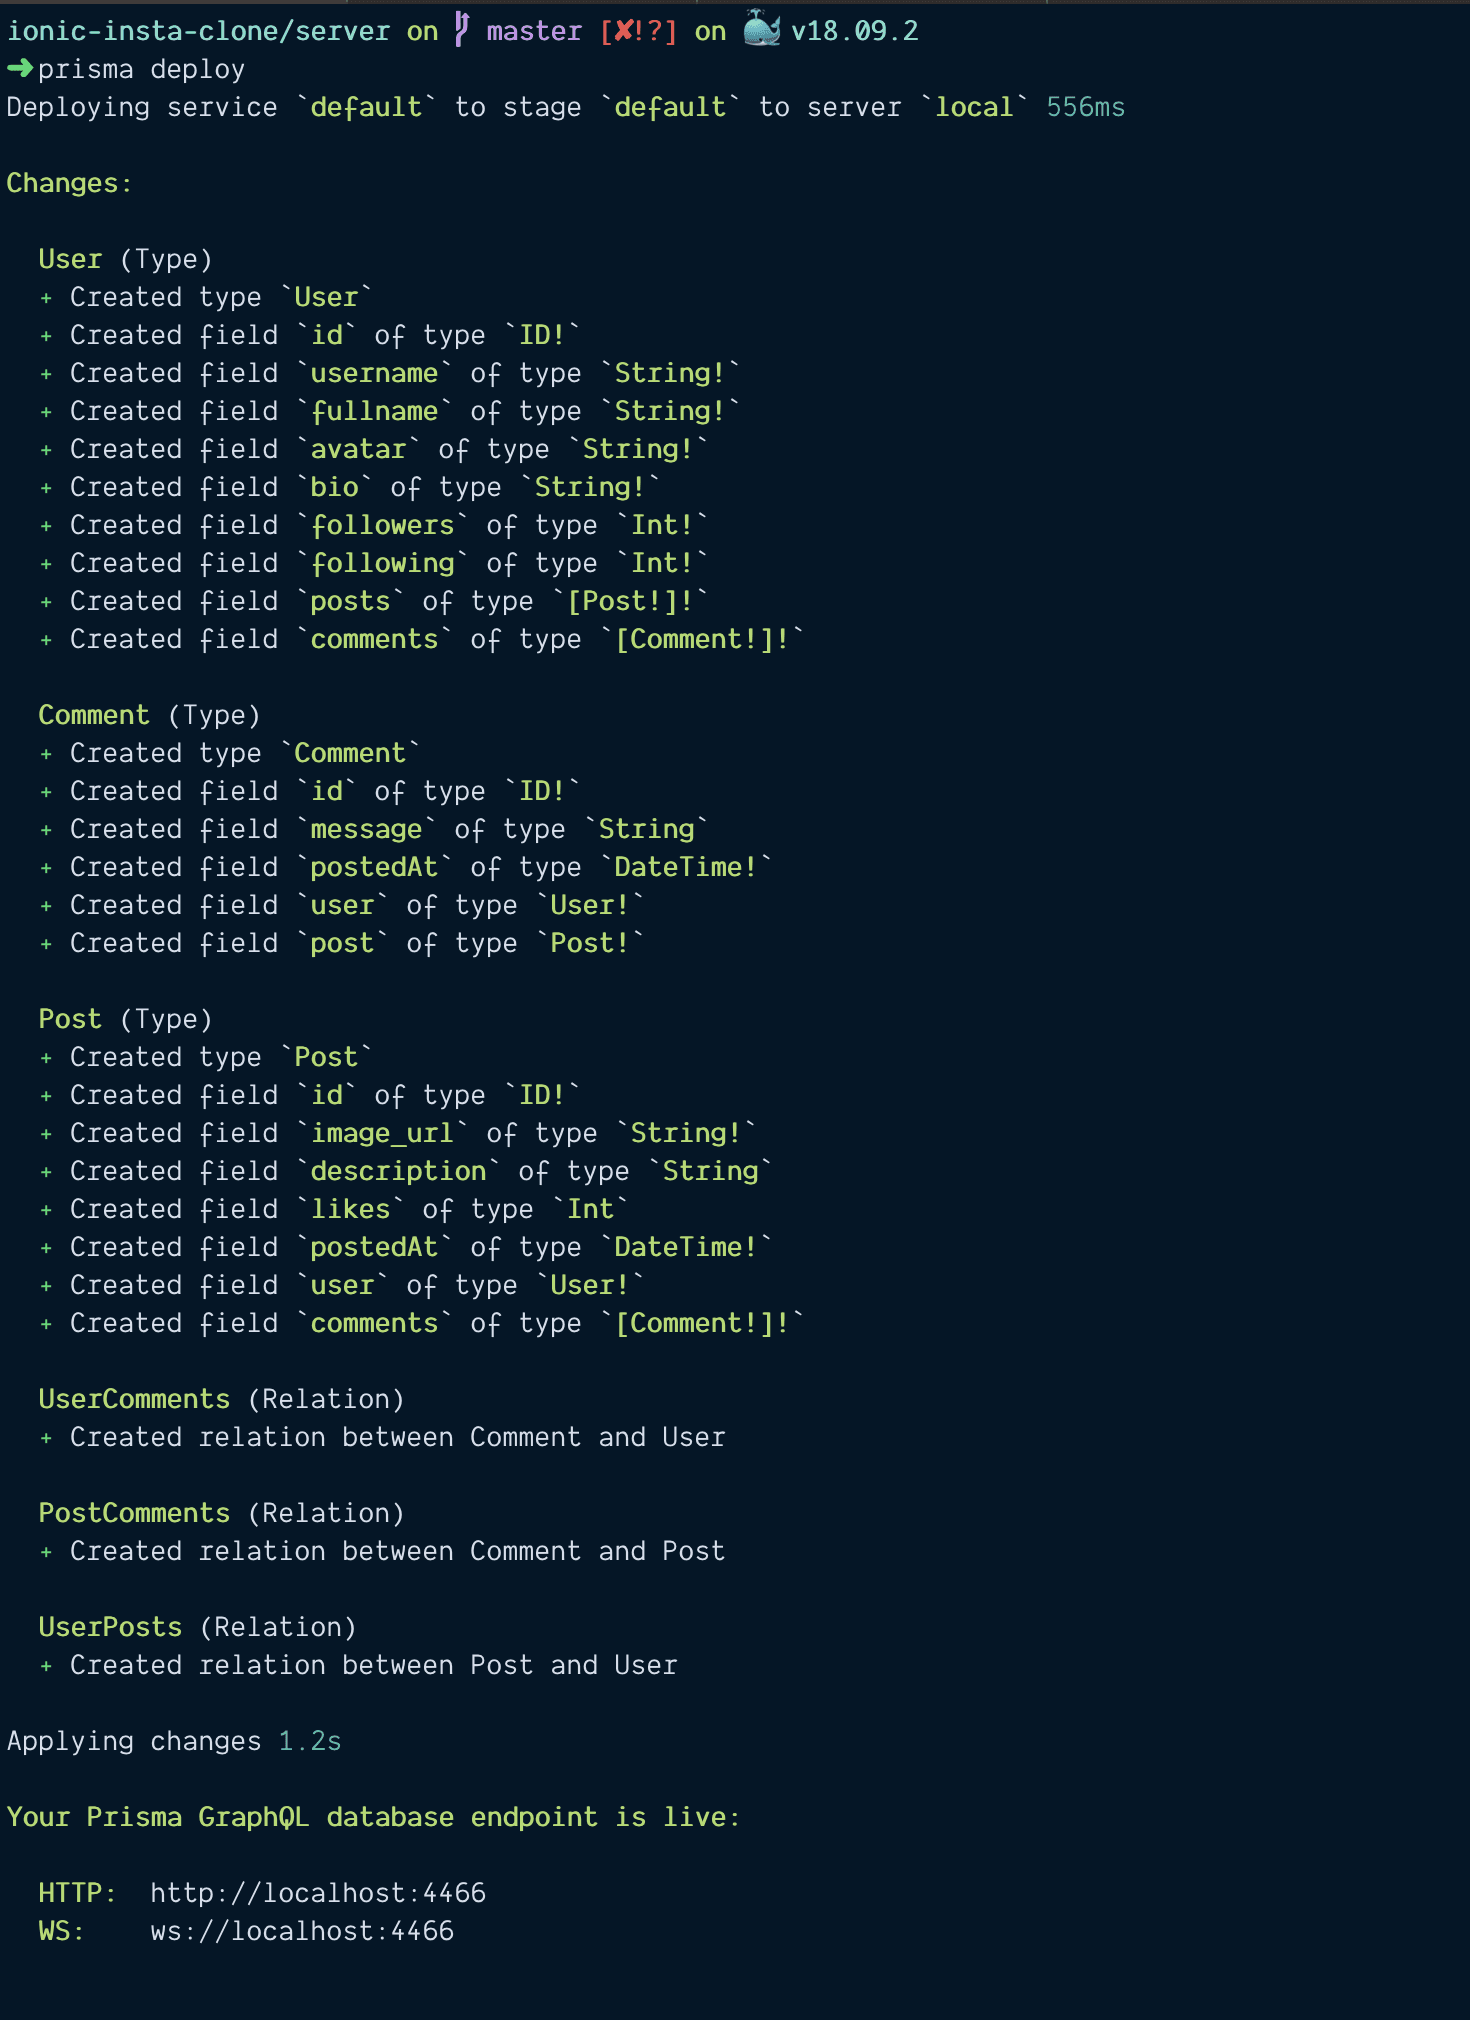
Now that we have specified the data model for the application, we then deploy the Prisma service by running the command below in the server directory:
prisma deploy
You get a prompt that looks like this:
Now that we have deployed our Prisma service, let’s go ahead to the playground to see how fetching data using the GraphQL API will look like. Navigate to http://localhost:4466 and you get a view that looks like this:
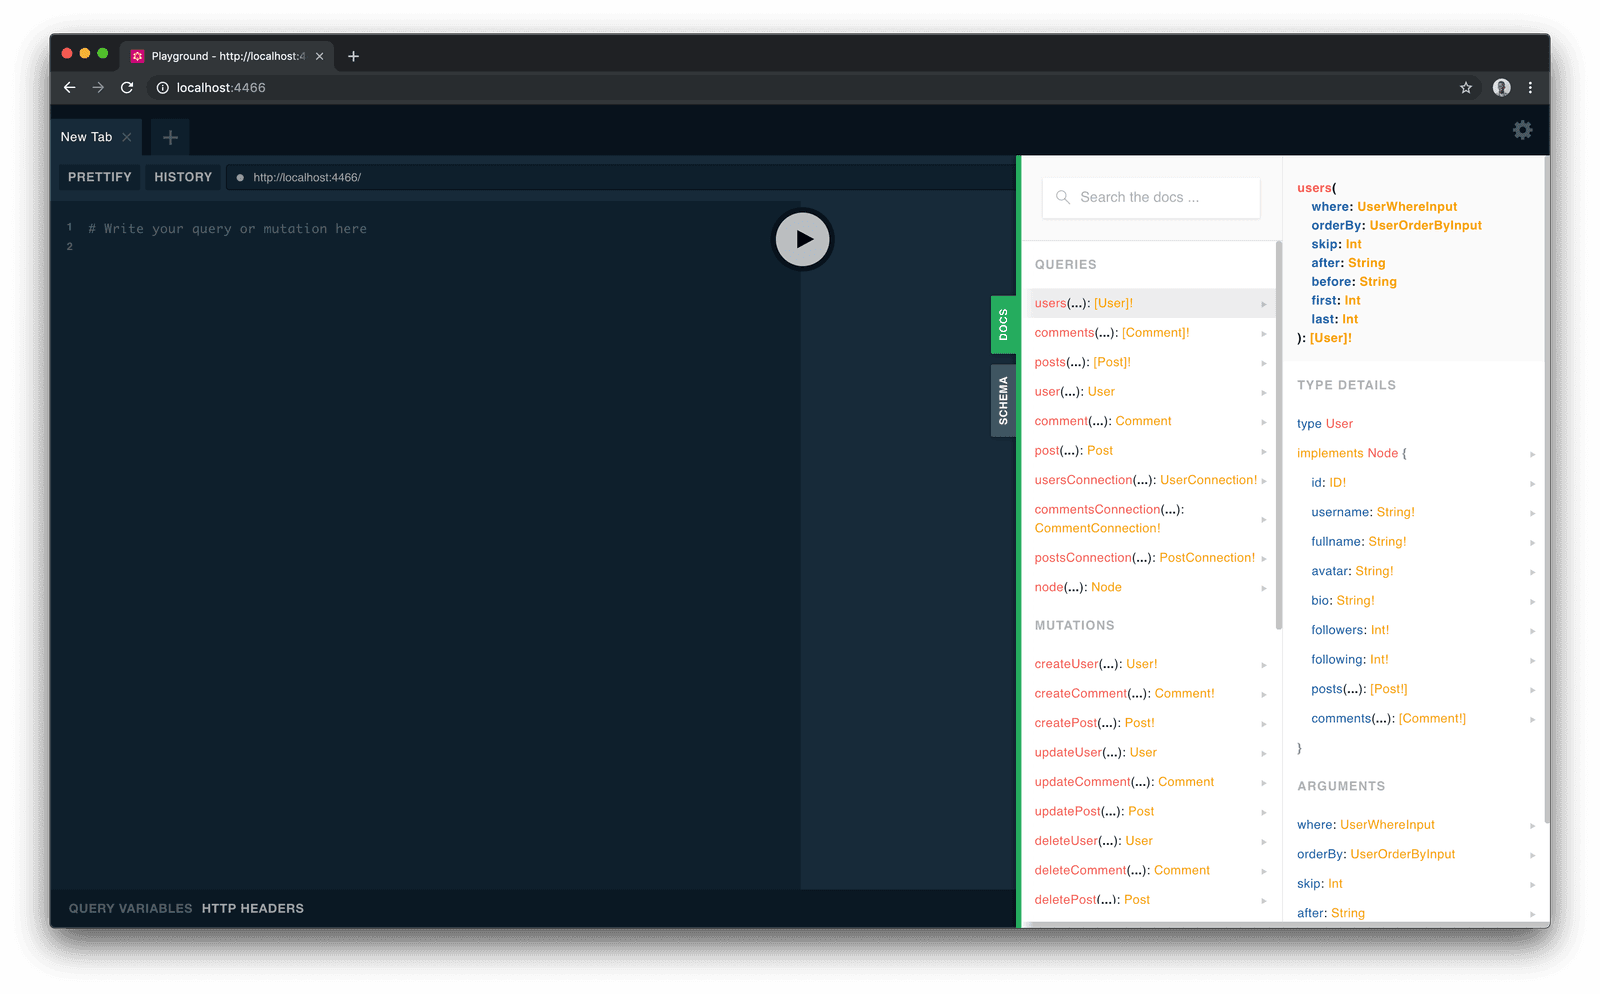
Now with Prisma, all the possible queries and mutations possible on the data model are created automatically after we deployed the service. This means that as we update our data model, the possible queries and mutations on our data are also updated accordingly.
Creating a new user
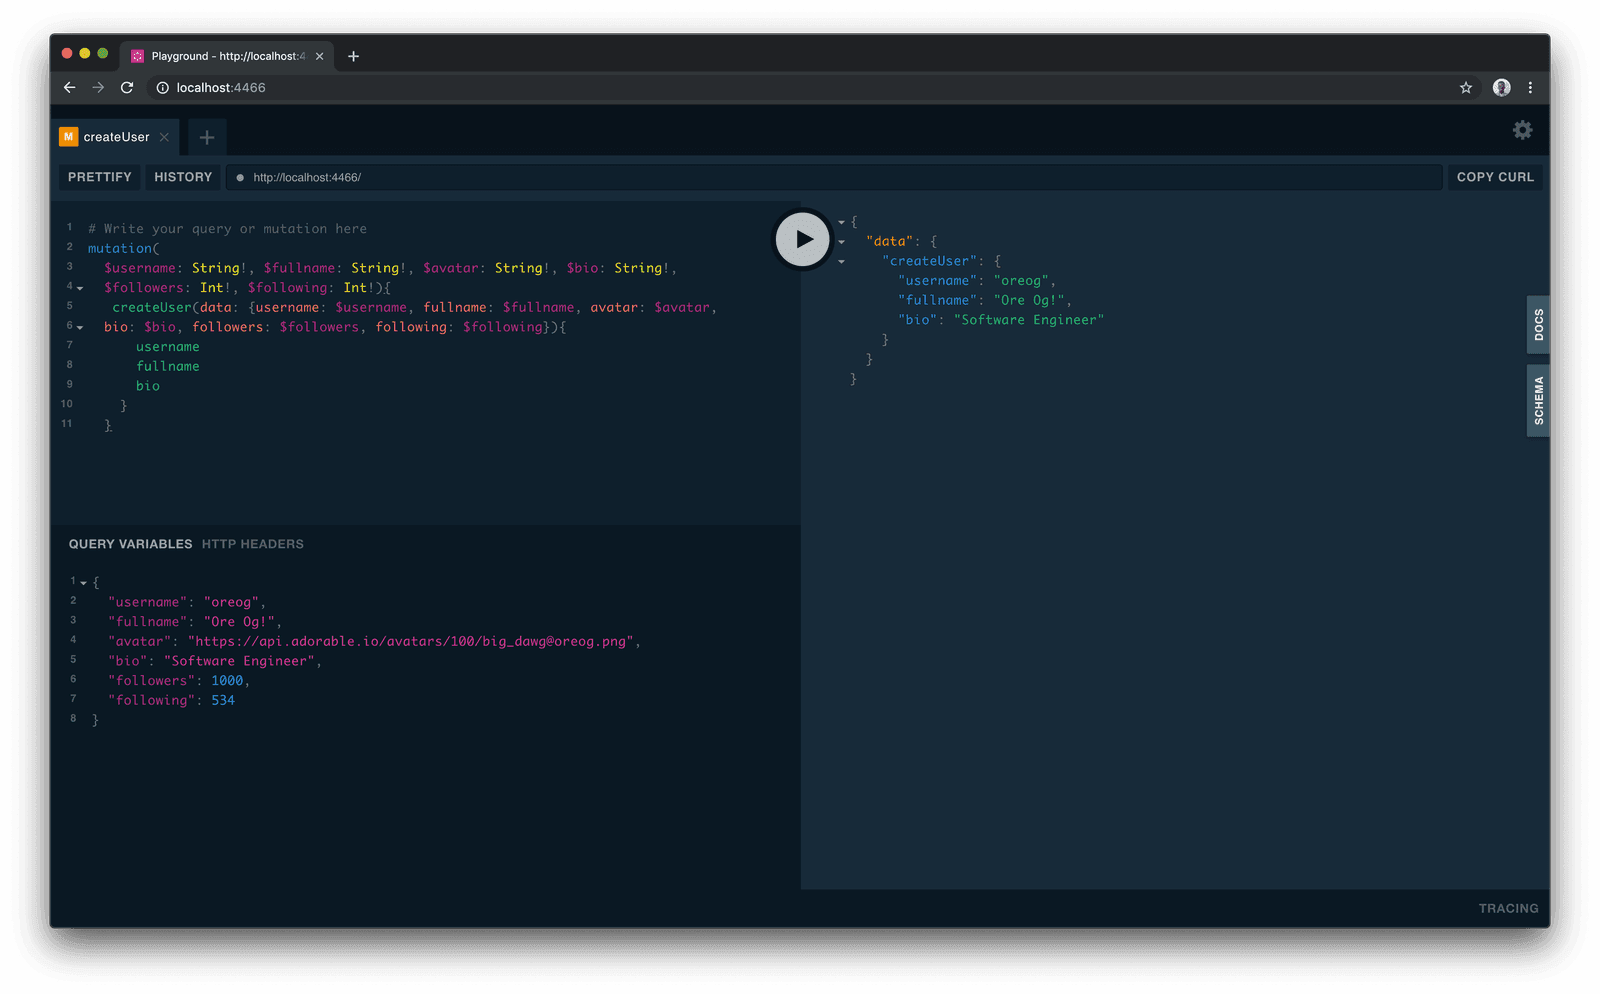
Creating a new user from the playground will look like this:
1mutation( 2 $username: String!, $fullname: String!, $avatar: String!, $bio: String!, 3 $followers: Int!, $following: Int!){ 4 createUser(data: {username: $username, fullname: $fullname, avatar: $avatar, 5 bio: $bio, followers: $followers, following: $following}){ 6 username 7 fullname 8 bio 9 } 10 }
Add the query variables in the bottom left section:
1{ 2 "username": "oreog", 3 "fullname": "Ore Og!", 4 "avatar": "https://api.adorable.io/avatars/100/big_dawg@oreog.png", 5 "bio": "Software Engineer", 6 "followers": 1000, 7 "following": 534 8 }
When you run the mutation, you will have a view that looks like this. With the created user returned on the right side of the view.
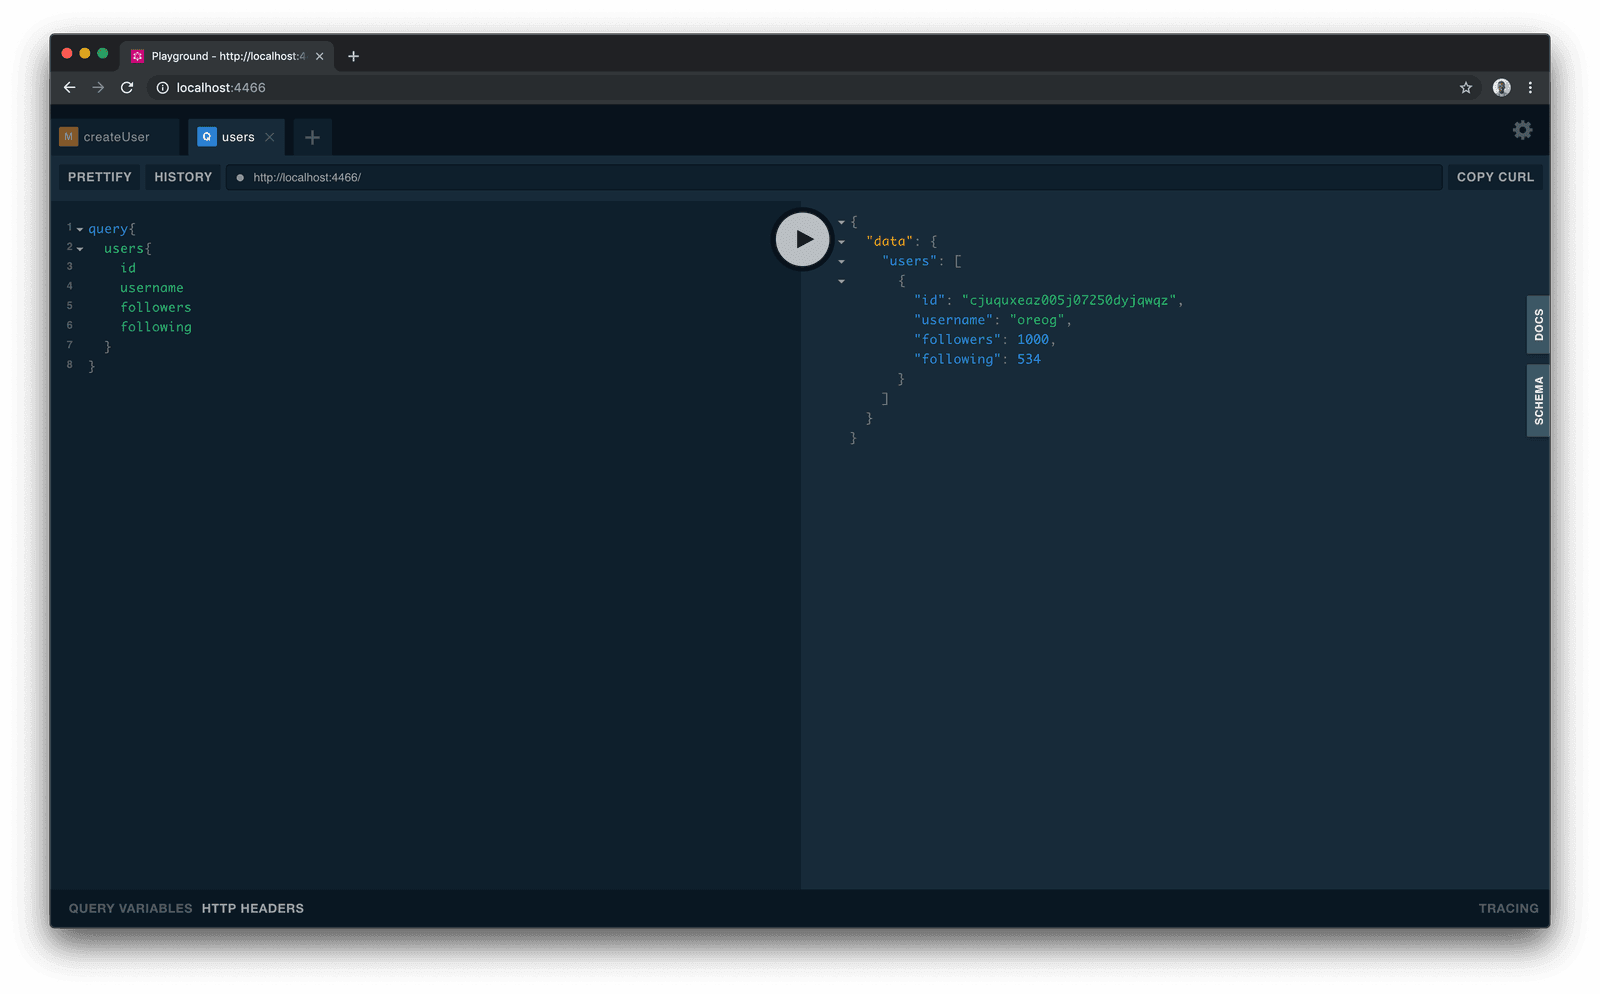
Fetching the list of users
Now, to view the available users, create a query that looks like this:
1query{ 2 users{ 3 id 4 username 5 followers 6 following 7 } 8 }
When the query is run, you get the list of users with the requested information.
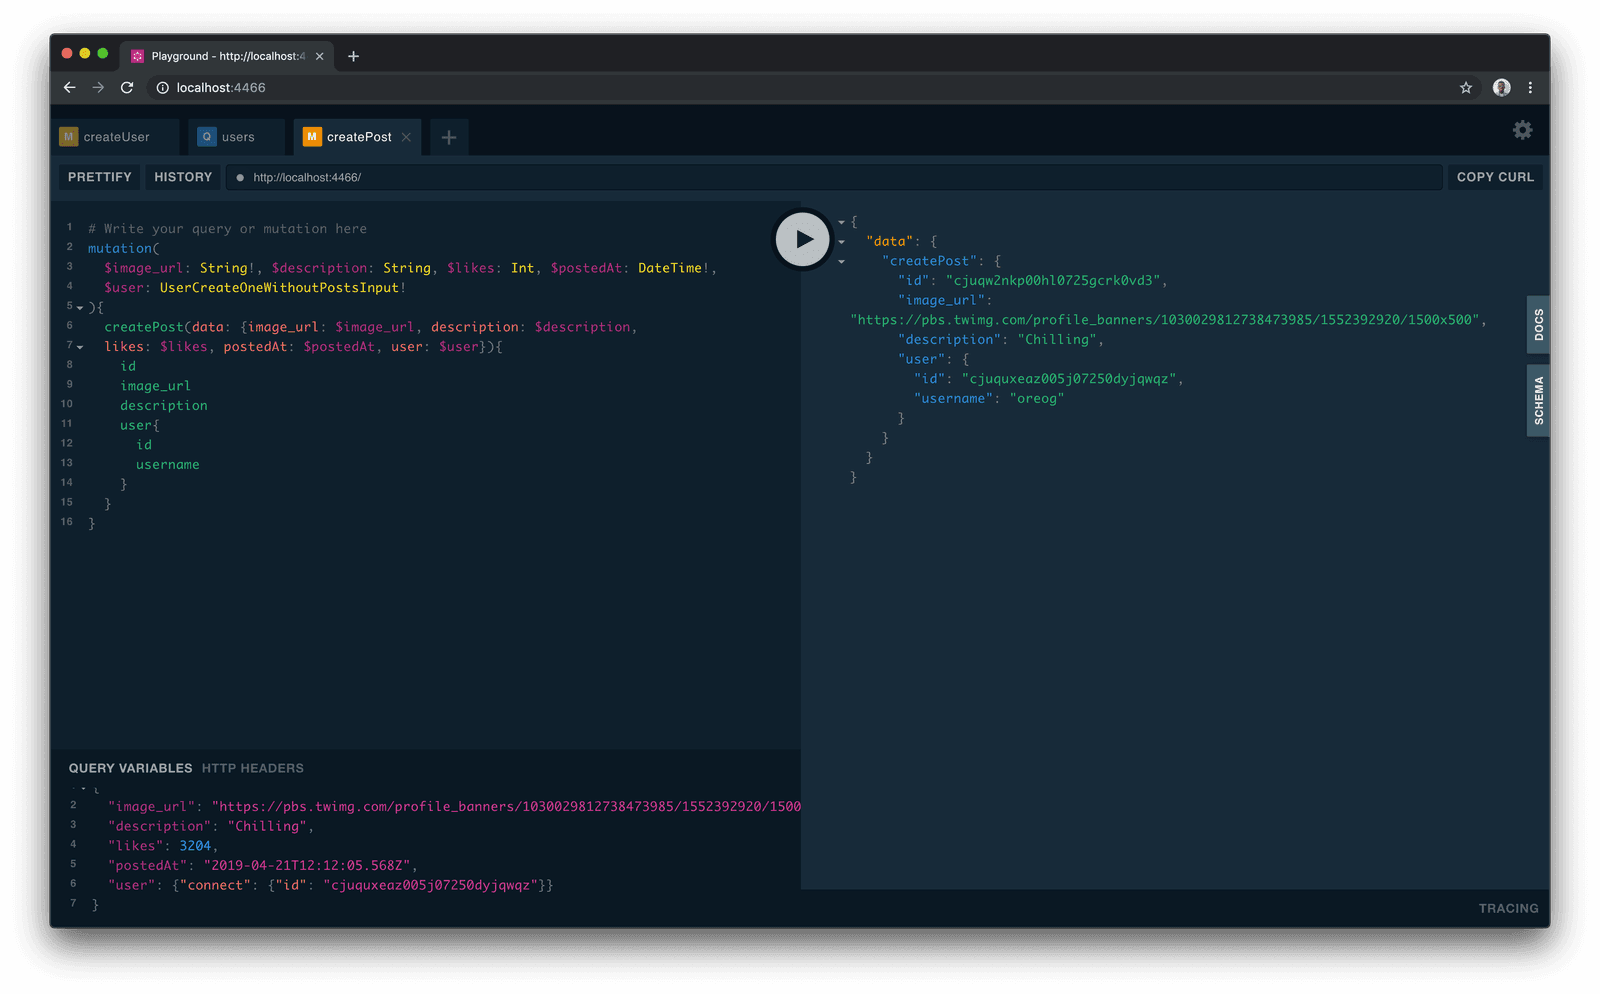
Creating a new post
To create a new post, the mutation will look like this:
1mutation( 2 $image_url: String!, $description: String, $likes: Int, $postedAt: DateTime!, 3 $user: UserCreateOneWithoutPostsInput! 4 ){ 5 createPost(data: {image_url: $image_url, description: $description, 6 likes: $likes, postedAt: $postedAt, user: $user}){ 7 id 8 image_url 9 description 10 user{ 11 id 12 username 13 } 14 } 15 }
Add the query variables to the bottom left of the console. This will specify the content of the post you’re about to create:
1{ 2 "image_url": "https://pbs.twimg.com/media/D4hTNmQWsAADzpo?format=jpg&name=medium", 3 "description": "Hi there", 4 "likes": 1104, 5 "postedAt": "2019-04-21T12:19:05.568Z", 6 "user": {"connect": {"id": "USER_ID_FETCHED_FROM_GRAPHQL_SERVER"}} 7 }
Pick an
idof your choice from the previous query above
Rendering data in our application
Now that we have seen how to create a GraphQL server using Prisma, let’s go ahead to enable our current Ionic application to fetch data dynamically using GraphQL. To do this, we going to make use of Apollo Client. Apollo Client gives developers the ability to bind GraphQL data to their user interface with ease.
We are going to assume that our database has already been populated with some sample data we are going to fetch
Installing the Apollo client
Let’s see how to use this with our application. First install the necessary packages in your ionic-insta-clone project, because Ionic applications are built with Angular, we are going to install packages that allow us to use the Apollo Client in Angular applications:
1cd instagram-ionic 2 3 npm install apollo-angular@1.1.2 apollo-angular-link-http@1.1.1 apollo-client@2.3.8 apollo-cache-inmemory@1.2.7 graphql-tag@2.9.2 graphql@0.13.2 pluralize --save 4 5 npm install apollo-utilities@1.0.22 --no-save 6 npm install typescript@3.0.0 --save-dev
We then need to import the modules in our app.module.ts file:
1// src/app/app.module.ts 2 import { NgModule, ErrorHandler } from '@angular/core'; 3 import { BrowserModule } from '@angular/platform-browser'; 4 import { IonicApp, IonicModule, IonicErrorHandler } from 'ionic-angular'; 5 import { MyApp } from './app.component'; 6 7 // import modules for apollo client 8 import {HttpClientModule} from '@angular/common/http'; 9 import {ApolloModule, Apollo} from 'apollo-angular'; 10 import {HttpLinkModule, HttpLink} from 'apollo-angular-link-http'; 11 import {InMemoryCache} from 'apollo-cache-inmemory'; 12 13 // import other pages 14 [...] 15 16 @NgModule({ 17 declarations: [...], 18 imports: [ 19 HttpClientModule, 20 ApolloModule, 21 HttpLinkModule, 22 BrowserModule, 23 IonicModule.forRoot(MyApp) 24 ], 25 // other app specifications 26 }) 27 export class AppModule {}
Configuring the Apollo client
In the app.module.ts file, we then go ahead to inject Apollo into our application like this:
1// src/app/app.module.ts 2 import {HttpClientModule} from '@angular/common/http'; 3 import {ApolloModule, Apollo} from 'apollo-angular'; 4 import {HttpLinkModule, HttpLink} from 'apollo-angular-link-http'; 5 import {InMemoryCache} from 'apollo-cache-inmemory'; 6 // other application imports 7 [...] 8 9 export class AppModule { 10 constructor(apollo: Apollo, httpLink: HttpLink){ 11 apollo.create({ 12 link: httpLink.create({uri: 'http://localhost:4466'}), 13 // uri specifies the endpoint for our graphql server 14 cache: new InMemoryCache() 15 }) 16 } 17 }
To avoid an error when your application is being compiled, add the following to your tsconfig.json:
1// tsconfig.json 2 { 3 "compilerOptions": { 4 // other options 5 "lib": [ 6 "esnext.asynciterable" 7 ] 8 // other options 9 } 10 // other options 11 }
Now that we have the client fully configured, let’s get to using it to fetch and render data to the user.
Fetching and rendering posts on home page
Let’s head over to the homepage to see how we can achieve this. In your home.ts file, import the Apollo client and then create a query to fetch the post as follows:
1// src/pages/home/home.ts 2 import { Component, OnInit } from '@angular/core'; 3 import { NavController, NavParams } from 'ionic-angular'; 4 import { ProfilePage } from '../profile/profile'; 5 import { CommentPage } from '../comment/comment'; 6 import gql from 'graphql-tag'; 7 import { Apollo } from 'apollo-angular'; 8 9 @Component({ 10 selector: 'page-home', 11 templateUrl: 'home.html', 12 entryComponents: [ProfilePage, CommentPage] 13 }) 14 15 export class HomePage implements OnInit { 16 posts: any; 17 18 constructor(public navCtrl: NavController, private apollo: Apollo) { 19 } 20 21 ngOnInit(){ 22 this.fetchPosts(); 23 } 24 25 fetchPosts() { 26 this.apollo 27 .query({ 28 query: gql` 29 { 30 posts { 31 image_url 32 description 33 likes 34 user { 35 id 36 username 37 avatar 38 } 39 comments { 40 id 41 } 42 } 43 } 44 ` 45 }) 46 .subscribe(({ data }) => { 47 let inner_posts: any = data; 48 this.posts = inner_posts.posts; 49 }); 50 } 51 52 [...] 53 }
Afterward, we then go ahead to the home.html and then render the posts on the homepage as follows:
1<!-- src/pages/home/home.html --> 2 <ion-header> 3 <ion-navbar> 4 <ion-title>Instagram Clone</ion-title> 5 </ion-navbar> 6 </ion-header> 7 8 <ion-content> 9 <!-- this is where the posts will be --> 10 <div *ngFor="let post of posts"> 11 <ion-card class="single-post-home"> 12 <ion-item (click)="toProfilePage(post.user.id)"> 13 <ion-avatar item-start> 14 <img [src]="post.user.avatar"> 15 </ion-avatar> 16 <h2>{{post.user.username}}</h2> 17 </ion-item> 18 19 <img [src]="post.image_url"> 20 21 <ion-card-content> 22 <p><strong>{{post.user.username}}</strong> {{post.description}}</p> 23 </ion-card-content> 24 25 <ion-row> 26 <ion-col> 27 <button ion-button icon-start clear small (click)="likePost()"> 28 <ion-icon name="heart"></ion-icon> 29 <div>{{post.likes}} likes</div> 30 </button> 31 </ion-col> 32 <ion-col> 33 <button ion-button icon-start clear small (click)="toCommentSection()"> 34 <ion-icon name="text"></ion-icon> 35 <div>{{post.comments.length}} Comments</div> 36 </button> 37 </ion-col> 38 </ion-row> 39 40 </ion-card> 41 </div> 42 43 <ion-fab bottom right> 44 <button ion-fab mini><ion-icon name="add"></ion-icon></button> 45 </ion-fab> 46 </ion-content>
Now, we also need to update the toProfilePage() function, in our home.ts file to take us to the profile page.
1// src/pages/home/home.ts 2 3 [...] 4 5 export class HomePage implements OnInit { 6 [...] 7 8 public toProfilePage(user_id: string) { 9 let nav_params = new NavParams({ id: user_id }); 10 this.navCtrl.push(ProfilePage, nav_params); 11 } 12 13 [...] 14 }
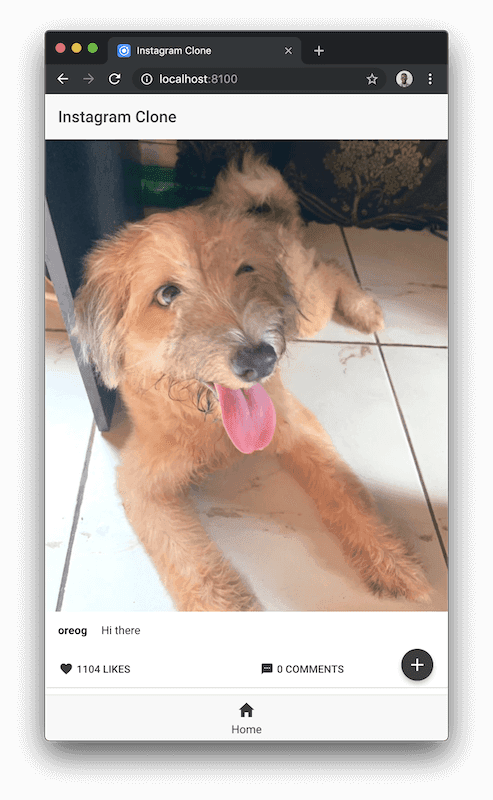
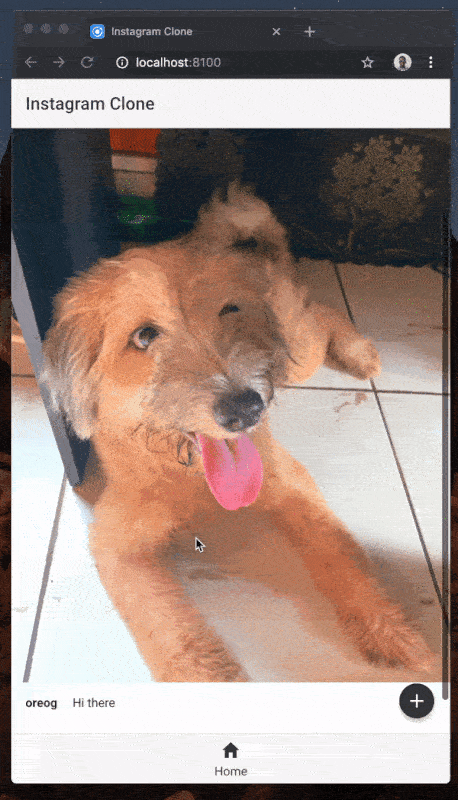
We created a navigation parameter object with the user_id passed to the next page. Now, when we run the application:
ionic serve
we have the following view:
Fetching and rendering data on the profile page
When the username or avatar is clicked, we want to navigate to the user’s profile page. Now, the profile.ts page is also updated to fetch the users information from the GraphQL server and display it. Update the file as follows:
1// src/pages/profile/profile.ts 2 3 import { Component, OnInit } from '@angular/core'; 4 import { IonicPage, NavController, NavParams } from 'ionic-angular'; 5 import { Apollo } from 'apollo-angular'; 6 import gql from 'graphql-tag'; 7 import pluralize from 'pluralize'; 8 9 @IonicPage() 10 @Component({ 11 selector: 'page-profile', 12 templateUrl: 'profile.html', 13 }) 14 15 export class ProfilePage implements OnInit { 16 user: any; 17 18 constructor(public navCtrl: NavController, public navParams: NavParams, private apollo: Apollo) { 19 } 20 21 ngOnInit(){ 22 this.fetchProfile( this.navParams.get('id')); 23 } 24 25 26 fetchProfile(user_id: string){ 27 this.apollo 28 .query({ 29 query: gql` 30 { 31 user(where: {id: "${user_id}"}){ 32 id 33 username 34 fullname 35 avatar 36 bio 37 followers 38 following 39 posts{ 40 image_url 41 } 42 } 43 } 44 `, 45 }) 46 .subscribe(({ data }) => { 47 let result:any = data; 48 this.user = result.user; 49 }); 50 } 51 52 plural(word, number){ 53 return pluralize(word, number); 54 } 55 }
After the page is created, the Apollo Client makes a query to fetch the user profile using the user_id and then assigns the results to the user property of the Profile page class.
Next, update the profile.html to render the user’s data:
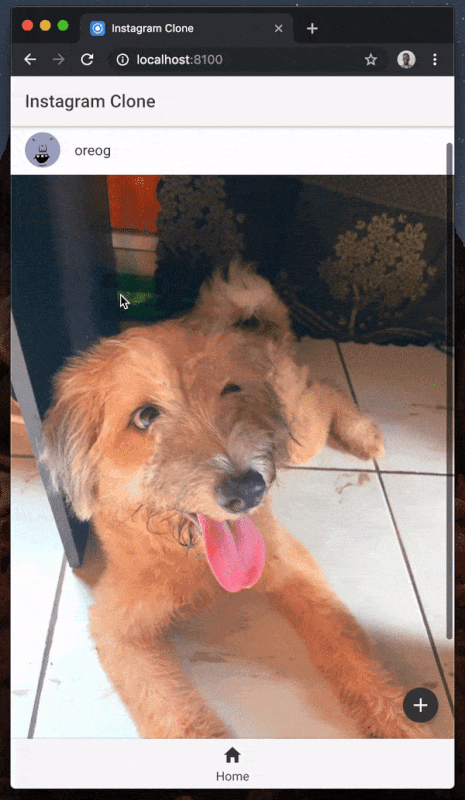
1<!-- src/pages/profile/profile.html --> 2 <ion-header> 3 4 <ion-navbar> 5 <ion-title>{{user?.username}}</ion-title> 6 </ion-navbar> 7 8 </ion-header> 9 10 11 <ion-content> 12 <!-- first set should be a row --> 13 <ion-grid class="profile-intro"> 14 <ion-row> 15 <ion-col col-4> 16 <img class="profile-photo" [src]="user?.avatar"> 17 </ion-col> 18 <ion-col col-8> 19 <div class="profile-info"> 20 <div class="post-count info-square"> 21 <p> 22 <strong>{{ user?.posts.length }}</strong><br> 23 <em>{{ this.plural('post', user?.posts.length) }}</em> 24 </p> 25 </div> 26 <div class="follower-count info-square"> 27 <p> 28 <strong>{{ user?.followers }}</strong><br> 29 <em>{{ this.plural('follower', user?.followers) }}</em> 30 </p> 31 </div> 32 <div class="following-count info-square"> 33 <p> 34 <strong>{{ user?.following }}</strong><br> 35 <em>following</em> 36 </p> 37 </div> 38 </div> 39 <div> 40 <button ion-button class="follow-button">Follow</button> 41 </div> 42 </ion-col> 43 </ion-row> 44 </ion-grid> 45 46 <div class="more-details"> 47 <p class="user-name"><strong>{{ user?.fullname }}</strong></p> 48 <p class="user-bio">{{ user?.bio }}</p> 49 </div> 50 51 <ion-segment color="primary"> 52 <ion-segment-button value="posts" selected> 53 <ion-icon name="grid"></ion-icon> 54 </ion-segment-button> 55 <ion-segment-button value="tagged"> 56 <ion-icon name="contacts"></ion-icon> 57 </ion-segment-button> 58 <ion-segment-button value="bookmark"> 59 <ion-icon name="bookmark"></ion-icon> 60 </ion-segment-button> 61 </ion-segment> 62 63 <ion-grid class="image-grid"> 64 <ion-row class="single-row"> 65 <ion-col *ngFor = "let post of user?.posts" col-4 class="single-image"> 66 <img width="100%" height="100%" [src]="post.image_url"> 67 </ion-col> 68 </ion-row> 69 </ion-grid> 70 </ion-content>
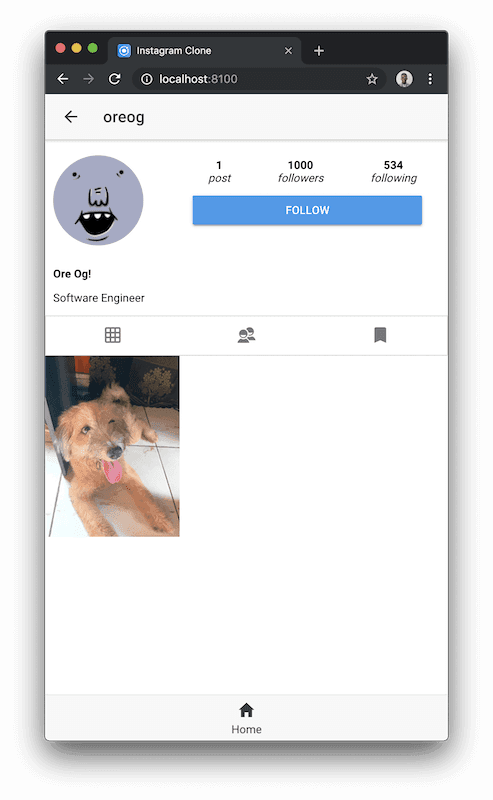
Now, make sure your server is running and then visit the browser at http://locahost:8100 - where ionic is serving your application at. You should get a view that looks like this:
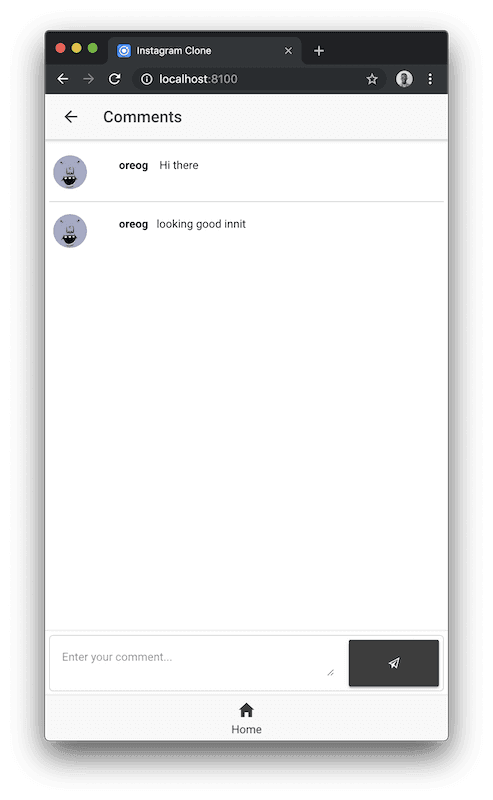
Fetching and rendering and creating comments on the comments page
Finally, let’s consider how we handle comments in our application dynamically. In the home.html let’s update the comment button to send the user to view the post comments:
1<!-- src/pages/home/home.html --> 2 3 [...] 4 <ion-col> 5 <button ion-button icon-start clear small (click)="toCommentSection(post)"> 6 <ion-icon name="text"></ion-icon> 7 <div>{{post.comments.length}} Comments</div> 8 </button> 9 </ion-col> 10 [...]
And then update the toCommentSection() function in the home.ts to pass the post as a parameter to the Comments page:
1// src/pages/home/home.ts 2 3 [...] 4 public toCommentSection(post_data: any) { 5 let nav_params = new NavParams({ post: post_data }); 6 this.navCtrl.push(CommentPage, nav_params); 7 } 8 [...]
Now, in the comment.ts, we import the Apollo client that was configured earlier and fetch the comments for the selected post:
1// src/pages/comment/comment.ts 2 3 import { Component } from '@angular/core'; 4 import { IonicPage, NavController, NavParams } from 'ionic-angular'; 5 import { Apollo } from 'apollo-angular'; 6 import gql from 'graphql-tag'; 7 8 @IonicPage() 9 @Component({ 10 selector: 'page-comment', 11 templateUrl: 'comment.html' 12 }) 13 14 export class CommentPage { 15 comments: any; 16 username: string; 17 post_desc: string; 18 user_avatar: string; 19 20 constructor( 21 public navCtrl: NavController, 22 public navParams: NavParams, 23 private apollo: Apollo 24 ) { 25 this.username = this.navParams.get('username'); 26 this.user_avatar = this.navParams.get('avatar'); 27 this.post_desc = this.navParams.get('post_desc'); 28 this.loadComments(this.navParams.get('post_id')); 29 } 30 31 loadComments(post_id: string) { 32 this.apollo 33 .query({ 34 query: gql` 35 { 36 comments(where: { post: { id: "${post_id}" } }) { 37 id 38 message 39 user { 40 avatar 41 username 42 } 43 } 44 } 45 ` 46 }) 47 .subscribe(({ data }) => { 48 let result: any = data; 49 this.comments = result.comments; 50 }); 51 } 52 }
Afterwards, we update the comment.html to show the users, comments as follows:
1<!-- src/pages/comment/comment.html --> 2 <ion-header> 3 <ion-navbar> 4 <ion-title>Comments</ion-title> 5 </ion-navbar> 6 </ion-header> 7 8 <ion-content> 9 <ion-grid> 10 <ion-row class="post-content"> 11 <ion-col col-2> 12 <ion-avatar item-start> 13 <img class="icon-photo" [src]="user_avatar"> 14 </ion-avatar> 15 </ion-col> 16 <ion-col col-10> 17 <div> 18 <p> 19 <strong>{{username}}</strong> {{post_desc}} 20 </p> 21 </div> 22 </ion-col> 23 </ion-row> 24 25 <ion-row *ngFor="let comment of comments" class="user-comments"> 26 <ion-col col-2> 27 <ion-avatar item-start> 28 <img class="icon-photo" [src]="comment.user.avatar"> 29 </ion-avatar> 30 </ion-col> 31 <ion-col col-10> 32 <div> 33 <p> 34 <strong>{{comment.user.username}}</strong> {{ comment.message }} 35 </p> 36 </div> 37 </ion-col> 38 </ion-row> 39 </ion-grid> 40 </ion-content> 41 42 <ion-footer> 43 <ion-grid> 44 <ion-row class="comment-area"> 45 <ion-col col-9> 46 <ion-textarea placeholder="Enter your comment..."></ion-textarea> 47 </ion-col> 48 <ion-col col-3> 49 <button ion-button class="comment-button"> 50 <ion-icon name="paper-plane"></ion-icon> 51 </button> 52 </ion-col> 53 </ion-row> 54 </ion-grid> 55 </ion-footer>
Conclusion
In this part of this series, we examined how to connect our application with some dynamic data using Prisma to generate a GraphQL API and Apollo Client to interact with our GraphQL API seamlessly only requesting data that we need to render. In the next part, we will examine how to add this data from the interface and integrate realtime functionality to the application. Here’s a link to the full GitHub repository for more reference.


© 2026 Pusher Ltd. All rights reserved.
Pusher Limited is a company registered in England and Wales (No. 07489873) whose registered office is at MessageBird UK Limited, 3 More London Riverside, 4th Floor, London, United Kingdom, SE1 2AQ.