- Products

- Developers
- User stories
- Blog
- Pricing

Build a comment voting system with React and Node
Introduction
In this tutorial, we’ll be integrating Channels’ capabilities into a comment system built with React. If you want to look at the complete code used for this tutorial, you can find it in this GitHub repository.
To make the comments section of a website more engaging, and so that readers can find the most useful or interesting comments, many comments software include voting capabilities that allow the best comments rise to the top while the irrelevant ones sink to the bottom.
The problem with many of them is that they are not updated in realtime. Some even require a page refresh before you can see the latest comments and votes. But with Pusher Channels, we can build a comment system that can be updated in realtime across all connected clients without requiring a refresh.
Prerequisites
Make sure you have Node.js (version 6 or later) and npm installed on your computer. Otherwise, you can install Node and npm by following the instructions on this page. You also need to have a basic experience with building React and Node.js applications as I will not be explaining the basics of React and Node in this tutorial.
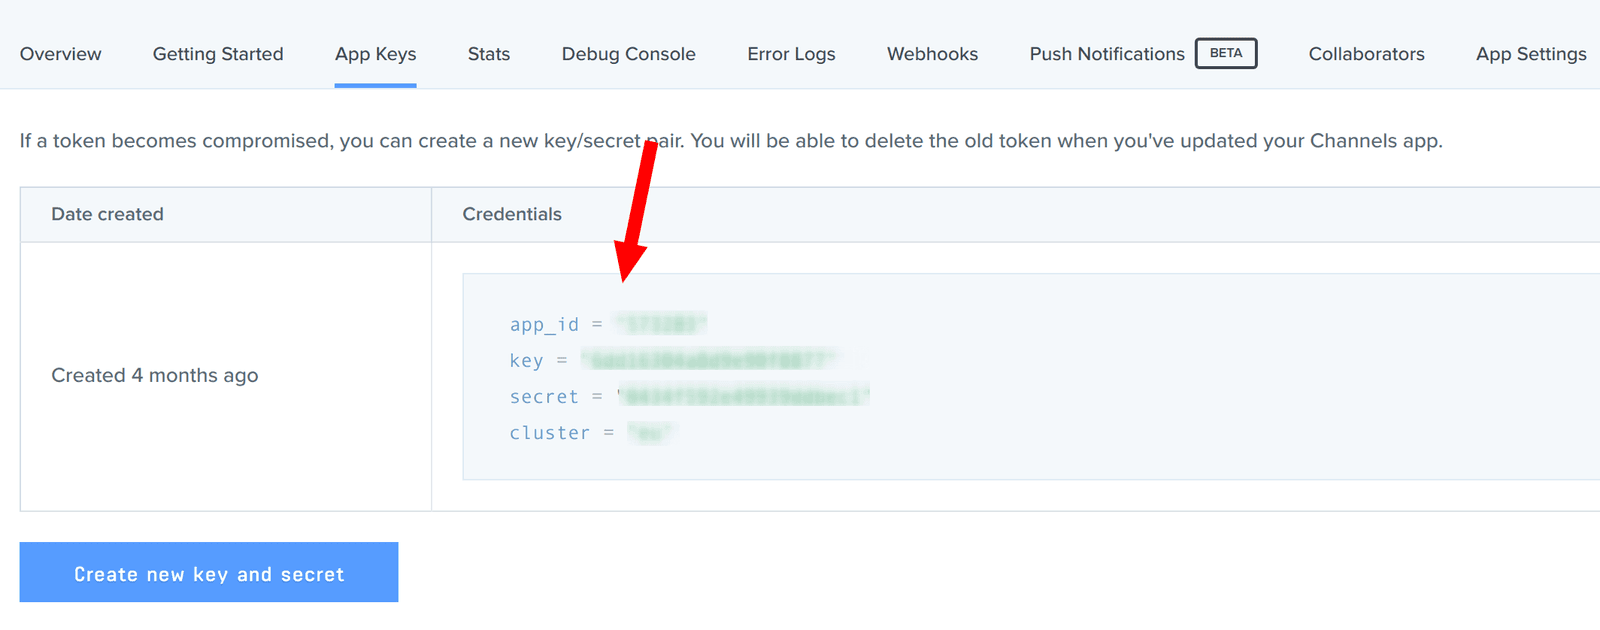
Sign up for Pusher Channels
Head over to the Pusher website and sign up for a free account. Select Channels apps on the sidebar, and hit Create Channels app to create a new app. Once your app is created, navigate to the API Keys tab and take note of your app credentials as we’ll be using them in the next section.
Set up the server
Create a new project folder in your filesystem. You can call it realtime-comments or something like that. Next, launch the terminal on your machine, cd into your project folder and run npm init -y to initialize the project with a package.json file.
Next, run the command below to install all the dependencies we’ll be making use of on the server side:
npm install express body-parser cors dotenv nedb pusher --save
Here’s what each package does:
- express: A minimal and flexible Node.js server.
- nedb: In memory database for Node.js.
- body-parser: Express middleware for parsing incoming request bodies.
- dotenv: Loads environmental variables from
.envfile intoprocess.env. - pusher: Node.js SDK for Pusher Channels.
- cors: For enabling CORS requests
After the installation is complete, create a new .env file at the root of your project directory, and structure it as follows:
1// .env 2 3 PORT=5000 4 PUSHER_APP_ID=<your app id> 5 PUSHER_APP_KEY=<your app key> 6 PUSHER_APP_SECRET=<your app secret> 7 PUSHER_APP_CLUSTER=<your app cluster>
Hardcoding credentials in your code is a bad practice so we’re going to use the dotenv package to load the app’s credentials from the .env file and make them available on process.env. You should not include this file in your source control system.
Go ahead and create the server entry file server.js in the root of your project directory. This file is where we’ll set up our Node server, routing and in-memory database for saving comments and votes. We’ll also trigger Channels events when a new comment or vote is made so that our app frontend can be updated promptly.
Open up server.js in your text editor and paste in the following code:
1// server.js 2 3 require('dotenv').config({ path: '.env' }); 4 5 const express = require('express'); 6 const bodyParser = require('body-parser'); 7 const cors = require('cors'); 8 const Pusher = require('pusher'); 9 const Datastore = require('nedb'); 10 11 const app = express(); 12 13 const db = new Datastore(); 14 15 const pusher = new Pusher({ 16 appId: process.env.PUSHER_APP_ID, 17 key: process.env.PUSHER_APP_KEY, 18 secret: process.env.PUSHER_APP_SECRET, 19 cluster: process.env.PUSHER_APP_CLUSTER, 20 useTLS: true, 21 }); 22 23 app.use(cors()); 24 app.use(bodyParser.urlencoded({ extended: false })); 25 app.use(bodyParser.json()); 26 27 app.set('port', process.env.PORT || 5000); 28 const server = app.listen(app.get('port'), () => { 29 console.log(`Express running → PORT ${server.address().port}`); 30 });
The above code creates a simple Node server that runs on port 5000. We’re not doing much yet. We’ll need to create some routes to handle when a new comment is made or when a comment is voted on so that we can trigger events.
Let’s add a route that sends all existing comments to the client on load:
1// server.js 2 ... 3 4 app.use(bodyParser.json()); 5 6 app.get('/', (req, res) => { 7 db.find({}, (err, data) => { 8 if (err) return res.status(500).send(err); 9 10 res.json(data); 11 }); 12 }); 13 14 ...
Next, add a route that receives a comment from the client, saves it to the in-memory database and triggers a new Channels event.
1// server.js 2 ... 3 4 app.get('/', (req, res) => { 5 db.find({}, (err, data) => { 6 if (err) return res.status(500).send(err); 7 8 res.json(data); 9 }); 10 }); 11 12 app.post('/comment', (req, res) => { 13 db.insert(Object.assign({}, req.body), (err, newComment) => { 14 if (err) { 15 return res.status(500).send(err); 16 } 17 18 pusher.trigger('comments', 'new-comment', { 19 comment: newComment, 20 }); 21 22 res.status(200).send('OK'); 23 }); 24 }); 25 26 ...
With Channels, all we need to do to trigger an update on our app frontend is to use the trigger method on the pusher instance that we have created. Here, we’re triggering an event named new-comment to Channels on a channel called comments, and passing the new comment in the event payload.
For the client to receive an update, it needs to subscribe to the comments channel first. I’ll show you how to set this up in the next section.
Before you continue, install the nodemon package globally, so that you don’t have to restart your server manually whenever your code changes:
npm install -g nodemon
Run the command below to start the server with nodemon:
nodemon server.js
Set up the application frontend
Let’s use the create-react-app package to bootstrap our React application. You can install it on your machine by running npm install -g create-react-app in the terminal.
Once the installation is done, run the command below to setup the React app:
create-react-app client
Next, cd into the newly created client directory and install the other dependencies which we’ll be needing for the application frontend:
npm install pusher-js axios --save
Finally, start the development server by running npm start from within the root of the client directory and navigate to http://localhost:3000 in your browser.
Add the styles for the app
Within the client directory, open up src/App.css and change its contents to look like this:
1// client/src/App.css 2 3 .App { 4 width: 100%; 5 max-width: 600px; 6 margin: 0 auto; 7 } 8 9 .post { 10 text-align: center; 11 } 12 13 label { 14 display: block; 15 margin-bottom: 10px; 16 font-weight: bold; 17 } 18 19 input, textarea { 20 width: 100%; 21 margin-bottom: 20px; 22 border: 1px solid #dedede; 23 padding: 10px; 24 } 25 26 button { 27 display: inline-block; 28 height: 38px; 29 padding: 0 30px; 30 color: white; 31 text-align: center; 32 font-size: 11px; 33 font-weight: 700; 34 line-height: 38px; 35 letter-spacing: .1rem; 36 text-transform: uppercase; 37 text-decoration: none; 38 white-space: nowrap; 39 border-radius: 2px; 40 background-color: #331550; 41 border: 1px solid #331550; 42 cursor: pointer; 43 box-sizing: border-box; 44 } 45 46 .comment { 47 padding-top: 20px; 48 padding-bottom: 20px; 49 border-bottom: 1px solid #ccc; 50 } 51 52 .voting { 53 display: flex; 54 justify-content: space-between; 55 align-content: center; 56 } 57 58 .upvote { 59 background-color: #073525; 60 border: 1px solid #073525; 61 margin-right: 10px; 62 } 63 64 .downvote { 65 background-color: #FF0026; 66 border: 1px solid #FF0026; 67 }
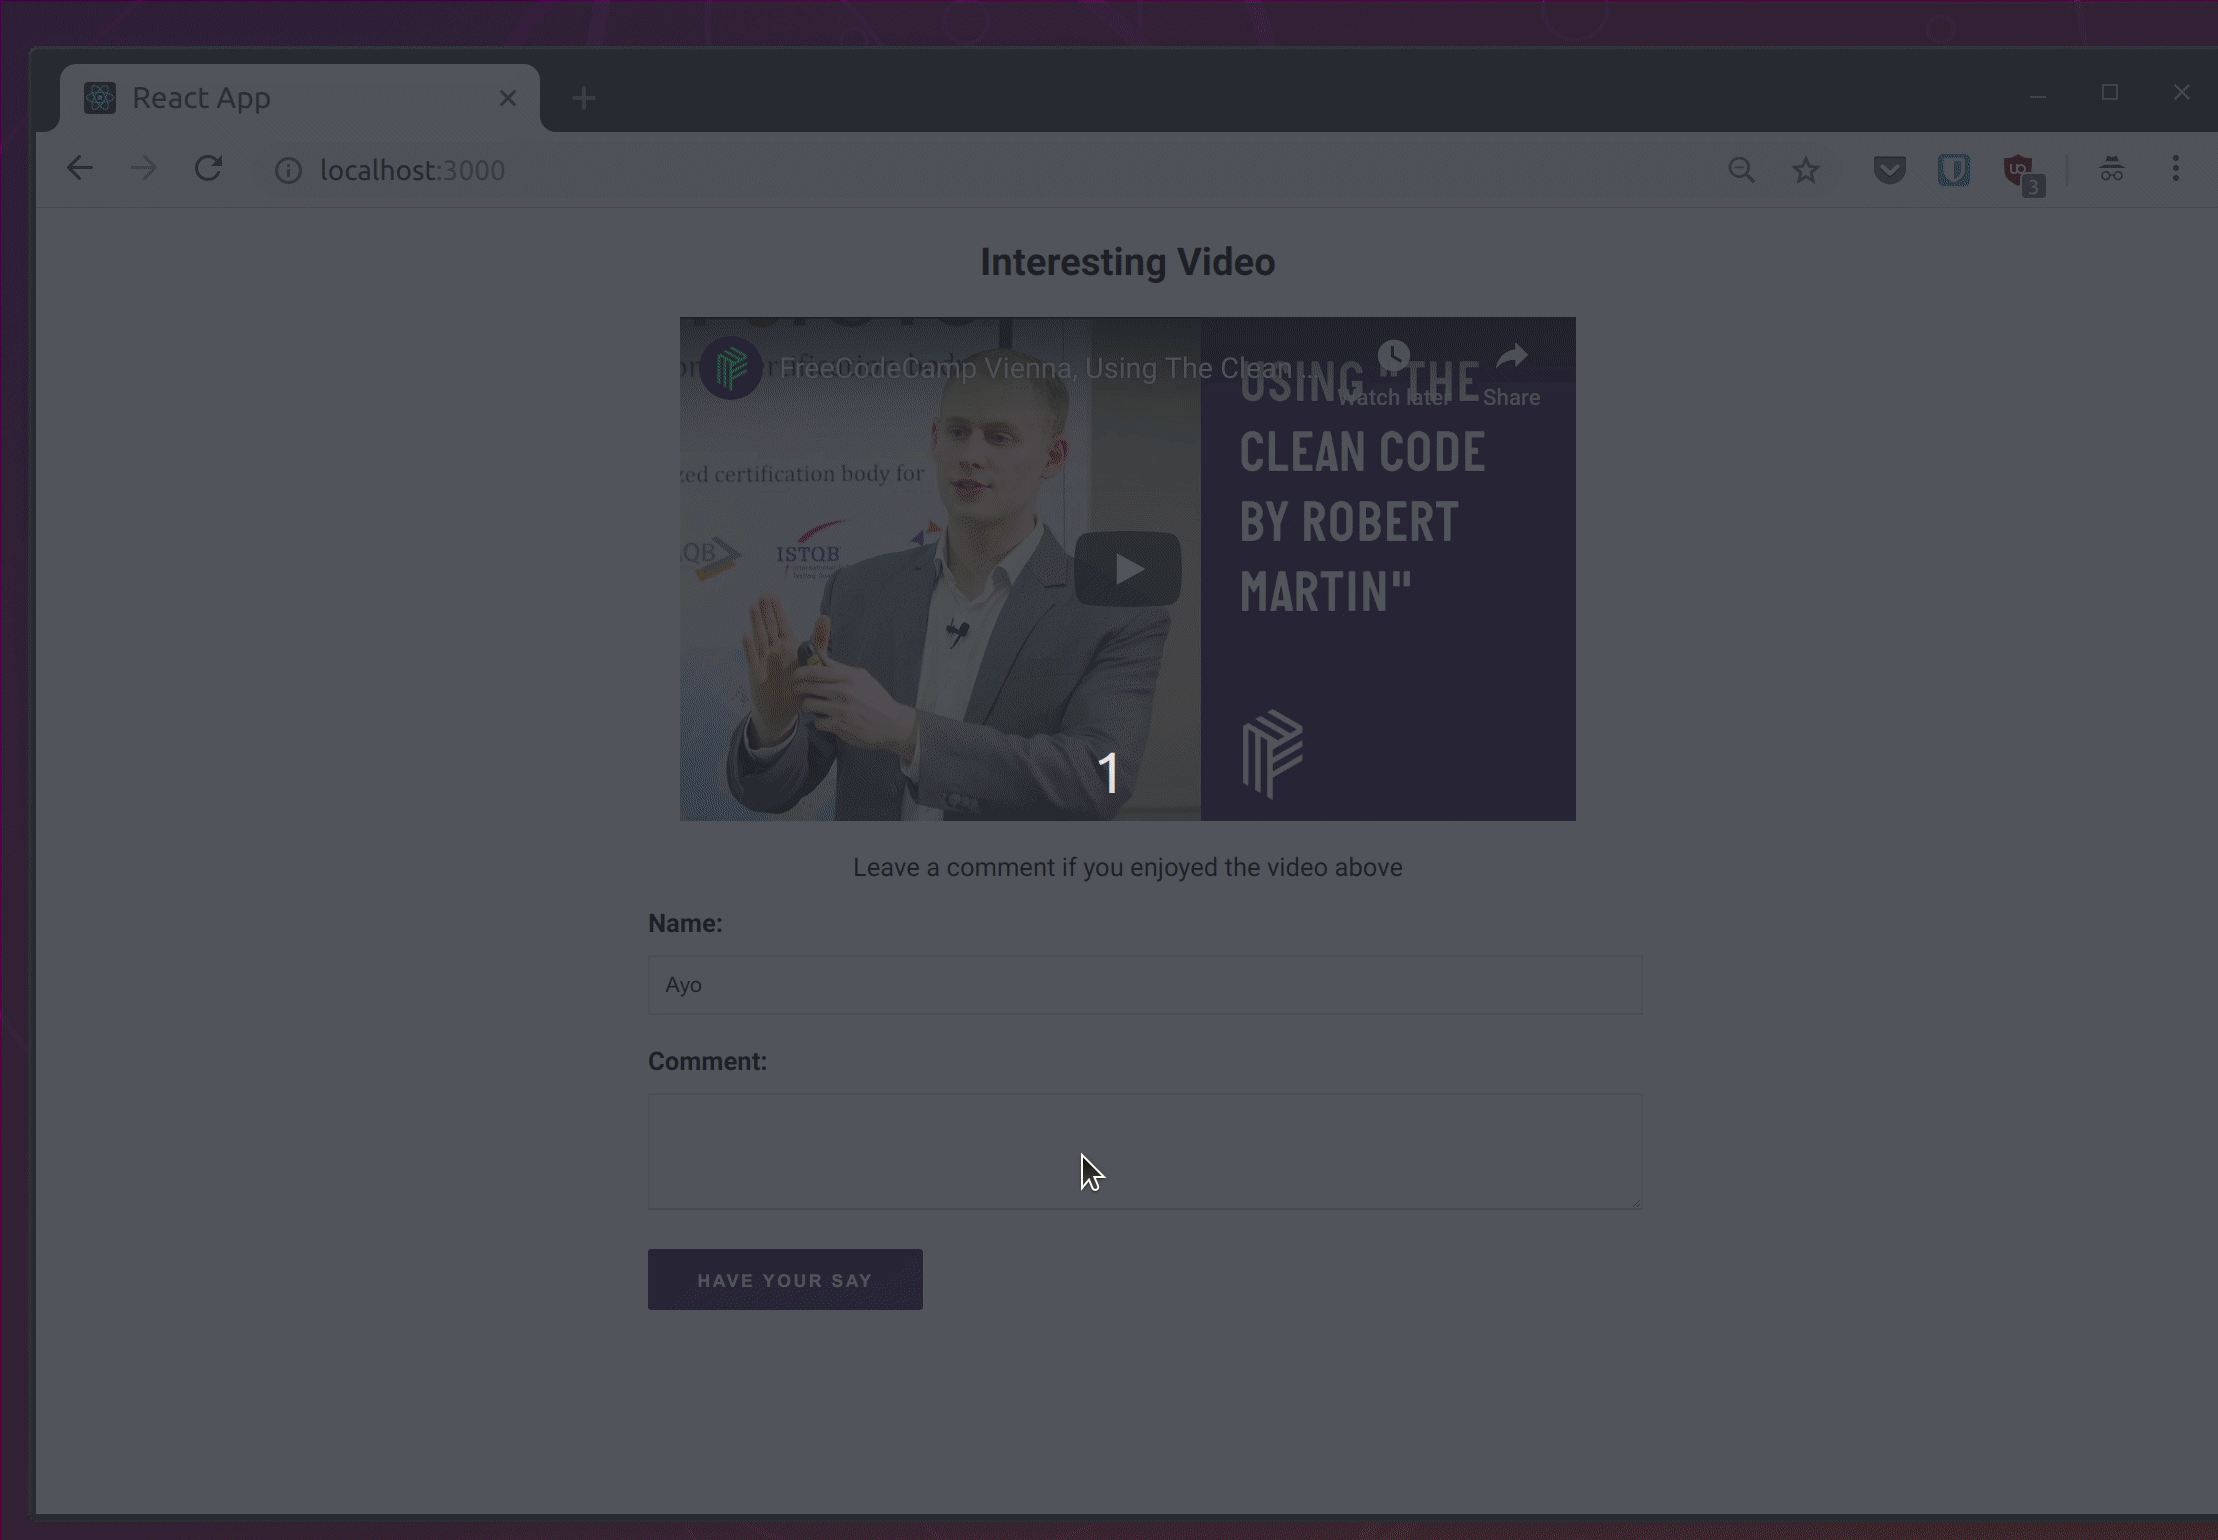
Post comments and display them in realtime
Open up client/src/App.js in your text editor and change its contents to look like this:
1// client/src/App.js 2 3 import React, { Component } from 'react'; 4 import Pusher from 'pusher-js'; 5 import axios from 'axios'; 6 import './App.css'; 7 8 class App extends Component { 9 state = { 10 username: '', 11 newComment: '', 12 comments: [], 13 }; 14 15 updateInput = event => { 16 const { name, value } = event.target; 17 this.setState({ 18 [name]: value, 19 }); 20 }; 21 22 postComment = event => { 23 event.preventDefault(); 24 const { username, newComment } = this.state; 25 if (username.trim() === '' || newComment.trim() === '') return; 26 27 const data = { 28 name: username, 29 text: newComment, 30 votes: 0, 31 }; 32 33 axios 34 .post('http://localhost:5000/comment', data) 35 .then(() => { 36 this.setState({ 37 username: '', 38 newComment: '', 39 }); 40 }) 41 .catch(error => console.log(error)); 42 }; 43 44 componentDidMount() { 45 const pusher = new Pusher('<your app key>', { 46 cluster: '<your app cluster>', 47 encrypted: true, 48 }); 49 50 axios.get('http://localhost:5000').then(({ data }) => { 51 this.setState({ 52 comments: [...data], 53 }); 54 }).catch(error => console.log(error)) 55 56 const channel = pusher.subscribe('comments'); 57 channel.bind('new-comment', data => { 58 this.setState(prevState => { 59 const { comments } = prevState; 60 comments.push(data.comment); 61 62 return { 63 comments, 64 }; 65 }); 66 }); 67 } 68 69 render() { 70 const { username, newComment, comments } = this.state; 71 72 const userComments = comments.map(e => ( 73 <article className="comment" key={e._id}> 74 <h1 className="comment-user">{e.name}</h1> 75 <p className="comment-text">{e.text}</p> 76 <div className="voting"> 77 <div className="vote-buttons"> 78 <button className="upvote"> 79 Upvote 80 </button> 81 <button className="downvote"> 82 Downvote 83 </button> 84 </div> 85 <div className="votes">Votes: {e.votes}</div> 86 </div> 87 </article> 88 )); 89 90 return ( 91 <div className="App"> 92 <article className="post"> 93 <h1>Interesting Video</h1> 94 <iframe 95 title="video" 96 width="560" 97 height="315" 98 src="https://www.youtube.com/embed/PC60fAKJiek" 99 frameborder="0" 100 allow="accelerometer; autoplay; encrypted-media; gyroscope; picture-in-picture" 101 allowfullscreen 102 /> 103 <p>Leave a comment if you enjoyed the video above</p> 104 </article> 105 <section className="comments-form"> 106 <form onSubmit={this.postComment}> 107 <label htmlFor="username">Name:</label> 108 <input 109 className="username" 110 name="username" 111 id="username" 112 type="name" 113 value={username} 114 onChange={this.updateInput} 115 /> 116 117 <label htmlFor="new-comment">Comment:</label> 118 <textarea 119 className="comment" 120 name="newComment" 121 id="new-comment" 122 value={newComment} 123 onChange={this.updateInput} 124 /> 125 <button type="submit">Have your say</button> 126 </form> 127 </section> 128 <section className="comments-section">{userComments}</section> 129 </div> 130 ); 131 } 132 } 133 134 export default App;
As you can see, we have a simple form that takes the name of the user and their comment. Once the form is submitted, we initialize a votes property on the comment to keep track of the number of votes and post it to the /comment route we created on the server earlier.
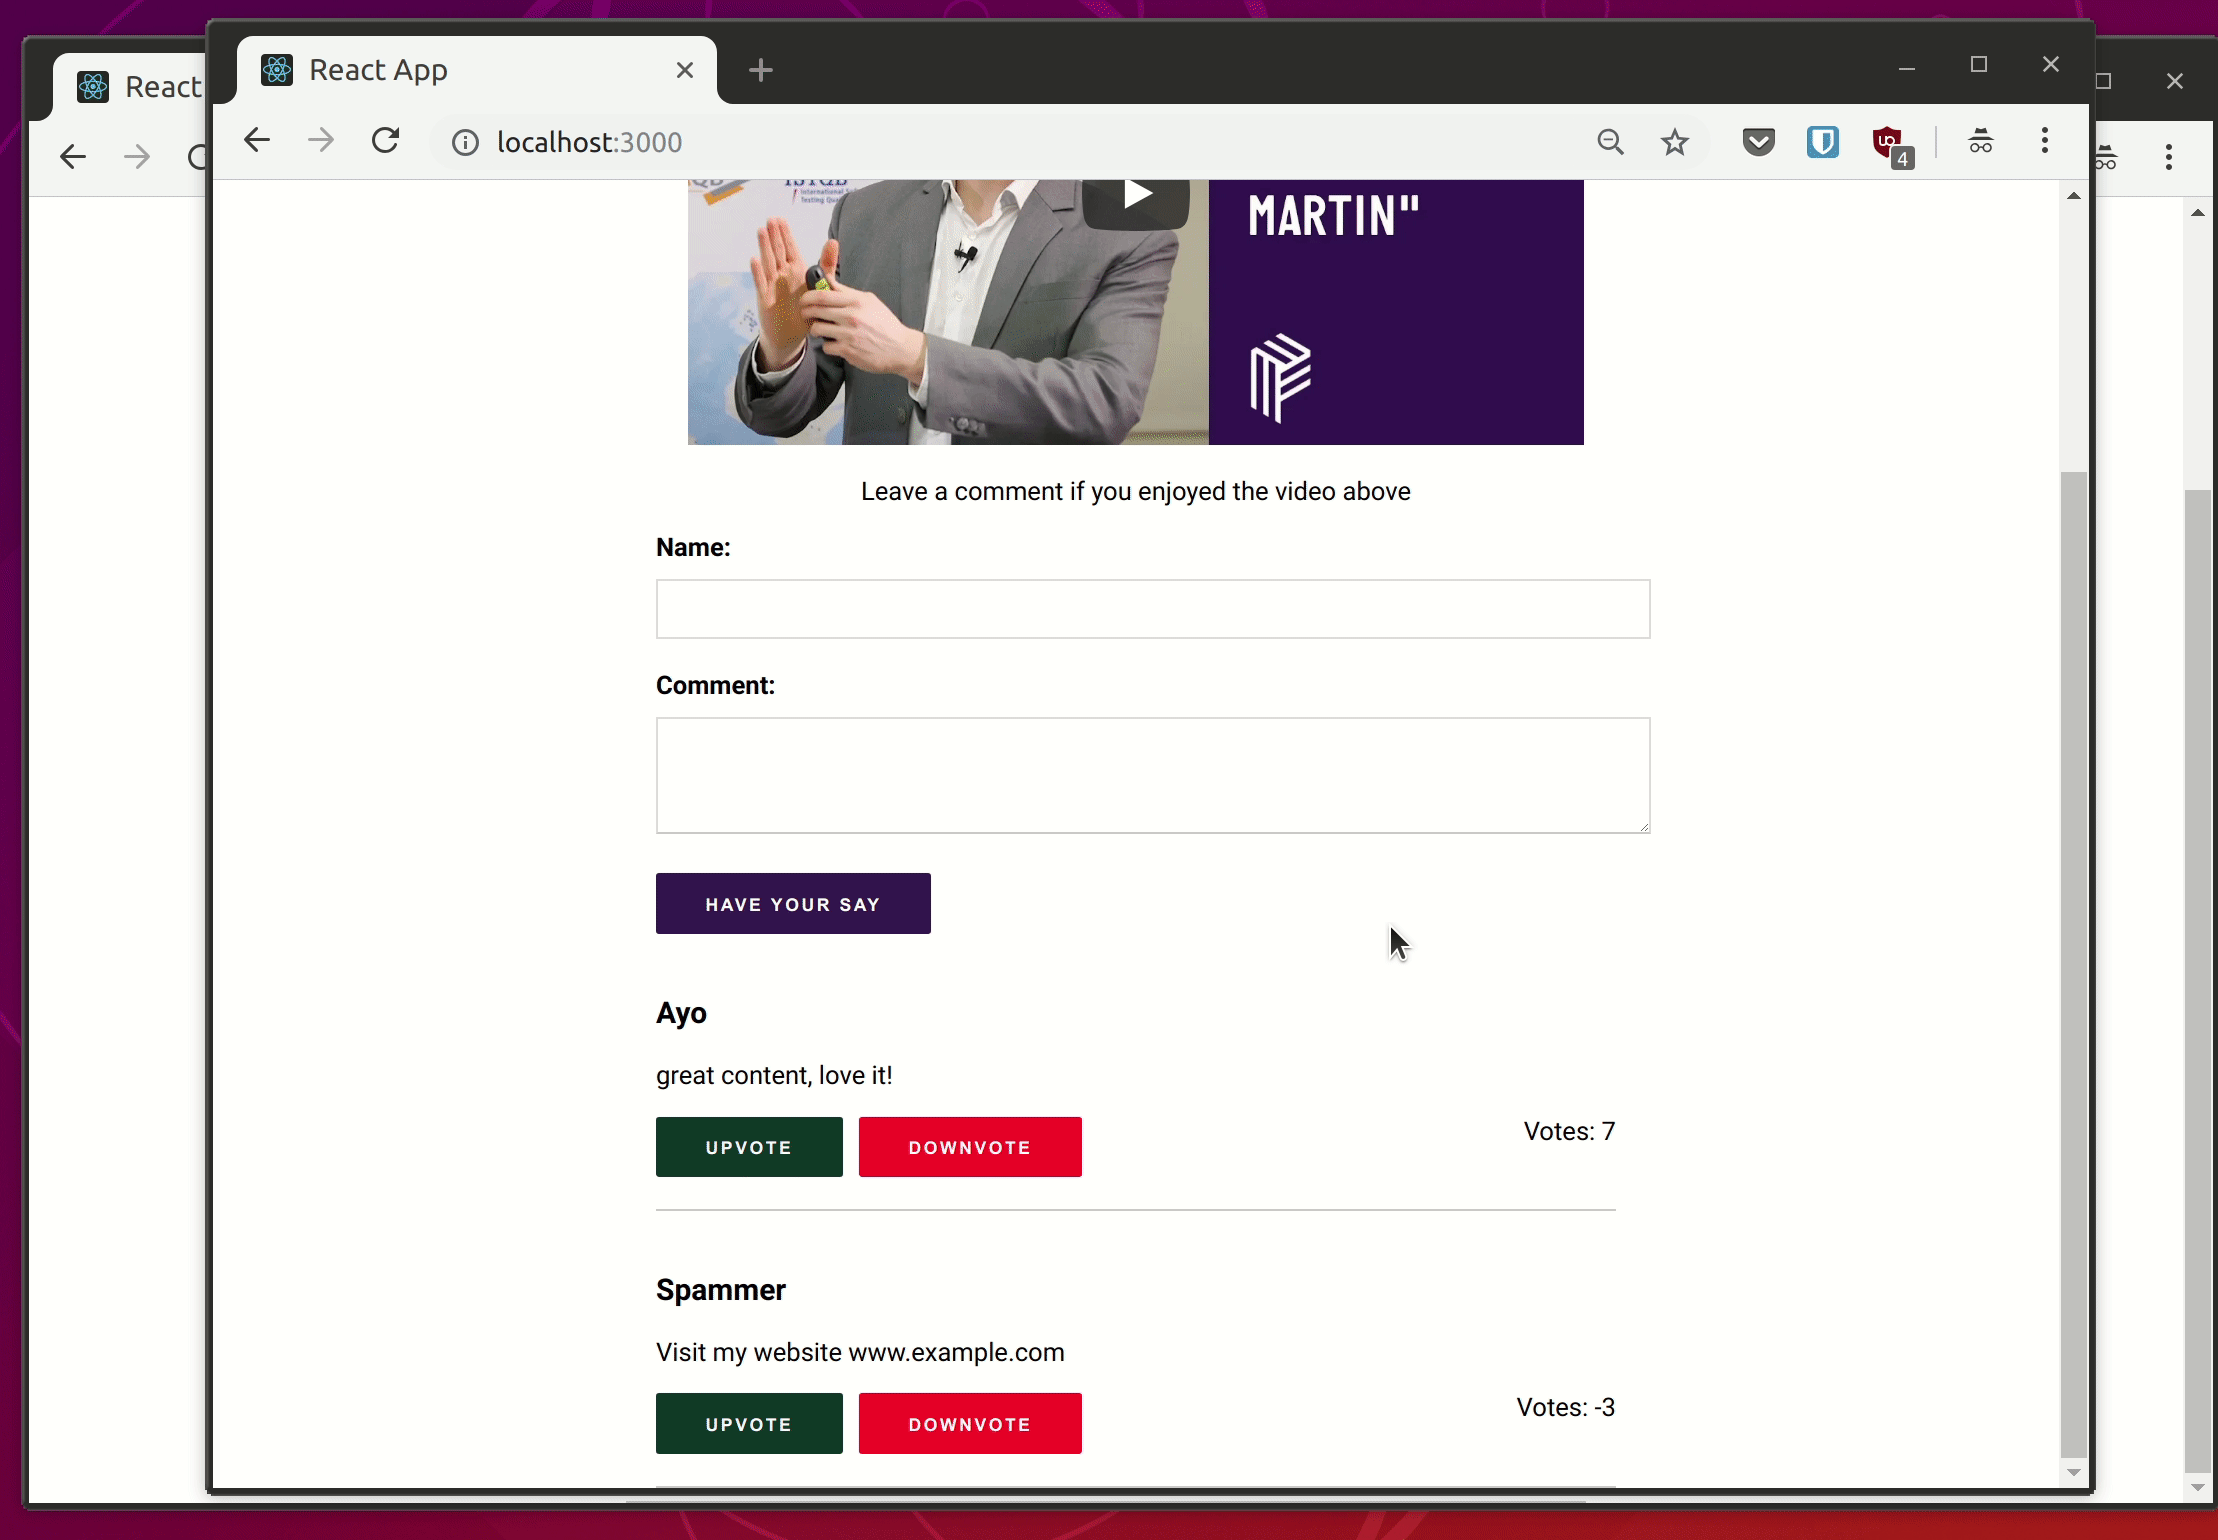
In the componentDidMount() lifecycle hook, we’re using the Pusher client library to latch on to events emitted by the server so that we can update the application state and display the latest comments instantly. Here, we’re listening for the new-comment event on the comments channel. Once the new-comment event is triggered, our application is updated with the new comment as shown below:
Note that you need to replace with <your app key> and <your app cluster> with the appropriate values from your app dashboard before running the code.
Add voting capabilities
Each comment has an upvote and downvote button, but it doesn’t do anything just yet. Let’s make it so that when the upvote button is clicked, the votes count is increased by one and when the downvotes button is clicked, the votes count is decreased by one.
Update client/src/App.js to look like this:
1// client/src/App.js 2 ... 3 vote = (id, num) => { 4 axios.post('http://localhost:5000/vote', { 5 id, 6 vote: num, 7 }); 8 }; 9 10 componentDidMount() { 11 ... 12 const channel = pusher.subscribe('comments'); 13 channel.bind('new-comment', data => { 14 this.setState(prevState => { 15 const { comments } = prevState; 16 comments.push(data.comment); 17 18 return { 19 comments, 20 }; 21 }); 22 }); 23 24 channel.bind('new-vote', data => { 25 let { comments } = this.state; 26 comments = comments.map(e => { 27 if (e._id === data.comment._id) { 28 return data.comment; 29 } 30 31 return e; 32 }); 33 34 this.setState({ 35 comments, 36 }); 37 }); 38 } 39 40 render() { 41 const { username, newComment, comments } = this.state; 42 43 const userComments = comments.map(e => ( 44 <article className="comment" key={e._id}> 45 <h1 className="comment-user">{e.name}</h1> 46 <p className="comment-text">{e.text}</p> 47 <div className="voting"> 48 <div className="vote-buttons"> 49 <button className="upvote" onClick={() => this.vote(e._id, 1)}> 50 Upvote 51 </button> 52 <button className="downvote" onClick={() => this.vote(e._id, -1)}> 53 Downvote 54 </button> 55 </div> 56 <div className="votes">Votes: {e.votes}</div> 57 </div> 58 </article> 59 )); 60 }
Once the upvote or downvote button is clicked, the ID of the comment and is sent to the server along with a number that increments or decrements the votes count. Notice that we’re now listening for the new-vote event in componentDidMount() so that we can easily update the votes count on the frontend, once this event is triggered on the server.
Let’s go ahead and create the /vote route in server.js and trigger the new-vote event once a new vote is made on a comment. Add the following code to your server.js file below the /comment route:
1// server.js 2 3 ... 4 5 app.post('/vote', (req, res) => { 6 const { id, vote } = req.body; 7 db.findOne({ _id: id }, function (err, doc) { 8 if (err) { 9 return res.status(500).send(err); 10 } 11 12 db.update({ _id: id }, { $set: { votes: doc.votes + vote } }, { returnUpdatedDocs: true }, (err, num, updatedDoc) => { 13 if (err) return res.status(500).send(err); 14 15 pusher.trigger('comments', 'new-vote', { 16 comment: updatedDoc, 17 }); 18 }); 19 }); 20 }); 21 22 ...
As you can see, once a new vote is received, the record is updated in the database and we trigger the new-vote event with the updated comment in its payload. This allows us to update the vote count on each comment as soon as they happen.
Wrap up
In this tutorial, we learned how easy it is to create a live comments system and update several clients in realtime with Pusher Channels. If you want to learn more about Channels, visit its documentation page or check out more tutorials on the Pusher blog.
Thanks for reading! Remember that you can find the source code of this app in this GitHub repository.


© 2025 Pusher Ltd. All rights reserved.
Pusher Limited is a company registered in England and Wales (No. 07489873) whose registered office is at MessageBird UK Limited, 3 More London Riverside, 4th Floor, London, United Kingdom, SE1 2AQ.