- Products

- Developers
- User stories
- Blog
- Pricing

Create a carpooling app with React Native - Part 2: Creating the frontend
Introduction
This is the second part of a two-part series on creating a carpooling app with React Native. This is the part where we will be creating the actual app. I’ll be showing you how to set up the app so you can run it on an Android emulator (Genymotion) or an iOS device.
Prerequisites
You need to have completed part one before moving on to this tutorial.
To effectively follow this tutorial, you should have a good grasp of the following React concepts:
- props
- refs
- state
- component lifecycle
As for building the app with React Native, knowing how to do the following will be helpful:
- How to use primitive React Native components such as the
VieworText. - How to add styles to the components.
- How to create your own components.
What we’ll be building
The complete details on what we’ll be building are available in the first part of the series. As a refresher, we’ll be building a carpooling app. This allows the user to share the vehicle they’re currently riding in so someone else can hop in the same vehicle. The app is responsible for:
- Matching the users so that only the users who are going the same route can share a ride with each other.
- After two users are matched, the app provides realtime tracking on where each other currently are.
For the rest of the tutorial, I’ll be referring to the user who is sharing the ride as the “rider”. While the user who is searching for a ride as the “hiker”.
Installing the dependencies
Start by generating a new React Native project:
react-native init Ridesharer
This will create a Ridesharer directory. This will serve as the root directory that we’ll be using for the rest of the tutorial.
The app relies on the following libraries to implement specific features:
- axios - for making requests to the server. Although React Native already comes with fetch, axios gives us a simpler API to work with.
- pusher-js - the official Pusher JavaScript library. This allows us connect to a Pusher app and send realtime data.
- react-native-geocoding - for converting latitude and longitude pairs to the actual name of the place.
- react-native-google-places-autocomplete - for searching the user’s destination.
- react-native-maps - for showing a map inside the app. This is also used for showing markers on where the users are and their destinations.
- react-native-maps-directions - for showing the route from the user’s origin to their destination.
- react-native-vector-icons - for using icons inside the app.
- react-navigation - for easily implementing navigation between screens.
To ensure that we’re both using the same package versions, open the package.json file and update the dependencies with the following:
1"dependencies": { 2 "axios": "0.18.0", 3 "prop-types": "15.6.1", 4 "pusher-js": "4.2.2", 5 "react": "16.3.1", 6 "react-native": "0.55.4", 7 "react-native-geocoding": "0.3.0", 8 "react-native-google-places-autocomplete": "1.3.6", 9 "react-native-maps": "0.20.1", 10 "react-native-maps-directions": "1.6.0", 11 "react-native-vector-icons": "4.6.0", 12 "react-navigation": "2.0.1" 13 },
Once that’s done, save the file and execute npm install.
Setting up the dependencies
Now that you’ve installed all the dependencies, there’s one more thing you have to do before you can start coding the app. Additional setup is required for the following dependencies:
Instructions on how to set up the dependencies are available on the Github repos for each library. Here are the links to the setup instructions to the specific version we’re using:
Note that if you’re reading this sometime in the future, you’ll probably have to install the latest package versions and follow their latest installation instructions.
Building the app
Now we’re ready to build the app. Navigate inside the Ridesharer directory as that’s going to be our working directory.
Note that anytime you feel confused on where to add a specific code, you can always visit the GitHub repo and view the file.
Index
Open the index.js file and make sure you’re registering the same name that you used when you generated the project. In this case, it should be Ridesharer:
1// Ridesharer/index.js 2 import { AppRegistry } from 'react-native'; 3 import App from './App'; 4 5 AppRegistry.registerComponent('Ridesharer', () => App);
Root component
Create a Root.js file. This will serve as the Root component of the app. This is where we set up the navigation so we include the two pages of the app: Home and Map. We will be creating these pages later:
1// Ridesharer/Root.js 2 import React from 'react'; 3 import { StackNavigator } from 'react-navigation'; 4 5 import HomePage from './app/screens/Home'; 6 import MapPage from './app/screens/Map'; 7 8 const RootStack = StackNavigator( 9 { 10 Home: { 11 screen: HomePage 12 }, 13 Map: { 14 screen: MapPage 15 } 16 }, 17 { 18 initialRouteName: 'Home', // set the home page as the default page 19 } 20 ); 21 22 export default RootStack;
In the above code, we’re using the StackNavigator, one of the navigators that comes with the React Navigation library. This allows us to push and pop pages to and from a stack. Navigating to a page means pushing it in front of the stack, going back means popping the page that’s currently in front of the stack.
App component
Open the App.js file and render the App component:
1// Ridesharer/App.js 2 import React, { Component } from 'react'; 3 import { 4 StyleSheet, 5 View 6 } from 'react-native'; 7 8 import Root from './Root'; 9 10 export default class App extends Component { 11 12 render() { 13 return ( 14 <View style={styles.container}> 15 <Root /> 16 </View> 17 ); 18 } 19 20 } 21 22 const styles = StyleSheet.create({ 23 container: { 24 flex: 1, 25 backgroundColor: '#fff' 26 } 27 });
Tapper component
The Tapper component is simply a button created for convenience. We can’t really apply a custom style to the built-in React Native Button component so we’re creating this one. This component wraps the Button component in a View in which the styles are applied:
1// Ridesharer/app/components/Tapper/Tapper.js 2 import React from 'react'; 3 import { View, Button } from 'react-native'; 4 5 import styles from './styles'; 6 7 const Tapper = (props) => { 8 return ( 9 <View style={styles.button_container}> 10 <Button 11 onPress={props.onPress} 12 title={props.title} 13 color={props.color} 14 /> 15 </View> 16 ); 17 } 18 19 export default Tapper;
Here’s the style declaration:
1// Ridesharer/app/components/Tapper/styles.js 2 import { StyleSheet } from 'react-native'; 3 4 export default StyleSheet.create({ 5 button_container: { 6 margin: 10 7 }, 8 });
Lastly, we export it using an index.js file so that we can simply refer to the component as Tapper without including the Tapper.js file in the import statement later on:
1// Ridesharer/app/components/Tapper/index.js 2 import Tapper from './Tapper'; 3 4 export default Tapper;
If you don’t want to create a separate component, you can always use the TouchableOpacity and TouchableHighlight components. Those two allow you to add a custom style.
Home page
The Home page is the default page the user sees when they open the app.
Start by including all the React Native packages that we need:
1// Ridesharer/app/screens/Home.js 2 import React, { Component } from 'react'; 3 import { 4 View, 5 Text, 6 StyleSheet, 7 TextInput, 8 Alert, 9 ActivityIndicator, 10 PermissionsAndroid, 11 KeyboardAvoidingView 12 } from 'react-native';
Among the packages above, only these three warrants an explanation:
PermissionsAndroid- for asking permissions to use the device’s Geolocation feature on Android.KeyboardAvoidingView- for automatically adjusting the View when the on-screen keyboard pops out. This allows the user to see what they’re inputting while the keyboard is open. Most of the time, especially on devices with small screen, the input is hidden when the keyboard is open.
Next, include the third-party packages we installed earlier:
1import axios from 'axios'; 2 import Icon from 'react-native-vector-icons/FontAwesome'; 3 import Tapper from '../components/Tapper';
Add your ngrok URL (this was created in the first part of the series):
const base_url = 'YOUR NGROK URL';
Declare the function that will ask for the Geolocation permission and then call it:
1async function requestGeolocationPermission() { 2 try{ 3 const granted = await PermissionsAndroid.request( 4 PermissionsAndroid.PERMISSIONS.ACCESS_FINE_LOCATION, 5 { 6 'title': 'Ridesharer Geolocation Permission', 7 'message': 'Ridesharer needs access to your current location so you can share or search for a ride' 8 } 9 ); 10 11 if(granted === PermissionsAndroid.RESULTS.GRANTED){ 12 console.log("You can use the geolocation") 13 }else{ 14 console.log("Geolocation permission denied") 15 } 16 }catch(err){ 17 console.warn(err) 18 } 19 } 20 21 requestGeolocationPermission();
Hide the header. The Home page doesn’t need it:
1export default class Home extends Component { 2 static navigationOptions = { 3 header: null, 4 }; 5 }
Set the default state for the loader (for controlling the visibility of the ActivityIndicator) and username:
1state = { 2 is_loading: false, 3 username: '' 4 }
Render the Home page. In this page we have:
- An input that asks for the user’s name
- A button for sharing a ride
- A button for hitching a ride
Note that we’re using the KeyboardAvoidingView as a wrapper. This way, everything inside it will adjust accordingly when the on-screen keyboard becomes visible:
1render() { 2 3 return ( 4 <KeyboardAvoidingView style={styles.container} behavior="padding" enabled> 5 <View style={styles.jumbo_container}> 6 <Icon name="question-circle" size={35} color="#464646" /> 7 <Text style={styles.jumbo_text}>What do you want to do?</Text> 8 </View> 9 10 <View> 11 <TextInput 12 placeholder="Enter your username" 13 style={styles.text_field} 14 onChangeText={(username) => this.setState({username})} 15 value={this.state.username} 16 clearButtonMode={"always"} 17 returnKeyType={"done"} 18 /> 19 <ActivityIndicator size="small" color="#007ff5" style={{marginTop: 10}} animating={this.state.is_loading} /> 20 </View> 21 22 <View style={styles.close_container}> 23 <Tapper 24 title="Share a Ride" 25 color="#007ff5" 26 onPress={() => { 27 this.enterUser('share'); 28 }} 29 /> 30 31 <Tapper 32 title="Hitch a Ride" 33 color="#00bcf5" 34 onPress={() => { 35 this.enterUser('hike'); 36 }} 37 /> 38 </View> 39 40 </KeyboardAvoidingView> 41 ); 42 }
When either of the buttons is pressed, the function below gets executed. All it does is create the user if they don’t already exist:
1enterUser = (action) => { 2 if(this.state.username){ // user should enter a username before they can enter 3 4 this.setState({ 5 is_loading: true 6 }); 7 8 // make a POST request to the server for creating the user 9 axios.post(`${base_url}/save-user.php`, { 10 username: this.state.username // the username entered in the text field 11 }) 12 .then((response) => { 13 14 if(response.data == 'ok'){ 15 // hide the ActivityIndicator 16 this.setState({ 17 is_loading: false 18 }); 19 20 // navigate to the Map page, submitting the user's action (ride or hike) and their username as a navigation param (so it becomes available on the Map page) 21 this.props.navigation.navigate('Map', { 22 action: action, 23 username: this.state.username 24 }); 25 } 26 27 }); 28 29 }else{ 30 Alert.alert( 31 'Username required', 32 'Please enter a username' 33 ); 34 } 35 }
Add the styles for the Home page:
1const styles = StyleSheet.create({ 2 container: { 3 flex: 1, 4 alignItems: 'center', 5 justifyContent: 'space-around' 6 }, 7 jumbo_container: { 8 padding: 50, 9 alignItems: 'center' 10 }, 11 jumbo_text: { 12 marginTop: 20, 13 textAlign: 'center', 14 fontSize: 25, 15 fontWeight: 'bold' 16 }, 17 text_field: { 18 width: 200, 19 height: 50, 20 padding: 10, 21 backgroundColor: '#FFF', 22 borderColor: 'gray', 23 borderWidth: 1 24 } 25 });
Map page
The Map page contains the main meat of the app. This allows the user to share or search for a ride. The tracking of location is implemented via Google Maps, Pusher Channels, and React Native’s Geolocation feature.
Start by including all the React Native packages that we need:
1// Ridesharer/app/screens/Map.js 2 import React, { Component } from 'react'; 3 import { 4 View, 5 Text, 6 StyleSheet, 7 Alert, 8 Dimensions, 9 ActivityIndicator 10 } from 'react-native';
Next, include the packages that we installed earlier:
1import { GooglePlacesAutocomplete } from 'react-native-google-places-autocomplete'; 2 import MapView, { Marker, Callout } from 'react-native-maps'; 3 import MapViewDirections from 'react-native-maps-directions'; 4 import Icon from 'react-native-vector-icons/FontAwesome'; 5 import Pusher from 'pusher-js/react-native'; 6 import Geocoder from 'react-native-geocoding'; 7 import axios from 'axios';
Include the location library. We will be creating this later, but for now, know that these functions are used to center the map correctly (regionFrom()) and getting the difference of two coordinates in meters (getLatLonDiffInMeters()):
1import { regionFrom, getLatLonDiffInMeters } from '../lib/location'; 2 import Tapper from '../components/Tapper';
Initialize your API keys and ngrok base URL:
1const google_api_key = 'YOUR GOOGLE PROJECT API KEY'; 2 const base_url = 'YOUR NGROK BASE URL'; 3 const pusher_app_key = 'YOUR PUSHER APP KEY'; 4 const pusher_app_cluster = 'YOUR PUSHER APP CLUSTER'; 5 6 Geocoder.init(google_api_key); // initialize the geocoder
Next, also declare the timeouts for searching and sharing a ride. We will be using these values later to reset the app’s UI if it couldn’t match two users within these timeouts:
1const search_timeout = 1000 * 60 * 10; // 10 minutes 2 const share_timeout = 1000 * 60 * 5; // 5 minutes
Setup a default region that the map will display:
1const default_region = { 2 latitude: 37.78825, 3 longitude: -122.4324, 4 latitudeDelta: 0.0922, 5 longitudeDelta: 0.0421, 6 };
Get the device width. We will be using this later to set the width of the auto-complete text field for searching places:
var device_width = Dimensions.get('window').width;
Next, create the Map component and set the navigationOptions. Unlike the Home page earlier, we need to set a few options for the navigation. This includes the header title and the styles applied to it. Putting these navigation options will automatically add a back button to the header to allow the user to go back to the Home page:
1export default class Map extends Component { 2 3 static navigationOptions = ({navigation}) => ({ 4 headerTitle: 'Map', 5 headerStyle: { 6 backgroundColor: '#007ff5' 7 }, 8 headerTitleStyle: { 9 color: '#FFF' 10 } 11 }); 12 13 // next: add the code for initializing the state 14 }
Next, initialize the state:
1state = { 2 start_location: null, // the coordinates (latitude and longitude values) of the user's origin 3 end_location: null, // the coordinates of the user's destination 4 region: default_region, // the region displayed in the map 5 from: '', // the name of the place where the user is from (origin) 6 to: '', // the name of the place where the user is going (destination) 7 rider_location: null, // the coordinates of the rider's current location 8 hiker_location: null, // the coordinates of the hiker's origin 9 is_loading: false, // for controlling the visibility of the ActivityIndicator 10 has_journey: false // whether the rider has accepted a hiker's request or a hiker's request has been accepted by a rider 11 } 12 13 // next: add the constructor
Next, add the constructor:
1constructor(props) { 2 super(props); 3 this.from_region = null; 4 this.watchId = null; // unique ID for the geolocation watcher. Storing it in a variable allows us to stop it at a later time (for example: when the user is done using the app) 5 this.pusher = null; // variable for storing the Pusher instance 6 this.user_channel = null; // the Pusher channel for the current user 7 this.journey_id = null; // the hiker's route ID 8 this.riders_channel = []; // if current user is a hiker, the value of this will be the riders channel 9 this.users_channel = null; // the current user's channel 10 this.hiker = null // for storing the hiker's origin coordinates; primarily used for getting the distance between the rider and the hiker 11 }
Once the component is mounted, you want to get the username that was passed from the Home page earlier. This username is used later on as the unique key for identifying each user that connects to Pusher Channels:
1componentDidMount() { 2 const { navigation } = this.props; 3 const username = navigation.getParam('username'); 4 5 this.pusher = new Pusher(pusher_app_key, { 6 authEndpoint: `${base_url}/pusher-auth.php`, 7 cluster: pusher_app_cluster, 8 encrypted: true 9 }); 10 11 // next: add the code for subscribing to the current user's own channel 12 }
Next, add the code for subscribing to the current user's own channel. This allows the user to send and receive data in realtime through this channel. In the hiker’s case, they use it to make a request to the matching rider. In the rider’s case, they use it to receive requests coming from hikers as well as sending an acceptance and their current location to the hiker:
this.users_channel = this.pusher.subscribe(`private-user-${username}`); // note that the private-* is required when using private channels
When a rider receives a request, the code below is executed. This alerts the rider that someone wants to ride with them. They can either accept or decline it:
1this.users_channel.bind('client-rider-request', (hiker) => { 2 3 Alert.alert( 4 `${hiker.username} wants to ride with you`, 5 `Pickup: ${hiker.origin} \nDrop off: ${hiker.dest}`, 6 [ 7 { 8 text: "Decline", 9 onPress: () => { 10 // do nothing 11 }, 12 style: "cancel" 13 }, 14 { 15 text: "Accept", 16 onPress: () => { 17 this.acceptRide(hiker); 18 } 19 }, 20 ], 21 { cancelable: false } // no cancel button 22 ); 23 24 }); 25 26 // next: add code for getting the user's origin
Note that in the code above, we’re not really handling declines. This is to keep the focus on the key feature of the app.
Next, get the user’s current location via the Geolocation API. At this point, we can already use the API without problems (unless the user didn’t approve the permission). We’ll just focus our attention on the “happy path” to keep things simple so we’ll assume that the user approved the permission request:
1navigator.geolocation.getCurrentPosition( 2 (position) => { 3 // get the region (this return the latitude and longitude delta values to be used by React Native Maps) 4 var region = regionFrom( 5 position.coords.latitude, 6 position.coords.longitude, 7 position.coords.accuracy 8 ); 9 10 // convert the coordinates to the descriptive name of the place 11 Geocoder.from({ 12 latitude: position.coords.latitude, 13 longitude: position.coords.longitude 14 }) 15 .then((response) => { 16 // the response object is the same as what's returned in the HTTP API: https://developers.google.com/maps/documentation/geocoding/intro 17 18 this.from_region = region; // for storing the region in case the user presses the "reset" button 19 20 // update the state to indicate the user's origin on the map (using a marker) 21 this.setState({ 22 start_location: { 23 latitude: position.coords.latitude, 24 longitude: position.coords.longitude 25 }, 26 region: region, // the region displayed on the map 27 from: response.results[0].formatted_address // the descriptive name of the place 28 }); 29 30 }); 31 32 } 33 );
Next, add the acceptRide() function. This function is executed when the rider accepts a hiker’s ride request:
1acceptRide = (hiker) => { 2 3 const username = this.props.navigation.getParam('username'); 4 5 let rider_data = { 6 username: username, 7 origin: this.state.from, // descriptive name of the rider's origin 8 dest: this.state.to, // descriptive name of the rider's destination 9 coords: this.state.start_location // the rider's origin coordinates 10 }; 11 12 this.users_channel.trigger('client-rider-accepted', rider_data); // inform hiker that the rider accepted their request; send along the rider's info 13 14 // make a request to delete the route so other hikers can no longer search for it (remember the 1:1 ratio for a rider to hiker?) 15 axios.post(`${base_url}/delete-route.php`, { 16 username: username 17 }) 18 .then((response) => { 19 console.log(response.data); 20 }) 21 .catch((err) => { 22 console.log('error excluding rider: ', err); 23 }); 24 25 this.hiker = hiker; // store the hiker's info 26 27 // update the state to stop the loading animation and show the hiker's location 28 this.setState({ 29 is_loading: false, 30 has_journey: true, 31 hiker_location: hiker.origin_coords 32 }); 33 34 }
Next, add the function for rendering the UI:
1render() { 2 const { navigation } = this.props; 3 // get the navigation params passed from the Home page earlier 4 const action = navigation.getParam('action'); // action is either "ride" or "hike" 5 const username = navigation.getParam('username'); 6 7 let action_button_label = (action == 'share') ? 'Share Ride' : 'Search Ride'; 8 9 // next: add code for rendering the UI 10 }
The map UI contains the following:
MapViewcomponent for rendering the map. Inside it are the following:Markercomponent for showing the origin and destination of the user, as well as for showing the location of the rider (if the user is a hiker), or the hiker (if the user is a rider).MapViewDirectionscomponent for showing the route from the origin to the destination of the current user.
GooglePlacesAutocompletecomponent for rendering an auto-complete text field for searching and selecting a destination.ActivityIndicatorfor showing a loading animation while the rider waits for someone to request a ride, or when the hiker waits for the app to find a matching rider.Tappercomponent for sharing a ride or searching a ride.Tappercomponent for resetting the selection (auto-complete text field and marker).
1return ( 2 <View style={styles.container}> 3 4 <MapView 5 style={styles.map} 6 region={this.state.region} 7 zoomEnabled={true} 8 zoomControlEnabled={true} 9 > 10 { 11 this.state.start_location && 12 <Marker coordinate={this.state.start_location}> 13 <Callout> 14 <Text>You are here</Text> 15 </Callout> 16 </Marker> 17 } 18 19 { 20 this.state.end_location && 21 <Marker 22 pinColor="#4196ea" 23 coordinate={this.state.end_location} 24 draggable={true} 25 onDragEnd={this.tweakDestination} 26 /> 27 } 28 29 { 30 this.state.rider_location && 31 <Marker 32 pinColor="#25a25a" 33 coordinate={this.state.rider_location} 34 > 35 <Callout> 36 <Text>Rider is here</Text> 37 </Callout> 38 </Marker> 39 } 40 41 { 42 this.state.hiker_location && 43 <Marker 44 pinColor="#25a25a" 45 coordinate={this.state.hiker_location} 46 > 47 <Callout> 48 <Text>Hiker is here</Text> 49 </Callout> 50 </Marker> 51 } 52 53 { 54 this.state.start_location && this.state.end_location && 55 <MapViewDirections 56 origin={{ 57 'latitude': this.state.start_location.latitude, 58 'longitude': this.state.start_location.longitude 59 }} 60 destination={{ 61 'latitude': this.state.end_location.latitude, 62 'longitude': this.state.end_location.longitude 63 }} 64 strokeWidth={5} 65 strokeColor={"#2d8cea"} 66 apikey={google_api_key} 67 /> 68 } 69 70 </MapView> 71 72 <View style={styles.search_field_container}> 73 74 <GooglePlacesAutocomplete 75 ref="endlocation" 76 placeholder='Where do you want to go?' 77 minLength={5} 78 returnKeyType={'search'} 79 listViewDisplayed='auto' 80 fetchDetails={true} 81 onPress={this.selectDestination} 82 83 query={{ 84 key: google_api_key, 85 language: 'en', 86 }} 87 88 styles={{ 89 textInputContainer: { 90 width: '100%', 91 backgroundColor: '#FFF' 92 }, 93 listView: { 94 backgroundColor: '#FFF' 95 } 96 }} 97 debounce={200} 98 /> 99 </View> 100 101 <ActivityIndicator size="small" color="#007ff5" style={{marginBottom: 10}} animating={this.state.is_loading} /> 102 103 { 104 !this.state.is_loading && !this.state.has_journey && 105 <View style={styles.input_container}> 106 107 <Tapper 108 title={action_button_label} 109 color={"#007ff5"} 110 onPress={() => { 111 this.onPressActionButton(); 112 }} /> 113 114 <Tapper 115 title={"Reset"} 116 color={"#555"} 117 onPress={this.resetSelection} 118 /> 119 120 </View> 121 } 122 123 </View> 124 );
The code above should be pretty self-explanatory. If you’re unsure what a specific prop does, how the component works, or what children is it expecting, you can always check the Github repo of the package we’re using.
Next, let’s move on to the functions used in the UI. The resetSelection() is executed when the reset button is pressed by the user. This empties the auto-complete text field for searching for places, it also updates the state so the UI reverts back to its previous state before the destination was selected. This effectively removes the marker showing the user’s destination, as well as the route going to it:
1resetSelection = () => { 2 this.refs.endlocation.setAddressText(''); 3 this.setState({ 4 end_location: null, 5 region: this.from_region, 6 to: '' 7 }); 8 }
The tweakDestination() function is executed when the user drops the destination marker somewhere else:
1tweakDestination = () => { 2 // get the name of the place 3 Geocoder.from({ 4 latitude: evt.nativeEvent.coordinate.latitude, 5 longitude: evt.nativeEvent.coordinate.longitude 6 }) 7 .then((response) => { 8 this.setState({ 9 to: response.results[0].formatted_address 10 }); 11 }); 12 13 this.setState({ 14 end_location: evt.nativeEvent.coordinate 15 }); 16 }
The selectDestination() function is executed when the user selects their destination. This function will update the state so it shows the user’s destination in the map:
1selectDestination = (data, details = null) => { 2 3 const latDelta = Number(details.geometry.viewport.northeast.lat) - Number(details.geometry.viewport.southwest.lat) 4 const lngDelta = Number(details.geometry.viewport.northeast.lng) - Number(details.geometry.viewport.southwest.lng) 5 6 let region = { 7 latitude: details.geometry.location.lat, 8 longitude: details.geometry.location.lng, 9 latitudeDelta: latDelta, 10 longitudeDelta: lngDelta 11 }; 12 13 this.setState({ 14 end_location: { 15 latitude: details.geometry.location.lat, 16 longitude: details.geometry.location.lng, 17 }, 18 region: region, 19 to: this.refs.endlocation.getAddressText() // get the full address of the user's destination 20 }); 21 22 }
When the user presses the Share a Ride or Search a Ride button, the onPressActionButton() function is executed. This executes either the shareRide() function or the hikeRide() function depending on the action selected from the Home page earlier:
1onPressActionButton = () => { 2 3 const action = this.props.navigation.getParam('action'); 4 const username = this.props.navigation.getParam('username'); 5 6 this.setState({ 7 is_loading: true 8 }); 9 10 if(action == 'share'){ 11 this.shareRide(username); 12 }else if(action == 'hike'){ 13 this.hikeRide(username); 14 } 15 16 }
The shareRide() function is executed when a rider shares their ride after selecting a destination. This makes a request to the server to save the route. The response contains the unique ID assigned to the rider’s route. This ID is assigned as the value of this.journey_id. This will be used later to:
- Make a request to the server to update the route record stored in the Elasticsearch index.
- Know when to start doing something with the current location data. This is because the current position begins to be watched right after the user presses on the Share a Ride button as you’ll see on the code block after this:
1shareRide = (username) => { 2 3 axios.post(`${base_url}/save-route.php`, { 4 username: username, 5 from: this.state.from, 6 to: this.state.to, 7 start_location: this.state.start_location, 8 end_location: this.state.end_location 9 }) 10 .then((response) => { 11 this.journey_id = response.data.id; 12 Alert.alert( 13 'Ride was shared!', 14 'Wait until someone makes a request.' 15 ); 16 }) 17 .catch((error) => { 18 console.log('error occurred while saving route: ', error); 19 }); 20 21 // next: add code for watching the rider's current location 22 23 }
Next, start watching the user’s current location. Note that we won’t actually do anything with the location data unless the rider has already shared their ride and that they have already approved a hiker to ride with them. Once both conditions are met, we make a request to the server to update the previously saved route with the rider’s current location. This way, when a hiker searches for a ride, the results will be biased based on the rider’s current location and not their origin:
1this.watchId = navigator.geolocation.watchPosition( 2 (position) => { 3 4 let latitude = position.coords.latitude; 5 let longitude = position.coords.longitude; 6 let accuracy = position.coords.accuracy; 7 8 if(this.journey_id && this.hiker){ // needs to have a destination and a hiker 9 // update the route with the rider's current location 10 axios.post(`${base_url}/update-route.php`, { 11 id: this.journey_id, 12 lat: latitude, 13 lon: longitude 14 }) 15 .then((response) => { 16 console.log(response); 17 }); 18 19 // next: add code for sending rider's current location to the hiker 20 21 } 22 23 }, 24 (error) => { 25 console.log('error occured while watching position: ', error); 26 }, 27 { 28 enableHighAccuracy: true, // get more accurate location 29 timeout: 20000, // timeout after 20 seconds of not being able to get location 30 maximumAge: 2000, // location has to be atleast 2 seconds old for it to be relevant 31 distanceFilter: 10 // allow up to 10-meter difference from the previous location before executing the callback function again 32 } 33 ); 34 35 // last: add code for resetting the UI after 5 minutes of sharing a ride
Next, we send a client-rider-location event to the rider’s own channel. Later, we’ll have the hiker subscribe to the rider’s channel (the one they matched with) so that they’ll receive the location updates:
1let location_data = { 2 username: username, 3 lat: latitude, 4 lon: longitude, 5 accy: accuracy 6 }; 7 8 this.users_channel.trigger('client-rider-locationchange', location_data); // note: client-* is required when sending client events through Pusher 9 10 // update the state so that the rider’s current location is displayed on the map and indicated with a marker 11 this.setState({ 12 region: regionFrom(latitude, longitude, accuracy), 13 start_location: { 14 latitude: latitude, 15 longitude: longitude 16 } 17 }); 18 19 // next: add code for updating the app based on how near the rider and hiker are from each other
Next, we need to get the difference (in meters) between the rider’s coordinates and the hiker’s origin:
1let diff_in_meters = getLatLonDiffInMeters(latitude, longitude, this.hiker.origin_coords.latitude, this.hiker.origin_coords.longitude); 2 3 if(diff_in_meters <= 20){ 4 this.resetUI(); 5 }else if(diff_in_meters <= 50){ 6 Alert.alert( 7 'Hiker is near', 8 'Hiker is around 50 meters from your current location' 9 ); 10 }
Next, add the code for resetting the UI after five minutes without anyone requesting to share a ride with the rider:
1setTimeout(() => { 2 this.resetUI(); 3 }, share_timeout);
Here’s the code for resetting the UI:
1resetUI = () => { 2 3 this.from_region = null; 4 this.watchId = null; 5 this.pusher = null; 6 this.user_channel = null; 7 this.journey_id = null; 8 this.riders_channel = []; 9 this.users_channel = null; 10 this.hiker = null; 11 12 this.setState({ 13 start_location: null, 14 end_location: null, 15 region: default_region, 16 from: '', 17 to: '', 18 rider_location: null, 19 hiker_location: null, 20 is_loading: false, 21 has_journey: false 22 }); 23 24 this.props.navigation.goBack(); // go back to the Home page 25 26 Alert.alert('Awesome!', 'Thanks for using the app!'); 27 28 }
Now let’s move on to the hiker’s side of things. When the hiker presses the Search a Ride button, the hikeRide() function is executed. This function is executed every five seconds until it finds a rider which matches the hiker’s route. If a rider cannot be found within ten minutes, the function stops. Once the server returns a suitable rider, it responds with the rider’s information (username, origin, destination, coordinates). This is then used to subscribe to the rider’s channel so the hiker can request for a ride and receive location updates. Note that this is done automatically, so the hiker doesn’t have control over who they share a ride with:
1hikeRide = (username) => { 2 3 var interval = setInterval(() => { 4 // make a request to the server to get riders that matches the hiker's route 5 axios.post(`${base_url}/search-routes.php`, { 6 origin: this.state.start_location, 7 dest: this.state.end_location 8 }) 9 .then((response) => { 10 11 if(response.data){ 12 13 clearInterval(interval); // assumes the rider will accept the request 14 15 let rider = response.data; // the rider's info 16 17 // subscribe to the rider's channel so the hiker can make a request and receive updates from the rider 18 this.riders_channel = this.pusher.subscribe(`private-user-${rider.username}`); 19 20 this.riders_channel.bind('pusher:subscription_succeeded', () => { 21 // when subscription succeeds, make a request to the rider to share the ride with them 22 this.riders_channel.trigger('client-rider-request', { 23 username: username, // username of the hiker 24 origin: this.state.from, // descriptive name of the hiker's origin 25 dest: this.state.to, // descriptive name of the hiker's destination 26 origin_coords: this.state.start_location // coordinates of the hiker's origin 27 }); 28 }); 29 30 // next: add code for listening for when the rider accepts their request 31 } 32 }) 33 .catch((error) => { 34 console.log('error occurred while searching routes: ', error); 35 }); 36 37 }, 5000); 38 39 setTimeout(() => { 40 clearInterval(interval); 41 this.resetUI(); 42 }, ten_minutes); 43 44 }
Once the rider accepts the ride request, the function below is executed:
1this.riders_channel.bind('client-rider-accepted', (rider_data) => { 2 Alert.alert( 3 `${rider_data.username} accepted your request`, 4 `You will now receive updates of their current location` 5 ); 6 7 // update the map to show the rider's origin 8 this.setState({ 9 is_loading: false, 10 has_journey: true, 11 rider_location: rider_data.coords 12 }); 13 14 // next: add code for subscribing to the rider's location change 15 });
As you’ve seen earlier, when the rider’s location changes, it triggers an event called client-rider-location-change. Any user who is subscribed to the rider’s channel and is listening for that event will get the location data in realtime:
1this.riders_channel.bind('client-rider-locationchange', (data) => { 2 // update the map with the rider's current location 3 this.setState({ 4 region: regionFrom(data.lat, data.lon, data.accy), 5 rider_location: { 6 latitude: data.lat, 7 longitude: data.lon 8 } 9 }); 10 11 let hikers_origin = this.state.start_location; 12 let diff_in_meters = getLatLonDiffInMeters(data.lat, data.lon, hikers_origin.latitude, hikers_origin.longitude); 13 14 if(diff_in_meters <= 20){ 15 this.resetUI(); 16 }else if(diff_in_meters <= 50){ 17 Alert.alert( 18 'Rider is near', 19 'Rider is around 50 meters from your location' 20 ); 21 } 22 });
Add the styles for the Map page:
1const styles = StyleSheet.create({ 2 container: { 3 position: 'absolute', 4 top: 0, 5 left: 0, 6 right: 0, 7 bottom: 0, 8 justifyContent: 'flex-end', 9 alignItems: 'center', 10 }, 11 map: { 12 position: 'absolute', 13 top: 0, 14 left: 0, 15 right: 0, 16 bottom: 0, 17 }, 18 search_field_container: { 19 height: 150, 20 width: device_width, 21 position: 'absolute', 22 top: 10 23 }, 24 input_container: { 25 alignSelf: 'center', 26 backgroundColor: '#FFF', 27 opacity: 0.80, 28 marginBottom: 25 29 } 30 });
Location library
Here’s the code for getting the latitude and longitude delta values. As you have seen from the code earlier, this function is mainly used to get the region displayed on the map:
1// Ridesharer/app/lib/location.js 2 export function regionFrom(lat, lon, accuracy) { 3 const oneDegreeOfLongitudeInMeters = 111.32 * 1000; 4 const circumference = (40075 / 360) * 1000; 5 6 const latDelta = accuracy * (1 / (Math.cos(lat) * circumference)); 7 const lonDelta = (accuracy / oneDegreeOfLongitudeInMeters); 8 9 return { 10 latitude: lat, 11 longitude: lon, 12 latitudeDelta: Math.max(0, latDelta), 13 longitudeDelta: Math.max(0, lonDelta) 14 }; 15 }
And here’s the function for getting the difference (in meters) between two coordinates. This is mainly used for notifying the users when they’re already near each other, and to reset the app UI when they’re already very near each other:
1export function getLatLonDiffInMeters(lat1, lon1, lat2, lon2) { 2 var R = 6371; // radius of the earth in km 3 var dLat = deg2rad(lat2-lat1); // deg2rad below 4 var dLon = deg2rad(lon2-lon1); 5 var a = 6 Math.sin(dLat/2) * Math.sin(dLat/2) + 7 Math.cos(deg2rad(lat1)) * Math.cos(deg2rad(lat2)) * 8 Math.sin(dLon/2) * Math.sin(dLon/2) 9 ; 10 var c = 2 * Math.atan2(Math.sqrt(a), Math.sqrt(1-a)); 11 var d = R * c; // distance in km 12 return d * 1000; 13 }
The deg2rad() function used above converts the degrees value to radians:
1function deg2rad(deg) { 2 return deg * (Math.PI/180) 3 }
Running the app
Before you can run the app on Android, you need to make sure you have the following Android SDK packages installed, you can find these under SDK Tools on the SDK manager:
- Google Play services
- Android Support Repository
- Google Repository
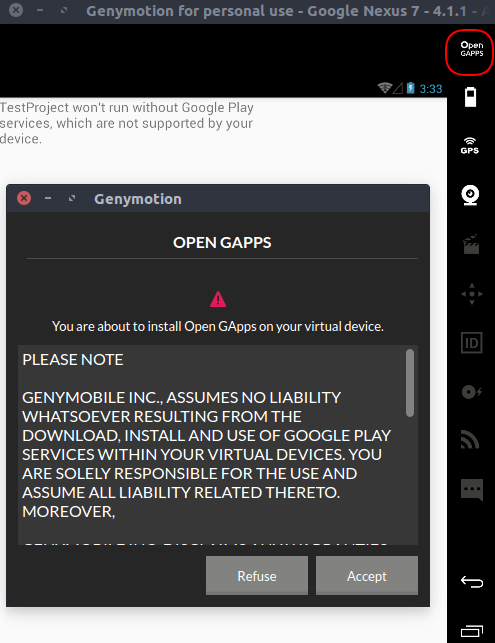
If you’re going to test the app on Genymotion, you need to install Google Play services first. Since the app is using Google Maps, you need Google Play services for the feature to work. If you have version 2.10 or above, they provide an easy way to install it. Just click on Open GAPPS on a running emulator instance and go through the installation wizard. After that, restart the device and you should be good to go:
To run the app on Android, execute the following command. This will run the app either on an opened emulator instance (for example: Genymotion) or an Android device (if you have connected one):
react-native run-android
If you’re having problems with getting the app to run on Android, be sure to check my article on Debugging common React Native issues on Android.
For iOS, you just have to make sure you have the latest version of Xcode installed. Note that if you want to run the app on a device, you can only do it via Xcode by opening the .xcworkspace file.
To run the app on an iOS device, select your device on Xcode and click the big play button.
To run the app in the iOS simulator, you can also do it via Xcode using the method above. But if you want to run it from the terminal, you can execute the following command from the root directory of your project:
react-native run-ios
If you want to run the app on a specific simulator, you first have to list which devices are available:
xcrun simctl list devicetypes
This will return the list of devices:
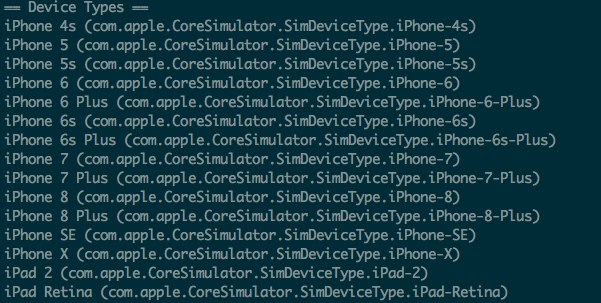
You can then copy the device name (for example: iPhone 5s) and specify it as a value for the --simulator option:
react-native run-ios --simulator="iPhone 5s"
If you’re having problems with running the app on an iOS simulator or device, be sure to check my article on Debugging common React Native issues on iOS.
Conclusion
That’s it! In this series, you’ve learned how to create a carpooling app with React Native. Along the way, you also learned the following:
- How to use axios to make requests to the server.
- How to use React Native’s Geolocation feature.
- How to add Google Play Services to Genymotion.
- How to use Genymotion’s GPS emulation tool.
- How to use Pusher Channels.
- How to use Google’s Geocoding API.
You can find all the codes used in this series on this GitHub repo.


© 2026 Pusher Ltd. All rights reserved.
Pusher Limited is a company registered in England and Wales (No. 07489873) whose registered office is at MessageBird UK Limited, 3 More London Riverside, 4th Floor, London, United Kingdom, SE1 2AQ.