- Products

- Developers
- User stories
- Blog
- Pricing

Implement the CallKit extension for iOS - Part 2: CallKit extension
Introduction
Introduction
Apple's CallKit framework for iOS is often used to create integrated VoIP apps for the iPhone. CallKit also lets you add numbers to the phone block list and Caller ID lists. This is the capability we will be exploring in this tutorial series.
In part one of this tutorial you created an iOS app that you can use to add names and numbers to a caller ID list and add numbers to a block list. In this, the second part, you will create a CallKit extension that provides these lists to the iOS phone app.
The key concepts covered by this tutorial are:
- Sharing Core Data between an iOS app and an iOS extension
- Reloading a CallKit extension from an iOS app
- Debugging an iOS app extension
Prerequisites
- A Mac with Xcode 10
- An iPhone (You cannot use the simulator to test CallKit extensions)
- Familiarity with Xcode and storyboards
- Familiarity with general UIKit programming
Building the App Extension
Getting Started
Start by opening the CallKitTutorial project that you created in part one.
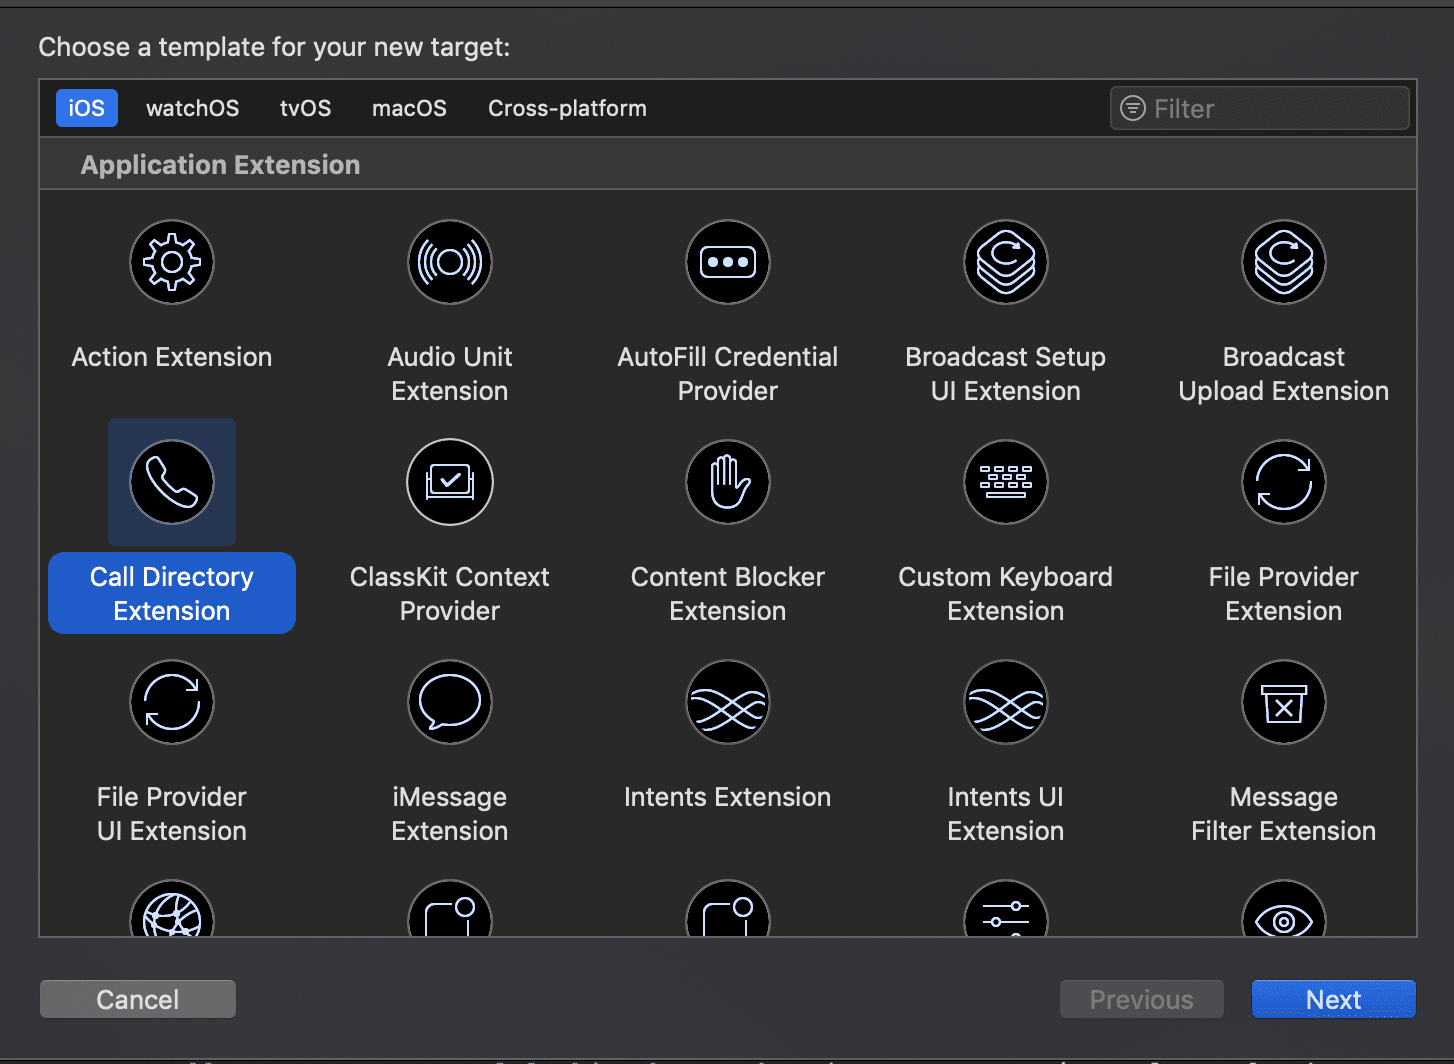
- Select the File->New->Target... menu item.
- Select Call Directory Extension from the available items and click Next
- Use
CallKitTutorialExtensionfor the name and click Finish. - Activate the new scheme if prompted by Xcode.
Xcode has created a new folder, CallKitTutorialExtension, in the project navigator. Inside this folder you will see the file CallDirectoryHandler.swift. This file contains sample code that uses fixed strings to identify and block numbers. We will replace this with code that fetches numbers from the Core Data repository we created in part one.
In part one, we created the CallerData framework to hold the Core Data code. We need to add this framework to the CallKitTutorial extension.
- Select the blue
CallKitTutorialproject node at the top of the project navigator. - Select the
CallKitTutorialExtensiontarget from the TARGETS list. - Click the '+' sign under Linked Frameworks and Libraries*.*
- Select
CallerData.frameworkfrom the pop up window. - Click Add.
We also create an Application Group in part one. This lets the app and the extension share data. We need to allow the extension to access this Application Group:
- Select the CallKitTutorialExtension target
- Select the Capabilities tab
- Turn on the switch next to App Groups
- Select the app group you created in part one. It will end with
.CallKitTutorialif you followed the suggestion in part one.
Extension operation
Open CallDirectoryHandler.swift. You will see that it subclasses the [CXCallDirectoryProvider](https://developer.apple.com/documentation/callkit/cxcalldirectoryprovider) class. This protocol defines all of the functions that a CallKit Directory extension needs to implement.
You might imagine that these functions would receive the number of an incoming call and return either identification or blocking information. This isn't, however, how the directory extension operates. Providing incoming call details to the extension would violate the user's privacy. The directory extension actually provides identification and blocking data to iOS when requested. iOS incorporates this data into the phone application. It is the phone application that blocks or identifies callers.
iOS requests data from the extension when:
- The phone starts up.
- The extension is enabled in the Settings App.
- The app that hosts the extension requests an extension reload
When iOS requests data the following happens:
- The extension's
beginRequestfunction is called. This function receives an instance ofCXCallDirectoryExtensionContext - The extension adds blocking and identification details by calling
addBlockingEntryandaddIdentificationEntryon the context - The extension calls
completeRequeston the context when it has finished adding entries.
Modify the template code
The first function you will see in CallDirectoryHandler.swift is beginRequest:
1// CallKitTutorialExtension/CallDirectoryHandler.swift
2
3 override func beginRequest(with context: CXCallDirectoryExtensionContext) {
4 context.delegate = self
5
6 // Check whether this is an "incremental" data request. If so, only provide the set of phone number blocking
7 // and identification entries which have been added or removed since the last time this extension's data was loaded.
8 // But the extension must still be prepared to provide the full set of data at any time, so add all blocking
9 // and identification phone numbers if the request is not incremental.
10 if context.isIncremental {
11 addOrRemoveIncrementalBlockingPhoneNumbers(to: context)
12
13 addOrRemoveIncrementalIdentificationPhoneNumbers(to: context)
14 } else {
15 addAllBlockingPhoneNumbers(to: context)
16
17 addAllIdentificationPhoneNumbers(to: context)
18 }
19
20 context.completeRequest()
21 }
You can see that iOS can request an incremental or complete update. The isIncremental property of the context indicates the type of update that iOS is requesting. To actually perform an incremental update, we need to know the date & time of the previous update. UserDefaults provides a convenient place to store this information.
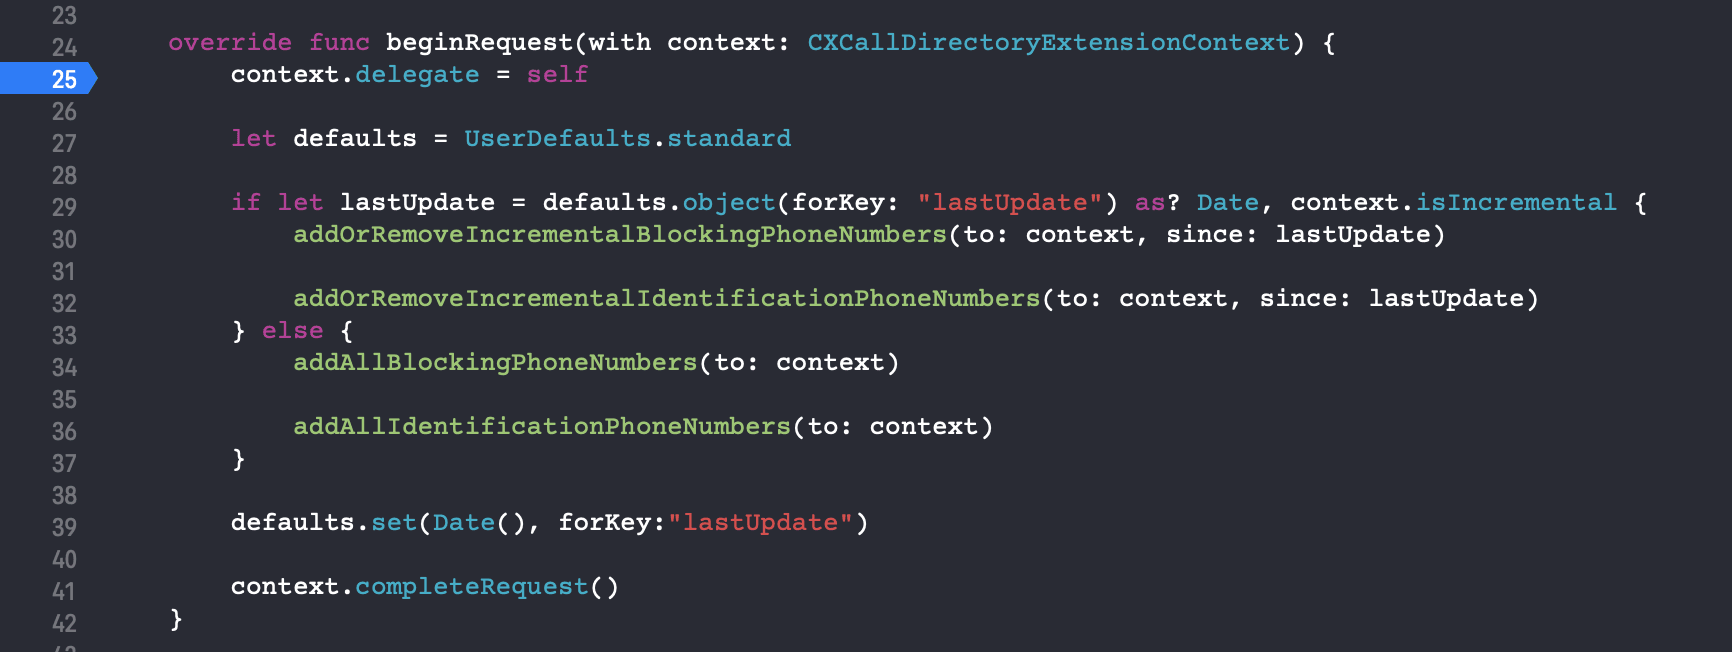
Change the function so that it looks like this:
1// CallKitTutorialExtension/CallDirectoryHandler.swift
2
3 override func beginRequest(with context: CXCallDirectoryExtensionContext) {
4 context.delegate = self
5
6 // Check whether this is an "incremental" data request. If so, only provide the set of phone number blocking
7 // and identification entries which have been added or removed since the last time this extension's data was loaded.
8 // But the extension must still be prepared to provide the full set of data at any time, so add all blocking
9 // and identification phone numbers if the request is not incremental.
10
11 let defaults = UserDefaults.standard
12
13 if let lastUpdate = defaults.object(forKey: "lastUpdate") as? Date, context.isIncremental {
14 addOrRemoveIncrementalBlockingPhoneNumbers(to: context, since: lastUpdate)
15
16 addOrRemoveIncrementalIdentificationPhoneNumbers(to: context, since: lastUpdate)
17 } else {
18 addAllBlockingPhoneNumbers(to: context)
19
20 addAllIdentificationPhoneNumbers(to: context)
21 }
22
23 defaults.set(Date(), forKey:"lastUpdate")
24
25 context.completeRequest()
26 }
Now the code only performs an incremental update if the last update time is available. Once the updates are complete, the time of this update is stored in UserDefaults.
Adding the since parameter to addOrRemoveIncrementalBlockingPhoneNumbers and addOrRemoveIncrementalIdentificationPhoneNumbers will cause errors. Don't worry. We will fix that shortly.
The example code provided in the template uses fixed data. We want to get our data from the Core Data store we set up in part one. The CallerData framework already has the functions we need to do that.
First, lets ensure we can access our CallerData framework and Core Data. Add:
1// CallKitTutorialExtension/CallDirectoryHandler.swift 2 3 import CallerData 4 import CoreData
to the imports at the top of CallDirectoryHandler.swift.
Now add a property and a function to the CallDirectoryHandler class:
1// CallKitTutorialExtension/CallDirectoryHandler.swift
2
3 private let callerData = CallerData()
4
5 private func callers(blocked: Bool, includeRemoved: Bool = false, since date: Date? = nil) throws -> [Caller] {
6 let fetchRequest:NSFetchRequest<Caller> = self.callerData.fetchRequest(blocked: blocked, includeRemoved: includeRemoved, since: date)
7 let callers = try self.callerData.context.fetch(fetchRequest)
8 return callers
9 }
The callerData property provides an instance of the CallerData class that we created in part one.
We will use the callers function to fetch the data we will need.
Replace addAllBlockingPhoneNumbers with the following:
1// CallKitTutorialExtension/CallDirectoryHandler.swift
2
3 private func addAllBlockingPhoneNumbers(to context: CXCallDirectoryExtensionContext) {
4 if let callers = try? self.callers(blocked: true) {
5 for caller in callers {
6 context.addBlockingEntry(withNextSequentialPhoneNumber: caller.number)
7 }
8 }
9 }
That was easy. Omitting the includeRemoved and since parameters from the call to self.callers means that code uses default values of false and nil from the function declaration, returning all numbers in the data store.
Note the name of the parameter to
addBlockingEntry-withNextSequentialPhoneNumber. You must provide numbers to CallKit in ascending order. There is a sort clause in the Core Data fetch that takes care of that for us. If you are writing your own extension make sure you sort your data.
Next, replace the addOrRemoveIncrementalBlockingPhoneNumbers from the template with this code:
1// CallKitTutorialExtension/CallDirectoryHandler.swift
2
3 private func addOrRemoveIncrementalBlockingPhoneNumbers(to context: CXCallDirectoryExtensionContext, since date: Date) {
4 if let callers = try? self.callers(blocked: true, includeRemoved: true, since: date) {
5 for caller in callers {
6 if caller.isRemoved {
7 context.removeBlockingEntry(withPhoneNumber: caller.number)
8 } else {
9 context.addBlockingEntry(withNextSequentialPhoneNumber: caller.number)
10 }
11 }
12 }
13 }
We use the since date to identify changes that have occurred after the previous update. We also need to consider the case where a number was unblocked by removing it from the blocking list. The record's isRemoved property determines whether to add or remove the number.
Adding identification entries is very similar; the only difference is that both a name and number are required.
Replace addAllIdentificationPhoneNumbers and addOrRemoveIncrementalIdentificationPhoneNumbers with:
1// CallKitTutorialExtension/CallDirectoryHandler.swift
2
3 private func addAllIdentificationPhoneNumbers(to context: CXCallDirectoryExtensionContext) {
4 if let callers = try? self.callers(blocked: false) {
5 for caller in callers {
6 if let name = caller.name {
7 context.addIdentificationEntry(withNextSequentialPhoneNumber: caller.number, label: name)
8 }
9 }
10 }
11 }
12
13 private func addOrRemoveIncrementalIdentificationPhoneNumbers(to context: CXCallDirectoryExtensionContext, since date: Date) {
14 if let callers = try? self.callers(blocked: false, includeRemoved: true, since: date) {
15 for caller in callers {
16 if caller.isRemoved {
17 context.removeIdentificationEntry(withPhoneNumber: caller.number)
18 } else {
19 if let name = caller.name {
20 context.addIdentificationEntry(withNextSequentialPhoneNumber: caller.number, label: name)
21 }
22 }
23 }
24 }
25 }
We are almost ready to run the app. The last thing we need to provide a method for the main app to trigger the beginRequest function in the CallKit extension. We can’t do this directly due to the iOS sandbox. Rather, we must submit a request to iOS, asking it to notify the extension that there is new data. We can use [CXCallDirectoryManager](https://developer.apple.com/documentation/callkit/cxcalldirectorymanager) to do this.
Open the ViewController.swift file from part 1 and find the reloadTapped function. Add the code to tell the extension that there is changed data:
1// CallKitTutorial/ViewController.swift
2
3 @IBAction func reloadTapped(_ sender: UIButton) {
4 CXCallDirectoryManager.sharedInstance.reloadExtension(withIdentifier: "me.wilko.CallKitTutorial.CallKitTutorialExtension", completionHandler: { (error) in
5 if let error = error {
6 print("Error reloading extension: \(error.localizedDescription)")
7 }
8 })
9 }
You will need to change the string in reloadExtension(withIdentifier:) to the bundle id for your extension. You can find this in the settings for the CallKitTutorialExtension target in Xcode.
Open the Main.storyboard file and select the Reload extension button. Drag from touch up inside in the connections inspector to the view controller object and select reloadTapped from the popup. This will call the reloadTapped function when the user taps on the button.
Ready to run
We can now run the app. Select CallKitTutorial from the scheme drop down at the top of the Xcode window and hit the "play" button. Make sure that you have selected your iPhone from the device drop down. Hit the "+" sign and add an entry for a number from which you can make a call. Make sure you use the full 'e.164' number format as discussed in part one.
Note: Your phone's contacts will override a CallKit extension. If the calling number matches an entry in your contacts then the phone shows that name. The phone blocks a number in the block list even if you have a matching contact.
Enable the extension
Installing the app on your phone also installed the CallKit extension, but it won't do anything until you enable it.
Open the Settings application and find Call blocking and identification under Phone. You will see a switch next to “CallKitTutorial”. Turn it on to enable your extension.
Now call your iPhone. You should see the name you entered as the caller identification, along with an indication that the name came from our app.
Open the CallKit Tutorial app again. Remove the number from the ID list and add it to the Block list. Tap the Reload extension button.
Now call your iPhone again. This time your call should go straight to voicemail (or you may get a busy tone - it depends on what call forwarding you have enabled on your service). Congratulations; you have created a working CallKit directory extension!
Debugging the extension
The Xcode debugger is a powerful tool that lets you examine your code in operation. You may have used it to debug your apps. You can also use it to debug extensions. The process is a little different to debugging an app as you don't directly launch an extension.
Open CallDirectoryHandler.swift and click in the margin next to the first line in the beginRequest function. The blue flag indicates that a breakpoint has been set. When execution reaches this line, program execution will be suspended and Xcode will enter the debugger.
Once you have set the breakpoint you need to run your code. Select CallKitTutorialExtension and your device in the target drop down. Hit the play button to launch your code as usual. At this point you will see something different. Xcode will ask which app you want to launch as you can't run the extension itself.
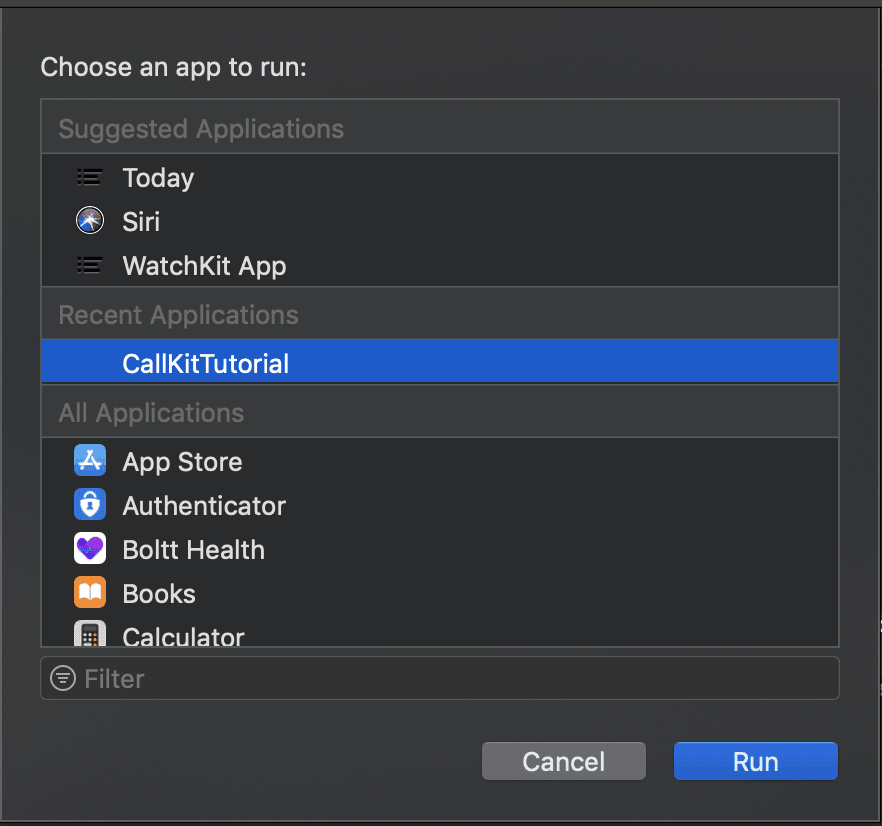
Select CallKitTutorial and tap Run.
Once the app has launched on your phone, tap the Reload extension button. After a few seconds the Xcode debugger will open with the line where we added the breakpoint selected. You can step through the code and examine variables to observe how the extension operates.
For example, we can determine if this is an incremental update request or not. At the green (lldb) prompt in the bottom right window, enter the command po context.isIncremental and press return. The debugger will show the value of this variable, either true or false.
The
pocommand is an alias for theexpressioncommand (typehelp poat the (lldb) prompt for more information). In this case we used it to evaluate a property value, but it can evaluate more complex expressions. For example, enteringpo if context.isIncremental { print("Is incremental")}will print Is incremental ifisIncrementalistrue.
Use the step over and step into buttons to execute your extension code one line at a time and observe how it works.
Conclusion
In this tutorial we have created a CallKit extension that uses shared Core Data to identify and block callers.
- We added an app extension to an existing iOS app.
- We re-used the Core Data framework that we created in part one.
- We explored debugging app extensions using the Xcode debugger.
The completed code for parts one and two of this tutorial series is available on GitHub.


© 2026 Pusher Ltd. All rights reserved.
Pusher Limited is a company registered in England and Wales (No. 07489873) whose registered office is at MessageBird UK Limited, 3 More London Riverside, 4th Floor, London, United Kingdom, SE1 2AQ.