- Products

- Developers
- User stories
- Blog
- Pricing

Implement the CallKit extension for iOS - Part 1: User interface
- Introduction
- Introduction
- Prerequisites
- Building the App
- Getting Started
- Setting the scene
- Making connections
- Playing outside the sandbox
- Putting things into context
- Fetching results
- Adding data to the view
- Laying it on the table
- Fetched results delegate
- Adding data
- It's the little things
- Passing the caller
- Conclusion
Introduction
Introduction
Apple's CallKit framework for iOS is often used to create integrated VoIP apps for the iPhone. CallKit also lets you add numbers to the phone block list and Caller ID lists. This is the capability we will be exploring in this tutorial series.
In this tutorial you will create an iOS app that you can use to add names and numbers to a caller ID list and add numbers to a block list.
In the second part you will create a CallKit extension that provides these lists to the iOS phone app.
The key concepts covered by this tutorial are:
- Sharing Core Data between an iOS app and an iOS extension
- Reloading a CallKit extension from an iOS app
- Debugging an iOS app extension
Prerequisites
- A Mac with Xcode 10
- An iPhone (You cannot use the simulator to test CallKit extensions)
- Familiarity with Xcode and storyboards
- Familiarity with general UIKit programming
Building the App
Getting Started
Start by opening Xcode and creating a new iOS Single View application and naming it CallKitTutorial. Make sure you select Swift as the language and that you tick Use Core Data.
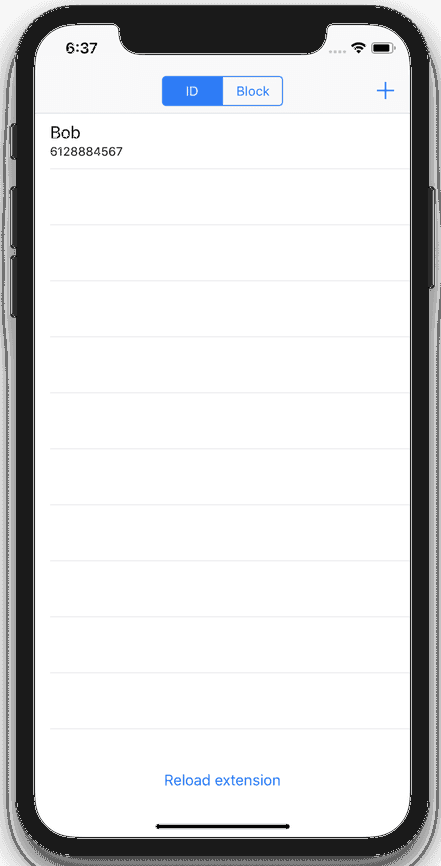
The app has a simple user interface. It has a table view that lists the numbers that we want to identify and to block.
Setting the scene
Open the Main.Storyboard file and select the view controller. From the Editor menu select Embed In->Navigation Controller. This will add a navigation bar to the top of the scene.
You can downloaded a completed storyboard file from this tutorial’s GitHub repository.
Now, let's add a segmented control to the navigation bar. This will select between the ID and Block lists.
- Drag a Segmented Control to the middle of the navigation bar in the View Controller scene.
- A blue outline will appear. Drop the segmented control and it will appear in the navigation bar.
- Select the Segmented Control. Using the property inspector, change the title of the first segment to "ID" and the second segment to "Block".
Next, we will add the "+" button to the right hand side of the navigation bar:
- Drag a Bar Button Item from the object library and drop it on the right hand side of the navigation bar
- Using the property inspector, change the bar button's System Item to Add
We need a button to refresh the CallKit extension:
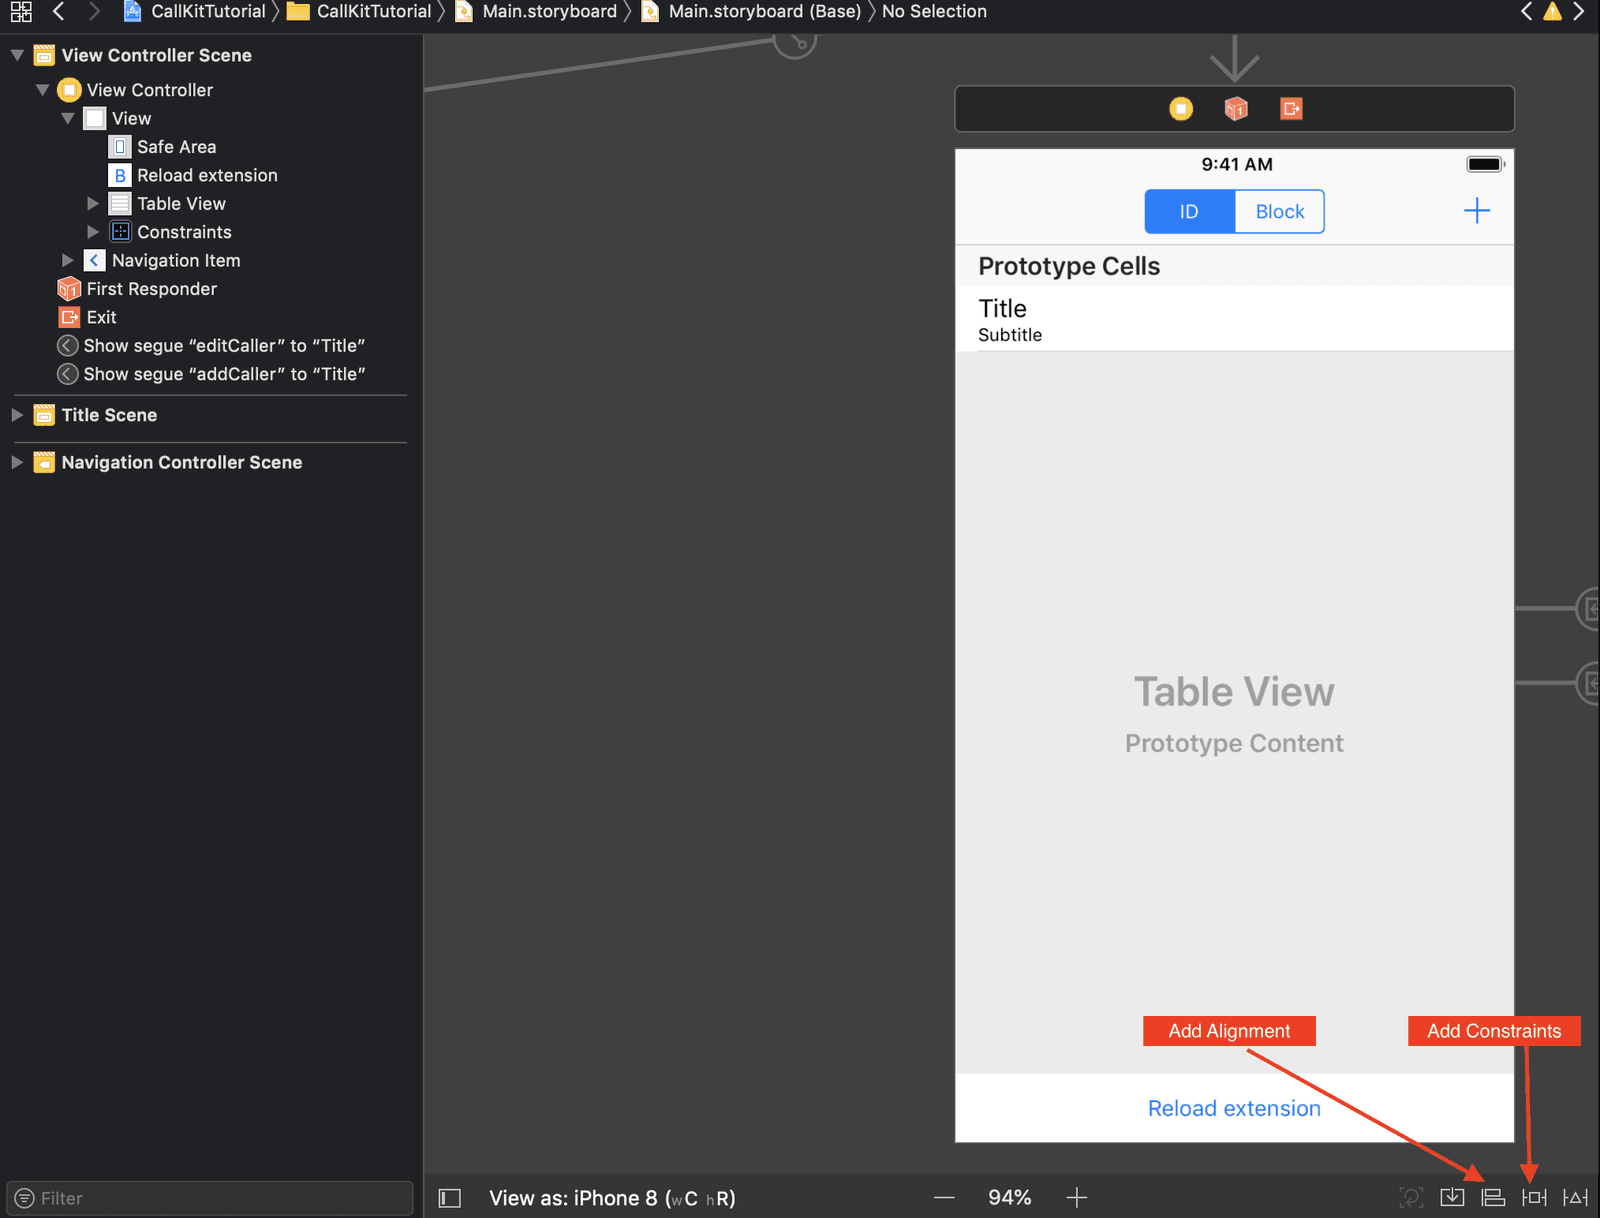
- Drag a Button from the object library and drop it near the bottom, center of the scene.
- Select the button.
- Use the Add New Constraints button (|⁃◻︎⁃|) to add a constraint between the bottom of the button and the nearest neighbor, which is the main view for the scene.
- Set the value to 8.
- Use the Add New Alignment Constraint button |⊟ to add a "Horizontally in container" constraint
- Change the button's title to "Reload extension"
The final item we need in this scene is a table view that will display the numbers:
- Drag a Table View from the object library to the center of the scene.
- Use the Add New Constraints button (|⁃◻︎⁃|) to add constraints with a value of 0 on the top, left and right and 12 to the bottom.
The table view needs a cell to display names and numbers. Select the table view and use the property inspector to add and configure a prototype cell:
- Use the properties inspector to set the number of Prototype Cells to 1.
- Select the added cell and set its style to Subtitle
- Set the cell's Reuse Identifier to CallerCell
Making connections
We need to connect the items in the view controller scene to the view controller code. Open ViewController.swift. Add properties for the table view & the segmented control and set the datasource and delegate for our table view:
1// CallKitTutorial/ViewController.swift
2
3 @IBOutlet weak var callerType: UISegmentedControl!
4 @IBOutlet weak var tableView: UITableView!
5
6 override func viewDidLoad() {
7 super.viewDidLoad()
8 self.tableView.dataSource = self
9 self.tableView.delegate = self
10 self.loadData()
11 }
Switch back to the Main.storyboard and use the Connections inspector to connect from new referencing outlet to the View Controller:
- Connect the table view to the
tableViewoutlet. - Connect the segmented control to the
callerTypeoutlet.
If you run your app at this point you should see something like the screen shot above.
###Core Data
While it is tempting to think of Core Data as a database, it is actually an object persistence system. A persistent store saves these objects. The most frequently used persistent store type is an SQLite database.
In Swift you can create objects and those objects can hold values in their properties. Those values can be simple, such as integers or strings, or they can be a reference to other objects. Core Data is very similar.
In Core Data you define entities, rather that object classes. Entities have attributes rather than properties. Xcode creates Swift code that defines objects with properties that correspond to your entities and attributes.
Our application needs to store a list of numbers. They might be numbers we want to block, or numbers we want to identify. Numbers we want to identify need an associated name. We will track number update and deletion to provide changes to the CallKit extension.
| Attribute | Type | Notes |
|---|---|---|
| isBlocked | Boolean | true if this number is on the "block" list |
| isRemoved | Boolean | true if this number has been removed from its list |
| name | String | The name associated with the number (if it isn't on the "block" list) |
| number | Integer 64 | The phone number |
| updatedDate | Date | The updated date/time for the entry |
Phone number formats: You may be wondering why
numberis a 64-bit integer and not, say, a string. There are lots of different ways to represent a phone number. Local, national, international: "8123-1234", "(02) 8123-1234" and "+61 2 8123-1234" are all different ways of writing the same phone number. The last form is e.164. If you strip away the formatting (+, - and spaces) you get a string of digits "61281231234". These digits can be stored as an integer. The largest value of a 64-bit integer is 9,223,372,036,854,775,807. That is enough to store any current phone number.
Selecting Use Core Data when we created the app caused Xcode to create an empty data model, CallKitTutorial.xcdatamodeld, and add Core Data code to the AppDelegate.swift file.
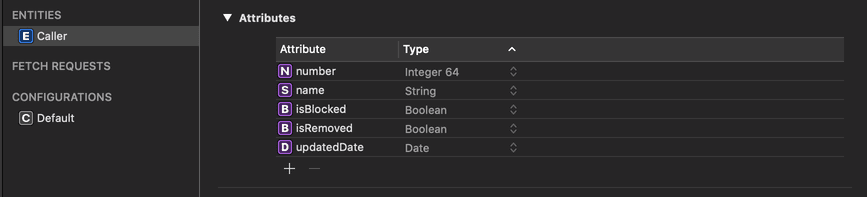
We need to add an entity and some attributes to the Core Data model.
- Open the
CallKitTutorial.xcdatamodeldfile. - Click Add Entity
- Change the entity name to
Caller - Click the "+" sign under the attribute list to add a new attribute
- Change the attribute name to
isBlockedand set the type toBoolean - Add another attribute
isRemoved, typeBoolean - Add
name, typeString - Add
numbertypeInteger 64 - Add
updatedDatetypeDate
Your Core Data model should now look like this:
The Single View App template puts the Core Data code into the AppDelegate.swift file. This is OK for a stand-alone app, but we are going to need Core Data code in our app and in the CallKit extension.
We will create a Framework to hold the Core Data code. This will make it easier to share code between the app and the extension.
- Select File->New->Target...
- Scroll to the bottom of the new target window and select Cocoa Touch Framework
- Name it
CallerData
You will see a new folder, CallerData in the project navigator. Let's move our Core Data model into the new framework.
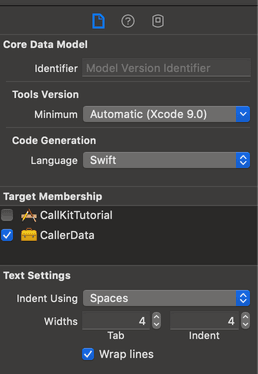
- Drag the
CallKitTutorial.xcdatamodeldfile into theCallerDatafolder in the project navigator pane. - Select the data model file. Use the checkboxes to change its Target Membership, in the file properties pane, from CallKitTutorial to CallerData.
We will need a file in the framework to hold our Core Data code. Press ⌘-N to create a new file. Select Swift File and name it CallerData.swift. Make sure that it is being added to the CallerData framework target.
Open this new file and add the following lines to import Core Data and add a class declaration:
1// CallerData/CallerData.swift 2 3 import Foundation 4 import CoreData 5 6 public final class CallerData { 7 8 public init() { 9 10 } 11 }
If you open the AppDelegate.swift file and look for the Core Data stack section. You will see a declaration for a variable named persistentContainer and a function saveContext. It will look like this:
1// CallKitTutorial/AppDelegate.swift
2
3 // MARK: - Core Data stack
4
5 lazy var persistentContainer: NSPersistentContainer = {
6
7 let container = NSPersistentContainer(name: "CallKitTutorial")
8 container.loadPersistentStores(completionHandler: { (storeDescription, error) in
9 if let error = error as NSError? {
10 fatalError("Unresolved error \(error), \(error.userInfo)")
11 }
12 })
13 return container
14 }()
15
16 // MARK: - Core Data Saving support
17
18 func saveContext () {
19 let context = persistentContainer.viewContext
20 if context.hasChanges {
21 do {
22 try context.save()
23 } catch {
24 let nserror = error as NSError
25 fatalError("Unresolved error \(nserror), \(nserror.userInfo)")
26 }
27 }
28 }
- Select that text (be careful not to select the last } in the file) and cut it to the clipboard
- Open
CallerData.swiftand paste the code in after theinitfunction. - Change the
applicationWillTerminatefunction inAppDelegate.swiftto remove the lineself.saveContext()
Note: The
saveContextfunction needs to be declared aspublicto ensure that we can still call it from our app after moving it into theCallerDataframework. Simply add thepublicmodifier as you see below
CallerData.swift should now look like:
1// CallerData/CallerData.swift
2
3 import Foundation
4 import CoreData
5
6 public final class CallerData {
7
8 public init() {
9
10 }
11
12 // MARK: - Core Data stack
13
14 lazy var persistentContainer: NSPersistentContainer = {
15
16 let container = NSPersistentContainer(name: "CallKitTutorial")
17 container.loadPersistentStores(completionHandler: { (storeDescription, error) in
18 if let error = error as NSError? {
19 fatalError("Unresolved error \(error), \(error.userInfo)")
20 }
21 })
22 return container
23 }()
24
25 // MARK: - Core Data Saving support
26
27 public func saveContext () {
28 let context = persistentContainer.viewContext
29 if context.hasChanges {
30 do {
31 try context.save()
32 } catch {
33 let nserror = error as NSError
34 fatalError("Unresolved error \(nserror), \(nserror.userInfo)")
35 }
36 }
37 }
38
39 }
Playing outside the sandbox
Apps on iOS run inside a sandbox. This is a limited environment that ensures an app can only access its own data. It is an important part of iOS security.
Usually, the sandbox isn't a problem. Your app only needs to access its own data or system data (such as contacts or photos) with the user's permission. For this app, we need to share data with our CallKit extension. Even though you are creating both the app and the extension, they each have their own sandbox.
It turns out that iOS provides a solution for this problem; App Groups. Apps (and extensions) that are signed by the same developer team can use an App Group to share files and KeyChain items securely.
We will need to set up an App Group for our project. The first step is to enable the App Groups capability. To do this, select the top-level project item (CallKitTutorial) in the project navigator and then select the CallKitTutorial target. Turn on the switch next to App Groups in the Capabilities tab.
Xcode will update your application provisioning profile to add the App Group entitlement. Once complete, you will see three ticks under Steps.
We now need to add an App Group that the app and the extension will share. App group names must be unique and start with "group.". Apple recommends adopting a reverse domain name style, as with app bundle IDs. Use something like group.com.mydomain.CallKitTutorial.
- Click the + sign under "App Groups"
- Enter your App Group name in the dialog box
- Click "OK"
Once again, you will see Xcode updating your provisioning profile. If you haven't chosen a unique name, you will get an error. Uncheck the group with the error and try again with a different name. Now that we have associated our app with the App Group, the Core Data code that Xcode added for us needs to change to use it.
Change the persistentContainer variable declaration in CallerData.swift to:
1// CallerData/CallerData.Swift
2
3 lazy var persistentContainer: NSPersistentContainer = {
4 let momdName = "CallKitTutorial"
5 let groupName = "YOUR_APP_GROUP_NAME"
6 let fileName = "demo.sqlite"
7
8 guard let modelURL = Bundle(for: type(of: self)).url(forResource: momdName, withExtension:"momd") else {
9 fatalError("Error loading model from bundle")
10 }
11
12 guard let mom = NSManagedObjectModel(contentsOf: modelURL) else {
13 fatalError("Error initializing mom from: \(modelURL)")
14 }
15
16 guard let baseURL = FileManager.default.containerURL(forSecurityApplicationGroupIdentifier: groupName) else {
17 fatalError("Error creating base URL for \(groupName)")
18 }
19
20 let storeUrl = baseURL.appendingPathComponent(fileName)
21
22 let container = NSPersistentContainer(name: momdName, managedObjectModel: mom)
23
24 let description = NSPersistentStoreDescription()
25
26 description.url = storeUrl
27
28 container.persistentStoreDescriptions = [description]
29
30 container.loadPersistentStores(completionHandler: { (storeDescription, error) in
31 if let error = error as NSError? {
32 fatalError("Unresolved error \(error), \(error.userInfo)")
33 }
34 })
35 return container
36 }()
Tip: Make sure you change the
groupNamevalue to match the group you created earlier.
This purpose of this code is to:
- Get the URL for the Core Data model from the application bundle.
- Initialize an instance of
NSManagedObjectModelusing the model. - Get a URL that refers to the container for our application group. This is a directory that is accessible to the apps that share access to the application group.
- Append a filename to this directory. This filename will be hold the sqlite database used by the Core Data store.
- Create an
NSPersistentContainerthat uses the managed object model - Create an
NSPersistentStoreDescriptionthat uses the application group file. - Tell the container to use persistent store description.
- And finally, load the persistent store.
Putting things into context
When working with Core Data, you frequently need access to the relevant NSManagedObjectContext. The managed object context we will need can be retrieved through the viewContext property of the persistentContainer. To make this a bit easier, we will add a computed variable to CallerData.swift that provides access to this property:
1public var context: NSManagedObjectContext { 2 return self.persistentContainer.viewContext 3 }
Fetching results
It is quite common to use table views and Core Data together. Apple has provided an object that helps with this task; The NSFetchedResultsController.
You provide the controller with an NSFetchRequest that retrieves the data you need.
The controller calls its delegate with results that initially match the query and when the set of results changes. This makes it easy to update the tableview as items are inserted and deleted in Core Data.
For our application we will need two sets of results; Numbers to block and numbers to identify. Let's add a function to CallData.swift that will return a NSFetchedRequest for either of these lists. We will also include options for a "since" date and whether to include "removed" items. We will use these later in the CallKit extension.
Add the following function to CallerData.swift:
1// CallerData/CallerData.swift
2
3 public func fetchRequest(blocked: Bool, includeRemoved: Bool = false, since date: Date? = nil) -> NSFetchRequest<Caller> {
4 let fr: NSFetchRequest<Caller> = Caller.fetchRequest()
5 var predicates = [NSPredicate]()
6
7 let blockedPredicate = NSPredicate(format:"isBlocked == %@",NSNumber(value:blocked))
8 predicates.append(blockedPredicate)
9
10 if !includeRemoved {
11 let removedPredicate = NSPredicate(format:"isRemoved == %@",NSNumber(value:false))
12 predicates.append(removedPredicate)
13 }
14
15 if let dateFrom = date {
16 let datePredicate = NSPredicate(format:"updatedDate > %@", dateFrom as NSDate)
17 predicates.append(datePredicate)
18 }
19
20 let predicate = NSCompoundPredicate(andPredicateWithSubpredicates: predicates)
21 fr.predicate = predicate
22 fr.sortDescriptors = [NSSortDescriptor(key: "number", ascending: true)]
23 return fr
24 }
The function creates several predicates:
- One to select either blocked or non-blocked numbers.
- One to filter removed numbers if
includeRemovedisfalse - One to return records only after any specified date
These predicates are then combined using an and condition using NSCompoundPredicate(andPredicateWithSubpredicates: predicates) and applied to the NSFetchRequest. The fetched objects will be sorted in ascending order of number.
The final CallerData.swift should look like this:
1// CallerData/CallerData.swift
2
3 import Foundation
4 import CoreData
5
6 public final class CallerData {
7 public init() {
8 }
9
10 // MARK: - Core Data stack
11
12 lazy var persistentContainer: NSPersistentContainer = {
13 let momdName = "CallKitTutorial"
14 let groupName = "group.me.wilko.CallKitTutorial"
15 let fileName = "demo.sqlite"
16
17 guard let modelURL = Bundle(for: type(of: self)).url(forResource: momdName, withExtension:"momd") else {
18 fatalError("Error loading model from bundle")
19 }
20
21 guard let mom = NSManagedObjectModel(contentsOf: modelURL) else {
22 fatalError("Error initializing mom from: \(modelURL)")
23 }
24
25 guard let baseURL = FileManager.default.containerURL(forSecurityApplicationGroupIdentifier: groupName) else {
26 fatalError("Error creating base URL for \(groupName)")
27 }
28
29 let storeUrl = baseURL.appendingPathComponent(fileName)
30
31 let container = NSPersistentContainer(name: momdName, managedObjectModel: mom)
32
33 let description = NSPersistentStoreDescription()
34
35 description.url = storeUrl
36
37 container.persistentStoreDescriptions = [description]
38
39 container.loadPersistentStores(completionHandler: { (storeDescription, error) in
40 if let error = error as NSError? {
41 fatalError("Unresolved error \(error), \(error.userInfo)")
42 }
43 })
44
45 return container
46 }()
47
48 public var context: NSManagedObjectContext {
49 return self.persistentContainer.viewContext
50 }
51
52 public func saveContext () {
53 let context = persistentContainer.viewContext
54 if context.hasChanges {
55 do {
56 try context.save()
57 } catch {
58 let nserror = error as NSError
59 fatalError("Unresolved error \(nserror), \(nserror.userInfo)")
60 }
61 }
62 }
63
64 public func fetchRequest(blocked: Bool, includeRemoved: Bool = false, since date: Date? = nil) -> NSFetchRequest<Caller> {
65 let fr: NSFetchRequest<Caller> = Caller.fetchRequest()
66 var predicates = [NSPredicate]()
67 let blockedPredicate = NSPredicate(format:"isBlocked == %@",NSNumber(value:blocked))
68 predicates.append(blockedPredicate)
69
70 if !includeRemoved {
71 let removedPredicate = NSPredicate(format:"isRemoved == %@",NSNumber(value:false))
72 predicates.append(removedPredicate)
73 }
74
75 if let dateFrom = date {
76 let datePredicate = NSPredicate(format:"updatedDate > %@", dateFrom as NSDate)
77 predicates.append(datePredicate)
78 }
79
80 let predicate = NSCompoundPredicate(andPredicateWithSubpredicates: predicates)
81 fr.predicate = predicate
82
83 fr.sortDescriptors = [NSSortDescriptor(key: "number", ascending: true)]
84 return fr
85 }
86 }
Adding data to the view
Now we are ready to connect the data to the view controller.
Open CallKitTutorial/ViewController.swift and add the following imports to the top of the file:
1// CallKitTutorial/ViewController.swift 2 3 import CoreData 4 import CallKit 5 import CallerData
These lines tell the compiler that we are going to use the CoreData & CallKit frameworks as well as our own CallerData framework.
We need to add some more properties to the view controller code:
1// CallKitTutorial/ViewController.swift
2
3 private var showBlocked: Bool {
4 return self.callerType.selectedSegmentIndex == 1
5 }
6
7 lazy private var callerData = CallerData()
8 private var resultsController: NSFetchedResultsController<Caller>!
- The first is a computed variable that returns
trueif the segmented control has "Blocked" (item 1) selected. - The second is an instance of our
CallerDataobject that we use to interact with CoreData. It islazy, which means that it won't be created until the first time it is used. - The final property is the
NSFetchedResultsControllerthat provides the data for the table view. It is an implicitly unwrapped optional (!) so it must be assigned a value before it is referenced or the app will crash.
Let's add code to do that:
1// CallKitTutorial/ViewController.swift
2
3 override func viewDidLoad() {
4 super.viewDidLoad()
5 self.tableView.dataSource = self
6 self.tableView.delegate = self
7 self.loadData()
8 }
9 private func loadData() {
10 self.navigationItem.title = self.showBlocked ? "Blocked":"ID"
11
12 let fetchRequest:NSFetchRequest<Caller> = self.callerData.fetchRequest(blocked: self.showBlocked)
13
14 self.resultsController = NSFetchedResultsController(fetchRequest: fetchRequest, managedObjectContext: self.callerData.context, sectionNameKeyPath: nil, cacheName: nil)
15 self.resultsController.delegate = self
16 do {
17 try self.resultsController.performFetch()
18 self.tableView.reloadData()
19 } catch {
20 print("Failed to fetch data: \(error.localizedDescription)")
21 }
22 }
23
24 @IBAction func callerTypeChanged(_ sender: UISegmentedControl) {
25 self.loadData()
26 }
27
28 @IBAction func unwindFromSave(_ sender: UIStoryboardSegue) {
29 }
This adds a function, loadData, that creates an NSFetchedResultsController to get the data we need and reload the table view. You can see how the showBlocked variable provides a convenient shortcut to the segmented control’s value.
The loadData function is called when the view controller is loaded and when the segmented control’s value is changed. The callerTypeChanged function handles this second case.
The Add/Edit scene, that we will add shortly, will use the unwindFromSave function and we will use the reloadTapped function in part two of this tutorial.
Don’t panic if you see an error on the line self.resultsController.delegate = self. We will fix this shortly.
Laying it on the table
Having fetched the data, we want to display it in the table view. To do that we need to implement the UITableViewDataSource protocol.
Scroll to the bottom of ViewController.swift and add the following lines:
1// CallKitTutorial/ViewController.swift
2
3 extension ViewController: UITableViewDataSource, UITableViewDelegate {
4 func numberOfSections(in tableView: UITableView) -> Int {
5 return self.resultsController.sections?.count ?? 0
6 }
7
8 func tableView(_ tableView: UITableView, numberOfRowsInSection section: Int) -> Int {
9 return self.resultsController.fetchedObjects?.count ?? 0
10 }
11
12 func tableView(_ tableView: UITableView, cellForRowAt indexPath: IndexPath) -> UITableViewCell {
13 let cell = tableView.dequeueReusableCell(withIdentifier: "CallerCell", for: indexPath)
14 let caller = self.resultsController.fetchedObjects![indexPath.row]
15
16 cell.textLabel?.text = caller.isBlocked ? String(caller.number) : caller.name ?? ""
17 cell.detailTextLabel?.text = caller.isBlocked ? "" : String(caller.number)
18
19 return cell
20 }
21
22 func tableView(_ tableView: UITableView, commit editingStyle: UITableViewCell.EditingStyle, forRowAt indexPath: IndexPath) {
23 switch editingStyle {
24 case .delete:
25 if let caller = self.resultsController.fetchedObjects?[indexPath.row] {
26 caller.isRemoved = true
27 caller.updatedDate = Date()
28 self.callerData.saveContext()
29 }
30 default:
31 break
32 }
33 }
34 }
This adds an extension to the ViewController class that tells the compiler that it conforms to the UITableViewDataSource and UITableViewDelegate protocols.
There are three functions that provide the data to the table through the UITableViewDataSource protocol:
numberOfSections- This returns the number of sections from the fetched results controller or 0 if there are no sections. We will have 1 section.numberOfRowsInSection- This returns the number of rows in the tableview. This is either the number of objects fetched or 0 if there are none.cellForRowAt- This returns a table view cell for the nominated row. We retrieve a cell and aCallerobject from the results. If blocked numbers are being shown then we show the number. If identification numbers are being shown we show the name and the number.
The final function is part of the UITableViewDelegate protocol. The table view calls this function when the user performs when an editing operation on the table. The only editing operation we want to support is the delete operation. This operation results from the user swiping left on the table row and tapping the delete button.
When this happens the isRemoved property is set to true, the updatedDate property is set to the current date & time and the updated Caller object is saved.
Why isn't the Caller simply deleted? We will see later that the CallKit extension can process incremental updates. To do this, the data needs to hold transactions rather than only the current records.
Fetched results delegate
The NSFetchedResultsController makes it easy to react to changes in the set of fetched objects. Whenever there is an update to an object that matches the query, the controller calls its delegate to provide details of the event.
Add another extension to implement the NSFetchedResultsControllerDelegate:
1// CallKitTutorial/ViewController.swift
2
3 extension ViewController: NSFetchedResultsControllerDelegate {
4
5 // 1. Changes are coming from the NSFetchedResultsController`
6 func controllerWillChangeContent(_ controller: NSFetchedResultsController<NSFetchRequestResult>) {
7 self.tableView.beginUpdates()
8 }
9
10 // 2. Process a change...
11 func controller(_ controller: NSFetchedResultsController<NSFetchRequestResult>, didChange anObject: Any, at indexPath: IndexPath?, for type: NSFetchedResultsChangeType, newIndexPath: IndexPath?) {
12
13 let newIndexPath: IndexPath? = newIndexPath != nil ? IndexPath(row: newIndexPath!.row, section: 0) : nil
14 let currentIndexPath: IndexPath? = indexPath != nil ? IndexPath(row: indexPath!.row, section: 0) : nil
15
16 switch type {
17 case .insert:
18 self.tableView.insertRows(at: [newIndexPath!], with: .automatic)
19
20 case .delete:
21 self.tableView.deleteRows(at: [currentIndexPath!], with: .fade)
22
23 case .move:
24 self.tableView.moveRow(at: currentIndexPath!, to: newIndexPath!)
25
26 case .update:
27 self.tableView.reloadRows(at: [currentIndexPath!], with: .automatic)
28
29 @unknown default:
30 fatalError()
31 }
32 }
33
34 //3. All changes have been delivered
35 func controllerDidChangeContent(_ controller: NSFetchedResultsController<NSFetchRequestResult>) {
36 self.tableView.endUpdates()
37 }
38 }
There are three functions in this extension:
controllerWillChangeContent- This is called prior to one or more updates being delivered to the delegate. Our code tells the tableview that updates are coming. The tableview will hold any visual updates until a subsequent call toendUpdatesdidChange- This is called when the result objects change. There are four possible updates:insert- A new object has been inserted into the results. We tell the table view about this by callinginsertRows.delete- An object has been removed from the results. We tell the table view about this by callingdeleteRows.move- An object has been moved up or down the list. We tell the table view about this by callingmoveRow.update- An object has been updated. We ask the table view to reload the relevant row so that the new data is shown.
controllerDidChangeContent- This is called after all updates have been delivered todidChange. Our code tells the table view that updates are now complete and it can perform any required visual updates (inserting, removing or reloading rows).
Adding data
If you run the app now, you will be able to select between the two number lists, but there is no data to display. Let's make that "+" do something.
First, let's prepare our existing view controller:
- Open the
Main.storyboardfile - Select the segmented control.
- Using the Connections Inspector, make a connection between "Value Changed" and the
callerTypeChangedfunction. - Drag a View Controller from the object library.
- Click on the "+" button in the navigation bar of the first scene and, while holding ctrl, drag a connection to the new view controller.
- When you release the mouse select "Show" from the popup menu.
- Select the new segue object between the two scenes and set its identifier to "addCaller"
- Click on the Caller Cell item in the first scene's object list.
- ctrl-drag to the second scene and select "show" from the popup menu.
- Again, select the new segue object between the two scenes and set its identifier to "editCaller"
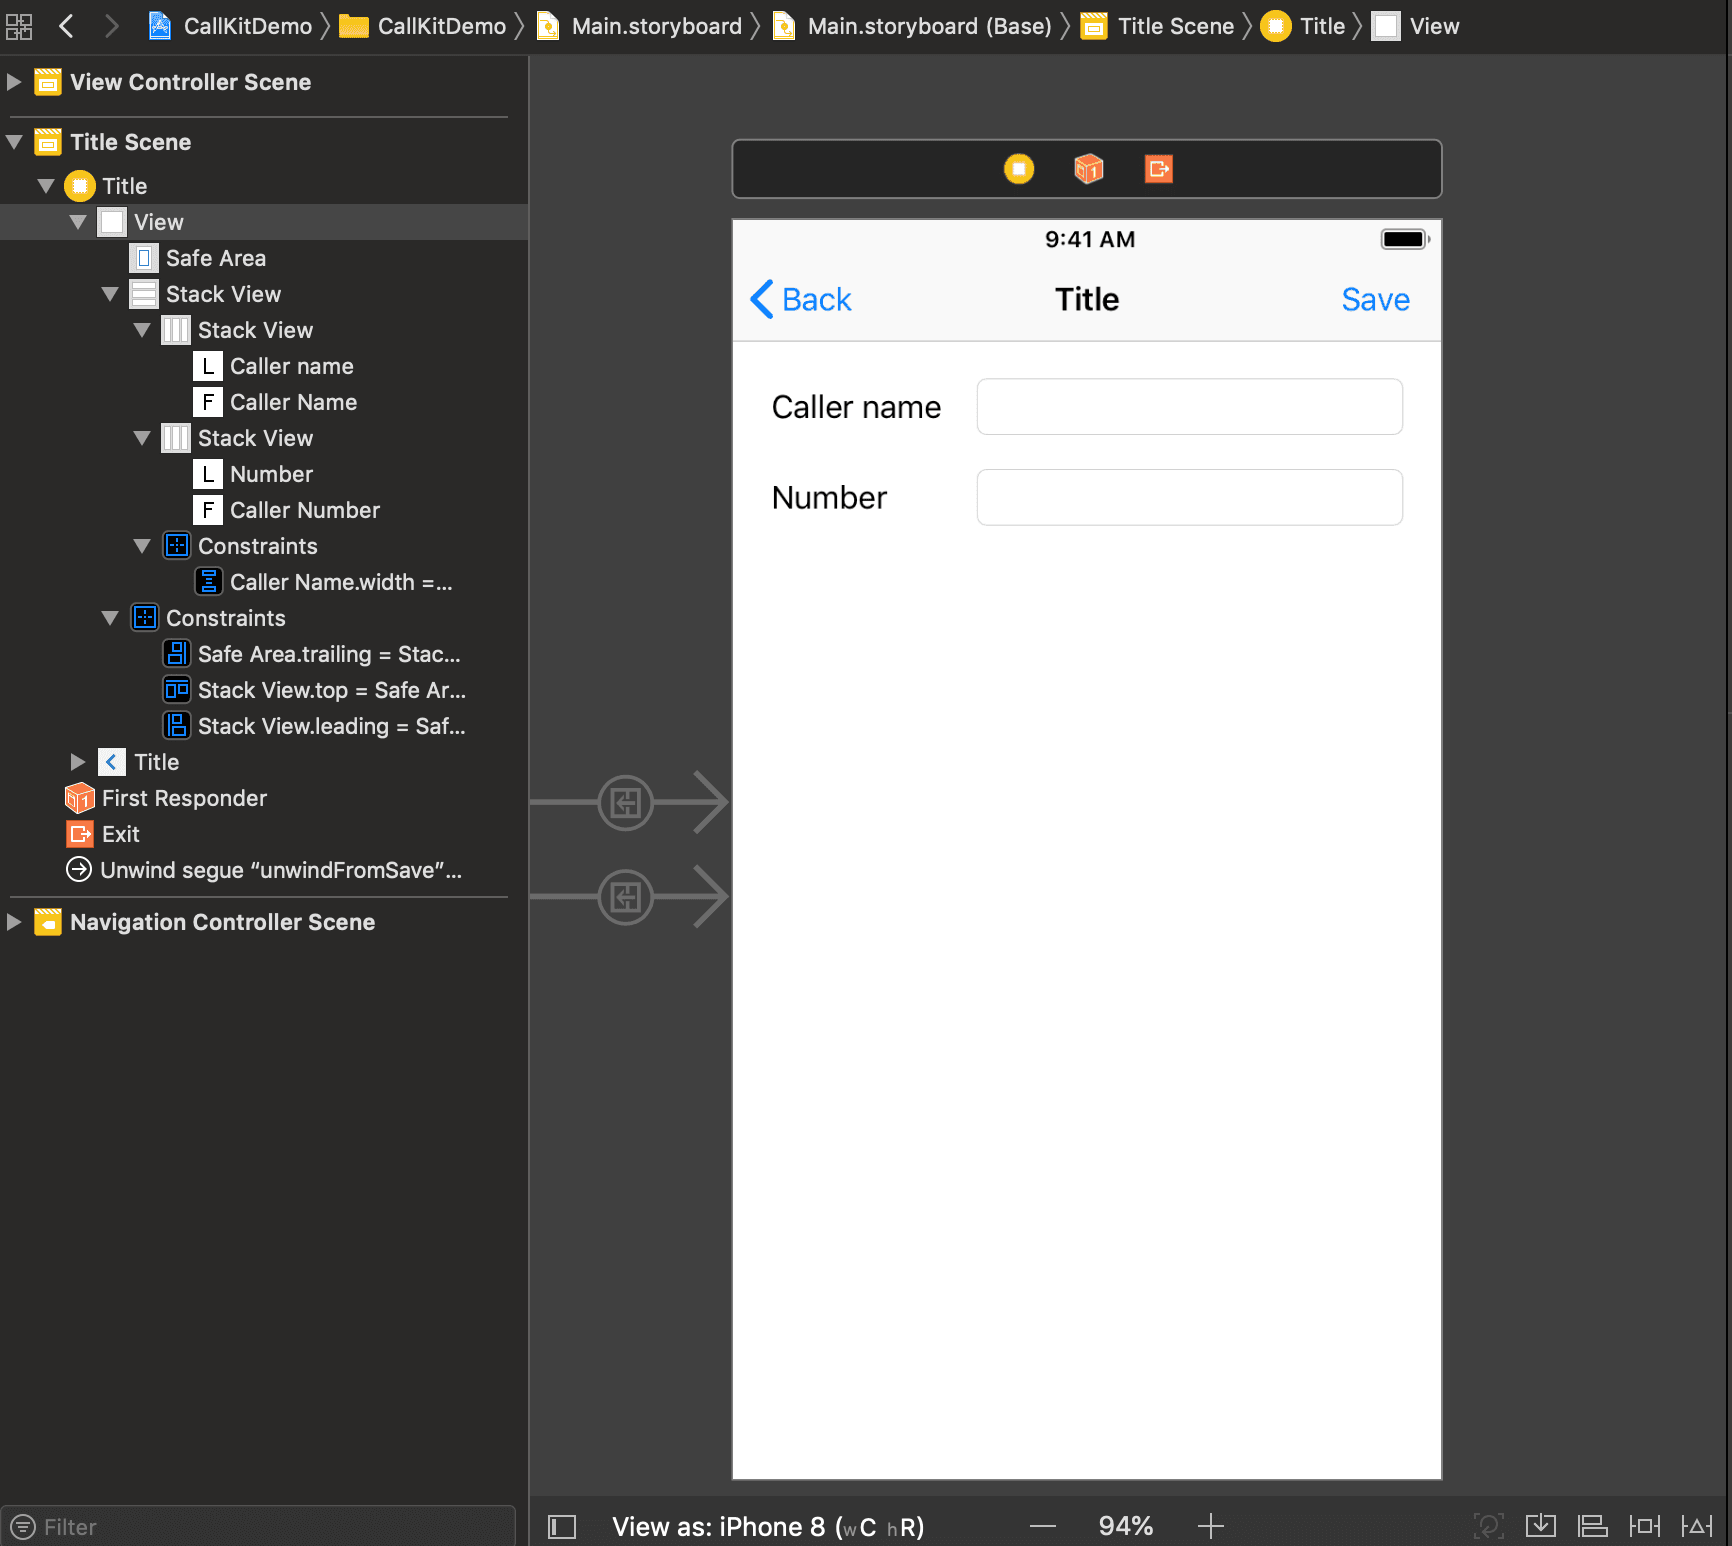
Now we need to add some controls to the new View Controller so that we can enter and save data.
- Drag a "Navigation Item" from the object library to the new view controller.
- Drag a "Bar Button Item" to the right hand side of the navigation bar.
- Change the button's "System Item" to "Save" in the attribute inspector
- ctrl-drag from the yellow "View Controller" icon at the top of the scene to the "Exit icon" and select unwindFromSave from the popup.
- Select the new Unwind segue from the left hand object navigator and set its identifier to "unwindFromSave"
- Drag a label from the object library to the top left of the view controller. The exact position doesn't matter.
- Change the label to "Caller name"
- Place a text field beside this label.
- Select both the label and the text field (select one and then select the other while holding command).
- Select "Editor->Embed in->Stack view menu item.
- Place a label under the first label and change it to "Number"
- Place another text field next to this label.
- Embed the label and text field in a stack view as you did with the first pair.
- Select the two stack views and embed them in a stack view.
- Select this newest stack view and use the |⁃◻︎⁃| button to add top, left and right constraints with a value of 20.
- Set the Alignment of the newest stack view to fill.
- Select the first text field and ctrl-drag to the second and select "Equal Widths" from the popup menu.
Your new scene should look like this:
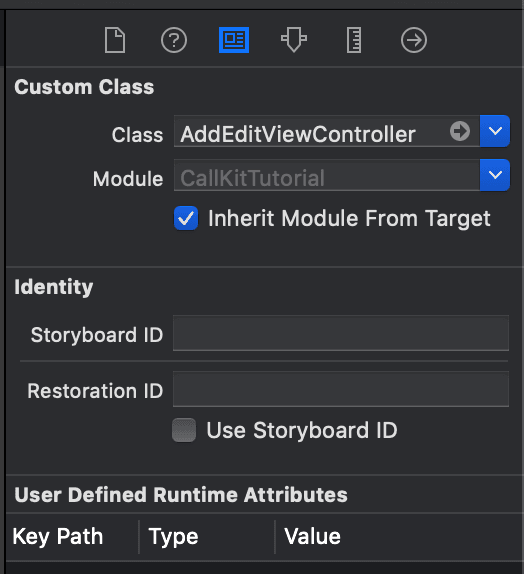
Now we can create some code for this scene. Create a new Cocoa Touch Class by pressing ⌘-N. Make it a subclass of UIViewController and name it AddEditViewController. Ensure you add it to the CallKitTutorial target
Open the new AddEditViewController.swift file and add
1// CallKitTutorial/ViewController.swift 2 3 import CallerData
to the top of the file. We also need to add the following properties:
1// CallKitTutorial/ViewController.swift
2
3 @IBOutlet weak var callerName: UITextField!
4 @IBOutlet weak var callerNumber: UITextField!
5 @IBOutlet weak var saveButton: UIBarButtonItem!
6
7 var caller: Caller? {
8 didSet {
9 self.updateUI()
10 }
11 }
12
13 var callerData: CallerData!
14 var isBlocked = false
These define:
- Properties for the name and number text fields.
- A property for the save button in the navigation bar.
- A property for the
Callerthat we are adding or editing. - A property for our
CallerDataCore Data framework object. - A property that tracks whether we are displaying a blocking number or an identification number.
Open the new view controller scene in Main.Storyboard file. Use the identity inspector to set the scene's class to AddEditViewController.
Use the connections inspector to connect the two text fields and the save button to the outlets we defined in the class.
It's the little things
Attention to small details can really improve the user's experience of your app. There are a couple of details we can address in our add/edit screen:
- Ensure that the Save button is disabled if the data isn't correct.
- Ensure that only digits can be entered into the number field
Add the following code to AddEditViewController.swift:
1// CallKitTutorial/AddEditViewController.swift
2
3 override func viewWillAppear(_ animated: Bool) {
4 super.viewWillAppear(animated)
5 self.updateUI()
6 }
7
8 private func updateUI() {
9
10 guard let caller = self.caller,
11 let callerName = self.callerName,
12 let callerNumber = self.callerNumber else {
13 return
14 }
15
16 callerName.text = caller.name
17 callerNumber.text = caller.number != 0 ? String(caller.number):""
18 self.navigationItem.title = caller.name
19
20 self.updateSaveButton()
21
22 }
23
24 private func updateSaveButton() {
25 self.saveButton.isEnabled = false
26 guard let name = self.callerName.text,
27 let number = self.callerNumber.text else {
28 return
29 }
30 self.saveButton.isEnabled = !(name.isEmpty || number.isEmpty)
31 }
32
33 @IBAction func textChanged(_ sender: UITextField) {
34 self.updateSaveButton()
35 }
This code calls the updateUI function when the view is about to appear.
UpdateUI verifies that the Caller property has a value and that that object has both a callerName and a callerNumber. These values are put into the text field. The screen title is also updated to the caller's name.
updateSaveButton ensures that the save button is only enabled if the Caller's name and number are not empty.
textChanged is an action function that we will used to update the save button state as the text fields change.
This takes care of our first requirement.
We can meet the second requirement by checking whether we have a valid number after the user enters each character. This requires a UITextFieldDelegate function. Add the following code to the bottom of AddEditViewController.swift:
1// CallKitTutorial/AddEditViewController.swift
2
3 extension AddEditViewController: UITextFieldDelegate {
4 func textField(_ textField: UITextField, shouldChangeCharactersIn range: NSRange, replacementString string: String) -> Bool {
5 guard let text = textField.text,
6 let textRange = Range(range, in: text) else {
7 return false
8 }
9 let updatedText = text.replacingCharacters(in: textRange,
10 with: string)
11 if textField == self.callerNumber {
12 if updatedText.isEmpty {
13 return true
14 }
15 if Int64(updatedText) == nil {
16 return false
17 }
18 } else if textField == self.callerName {
19 self.navigationItem.title = updatedText
20 }
21 return true
22 }
23 }
Entering a character triggers this delegate function. Returning true permits the change. Returning false prevents it.
The function uses the existing text field value and the proposed change to determine the new value for the field.
The function permits the change if the text field is the number field and the new value can convert to an Int64.
If the text field is the name field, the change is always permitted. The code also assigns the new value to the screen title.
In order for code to be called, we need to set our view controller as the delegate for the text fields. Replace the viewDidLoad function in CallKitTutorial/AddEditViewController.swift with the following:
1// CallKitTutorial/AddEditViewController.swift
2
3 override func viewDidLoad() {
4 super.viewDidLoad()
5 self.callerName.delegate = self
6 self.callerNumber.delegate = self
7 self.title = ""
8 }
Finally, we need to add a "save" function to CallKitTutorial/AddEditViewController:
1// CallKitTutorial/AddEditViewController.swift
2
3 @IBAction func saveTapped(_ sender: UIBarButtonItem) {
4 if let numberText = self.callerNumber.text,
5 let number = Int64(numberText) {
6 let caller = self.caller ?? Caller(context: self.callerData.context)
7 caller.name = self.callerName.text
8 caller.number = number
9 caller.isBlocked = self.isBlocked
10 caller.isRemoved = false
11 caller.updatedDate = Date()
12 self.callerData.saveContext()
13 }
14 self.performSegue(withIdentifier: "unwindFromSave", sender: self)
15 }
This code first ensures that both text fields have valid data.
If an entry is being edited, it retrieves the Caller Core Data object supplied by the previous view controller. If we are adding a new entry, it creates a new Caller object. The properties of this object are then set and saved.
Finally, the unwindFromSave segue is then invoked to exit this view controller.
The storyboard scene requires connections for these functions to work.
Open the AddEditViewController scene in Main.storyboard. Using the Connections Inspector:
- Connect Editing Changed in the Sent Event section and the
textChangedfunction for both text fields. - Connect the selector outlet of the save button and
saveTappedfunction in the view controller.
Passing the caller
We have one last piece of code to add to add to ViewController.swift. We need code to pass the CallerData object and the object to be edited to the AddEditViewController. This is done in prepareForSegue.
Open ViewController.swift and add the following function:
1// CallKitTutorial/AddEditViewController.swift
2
3 override func prepare(for segue: UIStoryboardSegue, sender: Any?) {
4 if let dest = segue.destination as? AddEditViewController {
5 dest.isBlocked = self.showBlocked
6 dest.callerData = self.callerData
7 if let cell = sender as? UITableViewCell,
8 let indexPath = tableView.indexPath(for: cell),
9 let caller = self.resultsController.fetchedObjects?[indexPath.row] {
10 dest.caller = caller
11 }
12 }
13 }
This function is called when a segue is triggered. It sets the isBlocked and callerData properties.
If the sender (The item that triggered the segue) is a table view cell, we know that the user wants to edit a row. We find the row for the cell and the object for that row. That object is passed to the AddEditViewController.
At this point you can run the app and you will be able to add, edit and remove both identification and block numbers.
Conclusion
In this tutorial we have created a simple application that uses Core Data to store phone number blocking and identification lists.
- We extracted the Core Data code into a framework so that it is available for re-use in part two.
- We used an Application Group so that the extension we create in part two can access the data from this app
- We implemented basic data validation for the data entered.
In part two we will create a CallKit Extension that provides the entered data to iOS for use in blocking and identifying callers.
If you are looking for a further challenge, you could use PhoneNumberKit to format and display the phone numbers. This framework can also be used to allow the user to enter numbers in common formats.
The completed code for parts one and two of this tutorial series is available on GitHub.


© 2026 Pusher Ltd. All rights reserved.
Pusher Limited is a company registered in England and Wales (No. 07489873) whose registered office is at MessageBird UK Limited, 3 More London Riverside, 4th Floor, London, United Kingdom, SE1 2AQ.