- Products

- Developers
- User stories
- Blog
- Pricing

Pusher Beams client API demo for iOS
- Introduction
- Introduction
- Prerequisites
- Demo setup
- How to send a notification
- SDK
- shared
- start()
- registerForRemoteNotifications()
- registerDeviceToken()
- stop()
- Overview
- Testing it out
- Device interests
- getDeviceInterests()
- setDeviceInterests()
- clearDeviceInterests()
- addDeviceInterest()
- removeDeviceInterest()
- Testing it out
- User
- setUserId()
- clearAllState()
- Testing it out
- Events
- interestsSetOnDeviceDidChange()
- handleNotification()
- Test it out
- Conclusion
Introduction
Introduction
The purpose of this tutorial is to help you understand what each part of the Beams API does in a client iOS app. Consider this a supplement to the Beams documentation if you need a little extra explanation.
The whole demo project is available on GitHub so that you can see the code in context.
Prerequisites
This tutorial is more of a reference rather than a step-by-step tutorial, but since it does contain an iOS project demonstrating the full API of the iOS Beams SDK, I’ll give you some pointers for how to set the demo project up as well as how to send push notifications to test it.
If you want to use the demo project, these are the prerequisites:
- Knowledge of iOS development (I used Xcode 10.2.1 with Swift 5.0.1 to make the demo)
- An iOS developer account
- A real iOS device (not the simulator) running iOS 10 or greater
- Create a free sandbox Pusher account or sign in.
- Familiarity with sending POST requests. I’ll give you the curl commands to initiate push notifications, but you are welcome to use another tool like Postman.
- Knowledge of server side development (mostly optional). You do not need a backend server to send push notifications to device interests. However, to send notifications to authenticated users, a server is required. This will only apply to the “setUserId()” section of this article (the Set ID button of the demo). The other parts of the demo app do not require a server. I’ll be using the Dart server from a previous tutorial, but you are free to port that code to any server language that Pusher supports.
This project was tested with Pusher Beams iOS SDK version 2.0.2.
Demo setup
The demo app I’ll be using has a UI to show each part of the Beams SDK.
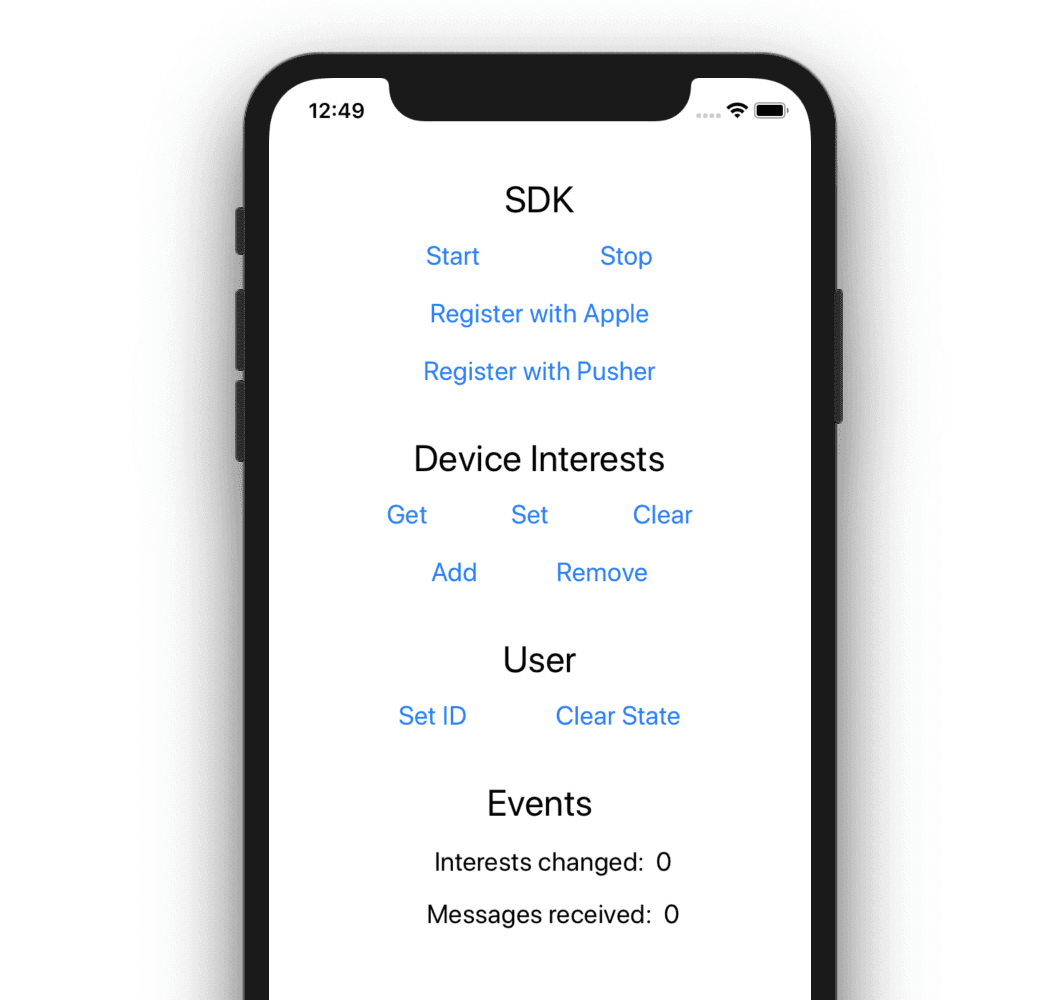
To set up this demo app, perform the following tasks:
- Clone the GitHub repo
- Create a Beams instance and configure APNs. You can follow the quick start guide. After you have entered your APNs signing key and team ID, you can exit the quick start wizard. Go to your Pusher dashboard, open your new instance, and go to the Credentials tab. You will find your Instance ID and Secret Key there.
- Using Xcode, in the cloned repo target settings, in the General section, update your bundle ID so that it is unique and make sure that your Team is set to your developer account. In the Capabilities section, make sure that Push Notifications is on and that Background Modes > Remote notifications is checked.
- In the cloned repo’s
ViewController.swiftfile, set theinstanceIdat the top to your Beams Instance ID. - Run the app on a real device.
The interesting parts of the repo are here:
I will describe the aspects related to sending push notifications below.
How to send a notification
In the descriptions throughout this tutorial, I will direct you to send push notifications to test the app. You could do that from a server, but for simplicity we'll use curl. (Alternatively, you could use Postman if you are more comfortable with that.)
Below are some curl commands that you will find useful. Replace the SSSSSSSSSSSSSSSSS with your Beams Secret Key and replace IDIDIDIDIDIDID with your Beams Instance ID, both of which you can find in your Beams dashboard under the Credentials tab for your instance.
Sending an APNs push notification for the device interest apple:
1curl -H "Content-Type: application/json" \ 2 -H "Authorization: Bearer SSSSSSSSSSSSSSSSS" \ 3 -X POST "https://IDIDIDIDIDIDID.pushnotifications.pusher.com/publish_api/v1/instances/IDIDIDIDIDIDID/publishes/interests" \ 4 -d '{"interests":["apple"],"apns":{"aps":{"alert":{"title":"Title","body":"Body text"}}}}'
You can change apple to something else or include multiple interests. That is, replace ["apple"] with ["apple","pear"].
Sending an APNs push notification to an authenticated user Mary:
1curl -H "Content-Type: application/json" \ 2 -H "Authorization: Bearer SSSSSSSSSSSSSSSSS" \ 3 -X POST "https://IDIDIDIDIDIDID.pushnotifications.pusher.com/publish_api/v1/instances/IDIDIDIDIDIDID/publishes/users" \ 4 -d '{"users":["Mary"],"apns":{"aps":{"alert":{"title":"My title","body":"Hey, Mary"}}}}'
This one is the same as the interests request, except that the string interests is replaced with users (in the path and in the JSON key), and the JSON value for users includes "Mary" in the array. I changed the message body a little, too.
SDK
In each section below I’ll describe what the methods of the SDK do.
shared
The methods of the PushNotifications class are all accessed from a singleton, the static shared instance. You can get a reference to it in anywhere in your app like this:
1import PushNotifications 2 3 let beamsClient = PushNotifications.shared
You will use it in your app delegate as well as any ViewControllers that need it. In the demo app’s AppDelegate file, however, I didn’t use it. This is so that you can see what is happening by performing each step of the initialization process manually.
start()
You always need to call the start method first. The other methods won’t work without it. Normally you would call start in your app delegate’s didFinishLaunchingWithOptions method, but in the demo app I put it in a button IBAction method.
beamsClient.start(instanceId: "your_instance_id_here")
The start method takes one parameter, the Beams instance ID, which you can find in your Pusher dashboard.
registerForRemoteNotifications()
After starting the SDK, the device needs to tell APNs (Apple Push Notification service) what kind of notifications it would like to receive. In the demo app, I called the button Register with Apple. The Beams SDK uses registerForRemoteNotifications for this purpose.
beamsClient.registerForRemoteNotifications(options: [.alert, .sound, .badge])
The options are an array of [UNAuthorizationOptions](https://developer.apple.com/documentation/usernotifications/unauthorizationoptions). An alert is the visual message that you see when a push notification arrives. The sound is what you hear, of course. The badge is the red circle with a number on the app icon. There are other options that you can request as well. Since alert, sound, and badge are the most common notification types to register, the Beams SDK has a convenience method that will register those three:
beamsClient.registerForRemoteNotifications()
Note that registering for alert, sound, and badge does not mean that all three of these will be triggered for every notification. Which ones are applied depends on the content of the JSON keys in the APNs message. In the “How to send a notification” section above, the APNs message only had the alert key set.
If the registration is successful then the app delegate will be notified and given a device token from APNs. You should take the device token and register it on the Beams server (see the “registerDeviceToken()” section below).
1func application(_ application: UIApplication, didRegisterForRemoteNotificationsWithDeviceToken deviceToken: Data) { 2 // register the deviceToken with the Pusher Beams server 3 }
If for some reason registering with Apple fails, you are notified in the app delegate here:
1func application(_ application: UIApplication, didFailToRegisterForRemoteNotificationsWithError error: Error) { 2 // failed to register with APNs 3 }
Note: Contrary to what the name sounds like,
registerForRemoteNotificationsdoes not actually make an HTTP request to remote APNs servers every time. It does make a request the first time, but after that the local system (not your app) stores the device token for your app and returns it quickly. The device token may change at certain events (like restoring the system from a backup or installing the app on a different device), but you don’t need to worry about that. The system will take care of it. You just get the device token from the app delegate method when the app launches and pass it on to the Pusher Beams SDK. Your job is done as far as the device token goes. Knowing this, when you see “register for remote notifications” or “register with Apple”, don’t assume that necessarily means an HTTP request. See the Apple developer docs and this Stack Overflow answer for more.
registerDeviceToken()
After you have registered with APNs and have been given a device token, you should give that token to the Pusher Beams server. As mentioned in the previous section, the place to do that is in the app delegate’s didRegisterForRemoteNotificationsWithDeviceToken method.
1func application(_ application: UIApplication, didRegisterForRemoteNotificationsWithDeviceToken deviceToken: Data) { 2 self.beamsClient.registerDeviceToken(deviceToken) 3 }
In the demo app, though, I let you do it manually using the Register with Pusher button.
stop()
Calling stop means that you won't get any more notifications. The state (device interests and Beams token) is deleted on the local device and on the remote Beams server.
1beamsClient.stop() { 2 // closure to run after the device is deleted from the Beams server 3 }
If you want to start getting messages again, you will need to call start, reregister with Apple and Pusher, and resubscribe to any interests that you want (since the state was deleted).
One use case for stop would be if a user wanted to opt out of receiving all notifications.
When a user logs out, prefer using clearAllState(). See the “User” section below.
Overview
Since the SDK methods are all separated into different buttons in the demo app, let me show the code that you would use in a typical app to start the Beams SDK. Here is the relevant code in the app delegate file:
1// AppDelegate.swift
2
3 import UIKit
4 // import the Pusher Beams SDK
5 import PushNotifications
6
7 @UIApplicationMain
8 class AppDelegate: UIResponder, UIApplicationDelegate {
9
10 var window: UIWindow?
11 var viewController: ViewController?
12
13 // get a reference to the SDK instance
14 let beamsClient = PushNotifications.shared
15
16 func application(_ application: UIApplication, didFinishLaunchingWithOptions launchOptions: [UIApplication.LaunchOptionsKey: Any]?) -> Bool {
17
18 // start the Beams SDK
19 self.beamsClient.start(instanceId: "your_instance_id_here")
20
21 // register this device to with Apple (APNs) to receive alert, sound,
22 // and badge notifications
23 self.beamsClient.registerForRemoteNotifications()
24
25 return true
26 }
27
28 func application(_ application: UIApplication, didRegisterForRemoteNotificationsWithDeviceToken deviceToken: Data) {
29
30 // take the device token from APNs and give it to the Pusher Beams server
31 self.beamsClient.registerDeviceToken(deviceToken)
32 }
33
34 func application(_ application: UIApplication, didFailToRegisterForRemoteNotificationsWithError error: Error) {
35 // there was an error registering this device with Apple (APNs)
36 }
37
38 // ...
39 }
Assuming that the registrations with Apple and Pusher were successful, your app is ready to receive push notifications at this point.
Testing it out
Starting the SDK and registering with Apple are required before registering the device token with Pusher:
- Do a fresh run of the app
- Tap the Start button
- Tap the Register with Apple button
- Note the in-app popup message indicating a successful APNs registration
- Tap the Register with Pusher button
- Note the in-app popup message indicating registration is happening
Stopping clears the state:
- Do a fresh run of the app
- Tap the Start button
- Tap the Register with Apple button
- Tap the Register with Pusher button
- Tap the Add button
- Add the "apple" device interest
- Tap the Get button
- Note that "apple" is an interest
- Tap the Stop button
- Tap the Get button
- Note that there are no interests
Device interests
Interests are topics that a device can subscribe to. When the server sends a push notification for a string that is in the device's list of interests, that device will receive a notification.
getDeviceInterests()
This method returns [String], which is an array of all of the interests that the device is subscribed to.
let interests = beamsClient.getDeviceInterests()
As long as you don't call stop, clearInterests, or clearAllState, the interests will still be available between runs of the app, even if the device powers down and restarts.
setDeviceInterests()
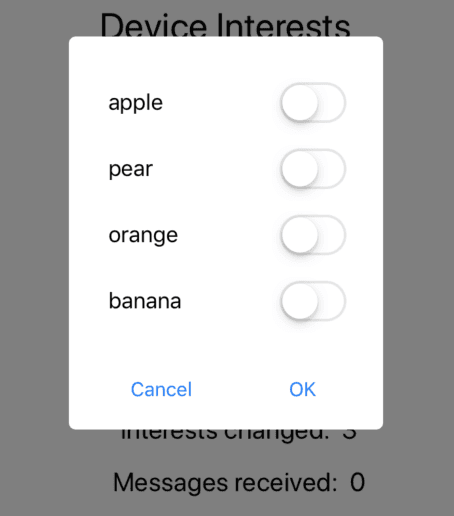
With setDeviceInterests you can choose a new list of interests to subscribe to. This replaces any old list that the device might have had. The device will receive push notifications for all interests in this list, but not for any interests outside of this list.
beamsClient.setDeviceInterests(interests: interests)
The type of the parameter interests is [String]. In the case of the demo app, this array is obtained from a popup alert.
Since setDeviceInterests can throw a MultipleInvalidInterestsError, you can handle it with a do-catch statement:
1do { 2 try beamsClient.setDeviceInterests(interests: interests) 3 } catch is MultipleInvalidInterestsError { 4 print("There are invalid interests name(s)") 5 } catch { 6 print("error") 7 }
clearDeviceInterests()
The method clearDeviceInterests does what it says and removes any interests that the device is subscribed to. The device will no longer receive push notifications for any interests.
try? beamsClient.clearDeviceInterests()
Internally this method calls setDeviceInterests with an empty array.
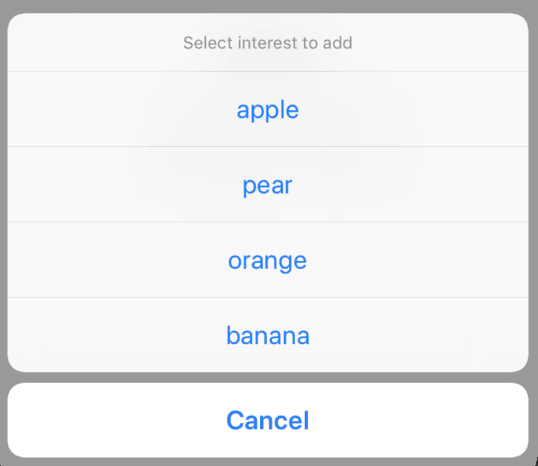
addDeviceInterest()
This method adds an interest to the list of interests that the device is already subscribed to. The device will receive push notifications for this interest.
1do { 2 try beamsClient.addDeviceInterest(interest: interest) 3 } catch is InvalidInterestError { 4 print("Invalid interest name") 5 } catch { 6 print("error") 7 }
The type for the parameter interest is a String. The valid characters for an interests string are
abcdefghijklmnopqrstuvwxyzABCDEFGHIJKLMNOPQRSTUVWXYZ0123456789_-=@,.;
and an interest can be up to 164 characters long. If the interest name does not follow these guidelines, then the SDK will throw an InvalidInterestError.
Adding the same interest twice does not cause a crash. It's the same as adding it once.
The demo app uses an Action Sheet to choose an interest.
removeDeviceInterest()
This method removes an interest from the list of interests that the device is already subscribed to. The device will no longer receive push notifications for this interest.
1do { 2 try beamsClient.removeDeviceInterest(interest: interest) 3 } catch is InvalidInterestError { 4 print("Invalid interest name") 5 } catch { 6 print("error") 7 }
The type for the parameter interest is a String with the same constraints as for addDeviceInterest.
Trying to remove an interest that the device is not subscribed to does not cause a crash.
Testing it out
These tests assume that you have already initialized the Beams SDK by tapping the Start, Register with Apple, and Register with Pusher buttons in that order.
Adding an interest allows the device to receive a notification:
- Tap the Add button
- Choose "apple"
- Put the app in the background
- Send a notification to users subscribed to the "apple" interest (Refer back to the "How to send a notification" section for help)
- Note that the device receives the notification
Removing an interest causes the device to not receive notification:
- Continuing from the last test, tap the Remove button
- Choose "apple"
- Put the app in the background
- Send a push notification for "apple"
- Note that the device doesn't receive a notification
Setting a list of interests replaces the old list:
- Tap the Set button
- Choose "apple" and "banana"
- Tap the Get button
- Note that "apple" and "banana" are in the list
- Tap the Set button again
- Choose "banana" and "orange"
- Tap the Get button again
- Note that "banana" and "orange" are in the list but "apple" is not
User
While interests are for sending push notifications to a large numbers devices by topic, user notifications can be sent to specific authenticated users. The notification will go to every device on which the user is logged in.
setUserId()
Of all the methods in the Beams SDK, this one is the most complex. Part of the reason is security. You have to prove who you are before Pusher will send you user specific notifications. Otherwise you could just say you're me and then get all of my private notifications.
The way it works is like this. First of all, a user who wants to receive private notifications gets a Beams token from the app server (not Pusher). This could be a one-step process using basic authentication with a username and password. Or it could be a two-step process of first logging in to get a session token and then using that to get a Pusher token. The server creates the Pusher token by signing a JWT payload with the instance's secret key. After the user has the Pusher token, it is sent to Pusher to prove they are who they say are. Only then will Pusher send them personal notifications.
Here is the sequence diagram taken from the Beams documentation:
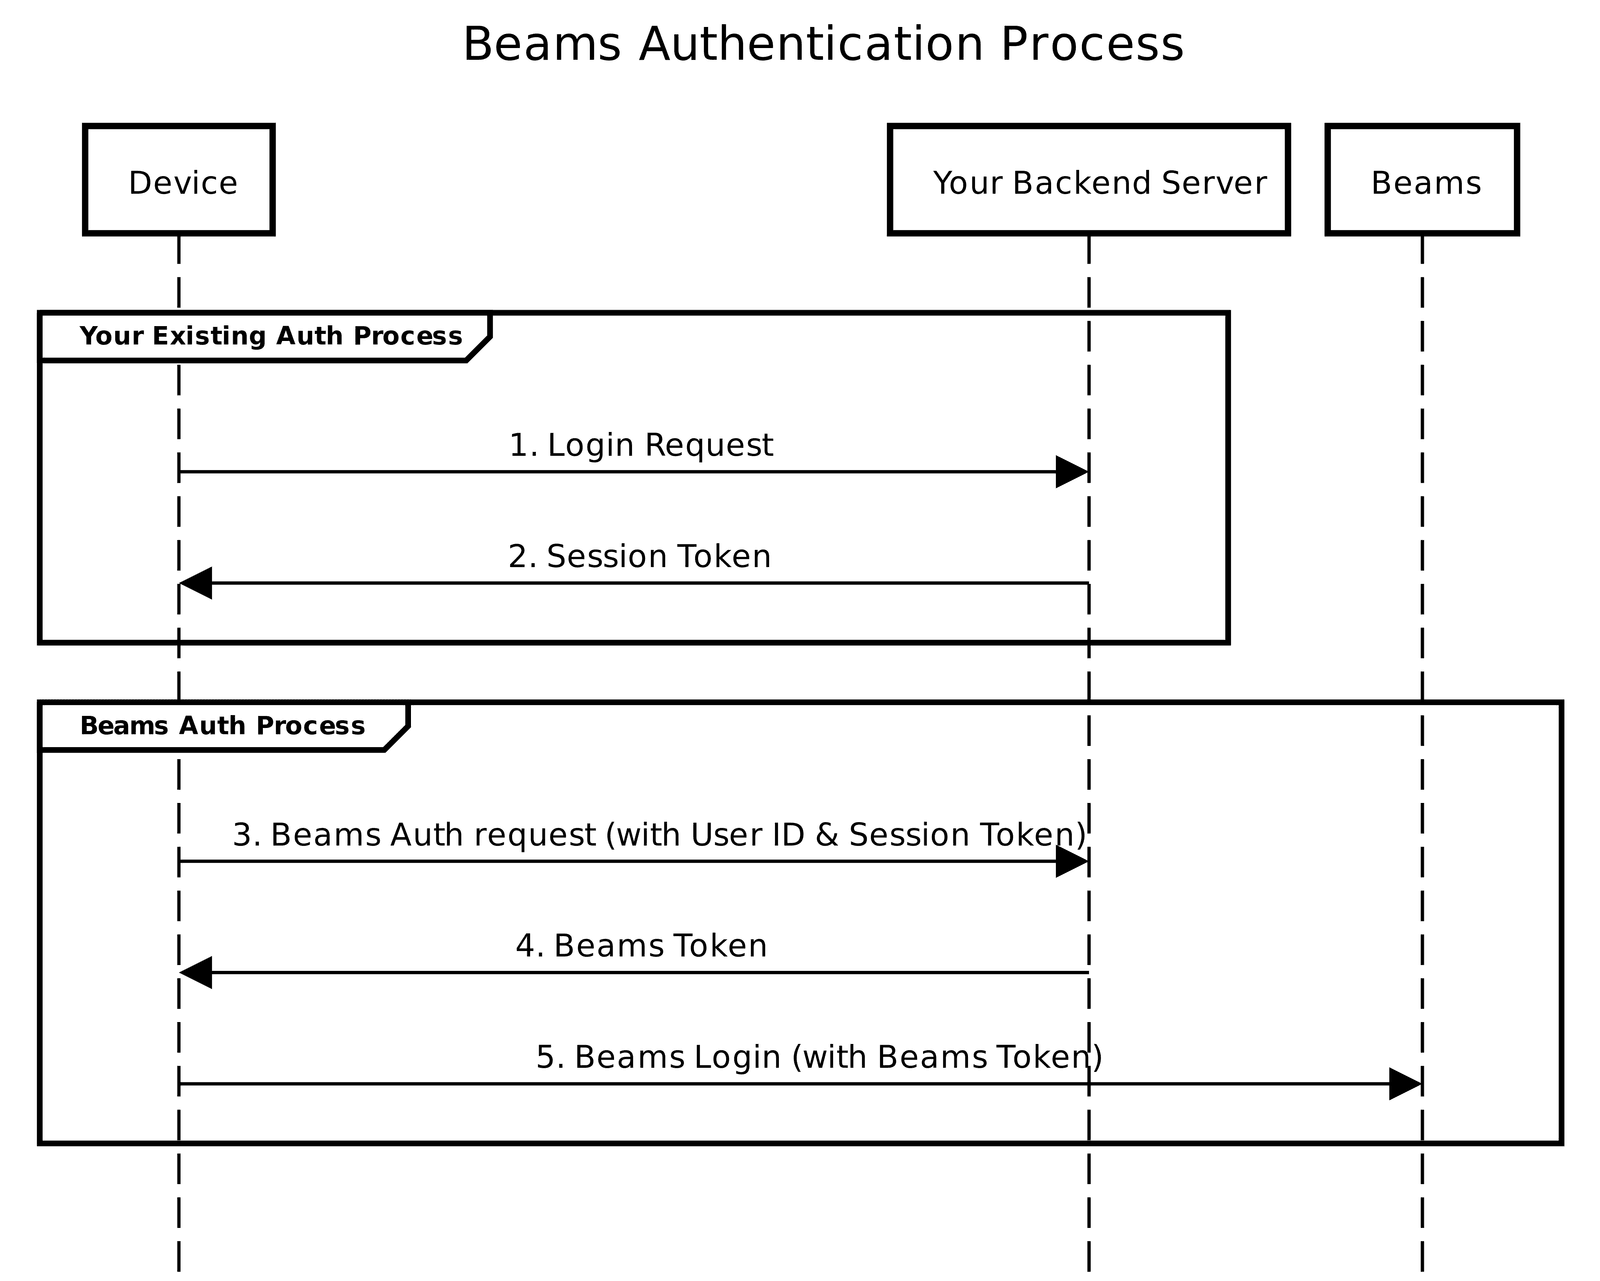
The process above is somewhat hidden by the Beams Android client API. The setUserId method takes three parameters:
1beamsClient.setUserId( 2 userId: String, 3 tokenProvider: TokenProvider, 4 completion: (Error?) -> Void 5 )
- The
userIdis the username that the app server knows the user as, and also what Pusher will use. When the app server wants to send a notification to a user, it will use this ID. The user ID cannot be longer than 164 bytes. - The
[TokenProvider](https://github.com/pusher/push-notifications-swift/blob/master/Sources/TokenProvider.swift)is a protocol with a single method, that is,fetchToken. You pass in the user ID and get back the Beams token. The iOS SDK uses this method to get the Beams token from your server whenever it needs it. You could write your own implementation of theTokenProviderprotocol, but the SDK already has one calledBeamsTokenProvider. The source code is here if you want to see what it does. - The
completionallows you to handle the success or failure of thesetUserIdrequest.
Since setUserId requires a TokenProvider and most people will use the BeamsTokenProvider, lets take a look at it. It has two parameters:
1BeamsTokenProvider( 2 authURL: String, 3 getAuthData: () -> (AuthData) 4 )
- The
authUrlis the endpoint on your server where you request the Beams token. It could be something likehttps://www.example.com/beamstoken. - Your server also needs other authentication data like an auth header or query parameters. This is where the
getAuthDataclosure comes in. It returns anAuthDatainstance.AuthDatais data class to hold the headers and query parameters.
1AuthData( 2 headers: [String: String], 3 queryParams: [String: String] 4 )
- The
headersis a Dictionary of whatever auth data your server uses to authenticate a user. For example, the key would probably beAuthorizationand the value might beBearer sometoken. - Some authentication setups provide the session token as a query parameter, in which case you would set it in
queryParams. If you are not using it, you can pass in an empty Dictionary.
So after all that explanation, here is what setting the user ID looks like in the demo app:
1// basic authentication credentials
2 let userId = "Mary"
3 let password = "mypassword"
4 let data = "\(userId):\(password)".data(using: String.Encoding.utf8)!
5 let base64 = data.base64EncodedString()
6
7 // Token Provider
8 let serverIP = "192.168.1.3"
9 let tokenProvider = BeamsTokenProvider(authURL: "http://\(serverIP):8888/token") { () -> AuthData in
10 let headers = ["Authorization": "Basic \(base64)"]
11 let queryParams: [String: String] = [:]
12 return AuthData(headers: headers, queryParams: queryParams)
13 }
14
15 // Get the Beams token and send it to Pusher
16 self.beamsClient.setUserId(
17 userId,
18 tokenProvider: tokenProvider,
19 completion: { error in
20 guard error == nil else {
21 print(error.debugDescription)
22 return
23 }
24 self.showResultsInLabel(message: "Successfully authenticated with Beams")
25 }
26 )
I'm just using basic authentication to simplify the code. In my case the server is running on my local machine, which is sharing the same WIFI router network as the iOS device that is making the request. This is the reason for using 192.168.1.3 for the IP address. Yours may be different.
One important thing to note about setUserId is that you should call this method every time the app starts if the user is logged in. When the user logs out, call clearAllState. This allows the device to stay in sync with the Beams server.
clearAllState()
The main purpose for clearAllState() is to log a user out.
1beamsClient.clearAllState { 2 // closure to run after the state has been cleared 3 }
The Beams token for the user and any interests will be deleted and the user will not receive any personal notifications on this device. Unlike stop, calling clearAllState does not require reregistering to get a device token from APNs if you want to add an interest or set the user ID again.
Testing it out
With how the iOS SDK is set up, there isn't really a way to use curl or Postman alone. You need to have a backend server to provide Beams tokens. Doing that is beyond the scope of this article, but you can find documentation for many server SDKs in the Beams documentation. Make special note of the generateToken() method. If you want to use a Dart server that is already configured for this demo, check out my previous tutorial. You will need to replace the server’s Secret Key and Instance ID with your own.
These tests assume that you have already initialized the Beams SDK by tapping the Start, Register with Apple, and Register with Pusher buttons in that order. Make sure your server is running, too.
Setting user ID allows user to receive personal notifications:
- Tap the Set ID button
- Put the app the background
- Send a personal notification to “Mary” (See the "How to send a notification" section for help.)
- Note that the device receives a personal notification
Clearing the state prevents the device from receiving a notification:
- Tap the Clear State button
- Put the app the background
- Send a personal notification
- Note that the device does not receive the notification
Events
You have a few options for getting updates about incoming messages and changes in the SDK.
interestsSetOnDeviceDidChange()
You can have your ViewController implement the InterestsChangedDelegate to get notified of changes to the list of interests that the device is subscribed to.
1// add the InterestsChangedDelegate to the ViewController
2 class ViewController: UIViewController, InterestsChangedDelegate {
3
4 let beamsClient = PushNotifications.shared
5
6 override func viewDidLoad() {
7 super.viewDidLoad()
8
9 // set the delegate
10 beamsClient.delegate = self
11 }
12
13 // implement the delegate method
14 func interestsSetOnDeviceDidChange(interests: [String]) {
15 // do something when the interests change
16 }
17 }
The InterestsChangedDelegate is a protocol with a single method interestsSetOnDeviceDidChange, which provides you with the new array of interests.
handleNotification()
The thing about push notifications is that they only appear when your app is in the background. So if a user gets one while they are using your app, they won't see it. You can overcome this problem by handing incoming messages in the [didReceiveRemoteNotification](https://developer.apple.com/documentation/uikit/uiapplicationdelegate/1623013-application) method of the AppDelegate. This method is a built in part of iOS, not the Beams SDK. It works in concert with APNs remote notifications. However, once a notification arrives there, you can pass it on to the Beams handleNotification method.
1// AppDelegate.swift
2
3 func application(_ application: UIApplication, didReceiveRemoteNotification userInfo: [AnyHashable: Any], fetchCompletionHandler completionHandler: @escaping (UIBackgroundFetchResult) -> Void) {
4 // Beams sends some notifications for internal-only use. Ignore them.
5 let notificationType = self.beamsClient.handleNotification(userInfo: userInfo)
6 if notificationType == .ShouldIgnore {
7 return
8 }
9
10 // handle the incoming message, perhaps fetching data or updating the UI
11
12 // let iOS know that you are done
13 completionHandler(UIBackgroundFetchResult.xxxx)
14 }
The userInfo is a Dictionary that contains the remote notification content. Here is an example of how you would extract the notification title and body from an alert:
1func extractUserInfo(userInfo: [AnyHashable : Any]) -> (title: String, body: String) {
2 var info = (title: "", body: "")
3 guard let aps = userInfo["aps"] as? [String: Any] else { return info }
4 guard let alert = aps["alert"] as? [String: Any] else { return info }
5 let title = alert["title"] as? String ?? ""
6 let body = alert["body"] as? String ?? ""
7 info = (title: title, body: body)
8 return info
9 }
When you are finished handing the message, call the completionHandler with an appropriate value for [UIBackgroundFetchResult](https://developer.apple.com/documentation/uikit/uibackgroundfetchresult). This lets iOS know that you are finished.
I found the following tutorials helpful for understanding how to handle push notifications:
- How to handle remote notification with background mode enabled
- Multiple scenarios with Push Notification in iOS
- How to Use the UserNotifications Framework Delegate Protocol
- Documentation
In the demo app I show an in-app popup when when a push notification arrives while the app is in the foreground.
Test it out
These tests assume that you have already initialized the Beams SDK by tapping the Start, Register with Apple, and Register with Pusher buttons in that order.
Delegate notifies ViewController about changed interests:
- Tap the Clear button to clear the interests
- Tap the Add button
- Add any interest
- Note that the number next to the Interests changed label is incremented
- Add the same interest again
- Note that the number isn’t incremented because there was no change
App handles received messages while in foreground:
- Tap the Add button
- Add the "apple" interest
- Keep the activity in the foreground
- Send a push notification for the "apple" interest
- Note that the activity UI responds with a popup and by incrementing the Messages received label
Conclusion
I hope this explanation of the full iOS client API for the Beams SDK has helped you to understand it better. Bookmark this page for future reference.
The demo app is available on GitHub.


© 2025 Pusher Ltd. All rights reserved.
Pusher Limited is a company registered in England and Wales (No. 07489873) whose registered office is at MessageBird UK Limited, 3 More London Riverside, 4th Floor, London, United Kingdom, SE1 2AQ.