- Products

- Developers
- User stories
- Blog
- Pricing

Create a live workout tracking app with React Native
- Introduction
- Prerequisites
- App overview
- Creating a Pusher app
- Clone the app
- Starter code tour
- Helpers
- Server
- Modals
- Components
- Screens
- Build the app
- Add the actions
- Add the reducers
- Connect the LogWorkout screen to the store
- Open the add exercise modal
- Add a new exercise
- Show the exercises
- Open the add set modal
- Add a new set
- Show the sets
- Increment a set
- Emit client events
- Listen for client events
- Running the app
- Conclusion
Introduction
In this tutorial, we’ll be creating a realtime workout tracking app with React Native and Pusher.
Prerequisites
Basic knowledge of React Native, React Navigation, and ES6 syntax is required.
We’ll also be using Redux. I’ll add as much detail as I can on what’s going on with all the Redux code, but you should at least be familiar with how Redux works.
We’ll be using Expo in order to easily test the app on multiple devices. Install Expo on your computer, then download the Expo client app for your iOS or Android device.
These are the package versions used in creating the app:
- Node 8.3.0
- Yarn 1.7.0
- Expo CLI 2.1.2
- Expo SDK 30.0.0
- Pusher 4.3.1
It’s always recommended to use the most recent stable versions, but in case the app doesn’t work for you, you can use the versions above to ensure we have the same environment.
Lastly, you must have a Pusher and an ngrok account.
App overview
The app that we will be creating is for gym buddies who are working out in a different gym. They can use it to keep track of their buddy’s workout even if they are away from each other.
The app has two tabs: one for logging their own workout, and another for tracking the workout of their buddy. Users can both log and track at the same time. This makes it possible for users to compete on who can make the most number of sets and reps for each exercise they choose.
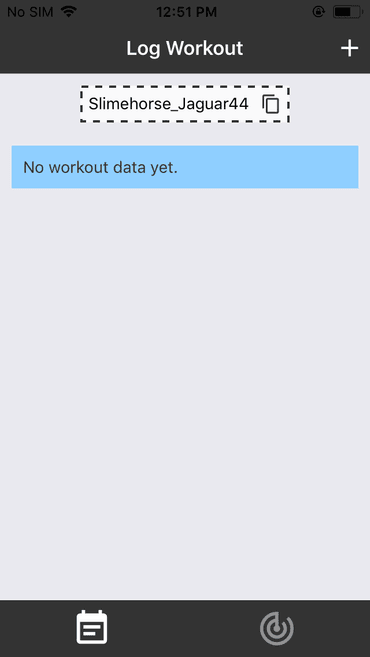
Upon opening the app, users will be greeted with the logging tab. This is where they can log their workouts. They’ll be automatically assigned a unique username. When they click on their username, it will be copied to the clipboard so they can easily share it with their buddy:
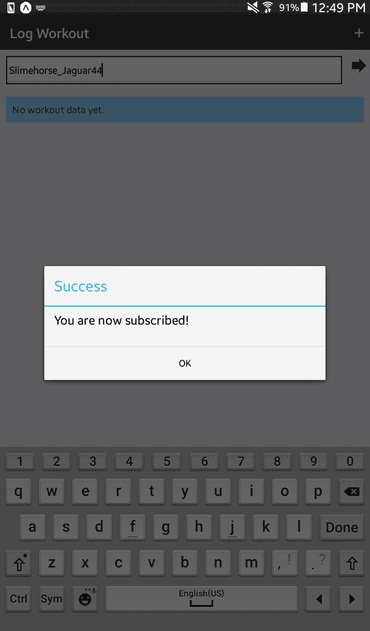
This is how it looks like when their buddy subscribes. Subscription can be done in the tracking tab. All they have to do is enter their buddy’s username and click on the right arrow:
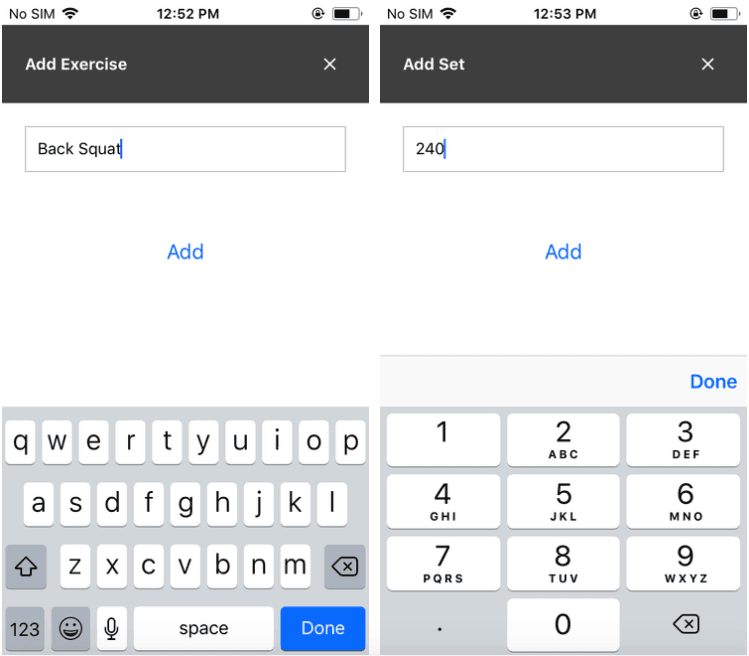
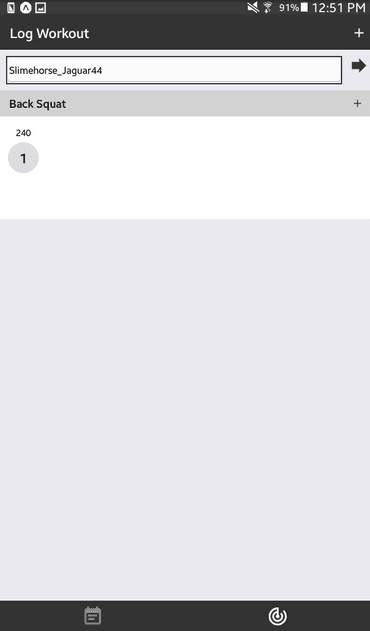
This is how it looks like when a user adds an exercise and a set:
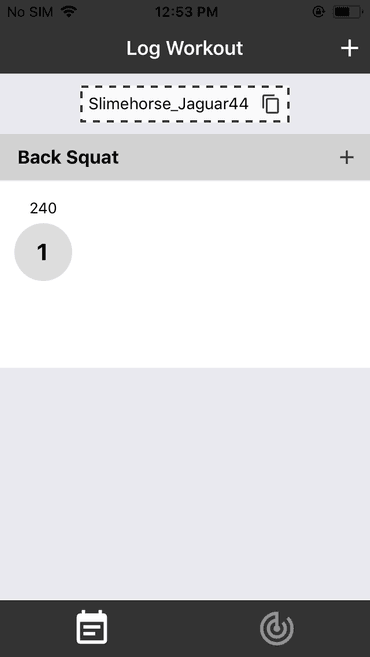
Once an exercise or set has been added, it will show in the list below the username. The number at the top of the circle is the weight, and the number inside it is the number of reps for that set. When the user clicks on the circle, the reps is incremented by one:
The tracking tab in their buddy’s screen is automatically synced with the exercise and sets the user has added:
You can view the source code of this app on this GitHub repo.
Creating a Pusher app
On your Pusher dashboard, create a new app and name it RNWorkout. Once created, enable the client events in the App Settings tab:
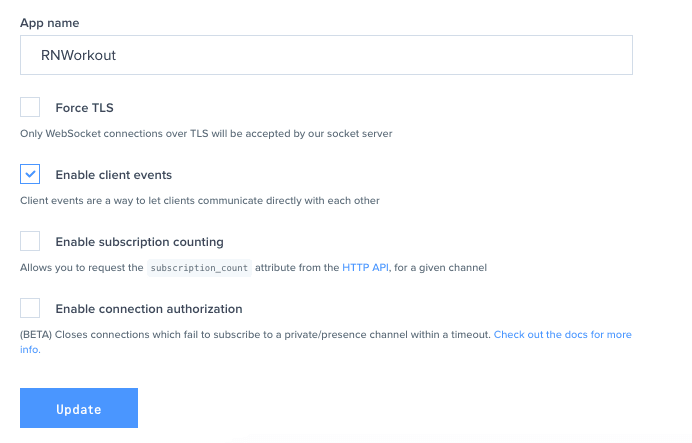
Client events allow us to emit messages directly from the app. Because normally, messages are only emitted from the server. This time, we’ll only be using the server to authenticate the user. This authentication process allows us to make requests directly from the app.
Clone the app
Start by cloning the repo:
git clone https://github.com/anchetaWern/RNWorkout.git
Switch to the starter branch and install both the app and server dependencies:
1cd RNWorkout 2 git checkout starter 3 yarn install 4 cd server 5 npm install
The starter branch contains a minimal version of the app where the screens, components, helper functions, styles, and the server code has already been added. This makes it easy for us to focus on the main subject of this tutorial, and that is how to work with Redux and Pusher Channels.
Starter code tour
Before we proceed with writing some code, let’s first do a quick tour of the code we have on the starter branch.
Helpers
The app/helpers folder contains two helper files for generating unique ID’s (uniqid.js) and usernames (uniqname.js). The unique ID’s are used as a unique identifier for the exercises and sets.
Server
The server folder contains the code for the server component of the app. This server is for authenticating the user when they initialize a new Pusher connection. No further updates are required inside this folder except for the server/.env file. We’ll update it later once we run the app.
Modals
The app/modals folder contains the code for the add exercise and add set modals. These modals are used for logging a new exercise and adding a set to a specific exercise. We will be updating the AddExerciseModal.js and AddSetModal.js later. This is to add the code for dispatching actions that will modify the store.
Components
The app/components folder contains all the components that the app is using. This includes the following:
- AlertBox - for showing messages enclosed inside a box.
- IconButton - for showing buttons with an icon in them.
- SetContainer - for showing the individual sets (the gray circles with a number inside and below them).
- List - serves as a container list for the SetContainer component.
- ConnectedFlatList - for showing all the workout data (exercises and sets).
Among the components above, we’re only going to update the ConnectedFlatList (app/components/ConnectedFlatList/ConnectedFlatList.js). As it is right now, it won’t really render anything. We have to turn it into a “connected” component so it will automatically re-render once the relevant data in the store is updated.
Screens
We only have one screen because the logging and tracking features are too similar to have their own screen. If you open the Root.js file, you’ll see that we’re only using the LogWorkout screen:
1import LogWorkoutScreen from "./app/screens/LogWorkout"; 2 3 const LogStack = createStackNavigator( 4 { 5 Log: LogWorkoutScreen 6 }, 7 { initialRouteName: "Log" } 8 ); 9 10 const TrackStack = createStackNavigator( 11 { 12 Track: LogWorkoutScreen 13 }, 14 { initialRouteName: "Track" } 15 );
We will be updating the app/screens/LogWorkout.js file later because that’s where we need to link everything up.
Build the app
Now we’re ready to build the app. Here’s what we’ll be doing through the rest of the tutorial:
- Add the actions.
- Add the reducers.
- Dispatch an action for adding a new exercise to the store when the user adds a new exercise.
- Dispatch an action for adding a new set to the store when the user adds a new set.
- Initialize Pusher.
- Subscribe user to their own channel so they can emit client events.
- Subscribe to another user so they can listen for client events emitted by that user.
- Emit a client event on the channel when a new exercise or set is added by the user.
- Listen for client events so the tracking tabs UI is synced to that of the user being followed.
The steps above aren’t ordered in a specific way. Most likely, you’ll have to switch between each of them as you’re testing the app. For this tutorial, I recommend you to start the app even if it’s not fully working yet. This allows you to easily see the effects of the code you’re adding, and not simply copy-pasting it:
expo start
Let’s make this as hands-on as possible. I’ll first mention what needs to be done so you can try on your own, and then you can peak at the code either here or in the GitHub repo if you’re not sure what to do. I’ve also added “todo” comments in the starter code as a guide on where you should put a specific code. Feel free to browse around the code whenever you see “our task is to…” or “next, we need to..” as that’s the cue for when we’ll start adding the code. Try to figure out on your own first before you proceed.
We’ll work on the functionality for logging workouts first. That will be the first screen that you see when you run the app. Right now, we only have the following:

The username is generated, and it can be copied to clipboard, but that’s it. Nothing you can really do in this tab (logging tab) right now.
Add the actions
Our first task is to figure out how to make the add exercise modal visible so we can enter the exercise we want to add.
My usual workflow when working with Redux is to first figure out what the global app state will look like. But before we can do that, we first need to determine the actions that can be done throughout the app in relation to how it affects the UI:
- Open or close modals.
- Add an exercise.
- Set the current exercise.
- Add a set.
- Increment set.
Note that I’ve excluded actions that are only applicable to a specific component. Here’s a good rule of thumb to determine if something is an action or not:
If the rest of the app’s UI isn’t affected if the value of a specific piece of data is updated, then it’s not an action.
For this app, non-actions include:
- Entering the name of the exercise.
- Entering the weight of a set.
Both instances don’t update the app’s UI in a way that affects the whole app, so the state for those can be managed within the component level.
Go ahead and create an app/actions folder. Inside it, create a types.js file and define all the actions that we came up with. This will help us avoid typos when working with actions:
1// app/actions/types.js 2 export const ADDED_EXERCISE = "added_exercise"; 3 4 export const ADDED_SET = "added_set"; 5 export const INCREMENTED_SET = "incremented_set"; 6 7 export const MODAL_TOGGLED = "modal_toggled"; 8 export const SET_EXERCISE = "set_exercise";
Next, define the action creators. These are functions that will return the data needed by each action. Each action type will have its own function, which returns it as the type property:
1// app/actions/index.js 2 import { 3 ADDED_EXERCISE, 4 ADDED_SET, 5 INCREMENTED_SET, 6 MODAL_TOGGLED, 7 SET_EXERCISE 8 } from "./types"; 9 10 export const addedExercise = (exerciseID, exerciseName, user = "me") => { 11 return { 12 type: ADDED_EXERCISE, 13 id: exerciseID, // a machine-friendly version of the exercise name 14 exercise: exerciseName, // name of the exercise (e.g. front squat) 15 user: user 16 }; 17 }; 18 19 export const addedSet = (setID, exerciseID, weight, user = "me") => { 20 return { 21 type: ADDED_SET, 22 id: setID, // unique ID for the set 23 exercise_id: exerciseID, // used for determining which exercise to put the set under 24 weight: weight, // how heavy is the weight being lifted (usually in lbs) 25 reps: 1, // default number of repetitions for a new set 26 user: user 27 }; 28 }; 29 30 export const incrementedSet = (setID, reps, user = "me") => { 31 return { 32 type: INCREMENTED_SET, 33 id: setID, // unique ID for the set 34 reps: reps, // repetitions performed for this set 35 user: user 36 }; 37 }; 38 39 export const modalToggled = (modalName, visibility) => { 40 return { 41 type: MODAL_TOGGLED, 42 modal: modalName, // addExerciseModal or addSetModal 43 visibility: visibility // true (visible) or false (not visible) 44 }; 45 }; 46 47 // for setting the exercise in which to add a set 48 export const setExercise = id => { 49 return { 50 type: SET_EXERCISE, 51 exercise_id: id 52 }; 53 };
Note that the addedExercise, addedSet, and incrementedSet functions have a user parameter which is set to me by default. This allows us to specify which specific app state will the data go. The value of this parameter can either be me or others. me is for the data displayed in the logging tab, while others is for the data displayed on the tracking tab.
Add the reducers
Next, we need to create the reducers. These are responsible for describing how a specific portion of the app state will change. Personally, I create a separate reducer based on the data they’re modifying. In this app, that would be:
- Exercise reducer (
ExerciseReducer.js) - for exercise-related data. - Set reducer (
SetReducer.js) - for set-related data. - UI reducer (
UIReducer.js) - for UI-related data. These are usually booleans which hide or show what is seen on the screen (for example, modals and progress loaders).
When it comes to figuring out which reducers to create, anything really goes if you’re only working on a throw-away project to learn a specific technology. But be sure to read about Redux best practices when working in a production app.
Create an app/reducers folder and create the files mentioned above inside it.
Let’s first start with the exercise reducer:
1// app/reducers/ExerciseReducer.js 2 import { ADDED_EXERCISE } from "../actions/types"; 3 4 import uniqid from "../helpers/uniqid"; 5 6 const INITIAL_STATE = { 7 exercises: [], 8 others_exercises: [] 9 }; 10 11 export default (state = INITIAL_STATE, action) => { 12 switch (action.type) { 13 case ADDED_EXERCISE: 14 const key = uniqid(); 15 const id = action.id; 16 const exercise = action.exercise; 17 18 // determine which specific array to update 19 const exercises = 20 action.user == "me" ? state.exercises : state.others_exercises; 21 22 // create a new array with the new exercise appended to the end of it 23 const updated_exercises = exercises.concat({ 24 key: key, 25 exercise_id: id, // machine-friendly version of the exercise name 26 exercise_name: exercise 27 }); 28 29 // return the new state based on which user performed the action 30 if (action.user == "me") { 31 return { ...state, exercises: updated_exercises }; 32 } 33 34 return { ...state, others_exercises: updated_exercises }; 35 36 default: 37 return state; 38 } 39 };
From the code above, the first step is to define the INITIAL_STATE. Note that this isn’t the initial value for the whole app state. This should only be for the specific data modified by this reducer. In this case, it’s only the exercises (the exercises logged by the current user), and others_exercises (the exercises logged by the user followed by the current user).
Based on the user passed from the action, we get and re-create either the exercises or others_exercises array. Take note of the word “re-create” as we’re not really supposed to modify the state directly, we only replace it with a different value. Redux handles the calculation needed to determine whether the UI should be re-rendered or not. And if you modify the state directly, then it won’t be ensured that that process will work correctly. That’s why we’re using the spread syntax and concat method to avoid updating the state directly.
Next is the set reducer. Again, we’re updating two arrays, one for each user. But this time, our reducer handles two actions, one for when the set is added, and another for when it’s incremented:
1// app/reducers/SetReducer.js 2 import { ADDED_SET, INCREMENTED_SET } from "../actions/types"; 3 4 const INITIAL_STATE = { 5 sets: [], 6 others_sets: [] 7 }; 8 9 export default (state = INITIAL_STATE, action) => { 10 let sets = []; 11 let index = 0; 12 let reps = 0; 13 14 let set_name = "sets"; 15 let current_sets = []; 16 17 switch (action.type) { 18 case ADDED_SET: 19 current_sets = action.user == "me" ? state.sets : state.others_sets; 20 sets = current_sets.concat({ 21 key: action.id, 22 exercise_id: action.exercise_id, 23 weight: action.weight, 24 reps: action.reps 25 }); 26 27 const updated_state = 28 action.user == "me" 29 ? { ...state, sets } 30 : { ...state, others_sets: sets }; 31 return updated_state; 32 33 case INCREMENTED_SET: 34 current_sets = action.user == "me" ? state.sets : state.others_sets; 35 sets = [...current_sets]; 36 index = sets.findIndex(itm => { 37 return itm.key == action.id; 38 }); 39 40 reps = action.reps; 41 sets[index] = { ...sets[index], reps: reps + 1 }; // add 1 to the current rep 42 43 if (action.user == "others") { 44 return { ...state, others_sets: sets }; 45 } 46 47 return { ...state, sets }; 48 49 default: 50 return state; 51 } 52 };
Next is the UI reducer. This is responsible for processing the actions for showing or hiding the modals, and setting the current exercise:
1// app/reducers/UIReducer.js 2 import { MODAL_TOGGLED, SET_EXERCISE } from "../actions/types"; 3 4 const INITIAL_STATE = { 5 ui: { 6 current_exercise: "", 7 addExerciseModalIsOpen: false, 8 addSetModalIsOpen: false 9 } 10 }; 11 12 export default (state = INITIAL_STATE, action) => { 13 let ui = {}; 14 switch (action.type) { 15 case SET_EXERCISE: 16 ui = { ...state.ui }; 17 ui["current_exercise"] = action.exercise_id; 18 19 return { 20 ...state, 21 ui 22 }; 23 24 case MODAL_TOGGLED: 25 ui = { ...state.ui }; 26 ui[`${action.modal}IsOpen`] = action.visibility; 27 28 const new_state = { 29 ...state, 30 ui 31 }; 32 33 return new_state; 34 35 default: 36 return state; 37 } 38 };
The final step is to combine all the reducers into a single file. This allows us to easily supply it when we create the store later:
1// app/reducers/index.js 2 import { combineReducers } from "redux"; 3 import ExerciseReducer from "./ExerciseReducer"; 4 import SetReducer from "./SetReducer"; 5 import UIReducer from "./UIReducer"; 6 7 export default combineReducers({ 8 exercises: ExerciseReducer, 9 sets: SetReducer, 10 ui: UIReducer 11 });
Connect the LogWorkout screen to the store
Now that we’ve defined our actions, action creators, and reducers, the next step is to link the LogWorkout screen to the store.
Open app/screens/LogWorkout.js and add the following:
1import { MaterialIcons } from "@expo/vector-icons"; // already added 2 3 // add these 4 import { createStore } from "redux"; 5 import { Provider } from "react-redux";
In the code above, createStore is used for creating the store. Consider the store as the global app state, while the Provider is a helper component that allows us to pass down the store to the component level. This gives us the ability to dispatch actions within this component and allow its child components to also connect to the store.
Next, import the actions and reducers. To create a store we need to pass the combined reducers as an argument. This makes the store aware of which reducers it should use when a specific action is dispatched from the app:
1import { 2 modalToggled, 3 incrementedSet, 4 addedExercise, 5 addedSet 6 } from "../actions"; 7 8 import reducers from "../reducers"; 9 const store = createStore(reducers);
Next, wrap the whole screen in the Provider component and pass the store as a value for the store prop:
1render() { 2 return ( 3 <Provider store={store}> 4 ... 5 </Provider> 6 ); 7 }
Once that’s done, we should be able to dispatch actions inside this component’s methods. In this case, we dispatch the action for opening the add exercise modal:
1showAddExerciseModal = () => { 2 store.dispatch(modalToggled("addExerciseModal", true)); 3 };
As the button for opening the modal is inside the header, we need to set the showAddExerciseModal function as a navigation param. That way, we can access it as such from the header:
1componentDidMount() { 2 this.props.navigation.setParams({ 3 showAddExerciseModal: this.showAddExerciseModal 4 }); 5 }
In the navigationOptions, you can now execute the showAddExerciseModal function:
1return { 2 headerTitle: `Log Workout`, 3 headerRight: ( 4 <IconButton 5 onPress={() => { 6 if (routeName == "Log") { 7 params.showAddExerciseModal(); // add this 8 } 9 }} 10 /> 11 ), 12 }
When the button is clicked, it should execute the exercise reducer and the app’s state will be modified. Currently, the add exercise modal isn’t really aware of the changes that happen in the store yet, so it won’t really become visible when the button is clicked.
Open the add exercise modal
The next step is to make the add exercise modal into a connected component. That way, it will become aware of the state changes so it can re-render itself when a data it depends on changes.
Open the app/modals/AddExerciseModal.js file. To turn a component into a connected component, we need to use the connect method from react-redux. This allows us to add the functions for mapping specific data in the store as a prop for this component. It also allows us to define functions that we can use inside the component to dispatch actions, as you’ll see later:
import { connect } from "react-redux";
Next, import the actions for toggling the visibility of the modal, and adding a new exercise:
import { modalToggled, addedExercise } from "../actions";
Next, scroll to the bottom of the file (right before export default AddExerciseModal) and define the mapStateToProps function. This is used for mapping whichever data we have on the store as a prop for this component. In this case, we only need the ui object from the UI reducer. We use object destructuring to extract it, and the spread syntax to extract the properties that are inside the ui object:
1const mapStateToProps = ({ ui }) => ({ 2 ...ui 3 });
Earlier, in the UI reducer, we defined the following initial state:
1// app/reducers/UIReducer.js 2 const INITIAL_STATE = { 3 ui: { 4 current_exercise: "", 5 addExerciseModalIsOpen: false, 6 addSetModalIsOpen: false 7 } 8 };
mapStateToProps gives us access to those specific properties in the ui object as if it were a prop that’s passed to the component (add exercise modal). To access the current visibility value of the add exercise modal, all we have to do is supply this.props.ui.addExerciseModalIsOpen to the visible prop of the Modal component:
1// app/modals/AddExerciseModal.js 2 <Modal 3 animationType="slide" 4 visible={this.props.ui.addExerciseModalIsOpen} 5 > 6 ... 7 </Modal>
But before we can do that, we first have to connect the component to the store. We can do that with the following code. This returns a “connected” version of the component, one that’s subscribed to the updates made in the store. mapStateToProps gets executed every time there’s an update to the store. If a relevant value is updated, the component is re-rendered because the prop it depends on is directly mapped to a value in the store:
1// app/modals/AddExerciseModal.js 2 export default connect( 3 mapStateToProps 4 )(AddExerciseModal); 5 6 // export default AddExerciseModal; // replace this with the one above
Once that’s done, clicking on the button in the header should make the add exercise modal visible.
If you’re wondering why we used this.props.ui.addExerciseModalIsOpen instead of this.props.addExerciseModalIsOpen, that’s because the data inside the UI reducer lives inside the ui object. We’ve defined this earlier in the reducer’s index file:
1// app/reducers/index.js 2 export default combineReducers({ 3 // ... 4 ui: UIReducer 5 });
And in the UI reducer, everything lives inside another ui object:
1// app/reducers/UIReducer.js 2 const INITIAL_STATE = { 3 ui: { 4 // ... 5 addSetModalIsOpen: false 6 } 7 };
So to access addSetModalIsOpen, we have to access ui.ui.addSetModalIsOpen from the store. Object destructuring gave us access to the ui object we’ve defined inside app/reducers/index.js file, while the spread syntax gave us access to the ui object defined inside app/reducers/UIReducer.js but not the properties inside of it:
1const mapStateToProps = ({ ui }) => ({ 2 ...ui // note: spreads the ui object defined in the app/reducers/index.js file. not the ui object in the app/reducers/UIReducer.js 3 });
This is why we still had to use this.props.ui.addExerciseModalIsOpen.
Add a new exercise
The next step is to add a new exercise when the add button in the add exercise modal is clicked. Earlier, you learned that to dispatch an action, you first have to import the action creator so you can dispatch it using the dispatch method from the store:
1// app/screens/LogWorkout.js 2 store.dispatch(modalToggled("addExerciseModal", true));
The problem we have now is that we have no access to the store or its dispatch method when inside the add exercise modal. The solution for that is the mapDispatchToProps method. It allows us to return functions that are also mapped as props for the component. The dispatch function is automatically passed as an argument to the mapDispatchToProps function, and we can use it to dispatch the action. In this case, we only need the action for toggling the visibility of the modal and adding the exercise:
1// app/modals/AddExerciseModal.js 2 // add this right below mapStateToProps 3 const mapDispatchToProps = dispatch => { 4 return { 5 closeModal: () => { 6 dispatch(modalToggled("addExerciseModal", false)); 7 }, 8 addExercise: (id, name) => { 9 dispatch(addedExercise(id, name)); 10 } 11 }; 12 };
To use mapDispatchToProps, pass it as the second argument for the connect function:
1export default connect( 2 mapStateToProps, 3 mapDispatchToProps 4 )(AddExerciseModal);
The next step is to call the two functions (closeModal and addExercise) we just mapped as props:
1addExercise = () => { 2 // add these 3 if (this.state.exercise_name) { 4 const name = this.state.exercise_name; 5 const id = name.replace(" ", "_"); 6 this.props.addExercise(id, name); 7 8 // already added 9 this.setState({ 10 exercise_name: "" 11 }); 12 13 this.props.closeModal(); 14 } 15 };
Once that’s done, a new exercise should be added to the store every time you click on the add button in the add exercise modal. The modal should also automatically close after that.
Don’t forget to close the modal when the close button is clicked:
1<IconButton 2 icon="close" 3 color="#FFF" 4 size={18} 5 onPress={() => { 6 this.props.closeModal(); // add this 7 }} 8 />
Show the exercises
Now that we’ve added the code for creating a new exercise, the next step is to show the exercises that were added. That’s the job of the ConnectedFlatList component.
What we need to do is very similar to what we did in the add exercise modal, so we’ll just breeze through the code. Start by importing all the things we need:
1// app/components/ConnectedFlatList/ConnectedFlatList.js 2 import { connect } from "react-redux"; 3 import uniqid from "../../helpers/uniqid"; 4 5 import { 6 modalToggled, 7 setExercise, 8 incrementedSet, 9 addedExercise, 10 addedSet 11 } from "../../actions";
Next, scroll to the bottom of the file and add the mapStateToProps function. While we’re here, let’s also add the data related to the sets:
1const mapStateToProps = state => { 2 return { 3 exercises: state.exercises.exercises, 4 sets: state.sets.sets, 5 others_exercises: state.exercises.others_exercises, 6 others_sets: state.sets.others_sets 7 }; 8 }; 9 10 export default connect( 11 mapStateToProps 12 )(ConnectedFlatList);
Next, get the relevant exercise data from the props. While we’re here, let’s also extract the sets data:
1render() { 2 // add these 3 const exercises = 4 this.props.user == "me" 5 ? this.props.exercises 6 : this.props.others_exercises; 7 const sets = 8 this.props.user == "me" ? this.props.sets : this.props.others_sets; 9 10 // already added 11 if (exercises.length) { 12 return ( 13 <FlatList 14 data={exercises} 15 extraData={sets} 16 renderItem={this.renderItem} 17 contentContainerStyle={{ paddingBottom: 50, backgroundColor: "#FFF" }} 18 /> 19 ); 20 } 21 }
Take note of the extraData prop that we’ve supplied for the FlatList. We’ve supplied sets to it because the sets data isn’t nested under the exercises array. That means that if we add a new set or increment an existing one, this FlatList won’t really get re-rendered. Supplying sets as an extraData allows us to re-render the main FlatList when the sets data is updated.
Once that’s done, you should now see the exercises being listed as you add them through the add exercise modal.
Open the add set modal
Now that we can add and show exercises, the next step is to show the add set modal.
When the plus button to the right of the exercise name is clicked, it should show the add set modal. To implement that, we need to dispatch the action for toggling the visibility of the add set modal.
Just like what we did earlier in the add exercise modal, we need to use mapDispatchToProps so we can dispatch actions by calling functions that are mapped as a prop:
1// app/components/ConnectedFlatList/ConnectedFlatList.js 2 // add these 3 const mapDispatchToProps = dispatch => { 4 return { 5 openAddSetModal: () => { 6 dispatch(modalToggled("addSetModal", true)); 7 }, 8 setExercise: exercise_id => { 9 dispatch(setExercise(exercise_id)); 10 } 11 }; 12 }; 13 14 export default connect( 15 mapStateToProps, 16 mapDispatchToProps // add this 17 )(ConnectedFlatList);
Note that aside from the modalToggled action, we also have setExercise. This is for updating the value of the current_exercise property in the UI reducer so that by the time the user hits the button for adding the set, we can extract this value from the props and supply it as one of the properties for the set to be created.
Next, inside the renderItem method, call the relevant functions you returned in mapDispatchToProps:
1renderItem = ({ item }) => { 2 return ( 3 <View key={item.key} listKey={item.key}> 4 <View style={styles.list_item_header}> 5 <Text style={styles.list_item_header_text}>{item.exercise_name}</Text> 6 <IconButton 7 icon="add" 8 size={20} 9 color="#333" 10 onPress={() => { 11 if (this.props.user == "me") { 12 // add these: 13 this.props.openAddSetModal(); 14 this.props.setExercise(item.exercise_id); 15 } 16 }} 17 /> 18 </View> 19 </View> 20 ); 21 }
The next step is to turn the add set modal into a connected component. You should already know how to do this so let’s just look at the code:
1// app/modals/AddSetModal.js 2 import { connect } from "react-redux"; 3 import { modalToggled, addedSet } from "../actions"; 4 import uniqid from "../helpers/uniqid"; 5 6 7 const mapStateToProps = ({ ui }) => ({ 8 ...ui 9 }); 10 11 export default connect( 12 mapStateToProps 13 )(AddSetModal); 14 15 16 render() { 17 return ( 18 <Modal 19 animationType="slide" 20 visible={this.props.ui.addSetModalIsOpen} 21 ... 22 > 23 </Modal> 24 ); 25 }
Once that’s done, the add set modal should become visible when the plus button to the right of the exercise name is clicked.
Add a new set
Adding a new set is very similar to how we added an exercise:
1// app/modals/AddSetModal.js 2 const mapDispatchToProps = dispatch => { 3 return { 4 closeModal: () => { 5 dispatch(modalToggled("addSetModal", false)); 6 }, 7 addSet: (setID, exerciseID, weight) => { 8 dispatch(addedSet(setID, exerciseID, weight)); 9 } 10 }; 11 }; 12 13 export default connect( 14 mapStateToProps, 15 mapDispatchToProps // add this 16 )(AddSetModal);
Take note of how we’re extracting the current_exercise from the props. Earlier, in the ConnectedFlatList, we’ve set the value for this property when the user clicks on the plus button to the right of the exercise name. That’s the purpose of the setExercise action, so we always have the correct value for the exercise_id when we add a new set:
1addSet = () => { 2 // add these 3 if (this.state.weight) { 4 const id = uniqid(); 5 const exercise_id = this.props.ui.current_exercise; 6 const weight = this.state.weight; 7 8 this.props.addSet(id, exercise_id, weight); 9 this.props.closeModal(); 10 11 // previously added code.. 12 } 13 };
Don’t forget to close the modal when its close button is clicked:
1<IconButton 2 icon="close" 3 color="#FFF" 4 size={18} 5 onPress={() => { 6 this.props.closeModal(); // add this 7 }} 8 />
Show the sets
The next step is to show the sets added for a specific exercise. Earlier, we already mapped the current values of the sets and others_sets array in the store over to this component via mapStateToProps. All we have to do now is extract the relevant sets data from the props:
1// app/components/ConnectedFlatList/ConnectedFlatList.js 2 renderSets = (exercise_id, key) => { 3 const id = uniqid(); 4 const l_key = exercise_id + ":" + key + ":" + id; 5 6 const sets_data = 7 this.props.user == "me" ? this.props.sets : this.props.others_sets; 8 const sets = sets_data.filter(item => { 9 return item.exercise_id == exercise_id; 10 }); 11 12 // already added: 13 if (sets.length) { 14 // ... 15 } 16 }
Note that the value of this.props.users in the code above is passed as a prop via the standard means (through the component). This is used to determine which specific set data to use (the current user or the user they’re following). The l_key is used as the value for the listKey for the FlatList that will contain each set. We need to supply this because we’re nesting a FlatList within a FlatList. The listKey prop allows React to differentiate between sibling flatlists.
At this point, you should be able to see the sets being listed below a specific exercise when you add them.
Increment a set
The final thing we need to implement when it comes to the logging functionality is incrementing the value of a specific set.
We called it “increment set”, but what we really want to do is to increment the number of reps for a specific set.
Start by adding it in the mapDispatchToProps:
1// app/components/ConnectedFlatList/ConnectedFlatList.js 2 const mapDispatchToProps = dispatch => { 3 return { 4 // added previously 5 setExercise: exercise_id => { 6 ... 7 }, 8 // add this 9 incrementSet: (set_id, reps) => { 10 dispatch(incrementedSet(set_id, reps)); 11 } 12 }; 13 };
Once that’s done, you should be able to call the method within the onPress method of the SetContainer:
1<SetContainer 2 ... 3 onPress={() => { 4 if (this.props.user == "me") { 5 this.props.incrementSet(item.key, item.reps); // add this 6 } 7 }} 8 />
At this point, clicking on a set should increment the number inside it.
Emit client events
Now we’re ready to implement the tracking tab.
Start by importing Pusher:
1// app/screens/LogWorkout.js 2 import Pusher from "pusher-js/react-native";
Next, initialize the class variables that we’re going to use:
1constructor(props) { 2 super(props); 3 this.pusher = null; 4 this.my_channel = null; // the channel of the current user 5 this.followed_channel = null; // the channel of the user they followed 6 }
Inside componentDidMount, add the code for initializing Pusher. Supply the credentials found in your Pusher app instance’s settings page. Leave the authEndpoint for now, we will supply it later once we run the server. Once that’s done, subscribe the user to their own channel (the unique username generated for them). In this case, we’re prefixing the channel name with private- to specify that this is a private channel. This specific channel type allows us to emit events directly from the app. Since it’s private, we have to authenticate through a server (the one inside the server directory of the project), that’s what the authEndpoint is for:
1componentDidMount() { 2 // previous code here 3 4 // add these: 5 this.pusher = new Pusher("YOUR PUSHER APP KEY", { 6 authEndpoint: "YOUR_NGROK_URL/pusher/auth", 7 cluster: "YOUR_PUSHER_APP_CLUSTER", 8 encrypted: true 9 }); 10 11 this.my_channel = this.pusher.subscribe(`private-user-${username}`); 12 this.my_channel.bind("pusher:subscription_error", status => { 13 Alert.alert( 14 "Error occured", 15 "Cannot connect to Pusher. Please restart the app." 16 ); 17 }); 18 19 this.my_channel.bind("pusher:subscription_succeeded", () => { 20 console.log("subscription to my channel ok!"); 21 }); 22 }
Next, inside the render method, we need to check whether my_channel is initialized before we render anything. This allows us to supply it as a prop to AddExerciseModal, AddSetModal, and ConnectedFlatList:
1render() { 2 return ( 3 <Provider store={store}> 4 <View> 5 { 6 this.props.navigation.state.routeName == "Log" && this.my_channel && ( 7 <View style={styles.log_content}> 8 <View style={styles.top_content}> 9 ... 10 </View> 11 <AddExerciseModal channel={this.my_channel} /> 12 <AddSetModal channel={this.my_channel} /> 13 14 <ConnectedFlatList user={"me"} channel={this.my_channel} /> 15 </View> 16 ) 17 } 18 </View> 19 </Provider> 20 ); 21 }
Why do we need to add my_channel as a prop to those three components you ask? That’s because we need to trigger client events when a specific action happens. In this case, the actions are:
- Adding a new exercise.
- Adding a new set.
- Incrementing a set.
Let’s quickly run through all the places which needs updating:
1// app/modals/AddExerciseModal.js 2 addExercise = () => { 3 if (this.state.exercise_name) { 4 this.props.addExercise(id, name); // already added 5 6 // add this 7 this.props.channel.trigger("client-added-exercise", { 8 id, 9 name 10 }); 11 12 // rest of the code 13 } 14 }; 15 16 17 // app/models/AddSetModal.js 18 addSet = () => { 19 if (this.state.weight) { 20 this.props.addSet(id, exercise_id, weight); // already added 21 // add this 22 this.props.channel.trigger("client-added-set", { 23 id, 24 exercise_id, 25 weight 26 }); 27 28 // rest of the code 29 } 30 }; 31 32 33 // app/components/ConnectedFlatList/ConnectedFlatList.js 34 35 <SetContainer 36 ... 37 onPress={() => { 38 if (this.props.user == "me") { 39 this.props.incrementSet(item.key, item.reps); // already added 40 // add this 41 this.props.channel.trigger("client-incremented-set", { 42 set_id: item.key, 43 reps: item.reps 44 }); 45 } 46 }} 47 />
The codes we’ve added above should be fairly easy to understand. We’re emitting a client event via the channel prop we’ve passed from the LogWorkout screen. The trigger method accepts the name of the event as its first argument, and an object containing the data we want to emit as its second.
Note that client events should always be prefixed with client-. This allows Pusher to determine that this event is sent from the client.
Listen for client events
The final step is to add the code for subscribing to the user entered in the tracking tab and listening to events as they get fired. We execute the code below when the user clicks on the button with a right arrow in the tracking tab:
1// app/screens/LogWorkout.js 2 3 subscribe = () => { 4 this.followed_channel = this.pusher.subscribe( 5 `private-user-${this.state.subscribedToUsername}` 6 ); 7 8 this.followed_channel.bind("pusher:subscription_error", status => { 9 Alert.alert( 10 "Error occured", 11 "Cannot connect to Pusher. Please restart the app." 12 ); 13 }); 14 15 this.followed_channel.bind("pusher:subscription_succeeded", () => { 16 Alert.alert("Success", "You are now subscribed!"); // let the user know that the subscription succeeded 17 18 // listen for the events that we've emitted earlier 19 this.followed_channel.bind("client-added-exercise", data => { 20 store.dispatch(addedExercise(data.id, data.name, "others")); // dispatch the action to update the UI for the tracking tab 21 }); 22 23 this.followed_channel.bind("client-added-set", data => { 24 store.dispatch( 25 addedSet(data.id, data.exercise_id, data.weight, "others") 26 ); 27 }); 28 29 this.followed_channel.bind("client-incremented-set", data => { 30 store.dispatch(incrementedSet(data.set_id, data.reps, "others")); 31 }); 32 }); 33 };
Running the app
Now that we’ve added all of the relevant code, the app should work after we’ve added all the config and linked it to its server component.
Start by adding your Pusher app credentials to the server/.env file:
1APP_ID=YOUR_PUSHER_APP_ID 2 APP_KEY=YOUR_PUSHER_APP_KEY 3 APP_SECRET=YOUR_PUSHER_APP_SECRET 4 APP_CLUSTER=YOUR_PUSHER_APP_CLUSTER 5 PORT=3000
Once that’s done, run the server:
node server.js
Next, add your ngrok auth token and expose port 3000 to the internet:
1./ngrok authToken YOUR_NGROK_AUTH_TOKEN 2 ./ngrok http 3000
Ngrok should show the https URL for the server. Copy it to your Pusher authEndpoint in the LogWorkout screen:
1// app/screens/LogWorkout.js 2 this.pusher = new Pusher("YOUR_PUSHER_APP_KEY", { 3 authEndpoint: "YOUR_NGROK_URL/pusher/auth", 4 cluster: "YOUR_PUSHER_APP_CLUSTER", 5 encrypted: true 6 });
Once that’s done, the app should be fully functional. Try running it on two devices:
expo start
Conclusion
In this tutorial, you learned how to use Pusher within a React Native app to create a realtime workout tracking app. Along the way, you’ve solidified your experience with basic Redux concepts and Pusher Channels.
You can view the source code of this app on this GitHub repo.


© 2025 Pusher Ltd. All rights reserved.
Pusher Limited is a company registered in England and Wales (No. 07489873) whose registered office is at MessageBird UK Limited, 3 More London Riverside, 4th Floor, London, United Kingdom, SE1 2AQ.