- Products

- Developers
- User stories
- Blog
- Pricing

Getting started with webpack - Part 6: Working with images
Introduction
In this part of the series, we will dig deeper into webpack to see what else is possible. We will specifically try to use other webpack plugins in our application to work with images.
In the previous part of the series, we have learned how to use plugins in webpack. We also learned about optimizations in webpack and how we can use some plugins as minimizers. We can use plugins to do many things while developing. In this article, we will consider a few uses specific to our application.
Let’s get started.
NOTE: Source code of the application is available on GitHub.
Prerequisites
To follow along in this series, you need the following requirements:
- Completed all previous parts of the series.
- Basic knowledge of JavaScript.
- Basic knowledge of the CLI.
- A text editor. VS Code is recommended.
- Node.js (>=6.11.5) and npm installed locally.
Let’s continue with the series.
Minifying images using the imagemin plugin
When developing applications, we usually want to make our asset files smaller. Doing this will lead to smaller assets and thus a faster website. To achieve image compression, we will be using a webpack plugin called imagemin-webpack-plugin.
Before we add it to the application, let’s see how this will be implemented in our config file.
To add it to our webpack configuration, you would typically need to do something like this:
1var ImageminPlugin = require('imagemin-webpack-plugin').default 2 3 module.exports = { 4 plugins: [ 5 // Make sure that the plugin is after any plugins that add images 6 new ImageminPlugin({ 7 disable: false, 8 pngquant: { 9 quality: [0.3, 0.5] 10 }, 11 }) 12 ] 13 }
Above, we imported the plugin and then we stored it to the ImageminPlugin variable. Next, in the actual webpack plugin, we instantiate the plugin and pass the following options to it:
disable: this accepts a boolean value. Iftrue, the plugin will be disabled. We would typically disable the plugin during development.pngquant: this accepts an object which will be the options for the imagemin pngquant plugin. To see the available options, check here.
There are other options we can specify, you can see all the options here.
One thing to remember though is, when you are adding other webpack plugins that work with images, you should always add them before the imagemin plugin.
Adding the imagemin plugin to our project
In this part, we will be building off the code in the previous part. If you don’t have it already, you can download the project code from GitHub. We will be using the code there as a base for the modifications we are going to make going forward. When you have downloaded the project, open Part-5 in your code editor and follow along.
Before we get started, run the following command in the root of the project to install the npm dependencies:
$ npm install
To get started, we need to decide the plugins we want to use and then install them using npm. After installing them, we will activate them in the webpack configuration file.
The plugins we will use are as follows:
- imagemin-webpack-plugin - to compress images
- copy-webpack-plugin - to copy compressed images around
- url-loader - a loader for webpack which transforms files into base64 URIs
- file-loader - resolves
import/require()on a file into a URL and emits the file into the output directory.
Let’s start adding them one after the other.
Loading images in our project
First, we will start with loading images in our project. For this, we need both file-loader and url-loader. To install them, run the following command:
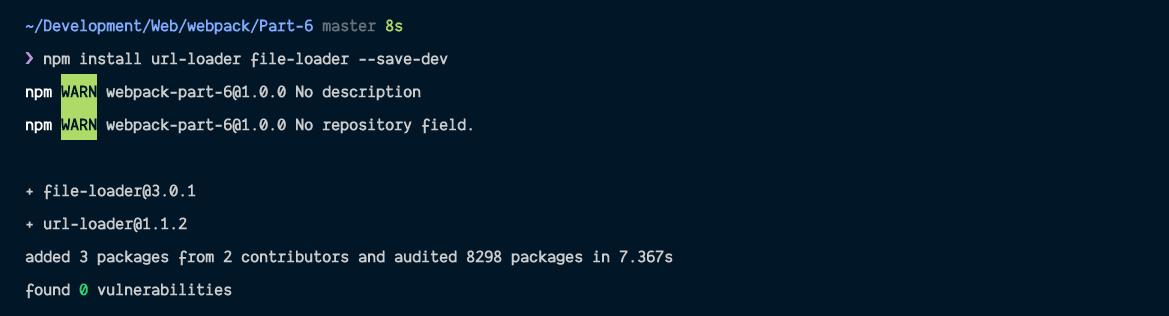
$ npm install url-loader file-loader --save-dev
When the installation is complete, open the webpack configuration file and replace the contents with the following:
1// File: ./webpack.config.js 2 const webpack = require('webpack'); 3 const path = require('path'); 4 const MiniCssExtractPlugin = require('mini-css-extract-plugin'); 5 const OptimizeCssAssetsPlugin = require('optimize-css-assets-webpack-plugin'); 6 const env = process.env.NODE_ENV; 7 8 module.exports = { 9 mode: env == 'production' || env == 'none' ? env : 'development', 10 entry: path.resolve(__dirname + '/src/index.js'), 11 output: { 12 path: path.resolve(__dirname + '/dist/assets'), 13 filename: 'bundle.js' 14 }, 15 module: { 16 rules: [ 17 { 18 test: /\.scss$/, 19 use: [MiniCssExtractPlugin.loader, 'css-loader', 'sass-loader'] 20 }, 21 { 22 test: /\.js$/, 23 exclude: /node_modules/, 24 loader: 'babel-loader' 25 }, 26 { 27 test: /\.(png|jp(e*)g|svg)$/, 28 use: [ 29 { 30 loader: 'url-loader', 31 options: { 32 limit: 8000, 33 name: 'images/[hash]-[name].[ext]', 34 publicPath: 'assets', 35 } 36 } 37 ] 38 } 39 ] 40 }, 41 plugins: [ 42 new MiniCssExtractPlugin({ 43 filename: '[name].css', 44 chunkFilename: '[id].css' 45 }), 46 new OptimizeCssAssetsPlugin({ 47 cssProcessorPluginOptions: { 48 preset: ['default', { discardComments: { removeAll: true } }] 49 } 50 }) 51 ] 52 };
Above, we just added a new rule to the list of rules. We added the rule to look for images and pass them through the url-loader. The test we run for images is /\.(png|jp(e*)g|svg)``*$*``/ which will match images with the following extensions: png, jpg, jpeg, svg.
We also specified some options for the url-loader:
limit- when the image file size is smaller than 8000 bytes (8kb), the image is converted to base64 format and passed as thesrcof the image. This helps save a DNS request and thus make your application faster. If the size is greater than 8000 bytes, the image is passed to thefile-loaderwhich will load the image normally.name- this is passed to the file loader in the situation where the file size is greater than 8000 bytes.
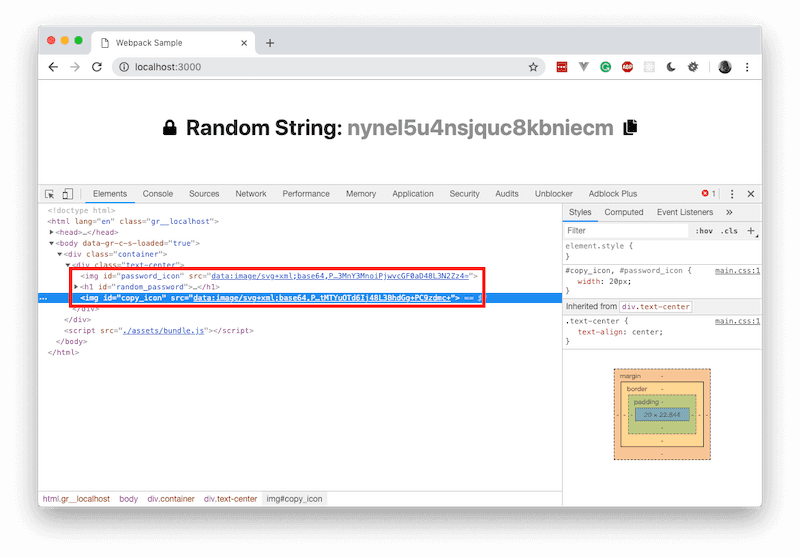
Now that we have configured that, let’s download this icon and this icon from font-awesome. After downloading them, place them in the src/images directory. The icons we downloaded are both below 8000 bytes so we will use this to demonstrate the base64 URL that the url-loader generates.
Open the index.js file and import both images and add them to the HTML as seen below:
1// File: ./src/index.js 2 // [...] 3 import passwordIcon from './images/lock-solid.svg'; 4 import copyIcon from './images/copy-solid.svg'; 5 6 document.getElementById('copy_icon').src = copyIcon; 7 document.getElementById('password_icon').src = passwordIcon;
Next, open the index.html file and replace the contents with the following:
1<!-- File: ./dist/index.html --> 2 <!DOCTYPE html> 3 <html lang="en"> 4 <head> 5 <meta charset="UTF-8" /> 6 <meta name="viewport" content="width=device-width, initial-scale=1.0" /> 7 <meta http-equiv="X-UA-Compatible" content="ie=edge" /> 8 <title>Webpack Sample</title> 9 <link rel="stylesheet" href="/assets/main.css" /> 10 </head> 11 <body> 12 <div class="container"> 13 <div class="text-center"> 14 <img id="password_icon" /> 15 <h1 id="random_password"></h1> 16 <img id="copy_icon" /> 17 </div> 18 </div> 19 <script src="./assets/bundle.js"></script> 20 </body> 21 </html>
Next, open the style.scss file and append the following code:
1/* File: ./src/style.scss */ 2 .text-center { 3 text-align: center; 4 } 5 6 #password_icon, 7 #copy_icon { 8 width: 20px; 9 } 10 11 #random_password { 12 display: inline-block; 13 margin: 0 10px; 14 }
Next, run the npm command to build the application:
$ npm run build
Now you can run the server to see the changes:
$ node dist/server.js
If all went well, you should see both images and if you Inspect Element and view the image source, you’ll notice it’ll be the Base64 representation.
Before we demonstrate the other way url-loader handles images, let’s implement the copy to clipboard feature.
Open the src/index.js file and replace:
document.getElementById('copy_icon').src = copyIcon;
With
1const copyIconElem = document.getElementById('copy_icon'); 2 copyIconElem.src = copyIcon; 3 copyIconElem.onclick = () => { 4 copyToClipboard(document.getElementById('actual_password').innerText); 5 alert('Copied to clipboard'); 6 };
Next, create a new file ./src/utilities/copyToClipboard.js and paste the following into it:
1// File: ./src/utilities/copyToClipboard.js 2 const copyToClipboard = str => { 3 const el = document.createElement('textarea'); 4 el.value = str; 5 el.setAttribute('readonly', ''); 6 el.style.position = 'absolute'; 7 el.style.left = '-9999px'; 8 document.body.appendChild(el); 9 el.select(); 10 document.execCommand('copy'); 11 document.body.removeChild(el); 12 }; 13 14 export default copyToClipboard;
The code above is just a function that copies the passed parameter to the clipboard.
In your src/index.js file, import the module you just created at the top:
1// File: ./src/index.js 2 // [...] 3 import copyToClipboard from './utilities/copyToClipboard' 4 5 // [...]
Next, in the same file, replace:
1document.addEventListener('DOMContentLoaded', () => { 2 const randomStringGenerator = new RandomStringGenerator(); 3 const randomStr = `Random String: <span>${randomStringGenerator.generate()}</span>`; 4 5 window.setTimeout( 6 () => (document.getElementsByTagName('h1')[0].innerHTML = randomStr), 7 0 8 ); 9 });
With
1document.addEventListener('DOMContentLoaded', () => { 2 const randomStringGenerator = new RandomStringGenerator(); 3 const randomString = `Random String: <span id="actual_password">${randomStringGenerator.generate()}</span>`; 4 document.getElementById('random_password').innerHTML = randomString; 5 });
Now you can build the app and start the server if not already running. The copy to clipboard function should work now.
Loading images with full URLs
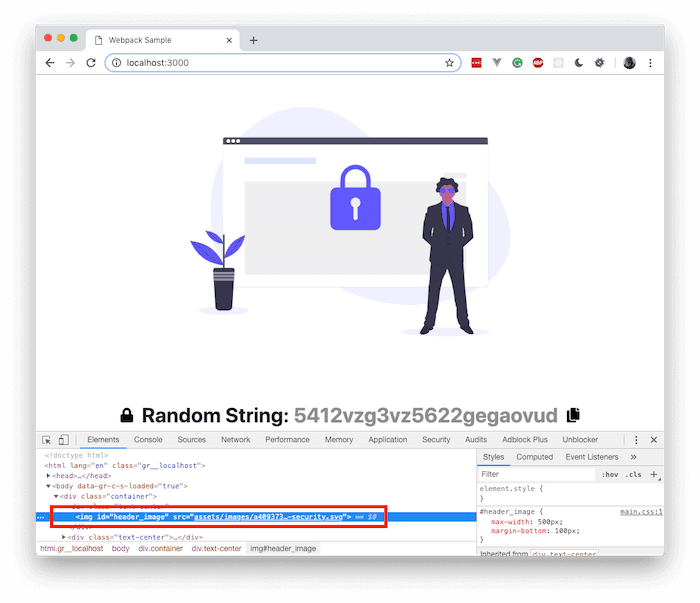
Now that we have demonstrated Base64 URLs for images, let’s demonstrate how larger images will be handled. Download an illustration from here and save it to your src/images directory. We are saving ours as security.svg.
To get started, open the src/index.js, import the image:
1// File: ./src/index.js 2 // [...] 3 4 import securityIllustration from './images/security.svg'; 5 6 document.getElementById('header_image').src = securityIllustration; 7 8 // [...]
Next, open the dist/index.html file and update as seen below:
1<!-- File: ./dist/index.html --> 2 <!-- [...] --> 3 <div class="container"> 4 <div class="text-center"> 5 <img id="header_image" /> 6 <!-- [...] --> 7 </div> 8 </div>
Now, open the ./src/style.scss and append this:
1#header_image { 2 max-width: 500px; 3 margin-bottom: 100px; 4 }
Finally, open the dist/server.js and replace the content with the following:
1// File: ./dist/server.js 2 const express = require('express'); 3 const app = express(); 4 const port = 3000; 5 const path = require('path'); 6 7 app.use('/assets', express.static(path.join(__dirname, 'assets'))); 8 app.get('/', (req, res) => res.sendFile(path.join(__dirname + '/index.html'))); 9 app.listen(port, () => console.log(`Example app listening on port ${port}!`));
Above, we are using express to serve all the static files.
Now that we have completed that, let’s build the application and start the server. To do this, run the following commands:
1$ npm run build 2 $ node dist/server.js
If you had the server running before, you need to stop it and restart it.
That’s all, we have our images compiled, compressed, and presented using our webpack plugins and loaders.
Conclusion
In this part of the series, we have learned how to work with images in webpack. We learned how to compress images and copy them to our public directory using webpack. However, Webpack is a lot more powerful than this. We will dive a little deeper in the next part.
The source code to this application is available on GitHub.


© 2026 Pusher Ltd. All rights reserved.
Pusher Limited is a company registered in England and Wales (No. 07489873) whose registered office is at MessageBird UK Limited, 3 More London Riverside, 4th Floor, London, United Kingdom, SE1 2AQ.