- Products

- Developers
- User stories
- Blog
- Pricing

Set up realtime monitoring for transactional emails with React and SendGrid
Introduction
Transactional emails are automated, realtime messages that are sent to users through email after a specific action has been performed on a website or application. These emails are often used for a wide range of alerts such as account creation, password resets, order confirmations, invoices, shipping notifications and more.
It is necessary for every business to have some sort of monitoring service for transactional emails so that you can easily detect when there’s a problem, such as when your emails keep ending up in the spam folder or when critical emails are not being delivered as expected.
In this tutorial, I’ll show you how to set up realtime monitoring of transactional emails with Pusher Channels and SendGrid. We’ll be using the scenario of a password reset email in this example, but you can easily extend it to fit other use cases.
Prerequisites
Previous experience with React and Node is required to be able to follow through with this tutorial. You also need to have Node (v8 or later) and npm installed on your computer. You can view the instructions for how to install or upgrade your Node install.
Sign up for Pusher Channels
Before we write any code, create a free sandbox Pusher account or sign in. Select Create Channels app on the sidebar to create a new app. Give your app a name and hit Create my app. Once your app is created, navigate to the API Keys tab and take note of the credentials. We’ll make use of it soon.
Sign up for SendGrid
Create a free account at Sendgrid.com. Once you're in, select Settings > API Keys on the sidebar and then create a new API key. Give your API key a name, and select Full Access under API Key Permissions. Once your key is created, keep it in view until after we’ve added it to an .env file in the next section.
Getting started
Create a new directory for this project and cd into it. Next, run npm init -y to initialize the project with a package.json file. Following that, run the command below to install the dependencies which we’ll be needing to build the server part of the application.
npm install express cors pusher @sendgrid/mail dotenv --save
Once the dependencies have been installed, create a new variables.env file and populate it with the following contents:
1// variables.env 2 PORT=5000 3 PUSHER_APP_ID=<your app id> 4 PUSHER_APP_KEY=<your app key> 5 PUSHER_APP_SECRET=<your app secret> 6 PUSHER_APP_CLUSTER=<your app cluster> 7 SENDGRID_API_KEY=<your sendgrid api key>
Next, create a new server.js file and populate it with the following contents:
1// server.js 2 3 require('dotenv').config({ path: 'variables.env' }); 4 5 const express = require('express'); 6 const bodyParser = require('body-parser'); 7 const cors = require('cors'); 8 const Pusher = require('pusher'); 9 const sgMail = require('@sendgrid/mail') 10 11 sgMail.setApiKey(process.env.SENDGRID_API_KEY) 12 13 const app = express(); 14 15 app.use(cors()) 16 app.use(bodyParser.json()); 17 app.use(bodyParser.urlencoded({ extended: true })); 18 19 const pusher = new Pusher({ 20 appId: process.env.PUSHER_APP_ID, 21 key: process.env.PUSHER_APP_KEY, 22 secret: process.env.PUSHER_APP_SECRET, 23 cluster: process.env.PUSHER_APP_CLUSTER, 24 useTLS: true, 25 }); 26 27 app.post("/reset-password", (req, res) => { 28 const { email } = req.body; 29 const msg = { 30 to: email, 31 from: 'noreply@fictionalservice.com', 32 subject: 'Reset your password', 33 html: ` 34 <p>We recently received a request to reset the password for your account. 35 Simply click the button below to reset your password.</p> 36 <button>Reset Password</button> 37 `, 38 }; 39 40 sgMail.send(msg) 41 .then(() => { 42 res.send("Success!"); 43 }) 44 .catch((err) => { 45 console.error(err); 46 res.status(500).send("An error occured"); 47 }); 48 }); 49 50 app.set('port', process.env.PORT || 5000); 51 const server = app.listen(app.get('port'), () => { 52 console.log(`Express running → PORT ${server.address().port}`); 53 });
Our server currently has a single route which expects an email address and sends a password reset email message to it via SendGrid’s API.
You can then start the server by running node server.js in the terminal. It should become available on port 5000.
Set up the application frontend
We’ll be making use of the create-react-app tool to bootstrap our React app, so make sure you have it installed on your machine. If not, you can install it globally using npm install -g create-react-app.
By now, the create-react-app command should be available on your machine. Run the following command in the terminal to create a new React app.
create-react-app client
As soon has the command has finished running, cd into the client directory and run the command below to install the following additional dependencies which we’ll be using to build our application frontend.
npm install react-router-dom react-toastify axios pusher-js react-spinkit skeleton-css --save
Once all the dependencies have been installed, run npm start to start the development server. The application should be viewable at http://localhost:3000.
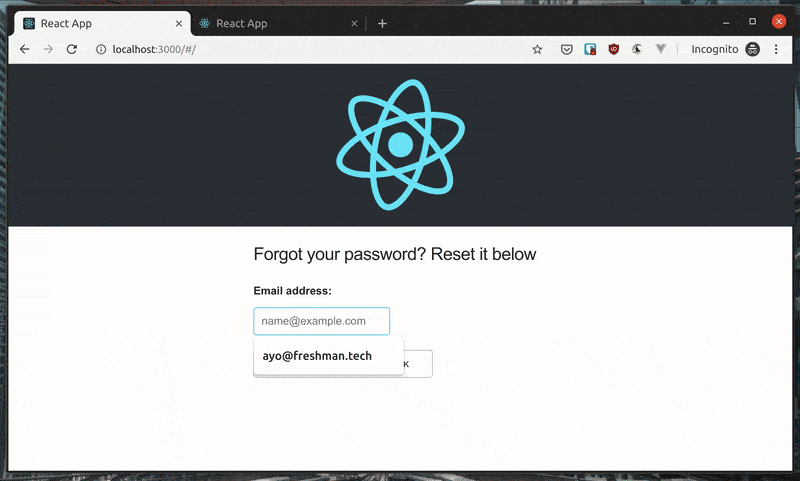
Create the password reset form
Open up client/src/index.js in your editor and change it to look like this:
1// client/src/index.js 2 3 import React from 'react'; 4 import ReactDOM from 'react-dom'; 5 import { HashRouter, Route } from 'react-router-dom'; 6 import './index.css'; 7 import App from './App'; 8 import * as serviceWorker from './serviceWorker'; 9 10 ReactDOM.render( 11 <HashRouter> 12 <Route exact path="/" component={App} /> 13 </HashRouter> 14 , document.getElementById('root')); 15 16 serviceWorker.unregister();
Next, modify the contents of client/src/App.js as follows:
1// client/src/App.js 2 3 import React from 'react'; 4 import axios from 'axios'; 5 import logo from './logo.svg'; 6 import Spinner from 'react-spinkit'; 7 import { ToastContainer, toast } from 'react-toastify'; 8 9 import 'react-toastify/dist/ReactToastify.min.css'; 10 import 'skeleton-css/css/normalize.css'; 11 import 'skeleton-css/css/skeleton.css'; 12 import './App.css'; 13 14 class App extends React.Component { 15 state = { 16 emailAddress: '', 17 loading: false, 18 } 19 20 handleChange = (event) => { 21 const { value } = event.target; 22 this.setState({ 23 emailAddress: value, 24 }); 25 } 26 27 handleSubmit = (event) => { 28 event.preventDefault(); 29 30 const { emailAddress } = this.state; 31 32 this.setState({ 33 loading: true, 34 }); 35 36 axios.post("http://localhost:5000/reset-password", { 37 email: emailAddress, 38 }).then(() => { 39 toast.success("Check your email address for the recovery link") 40 }) 41 .catch(() => { 42 toast.error("An problem occured, please try again later") 43 }) 44 .finally(() => { 45 this.setState({ 46 loading: false, 47 }) 48 }); 49 } 50 51 render() { 52 const { emailAddress, loading } = this.state; 53 54 return ( 55 <div className="App"> 56 <header className="App-header"> 57 <img src={logo} className="App-logo" alt="logo" /> 58 </header> 59 <section> 60 <form onSubmit={this.handleSubmit} className="password-reset" action=""> 61 <h5>Forgot your password? Reset it below</h5> 62 <label htmlFor="email-input">Email address:</label> 63 <input type="email" onChange={this.handleChange} value={emailAddress} className="email-input" placeholder="name@example.com" id="email-input" name="email" /> 64 <button type="submit">Email me a recovery link</button> 65 { loading ? <Spinner name='line-scale-pulse-out' /> : null } 66 </form> 67 <ToastContainer /> 68 </section> 69 </div> 70 71 ); 72 } 73 } 74 75 export default App;
Finally, update client/src/App.css as shown below:
1// client/src/App.css 2 3 .App { 4 text-align: center; 5 } 6 7 .App-logo { 8 animation: App-logo-spin infinite 20s linear; 9 height: 40vmin; 10 pointer-events: none; 11 } 12 13 .App-header { 14 background-color: #282c34; 15 display: flex; 16 flex-direction: column; 17 align-items: center; 18 justify-content: center; 19 font-size: calc(10px + 2vmin); 20 color: white; 21 margin-bottom: 20px; 22 } 23 24 .App-link { 25 color: #61dafb; 26 } 27 28 @keyframes App-logo-spin { 29 from { 30 transform: rotate(0deg); 31 } 32 to { 33 transform: rotate(360deg); 34 } 35 } 36 37 form { 38 width: 100%; 39 max-width: 400px; 40 margin: 0 auto; 41 text-align: left; 42 } 43 44 input, label { 45 display: block; 46 margin-bottom: 10px; 47 } 48 49 .email-input { 50 margin-bottom: 20px; 51 }
This part of the application is pretty simple. We have a single input where the user will enter their email address. Once the submit button is clicked, a POST request is made to the /reset-password endpoint which we set up earlier on the server.
Now, if we get a successful response (meaning an email was sent successfully), the app displays a toast notification informing the user to go check their email. Otherwise, an error message is displayed on the page.
Set up the monitoring dashboard
The next step is to set up a realtime monitoring dashboard that enables you to have a constant supervision on your transactional feeds.
Create a new Dashboard.js file in client/src and paste the following code into it:
1// client/src/Dashboard.js 2 3 import React, { Component } from 'react'; 4 import Pusher from 'pusher-js'; 5 6 import './Dashboard.css'; 7 8 class Dashboard extends Component { 9 state = { 10 processed: 0, 11 dropped: 0, 12 delivered: 0, 13 deferred: 0, 14 bounce: 0, 15 } 16 17 componentDidMount() { 18 const pusher = new Pusher('<your app key>', { 19 cluster: '<your app cluster>', 20 forceTLS: true 21 }); 22 23 var channel = pusher.subscribe('email-events'); 24 channel.bind('new-event', data => { 25 const { event } = data; 26 this.setState(prevState => { 27 return { 28 [event]: prevState[event] + 1 29 } 30 }); 31 }); 32 } 33 34 render() { 35 const { processed, dropped, delivered, deferred, bounce } = this.state; 36 return ( 37 <div className="Dashboard"> 38 <h1>Realtime Transactional Email Monitoring</h1> 39 <div className="metrics"> 40 41 <div className="metric"> 42 <span className="metric-name">Emails Processed</span> 43 <span className="metric-value">{processed}</span> 44 </div> 45 <div className="metric"> 46 <span className="metric-name">Emails Delivered</span> 47 <span className="metric-value">{delivered}</span> 48 </div> 49 <div className="metric"> 50 <span className="metric-name">Emails Dropped</span> 51 <span className="metric-value">{dropped}</span> 52 </div> 53 <div className="metric"> 54 <span className="metric-name">Emails Deferred</span> 55 <span className="metric-value">{deferred}</span> 56 </div> 57 <div className="metric"> 58 <span className="metric-name">Bounced Emails</span> 59 <span className="metric-value">{bounce}</span> 60 </div> 61 </div> 62 </div> 63 ); 64 } 65 } 66 67 export default Dashboard;
If you look at the componentDidMount() hook, you can see that we’re making use of the subscribe() method from Pusher to subscribe to a new channel called email-events. Finally, we’re listening for the new-event event on the email-events channel using the bind method and update the application state once we receive a new event on the channel.
Don’t forget to replace <your app id> and <your app cluster> with the appropriate values from your Channels dashboard.
Next, create the CSS file for the Dashboard component as shown below:
1// client/src/Dashboard.css 2 3 .Dashboard { 4 padding-top: 30px; 5 text-align: center; 6 } 7 8 h1 { 9 margin-bottom: 50px; 10 } 11 12 .metrics { 13 width: 1000px; 14 margin: 0 auto; 15 display: flex; 16 justify-content: space-between; 17 flex-wrap: wrap; 18 } 19 20 .metric { 21 width: 130px; 22 border-radius: 4px; 23 border: 1px solid #ddd; 24 display: flex; 25 flex-direction: column; 26 } 27 28 .metric span { 29 display: block; 30 } 31 32 .metric-value { 33 font-size: 50px; 34 }
Finally, update your client/src/index.js file as shown below:
1// client/src/index.js 2 3 import React from 'react'; 4 import ReactDOM from 'react-dom'; 5 import { HashRouter, Route } from 'react-router-dom'; 6 import './index.css'; 7 import App from './App'; 8 import Dashboard from './Dashboard'; 9 import * as serviceWorker from './serviceWorker'; 10 11 ReactDOM.render( 12 <HashRouter> 13 <Route exact path="/" component={App} /> 14 <Route exact path="/dash" component={Dashboard} /> 15 </HashRouter>// If you want your app to work offline and load faster, you can change 16 // unregister() to register() below. Note this comes with some pitfalls. 17 // Learn more about service workers: https://bit.ly/CRA-PWA 18 , document.getElementById('root')); 19 20 serviceWorker.unregister();
Trigger updates from the server
The SendGrid Event Webhook provides realtime feedback on every email you send across nine event types. Once an email is sent, SendGrid triggers a bunch of events on a provided HTTP POST URL. We can then use the information contained in the events to update our monitoring dashboard with Channels.
First let’s set up the route on the server. Add this below the /reset-password route:
1// server.js 2 3 app.post("/events", (req, res) => { 4 const events = req.body; 5 events.forEach(function (event) { 6 pusher.trigger('email-events', 'new-event', { 7 ...event 8 }); 9 }); 10 });
Save the file and restart the server in the terminal.
Next, we need to expose our localhost server publicly using ngrok. Visit the ngrok website to find out how to set it up on your computer. Once you have it installed, start an HTTP tunnel on port 5000 by running the command below in a separate terminal window. You will be provided with a couple of URLs but you only need the last one which is HTTPS enabled.
./ngrok http 5000
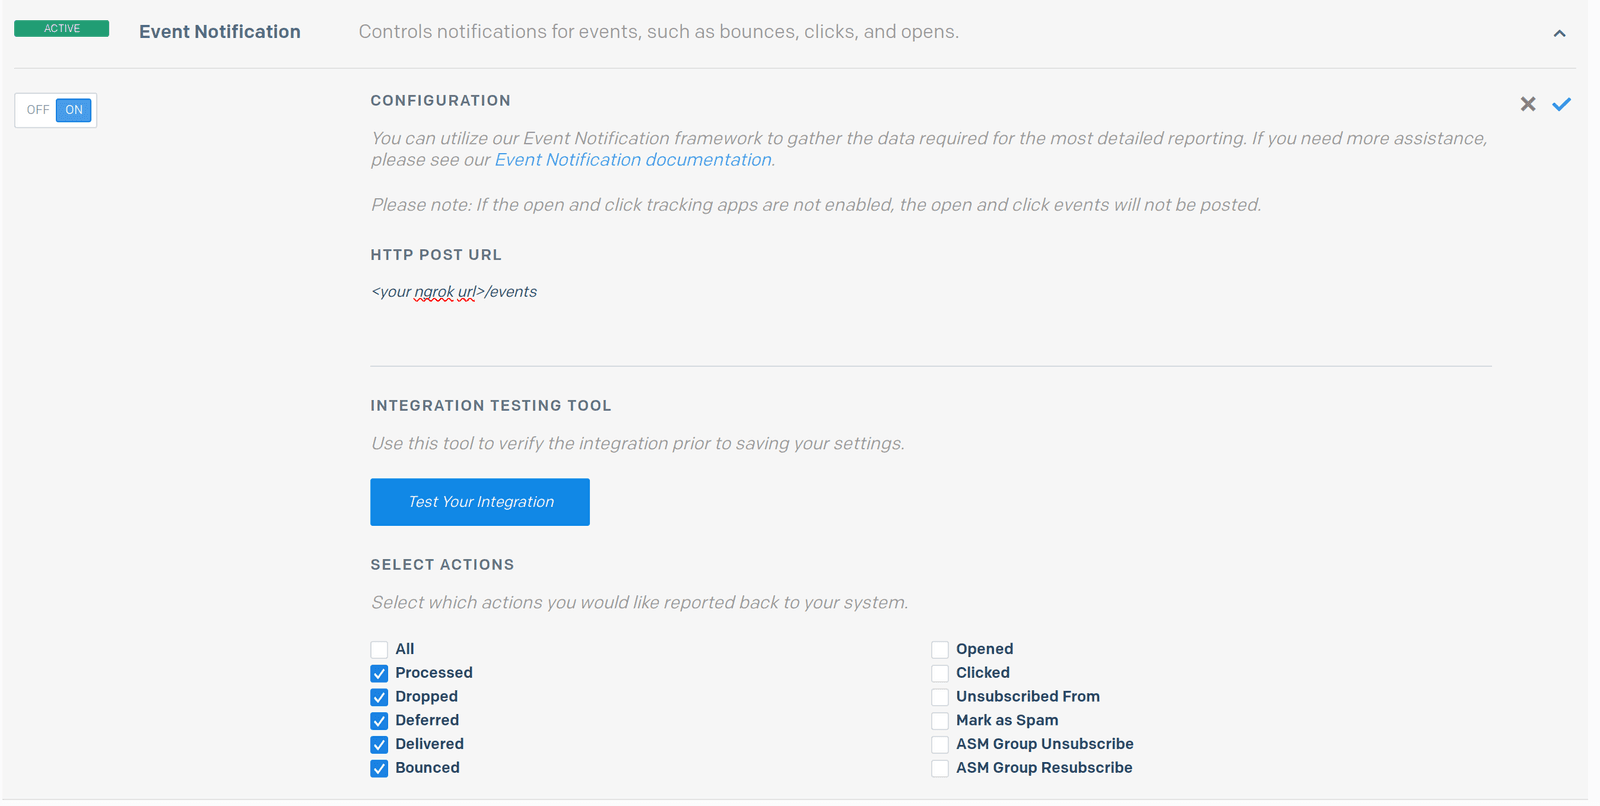
Finally, let’s activate SendGrid’s event notification service. On the SendGrid dashboard, go to Settings > Mail Settings, and scroll to the Event Notification setting. Toggle the setting on, and click the edit link, then update the HTTP POST URL input with <your ngrok url>/events.
Following that, select the following actions: Processed, Dropped, Deferred, Delivered, and Bounced then click the blue checkmark on the right to save.
Not only will you be able to set up monitoring for your business critical emails, but you’ll be the first to know if anything goes wrong, allowing you to save time and money, and improve customer experience.
Test the application
Open the password reset form on http://localhost:3000 and the dashboard at http://localhost:3000/#/dash in a separate tab. Enter your email address and submit the form. After a short while, you should see the metrics update on the dashboard.
Conclusion
You have now learned how to create a realtime monitoring dashboard for transactional emails. It was easy wasn’t it? We covered a simple use case but you can take it further and set up monitoring for all your business's critical emails.
Thanks for reading! Remember that you can find the source code of this app in this GitHub repository.


© 2025 Pusher Ltd. All rights reserved.
Pusher Limited is a company registered in England and Wales (No. 07489873) whose registered office is at MessageBird UK Limited, 3 More London Riverside, 4th Floor, London, United Kingdom, SE1 2AQ.