- Products

- Developers
- User stories
- Blog
- Pricing

Build a todo app for iOS, Android and web with react-native-web
Introduction
In this tutorial, I will be describing how to build a realtime application that runs on the web, Android and iOS. The application will be a Todo app but will also make use of Pusher Channels for realtime functionality. You can find a demo of the application below:
In the results of Stack Overflow’s 2019 developer survey, JavaScript happens to be the most popular technology. This is not by mere luck as it has proven we can write applications that can run almost anywhere - from web apps, desktop apps, android apps and iOS apps.
Prerequisites
- NodeJS >= 6
- Yarn package manager. Installation information can be found here.
Directory setup
You will need to create a new directory called realtime-todo. In this directory, you will also need to create another one called server. You can make use of the command below to achieve the above:
1$ mkdir realtime-todo 2 $ mkdir realtime-todo/server
Building the server
As you already know, we created a server directory, you will need to cd into that directory as that is where the bulk of the work for this section is going to be in. The first thing you need to do is to create a package.json file, you can make use of the following command:
$ touch package.json
In the newly created file, paste the following content:
1// realtime-todo/server/package.json 2 { 3 "name": "server", 4 "version": "1.0.0", 5 "description": "", 6 "main": "index.js", 7 "dependencies": { 8 "body-parser": "^1.18.3", 9 "cors": "^2.8.5", 10 "dotenv": "^7.0.0", 11 "express": "^4.16.4", 12 "pusher": "^2.2.0" 13 }, 14 "devDependencies": {}, 15 "scripts": { 16 "test": "echo \"Error: no test specified\" && exit 1" 17 } 18 }
After which you will need to actually install the dependencies, that can be done with:
$ yarn
Once the above command succeeds, you will need to create an index.js file that will house the actual todo API. You can create the file by running the command below:
$ touch index.js
In the index.js, paste the following contents:
1// realtime-todo/server/index.js 2 3 require('dotenv').config({ path: 'variable.env' }); 4 5 const express = require('express'); 6 const bodyParser = require('body-parser'); 7 const cors = require('cors'); 8 const Pusher = require('pusher'); 9 10 const pusher = new Pusher({ 11 appId: process.env.PUSHER_APP_ID, 12 key: process.env.PUSHER_APP_KEY, 13 secret: process.env.PUSHER_APP_SECRET, 14 cluster: process.env.PUSHER_APP_CLUSTER, 15 useTLS: true, 16 }); 17 18 const app = express(); 19 20 app.use(cors()); 21 app.use(bodyParser.json()); 22 app.use(bodyParser.urlencoded({ extended: true })); 23 24 app.post('/pusher/auth', function(req, res) { 25 var socketId = req.body.socket_id; 26 var channel = req.body.channel_name; 27 var auth = pusher.authenticate(socketId, channel); 28 res.send(auth); 29 }); 30 31 const todos = []; 32 33 app.get('/items', (req, res) => { 34 res.status(200).send({ tasks: todos }); 35 }); 36 37 app.post('/items', (req, res) => { 38 const title = req.body.title; 39 40 if (title === undefined) { 41 res 42 .status(400) 43 .send({ message: 'Please provide your todo item', status: false }); 44 return; 45 } 46 47 if (title.length <= 5) { 48 res.status(400).send({ 49 message: 'Todo item should be more than 5 characters', 50 status: false, 51 }); 52 return; 53 } 54 55 const index = todos.findIndex(element => { 56 return element.text === title.trim(); 57 }); 58 59 if (index >= 0) { 60 res 61 .status(400) 62 .send({ message: 'TODO item already exists', status: false }); 63 return; 64 } 65 66 const item = { 67 text: title.trim(), 68 completed: false, 69 }; 70 71 todos.push(item); 72 73 pusher.trigger('todo', 'items', item); 74 75 res 76 .status(200) 77 .send({ message: 'TODO item was successfully created', status: true }); 78 }); 79 80 app.post('/items/complete', (req, res) => { 81 const idx = req.body.index; 82 83 todos[idx].completed = true; 84 85 pusher.trigger('todo', 'complete', { index: idx }); 86 87 res.status(200).send({ 88 status: true, 89 }); 90 }); 91 92 app.set('port', process.env.PORT || 5200); 93 const server = app.listen(app.get('port'), () => { 94 console.log(`Express running on port ${server.address().port}`); 95 });
In the above, we create an API server that has three endpoints:
/items: anHTTPGET request to list all available todo items./items: anHTTPPOST request to create a new todo item./items/complete: used to mark a todo item as done.
Another thing you might have noticed in on Line 3 where we make mention of a file called variable.env. That file does not exists yet, so now is the time to create it. You can do that with the following command:
$ touch variable.env
In the newly created file, paste the following content:
1// realtime-todo/server/variable.env 2 3 PUSHER_APP_ID="PUSHER_APP_ID" 4 PUSHER_APP_KEY="PUSHER_APP_KEY" 5 PUSHER_APP_SECRET="PUSHER_APP_SECRET" 6 PUSHER_APP_CLUSTER="PUSHER_APP_CLUSTER" 7 PUSHER_APP_SECURE="1"
Please make sure to replace the placeholders with your original credentials
You can go ahead to run the server to make sure everything is fine. You can do that by running the command:
$ node index.js
Building the client
The client we will build in this section will run on the web. With the help of Expo and React Native, it will also run on Android and iOS. This is made possible via a library called [react-native-web](https://github.com/necolas/react-native-web).
To get up to speed, we will make use of a starter pack available on GitHub. You will need to navigate to the project root i.e realtime-todo and clone the starter pack project. That can be done with the following command:
1# Clone into the `client` directory 2 $ git clone git@github.com:joefazz/react-native-web-starter.git client
You will need to cd into the client directory as all changes to be made will be done there. You will also need to install the dependencies, that can be done by running yarn. As we will be making use of Pusher Channels and at the same time communicate with the server, you will need to run the following command:
$ yarn add axios pusher-js
The next step is to open the file located at src/App.js. You will need to delete all the existing content and replace with the following:
1// realtime-todo/client/src/App.js 2 3 import React, { Component } from 'react'; 4 import { 5 StyleSheet, 6 Text, 7 View, 8 FlatList, 9 Button, 10 TextInput, 11 SafeAreaView, 12 } from 'react-native'; 13 import axios from 'axios'; 14 import Alert from './Alert'; 15 import Pusher from 'pusher-js/react-native'; 16 17 const APP_KEY = 'PUSHER_APP_KEY'; 18 const APP_CLUSTER = 'PUSHER_APP_CLUSTER'; 19 20 export default class App extends Component { 21 state = { 22 tasks: [], 23 text: '', 24 initiator: false, 25 }; 26 27 changeTextHandler = text => { 28 this.setState({ text: text }); 29 }; 30 31 addTask = () => { 32 if (this.state.text.length <= 5) { 33 Alert('Todo item cannot be less than 5 characters'); 34 return; 35 } 36 37 // The server is the actual source of truth. Notify it of a new entry so it can 38 // add it to a database and publish to other available channels. 39 axios 40 .post('http://localhost:5200/items', { title: this.state.text }) 41 .then(res => { 42 if (res.data.status) { 43 this.setState(prevState => { 44 const item = { 45 text: prevState.text, 46 completed: false, 47 }; 48 49 return { 50 tasks: [...prevState.tasks, item], 51 text: '', 52 initiator: true, 53 }; 54 }); 55 56 return; 57 } 58 59 Alert('Could not add TODO item'); 60 }) 61 .catch(err => { 62 let msg = err; 63 64 if (err.response) { 65 msg = err.response.data.message; 66 } 67 68 Alert(msg); 69 }); 70 }; 71 72 markComplete = i => { 73 // As other devices need to know once an item is marked as done. 74 // The server needs to be informed so other available devices can be kept in sync 75 axios 76 .post('http://localhost:5200/items/complete', { index: i }) 77 .then(res => { 78 if (res.data.status) { 79 this.setState(prevState => { 80 prevState.tasks[i].completed = true; 81 return { tasks: [...prevState.tasks] }; 82 }); 83 } 84 }); 85 }; 86 87 componentDidMount() { 88 // Fetch a list of todo items once the app starts up. 89 axios.get('http://localhost:5200/items', {}).then(res => { 90 this.setState({ 91 tasks: res.data.tasks || [], 92 text: '', 93 }); 94 }); 95 96 const socket = new Pusher(APP_KEY, { 97 cluster: APP_CLUSTER, 98 }); 99 100 const channel = socket.subscribe('todo'); 101 102 // Listen to the items channel for new todo entries. 103 // The server publishes to this channel whenever a new entry is created. 104 channel.bind('items', data => { 105 // Since the app is going to be realtime, we don't want the same item to 106 // be shown twice. Device A publishes an entry, all other devices including itself 107 // receives the entry, so act like a basic filter 108 if (!this.state.initiator) { 109 this.setState(prevState => { 110 return { tasks: [...prevState.tasks, data] }; 111 }); 112 } else { 113 this.setState({ 114 initiator: false, 115 }); 116 } 117 }); 118 119 // This "complete" channel here is for items that were recently marked as done. 120 channel.bind('complete', data => { 121 if (!this.state.initiator) { 122 this.setState(prevState => { 123 prevState.tasks[data.index].completed = true; 124 return { tasks: [...prevState.tasks] }; 125 }); 126 } else { 127 this.setState({ 128 initiator: false, 129 }); 130 } 131 }); 132 } 133 134 render() { 135 return ( 136 // SafeAreaView is meant for the X family of iPhones. 137 <SafeAreaView style={{ flex: 1, backgroundColor: '#F5FCFF' }}> 138 <View style={[styles.container]}> 139 <FlatList 140 style={styles.list} 141 data={this.state.tasks} 142 keyExtractor={(item, index) => index.toString()} 143 renderItem={({ item, index }) => ( 144 <View> 145 <View style={styles.listItemCont}> 146 <Text 147 style={[ 148 styles.listItem, 149 item.completed && { textDecorationLine: 'line-through' }, 150 ]} 151 > 152 {item.text} 153 </Text> 154 {!item.completed && ( 155 <Button 156 title="✔" 157 onPress={() => this.markComplete(index)} 158 /> 159 )} 160 </View> 161 <View style={styles.hr} /> 162 </View> 163 )} 164 /> 165 166 <TextInput 167 style={styles.textInput} 168 onChangeText={this.changeTextHandler} 169 onSubmitEditing={this.addTask} 170 value={this.state.text} 171 placeholder="Add Tasks" 172 returnKeyType="done" 173 returnKeyLabel="done" 174 /> 175 </View> 176 </SafeAreaView> 177 ); 178 } 179 } 180 181 const styles = StyleSheet.create({ 182 container: { 183 flex: 1, 184 justifyContent: 'center', 185 alignItems: 'center', 186 backgroundColor: '#F5FCFF', 187 paddingTop: 20, 188 height: '100%', 189 }, 190 list: { 191 width: '100%', 192 }, 193 listItem: { 194 paddingTop: 2, 195 paddingBottom: 2, 196 fontSize: 18, 197 }, 198 hr: { 199 height: 1, 200 backgroundColor: 'gray', 201 }, 202 listItemCont: { 203 flexDirection: 'row', 204 alignItems: 'center', 205 justifyContent: 'space-between', 206 }, 207 textInput: { 208 height: 40, 209 paddingRight: 10, 210 borderColor: 'gray', 211 width: '100%', 212 }, 213 });
Please update Line 17 and 18 to contain your actual credentials.
While the above is pretty straight forward, perhaps the most interesting is the line that reads Alert('Could not add TODO item');. It is easy to think Alert.alert() should be used, while that is true, react-native-web doesn’t include support for the Alert component so we will have to roll out our own. Here is a list of all components react-native-web supports. Building functionality for making alerts on the web isn’t a herculean task. You will need to create a new file called Alert.js in the src directory.
$ touch src/Alert.js
In the newly created file Alert.js, paste the following contents:
1// realtime-todo/client/src/Alert.js 2 3 import { Platform, Alert as NativeAlert } from 'react-native'; 4 5 const Alert = msg => { 6 if (Platform.OS === 'web') { 7 alert(msg); 8 return; 9 } 10 11 NativeAlert.alert(msg); 12 }; 13 14 export default Alert;
Simple right ? We just check what platform the code is being executed on and take relevant action.
With that done, you will need to go back to the client directory. This is where you get to run the client. Depending on the platform you want to run the app in, the command to run will be different:
- Web :
yarn web. You will need to visithttp://localhost:3000. - Android/iOS :
yarn start-expo
If you go with the second option, you will be shown a web page that looks like the following:
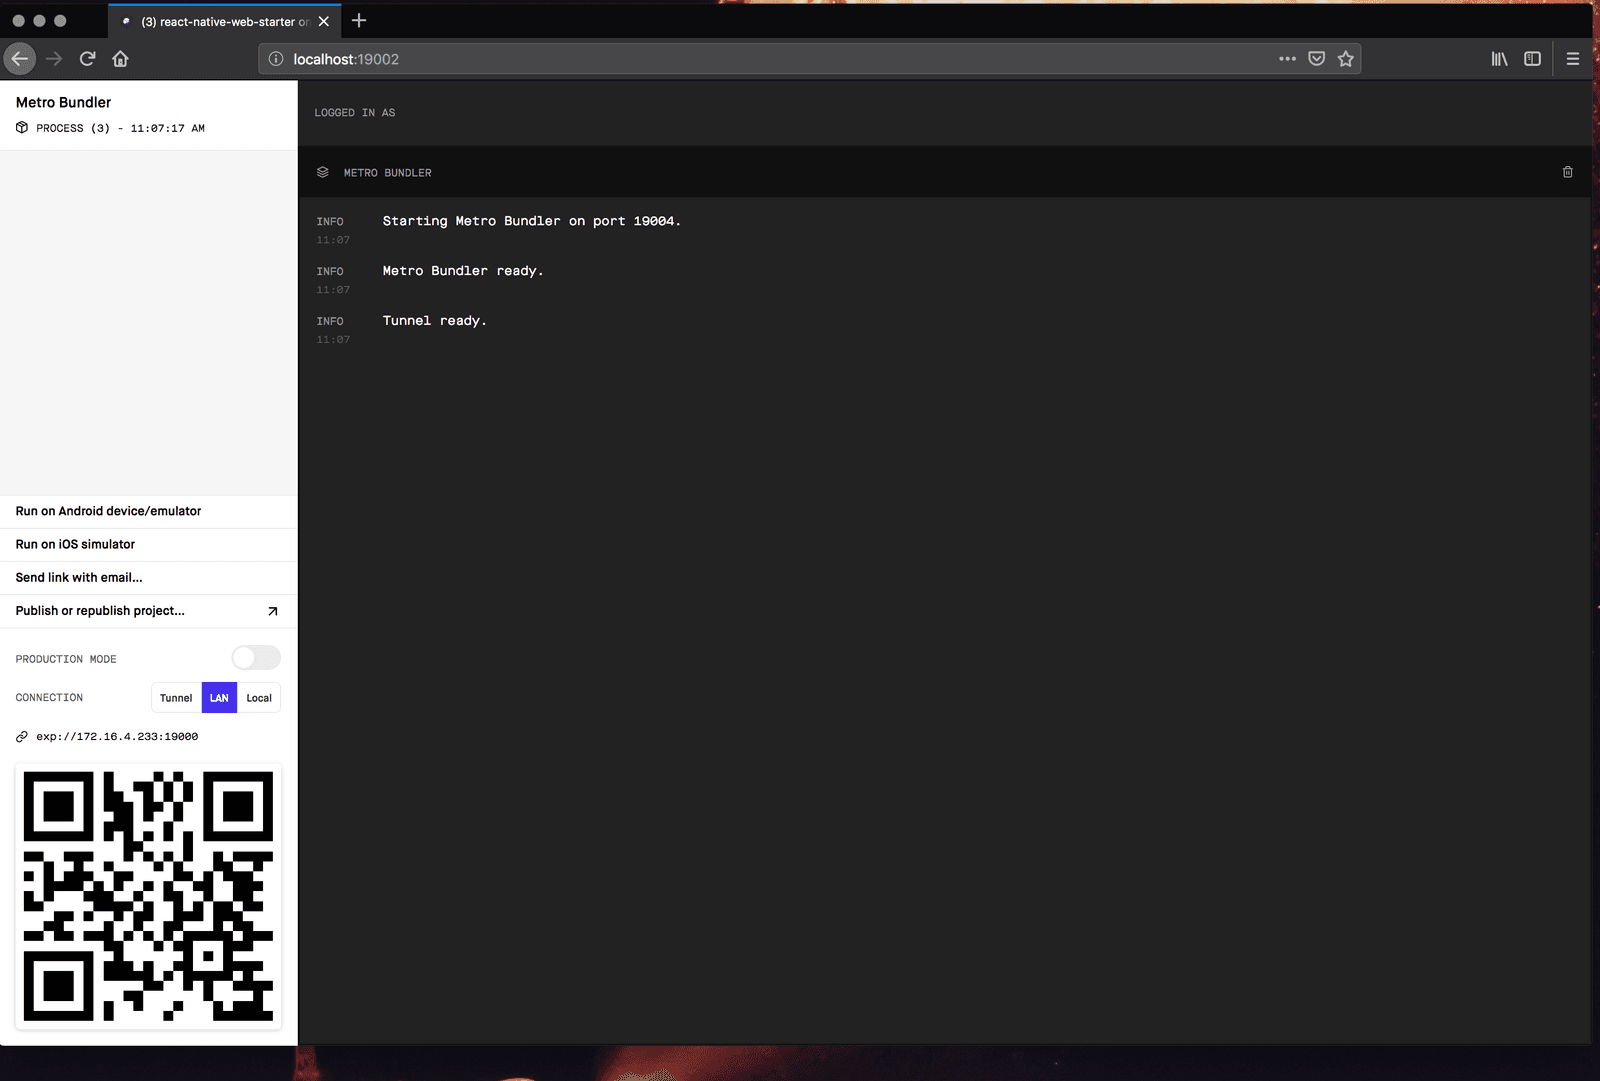
You can then click on the links on the left based on your choice.
Remember to leave the server running
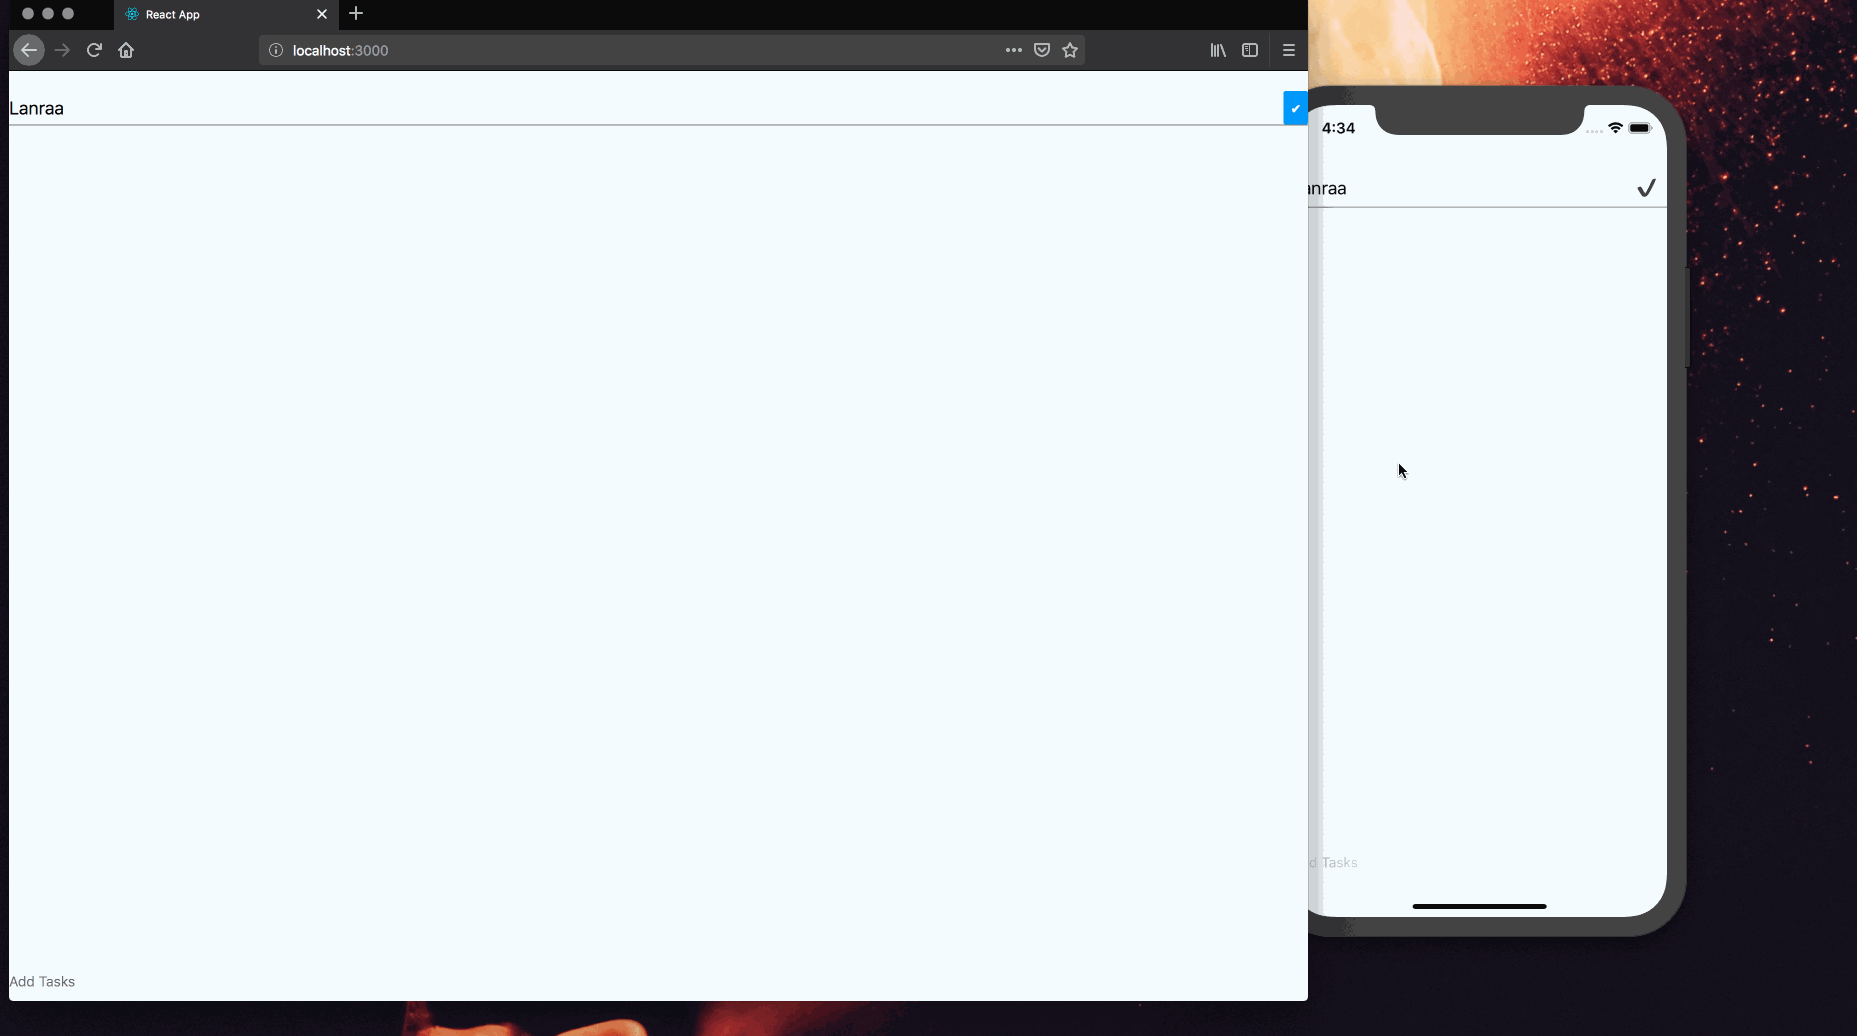
If you open the project on the web and on iOS/Android, you will be able to reproduce the demo below:
Conclusion
In this tutorial, I have described how to build an application that runs on Android, iOS and the web with just one codebase. We also integrated Pusher Channels so as to make communication realtime.
As always, you can find the code on GitHub.


© 2026 Pusher Ltd. All rights reserved.
Pusher Limited is a company registered in England and Wales (No. 07489873) whose registered office is at MessageBird UK Limited, 3 More London Riverside, 4th Floor, London, United Kingdom, SE1 2AQ.