- Products

- Developers
- User stories
- Blog
- Pricing

Building a realtime to-do app using React Hooks
Introduction
Note: To try out React Hooks, you will need the alpha build of React (at time of publication)
Introduction
In this article, we will build a todo application using functional components and Hooks to manage state, here’s a display of what we will have at the end of this tutorial:
In a previous article, we introduced React Hooks and looked at some ways to use the useState() and useEffect() methods. If you aren’t already familiar with these methods and their uses, please refer to this article.
Let’s get started.
Prerequisites
To follow along with this tutorial, you’ll need the following tool create-react-app installed.
To get the most out of this tutorial, you need knowledge of JavaScript and the React framework. If you want to play around with React Hooks, you will need the alpha build of React as this feature is still in alpha (as at the time of writing this article).
Setup
Let’s create a new React application using the create-react-app CLI tool:
1$ npx create-react-app react-todo-hooks 2 $ cd react-todo-hooks 3 $ npm install --save react@16.7.0-alpha.2 react-dom@16.7.0-alpha.2 4 $ npm start
We run the command on the third line because we want to install specific versions of
reactandreact-dom(currently in alpha) in order to tap into React Hooks
Running the last command will start the development server on port 3000 and open up a new page on our web browser:
We will create a components folder in the src directory and add two files within it:
Todo.js- This is where all of our functional components will go.Todo.css- This is where the styles for the application will go.
Open the Todo.css file and paste in the following CSS:
1/* File: src/components/Todo.css */ 2 3 body { 4 background: rgb(255, 173, 65); 5 } 6 7 .todo-container { 8 background: rgb(41, 33, 33); 9 width: 40vw; 10 margin: 10em auto; 11 border-radius: 15px; 12 padding: 20px 10px; 13 color: white; 14 border: 3px solid rgb(36, 110, 194); 15 } 16 17 .task { 18 border: 1px solid white; 19 border-radius: 5px; 20 padding: 0.5em; 21 margin: 0.5em; 22 } 23 24 .task button{ 25 background: rgb(12, 124, 251); 26 border-radius: 5px; 27 margin: 0px 5px; 28 padding: 3px 5px; 29 border: none; 30 cursor: pointer; 31 color: white; 32 float: right; 33 } 34 35 .header { 36 margin: 0.5em; 37 font-size: 2em; 38 text-align: center; 39 } 40 41 .create-task input[type=text] { 42 margin: 2.5em 2em; 43 width: 80%; 44 outline: none; 45 border: none; 46 padding: 0.7em; 47 }
Now we want to create two functional components in the Todo.js file:
1// Todo.js 2 3 import React, { useState } from 'react'; 4 import './Todo.css'; 5 6 function Task({ task }) { 7 return ( 8 <div 9 className="task" 10 style={{ textDecoration: task.completed ? "line-through" : "" }} 11 > 12 {task.title} 13 </div> 14 ); 15 } 16 function Todo() { 17 const [tasks, setTasks] = useState([ 18 { 19 title: "Grab some Pizza", 20 completed: true 21 }, 22 { 23 title: "Do your workout", 24 completed: true 25 }, 26 { 27 title: "Hangout with friends", 28 completed: false 29 } 30 ]); 31 return ( 32 <div className="todo-container"> 33 <div className="header">TODO - ITEMS</div> 34 <div className="tasks"> 35 {tasks.map((task, index) => ( 36 <Task 37 task={task} 38 index={index} 39 key={index} 40 /> 41 ))} 42 </div> 43 </div> 44 ); 45 } 46 47 export default Todo;
At the beginning of this snippet, we pulled in useState from the React library because we need it to manage the state within our functional components. Next, the Task component returns some JSX to define what each task element will look like.
In the Todo component, the useState function returns an array with two elements. The first item being the current state value for the tasks and the second being a function that can be used to update the tasks:
1const [tasks, setTasks] = useState([ 2 { 3 title: "Grab some Pizza", 4 completed: true 5 }, 6 { 7 title: "Do your workout", 8 completed: true 9 }, 10 { 11 title: "Hangout with friends", 12 completed: false 13 } 14 ]);
We finally return some JSX within the Todo component and nest the Task component.
Running the application
For us to see what we've done so far, we have to update the index.js file so that it knows where our Todo component is and how to render it to the DOM. Open the index.js file and update it with the following snippet:
1// File: index.js 2 import React from 'react'; 3 import ReactDOM from 'react-dom'; 4 import './index.css'; 5 import Todo from './components/Todo'; 6 import * as serviceWorker from './serviceWorker'; 7 8 ReactDOM.render(<Todo />, document.getElementById('root')); 9 10 serviceWorker.unregister();
Now we can save the file and start the development server (if it isn’t already running):
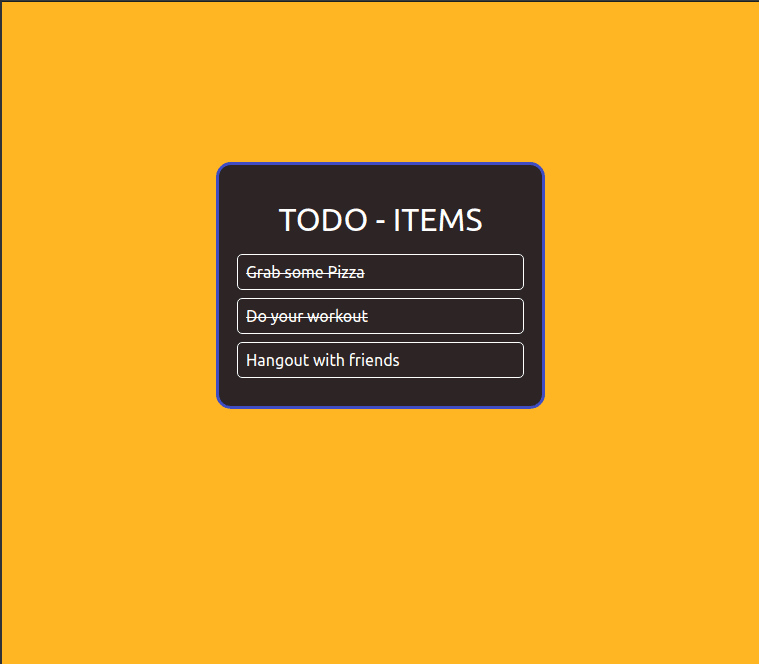
We get three hard-coded tasks, two of which are complete and one that isn’t. In the next section, we will work towards making the application interactive and able to receive input from the user.
Creating a new task
Our application currently works with hard-coded data and has no way to receive input in realtime, we will change that now. Let’s create a new functional component and call it CreateTask:
1// Todo.js 2 3 // [...] 4 5 function CreateTask({ addTask }) { 6 const [value, setValue] = useState(""); 7 8 const handleSubmit = e => { 9 e.preventDefault(); 10 if (!value) return; 11 12 addTask(value); 13 setValue(""); 14 } 15 16 return ( 17 <form onSubmit={handleSubmit}> 18 <input 19 type="text" 20 className="input" 21 value={value} 22 placeholder="Add a new task" 23 onChange={e => setValue(e.target.value)} 24 /> 25 </form> 26 ); 27 } 28 29 // [..]
Using useState, this component registers a state — value — and a function for updating it — setValue. The handleSubmit handler will prevent the default action that would normally be taken on the form and add a new Task using the latest value that is in the input field.
The CreateTask component receives a prop addTask, which is basically the function that adds a new task to the tasks state on the Todo component. We want to define this function and also update the JSX of the Todo component so it includes the CreateTask component. Let’s completely replace the code for the Todo component with this one:
1// File: Todo.js 2 3 // [...] 4 5 function Todo() { 6 const [tasks, setTasks] = useState([ 7 { 8 title: "Grab some Pizza", 9 completed: true 10 }, 11 { 12 title: "Do your workout", 13 completed: true 14 }, 15 { 16 title: "Hangout with friends", 17 completed: false 18 } 19 ]); 20 21 const addTask = title => { 22 const newTasks = [...tasks, { title, completed: false }]; 23 setTasks(newTasks); 24 }; 25 26 return ( 27 <div className="todo-container"> 28 <div className="header">TODO - ITEMS</div> 29 <div className="tasks"> 30 {tasks.map((task, index) => ( 31 <Task 32 task={task} 33 index={index} 34 key={index} 35 /> 36 ))} 37 </div> 38 <div className="create-task" > 39 <CreateTask addTask={addTask} /> 40 </div> 41 </div> 42 ); 43 } 44 45 // [..]
We’ve included the addTask method here:
1const addTask = title => { 2 const newTasks = [...tasks, { title, completed: false }]; 3 setTasks(newTasks); 4 };
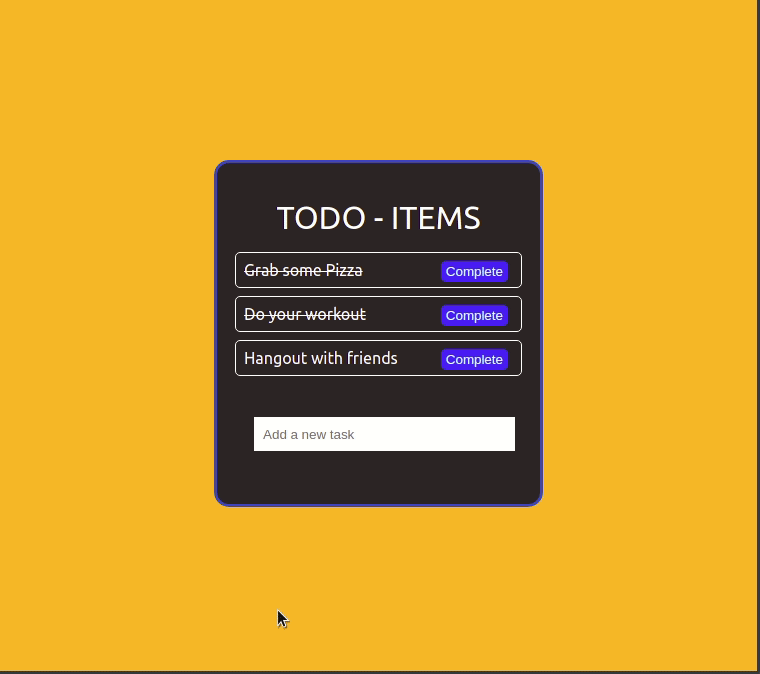
We can now save our changes and start the development server again (if it isn’t already running):

Now we have a nice input box where we can put in new values to create new tasks for the Todo application.
Completing a task
At this point, we need to be able to indicate that we have completed a task. Our tasks object in the Todo component already makes that possible as there is a completed key-value pair. What we need now is an interactive way for the user to set a task as completed without hard-coding the data.
The first thing we will do here is to update the Task component to receive a new prop and include a Complete button:
1// Todo.js 2 3 // [...] 4 5 function Task({ task, index, completeTask }) { 6 return ( 7 <div 8 className="task" 9 style={{ textDecoration: task.completed ? "line-through" : "" }} 10 > 11 {task.title} 12 <button onClick={() => completeTask(index)}>Complete</button> 13 </div> 14 ); 15 } 16 17 // [..]
Then we will also update the Todo component to define the completeTask method and pass it down as a prop to the Task component in the JSX:
1// File: Todo.js 2 3 // [...] 4 5 function Todo() { 6 const [tasks, setTasks] = useState([ 7 { 8 title: "Grab some Pizza", 9 completed: true 10 }, 11 { 12 title: "Do your workout", 13 completed: true 14 }, 15 { 16 title: "Hangout with friends", 17 completed: false 18 } 19 ]); 20 21 const addTask = title => { 22 const newTasks = [...tasks, { title, completed: false }]; 23 setTasks(newTasks); 24 }; 25 26 const completeTask = index => { 27 const newTasks = [...tasks]; 28 newTasks[index].completed = true; 29 setTasks(newTasks); 30 }; 31 32 return ( 33 <div className="todo-container"> 34 <div className="header">TODO - ITEMS</div> 35 <div className="tasks"> 36 {tasks.map((task, index) => ( 37 <Task 38 task={task} 39 index={index} 40 completeTask={completeTask} 41 key={index} 42 /> 43 ))} 44 </div> 45 <div className="create-task" > 46 <CreateTask addTask={addTask} /> 47 </div> 48 </div> 49 ); 50 } 51 52 // [...]
We can now start the development server and see what new features have been added:
Now we can click on a complete button to indicate that we have finished executing a task!
Removing a task
Another wonderful feature to include to the Todo application is an option to completely remove a task whether it has been completed or not. We can do this in similar steps like the ones we used in creating the complete feature.
Let’s start by updating the Task component to receive a removeTask prop and include an “X” button that deletes a task on click:
1// File: Todo.js 2 3 // [...] 4 5 function Task({ task, index, completeTask, removeTask }) { 6 return ( 7 <div 8 className="task" 9 style={{ textDecoration: task.completed ? "line-through" : "" }} 10 > 11 {task.title} 12 <button style={{ background: "red" }} onClick={() => removeTask(index)}>x</button> 13 <button onClick={() => completeTask(index)}>Complete</button> 14 </div> 15 ); 16 } 17 18 // [...]
Now we can update the Todo component to register the removeTask method and pass it down as a prop to the Task component in the JSX:
1// File: Todo.js 2 3 // [...] 4 5 function Todo() { 6 const [tasks, setTasks] = useState([ 7 { 8 title: "Grab some Pizza", 9 completed: true 10 }, 11 { 12 title: "Do your workout", 13 completed: true 14 }, 15 { 16 title: "Hangout with friends", 17 completed: false 18 } 19 ]); 20 21 const addTask = title => { 22 const newTasks = [...tasks, { title, completed: false }]; 23 setTasks(newTasks); 24 }; 25 26 const completeTask = index => { 27 const newTasks = [...tasks]; 28 newTasks[index].completed = true; 29 setTasks(newTasks); 30 }; 31 32 const removeTask = index => { 33 const newTasks = [...tasks]; 34 newTasks.splice(index, 1); 35 setTasks(newTasks); 36 }; 37 38 return ( 39 <div className="todo-container"> 40 <div className="header">TODO - ITEMS</div> 41 <div className="tasks"> 42 {tasks.map((task, index) => ( 43 <Task 44 task={task} 45 index={index} 46 completeTask={completeTask} 47 removeTask={removeTask} 48 key={index} 49 /> 50 ))} 51 </div> 52 <div className="create-task" > 53 <CreateTask addTask={addTask} /> 54 </div> 55 </div> 56 ); 57 } 58 59 // [...]
We can now test out the new functionality:
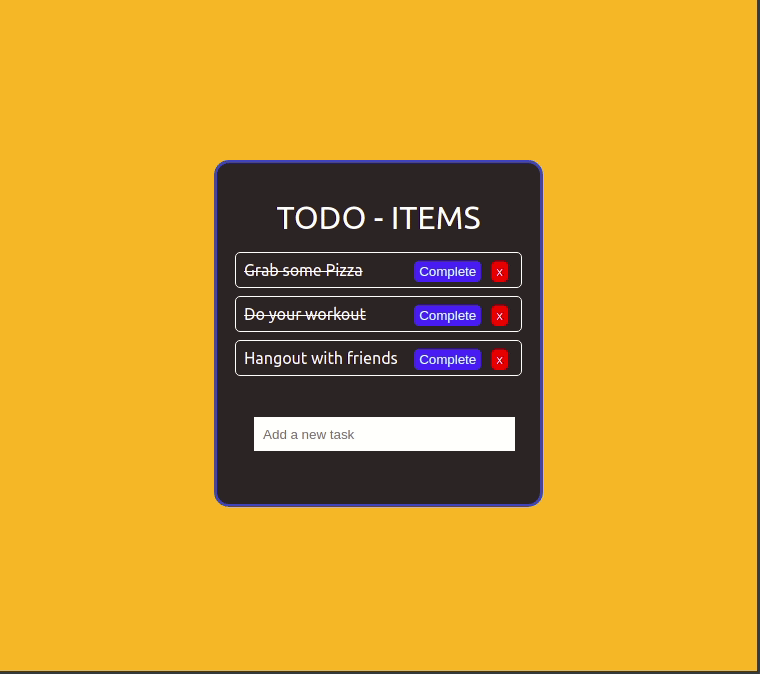
Great, we have a fully functional Todo application that is built off functional components only. We will add an additional feature in the next section.
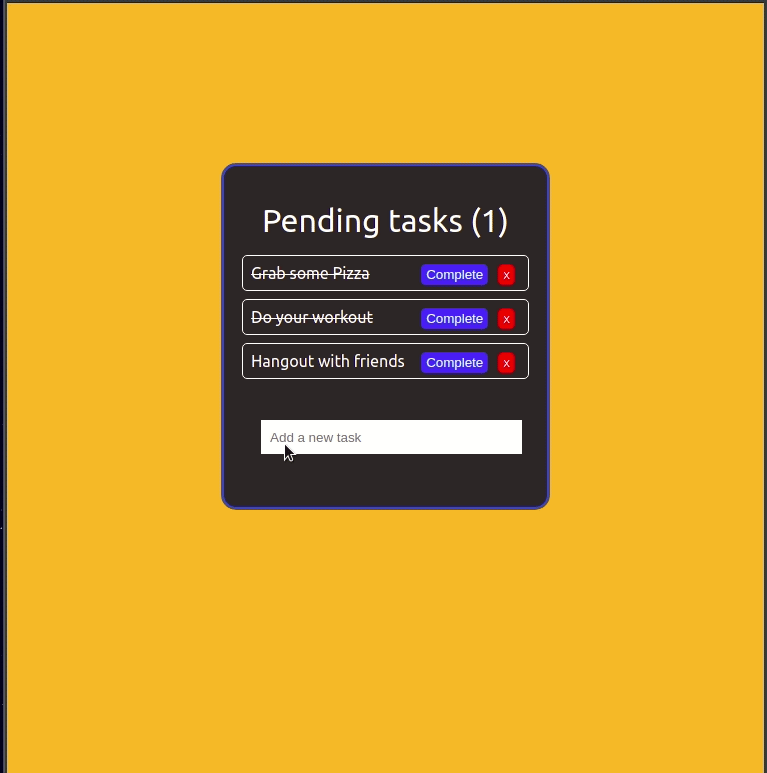
Using useEffect to monitor the number of uncompleted tasks remaining
In this section, we will use the useEffect state Hook to update the number of pending tasks whenever the DOM is re-rendered. You can learn more about the useEffect hook here.
First of all, we need to pull in useEffect from the react library:
import React, { useState, useEffect } from 'react';
Then we will register a new state Hook for the pending tasks in the Todo component:
const [tasksRemaining, setTasksRemaining] = useState(0);
We will also add an effect hook to update the state of tasksRemaining when the DOM re-renders:
useEffect(() => { setTasksRemaining(tasks.filter(task => !task.completed).length) });
Finally, we will update the JSX in the Todo component to reactively display the number of pending tasks. Here’s what the Todo component should look like:
1// File: Todo.js 2 3 // [...] 4 5 function Todo() { 6 const [tasksRemaining, setTasksRemaining] = useState(0); 7 const [tasks, setTasks] = useState([ 8 { 9 title: "Grab some Pizza", 10 completed: true 11 }, 12 { 13 title: "Do your workout", 14 completed: true 15 }, 16 { 17 title: "Hangout with friends", 18 completed: false 19 } 20 ]); 21 22 useEffect(() => { 23 setTasksRemaining(tasks.filter(task => !task.completed).length) 24 }); 25 26 const addTask = title => { 27 const newTasks = [...tasks, { title, completed: false }]; 28 setTasks(newTasks); 29 }; 30 31 const completeTask = index => { 32 const newTasks = [...tasks]; 33 newTasks[index].completed = true; 34 setTasks(newTasks); 35 }; 36 37 const removeTask = index => { 38 const newTasks = [...tasks]; 39 newTasks.splice(index, 1); 40 setTasks(newTasks); 41 }; 42 43 return ( 44 <div className="todo-container"> 45 <div className="header">Pending tasks ({tasksRemaining})</div> 46 <div className="tasks"> 47 {tasks.map((task, index) => ( 48 <Task 49 task={task} 50 index={index} 51 completeTask={completeTask} 52 removeTask={removeTask} 53 key={index} 54 /> 55 ))} 56 </div> 57 <div className="create-task" > 58 <CreateTask addTask={addTask} /> 59 </div> 60 </div> 61 ); 62 } 63 64 // [...]
We can test that the application displays the pending tasks correctly:
Conclusion
In this tutorial, we have learned how we can create a simple todo application using React Hooks. Hooks are a very welcome feature to React and it allows new levels of modularization that was not previously possible in React.
The source code to the application built in this article is on GitHub.


© 2026 Pusher Ltd. All rights reserved.
Pusher Limited is a company registered in England and Wales (No. 07489873) whose registered office is at MessageBird UK Limited, 3 More London Riverside, 4th Floor, London, United Kingdom, SE1 2AQ.