- Products

- Developers
- User stories
- Blog
- Pricing

Share your terminal as a web application with Go
Introduction
In this tutorial, we will explore how Pusher Channels can be used to share your terminal as a web page. If you want to play around with the code as you read this tutorial, visit this GitHub repository, which contains the final version of the code for you to check out and run locally.
A feature such as this is already available in CI servers, you already monitor in realtime the output of your build. It can also help in situations where you want a colleague to help troubleshoot an issue and don’t necessarily want to send log files back and forth, the colleague can take a look at your terminal directly instead.
Prerequisites
- Golang (
>=1.9) . A working knowledge of Go is required to follow this tutorial. - A Pusher Channels application. Create a free sandbox Pusher account or sign in.
- Git Bash if you are on Windows.
Building the program
An important aspect to this is implementing a Golang program that can act as a Pipe. So in short, we will be building a program that monitors the output of another program then displays it on the web UI we are going to build.
An example usage is:
$ ./script | go run main.go
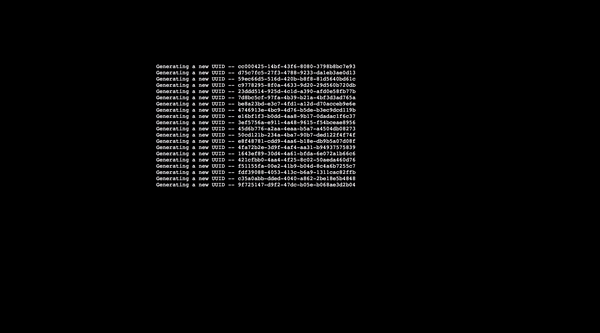
Here is an example of what we will be building:
The next step of action is to build the Golang program that will be used as pipe. To get started, create a Pusher Channels application by going to the Pusher dashboard. Click Create new app to get started.
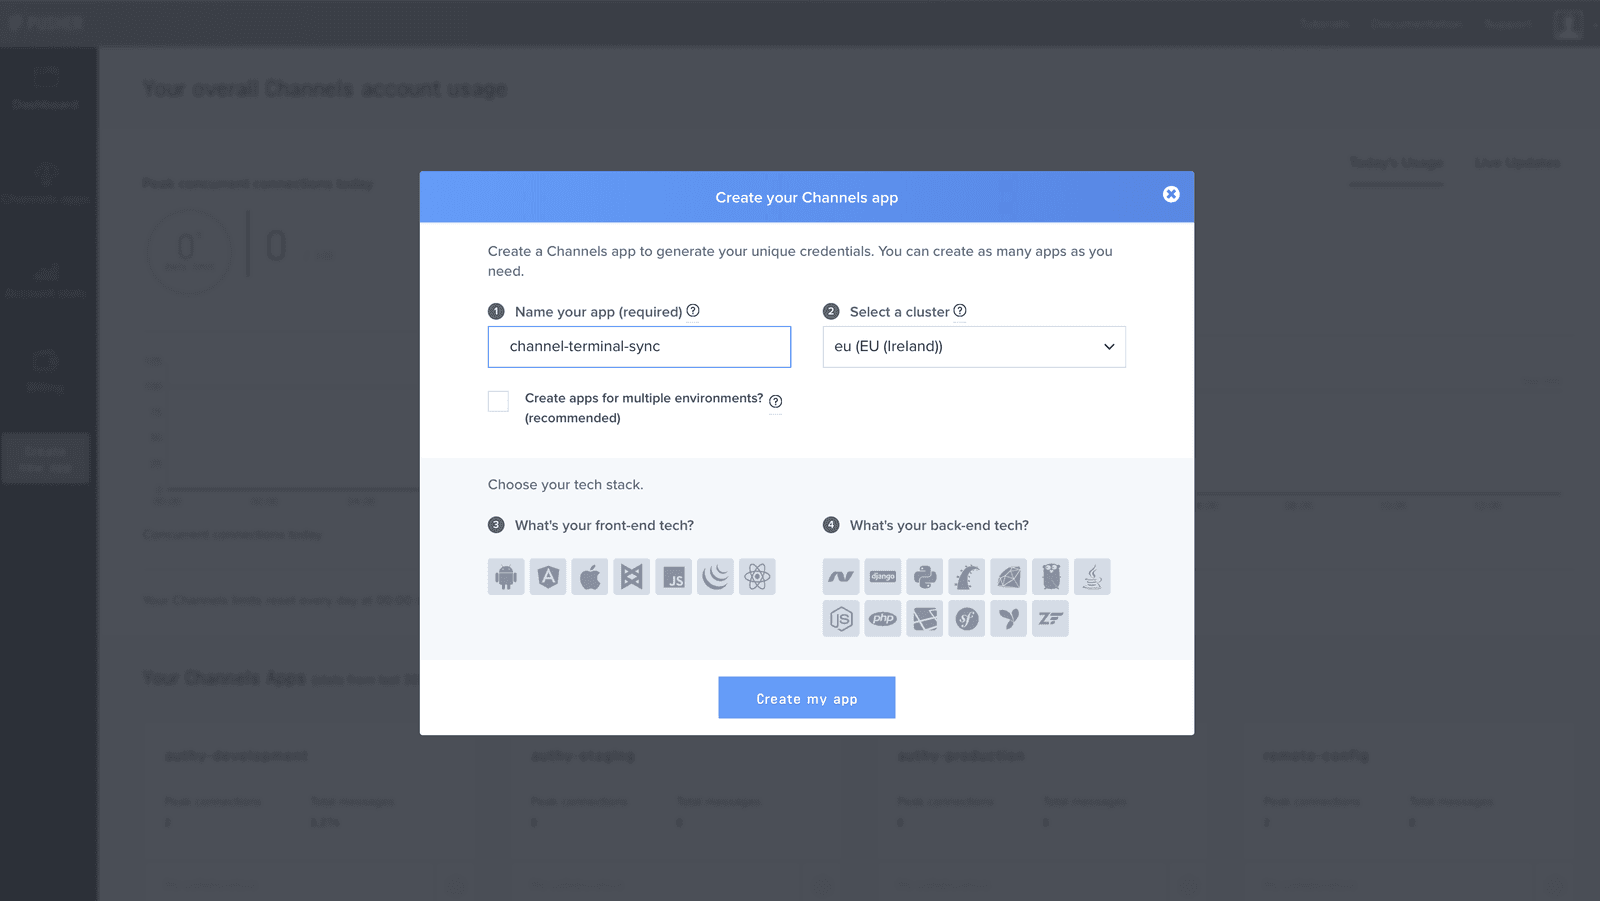
You will then be redirected to a control panel for your app where you’d be able to view the information about the app and more importantly, the authorization keys you need to connect to the application.
Once the above has been done, we will then proceed to create the actual Golang program. To do a little recap again, this program will perform two tasks:
- Act as a pipe for another program
- Start an
HTTPserver that displays the output of another program (the one being piped) in realtime.
The first thing to do is to create a new directory in your $GOPATH called pusher-channel-terminal-web-sync. That can be done with the following command:
$ mkdir $GOPATH/github.com/pusher-tutorials/pusher-channel-terminal-web-sync
You will need to create an .env file with the following contents:
1// pusher-channel-terminal-web-sync/.env 2 PUSHER_APP_ID="PUSHER_APP_ID" 3 PUSHER_APP_KEY="PUSHER_APP_KEY" 4 PUSHER_APP_SECRET="PUSHER_APP_SECRET" 5 PUSHER_APP_CLUSTER="PUSHER_APP_CLUSTER" 6 PUSHER_APP_SECURE="1"
Please remember to replace the placeholders with the original values. They can be gotten from the control panel.
The next step of action is to create a main.go file. This will house the actual code for connecting and publishing events to Pusher Channels so as to be able to show those in real time on the web.
You can create a main.go file with the following command:
$ touch main.go
Once the file has been created, the next step is to fetch some required dependency such as Pusher’s client SDK. To do that, you will need to run the command below:
1$ go get github.com/joho/godotenv 2 $ go get github.com/pusher/pusher-http-go
Once the above commands succeed, you will need to paste the following content into it:
1// pusher-channel-terminal-web-sync/main.go 2 package main 3 4 import ( 5 "bufio" 6 "bytes" 7 "flag" 8 "fmt" 9 "io" 10 "log" 11 "net/http" 12 "os" 13 "sync" 14 "text/template" 15 "time" 16 17 "github.com/joho/godotenv" 18 pusher "github.com/pusher/pusher-http-go" 19 ) 20 21 const ( 22 channelName = "realtime-terminal" 23 eventName = "logs" 24 ) 25 26 func main() { 27 28 var httpPort = flag.Int("http.port", 1500, "Port to run HTTP server on ?") 29 30 flag.Parse() 31 32 info, err := os.Stdin.Stat() 33 if err != nil { 34 log.Fatal(err) 35 } 36 37 if info.Mode()&os.ModeCharDevice != 0 { 38 log.Println("This command is intended to be used as a pipe such as yourprogram | thisprogram") 39 os.Exit(0) 40 } 41 42 if err := godotenv.Load(); err != nil { 43 log.Fatal("Error loading .env file") 44 } 45 46 appID := os.Getenv("PUSHER_APP_ID") 47 appKey := os.Getenv("PUSHER_APP_KEY") 48 appSecret := os.Getenv("PUSHER_APP_SECRET") 49 appCluster := os.Getenv("PUSHER_APP_CLUSTER") 50 appIsSecure := os.Getenv("PUSHER_APP_SECURE") 51 52 var isSecure bool 53 if appIsSecure == "1" { 54 isSecure = true 55 } 56 57 client := &pusher.Client{ 58 AppId: appID, 59 Key: appKey, 60 Secret: appSecret, 61 Cluster: appCluster, 62 Secure: isSecure, 63 HttpClient: &http.Client{ 64 Timeout: time.Minute * 2, 65 }, 66 } 67 68 go func() { 69 var t *template.Template 70 var once sync.Once 71 72 http.Handle("/static/", http.StripPrefix("/static/", http.FileServer(http.Dir(".")))) 73 74 http.HandleFunc("/", func(w http.ResponseWriter, r *http.Request) { 75 76 once.Do(func() { 77 tem, err := template.ParseFiles("index.html") 78 if err != nil { 79 log.Fatal(err) 80 } 81 82 t = tem.Lookup("index.html") 83 }) 84 85 t.Execute(w, nil) 86 }) 87 log.Fatal(http.ListenAndServe(fmt.Sprintf(":%d", *httpPort), nil)) 88 }() 89 90 reader := bufio.NewReader(os.Stdin) 91 92 var writer io.Writer 93 writer = pusherChannelWriter{client: client} 94 95 for { 96 in, _, err := reader.ReadLine() 97 if err != nil && err == io.EOF { 98 break 99 } 100 101 in = append(in, []byte("\n")...) 102 if _, err := writer.Write(in); err != nil { 103 log.Fatalln(err) 104 } 105 } 106 } 107 108 type pusherChannelWriter struct { 109 client *pusher.Client 110 } 111 112 func (pusher pusherChannelWriter) Write(p []byte) (int, error) { 113 s := string(p) 114 dd := bytes.Split(p, []byte("\n")) 115 116 var data = make([]string, 0, len(dd)) 117 118 for _, v := range dd { 119 data = append(data, string(v)) 120 } 121 122 _, err := pusher.client.Trigger(channelName, eventName, s) 123 return len(p), err 124 }
While the above code is a bit lengthy, I’d break it down.
- Line 35 - 38 is probably the most interesting part. We make sure the program can only be run if it is acting as a pipe to another program. An example is
someprogram | ourprogram. - Line 66 - 88 is where we start the
HTTPserver. The server will load up anindex.htmlfile where the contents of the program we are acting as a pipe for will be seen in realtime. Maybe another interesting thing isvar once sync.Once. Whatsync.Onceoffers us is the ability to perform a task just once throughout the lifetime of a program, with this we load the contents ofindex.htmljust once and don’t have to repeat it every time the web page is requested. - Line 109 - 125 is where we actually send output to Pusher Channels.
Great, something we have missed so far is the index.html file. You will need to go ahead to create that in the root directory with the following command:
$ touch index.html
Open the newly created file and paste in the following contents:
1// pusher-channel-terminal-web-sync/index.html 2 <!DOCTYPE html> 3 <html> 4 <head> 5 <meta charset="utf-8"> 6 <meta name="viewport" content="width=device-width, initial-scale=1"> 7 <title>Pusher realtime terminal sync</title> 8 <meta name="viewport" content="width=device-width, initial-scale=1" /> 9 <link rel="icon" type="image/x-icon" href="favicon.ico" /> 10 <link href="static/app.css" rel="stylesheet"> 11 <body> 12 <div id="terminal"> 13 <pre> 14 <output id="logs"></output> 15 </pre> 16 </div> 17 </body> 18 <script src="https://js.pusher.com/4.3/pusher.min.js"></script> 19 <script src="static/app.js"></script> 20 </html>
As you may have noticed, we referenced app.js and app.css file. We will get started with the app.js file , that can be done with the following command:
$ touch app.js
Once done, you will need to paste the following contents into it.:
1// pusher-channel-terminal-web-sync/app.js 2 (function() { 3 const APP_KEY = 'PUSHER_APP_KEY'; 4 const APP_CLUSTER = 'PUSHER_APP_CLUSTER'; 5 6 const logsDiv = document.getElementById('logs'); 7 8 const pusher = new Pusher(APP_KEY, { 9 cluster: APP_CLUSTER, 10 }); 11 12 const channel = pusher.subscribe('realtime-terminal'); 13 14 channel.bind('logs', data => { 15 const divElement = document.createElement('div'); 16 divElement.innerHTML = data; 17 18 logsDiv.appendChild(divElement); 19 }); 20 })();
Do make sure to replace
PUSHER_APP_KEYandPUSHER_APP_CLUSTERwith your original credentials
You also need to create the app.css file. That can be done with:
$ touch app.css
Once done, paste the following contents into it:
1// pusher-channel-terminal-web-sync/app.css 2 #terminal { 3 font-family: courier, monospace; 4 color: #fff; 5 width:750px; 6 margin-left:auto; 7 margin-right:auto; 8 margin-top:100px; 9 font-size:14px; 10 } 11 12 body { 13 background-color: #000 14 }
Nothing too fancy right? We just make the website’s background black and try to mimic a real terminal.
All is set and we can go ahead to test our program. A major key to testing this is an application that writes to standard output, such programs like cat or a running NodeJS program that writes log to standard output.
To make this as simple as can be, we will make use of another Go program that writes a UUID to standard output every second. This file can be created with:
1# This should be done within the pusher-channel-terminal-web-sync directory 2 $ mkdir uuid 3 $ touch uuid/uuid.go
Since we will be generating UUIDs, we will require a dependency for that. You can install that by running:
$ go get github.com/google/uuid
In the newly created uuid.go, paste the following contents into it:
1// pusher-channel-terminal-web-sync/uuid/uuid.go 2 package main 3 4 import ( 5 "fmt" 6 "time" 7 8 "github.com/google/uuid" 9 ) 10 11 func main() { 12 13 for { 14 time.Sleep(time.Millisecond * 500) 15 fmt.Printf("Generating a new UUID -- %s", uuid.New()) 16 fmt.Println() 17 } 18 }
All is set right now for us to test. To do this, we will need to build both the UUID generator and our actual program.
1# Linux and Mac 2 $ go build -o uuidgenerator uuid/uuid.go 3 $ go build 4 5 # Windows 6 $ go build -o uuidgenerator.exe uuid/uuid.go 7 $ go build
Once the above has been done, we will then run both of them. That can be done by running the command below:
$ ./uuidgenerator | ./pusher-channel-terminal-web-sync
There should be no output in the terminal but you should visit http://localhost:1500 in other to view the output of the UUID generator in real time. You should be presented with something as depicted in the gif below:
Conclusion
In this tutorial, I have described how Pusher Channels can be leveraged to build a realtime view of your terminal. This can be really useful if you want to share your terminal with someone else on the same network as you are or with a tool such as ngrok. You could do something like ngrok http 1500 and share the link with someone else.
As always, you can find the code on GitHub.


© 2026 Pusher Ltd. All rights reserved.
Pusher Limited is a company registered in England and Wales (No. 07489873) whose registered office is at MessageBird UK Limited, 3 More London Riverside, 4th Floor, London, United Kingdom, SE1 2AQ.