- Products

- Developers
- User stories
- Blog
- Pricing

View your live Spotify history with React and Node
Introduction
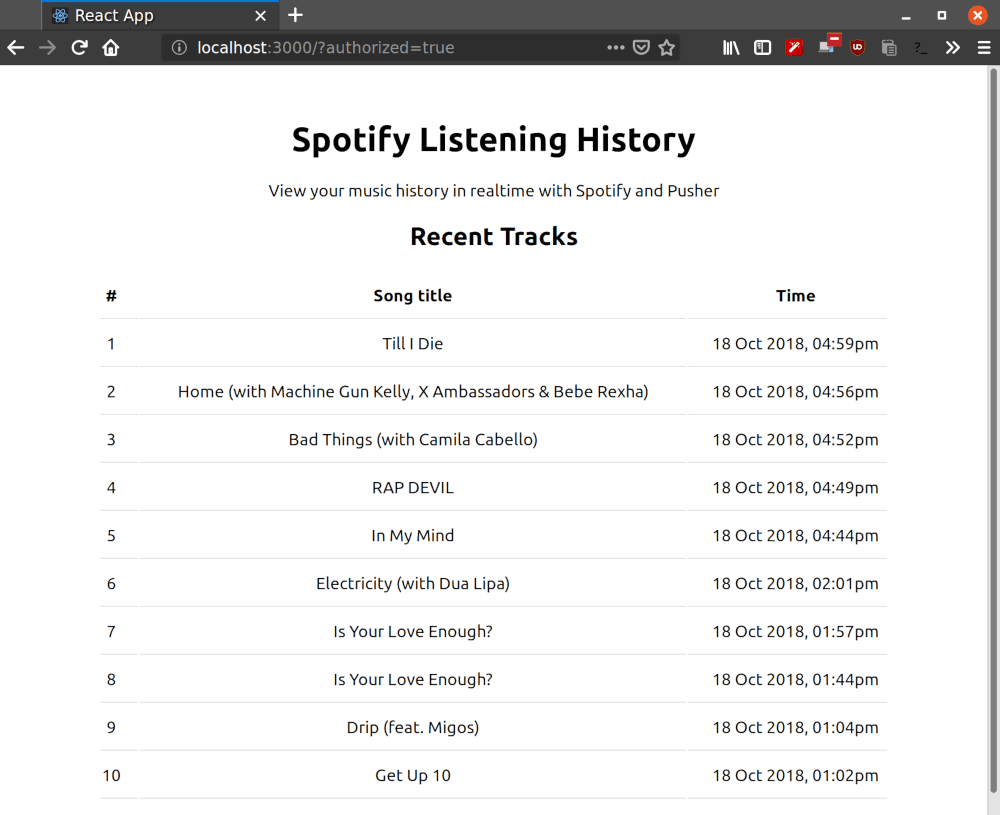
In this tutorial, we’ll be creating an application that displays your Spotify music history in realtime. Once you connect a Spotify account, it’ll display a list of your 10 most recently played tracks. Then it’ll keep updating that list as you play more songs. The final result will look like this:
Prerequisites
Experience with building Node.js and React applications is required to grasp the concepts explored in this tutorial. You also need Node.js (v6 and later) along with npm on your machine to run the commands and code included in this article. Here are the installation instructions.
Getting started
Create a new folder for this project in your filesystem. You can call it spotify-history or just spotify. Open up your terminal and cd into the newly created directory. Next, run the command below to initialize a new Node.js project:
npm init -y
The above command creates a new package.json file in the current directory. Now let’s install the dependencies we’ll be needing to build the server component of our application.
Run the following command in the terminal to install the required packages. I’ll explain what each one does as we progress through the tutorial.
npm install express cors nedb dotenv node-cron node-fetch pusher --save
Once the server dependencies have been installed, run the command below to install create-react-app globally on your machine. This tool helps us bootstrap React apps quickly with no build configuration.
npm install -g create-react-app
Once the installation completes, you'll have access to the create-react-app command that will be used to set up the React project. Next, run the following command from within the root of your project directory to create the frontend component of the app.
create-react-app client
This command creates a new client directory and installs all the packages that are needed to build and run a React application within it.
Next, change into the newly created client directory and run the command below install some additional dependencies that we’ll be needing in our application frontend:
npm install pusher-js date-fns --save
Finally, run npm start within the client directory to start the development server. It should be available at http://localhost:3000 or some other port if 3000 is not available on your machine.
Create the application frontend
Let’s begin by changing up the code in client/src/App.js to look like this:
1// client/src/App.js 2 3 import React, { Component } from 'react'; 4 import Pusher from 'pusher-js'; 5 import format from 'date-fns/format'; 6 import './App.css'; 7 8 class App extends Component { 9 constructor() { 10 super(); 11 const urlParams = new URLSearchParams(window.location.search); 12 const isUserAuthorized = urlParams.has('authorized') ? true : false; 13 14 this.state = { 15 isUserAuthorized, 16 musicHistory: [], 17 }; 18 } 19 20 render() { 21 const { isUserAuthorized, musicHistory } = this.state; 22 const connectSpotify = isUserAuthorized ? ( 23 '' 24 ) : ( 25 <a href="http://localhost:5000/login">Connect your Spotify account</a> 26 ); 27 28 const TableItem = (item, index) => ( 29 <tr key={item.played_at}> 30 <td>{index + 1}</td> 31 <td>{item.track_name}</td> 32 <td>{format(item.played_at, 'D MMM YYYY, hh:mma')}</td> 33 </tr> 34 ); 35 36 const RecentlyPlayed = () => ( 37 <div className="recently-played"> 38 <h2>Recent Tracks</h2> 39 <table className="table"> 40 <thead> 41 <tr> 42 <th>#</th> 43 <th>Song title</th> 44 <th>Time</th> 45 </tr> 46 </thead> 47 <tbody>{musicHistory.map((e, index) => TableItem(e, index))}</tbody> 48 </table> 49 </div> 50 ); 51 52 return ( 53 <div className="App"> 54 <header className="header"> 55 <h1>Spotify Listening History</h1> 56 <p>View your music history in realtime with Spotify and Pusher</p> 57 58 {connectSpotify} 59 {musicHistory.length !== 0 ? <RecentlyPlayed /> : null} 60 </header> 61 </div> 62 ); 63 } 64 } 65 66 export default App;
We’ve initialized the state of the application with two values: isUserAuthorized which keeps track of whether the user has authenticated with Spotify or not via a URL parameter, and musicHistory which is where all the recently played tracks will be stored. If isUserAuthorized is set to false (which it is by default), a link that prompts the user to connect a Spotify account to the app will be displayed on the screen.
Let’s change up the styles for the app in client/src/App.css:
1// client/src/App.css 2 3 .App { 4 width: 100%; 5 max-width: 750px; 6 margin: 0 auto; 7 padding: 30px; 8 text-align: center; 9 } 10 11 table { 12 width: 100%; 13 text-align: center; 14 } 15 16 th, 17 td { 18 padding: 12px 15px; 19 border-bottom: 1px solid #E1E1E1; } 20 th:first-child, 21 td:first-child { 22 padding-left: 0; } 23 th:last-child, 24 td:last-child { 25 padding-right: 0; }
Set up the server
In the root of your project directory, create a new server.js file and change its contents to look like this:
1// server.js 2 3 require('dotenv').config({ path: 'variables.env' }); 4 5 const express = require('express'); 6 const bodyParser = require('body-parser'); 7 const cors = require('cors'); 8 const Datastore = require('nedb'); 9 const cron = require('node-cron'); 10 const Pusher = require('pusher'); 11 12 const clientUrl = process.env.CLIENT_URL; 13 14 const app = express(); 15 16 const db = new Datastore(); 17 18 app.use(cors()); 19 app.use(bodyParser.json()); 20 app.use(bodyParser.urlencoded({ extended: true })); 21 22 app.set('port', process.env.PORT || 5000); 23 const server = app.listen(app.get('port'), () => { 24 console.log(`Express running → PORT ${server.address().port}`); 25 });
Next, create a file called variables.env also in the root of your project folder. This is where all the environmental variables will be stored so that they can be made available on process.env. The dotenv package is what allows us to achieve this.
1// variables.env 2 3 PORT=5000 4 CLIENT_URL=https://localhost:3000
The CLIENT_URL variable is the URL where the React development server is available on. You can change the value if your app is running on another port.
Sign up for Spotify
Before you can access and use Spotify’s API, you need to create a free account. You don’t need to be on the premium plan to follow through with this tutorial. Once you have done so, go to the developer dashboard and log in to with your Spotify account. Accept the terms of service and create your first app by selecting any one of the three options presented.
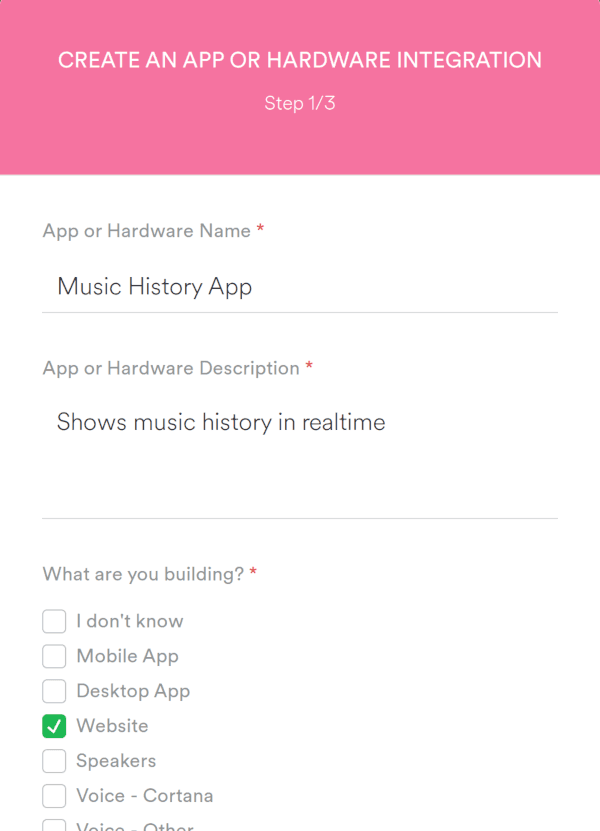
Fill the popup form as shown above and hit Next to move along. Hit No on the Are you developing a commercial integration? screen and tick all the checkboxes on the final screen before hitting the green SUBMIT button to create the app.
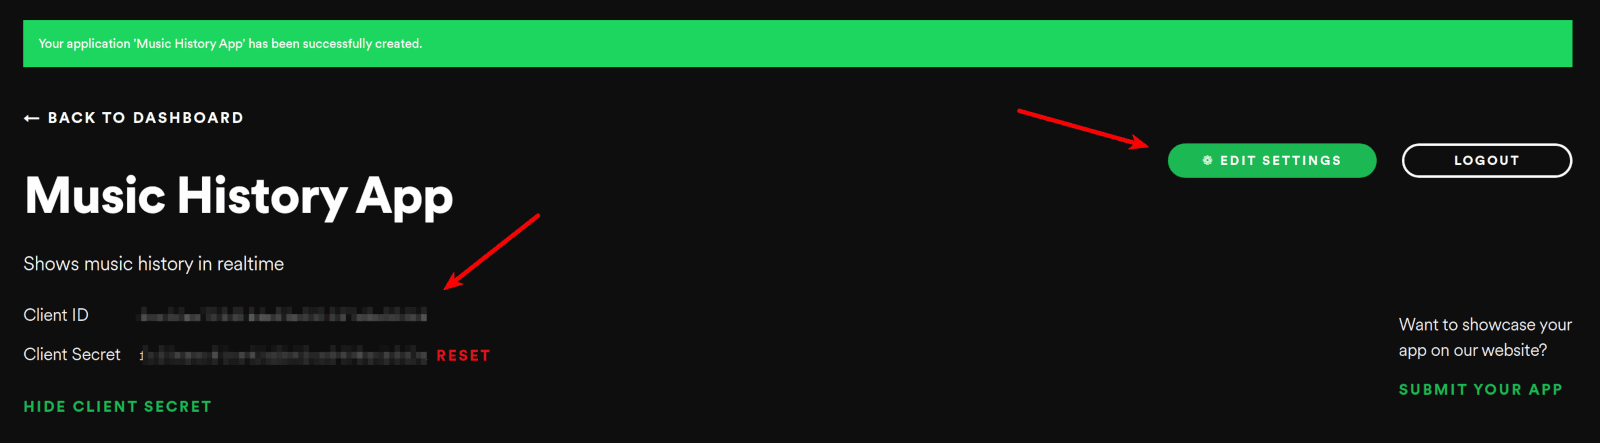
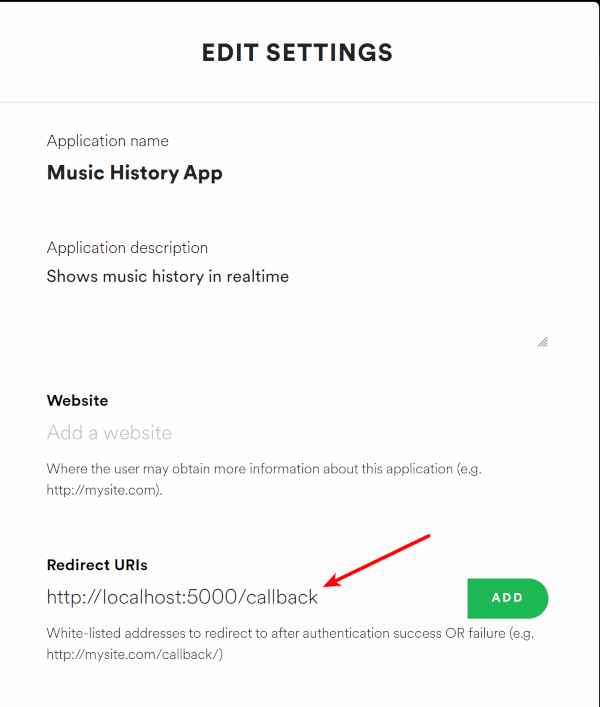
Once your app has been created, you will be redirected to the app page where you can access your Client ID and Client Secret tokens. You will find this at the top left of your screen. Also hit the EDIT SETTINGS button at the top right and add the redirect URI (http://localhost:5000/callback) in the popup form that appears, then hit the ADD button. Finally hit SAVE at the bottom of the form to save your settings.
Add the following variables to your variable.env file:
1// variables.env 2 3 SPOTIFY_CLIENT_ID=<your spotify client id> 4 SPOTIFY_CLIENT_SECRET=<your spotify client secret> 5 SPOTIFY_REDIRECT_URI=http://localhost:5000/callback
Next, create new credentials.js file in your project directory and change its contents to look like this:
1// credentials.js 2 3 const spotify = { 4 client_id: process.env.SPOTIFY_CLIENT_ID, 5 client_secret: process.env.SPOTIFY_CLIENT_SECRET, 6 redirect_uri: process.env.SPOTIFY_REDIRECT_URI, 7 }; 8 9 module.exports = spotify;
Create the authentication flow
We need to create a flow for authorizing users’ Spotify accounts to work with our app. We can do this by creating the login route in the server, which is where the user hits the Connect your Spotify account link is clicked on the app frontend.
Create a new file called authorizeSpotify.js and paste in the following code within it:
1// authorizeSpotify.js 2 3 const spotify = require('./credentials'); 4 5 const authorizeSpotify = (req, res) => { 6 const scopes = 'user-read-recently-played'; 7 8 const url = `https://accounts.spotify.com/authorize?&client_id=${ 9 spotify.client_id 10 }&redirect_uri=${encodeURI( 11 spotify.redirect_uri 12 )}&response_type=code&scope=${scopes}`; 13 14 res.redirect(url); 15 }; 16 17 module.exports = authorizeSpotify;
Next import this module into server.js and use it in the a new /login route as shown below:
1// server.js 2 3 ... 4 const Pusher = require('pusher'); 5 const authorizeSpotify = require('./authorizeSpotify'); 6 7 ... 8 app.use(bodyParser.urlencoded({ extended: true })); 9 app.get('/login', authorizeSpotify); 10 ...
Whenever, the user hits the /login route (by trying to connect a Spotify account), the app generates a request where the user is prompted to grant the user-read-recently-played permission.
When the user grants the permission, it will redirect back to the redirect URL you specified while creating the app (http://localhost:5000/callback). We need to grab the code that is included in the URL parameters and exchange it for an access token which will be used when interacting with the Spotify API. Let’s write the code that’ll do just that in the next step.
Create a new file called getAccessToken.js and paste the following code inside it:
1// getAccessToken.js 2 3 const fetch = require('node-fetch'); 4 const spotify = require('./credentials'); 5 6 const getAccessToken = (req, res, next) => { 7 const { code } = req.query; 8 9 if (code) { 10 const url = 'https://accounts.spotify.com/api/token'; 11 12 const data = { 13 grant_type: 'authorization_code', 14 code, 15 redirect_uri: spotify.redirect_uri, 16 client_id: spotify.client_id, 17 client_secret: spotify.client_secret, 18 }; 19 20 const headers = { 21 'Content-Type': 'application/x-www-form-urlencoded; charset=UTF-8', 22 }; 23 24 const searchParams = new URLSearchParams(); 25 26 Object.keys(data).forEach(prop => { 27 searchParams.set(prop, data[prop]); 28 }); 29 30 fetch(url, { 31 method: 'POST', 32 headers, 33 body: searchParams, 34 }) 35 .then(res => res.json()) 36 .then(credentials => { 37 req.credentials = credentials; 38 next(); 39 }) 40 .catch(next); 41 } 42 }; 43 44 module.exports = getAccessToken;
Next, require getAccessToken in server.js and use it in the /callback route as shown below:
1// server.js 2 3 ... 4 const authorizeSpotify = require('./authorizeSpotify'); 5 const getAccessToken = require('./getAccessToken'); 6 7 ... 8 app.get('/login', authorizeSpotify); 9 app.get('/callback', getAccessToken); 10 ...
In getAccessToken, we grab the code off the URL parameters and exchange it for an access token by making a POST request to the Spotify Accounts service. When the requested credentials are received, they’re saved on the req object and next() is invoked which executes the next middleware.
Let’s go ahead and create the succeeding middleware in the next step. This middleware is tasked with saving the credentials received from Spotify to a temporary database. Here’s the code that helps us achieve that:
1// server.js 2 ... 3 app.get('/login', authorizeSpotify); 4 app.get('/callback', getAccessToken, (req, res, next) => { 5 db.insert(req.credentials, err => { 6 if (err) { 7 next(err); 8 } else { 9 res.redirect(`${clientUrl}/?authorized=true`); 10 } 11 }); 12 });
This code allows us to redirect the user back to the app frontend once the credentials have been saved to the database. Notice the ?authorized=true parameter? That presence of that in the URL lets us detect that authorization was successful and isUserAuthorized will now be set to true in the app frontend.
Fetch the user’s recently played tracks
Now that we know that authorization with the Spotify API was successful, we need to fetch the 10 most recently played tracks of the user and display it on the page. At this point, you should start listening to some music on Spotify if your account is new so that some songs will show up when this request is performed.
Under the constructor() function, add the componentDidMount() lifecycle hook to your React app and paste the following code within it:
1// client/src/App.js 2 3 componentDidMount() { 4 const { isUserAuthorized } = this.state; 5 6 if (isUserAuthorized) { 7 fetch('http://localhost:5000/history') 8 .then(res => res.json()) 9 .then(data => { 10 this.setState({ 11 musicHistory: data, 12 }); 13 }) 14 .catch(error => console.log(error)); 15 } 16 }
We’re making a request to the /history route and we expect the 10 most recently played songs on the users’ account to be sent back. Let’s create this route on the server in the next step.
Create a file called getRecentlyPlayed and paste the code below within it. This is where the actual request to Spotify is performed.
1// getRecentlyPlayed.js 2 3 const fetch = require('node-fetch'); 4 5 const getRecentlyPlayed = accessToken => { 6 const url = 'https://api.spotify.com/v1/me/player/recently-played?limit=10'; 7 8 return fetch(url, { 9 method: 'GET', 10 headers: { 11 Accept: 'application/json', 12 'Content-Type': 'application/json', 13 Authorization: `Bearer ${accessToken}`, 14 }, 15 }) 16 .then(res => res.json()) 17 .then(data => data.items) 18 .catch(error => console.log(error)); 19 }; 20 21 module.exports = getRecentlyPlayed;
Next, import it in server.js and add the /history route below the other two:
1// server.js 2 3 ... 4 const getAccessToken = require('./getAccessToken'); 5 const getRecentlyPlayed = require('./getRecentlyPlayed'); 6 7 ... 8 app.get('/history', (req, res) => { 9 db.find({}, (err, docs) => { 10 if (err) { 11 throw Error('Failed to retrieve documents'); 12 } 13 14 const accessToken = docs[0].access_token; 15 getRecentlyPlayed(accessToken) 16 .then(data => { 17 const arr = data.map(e => ({ 18 played_at: e.played_at, 19 track_name: e.track.name, 20 })); 21 22 res.json(arr); 23 }) 24 .catch(err => console.log(err)); 25 }); 26 });
At this point, if the user is authenticated and this route is hit, the most recently played songs will be sent to the frontend and displayed on the page.
Set up realtime updates with Pusher
The next task is to make the list of songs update on the page as you continue to listen. Head over to the Pusher website and sign up for a free account. Select Channels apps on the sidebar, and hit Create Channels app to create a new app. Once your app is created, retrieve your credentials from the API Keys tab, then add the following to your variables.env file.
1// variables.env 2 3 PUSHER_APP_ID=<your app id> 4 PUSHER_APP_KEY=<your app key> 5 PUSHER_APP_SECRET=<your app secret> 6 PUSHER_APP_CLUSTER=<your app cluster>
We’re going to set up a cron job to run every five minutes, retrieve the most recently played songs and merge it with the existing list of recent tracks so that new songs are displayed on top. Change up server.js to look like this:
1// server.js 2 3 .... 4 const db = new Datastore(); 5 6 const pusher = new Pusher({ 7 appId: process.env.PUSHER_APP_ID, 8 key: process.env.PUSHER_APP_KEY, 9 secret: process.env.PUSHER_APP_SECRET, 10 cluster: process.env.PUSHER_APP_CLUSTER, 11 encrypted: true, 12 }); 13 14 ... 15 app.get('/history', (req, res) => { 16 db.find({}, (err, docs) => { 17 if (err) { 18 throw Error('Failed to retrieve documents'); 19 } 20 21 const accessToken = docs[0].access_token; 22 getRecentlyPlayed(accessToken) 23 .then(data => { 24 const arr = data.map(e => ({ 25 played_at: e.played_at, 26 track_name: e.track.name, 27 })); 28 29 res.json(arr); 30 }) 31 .then(() => { 32 cron.schedule('*/5 * * * *', () => { 33 getRecentlyPlayed(accessToken).then(data => { 34 const arr = data.map(e => ({ 35 played_at: e.played_at, 36 track_name: e.track.name, 37 })); 38 39 pusher.trigger('spotify', 'update-history', { 40 musicHistory: arr, 41 }); 42 }); 43 }); 44 }) 45 .catch(err => console.log(err)); 46 }); 47 });
Once the initial listing is made, a cron job is triggered that runs every five minutes. That’s what the */5 * * * * string signifies. The user’s most recently played tracks are fetched and pushed to the spotify channel via the update-history event. Any client that is subscribed to this channel can receive the latest data and update the list of tracks on the page.
Let’s go ahead and do just that in the frontend of our app. Update the componentDidMount() lifecycle hook in client/src/App.js to look like this:
1// client/src/App.js 2 3 componentDidMount() { 4 const { isUserAuthorized } = this.state; 5 6 if (isUserAuthorized) { 7 fetch('http://localhost:5000/history') 8 .then(res => res.json()) 9 .then(data => { 10 this.setState({ 11 musicHistory: data, 12 }); 13 }) 14 .catch(error => console.log(error)); 15 16 const pusher = new Pusher('<your app key>', { 17 cluster: '<your app cluster>', 18 encrypted: true, 19 }); 20 21 const channel = pusher.subscribe('spotify'); 22 channel.bind('update-history', data => { 23 this.setState(prevState => { 24 const arr = data.musicHistory 25 .map(item => { 26 const isPresent = prevState.musicHistory.find( 27 e => e.played_at === item.played_at 28 ); 29 if (isPresent === undefined) { 30 return item; 31 } else { 32 return null; 33 } 34 }) 35 .filter(Boolean); 36 return { 37 musicHistory: arr.concat(prevState.musicHistory), 38 }; 39 }); 40 }); 41 } 42 }
Here, we opened a connection to Channels and used the subscribe() method to subscribe to the spotify channel. Updates to the user’s music history are listened for via the bind method. Once an update is received, the data is merged with the existing one so that the list is updated with the latest tracks.
Don’t forget to replace the <your app key> and <your app cluster> placeholders with the appropriate details from your Pusher account dashboard.
Start your server by running node server.js and link your Spotify account on the frontend. As long as you continue to play music, you should see the page update with your most recent tracks updates.
Conclusion
That’s it! In this tutorial, you learned how to view your Spotify music history in realtime with React and Pusher. Along the way, you learned how to use Spotify’s API, and Pusher Channels to send and receive data in realtime.
You can find the app’s source code in this GitHub repo.


© 2026 Pusher Ltd. All rights reserved.
Pusher Limited is a company registered in England and Wales (No. 07489873) whose registered office is at MessageBird UK Limited, 3 More London Riverside, 4th Floor, London, United Kingdom, SE1 2AQ.