- Products

- Developers
- User stories
- Blog
- Pricing

Build a social poll app with counter using Node.js
Introduction
Over the years, web apps have come a long way, incorporating various technologies and techniques to create a more engaging experience for the user. Realtime technologies are one such improvement. They provide a powerful means of transforming an app into a social activity.
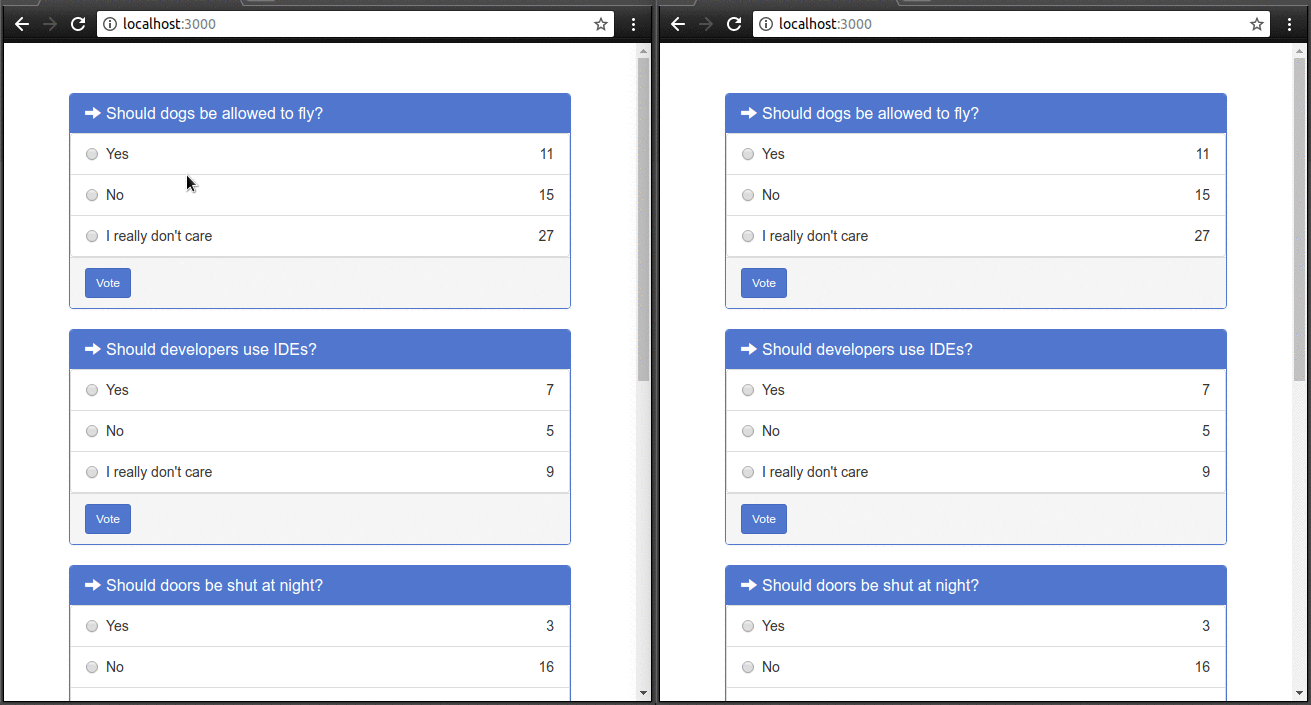
In this article, we’ll build a polls app. The home page of our app will display a list of polls. A visitor can vote on as many polls as they wish from the home page. Each time a new vote is cast on any poll, the number of votes for the different choices in that poll will update in realtime. Here’s a demo of the app:
You can check out the source code of the completed application on GitHub.
Set up the project
This tutorial assumes you have Node.js and MongoDB installed. We’ll be using Express, a popular lightweight Node.js framework. Let’s get started by using the express application generator:
If you don't already have it installed:
npm install express-generator -g
Create a new express app with view engine set to Handlebars (hbs)
1express --view=hbs pollser 2cd pollser && npm install
Then we’ll add our dependencies:
npm install --save dotenv mongoose pusher
Here’s a breakdown of what each module is for:
- We’re using MongoDB for our data store, so we’ll use Mongoose to map our models (JavaScript objects) to MongoDB documents.
- We need Pusher to talk to the Pusher APIs.
- Lastly, dotenv is a small package that helps us load our private configuration variables (namely our Pusher app credentials) from a .env file.
We’ll store our polls in a polls collection. Here’s an example of what a single item in this collection will look like:
1{ 2 "topic": "Should dogs be allowed to fly?" 3 "choices": [ 4 { 5 "value": "Yes", 6 "votes": 2, 7 "id": 0 8 }, 9 { 10 "value": "No", 11 "votes": 7, 12 "id": 1 13 }, 14 { 15 "value": "Perhaps", 16 "votes": 17, 17 "id": 2 18 } 19 ] 20 }
Let’s define our Poll model. We’ll put this in models/poll.js:
1let mongoose = require('mongoose'); 2 3 let Poll = mongoose.model('Poll', { 4 topic: String, 5 choices: [ 6 { 7 value: String, 8 votes: Number 9 } 10 ] 11 }); 12 13 module.exports = Poll;
Next up, let’s populate our database with some fake polls. Create a file called seed.js in the bin directory, with the following content:
1require('mongoose').connect('mongodb://localhost/pollser'); 2 3 const topics = [ 4 "Should dogs be allowed to fly?", 5 "Should doors be shut at night?", 6 "Should developers use IDEs?", 7 "Should cars have four wheels?", 8 "Should humans be allowed to wear shoes?" 9 ]; 10 let Poll = require('../models/poll'); 11 12 // empty the collection first 13 Poll.remove({}) 14 .then(() => { 15 let polls = []; 16 for (let i = 0; i < 5; i++) { 17 polls.push({ 18 topic: topics[i], 19 choices: [ 20 { 21 value: "Yes", 22 votes: Math.round(Math.random() * 20) 23 }, 24 { 25 value: "No", 26 votes: Math.round(Math.random() * 20) 27 }, 28 { 29 value: "I really don't care", 30 votes: Math.round(Math.random() * 20)u 31 } 32 ] 33 }); 34 } 35 return Poll.create(polls); 36 }) 37 .then(() => { 38 process.exit(); 39 }) 40 .catch((e) => { 41 console.log(e); 42 process.exit(1); 43 });
Run the seed using node (remember to start your MongoDB server by running mongod first):
node bin/seed.js
Retrieving and rendering polls
Let’s add our MongoDB connection setup to our app.js file, so the connection gets created when our app starts.
1// below this line: 2 var app = express(); 3 4 // add this 5 require('mongoose').connect('mongodb://localhost/pollser'); 6Next up is our route. Here, we’ll retrieve all polls from the database and pass them to the view. Replace the code in routes/index.js with this: 7 8 let router = require('express').Router(); 9 10 let Poll = require('./../models/poll'); 11 12 router.get('/', (req, res, next) => { 13 Poll.find().exec((err, polls) => { 14 res.render('index', { polls: polls }); 15 }); 16 }); 17 18 module.exports = router;
Let’s build our view. We’ll implement a simple interface that shows each poll as a Bootstrap panel with the choices listed in the panel body, and the number of votes for each choice shown at the right edge.
Replace the code in your views/layout.hbs with this:
1<!DOCTYPE html> 2 <html lang='en'> 3 <head> 4 <title>{{title}}</title> 5 <link rel='stylesheet' href='/stylesheets/style.css'/> 6 <link rel='stylesheet' href='//netdna.bootstrapcdn.com/bootstrap/3.0.1/css/bootstrap.min.css'/> 7 </head> 8 9 <body> 10 <div class="container"> 11 {{{body}}} 12 </div> 13 </body> 14 </html>
Put this in your views/index.hbs:
1<div class="row"> 2 3 {{#each polls }} 4 <div class="col-md-6"> 5 <form onsubmit="vote(event);" id="{{this._id}}"> 6 <div class="panel panel-primary"> 7 <div class="panel-heading"> 8 <h3 class="panel-title"> 9 <span class="glyphicon glyphicon-arrow-right"></span>{{ this.topic }} 10 </h3> 11 </div> 12 <div class="panel-body"> 13 <ul class="list-group"> 14 {{#each this.choices }} 15 <li class="list-group-item"> 16 <div class="radio"> 17 <label> 18 <input type="radio" name="optionsRadios" value="{{@index}}"> 19 {{ this.value }} 20 <div class="alignright" id="vote-count-{{../id}}-{{@index}}">{{ this.votes }}</div> 21 </label> 22 </div> 23 </li> 24 {{/each}} 25 </ul> 26 </div> 27 <div class="panel-footer"> 28 <input type="submit" id="vote-btn-{{this.id}}" class="btn btn-primary btn-sm" value="Vote"> 29 </div> 30 </div> 31 </form> 32 </div> 33 {{/each}} 34 </div>
Lastly, replace the contents of your public/stylesheets/style.css with this:
1body { 2 padding: 50px; 3 margin-top: 20px; 4 font: 14px "Lucida Grande", Helvetica, Arial, sans-serif; 5 } 6 7 .panel-body:not(.two-col) { 8 padding: 0px 9 } 10 11 .glyphicon { 12 margin-right: 5px; 13 } 14 15 .glyphicon-new-window { 16 margin-left: 5px; 17 } 18 19 .panel-body .radio, .panel-body .checkbox { 20 margin-top: 0px; 21 margin-bottom: 0px; 22 } 23 24 .panel-body .list-group { 25 margin-bottom: 0; 26 } 27 28 .margin-bottom-none { 29 margin-bottom: 0; 30 } 31 32 .panel-body .radio label, .panel-body .checkbox label { 33 display: block; 34 } 35 36 .alignright { 37 float: right; 38 }
Let’s implement the voting logic. Laying out the steps we need to perform:
A choice is selected on a certain poll, and the Vote button is clicked. This submits the containing form.
Our registered onsubmit handler retrieves the choice selected and the poll ID from the form and makes an AJAX call to our vote endpoint. The handler also updates the UI to reflect the increased number of votes.
The vote endpoint finds the poll with the specified ID in the database, and increments the number of votes corresponding to the selected choice by 1.
Let’s define our event handler. We’ll pull in Axios for API calls. Add this to your index.hbs:
1<script src="https://unpkg.com/axios/dist/axios.min.js"></script> 2 <script> 3 var vote = function (event) { 4 event.preventDefault(); 5 var pollId = event.target.id; 6 var choice = event.target.optionsRadios.value; 7 axios.post('/' + pollId + '/vote', {choice: choice}); 8 9 // disable the button, so a user san't vote twice 10 document.querySelector('#vote-btn-' + pollId).disabled = true; 11 var voteCount = document.querySelector('#vote-count-' + pollId + '-' + choice); 12 voteCount.textContent++; 13 voteCount.style.color = 'green'; 14 voteCount.style.fontWeight = '900'; 15 }; 16 </script>
For the vote endpoint, add this route in your routes/index.js:
1router.post('/:pollId/vote', (req, res, next) => { 2 const choice = req.body.choice; 3 const identifier = `choices.${choice}.votes`; 4 Poll.update({_id: req.params.pollId}, {$inc: {[identifier]: 1}}, {}, (err, numberAffected) => { 5 res.send(''); 6 }); 7 8 });
In this code snippet, we find the poll with the specified ID then increment the number of votes associated with the specified choice using MongoDB’s $inc operator (you can read more about that here).
You can start your app by running npm start. If you select a choice and click “Vote”, you should see the number of votes displayed for your choice increase.
Messaging with Pusher Channels
The final thing to do is modify our vote endpoint so it sends out a broadcast over Pusher Channels after incrementing the number of votes for the poll. We’ll also need to modify our frontend so that it listens for these broadcasts and updates the UI accordingly.
First off, create a free sandbox Pusher account or sign in. Then create an app and obtain your app credentials from the app dashboard. Create a file named .env in the root of your project with the following content:
1PUSHER_APP_ID=YOUR_APP_ID 2 PUSHER_APP_KEY=YOUR_APP_KEY 3 PUSHER_APP_SECRET=YOUR_APP_SECRET 4 PUSHER_APP_CLUSTER=YOUR_APP_CLUSTER
Replace YOUR_APP_ID, YOUR_APP_KEY, YOUR_APP_SECRET, and YOUR_APP_CLUSTER with your Pusher app ID, app key, app secret and cluster respectively. Then add this line to the top of your app.js. This is to setup dotenv so it pulls environment variables from our .env file:
require('dotenv').config();
Modify your routes/index.js so the vote endpoint looks like this:
1router.post('/:pollId/vote', (req, res, next) => { 2 const choice = req.body.choice; 3 const identifier = `choices.${choice}.votes`; 4 Poll.update({_id: req.params.pollId}, {$inc: {[identifier]: 1}}, {}, (err, numberAffected) => { 5 let Pusher = require('pusher'); 6 let pusher = new Pusher({ 7 appId: process.env.PUSHER_APP_ID, 8 key: process.env.PUSHER_APP_KEY, 9 secret: process.env.PUSHER_APP_SECRET, 10 cluster: process.env.PUSHER_APP_CLUSTER 11 }); 12 13 let payload = { pollId: req.params.pollId, choice: choice }; 14 pusher.trigger('poll-events', 'vote', payload, req.body.socketId); 15 16 res.send(''); 17 }); 18 19 });
You’ll notice we include a fourth parameter in our call to pusher.trigger. This is the socket ID, a unique identifier that Pusher assigns to each client connection. This means that every browser window where our voting page is open will have its own socket ID. By passing the socket ID to pusher.trigger, we are ensuring that the client with that ID will not get notified. This is what we want, since that client already updated its view after the Vote button was clicked.
Now, let’s add our listener to our index.hbs:
1<script src="https://js.pusher.com/4.1/pusher.min.js"></script> 2 <script> 3 var pusher = new Pusher('your_app_key', { cluster: 'your_app_cluster' }); 4 var socketId; 5 6 // retrieve the socket ID once we are connected 7 pusher.connection.bind('connected', function() { 8 socketId = pusher.connection.socket_id; 9 }); 10 11 pusher.subscribe('poll-events') 12 .bind('vote', function (data) { 13 var pollId = data.pollId; 14 var choice = data.choice; 15 var voteCount = document.querySelector('#vote-count-' + pollId + '-' + choice); 16 voteCount.textContent++; 17 // we'll flash the colour for a moment 18 var color = voteCount.style.color; 19 setTimeout(function () { 20 voteCount.style.color = color; 21 }, 2000); 22 voteCount.style.color = 'green'; 23 }); 24 </script>
Remember to replace your_app_key with your Pusher app key and your_app_cluster with your app cluster.
We’ll also have to add the socket ID to the POST request we make to the vote endpoint. Modify your vote handler so it looks like this:
1var vote = function (event) { 2 event.preventDefault(); 3 var pollId = event.target.id; 4 var choice = event.target.optionsRadios.value; 5 6 // we add the socket ID to our POST data 7 axios.post('/' + pollId + '/vote', {choice: choice, socketId: socketId}); 8 document.querySelector('#vote-btn-' + pollId).disabled = true; 9 var voteCount = document.querySelector('#vote-count-' + pollId + '-' + choice); 10 voteCount.textContent++; 11 voteCount.style.color = 'blue'; 12 voteCount.style.fontWeight = '900'; 13 };
Start up your MongoDB server by running mongod, then serve your app with npm start.
Now visit your app on http://localhost:3000 in two browser windows. You should see that as you vote for an option in one window, the change shows up in the other too.
Conclusion
Realtime technologies are a great way to make your app more of a social activity. By seeing the interactions of other users in realtime, users get to feel that they are part of a larger community. In this article, we’ve used Pusher Channels to create a basic social polling app.


© 2026 Pusher Ltd. All rights reserved.
Pusher Limited is a company registered in England and Wales (No. 07489873) whose registered office is at MessageBird UK Limited, 3 More London Riverside, 4th Floor, London, United Kingdom, SE1 2AQ.