- Products

- Developers
- User stories
- Blog
- Pricing

Notify Slack users of push notification status with webhooks
Introduction
Pusher Beams makes it extremely easy to send push notifications to all of your iOS and Android users with a single request. In this tutorial, I will be introducing Pusher Beams webhooks and how you can take advantage of them to send a notification to Slack every time a user reads/opens the sent notification.
Prerequisites
To follow along in this tutorial you need the following things:
- Android Studio.
- A Pusher account. Create a free sandbox Pusher account or sign in.
- Ngrok. We are going to build a server in this tutorial and we need to expose it to the internet so as to add it as a webhook for Pusher Beams. You can download Ngrok from its official website.
- Go
>=1.12.
To get started, you will need to create a new directory for this tutorial called beams-webhook-go. This will house both the code for the server and iOS application. It can be done with the following command:
$ mkdir beams-webhook-go
Creating the Slack app
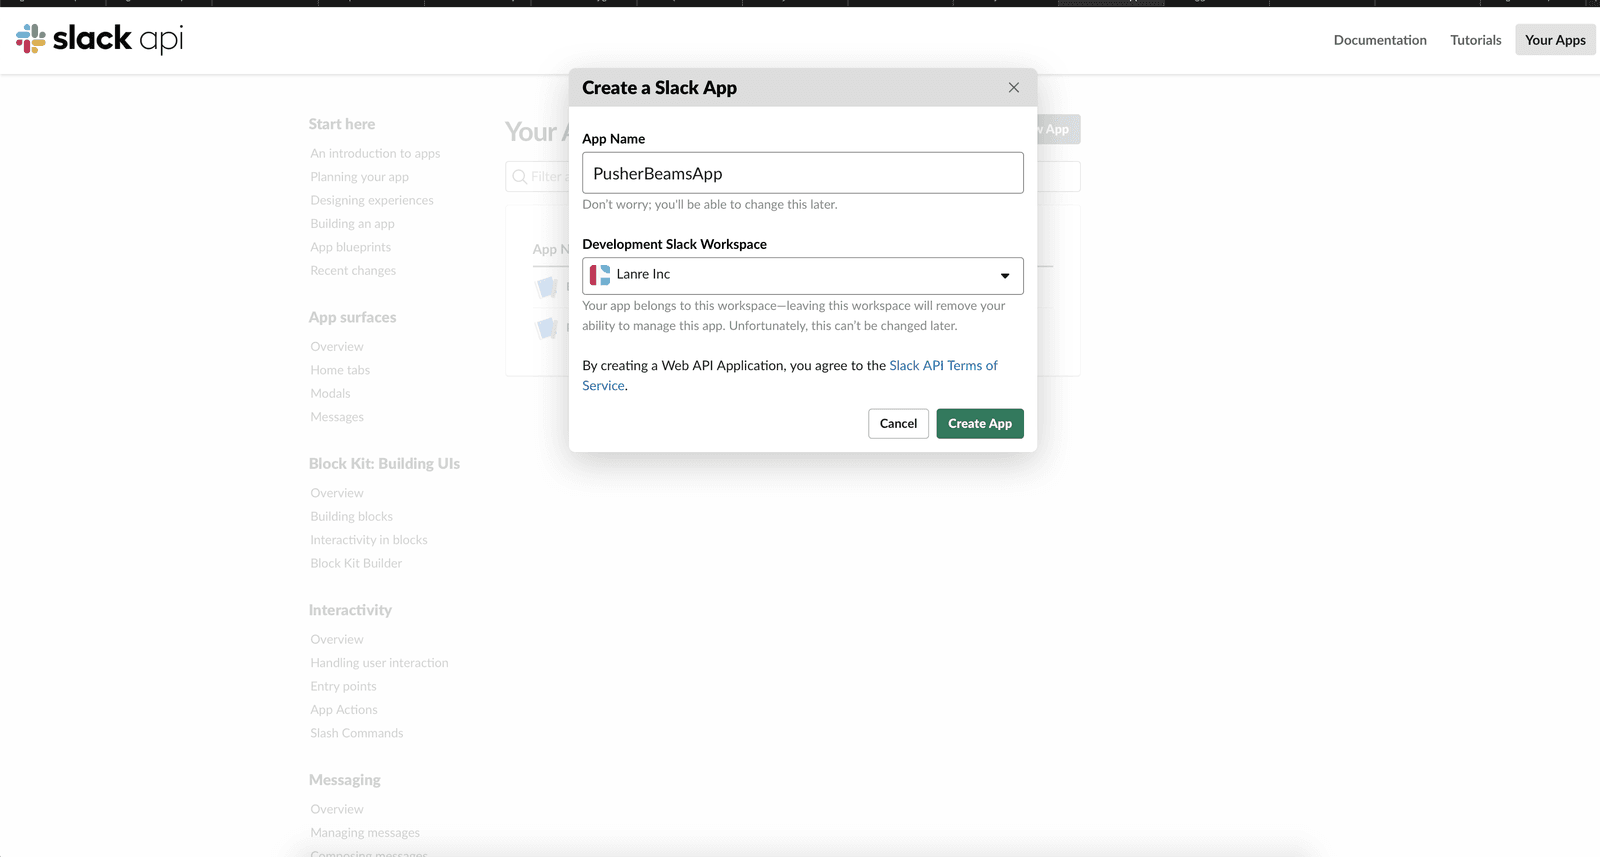
As explained at the introduction of this tutorial, we need to create a new Slack app. To do that, you need to visit the Slack apps’ page. You will then need to click on the New App button which will display the screenshot below. Once the fields have been filled correctly, push the Create App button to continue and create the app.
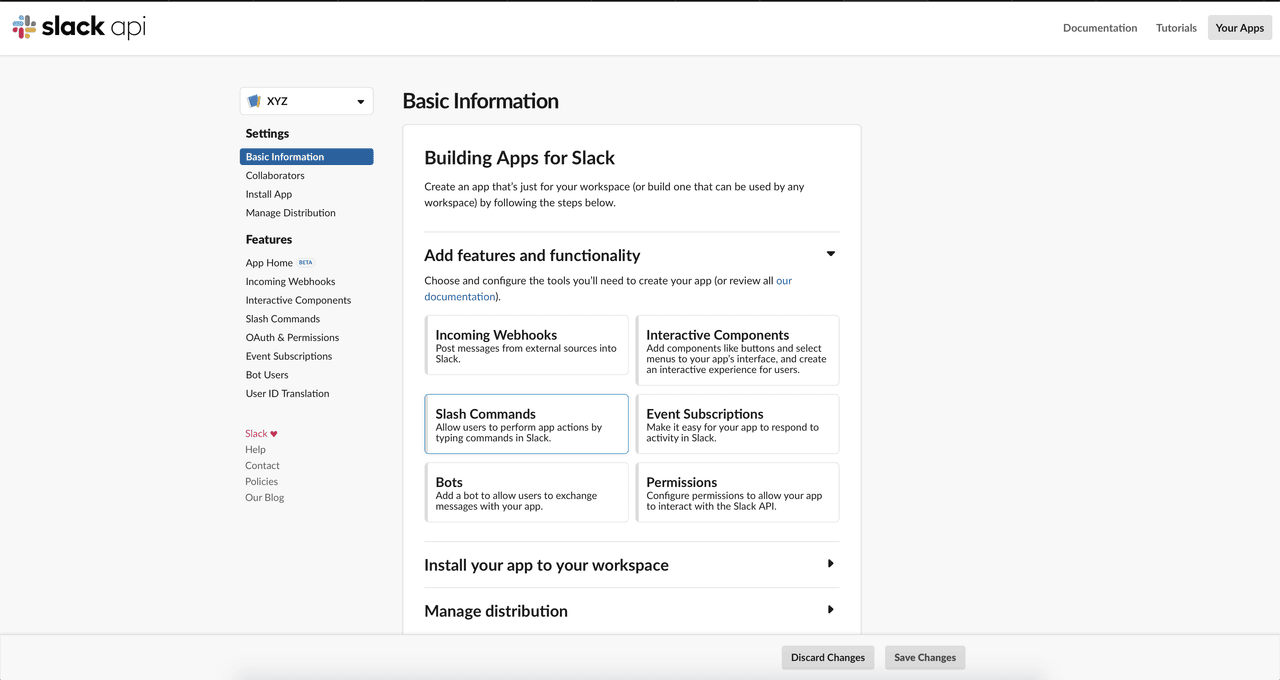
Once the app has been created, you will need to create a new Incoming webhook. This will require you to select a channel where events the app handles will be posted to. In the screenshot below, I have selected the random channel.
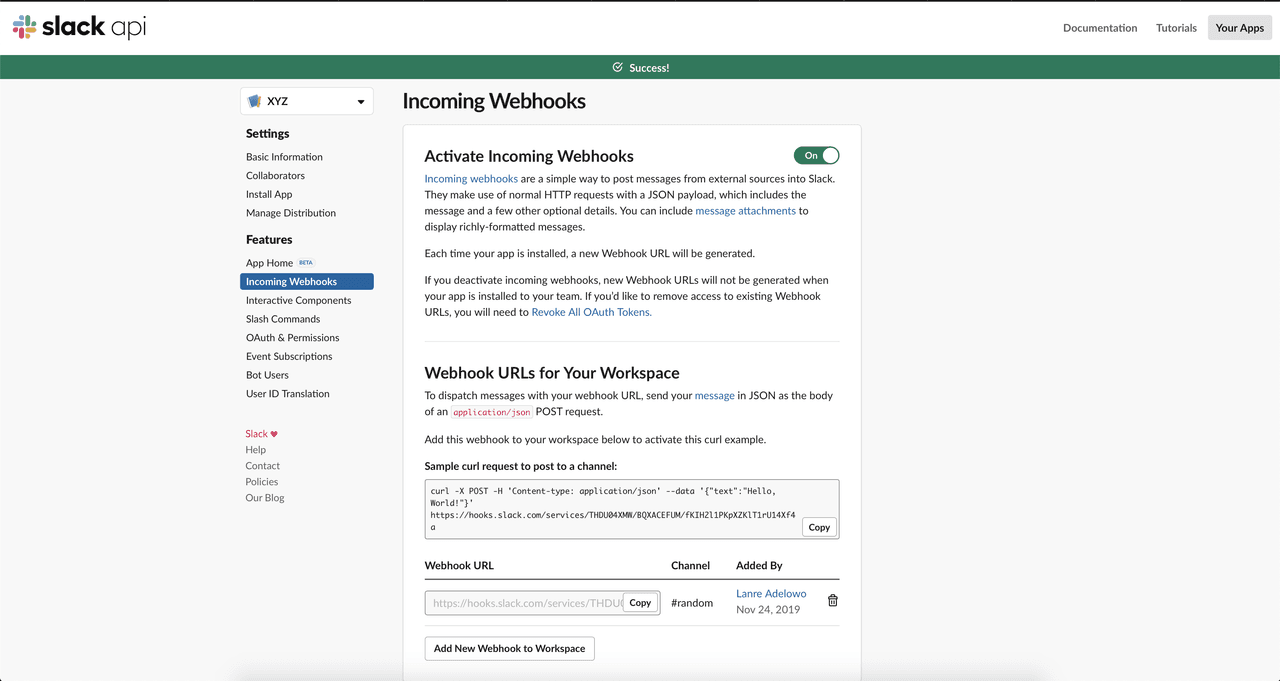
NOTE: Save the the URL that was generated. It will be needed in the next section when creating the server.
Setting up Firebase
Log in to or create a Firebase account here and go to your console. If you do not already have a project created you will need to create one and name it anything you like, if you have a project select it. Within the Project Overview page select Add App and follow the instruction for creating a new Android application.
Once you have completed the setup for your Android app you will be returned to the dashboard. You will need to go to the project settings (found within the “settings cog” in the top left). Once in the project settings select the Cloud Messaging tab. Copy the Server Key you will need it for setting up your Pusher Beams instance.

Creating the Pusher Beams app
Log in or create an account to access the Pusher dashboard. Create a new beams instance using the dashboard.
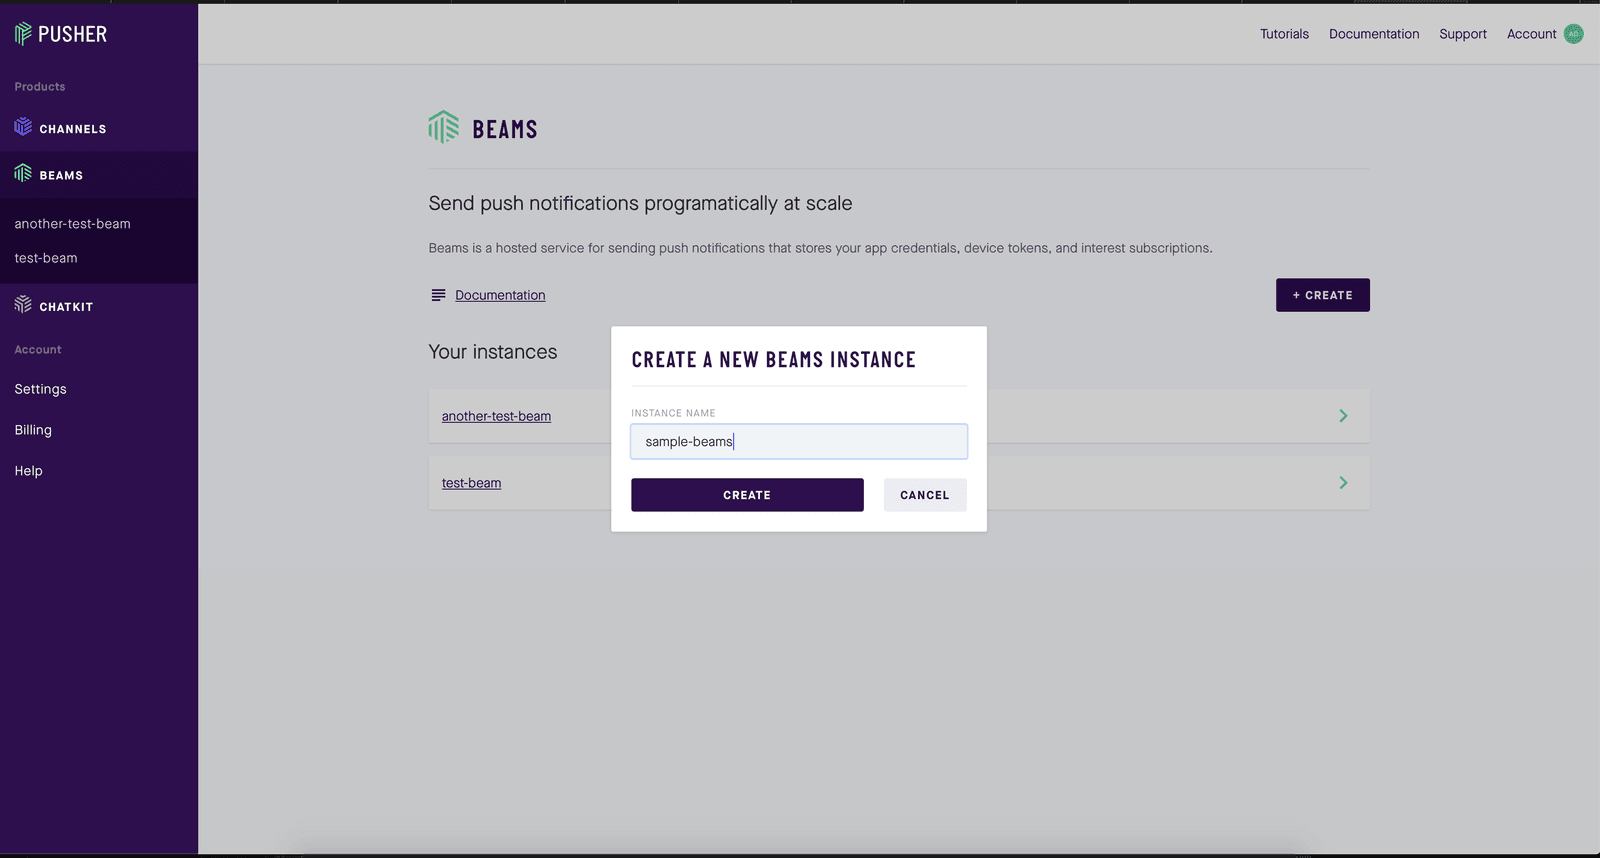
Once the Pusher Beams instance have been created, you will be presented with a quickstart screen. You will need to complete step one of the Android setup guide, by providing the FCM server key you copied earlier and select Continue.
You will need to copy your Pusher Beams instance ID and secret key as they will be needed when building the server in the next section.
Creating the backend server
We need to keep track of users, authenticate them. This is needed so we can make use of the authenticated users feature of Pusher Beams. To get started, you need to create another folder called server in the beams-webhook-go that was created earlier. To do that, you can make use of the following command:
1$ mkdir beams-webhook-go 2 $ cd beams-webhook-go 3 $ mkdir server 4 $ cd server
The next thing to do is to create a .env file which will contain secrets and variables needed to connect to Pusher Beams. To create the file, you can run the following command:
$ touch .env
In this newly created file, you need to paste the following in it:
1// beams-webhook-go/server/.env 2 PUSHER_BEAMS_INSTANCE_ID=YOUR_PUSHER_BEAMS_INSTANCE_ID 3 PUSHER_BEAMS_SECRET_KEY=YOUR_PUSHER_BEAMS_SECRET 4 PUSHER_BEAMS_WEBHOOK_SECRET=YOUR_PUSHER_WEBHOOK_SECRETS 5 SLACK_HOOKS_URL=SLACK_HOOKS_URL
You need to substitute the correct values in the above file. You can get the PUSHER_BEAMS_* values from the dashboard.
PUSHER_BEAMS_WEBHOOK_SECRETcan be anything you want as we’d use it to verify the request is coming from Pusher alone.
The next thing is to create two files - `main.go` and a `slack.go` - which will contain the logic for our server. We need to create three routes:
/auth: since we are building personalized notifications in this tutorial, we need to identify and differentiate a user from others so we can be certain only he/she receives the push notification./push: we need to be simulate an actual Push notification request. Whatever information is sent to the route will be published to an already authenticated user./slack: this will act as the webhook URL that is going to be added in the Pusher Beams dashboard.
You can create the aforementioned files with the following command:
$ touch main.go slack.go
Since we are using Go modules, you will need to also create a go.mod file. It can be done automatically by running go mod init. The next thing is to actually build the server. In main.go paste the following content:
1// beams-webhook-go/server/main.go 2 3 package main 4 5 import ( 6 "encoding/json" 7 "flag" 8 "fmt" 9 "log" 10 "net/http" 11 "os" 12 13 "github.com/joho/godotenv" 14 pushnotifications "github.com/pusher/push-notifications-go" 15 ) 16 17 func main() { 18 err := godotenv.Load() 19 if err != nil { 20 log.Fatal("Error loading .env file") 21 } 22 23 port := flag.Int64("http.port", 3000, "Port to run HTTP server on") 24 25 flag.Parse() 26 27 beamsClient, err := pushnotifications.New(os.Getenv("PUSHER_BEAMS_INSTANCE_ID"), os.Getenv("PUSHER_BEAMS_SECRET_KEY")) 28 if err != nil { 29 log.Fatalf("Could not set up Push Notifications client... %v", err) 30 } 31 32 mux := http.NewServeMux() 33 34 mux.HandleFunc("/push", createPushNotificationHandler(beamsClient)) 35 mux.HandleFunc("/auth", authenticateUser(beamsClient)) 36 mux.HandleFunc("/slack", handleWebhook) 37 38 if err := http.ListenAndServe(fmt.Sprintf(":%d", *port), mux); err != nil { 39 log.Fatal(err) 40 } 41 } 42 43 var currentUser = "" 44 45 func authenticateUser(client pushnotifications.PushNotifications) http.HandlerFunc { 46 return func(w http.ResponseWriter, r *http.Request) { 47 48 userIDinQueryParam := r.URL.Query().Get("user_id") 49 50 beamsToken, err := client.GenerateToken(userIDinQueryParam) 51 if err != nil { 52 w.WriteHeader(http.StatusInternalServerError) 53 return 54 } 55 56 currentUser = userIDinQueryParam 57 58 beamsTokenJson, err := json.Marshal(beamsToken) 59 if err != nil { 60 w.WriteHeader(http.StatusInternalServerError) 61 return 62 } 63 64 w.WriteHeader(http.StatusOK) 65 w.Write(beamsTokenJson) 66 } 67 } 68 69 func createPushNotificationHandler(client pushnotifications.PushNotifications) http.HandlerFunc { 70 return func(w http.ResponseWriter, r *http.Request) { 71 72 if r.Method != http.MethodPost { 73 w.WriteHeader(http.StatusMethodNotAllowed) 74 return 75 } 76 77 var data map[string]interface{} 78 79 type response struct { 80 Status bool `json:"status"` 81 Message string `json:"message"` 82 } 83 84 if err := json.NewDecoder(r.Body).Decode(&data); err != nil { 85 w.WriteHeader(http.StatusBadRequest) 86 encode(w, response{ 87 Status: false, 88 Message: "Invalid bad request", 89 }) 90 return 91 } 92 93 publishRequest := map[string]interface{}{ 94 "apns": map[string]interface{}{ 95 "aps": map[string]interface{}{ 96 "alert": data, 97 }, 98 }, 99 "fcm": map[string]interface{}{ 100 "notification": data, 101 }, 102 } 103 104 _, err := client.PublishToUsers([]string{currentUser}, publishRequest) 105 if err != nil { 106 log.Println(err) 107 w.WriteHeader(http.StatusInternalServerError) 108 encode(w, response{ 109 Status: false, 110 Message: "Could not send push notification", 111 }) 112 return 113 } 114 115 w.WriteHeader(http.StatusOK) 116 encode(w, response{ 117 Status: true, 118 Message: "Push notification sent successfully", 119 }) 120 } 121 } 122 123 var encode = func(w http.ResponseWriter, v interface{}) { 124 _ = json.NewEncoder(w).Encode(v) 125 }
In the above, we load the values we saved in the .env, connect to Pusher Beams and also create an HTTP server. The needed routes have also been created. But a missing part is handleWebhook which doesn’t exist yet. We will be implementing that in the slack.go file. You will need to open the slack.go file and paste the following contents:
1// beams-webhook-go/server/slack.go 2 3 package main 4 5 import ( 6 "bytes" 7 "crypto/hmac" 8 "crypto/sha1" 9 "encoding/hex" 10 "encoding/json" 11 "io" 12 "net/http" 13 "os" 14 ) 15 16 func handleWebhook(w http.ResponseWriter, r *http.Request) { 17 18 hasher := hmac.New(sha1.New, []byte(os.Getenv("PUSHER_BEAMS_WEBHOOK_SECRET"))) 19 20 type response struct { 21 Message string `json:"message"` 22 Status bool `json:"status"` 23 } 24 25 if r.Header.Get("Webhook-Event-Type") != "v1.UserNotificationOpen" { 26 w.WriteHeader(http.StatusOK) 27 encode(w, response{ 28 Message: "Ok", 29 Status: true, 30 }) 31 return 32 } 33 34 if _, err := io.Copy(hasher, r.Body); err != nil { 35 w.WriteHeader(http.StatusBadRequest) 36 encode(w, response{ 37 Message: "Could not create crypto hash", 38 Status: false, 39 }) 40 return 41 } 42 43 expectedHash := hex.EncodeToString(hasher.Sum(nil)) 44 45 if expectedHash != r.Header.Get("webhook-signature") { 46 w.WriteHeader(http.StatusBadRequest) 47 encode(w, response{ 48 Message: "Invalid webhook signature", 49 Status: false, 50 }) 51 return 52 } 53 54 var request struct { 55 Message string `json:"text"` 56 } 57 58 request.Message = "User opened a notification just now" 59 60 var buf = new(bytes.Buffer) 61 62 _ = json.NewEncoder(buf).Encode(request) 63 64 req, err := http.NewRequest(http.MethodPost, os.Getenv("SLACK_HOOKS_URL"), buf) 65 if err != nil { 66 w.WriteHeader(http.StatusInternalServerError) 67 encode(w, response{ 68 Message: "Could not send notification to Slack", 69 Status: false, 70 }) 71 return 72 } 73 74 resp, err := http.DefaultClient.Do(req) 75 if err != nil { 76 w.WriteHeader(http.StatusInternalServerError) 77 encode(w, response{ 78 Message: "Error while pinging Slack", 79 Status: false, 80 }) 81 return 82 } 83 84 if resp.StatusCode > http.StatusAccepted { 85 w.WriteHeader(http.StatusInternalServerError) 86 encode(w, response{ 87 Message: "Unexpected response from Slack", 88 Status: false, 89 }) 90 return 91 } 92 93 w.WriteHeader(http.StatusOK) 94 encode(w, response{ 95 Message: "Message sent to Slack successfully", 96 Status: true, 97 }) 98 }
In the above, we only care about webhooks that are of the type, v1.UserNotificationOpen. There are also other types of webhook events but this is the one of utmost concern in the tutorial. After which we verify that Pusher actually made the request, that is done by generating a hash of the request body with the key we added to the PUSHER_BEAMS_WEBHOOK_SECRET in the .env file earlier, then match it with what was sent in the request headers. If they both match, we can be certain it is a valid request.
The next thing to do is to run the server. This can be done by running the following commands:
1$ go build 2 $ go mod tidy ## This step can be skipped 3 $ ./server
At this point, the server will be running at port 3000. You will then need to start ngrok as the server needs to be exposed to the internet so it can be added as a webhook in the Pusher Beams dashboard. To do that, run the following command:
$ ngrok http 3000
If the above command succeeds, you will be presented with a URL, copy it as you will be needing it in a bit.
The next thing to do is to visit your Pusher Beams dashboard, select your app and visit the Settings tab.
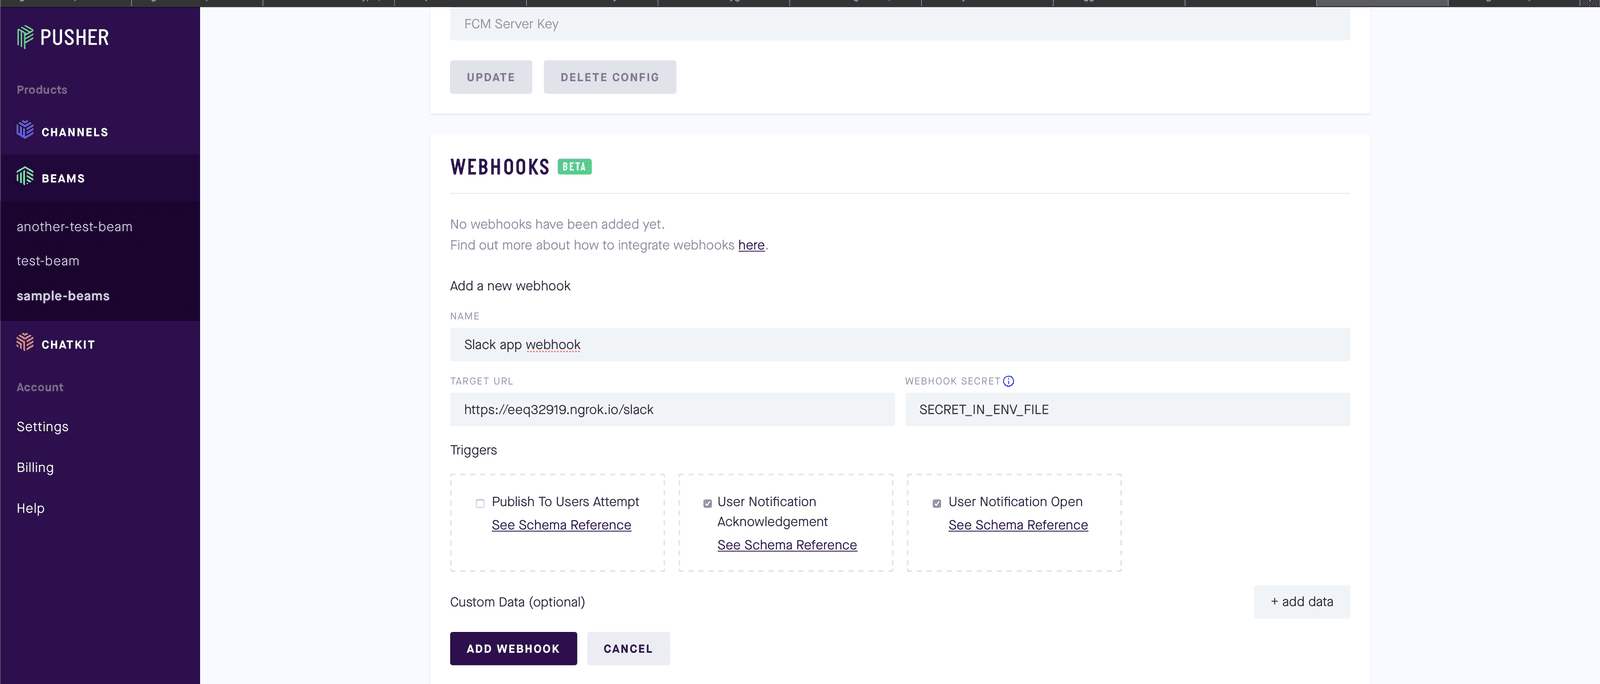
Paste the URL the
ngrokcommand outputted, then append/slackto it. Also, the secret that was defined in the.envfile asPUSHER_BEAMS_WEBHOOK_SECRETwill need to be added here.
Creating the Android app
In this section, we are going to create a very basic Android app that actually doesn’t show anything to the user except for the Push notification. To do this, you will need to create a new Empty Activity project using Android Studio. You can name it PusherBeamsSlackWebhook. Provide a Package name, you need to make sure the package name matches what was provided when setting up Firebase earlier in the tutorial.
Please note that this project should be created in the
beams-webhook-gofolder so it lives side by side with theserverdirectory
The next step is to add the dependencies needed, you need to update the app/build.gradle with:
1// beams-webhook-go/PusherBeamsSlackWebhook/app/build.gradle 2 3 dependencies { 4 ... 5 implementation 'com.google.firebase:firebase-core:16.0.9' 6 implementation 'com.google.firebase:firebase-messaging:18.0.0' 7 implementation 'com.pusher:push-notifications-android:1.4.6' 8 ... 9 } 10 11 apply plugin: 'com.google.gms.google-services'
The next step is to visit the Firebase dashboard to download the google-services.json file then add it to the project. After which you will need to synchronize Gradle by pressing the Sync Now button.
Once the above succeeds, you will then need to actually implement the Pusher Beams SDK. That can be done by opening the MainActivity.kt file and replacing its entire content with the following:
1// beams-webhook-go/PusherBeamsSlackWebhook/app/src/main/java/com/example/pusherbeamsslackwebhook/MainActivity.kt 2 3 package com.example.pusherbeamsslackwebhook 4 5 import android.content.SharedPreferences 6 import androidx.appcompat.app.AppCompatActivity 7 import android.os.Bundle 8 import android.util.Log 9 import com.pusher.pushnotifications.* 10 import com.pusher.pushnotifications.auth.AuthData 11 import com.pusher.pushnotifications.auth.AuthDataGetter 12 import com.pusher.pushnotifications.auth.BeamsTokenProvider 13 import java.util.* 14 15 class MainActivity : AppCompatActivity() { 16 17 private val PREF_NAME = "uuid-generated" 18 19 override fun onCreate(savedInstanceState: Bundle?) { 20 super.onCreate(savedInstanceState) 21 setContentView(R.layout.activity_main) 22 23 24 PushNotifications.start(applicationContext, "PUSHER_INSTANCE_ID") 25 PushNotifications.addDeviceInterest("webhook-slack") 26 27 val sharedPref: SharedPreferences = getSharedPreferences(PREF_NAME, 0) 28 29 if (!sharedPref.getBoolean(PREF_NAME, false)) { 30 31 var uuid = UUID.randomUUID().toString() 32 33 val serverUrl = "https://NGROK.ngrok.io/auth?user_id=${uuid}" 34 val tokenProvider = BeamsTokenProvider(serverUrl, 35 object : AuthDataGetter { 36 override fun getAuthData(): AuthData { 37 return AuthData( 38 headers = hashMapOf() 39 ) 40 } 41 }) 42 43 44 PushNotifications.setUserId( 45 uuid, 46 tokenProvider, 47 object : BeamsCallback<Void, PusherCallbackError> { 48 override fun onFailure(error: PusherCallbackError) { 49 Log.e( 50 "BeamsAuth", 51 "Could not login to Beams: ${error.message}" 52 ) 53 } 54 55 override fun onSuccess(vararg values: Void) { 56 Log.i("BeamsAuth", "Beams login success") 57 } 58 } 59 ) 60 val editor = sharedPref.edit() 61 editor.putBoolean(PREF_NAME, true) 62 editor.apply() 63 } 64 } 65 }
Please remember to replace
PUSHER_INSTANCE_IDwith the actual value gotten from the Pusher Beams dashboard.
Finally, you can run the application now.
Testing the implementation
Remember we created a push route in our server earlier, you will make use of it to create a push notification that will be sent to the application. That can be done with the following command:
$ curl localhost:3000/push -X POST -d '{"title" : "Here is a new push notification"}'
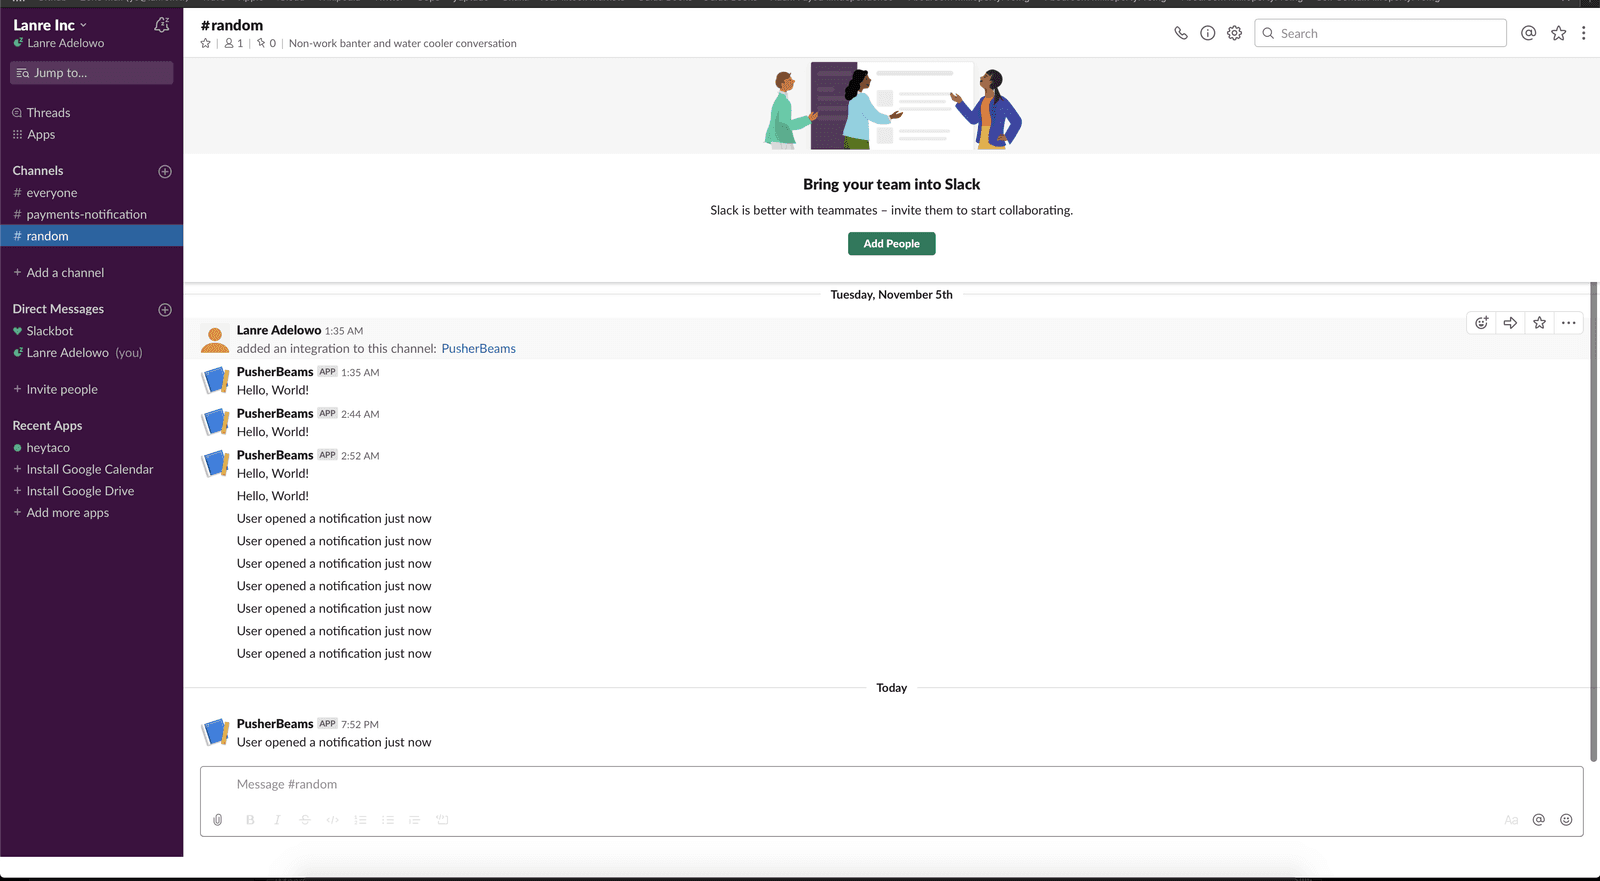
Once the above command succeeds, a push notification will be sent to the device. You will need to open it - the push notification. After which you can take a look at the Slack workspace and channel which you configured earlier. The channel should have messages similar to the below screenshot.

Conclusion
In this tutorial we have learnt how to integrate Pusher Beams webhooks and Slack. As always, the entire code can be found on GitHub.


© 2026 Pusher Ltd. All rights reserved.
Pusher Limited is a company registered in England and Wales (No. 07489873) whose registered office is at MessageBird UK Limited, 3 More London Riverside, 4th Floor, London, United Kingdom, SE1 2AQ.