- Products

- Developers
- User stories
- Blog
- Pricing

Build a shopping cart with Kotlin - Part 3: Adding reactivity to the app
Introduction
Introduction
In this last part of the tutorial series, we will add some reactivity to our app using RxKotlin, and complete our shopping cart.
Prerequisites
In order to follow along with the tutorial, make sure you meet the following requirements:
- IntelliJ IDEA or Android Studio.
- Experience with the Kotlin language
- Having followed and completed the previous parts of the tutorial series: Part 1 Part 2
- An emulator or physical device (for app testing/debugging purpose)
What’s RxKotlin?
You may not know what RxKotlin is about. Well I cannot blame you for that 🙂 . The first thing you should know is that RxKotlin is about Reactive programming with Kotlin. And you may also ask what is reactive programming, right ?
According to Wikipedia,
Reactive programming is a programming paradigm oriented around data flows and the propagation of change. This means that it should be possible to express static or dynamic data flows with ease in the programming languages used, and that the underlying execution model will automatically propagate changes through the data flow
This paradigm is built on the ideology of the observable pattern, and provides us with many tools to build reactive apps. We have essentially three components involved in reactive programming:
-
Observers: an observer subscribes to an observable.
-
Observables: an observable emits a stream of data which the the observer listens for and reacts to.
-
Operators: they allow the observer to perform a set of really useful operations over the sequence of items emitted by the the observable.
Now that you grasp some basic concepts of reactive programming, I can explain you what RxKotlin is about.
According to the official definition,
RxKotlin is a lightweight library that adds convenient extension functions to RxJava. You can use RxJava with Kotlin out-of-the-box, but Kotlin has language features (such as extension functions) that can streamline usage of RxJava even more. RxKotlin aims to conservatively collect these conveniences in one centralized library, and standardize conventions for using RxJava with Kotlin.
So from what is said, we see that RxKotlin is a wrapper around RxJava which is itself an open-source implementation of the ReactiveX library that helps you create applications in the reactive programming style.
Now we can move on to the implementation of this concept into our shopping cart app.
Adding reactivity to the counter with RxKotlin
Now, head over to your build.gradle file, then add the RxJava and RxKotlin libraries to your dependencies block:
1//..app/build.gradle 2 implementation 'io.reactivex.rxjava2:rxjava:2.1.9' 3 implementation 'io.reactivex.rxjava2:rxkotlin:2.2.0'
You remembered in the previous part we’ve added some listeners to our buttons to perform some operations over our cart. We’ll update this section, we’ll add a taste of reactivity using the really cool possibilities RxKotlin offers us.
Move to your ProductAdapter file where you defined listeners,
1itemView.addToCart.setOnClickListener { view -> 2 3 val item = CartItem(product) 4 5 ShoppingCart.addItem(item) 6 //notify users 7 Snackbar.make( 8 (itemView.context as MainActivity).coordinator, 9 "${product.name} added to your cart", 10 Snackbar.LENGTH_LONG 11 ).show() 12 13 } 14 15 itemView.removeItem.setOnClickListener { view -> 16 17 val item = CartItem(product) 18 19 ShoppingCart.removeItem(item, itemView.context) 20 21 Snackbar.make( 22 (itemView.context as MainActivity).coordinator, 23 "${product.name} removed from your cart", 24 Snackbar.LENGTH_LONG 25 ).show() 26 27 }
and amend this section like the following:
1../app/src/main/java/yourPackage/ProductAdapter.kt 2 3 Observable.create(ObservableOnSubscribe<MutableList<CartItem>> { 4 5 itemView.addToCart.setOnClickListener { view -> 6 7 val item = CartItem(product) 8 9 ShoppingCart.addItem(item) 10 //notify users 11 Snackbar.make( 12 (itemView.context as MainActivity).coordinator, 13 "${product.name} added to your cart", 14 Snackbar.LENGTH_LONG 15 ).show() 16 17 it.onNext(ShoppingCart.getCart()) 18 19 } 20 21 itemView.removeItem.setOnClickListener { view -> 22 23 val item = CartItem(product) 24 25 ShoppingCart.removeItem(item, itemView.context) 26 27 Snackbar.make( 28 (itemView.context as MainActivity).coordinator, 29 "${product.name} removed from your cart", 30 Snackbar.LENGTH_LONG 31 ).show() 32 33 it.onNext(ShoppingCart.getCart()) 34 } 35 36 37 }).subscribe { cart -> 38 var quantity = 0 39 40 cart.forEach { cartItem -> 41 quantity += cartItem.quantity 42 } 43 44 (itemView.context as MainActivity).cart_size.text = quantity.toString() 45 Toast.makeText(itemView.context, "Cart size $quantity", Toast.LENGTH_SHORT).show() 46 }
What we’ve done above is pretty simple. We’ve created an Observable from our shopping cart data as we know it is basically a list of CartItem:
Observable.create(ObservableOnSubscribe<MutableList<CartItem>> {
Then whenever an item is added or removed, we pulled the new state of the shopping cart to the data stream with this line: it.onNext(ShoppingCart.getCart()).
Next we subscribe to this stream of data, once we get it, we made some basic operation to get the updated shopping cart size and finally we display it on the counter: (itemView.context as MainActivity).cart_size.text = quantity.toString(). Pretty simple, right?
You should agree that in just a few lines of code, we’ve added some reactivity to our shopping cart 😎.
Now if you run and test your app, you should see it behaving like expected. No more disappointment like in the previous article 😁.
Let’s finish our app by adding a review functionality with a Checkout button.
Adding the review functionality to the shopping cart
In this section, we’ll build an activity responsible for reviewing our shopping cart items as well as convenient details.
Create a cart_list_item file and paste the following inside. This layout is responsible for handling the view of a single cart item. It simply contains the cart item image, its name, price and quantity.
1<?xml version="1.0" encoding="utf-8"?> 2 //../app/src/main/java/res/layout/cart_list_item.xml 3 <android.support.v7.widget.CardView 4 xmlns:android="http://schemas.android.com/apk/res/android" 5 xmlns:app="http://schemas.android.com/apk/res-auto" 6 app:cardUseCompatPadding="true" 7 app:cardElevation="1.5dp" 8 android:layout_margin="2dp" 9 app:cardBackgroundColor="@android:color/white" 10 app:cardCornerRadius="2dp" 11 android:layout_width="match_parent" 12 android:layout_height="wrap_content"> 13 14 <LinearLayout 15 xmlns:android="http://schemas.android.com/apk/res/android" 16 android:layout_width="match_parent" 17 android:gravity="center_vertical" 18 android:weightSum="1.5" 19 android:layout_height="match_parent"> 20 21 22 <ImageView 23 android:layout_weight=".5" 24 android:scaleType="fitXY" 25 android:id="@+id/product_image" 26 android:layout_width="170dp" 27 android:layout_height="135dp"/> 28 29 30 <LinearLayout 31 android:layout_weight=".5" 32 android:gravity="center_vertical" 33 android:layout_marginRight="8dp" 34 android:padding="8dp" 35 android:orientation="vertical" 36 android:layout_width="wrap_content" 37 android:layout_height="match_parent" 38 android:layout_marginEnd="8dp"> 39 40 41 <TextView 42 android:textSize="19sp" 43 android:textColor="@android:color/black" 44 android:id="@+id/product_name" 45 android:layout_width="wrap_content" 46 android:layout_height="wrap_content"/> 47 48 49 <TextView 50 android:layout_marginTop="10dp" 51 android:textSize="16sp" 52 android:textStyle="bold" 53 android:id="@+id/product_price" 54 android:textColor="@android:color/holo_red_light" 55 android:layout_width="wrap_content" 56 android:layout_height="wrap_content"/> 57 58 59 </LinearLayout> 60 61 62 <TextView 63 android:textStyle="bold" 64 android:layout_marginEnd="12dp" 65 android:gravity="center_vertical" 66 android:layout_gravity="center_vertical" 67 android:padding="8dp" 68 android:textColor="@android:color/black" 69 android:textSize="16sp" 70 android:background="@drawable/round_background" 71 android:id="@+id/product_quantity" 72 android:layout_width="wrap_content" 73 android:layout_height="wrap_content" 74 android:layout_marginRight="12dp"/> 75 76 </LinearLayout> 77 </android.support.v7.widget.CardView>
We’ll also a need adapter to render our shopping cart items properly.
Create a ShoppingCartAdapter.kt file and paste the following inside:
1//..app/src/main/java/yourPackage/ShoppingCartAdapter.kt 2 3 import android.content.Context 4 import android.support.v7.widget.RecyclerView 5 import android.view.LayoutInflater 6 import android.view.View 7 import android.view.ViewGroup 8 import com.squareup.picasso.Picasso 9 import kotlinx.android.synthetic.main.cart_list_item.view.* 10 11 class ShoppingCartAdapter(var context: Context, var cartItems: List<CartItem>) : 12 RecyclerView.Adapter<ShoppingCartAdapter.ViewHolder>() { 13 override fun onCreateViewHolder(parent: ViewGroup, p1: Int): ShoppingCartAdapter.ViewHolder { 14 15 // The layout design used for each list item 16 val layout = LayoutInflater.from(context).inflate(R.layout.cart_list_item, parent, false) 17 18 return ViewHolder(layout) 19 } 20 21 // This returns the size of the list. 22 override fun getItemCount(): Int = cartItems.size 23 24 override fun onBindViewHolder(viewHolder: ShoppingCartAdapter.ViewHolder, position: Int) { 25 26 //we simply call the `bindItem` function here 27 viewHolder.bindItem(cartItems[position]) 28 } 29 class ViewHolder(view: View) : RecyclerView.ViewHolder(view) { 30 31 fun bindItem(cartItem: CartItem) { 32 33 // This displays the cart item information for each item 34 Picasso.get().load(cartItem.product.photos[0].filename).fit().into(itemView.product_image) 35 36 itemView.product_name.text = cartItem.product.name 37 38 itemView.product_price.text = "$${cartItem.product.price}" 39 40 itemView.product_quantity.text = cartItem.quantity.toString() 41 42 } 43 } 44 45 }
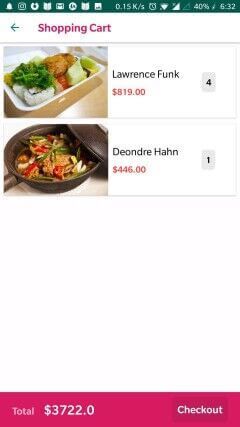
Now, we are a few to finish our mobile app. The next step is build the activity responsible for handing the review of our shopping cart. It will have the following rendering 😋
Create an empty activity named ShoppingCartActivity or whatever you want. Then, move on to your activity_shopping_cart.xml file and replace the content with the following:
1//../app/src/main/java/res/layout/activity_shopping_cart.xml 2 3 <?xml version="1.0" encoding="utf-8"?> 4 <android.support.design.widget.CoordinatorLayout 5 xmlns:android="http://schemas.android.com/apk/res/android" 6 xmlns:tools="http://schemas.android.com/tools" 7 xmlns:app="http://schemas.android.com/apk/res-auto" 8 android:layout_width="match_parent" 9 android:background="#fffffdff" 10 android:layout_height="match_parent" 11 tools:context=".ShoppingCartActivity"> 12 13 <android.support.design.widget.AppBarLayout 14 android:background="@android:color/transparent" 15 android:fitsSystemWindows="true" 16 android:layout_width="match_parent" 17 android:layout_height="?attr/actionBarSize"> 18 19 <android.support.v7.widget.Toolbar 20 android:id="@+id/toolbar" 21 app:titleTextColor="@color/colorAccent" 22 app:title="Shopping Cart" 23 android:background="@android:color/white" 24 android:layout_width="match_parent" 25 android:layout_height="?attr/actionBarSize"/> 26 27 </android.support.design.widget.AppBarLayout> 28 29 30 <android.support.v7.widget.RecyclerView 31 app:layout_behavior="@string/appbar_scrolling_view_behavior" 32 android:id="@+id/shopping_cart_recyclerView" 33 android:layout_margin="2dp" 34 android:layout_width="match_parent" 35 android:layout_height="match_parent"/> 36 37 38 <RelativeLayout 39 android:padding="8dp" 40 app:elevation="4dp" 41 android:layout_gravity="bottom" 42 android:elevation="15dp" 43 android:background="@color/colorAccent" 44 android:layout_width="match_parent" 45 android:layout_height="66dp" 46 tools:targetApi="lollipop"> 47 48 49 <LinearLayout 50 android:layout_alignParentStart="true" 51 android:layout_centerVertical="true" 52 android:layout_width="wrap_content" 53 android:layout_marginLeft="15dp" 54 android:layout_height="wrap_content" 55 tools:ignore="RtlCompat"> 56 57 <TextView 58 android:id="@+id/totalLabel" 59 android:textSize="18sp" 60 android:textStyle="bold" 61 android:text="Total" 62 android:layout_width="wrap_content" 63 android:layout_height="wrap_content" 64 /> 65 66 <TextView 67 android:layout_marginStart="18dp" 68 android:id="@+id/total_price" 69 android:textSize="24sp" 70 android:textColor="@android:color/white" 71 android:textStyle="bold" 72 android:layout_width="wrap_content" 73 android:layout_height="wrap_content" 74 tools:ignore="RtlCompat"/> 75 76 </LinearLayout> 77 78 79 <Button 80 android:textSize="19sp" 81 android:layout_centerVertical="true" 82 android:layout_marginEnd="15dp" 83 android:layout_marginRight="15dp" 84 android:padding="10dp" 85 android:layout_alignParentEnd="true" 86 android:text="Checkout" 87 android:textAllCaps="false" 88 android:background="@drawable/round_background" 89 android:textColor="@android:color/white" 90 android:layout_width="wrap_content" 91 android:layout_height="wrap_content" 92 android:layout_alignParentRight="true"/> 93 94 95 </RelativeLayout> 96 97 </android.support.design.widget.CoordinatorLayout>
The above layout contains a recycler view to display our shopping cart items, and a bottom bar containing the total price of our shopping and a Checkout button.
Also, replace the content of your ShoppingCartActivity like the following:
1//..app/src/main/java/yourPackage/ShoppingCartActivity.kt 2 3 import android.graphics.PorterDuff 4 import android.support.v7.app.AppCompatActivity 5 import android.os.Bundle 6 import android.support.v4.content.ContextCompat 7 import android.support.v7.widget.LinearLayoutCompat 8 import android.support.v7.widget.LinearLayoutManager 9 import android.support.v7.widget.RecyclerView 10 import android.view.MenuItem 11 import kotlinx.android.synthetic.main.activity_shopping_cart.* 12 13 class ShoppingCartActivity : AppCompatActivity() { 14 15 lateinit var adapter: ShoppingCartAdapter 16 17 override fun onCreate(savedInstanceState: Bundle?) { 18 super.onCreate(savedInstanceState) 19 setContentView(R.layout.activity_shopping_cart) 20 21 setSupportActionBar(toolbar) 22 23 supportActionBar?.setDisplayShowHomeEnabled(true) 24 supportActionBar?.setDisplayHomeAsUpEnabled(true) 25 26 val upArrow = ContextCompat.getDrawable(this, R.drawable.abc_ic_ab_back_material) 27 upArrow?.setColorFilter(ContextCompat.getColor(this, R.color.colorPrimary), PorterDuff.Mode.SRC_ATOP) 28 supportActionBar?.setHomeAsUpIndicator(upArrow) 29 30 adapter = ShoppingCartAdapter(this, ShoppingCart.getCart()) 31 adapter.notifyDataSetChanged() 32 33 shopping_cart_recyclerView.adapter = adapter 34 35 shopping_cart_recyclerView.layoutManager = LinearLayoutManager(this) 36 37 var totalPrice = ShoppingCart.getCart() 38 .fold(0.toDouble()) { acc, cartItem -> acc + cartItem.quantity.times(cartItem.product.price!!.toDouble()) } 39 40 total_price.text = "$${totalPrice}" 41 } 42 43 override fun onOptionsItemSelected(item: MenuItem?): Boolean { 44 45 when (item?.itemId) { 46 android.R.id.home -> { 47 onBackPressed() 48 } 49 } 50 51 return super.onOptionsItemSelected(item) 52 } 53 }
In this activity, we are doing three essential things, first we provide our adapter with the shopping cart items to handle, then we configure and tell our recycler view that its adapter is ready to use and we assigned it, then we compute the total price from the shopping cart items and display it.
We get a reference to the arrow back icon, and tint its color to fit our design needs.
1val upArrow = ContextCompat.getDrawable(this, R.drawable.abc_ic_ab_back_material) 2 upArrow?.setColorFilter(ContextCompat.getColor(this, R.color.colorPrimary), PorterDuff.Mode.SRC_ATOP) 3 supportActionBar?.setHomeAsUpIndicator(upArrow)
1override fun onOptionsItemSelected(item: MenuItem?): Boolean { 2 when (item?.itemId) { 3 android.R.id.home -> { 4 onBackPressed() 5 } 6 } 7 return super.onOptionsItemSelected(item) 8 }
This block of code simply redirects the user to the previous screen/activity when the back arrow icon is clicked.
Now we need a way to link our two screens, the MainActivity one and the ShoppingCartActivity one. But how? 🤔 We just need to add a click listener to the showCart button defined in the MainActivity class, the listener handler will head us to the ShoppingCartActivity screen.
So add this block of code into your MainActivity.kt file after the getProducts method:
1//..app/src/main/java/yourPackage/MainActivity.kt 2 3 showCart.setOnClickListener { 4 startActivity(Intent(this, ShoppingCartActivity::class.java)) 5 }
Our app is complete now with all the expected features. You can run and test it, hopefully everything should be working fine. Otherwise, check if you haven’t missed any step.
Conclusion
Finally we reached the end of this tutorial series. I think this part has been more useful to you than others because you have learned a new concept : Reactive programming and put it into practice. You can grab the source code for the last part here; if you want and you can even fork the repo to add more features to the app 😉.


© 2026 Pusher Ltd. All rights reserved.
Pusher Limited is a company registered in England and Wales (No. 07489873) whose registered office is at MessageBird UK Limited, 3 More London Riverside, 4th Floor, London, United Kingdom, SE1 2AQ.