- Products

- Developers
- User stories
- Blog
- Pricing

Build a shopping cart with Kotlin - Part 1: Listing products
Introduction
Introduction
In this tutorial I’ll show you how to build a shopping cart using Kotlin. A shopping cart is a must-have in any e-commerce application. This course will guide you through building a full shopping cart with Kotlin.
Our end result will be an Android app built with the Kotlin language (rather than Java for the sake of productivity) listing some products to the user and allowing them to add some to their shopping cart. They should also be able to review their shopping cart.
In this first part of this tutorial series we’ll be building our app that shows a list of products to the users.
Demo
Here is the final result of the first part of the tutorial series 😎
Prerequisites
In order to follow along, you will need some experience with the Kotlin programming language. You will also need appropriate IDEs. I suggest IntelliJ IDEA or Android Studio. It is also assumed that you know how to use the IDEs that you are working with, including interacting with either an emulated or physical mobile device for running your apps.
Configuring your project
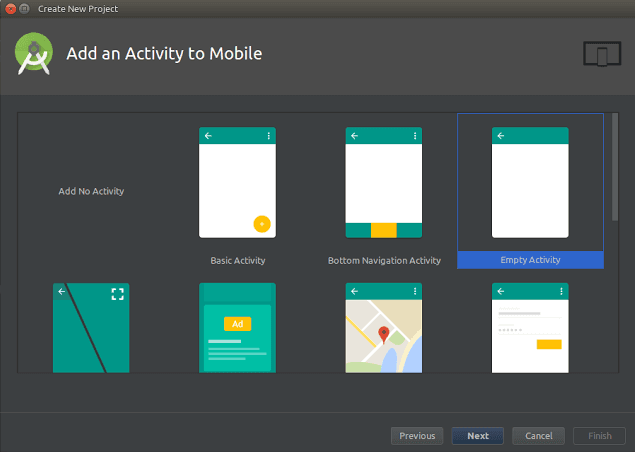
Open Android Studio, create a new project. Insert the name of your app and company domain name then select the Include Kotlin support checkbox to enable Kotlin in the project.
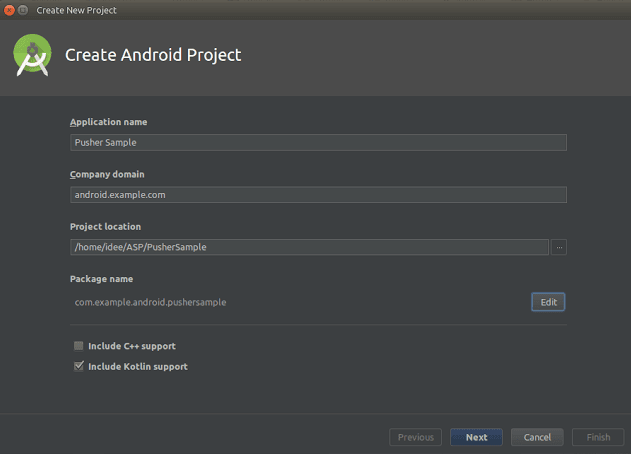
For this article, we will set the minimum supported Android version at 4.03 (API 15). Next, choose an empty activity template and click on Finish.
Then head over to your ../app/build.gradle file and paste this inside the dependencies block, as we’ll be using these dependencies in this tutorial
1//..app/build.gradle 2 implementation 'com.google.code.gson:gson:2.8.2' 3 implementation 'com.squareup.picasso:picasso:2.71828' 4 implementation 'com.squareup.retrofit2:retrofit:2.4.0' 5 implementation 'com.squareup.retrofit2:converter-gson:2.3.0' 6 implementation 'com.squareup.retrofit2:converter-scalars:2.3.0' 7 implementation 'com.android.support:design:28.0.0' 8 implementation 'com.android.support:cardview-v7:28.0.0' 9 implementation 'com.android.support:recyclerview-v7:28.0.0'
- Retrofit: We will need the Retrofit library (a “type-safe HTTP client”) to enable us send messages to our remote server which we will build later on.
- Picasso: Picasso is "A powerful image downloading and caching library for Android”
Also, amend your styles.xml like the following. This should enable us to use a toolbar inside our application.
1//..app/src/main/res/values/styles.xml 2 3 <resources> 4 5 <!-- Base application theme. --> 6 <style name="AppTheme" parent="Theme.AppCompat.NoActionBar"> 7 <!-- Customize your theme here. --> 8 <item name="colorPrimary">@color/colorPrimary</item> 9 <item name="colorPrimaryDark">@color/colorPrimaryDark</item> 10 <item name="colorAccent">@color/colorAccent</item> 11 </style> 12 13 </resources>
Build your product model, adapter and layout
Our product should have a unique identifier, a price, a name, a description and a set of images if possible. Now that we know the structure of our product item, let’s define its model. We’ll build our product entity using a Kotlin data class.
Create a Product.kt file, then copy and paste the following piece of code inside:
1//..app/src/main/java/yourPackage/Product.kt 2 import com.google.gson.annotations.SerializedName 3 4 data class Product( 5 @SerializedName("description") 6 var description: String? = null, 7 8 @SerializedName("id") 9 var id: Int? = null, 10 11 @SerializedName("name") 12 var name: String? = null, 13 14 @SerializedName("price") 15 var price: String? = null, 16 17 @SerializedName("photos") 18 var photos: List<Photo> = arrayListOf() 19 )
As our product has a set of photos, we’ll also define its entity. Create a Photo.kt file, then paste the following code inside as well:
1//..app/src/main/java/yourPackage/Photo.kt 2 import com.google.gson.annotations.SerializedName 3 4 data class Photo( 5 @SerializedName("filename") 6 var filename: String? = null 7 )
Next, we’ll build our product adapter responsible to handle the display of our products list.
Create a ProductAdapter.kt file and paste the following inside:
1//..app/src/main/java/yourPackage/ProductAdapter.kt 2 3 import android.annotation.SuppressLint 4 import android.content.Context 5 import android.support.design.widget.Snackbar 6 import android.support.v7.widget.RecyclerView 7 import android.view.LayoutInflater 8 import android.view.View 9 import android.view.ViewGroup 10 import android.widget.Toast 11 import com.squareup.picasso.Picasso 12 import kotlinx.android.synthetic.main.activity_main.* 13 import kotlinx.android.synthetic.main.product_row_item.view.* 14 15 class ProductAdapter(var context: Context, var products: List<Product> = arrayListOf()) : 16 RecyclerView.Adapter<ProductAdapter.ViewHolder>() { 17 override fun onCreateViewHolder(p0: ViewGroup, p1: Int): ProductAdapter.ViewHolder { 18 // The layout design used for each list item 19 val view = LayoutInflater.from(context).inflate(R.layout.product_row_item, null) 20 return ViewHolder(view) 21 22 } 23 // This returns the size of the list. 24 override fun getItemCount(): Int = products.size 25 26 override fun onBindViewHolder(viewHolder: ProductAdapter.ViewHolder, position: Int) { 27 //we simply call the `bindProduct` function here 28 viewHolder.bindProduct(products[position]) 29 } 30 31 class ViewHolder(view: View) : RecyclerView.ViewHolder(view) { 32 33 // This displays the product information for each item 34 fun bindProduct(product: Product) { 35 36 itemView.product_name.text = product.name 37 itemView.product_price.text = "$${product.price.toString()}" 38 Picasso.get().load(product.photos[0].filename).fit().into(itemView.product_image) 39 } 40 41 } 42 43 }
Next, let’s create our product item layout. This layout file contains:
- an
ImageViewto display the product image - two
TextViewone to display the product name and the other for the product price.
All these widgets are wrapped inside a CardView to add a shadow and a radius to the layout 🙂.
Create a product_row_item file and paste the following inside. This layout is responsible for handling the view of a single item of our list.
1//../app/src/main/java/res/layout/product_row_item.xml 2 3 <?xml version="1.0" encoding="utf-8"?> 4 <android.support.v7.widget.CardView 5 xmlns:card_view="http://schemas.android.com/tools" 6 xmlns:android="http://schemas.android.com/apk/res/android" 7 xmlns:app="http://schemas.android.com/apk/res-auto" 8 app:cardUseCompatPadding="true" 9 android:layout_margin="4dp" 10 app:cardBackgroundColor="@android:color/white" 11 app:cardCornerRadius="4dp" 12 android:background="?attr/selectableItemBackground" 13 app:cardElevation="3dp" 14 android:foreground="?attr/selectableItemBackground" 15 card_view:cardElevation="4dp" 16 android:layout_width="match_parent" 17 android:layout_height="wrap_content"> 18 19 <LinearLayout 20 android:orientation="vertical" 21 android:layout_width="match_parent" 22 android:layout_height="match_parent"> 23 24 <ImageView 25 android:id="@+id/product_image" 26 android:layout_width="match_parent" 27 android:layout_height="140dp"/> 28 29 <LinearLayout 30 android:padding="10dp" 31 android:orientation="vertical" 32 android:layout_width="match_parent" 33 android:layout_height="wrap_content"> 34 35 36 <TextView 37 android:textColor="@android:color/black" 38 android:textSize="22sp" 39 android:layout_marginBottom="12dp" 40 android:id="@+id/product_name" 41 android:layout_width="wrap_content" 42 android:layout_height="wrap_content"/> 43 44 45 <TextView 46 android:textSize="19sp" 47 android:textColor="@android:color/black" 48 android:id="@+id/product_price" 49 android:layout_width="wrap_content" 50 android:layout_height="wrap_content"/> 51 </LinearLayout> 52 53 <ImageButton 54 android:id="@+id/addToCart" 55 android:paddingHorizontal="16dp" 56 android:tint="@android:color/white" 57 android:paddingVertical="4dp" 58 android:src="@drawable/ic_add_shopping" 59 android:layout_gravity="end" 60 android:background="@color/colorAccent" 61 android:layout_width="wrap_content" 62 android:layout_height="wrap_content" 63 card_view:targetApi="o"/> 64 65 </LinearLayout> 66 67 </android.support.v7.widget.CardView>
These are the links to get the drawable icons we used in our layout : ic_add_shopping and ic_shopping_basket. They are to paste in ../app/src/main/res/drawable folder.
Preparing API calls
We’ll make calls to an external API to get our products data.
Create an APIConfig.kt file. This class gives us an instance of Retrofit for our network calls:
1//..app/src/main/java/yourPackage/APIConfig.kt 2 import android.content.Context 3 import okhttp3.OkHttpClient 4 import retrofit2.Retrofit 5 import retrofit2.converter.gson.GsonConverterFactory 6 import com.google.gson.GsonBuilder 7 import retrofit2.converter.scalars.ScalarsConverterFactory 8 9 object APIConfig { 10 11 val BASE_URL = "https://all-spices.com/api/products/" 12 13 private var retrofit: Retrofit? = null 14 15 var gson = GsonBuilder() 16 .setLenient() 17 .create() 18 19 fun getRetrofitClient(context: Context): Retrofit { 20 21 val okHttpClient = OkHttpClient.Builder() 22 .build() 23 24 if (retrofit == null) { 25 retrofit = Retrofit.Builder() 26 .baseUrl(BASE_URL) 27 .client(okHttpClient) 28 .addConverterFactory(ScalarsConverterFactory.create()) 29 .addConverterFactory(GsonConverterFactory.create(gson)) 30 .build() 31 } 32 return retrofit!! 33 } 34 }
Next, create an API Interface file in the src/main/java/yourPackage folder called ApiService.kt. This interface is used to define endpoints to be used during network calls. For this application, we will create just one endpoint:
1import retrofit2.Call 2 import retrofit2.http.* 3 4 interface APIService { 5 @Headers("Content-Type: application/json", "Accept: application/json") 6 @GET("bestRated") 7 fun getProducts( 8 ): Call<List<Product>> 9 10 }
Listing products
For listing products, we’ll need a recycler view (a recycler view is a widget for listing a list of items, as it happens our products list). Now, move on to your src/main/java/res/layout/activity_main.xml file, amend it like the following:
1<?xml version="1.0" encoding="utf-8"?> 2 <android.support.design.widget.CoordinatorLayout 3 xmlns:android="http://schemas.android.com/apk/res/android" 4 xmlns:app="http://schemas.android.com/apk/res-auto" 5 android:layout_height="match_parent" 6 android:background="#fffffa" 7 android:id="@+id/coordinator" 8 android:layout_width="match_parent"> 9 10 11 <android.support.design.widget.AppBarLayout 12 android:background="@android:color/transparent" 13 android:fitsSystemWindows="true" 14 android:layout_width="match_parent" 15 android:layout_height="?attr/actionBarSize"> 16 17 <android.support.v7.widget.Toolbar 18 android:id="@+id/toolbar" 19 app:titleTextColor="@color/colorAccent" 20 app:title="Shopping List" 21 android:background="@android:color/white" 22 android:layout_width="match_parent" 23 android:layout_height="?attr/actionBarSize"> 24 25 </android.support.v7.widget.Toolbar> 26 27 </android.support.design.widget.AppBarLayout> 28 29 30 <android.support.v4.widget.SwipeRefreshLayout 31 android:id="@+id/swipeRefreshLayout" 32 app:layout_behavior="@string/appbar_scrolling_view_behavior" 33 android:layout_width="match_parent" 34 android:layout_height="wrap_content"> 35 36 <android.support.v7.widget.RecyclerView 37 android:id="@+id/products_recyclerview" 38 android:layout_width="match_parent" 39 android:layout_height="match_parent"/> 40 41 </android.support.v4.widget.SwipeRefreshLayout> 42 43 44 <android.support.design.widget.FloatingActionButton 45 android:id="@+id/showBasket" 46 android:src="@drawable/ic_shopping_basket" 47 android:tint="@android:color/white" 48 android:layout_margin="16dp" 49 android:layout_gravity="bottom|end" 50 app:fabSize="normal" 51 android:layout_width="wrap_content" 52 android:layout_height="wrap_content"/> 53 54 </android.support.design.widget.CoordinatorLayout>
The above layout contains a recycler view which itself is wrapped in a SwipeRefreshLayout widget. We also add a button for adding items to our shopping cart, but this will be handled in the second part of the tutorial.
Next, move on to your src/main/MainActvity.kt file, and amend like the following:
1//..app/src/main/java/yourPackage/MainActivity.kt 2 3 import android.content.Intent 4 import android.support.v7.app.AppCompatActivity 5 import android.os.Bundle 6 import android.support.v4.content.ContextCompat 7 import android.support.v7.widget.StaggeredGridLayoutManager 8 import android.util.Log 9 import android.widget.Toast 10 import kotlinx.android.synthetic.main.activity_main.* 11 import retrofit2.Call 12 import retrofit2.Response 13 14 class MainActivity : AppCompatActivity() { 15 16 private lateinit var apiService: APIService 17 private lateinit var productAdapter: ProductAdapter 18 19 private var products = listOf<Product>() 20 21 override fun onCreate(savedInstanceState: Bundle?) { 22 super.onCreate(savedInstanceState) 23 24 setContentView(R.layout.activity_main) 25 26 setSupportActionBar(toolbar) 27 apiService = APIConfig.getRetrofitClient(this).create(APIService::class.java) 28 29 swipeRefreshLayout.setColorSchemeColors(ContextCompat.getColor(this, R.color.colorPrimary)) 30 31 swipeRefreshLayout.isRefreshing = true 32 33 // assign a layout manager to the recycler view 34 products_recyclerview.layoutManager = StaggeredGridLayoutManager(2, StaggeredGridLayoutManager.VERTICAL) 35 36 getProducts() 37 38 } 39 40 41 fun getProducts() { 42 apiService.getProducts().enqueue(object : retrofit2.Callback<List<Product>> { 43 override fun onFailure(call: Call<List<Product>>, t: Throwable) { 44 45 print(t.message) 46 Log.d("Data error", t.message) 47 Toast.makeText(this@MainActivity, t.message, Toast.LENGTH_SHORT).show() 48 49 } 50 51 override fun onResponse(call: Call<List<Product>>, response: Response<List<Product>>) { 52 53 swipeRefreshLayout.isRefreshing = false 54 products = response.body()!! 55 56 productAdapter = ProductAdapter(this@MainActivity, products) 57 58 products_recyclerview.adapter = productAdapter 59 productAdapter.notifyDataSetChanged() 60 61 } 62 63 }) 64 } 65 66 }
We declared an APIService instance, a ProductAdapter instance we’ll initialize later.
Next, we initialized the list to hold the products: private var products = listOf<Product>().
Then, in the onCreate method, we initialized our APIService instance, configured our swipe refresh layout and made it refreshing, and assigned a proper layout to our recycler view.
In the getProducts methods, we made an API call to fetch our products, if everything gets well we first disable the swipe refresh layout, then assign the result to our products list, initialised our product adapter, assigned the adapter to the recycler view, and tell the adapter data its state has changed. Otherwise, we just logged the error for debugging purpose.
Next up is to add the Internet permission in your AndroidManifest.xml file. Update the file with the code snippet below:
1//app/src/main 2 <uses-permission android:name="android.permission.INTERNET"/>
We are done with the first part of this article. Now you can run your app to see if everything is correct.
Conclusion
In this first tutorial of this series, we have demonstrated how to get data/products from an external API, and render it with the help of a recycler view. In the next part, we’ll see how to add products to cart. This is the code for the first of the tutorial series.


© 2026 Pusher Ltd. All rights reserved.
Pusher Limited is a company registered in England and Wales (No. 07489873) whose registered office is at MessageBird UK Limited, 3 More London Riverside, 4th Floor, London, United Kingdom, SE1 2AQ.