- Products

- Developers
- User stories
- Blog
- Pricing

Build a ride sharing iOS app with push notifications
- Introduction
- Prerequisites
- About our applications
- Building the backend application (API)
- Building the Rider application
- Integrating realtime updates using Pusher
- Setting up Google Maps
- Defining secret keys and ride status
- Building the Driver application
- Integrating realtime updates using Pusher
- Setting up Google Maps
- Defining secret keys and ride status
- Adding push notifications to our iOS applications
- Configure APNs
- Creating your Pusher application
- Updating your Rider application to support push notifications
- Updating your Driver application to support Push notifications
- Adding rich actions to our push notifications on iOS
- Creating our notification service extension
- Sending push notifications from our Node.js API
- Conclusion
Introduction
Ride sharing applications like Uber and Lyft let passengers request a ride from drivers in their area. When a passenger requests a ride, the application finds a driver as quickly as possible. If the passenger closes the app while they wait, they need a way to be notified that a car is on its way and again once it’s arrived.
In this article, we will be creating a simple make-believe Ride Sharing application with a focus on how you can integrate Pusher’s Beams API to deliver transactional push notifications.
We will be making two iOS applications to cater to the driver and the rider and a Node.js application to power them both. We will then add push notifications to alert the driver that a new ride request is available, and the passenger that they have a driver on their way, and once they arrive.
Prerequisites
- A Mac with Xcode installed. Download Xcode here.
- Knowledge of using Xcode.
- Knowledge of Swift.
- A Pusher account. Create one here.
- A Google Maps API key. Create one here.
- Basic knowledge of JavaScript/Node.js (Check out this tutorial).
- Cocoapods installed on your machine.
Once you have the requirements, let’s start.
About our applications
Through the course of this tutorial, we will be making three applications:
- The backend application (Web using Node.js). This will be the power house of both iOS applications. It will contain all the endpoints required for the application to function properly. It will also be responsible for sending the push notifications to the respective devices.
- The rider application (iOS using Swift). This will be the application the rider will use to request rides.
- The driver application (iOS using Swift). This will be the application the driver will use to accept requests from riders. The driver will be able to update the status of the ride as the situation warrants.
Here is a screen recording of what we will have when we are done:
💡 We will not be focusing too much on the Ride Sharing functionality but we will be focusing mostly on how you can integrate push notifications to the application.
Building the backend application (API)
The first thing we want to build is the API. We will be adding everything required to support our iOS applications and then add push notifications later on.
To get started, create a project directory for the API. In the directory, create a new file called package.json and in the file paste the following:
1{ 2 "main": "index.js", 3 "scripts": {}, 4 "dependencies": { 5 "body-parser": "^1.18.2", 6 "express": "^4.16.2", 7 "pusher": "^1.5.1", 8 "pusher-push-notifications-node": "^0.10.1" 9 } 10 }
Next run the command below in your terminal:
$ npm install
This will install all the listed dependencies. Next, create an index.js file in the same directory as the package.json file and paste in the following code:
1// -------------------------------------------------------- 2 // Pull in the libraries 3 // -------------------------------------------------------- 4 5 const app = require('express')() 6 const bodyParser = require('body-parser') 7 const config = require('./config.js') 8 const Pusher = require('pusher') 9 const pusher = new Pusher({ 10 appId: 'PUSHER_APP_ID', 11 key: 'PUSHER_APP_KEY', 12 secret: 'PUSHER_APP_SECRET', 13 cluster: 'PUSHER_APP_CLUSTER', 14 encrypted: true 15 }) 16 17 // -------------------------------------------------------- 18 // In-memory database 19 // -------------------------------------------------------- 20 21 let rider = null 22 let driver = null 23 let user_id = null 24 let status = "Neutral" 25 26 // -------------------------------------------------------- 27 // Express Middlewares 28 // -------------------------------------------------------- 29 30 app.use(bodyParser.json()) 31 app.use(bodyParser.urlencoded({extended: false})) 32 33 // -------------------------------------------------------- 34 // Helpers 35 // -------------------------------------------------------- 36 37 function uuidv4() { 38 return 'xxxxxxxx-xxxx-4xxx-yxxx-xxxxxxxxxxxx'.replace(/[xy]/g, function (c) { 39 var r = Math.random() * 16 | 0, v = c == 'x' ? r : (r & 0x3 | 0x8); 40 return v.toString(16); 41 }); 42 } 43 44 // -------------------------------------------------------- 45 // Routes 46 // -------------------------------------------------------- 47 48 // ----- Rider -------------------------------------------- 49 50 app.get('/status', (req, res) => res.json({ status })) 51 52 app.get('/request', (req, res) => res.json(driver)) 53 54 app.post('/request', (req, res) => { 55 user_id = req.body.user_id 56 status = "Searching" 57 rider = { name: "Jane Doe", longitude: -122.088426, latitude: 37.388064 } 58 59 pusher.trigger('cabs', 'status-update', { status, rider }) 60 res.json({ status: true }) 61 62 }) 63 app.delete('/request', (req, res) => { 64 driver = null 65 status = "Neutral" 66 pusher.trigger('cabs', 'status-update', { status }) 67 res.json({ status: true }) 68 }) 69 70 // ----- Driver ------------------------------------------ 71 72 app.get('/pending-rider', (req, res) => res.json(rider)) 73 74 app.post('/status', (req, res) => { 75 status = req.body.status 76 77 if (status == "EndedTrip" || status == "Neutral") { 78 rider = driver = null 79 } else { 80 driver = { name: "John Doe" } 81 } 82 83 pusher.trigger('cabs', 'status-update', { status, driver }) 84 res.json({ status: true }) 85 }) 86 87 // ----- Misc --------------------------------------------- 88 89 app.get('/', (req, res) => res.json({ status: "success" })) 90 91 // -------------------------------------------------------- 92 // Serve application 93 // -------------------------------------------------------- 94 95 app.listen(4000, _ => console.log('App listening on port 4000!'))
💡 You need to replace the
PUSHER_APP_*keys with the real keys from the Pusher dashboard.
In the code above, we first pull in all the dependencies we need for the application to run. Next we set up some variables to hold data as an in-memory data store. We then define a UUID generator function which we will use to generate ID’s for objects. Next we define our applications routes:
POST /requestsaves a new request for a driver.GET /requestgets the driver that is handling the request.DELETE /requestcancels a request for a ride.GET /pending-ordergets the pending requests.POST /statuschanges the status of a ride.
That’s all we need in the API for now and we will revisit it when we need to send push notifications. If you want to test that the API is working, then run the following command on your terminal:
$ node index.js
This will start a new Node server listening on port 4000.
Building the Rider application
The next thing we need to do is build the client application. Launch Xcode and create a new ‘Single Application’ project. We will name our project RiderClient.
Once the project has been created, exit Xcode and create a new file called Podfile in the root of the Xcode project you just created. In the file paste in the following code:
1platform :ios, '11.0' 2 3 target 'RiderClient' do 4 use_frameworks! 5 pod 'GoogleMaps', '~> 2.6.0' 6 pod 'PusherSwift', '~> 5.1.1' 7 pod 'Alamofire', '~> 4.6.0' 8 end
In the file above, we specified the dependencies the project needs to run. Remember to change the target above to the name of your project. Now in your terminal, run the following command to install the dependencies:
$ pod install
After the installation is complete, open the Xcode workspace file that was generated by Cocoapods. This will relaunch Xcode.
When Xcode has been relaunched, open the Main.storyboard file and in there we will create the storyboard for our client application. Below is a screenshot of how we have designed our storyboard:
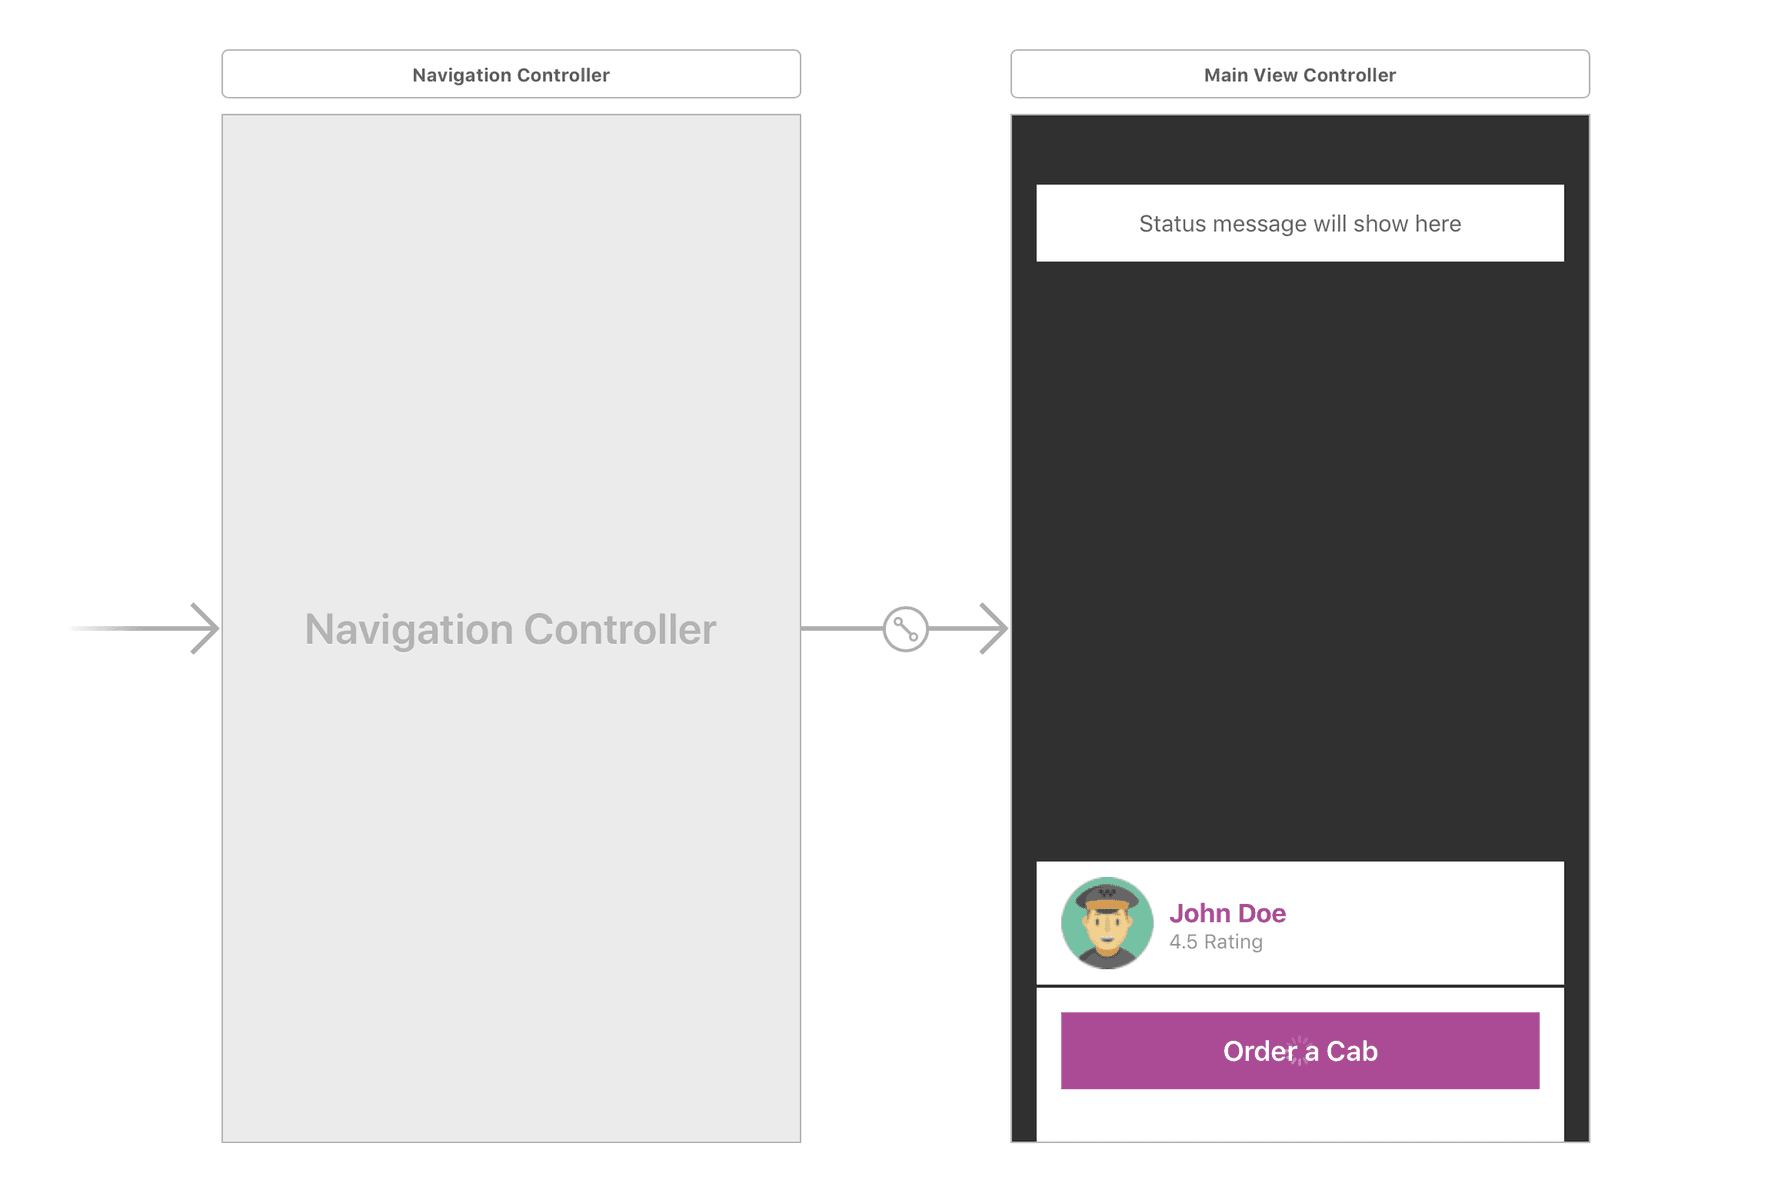
In the main View Controller, we have defined views that will display the status of the ride, the driver details and the CTA button.
💡 CTA is an abbreviation for call to action.
Create a new file in Xcode called MainController.swift, and make it the custom class for the main View Controller above. Next paste in the following code:
1import UIKit
2 import Alamofire
3 import GoogleMaps
4
5 class MainViewController: UIViewController, GMSMapViewDelegate {
6 var latitude = 37.388064
7 var longitude = -122.088426
8 var locationMarker: GMSMarker!
9
10 @IBOutlet weak var mapView: GMSMapView!
11 @IBOutlet weak var loadingIndicator: UIActivityIndicatorView!
12 @IBOutlet weak var loadingOverlay: UIView!
13 @IBOutlet weak var orderButton: UIButton!
14 @IBOutlet weak var orderStatusView: UIView!
15 @IBOutlet weak var orderStatus: UILabel!
16 @IBOutlet weak var cancelButton: UIButton!
17 @IBOutlet weak var driverDetailsView: UIView!
18
19 override func viewDidLoad() {
20 super.viewDidLoad()
21 mapView.camera = GMSCameraPosition.camera(withLatitude:latitude, longitude:longitude, zoom:15.0)
22 mapView.delegate = self
23 locationMarker = GMSMarker(position: CLLocationCoordinate2D(latitude: latitude, longitude: longitude))
24 locationMarker.map = mapView
25 orderStatusView.layer.cornerRadius = 5
26 orderStatusView.layer.shadowOffset = CGSize(width: 0, height: 0)
27 orderStatusView.layer.shadowColor = UIColor.black.cgColor
28 orderStatusView.layer.shadowOpacity = 0.3
29
30 updateView(status: .Neutral, msg: nil)
31 }
32 }
In the code above we have the View Controller class. In the viewDidLoad we set up Google Maps, and call the updateView method. The updateView method is a helper function that simply alters the view displayed depending on the RideStatus. Add the method to the class:
1private func updateView(status: RideStatus, msg: String?) {
2 switch status {
3 case .Neutral:
4 driverDetailsView.isHidden = true
5 loadingOverlay.isHidden = true
6 orderStatus.text = msg != nil ? msg! : "💡 Tap the button below to get a cab."
7 orderButton.setTitleColor(UIColor.white, for: .normal)
8 orderButton.isHidden = false
9 cancelButton.isHidden = true
10 loadingIndicator.stopAnimating()
11
12 case .Searching:
13 loadingOverlay.isHidden = false
14 orderStatus.text = msg != nil ? msg! : "🚕 Looking for a cab close to you..."
15 orderButton.setTitleColor(UIColor.clear, for: .normal)
16 loadingIndicator.startAnimating()
17 case .FoundRide, .Arrival:
18 driverDetailsView.isHidden = false
19 loadingOverlay.isHidden = true
20
21 if status == .FoundRide {
22 orderStatus.text = msg != nil ? msg! : "😎 Found a ride, your ride is on it's way"
23 } else {
24 orderStatus.text = msg != nil ? msg! : "⏰ Your driver is waiting, please meet outside."
25 }
26
27 orderStatus.text = msg != nil ? msg! : "😎 Found a ride, your ride is on it's way"
28 orderButton.isHidden = true
29 cancelButton.isHidden = false
30 loadingIndicator.stopAnimating()
31 case .OnTrip:
32 orderStatus.text = msg != nil ? msg! : "🙂 Your ride is in progress. Enjoy."
33 cancelButton.isEnabled = false
34 case .EndedTrip:
35 orderStatus.text = msg != nil ? msg! : "🌟 Ride complete. Have a nice day!"
36 orderButton.setTitleColor(UIColor.white, for: .normal)
37 driverDetailsView.isHidden = true
38 cancelButton.isEnabled = true
39 orderButton.isHidden = false
40 cancelButton.isHidden = true
41 }
42 }
Next we have the orderButtonPressed method that calls the sendRequest method which sends a request to the API. The next method is the cancelButtonPressed which also calls the sendRequest method.
1@IBAction func orderButtonPressed(_ sender: Any) {
2 updateView(status: .Searching, msg: nil)
3
4 sendRequest(.post) { successful in
5 guard successful else {
6 return self.updateView(status: .Neutral, msg: "😔 No drivers available.")
7 }
8 }
9 }
10
11 @IBAction func cancelButtonPressed(_ sender: Any) {
12 sendRequest(.delete) { successful in
13 guard successful == false else {
14 return self.updateView(status: .Neutral, msg: nil)
15 }
16 }
17 }
18
19 private func sendRequest(_ method: HTTPMethod, handler: @escaping(Bool) -> Void) {
20 let url = AppConstants.API_URL + "/request"
21 let params = ["user_id": AppConstants.USER_ID]
22
23 Alamofire.request(url, method: method, parameters: params)
24 .validate()
25 .responseJSON { response in
26 guard response.result.isSuccess,
27 let data = response.result.value as? [String:Bool],
28 let status = data["status"] else { return handler(false) }
29
30 handler(status)
31 }
32 }
Integrating realtime updates using Pusher
Next, let’s add some Pusher functionality to the View Controller so it can pick up changes to the RideStatus in realtime.
First, you need to import the Pusher swift SDK:
import PusherSwift
Then define the pusher variable at the top of the class:
1let pusher = Pusher(
2 key: AppConstants.PUSHER_API_KEY,
3 options: PusherClientOptions(host: .cluster(AppConstants.PUSHER_API_CLUSTER))
4 )
Next, add the following method to the class:
1private func listenForUpdates() {
2 let channel = pusher.subscribe("cabs")
3
4 let _ = channel.bind(eventName: "status-update") { data in
5 if let data = data as? [String:AnyObject] {
6 if let status = data["status"] as? String,
7 let rideStatus = RideStatus(rawValue: status) {
8 self.updateView(status: rideStatus, msg: nil)
9 }
10 }
11 }
12
13 pusher.connect()
14 }
The method above just subscribes to a Pusher channel and binds to the status-update event on the channel. When the event is triggered, the updateView method is called.
Finally at the bottom of the viewDidLoad method, add a call to the listenForUpdates method:
listenForUpdates()
Now when the backend application triggers a status update event, our rider application will pick it up and change the UI as necessary.
Setting up Google Maps
Next, open your AppDelegate class and import the following:
import GoogleMaps
Next you can replace the application(didFinishLaunchingWithOptions:) method with the following code:
1func application(_ application: UIApplication, didFinishLaunchingWithOptions launchOptions: [UIApplicationLaunchOptionsKey: Any]?) -> Bool {
2 GMSServices.provideAPIKey(AppConstants.GOOGLE_API_KEY)
3 return true
4 }
Defining secret keys and ride status
Create a new file called AppConstants.swift and paste the following code in:
1import Foundation
2
3 class AppConstants {
4 static let GOOGLE_API_KEY = "GOOGLE_MAPS_API_KEY"
5 static let PUSHER_API_KEY = "PUSHER_APP_KEY"
6 static let PUSHER_API_CLUSTER = "PUSHER_APP_CLUSTER"
7 static let API_URL = "http://127.0.0.1:4000"
8 static let USER_ID = UUID().uuidString
9 }
⚠️ You need to replace the placeholders above with the actual values from their respective dashboards.
Next, create a file called RideStatus.swift this will be where we will define all the available ride statuses:
1import Foundation
2
3 enum RideStatus: String {
4 case Neutral = "Neutral"
5 case Searching = "Searching"
6 case FoundRide = "FoundRide"
7 case Arrived = "Arrived"
8 case OnTrip = "OnTrip"
9 case EndedTrip = "EndedTrip"
10 }
That's all for the client application. Let’s move on to creating the Rider application.
One last thing we need to do though is modify the info.plist file. We need to add an entry to the plist file to allow connection to our local server:
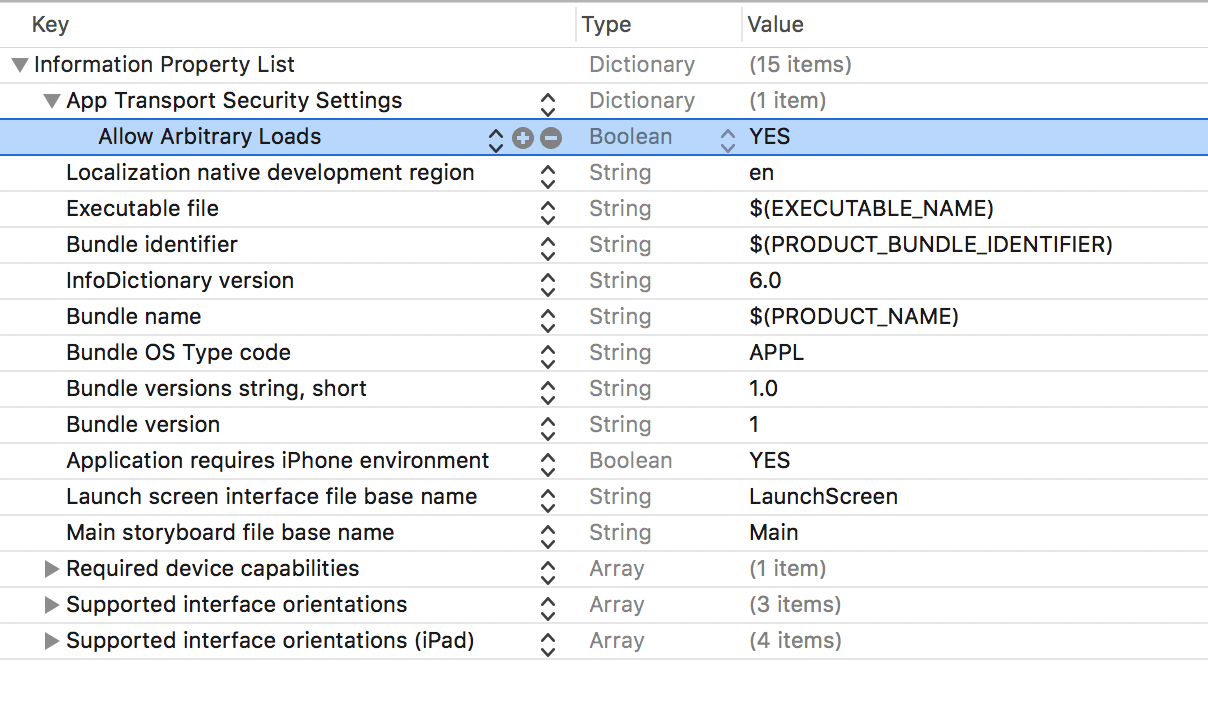
Let’s move on to the rider application.
Building the Driver application
Launch Xcode and create a new ‘Single Application’ project. We will name our project RiderDriver.
Once the project has been created, exit Xcode and create a new file called Podfile in the root of the Xcode project you just created. In the file paste in the following code:
1platform :ios, '11.0' 2 3 target 'RiderDriver' do 4 use_frameworks! 5 pod 'PusherSwift', '~> 5.1.1' 6 pod 'Alamofire', '~> 4.6.0' 7 pod 'GoogleMaps', '~> 2.6.0' 8 pod 'PushNotifications' 9 end
In the file above, we specified the dependencies the project needs to run. Remember to change the target above to the name of your project. Now in your terminal, run the following command to install the dependencies:
$ pod install
After the installation is complete, open the Xcode workspace file that was generated by Cocoapods. This will relaunch Xcode.
When Xcode has been relaunched, open the Main.storyboard file and in there we will create the storyboard for our client application. Below is a screenshot of how we have designed our storyboard:

In the main View Controller, we have defined views that will display the rider information and buttons needed to change the status of the ride. We also have a hidden view that will be displayed when there are no pending requests.
Create a new file in Xcode called MainController.swift, and make it the custom class for the main View Controller above. Next paste in the following code:
1import UIKit
2 import Alamofire
3 import GoogleMaps
4
5 class MainViewController: UIViewController, GMSMapViewDelegate {
6 var status: RideStatus!
7 var locationMarker: GMSMarker!
8
9 @IBOutlet weak var riderName: UILabel!
10 @IBOutlet weak var mapView: GMSMapView!
11 @IBOutlet weak var requestView: UIView!
12 @IBOutlet weak var noRequestsView: UIView!
13 @IBOutlet weak var cancelButton: UIButton!
14 @IBOutlet weak var statusButton: UIButton!
15
16 override func viewDidLoad() {
17 super.viewDidLoad()
18 status = .Neutral
19 requestView.isHidden = true
20 cancelButton.isHidden = true
21 noRequestsView.isHidden = false
22 Timer.scheduledTimer(
23 timeInterval: 2,
24 target: self,
25 selector: #selector(findNewRequests),
26 userInfo: nil,
27 repeats: true
28 )
29 }
30 }
The viewDidLoad sets the initial setting for the UI. Then we register a timer that fires the findNewRequests method every 2 seconds. Let’s define that method. Add the method below to the class:
1@objc private func findNewRequests() {
2 guard status == .Neutral else { return }
3
4 Alamofire.request(AppConstants.API_URL + "/pending-rider")
5 .validate()
6 .responseJSON { response in
7 guard response.result.isSuccess,
8 let data = response.result.value as? [String:AnyObject] else { return }
9
10 self.loadRequestForRider(Rider(data: data))
11 }
12 }
The method will send a request to the backend and if there is a pending request, it loads it to the UI. It however does not fire the request unless the ride status is Neutral.
Next lets define the loadRequestsForRider method that is called when there is a pending ride request:
1private func loadRequestForRider(_ rider: Rider) {
2 mapView.camera = GMSCameraPosition.camera(withLatitude:rider.latitude, longitude:rider.longitude, zoom:15.0)
3 mapView.delegate = self
4
5 locationMarker = GMSMarker(position: CLLocationCoordinate2D(latitude: rider.latitude, longitude: rider.longitude))
6 locationMarker.map = mapView
7
8 status = .Searching
9 cancelButton.isHidden = false
10 statusButton.setTitle("Accept Trip", for: .normal)
11
12 riderName.text = rider.name
13 requestView.isHidden = false
14 noRequestsView.isHidden = true
15 }
The method simply loads Google Maps using the longitude and latitude of the rider making the request. Then it also prepares the UI to display the request.
The next methods to define will be the methods that change the status of the ride and update the UI depending on various events:
1private func sendStatusChange(_ status: RideStatus, handler: @escaping(Bool) -> Void) {
2 let url = AppConstants.API_URL+"/status"
3 let params = ["status": status.rawValue]
4
5 Alamofire.request(url, method: .post, parameters: params).validate()
6 .responseJSON { response in
7 guard response.result.isSuccess,
8 let data = response.result.value as? [String: Bool] else { return handler(false) }
9
10 handler(data["status"]!)
11 }
12 }
13
14 private func getNextStatus(after status: RideStatus) -> RideStatus {
15 switch self.status! {
16 case .Neutral,
17 .Searching: return .FoundRide
18 case .FoundRide: return .Arrived
19 case .Arrived: return .OnTrip
20 case .OnTrip: return .EndedTrip
21 case .EndedTrip: return .Neutral
22 }
23 }
24
25 @IBAction func cancelButtonPressed(_ sender: Any) {
26 if status == .FoundRide || status == .Searching {
27 sendStatusChange(.Neutral) { successful in
28 if successful {
29 self.status = .Neutral
30 self.requestView.isHidden = true
31 self.noRequestsView.isHidden = false
32 }
33 }
34 }
35 }
36
37 @IBAction func statusButtonPressed(_ sender: Any) {
38 let nextStatus = getNextStatus(after: self.status)
39
40 sendStatusChange(nextStatus) { successful in
41 self.status = self.getNextStatus(after: nextStatus)
42
43 switch self.status! {
44 case .Neutral, .Searching:
45 self.cancelButton.isHidden = true
46 case .FoundRide:
47 self.cancelButton.isHidden = false
48 self.statusButton.setTitle("Announce Arrival", for: .normal)
49 case .Arrived:
50 self.cancelButton.isHidden = false
51 self.statusButton.setTitle("Start Trip", for: .normal)
52 case .OnTrip:
53 self.cancelButton.isHidden = true
54 self.statusButton.setTitle("End Trip", for: .normal)
55 case .EndedTrip:
56 self.status = .Neutral
57 self.noRequestsView.isHidden = false
58 self.requestView.isHidden = true
59 self.statusButton.setTitle("Accept Trip", for: .normal)
60 }
61 }
62 }
The sendStatusChange is a helper method that sends requests to the API to change the status of a ride. The getNextStatus is a helper method that returns the next RideStatus in line from the one passed to it.
The cancelButtonPressed is fired when the cancel button is pressed and it requests the ride be canceled. Finally, the statusButtonPressed just sends a request to change the status based on the current status of the ride. It also updates the UI to fit the status it was changed to.
Integrating realtime updates using Pusher
Next, let’s add some Pusher functionality to the View Controller so it can pick up changes to the RideStatus in realtime.
First, you need to import the Pusher swift SDK:
import PusherSwift
Then define the pusher variable at the top of the class:
1let pusher = Pusher(
2 key: AppConstants.PUSHER_API_KEY,
3 options: PusherClientOptions(host: .cluster(AppConstants.PUSHER_API_CLUSTER))
4 )
Next, add the following method to the class:
1private func listenForStatusUpdates() {
2 let channel = pusher.subscribe(channelName: "cabs")
3
4 let _ = channel.bind(eventName: "status-update") { data in
5 if let data = data as? [String: AnyObject] {
6 if let status = data["status"] as? String, let rideStatus = RideStatus(rawValue: status) {
7 if rideStatus == .Neutral {
8 self.status = .Neutral
9 self.cancelButtonPressed(UIButton())
10 }
11 }
12 }
13 }
14
15 pusher.connect()
16 }
The method above just subscribes to a Pusher channel and binds to the status-update event on the channel. When the event is triggered, the cancel button function is called.
Finally at the bottom of the viewDidLoad method, add a call to the listenForStatusUpdates method:
listenForStatusUpdates()
Now when the backend application triggers a status update event, our application will pick it up and change the UI as necessary.
Setting up Google Maps
Next, open your AppDelegate class and import the following:
import GoogleMaps
Next you can replace the application(didFinishLaunchingWithOptions:) method with the following code:
1func application(_ application: UIApplication, didFinishLaunchingWithOptions launchOptions: [UIApplicationLaunchOptionsKey: Any]?) -> Bool {
2 GMSServices.provideAPIKey(AppConstants.GOOGLE_API_KEY)
3 return true
4 }
Defining secret keys and ride status
Create a new file called AppConstants.swift and paste the following code in:
1class AppConstants {
2 static let GOOGLE_API_KEY = "GOOGLE_API_KEY"
3 static let PUSHER_KEY = "PUSHER_API_KEY"
4 static let PUSHER_CLUSTER = "PUSHER_API_CLUSTER"
5 static let API_URL = "http://127.0.0.1:4000"
6 static let PUSH_NOTIF_INSTANCE_ID = "PUSHER_NOTIFICATION_INSTANCE_ID"
7 static let USER_ID = UUID().uuidString
8 }
⚠️ You need to replace the placeholders above with the actual values from their respective dashboards.
Next, create two files called Rider.swift and RideStatus.swift then paste the following code into the files:
1// Rider.swift
2 import Foundation
3
4 struct Rider {
5 let name: String
6 let longitude: Double
7 let latitude: Double
8
9 init(data: [String:AnyObject]) {
10 self.name = data["name"] as! String
11 self.longitude = data["longitude"] as! Double
12 self.latitude = data["latitude"] as! Double
13 }
14 }
1// RideStatus.swift
2 import Foundation
3
4 enum RideStatus: String {
5 case Neutral = "Neutral"
6 case Searching = "Searching"
7 case FoundRide = "FoundRide"
8 case Arrived = "Arrived"
9 case OnTrip = "OnTrip"
10 case EndedTrip = "EndedTrip"
11 }
That's all for the rider application. One last thing we need to do though is modify the info.plist file as we did in the client application.
Now we have created the applications and you can run them to see them in action. However, we have not added push notifications to the application. We need to do this so that the user can know there is an event on the service when the application is minimised.
Let’s set up push notifications.
Adding push notifications to our iOS applications
The first thing we need to do is make our server capable of sending push notifications.
At this point, the application works as expected out of the box. We now need to add push notifications to the application to make it more engaging even when the user is not currently using the application.
⚠️ You need to be enrolled to the Apple Developer program to be able to use the Push Notifications feature. Also Push Notifications do not work on Simulators so you will need an actual iOS device to test.
Pusher’s Beams API has first-class support for native iOS applications. Your iOS app instances subscribe to Interests; then your servers send push notifications to those interests. Every app instance subscribed to that interest will receive the notification, even if the app is not open on the device at the time.
This section describes how you can set up an iOS app to receive transactional push notifications about your food delivery orders through Pusher.
Configure APNs
Pusher relies on Apple Push Notification service (APNs) to deliver push notifications to iOS application users on your behalf. When we deliver push notifications, we use your APNs Key. This page guides you through the process of getting an APNs Key and how to provide it to Pusher.
Head over to the Apple Developer dashboard by clicking here and then create a new Key as seen below:
When you have created the key, download it. Keep it safe as we will need it in the next section.
⚠️ You have to keep the generated key safe as you cannot get it back if you lose it.
Creating your Pusher application
The next thing you need to do is create a new Pusher Push Notification application from the Pusher dashboard.

When you have created the application, you should be presented with a Quickstart wizard that will help you set up the application.
In order to configure Push Notifications you will need to get an APNs key from Apple. This is the same key as the one we downloaded in the previous section. Once you’ve got the key, upload it to the Quickstart wizard.
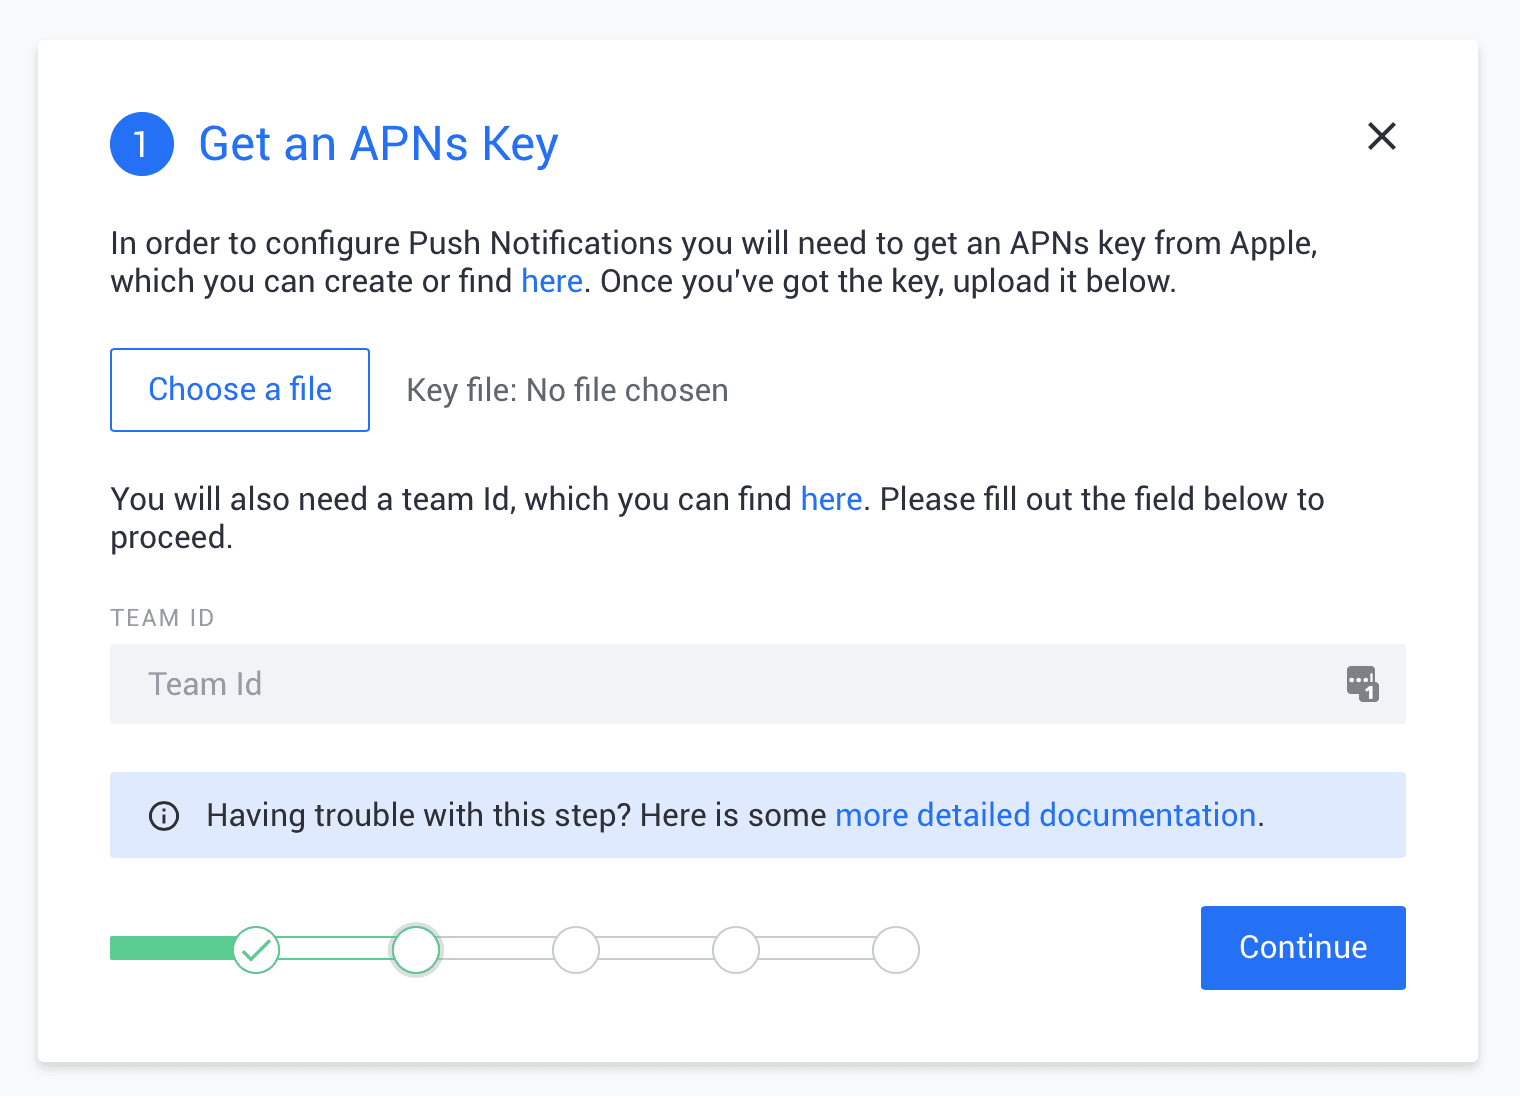
Enter your Apple Team ID. You can get the Team ID from here. Click on the continue to proceed to the next step.
Updating your Rider application to support push notifications
In your client application, if you haven’t already, open the Podfile and add the following pod to the list of dependencies:
pod 'PushNotifications'
Now run the pod install command as you did earlier to pull in the notifications package. Next open the AppDelegate class and import the PushNotifications package:
import PushNotifications
Now, as part of the AppDelegate class, add the following:
1let pushNotifications = PushNotifications.shared
2
3 func application(_ application: UIApplication, didFinishLaunchingWithOptions launchOptions: [UIApplicationLaunchOptionsKey: Any]?) -> Bool {
4 // [...]
5
6 self.pushNotifications.start(instanceId: "PUSHER_NOTIF_INSTANCE_ID")
7 self.pushNotifications.registerForRemoteNotifications()
8
9 // [...]
10
11 return true
12 }
13
14 func application(_ application: UIApplication, didRegisterForRemoteNotificationsWithDeviceToken deviceToken: Data) {
15 // [...]
16
17 self.pushNotifications.registerDeviceToken(deviceToken) {
18 try? self.pushNotifications.subscribe(interest: "rider_\(AppConstants.USER_ID)")
19 }
20
21 // [...]
22 }
💡 Replace
PUSHER_PUSH_NOTIF_INSTANCE_IDwith the key given to you by the Pusher application.
In the code above, we set up push notifications in the application(didFinishLaunchingWithOptions:) method and then we subscribe to the interest in the application(didRegisterForRemoteNotificationsWithDeviceToken:) method.
The dynamic interest demos how you can easily use specific interests for specific devices or users. As long as the server pushes to the correct interest, you can rest assured that devices subscribed to the interest will get the push notification.
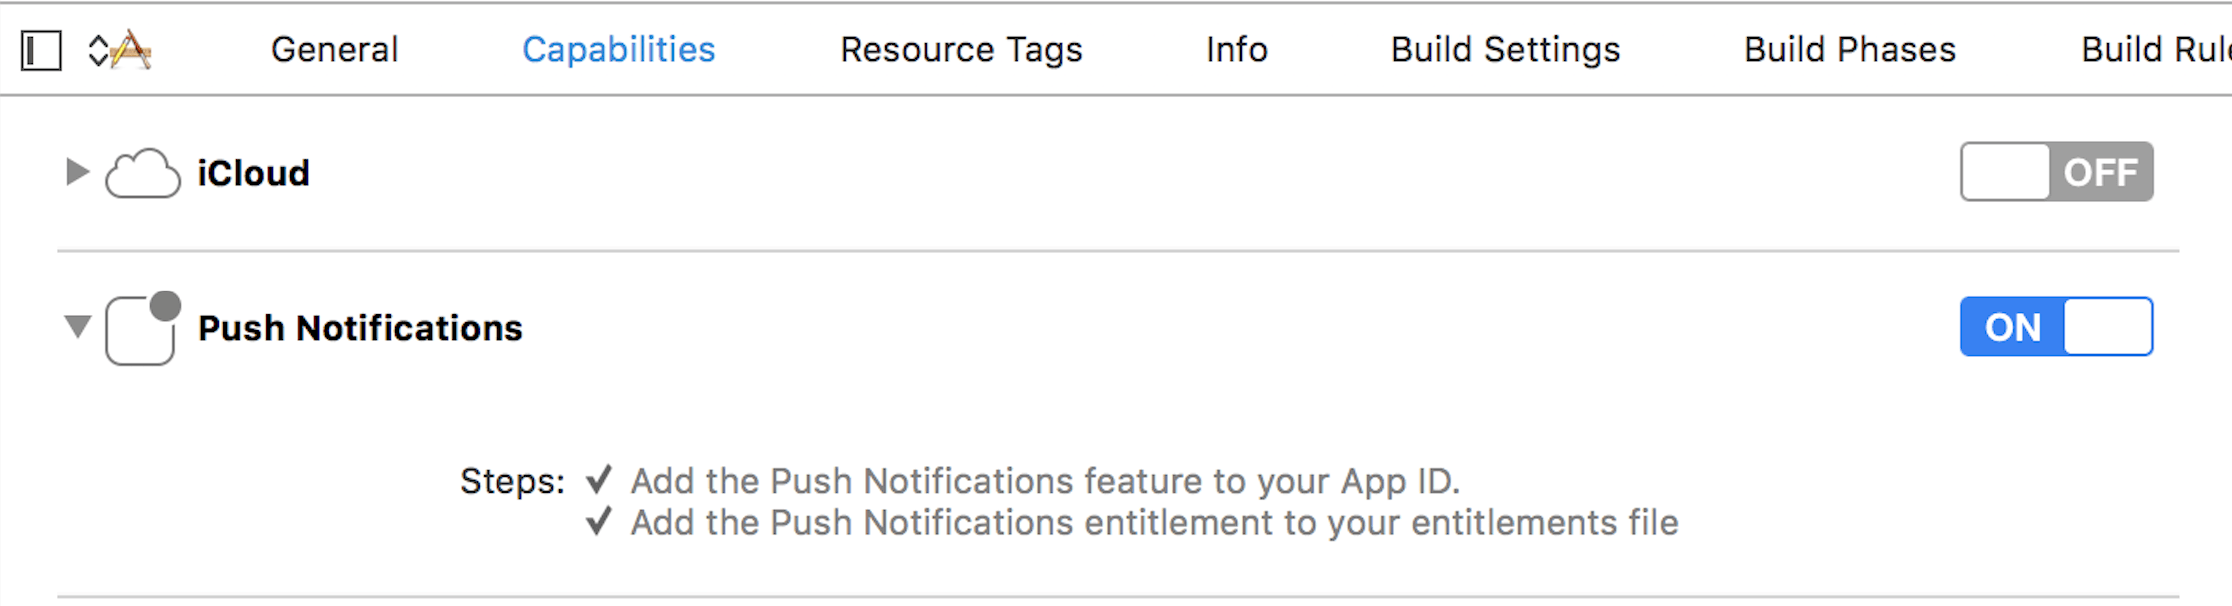
Next, we need to enable push notifications for the application. In the project navigator, select your project, and click on the Capabilities tab. Enable Push Notifications by turning the switch ON.
Updating your Driver application to support Push notifications
Your rider application also needs to be able to receive Push Notifications. The process is similar to the set up above. The only difference will be the interest we will be subscribing to in AppDelegate which will be ride_requests.
Adding rich actions to our push notifications on iOS
As it currently stands, our application will be able to receive push notifications but let’s take it one step further and add rich actions to the application. This will add more engagement to the notification.
First, open the AppDelegate class and import the following classes:
1import PushNotifications 2 import UserNotifications
Next, you need to extend the AppDelegate with the `` class. Then add the following code:
1func application(_ application: UIApplication, didFinishLaunchingWithOptions launchOptions: [UIApplicationLaunchOptionsKey: Any]?) -> Bool {
2 // [...]
3
4 let center = UNUserNotificationCenter.current()
5 center.delegate = self
6
7 let cancelAction = UNNotificationAction(
8 identifier: "cancel",
9 title: "Reject",
10 options: [.foreground]
11 )
12
13 let acceptAction = UNNotificationAction(
14 identifier: "accept",
15 title: "Accept Request",
16 options: [.foreground]
17 )
18
19 let category = UNNotificationCategory(
20 identifier: "DriverActions",
21 actions: [acceptAction, cancelAction],
22 intentIdentifiers: []
23 )
24
25 center.setNotificationCategories([category])
26
27 // [...]
28
29 return true
30 }
In the code above, we are specifying the actions we want our push notifications to display.
In the same AppDelegate class, add the following method which will handle the actions when they are selected on the push notification:
1func userNotificationCenter(_ center: UNUserNotificationCenter, didReceive response: UNNotificationResponse, withCompletionHandler completionHandler: @escaping () -> Void) {
2 let name = Notification.Name("status")
3
4 if response.actionIdentifier == "cancel" {
5 NotificationCenter.default.post(name: name, object: nil, userInfo: ["status": RideStatus.Neutral])
6 }
7
8 if response.actionIdentifier == "accept" {
9 NotificationCenter.default.post(name: name, object: nil, userInfo: ["status": RideStatus.FoundRide])
10 }
11
12 completionHandler()
13 }
In the code, we just send a local notification when the push notification action is tapped. Next, we will add an observer in our view controller that will trigger some code when the notification is received.
Open the MainViewController class and add the following code in the viewDidLoad method:
1NotificationCenter.default.addObserver( 2 self, 3 selector: #selector(changeStatusFromPushNotification), 4 name: Notification.Name("status"), 5 object: nil 6 )
Next, add the changeStatusFromPushNotification method to the class:
1@objc private func changeStatusFromPushNotification(notification: Notification) {
2 guard
3 let data = notification.userInfo as? [String: RideStatus],
4 let status = data["status"] else { return }
5
6 sendStatusChange(status) { successful in
7 guard successful else { return }
8
9 if status == .Neutral {
10 self.status = .FoundRide
11 self.cancelButtonPressed(UIButton())
12 }
13
14 if status == .FoundRide {
15 self.status = .Searching
16 self.statusButtonPressed(UIButton())
17 }
18 }
19 }
This callback just triggers the sendStatusChange method that we have already defined earlier in the tutorial.
Creating our notification service extension
Next, we need to create our Notification Service Extension.
💡 When receiving a notification in an iOS app, you may want to be able to download content in response to it or edit the content before it is shown to the user. In iOS 10, Apple now allows apps to do this through a new Notification Service Extension. - Codetuts
In Xcode, go to File > New > Target… and select Notification Service Extension then give the target a name and click Done.

If you look in the file browser in Xcode, you should see the new target added with two new files: NotificationService.swift and info.plist. We will be modifying these files to make sure it gets and provides the right information for our push notification.
Open the NotificationService class and replace the didReceive method with the following:
1override func didReceive(_ request: UNNotificationRequest, withContentHandler contentHandler: @escaping (UNNotificationContent) -> Void) {
2 self.contentHandler = contentHandler
3 bestAttemptContent = (request.content.mutableCopy() as? UNMutableNotificationContent)
4
5 func failEarly() {
6 contentHandler(request.content)
7 }
8
9 guard
10 let content = (request.content.mutableCopy() as? UNMutableNotificationContent),
11 let apnsData = content.userInfo["data"] as? [String: Any],
12 let mapURL = apnsData["attachment-url"] as? String,
13 let attachmentURL = URL(string: mapURL.addingPercentEncoding(withAllowedCharacters: .urlQueryAllowed)!),
14 let imageData = try? NSData(contentsOf: attachmentURL, options: NSData.ReadingOptions()),
15 let attachment = UNNotificationAttachment.create(imageFileIdentifier: "image.png", data: imageData, options: nil)
16 else {
17 return failEarly()
18 }
19
20 content.attachments = [attachment]
21 contentHandler(content.copy() as! UNNotificationContent)
22 }
In the code above, we try to get the content of the push notification. Since we want to display the map in the notification, we are expecting a static map URL from the custom data of the push notification. We use that and serve it as an attachment which we add the to content of the push. We finally pass the content to the contentHandler.
Next, add the following extension to the same file:
1extension UNNotificationAttachment {
2
3 static func create(imageFileIdentifier: String, data: NSData, options: [NSObject : AnyObject]?) -> UNNotificationAttachment? {
4 let fileManager = FileManager.default
5 let tmpSubFolderName = ProcessInfo.processInfo.globallyUniqueString
6 let tmpSubFolderURL = NSURL(fileURLWithPath: NSTemporaryDirectory()).appendingPathComponent(tmpSubFolderName, isDirectory: true)
7
8 do {
9 try fileManager.createDirectory(at: tmpSubFolderURL!, withIntermediateDirectories: true, attributes: nil)
10 let fileURL = tmpSubFolderURL?.appendingPathComponent(imageFileIdentifier)
11 try data.write(to: fileURL!, options: [])
12 let imageAttachment = try UNNotificationAttachment(identifier: imageFileIdentifier, url: fileURL!, options: options)
13 return imageAttachment
14 } catch let error {
15 print("error \(error)")
16 }
17
18 return nil
19 }
20 }
The create method saves the static map to a temporary location on the device so it does not have to load from a URL.
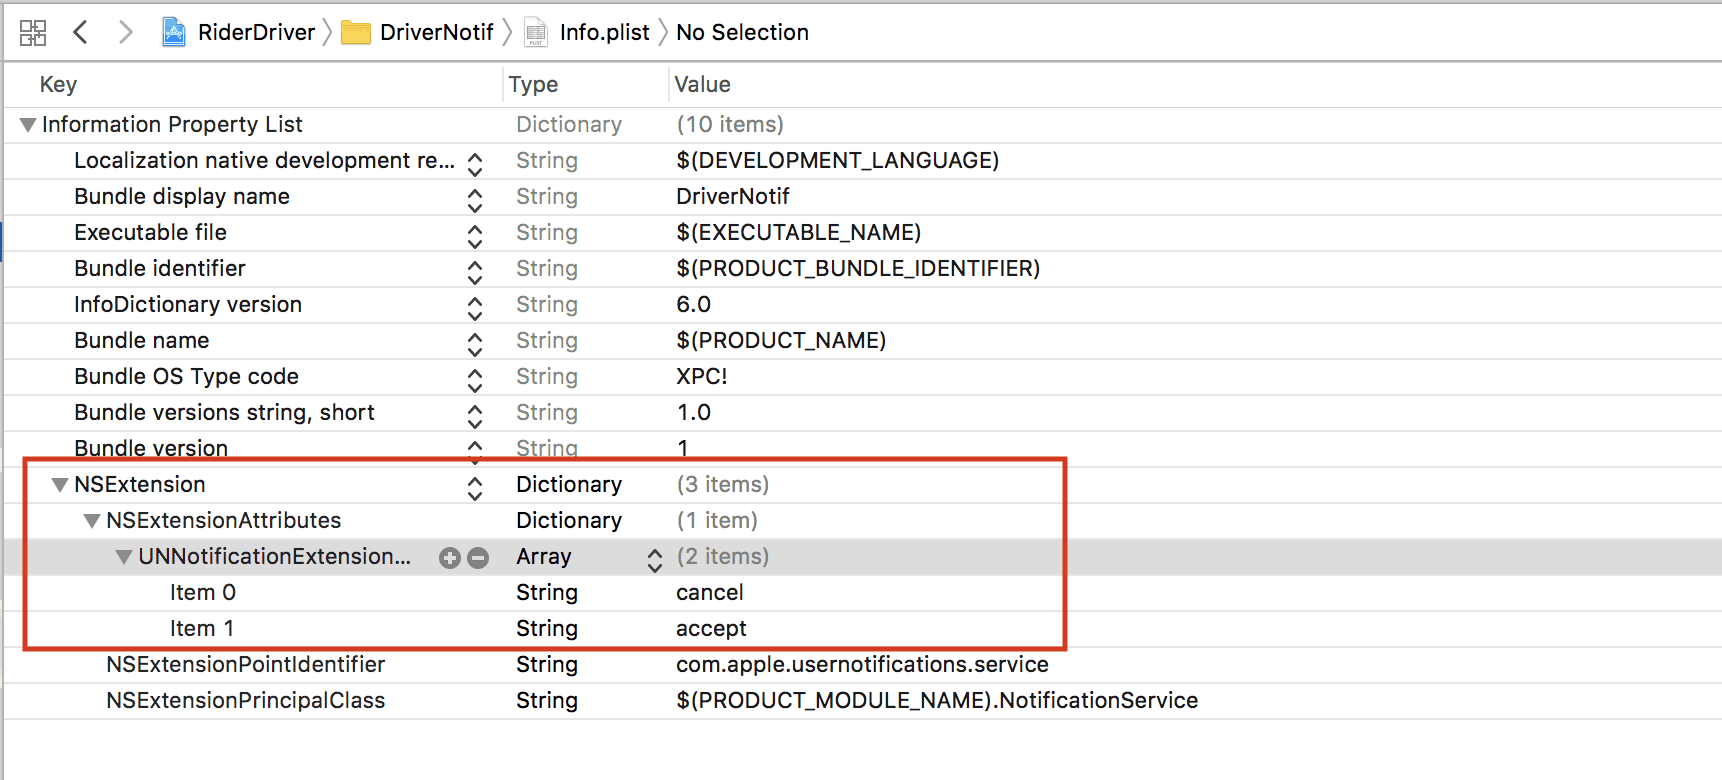
One final change we want to make is in the info.plist file. Here we want to register all the action identifiers for the push notification. Open the info.plist file and add the following as highlighted in the image below;
That’s all we need to do on the application side. Now we need to make sure the API sends the push notifications.
Sending push notifications from our Node.js API
In the Node.js project, open our index.js file and import the push notification package:
1const PushNotifications = require('pusher-push-notifications-node')
2 const pushNotifications = new PushNotifications({
3 instanceId: 'YOUR_INSTANCE_ID_HERE',
4 secretKey: 'YOUR_SECRET_KEY_HERE'
5 })
💡 You should replace the placeholder values with the values from your Pusher dashboard.
Next, add the following helper functions:
1function sendRiderPushNotificationFor(status) {
2 switch (status) {
3 case "Neutral":
4 var alert = {
5 "title": "Driver Cancelled :(",
6 "body": "Sorry your driver had to cancel. Open app to request again.",
7 }
8 break;
9 case "FoundRide":
10 var alert = {
11 "title": "🚕 Found a ride",
12 "body": "The driver is on the way."
13 }
14 break;
15 case "Arrived":
16 var alert = {
17 "title": "🚕 Driver is waiting",
18 "body": "The driver outside, please meet him."
19 }
20 break;
21 case "OnTrip":
22 var alert = {
23 "title": "🚕 You are on your way",
24 "body": "The driver has started the trip. Enjoy your ride."
25 }
26 break;
27 case "EndedTrip":
28 var alert = {
29 "title": "🌟 Ride complete",
30 "body": "Your ride cost $15. Open app to rate the driver."
31 }
32 break;
33 }
34 if (alert != undefined) {
35 pushNotifications.publish(['rider'], {apns: {aps: {alert, sound: "default"}}})
36 .then(resp => console.log('Just published:', resp.publishId))
37 .catch(err => console.log('Error:', err))
38 }
39 }
40
41 function sendDriverPushNotification() {
42 pushNotifications.publish(['ride_requests'], {
43 "apns": {
44 "aps": {
45 "alert": {
46 "title": "🚗 New Ride Request",
47 "body": `New pick up request from ${rider.name}.`,
48 },
49 "category": "DriverActions",
50 "mutable-content": 1,
51 "sound": 'default'
52 },
53 "data": {
54 "attachment-url": "https://maps.google.com/maps/api/staticmap?markers=color:red|37.388064,-122.088426&zoom=13&size=500x300&sensor=true"
55 }
56 }
57 })
58 .then(response => console.log('Just published:', response.publishId))
59 .catch(error => console.log('Error:', error));
60 }
Above we have two functions. The first is sendRiderPushNotificationFor which sends a notification to the rider based on the status of the trip. The second method is the sendDriverPushNotification which just sends a notification to the driver.
In the sendDriverPushNotification we can see the format for the push notification is a little different than the first. This is because we are supporting rich actions so we have to specify the category key and the mutable-content key. The category must match the name we specified in the AppDelegate.
Next, you need to call the functions above in their respective routes. The first function should be added to the POST /status route above the pusher.trigger method call. The second function should be called in the POST /request route above the pusher.trigger method call.
Now, when we run our applications, we should get push notifications on our devices.
⚠️ When working with push notifications on iOS, the server must be served in HTTPS.
That’s all there is to adding push notifications using Pusher. Heres a screen recording of our applications in action:
Conclusion
In this article, we created a basic ride sharing service and used that to demonstrate how to use Pusher to send push notifications with rich actions. Hopefully you learnt how you can use Pusher to simplify the process of sending Push Notifications to your users.
The source code to the repository is available on GitHub.


© 2026 Pusher Ltd. All rights reserved.
Pusher Limited is a company registered in England and Wales (No. 07489873) whose registered office is at MessageBird UK Limited, 3 More London Riverside, 4th Floor, London, United Kingdom, SE1 2AQ.