- Products

- Developers
- User stories
- Blog
- Pricing

Build a realtime table with Angular
Introduction
Introduction
In a traditional web app, the clients (browser) has no idea when the state of the server may have changed. It either polls for changes at a particular interval or waits for the user to initiate the change. With realtime features, information is transmitted (almost) instantaneously between the users and the server. Pusher helps to bring realtime apps to the masses with their simple APIs from the client end down to the server.
In this tutorial, we’ll demonstrate how to integrate Pusher with an Angular application. We will create a realtime table, where we don’t need to refresh our page or component anytime there’s a change to our table’s data, our table should immediately update based on the current state of the data.
Prerequisites
We are going to make use of the following dependencies:
-
Angular 4+: a platform that makes it easy to build applications with the web. Angular combines declarative templates, dependency injection, end to end tooling, and integrated best practices to solve development challenges.
-
Pusher: a hosted service that makes it super-easy to add realtime data and functionality to web and mobile applications. It has different products based on the need of your application.
-
Bootstrap 4: an open source toolkit for developing with HTML and CSS. It includes HTML and CSS based design templates for typography, forms, buttons, tables, navigation, modals, image carousels and many other, as well as optional JavaScript plugins.
-
open-iconic: an open source icon set with 223 marks in SVG, webfont and raster formats
Please ensure you have Node and npm installed before starting the tutorial. No knowledge of Angular is required, but a basic understanding of Javascript (not necessarily Typescript) may be helpful.
Let’s build our realtime application
Bootstrapping with Angular-cli:
1npm install -g @angular/cli 2 ng new realtimeNgTable 3 cd realtimeNgTable
We installed a command line interface to scaffold and build Angular apps globally. It exposes ng in our terminal for us to make use of the commands available. To confirm everything went well, run the below command on your terminal within the newly created app folder /realtimeNgTable.
ng serve
You should see this:
Installing dependencies:
npm install bootstrap open-iconic @theo4u/ng-alert pusher-js
Open .angular-cli.json within our application root folder and update the styles field to look like so:
1"styles": [ 2 "../node_modules/bootstrap/dist/css/bootstrap.css", 3 "../node_modules/open-iconic/font/css/open-iconic-bootstrap.css", 4 "../node_modules/@theo4u/ng-alert/style.css", 5 "styles.css" 6 ]
Open src/styles.css and add the below CSS to it:
1/* You can add global styles to this file, and also import other style files */ 2 .box-shadow { box-shadow: 0 .25rem .75rem rgba(0, 0, 0, .05); } 3 4 /* ngAlert customization */ 5 .app-level-alert { 6 padding-top: 10px; 7 }
We added a utility style for adding shadows to our div and also for making our alert align later on.
Finally, open src/app/app.module.ts to add NgAlertModule to the imports array:
1import { BrowserModule } from '@angular/platform-browser'; 2 import { NgModule } from '@angular/core'; 3 import { NgAlertModule } from '@theo4u/ng-alert'; 4 import { AppComponent } from './app.component'; 5 6 @NgModule({ 7 declarations: [ 8 AppComponent 9 ], 10 imports: [ 11 BrowserModule, 12 NgAlertModule 13 ], 14 providers: [], 15 bootstrap: [AppComponent] 16 }) 17 export class AppModule { }
At this point, we have successfully fixed our app dependencies and styling.
Next, we need to create two services to manage our Pusher instance (we don’t have to always create a new instance of Pusher anytime we want to use it, we can use just one instance of it throughout the entire app) and our employees (interaction with the remote server and vice versa for employee’s data):
1ng g s services/pusher --spec false 2 ng g s services/employee --spec false 3 ng g i interfaces/iemployee
We used another command of Angular CLI, which in full is ng generate service path/name. This creates a folder if not existing called services/ and place our service files there. We also used --spec false to let the Angular CLI know we don’t need to generate test file for the service file. The last comand generates an employee interface to help give an idea of what an employee object should have.
Open src/app/services/pusher.service.ts and update it to look like the one below:
1import { Injectable } from '@angular/core'; 2 import * as Pusher from 'pusher-js'; 3 4 // this is here to discourage the instantianting of pusher any where its 5 // needed, better to reference it from one place 6 @Injectable() 7 export class PusherService { 8 private _pusher: any; 9 10 constructor() { 11 this._pusher = new Pusher(API_KEY, { 12 cluster: CLUSTER, 13 encrypted: true 14 }); 15 } 16 // any time it is needed we simply call this method 17 getPusher() { 18 return this._pusher; 19 } 20 21 }
We insert the free API_KEY and CLUSTER we get after signing up and creating a channel app with Pusher.
After creating an app from Pusher’s dashboard, navigate to
App Keystab to see your app credentials
To ensure that connection traffic is encrypted, we set encrypted to the Boolean true in our app. Read more about client configuration here.
Open src/app/interfaces/iemployee.ts and update it to look like so:
1export interface IEmployee { 2 id?: number; 3 name: string; 4 position: string; 5 salary: string; 6 createdAt?: string; 7 }
Let’s now move over to our src/app/services/employee.service.ts. This file will manage everything relating to employee and our server:
1// src/app/services/employee.service.ts 2 import { Injectable } from '@angular/core'; 3 import { Observable } from 'rxjs/Observable'; 4 import { HttpClient } from '@angular/common/http'; 5 import { IEmployee } from '../interfaces/iemployee'; 6 import 'rxjs/add/operator/map'; 7 import 'rxjs/add/operator/mapTo'; 8 import { PusherService } from './pusher.service'; 9 10 @Injectable() 11 export class EmployeeService { 12 private _endPoint = 'http://localhost:2000/employee' 13 private _channel: any; 14 15 constructor(private _http: HttpClient, private _pusherService: PusherService) { 16 this._channel = this._pusherService.getPusher().subscribe('employee'); 17 } 18 19 /** 20 * @return employee's channel for the different event available under employee 21 */ 22 getChannel () { 23 return this._channel; 24 } 25 26 list (): Observable<IEmployee[]> { 27 return this._http.get(this._endPoint) 28 .map(res => <IEmployee[]> res); 29 } 30 31 /** 32 * Create new employee 33 * @param param 34 * @return Observable<IEmployee> with the id 35 */ 36 create(param: IEmployee): Observable<IEmployee> { 37 return this._http.post(this._endPoint, param) 38 .map(res => <IEmployee> res); 39 } 40 41 /** 42 * Remove an employee 43 * @param employee to remove 44 * @return Observable<IEmployee> the employee just removed 45 */ 46 delete(employee: IEmployee): Observable<IEmployee> { 47 return this._http.delete(`${this._endPoint}/${employee.id}`) 48 .mapTo(employee); 49 } 50 51 }
Observe that we attached this service to the employee’s channel, which means anything that has to do with an employee and Pusher is within our employee’s service file.
Let’s make our services available to be used by others from our app.module.ts by providing them also adding HTTPClientModule since it was used within employee.service.ts for http requests:
1// src/app/app.module.ts 2 import { EmployeeService } from './services/employee.service'; 3 import { PusherService } from './services/pusher.service'; 4 import { HttpClientModule } from '@angular/common/http'; 5 ... 6 imports: [ 7 ..., 8 HttpClientModule 9 ], 10 providers:[EmployeeService, PusherService]
Angular components to manage employees
We’ll now create two more components to list employees and create employees:
1ng g c listEmployee -is --spec false 2 ng g c createEmployee -is --spec false
Using the Angular CLI, we generated a component with no test attached as explained earlier. It will create a folder for each containing a .ts and a .html. The -is command means don’t create a .css file instead use inline styling within our .ts. Since, we are not going to do alot or no styling within each component.
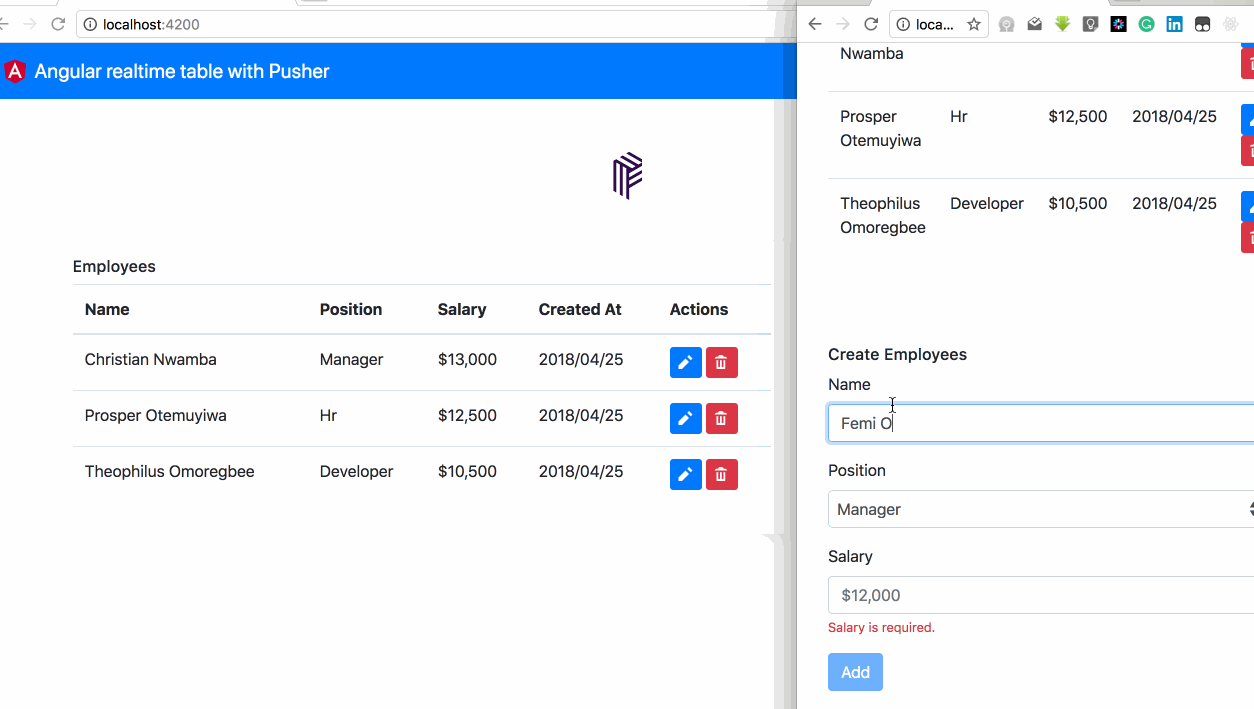
Let’s start with the list employee component, it should look like our gif above.
Open list-employee.component.html and update it to look like so:
1<!-- src/app/list-employee/list-employee.component.html --> 2 3 <h6 class="pb-2 mb-0">Employees</h6> 4 <table class="table"> 5 <thead> 6 <tr> 7 <th scope="col">Name</th> 8 <th scope="col">Position</th> 9 <th scope="col">Salary</th> 10 <th scope="col">Created At</th> 11 <th scope="col">Actions</th> 12 </tr> 13 </thead> 14 <tbody> 15 <tr *ngFor="let employee of employees"> 16 <td> 17 <span *ngIf="employee.new" class="badge badge-primary">new</span> 18 {{employee.name}} 19 </td> 20 <td>{{employee.position}}</td> 21 <td>{{employee.salary}}</td> 22 <td>{{employee.createdAt | date:'yyyy/MM/dd'}}</td> 23 <td> 24 <button (click)="delete(employee)" class="btn btn-danger btn-sm"> 25 <span class="oi oi-trash"></span> 26 </button> 27 </td> 28 </tr> 29 <tr *ngIf="loading"> 30 <td colspan="5" align="center">Fetching Employees</td> 31 </tr> 32 </tbody> 33 </table>
Next open list-employee.component.ts and update it with the code below:
1// src/app/list-employee/list-employee.component.ts 2 3 import { Component, OnInit } from '@angular/core'; 4 import { EmployeeService } from '../services/employee.service'; 5 import { IEmployee } from '../interfaces/iemployee'; 6 import { NgAlertService, MessageType } from '@theo4u/ng-alert'; 7 8 @Component({ 9 selector: 'app-list-employee', 10 templateUrl: './list-employee.component.html', 11 styles: [] 12 }) 13 export class ListEmployeeComponent implements OnInit { 14 employees: IEmployee[] = []; 15 loading = true; 16 17 constructor(private _employeeService: EmployeeService, private _ngAlert: NgAlertService) { } 18 19 ngOnInit() { 20 this.loading = true; 21 this._employeeService.list() 22 .subscribe(employees => { 23 this.loading = false; 24 this.employees = employees; 25 }); 26 } 27 28 delete(employee: IEmployee) { 29 // show delete confirmation with ngAlert 30 this._ngAlert.push({ 31 message: `<strong>Are you sure!</strong> you want to delele this employee with name <strong>${employee.name}</strong>`, 32 type: MessageType.warning, 33 buttons: [ 34 { 35 label: 'Continue', 36 action: () => { 37 this._actualDelete(employee); 38 }, 39 css: 'btn btn-danger' 40 } 41 ] 42 }); 43 } 44 45 private _actualDelete (employee: IEmployee) { 46 this._employeeService.delete(employee) 47 .subscribe(() => { 48 // remove the employee if removed successfully 49 this.employees = this.employees.filter(item => item !== employee); 50 this._ngAlert.push({ 51 message: `${employee.name} removed`, 52 type: MessageType.success 53 }); 54 }); 55 } 56 57 }
Here, we are simply performing a normal loading and deleting of employees from our remote server via EmployeeService.
Let’s go into our create-employee.component.html. Here, we’ll make use of Angular’s reactive form:
1<!-- src/app/create-employee/create-employee.component.html --> 2 3 <h6 class="pb-2 mb-0">Create Employees</h6> 4 5 <form [formGroup]="employeeForm" (ngSubmit)="onSubmit()" novalidate> 6 <div class="form-group"> 7 <label for="name">Name</label> 8 <input formControlName="name" type="text" class="form-control" id="name" placeholder="Christian Nwamba"> 9 <small *ngIf="employeeForm.get('name').hasError('required')" class="form-text text-danger">Name is required.</small> 10 </div> 11 <div class="form-group"> 12 <label for="position">Position</label> 13 <select formControlName="position" class="form-control" id="position"> 14 <option>Manager</option> 15 <option>Hr</option> 16 <option>Developer</option> 17 </select> 18 </div> 19 <div class="form-group"> 20 <label for="salary">Salary</label> 21 <input formControlName="salary" type="text" class="form-control" id="salary" placeholder="$12,000"> 22 <small *ngIf="employeeForm.get('salary').hasError('required')" class="form-text text-danger">Salary is required.</small> 23 </div> 24 <button type="submit" [disabled]="loader || employeeForm.invalid" class="btn btn-primary">{{loader?'Adding':'Add'}}</button> 25 </form>
Open create-employee.component.ts to manage our HTML template above. We are making use of the .create method in our employee’s service with reactive forms to validate entries easily under the _createForm method.
1// src/app/create-employee/create-employee.component.ts 2 3 import { Component, OnInit } from '@angular/core'; 4 import { FormGroup, FormBuilder, Validators } from '@angular/forms'; 5 import { EmployeeService } from '../services/employee.service'; 6 import { IEmployee } from '../interfaces/iemployee'; 7 8 @Component({ 9 selector: 'app-create-employee', 10 templateUrl: './create-employee.component.html', 11 styles: [] 12 }) 13 export class CreateEmployeeComponent implements OnInit { 14 employeeForm: FormGroup; 15 loader: boolean; 16 17 constructor(private _fb: FormBuilder, private _employeeService: EmployeeService) { } 18 19 ngOnInit() { 20 this._createForm(); 21 } 22 23 /** 24 * create our reactive form here 25 */ 26 private _createForm() { 27 this.employeeForm = this._fb.group({ 28 name: ['', Validators.required], 29 position: ['Manager', Validators.required], 30 salary: ['', Validators.required] 31 }); 32 } 33 34 /** 35 * submit new employee to server 36 */ 37 onSubmit() { 38 const param = this.employeeForm.value; 39 this._employeeService.create(param) 40 .subscribe((employee: IEmployee) => { 41 this.loader = false; 42 this.employeeForm.reset({position: 'Manager'}); 43 }, 44 (error) => { 45 console.error(error); 46 this.loader = false; 47 }); 48 } 49 50 }
Making use of our components
Let’s call our component so we can test easily with our browser, open up app.component.ts and update it to look like so:
1// src/app/app.component.ts 2 3 import { Component, OnInit, OnDestroy } from '@angular/core'; 4 import { IMessage, MessageType, CloseType, NgAlertService } from '@theo4u/ng-alert'; 5 import { Subscription } from 'rxjs/Subscription'; 6 7 @Component({ 8 selector: 'app-root', 9 templateUrl: './app.component.html', 10 styleUrls: ['./app.component.css'] 11 }) 12 export class AppComponent implements OnInit, OnDestroy { 13 message: IMessage; 14 closeTypes = CloseType; 15 private _alertSub: Subscription; 16 17 constructor(private _ngAlert: NgAlertService) { 18 } 19 20 ngOnInit () { 21 this._alertSub = this._ngAlert.getSource().subscribe(message => { 22 this.message = message; 23 }); 24 } 25 26 ngOnDestroy () { 27 this._alertSub.unsubscribe(); 28 } 29 30 }
Most of what is going on here is about managing our app level alerts. Anytime an alert is triggered from any component, we can easily get it here and we can also unsubscribe from it once we are done with the component. Check the delete method in list-employee.component.ts to see where we push a confirmation message before deleting any employee.
Open app.components.html and let’s call our components side by side:
1<div class="container"> 2 <!-- Alert here --> 3 <div class="app-level-alert"> 4 <ng-alert [(message)]="message" [dismissable]="true" [closeType]="closeTypes.TIMES"></ng-alert> 5 </div> 6 <!-- /Alert here --> 7 8 <div class="row"> 9 <div class="col-md-8"> 10 <div class="my-3 p-3 bg-white rounded box-shadow"> 11 <app-list-employee></app-list-employee> 12 </div> 13 </div> 14 <div class="col-md-4"> 15 <div class="my-3 p-3 bg-white rounded box-shadow"> 16 <app-create-employee></app-create-employee> 17 </div> 18 </div> 19 </div> 20 21 </div>
Our final app.module.ts should now be like this:
1// src/app/app.module.ts 2 3 import { BrowserModule } from '@angular/platform-browser'; 4 import { NgModule } from '@angular/core'; 5 import { NgAlertModule } from '@theo4u/ng-alert'; 6 import { AppComponent } from './app.component'; 7 import { CreateEmployeeComponent } from './create-employee/create-employee.component'; 8 import { ListEmployeeComponent } from './list-employee/list-employee.component'; 9 import { EmployeeService } from './services/employee.service'; 10 import { ReactiveFormsModule } from '@angular/forms'; 11 import { HttpClientModule } from '@angular/common/http'; 12 import { PusherService } from './services/pusher.service'; 13 14 @NgModule({ 15 declarations: [ 16 AppComponent, 17 CreateEmployeeComponent, 18 ListEmployeeComponent 19 ], 20 imports: [ 21 BrowserModule, 22 ReactiveFormsModule, 23 NgAlertModule, 24 HttpClientModule 25 ], 26 providers: [EmployeeService, PusherService], 27 bootstrap: [AppComponent] 28 }) 29 export class AppModule { }
Our app behaviour should now look like this:
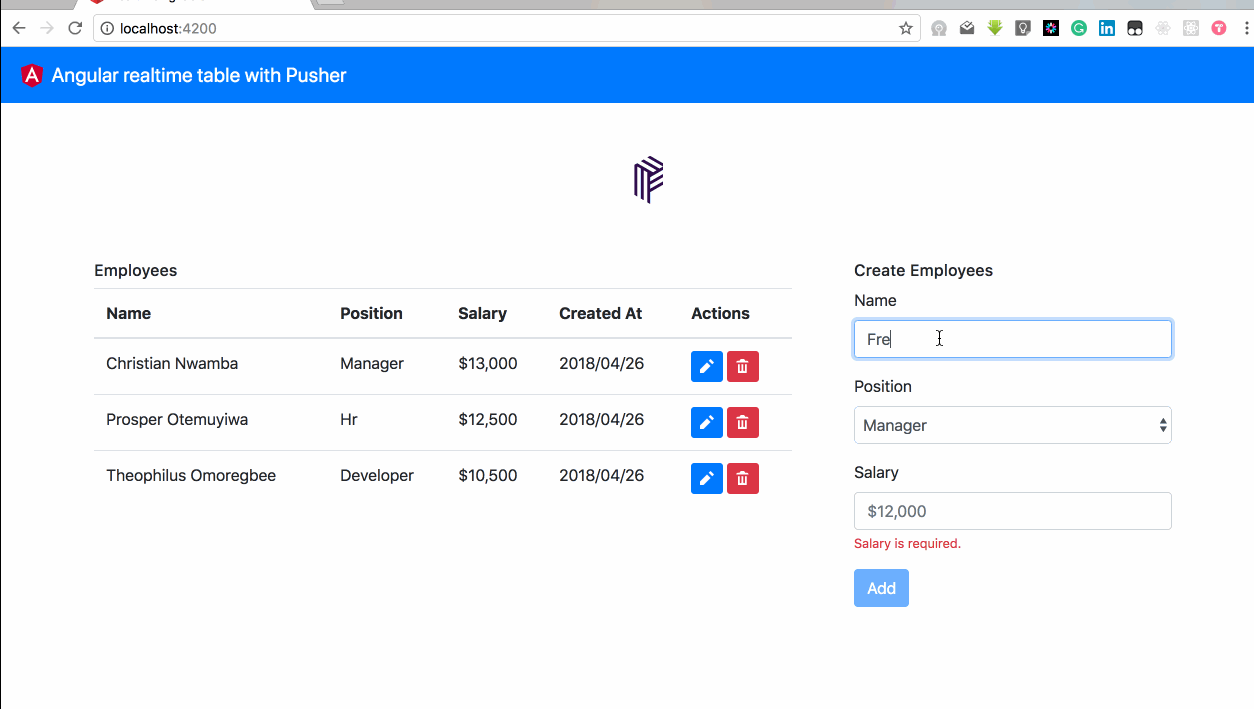
We have to always refresh our page to get newly added employees or deleted employees, next section will handle this.
Integrating Pusher for realtime table updates
Pusher is a hosted service that makes it super-easy to add realtime data and functionality to web and mobile applications. Pusher sits as a realtime layer between your servers and your clients. Pusher also maintains persistent connections to the clients over WebSocket if possible and falling back to HTTP-based connectivity so that as soon as your servers have new data that they want to push to the clients they can do, instantly via Pusher.
We’ll use Pusher’s event based API know as Pusher Channels. All we need to do is to subscribe to a particular channel like employee ( employee.service.ts getChannel() method) and watch for any event type (new, deleted) emitted and know how to handle the data coming along with the event.
Open list-employee.component.ts to spice it up with Pusher. We are watching for new and deleted employees, add the following to ngOnInit method:
1// subscribe to pusher's event 2 this._employeeService.getChannel().bind('new', data => { 3 data.new = true; 4 this.employees.push(data); 5 }); 6 7 this._employeeService.getChannel().bind('deleted', data => { 8 this.employees = this.employees.filter(emp => emp.id !== data.id); 9 });
Anytime a new/deleted record is received we get the data as well and then manipulate our array of employees. When a record is added we need to let the user know that this record just came in using data.new=true , which was used in our list-employee.component.html to show a new label.
Now, try deleting or adding a record from another browser window, the current one should be updated.
Integrating Pusher to our Node server
Our server is simply going to simulate an actual DB and routes to create, delete and get employees from a mock array object as our DB. Also, obeying the twelve-factor approach to handling configurations for our server. Open your terminal within our application folder /realtimeNgTable and run the following commands:
1npm install express body-parser cors pusher dotenv shortid 2 touch server.js 3 touch mocks.js 4 touch .env
Mock is simply going to export our initial list of employees, like so:
1// src/mocks.js 2 module.exports = [ 3 { 4 id: 'S1234X', 5 name: 'Christian Nwamba', 6 position: 'Manager', 7 salary: '$13,000', 8 createdAt: new Date().toISOString() 9 }, 10 { 11 id: 'S1234Y', 12 name: 'Prosper Otemuyiwa', 13 position: 'Hr', 14 salary: '$12,500', 15 createdAt: new Date().toISOString() 16 }, 17 { 18 id: 'S1234Z', 19 name: 'Theophilus Omoregbee', 20 position: 'Developer', 21 salary: '$10,500', 22 createdAt: new Date().toISOString() 23 } 24 ]
Let’s setup our server in server.js:
1//server.js 2 const express = require('express') 3 const bodyParser = require('body-parser') 4 const Pusher = require('pusher') 5 const cors = require('cors') 6 const dotenv = require('dotenv').config() 7 const shortId = require('shortid') 8 let mocks = require('./mocks') 9 10 const app = express() 11 app.use(cors()) 12 app.use(bodyParser.urlencoded({ extended: false })) 13 app.use(bodyParser.json()) 14 15 const pusher = new Pusher({ 16 appId: process.env.PUSHER_APPID, 17 key: process.env.PUSHER_KEY, 18 secret: process.env.PUSHER_SECRET, 19 cluster: process.env.PUSHER_CLUSTER, 20 encrypted: true 21 }) 22 23 app.post('/employee', (req, res) => { 24 // simulate actual db save with id (using shortId) and createdAt added 25 const employee = { 26 id: shortId.generate(), 27 createdAt: new Date().toISOString(), 28 ...req.body 29 } 30 mocks.push(employee) // like our db 31 // trigger this update to our pushers listeners 32 pusher.trigger('employee', 'new', employee) 33 res.send(employee) 34 }) 35 36 app.delete('/employee/:id', (req, res) => { 37 const employee = mocks.find(emp => emp.id === req.params.id) 38 mocks = mocks.filter(emp => emp.id !== employee.id) 39 pusher.trigger('employee', 'deleted', employee) 40 res.send(employee) 41 }) 42 43 app.get('/employee', (req, res) => { 44 res.send(mocks) 45 }) 46 47 app.listen(2000, () => console.log('Listening at 2000'))
We instantiated Pusher with environment parameters, as said earlier on we are sticking with the twelve-factor approach, where we use .env file to pass environment variables to our server.js.
Let’s populate our .env file with our Pusher credentials
1PUSHER_APPID=YOUR_APP_ID 2 PUSHER_KEY=YOUR_APP_KEY 3 PUSHER_SECRET=YOUR_APP_SECRET 4 PUSHER_CLUSTER=YOUR_APP_CLUSTER
Finally, running the below command in our terminal should start the node server
node server.js
Any time a new record is created we trigger the event to everyone who subscribed to the channel with the event type and additional data to pass across.
Conclusion
With this sample realtime Angular table, we can definitely build more with Pusher’s channel event-based APIs to handle any form of realtime update needed in our Angular application. You can extend this sample application to handle edit by triggering another type of event and the data as {id, data}. With the id of the record that got updated from the server and the data as the changes. Source code for both the frontend and the backend node server is located on Github.


© 2026 Pusher Ltd. All rights reserved.
Pusher Limited is a company registered in England and Wales (No. 07489873) whose registered office is at MessageBird UK Limited, 3 More London Riverside, 4th Floor, London, United Kingdom, SE1 2AQ.