- Products

- Developers
- User stories
- Blog
- Pricing

Create a realtime results feed with React and Node.js
- Introduction
- Prerequisites
- Objective
- Housekeeping
- Using the global state concept
- Getting started with the frontend
- Creating a Channels app
- Creating a Beams app
- Creating a Service Worker
- Building the realtime poll results app
- Frontend
- The States Component
- The State Component
- The Modal Component
- Server
- Running the App
Introduction
In November 2020 The Washington Post broke Pusher records as they delivered realtime results coverage of one of their largest news events to date using a WebSocket implementation with Pusher Channels. Channels offers substantial scope for building dynamic realtime features into your apps.
In this tutorial we’ll show you how you can deliver engaging live data updates to your own users by building a dynamic realtime results app using Channels (and add some bonus features using Beams, our comprehensive push notifications API). We’ll use some sample data to build an app which reports live votes.
Prerequisites
For this tutorial, you need a basic knowledge of React and Node.js. We will also use the following:
- React hooks and functional components for the frontend
- A Node js environment for the backend with the following packages:
- Express.js
- pusher-js
- CORS
- @pusher/push-notifications-server
- Create a free sandbox Pusher account or sign in.
Objective
At the end of this tutorial, our demo app will stream live votes being fed from the server in real time. You’ll also be able to subscribe to receive web notifications in your browser via Beams, to inform you of major events, like the result of a particular poll.

Housekeeping
First things first, there are some basic things we need to put in place or take note before moving on to creating our live poll app.
Using the global state concept
Since we are building a relatively small web app for this tutorial, we won’t use a state management module like redux or mobx for the app. Instead, we’ll use the global state concept where we will cascade all relevant states at the top level component; in this case, App.js. Afterwards we’ll change and pass them to other child components. There is also no routing module like redux used in this tutorial.
Getting started with the frontend
Let’s get started with the front end and bootstrap with "create react app".
In the terminal, run:
create-react-app polling_app
Wait for all the dependencies to be installed. Afterwards, we’ll use the pusher-js module to connect and receive data from the server in real time. That is, we will install pusher-js and and @pusher/push-notifications-web to handle the web notifications.
To do this, navigate to the polling_app directory in your terminal and run:
npm install pusher-js @pusher/push-notifications-web
Now, let’s create a Channels app.
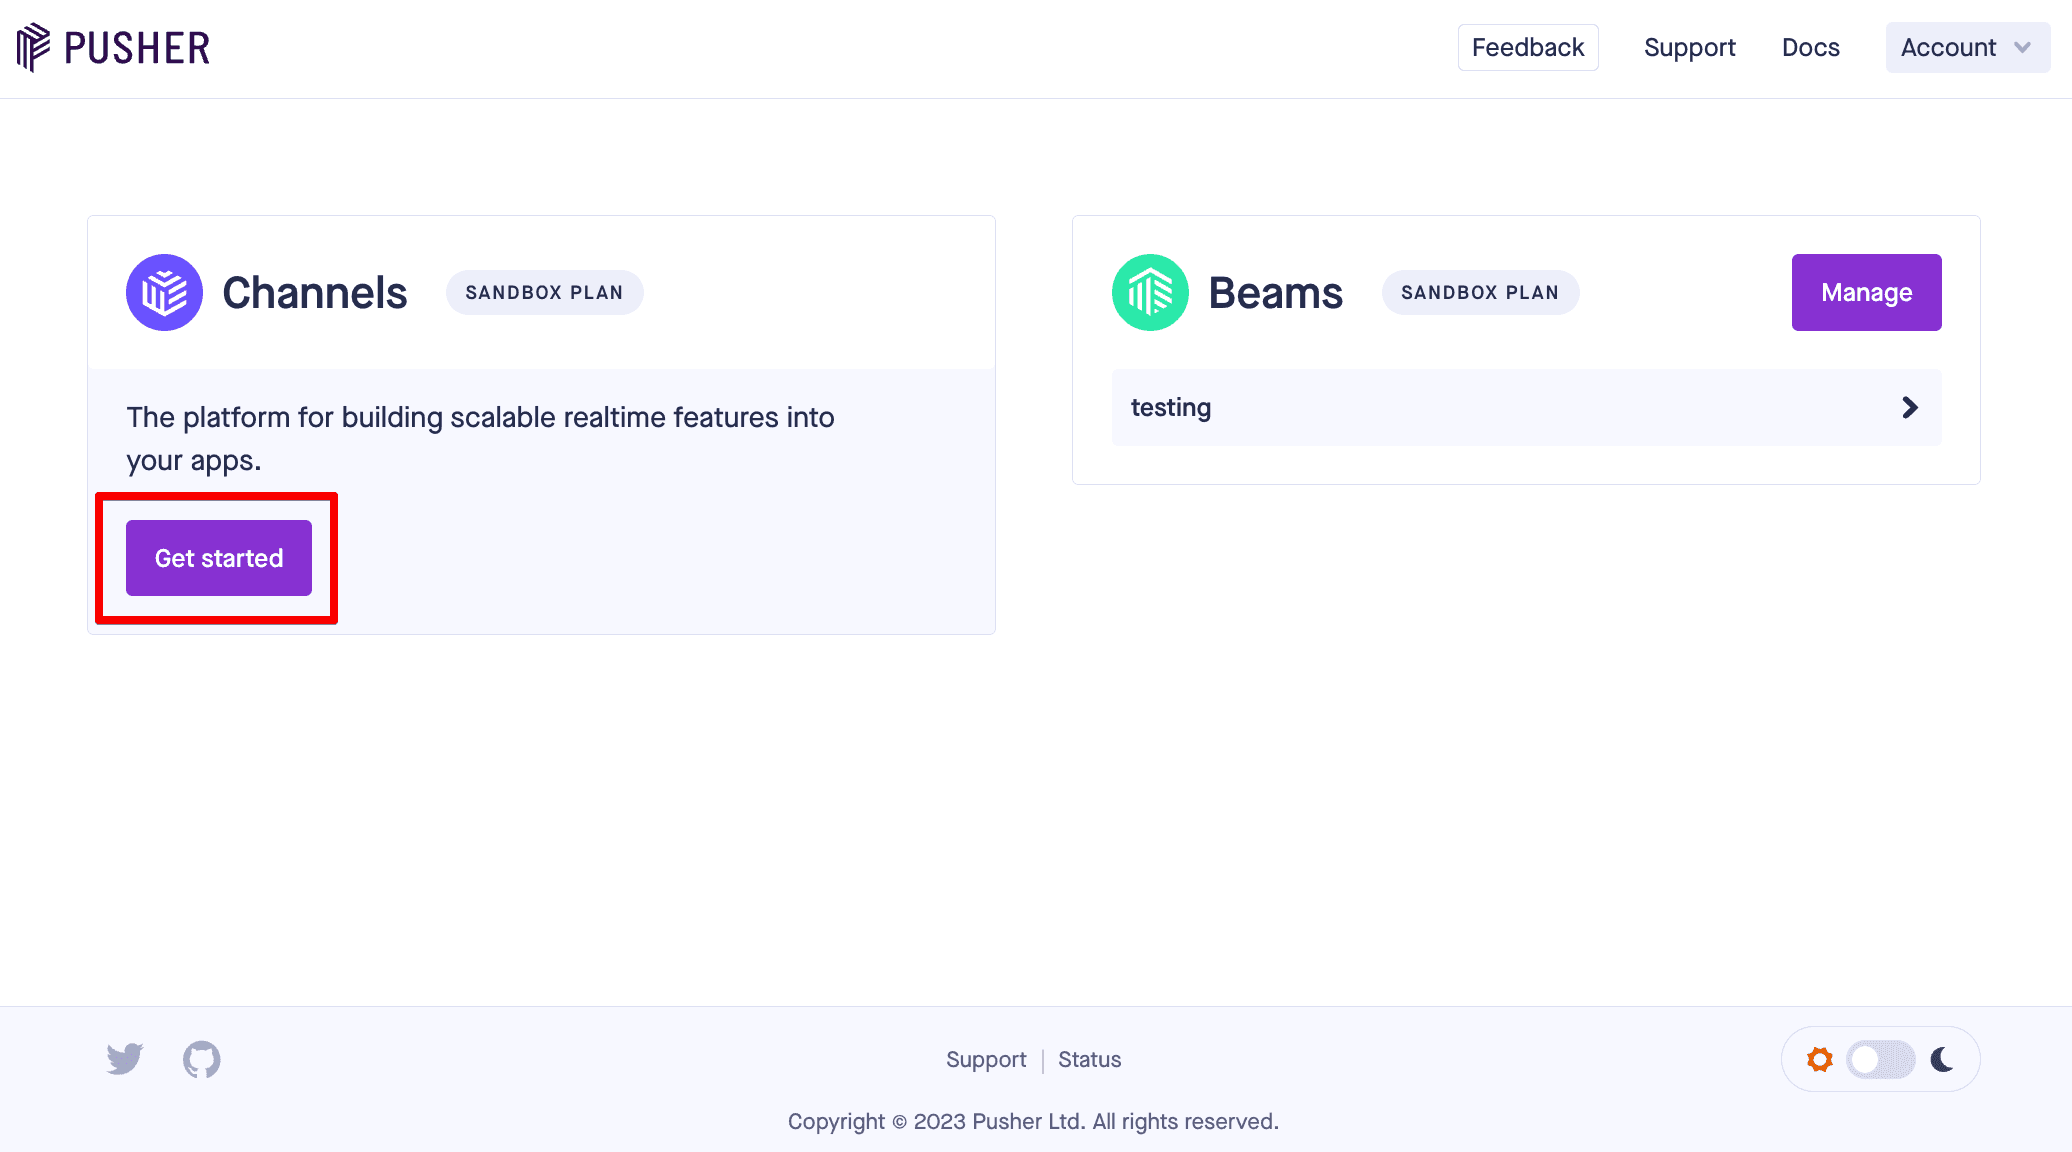
Creating a Channels app
Navigate to your Pusher account dashboard and click on “Get started” under Channels.
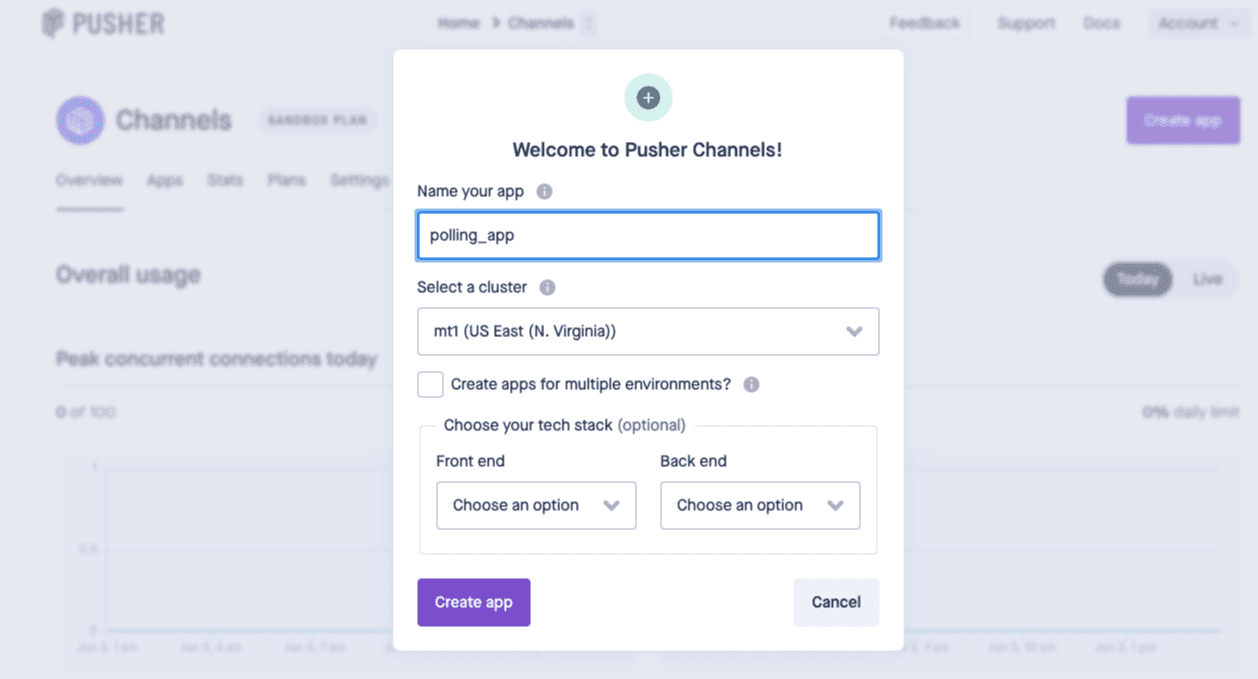
Follow the steps in the dialog box to name your app and select your preferred cluster location. Then, click Create app.
Next you'll see the following page. Here, the details you need for connections can be found under App Keys.
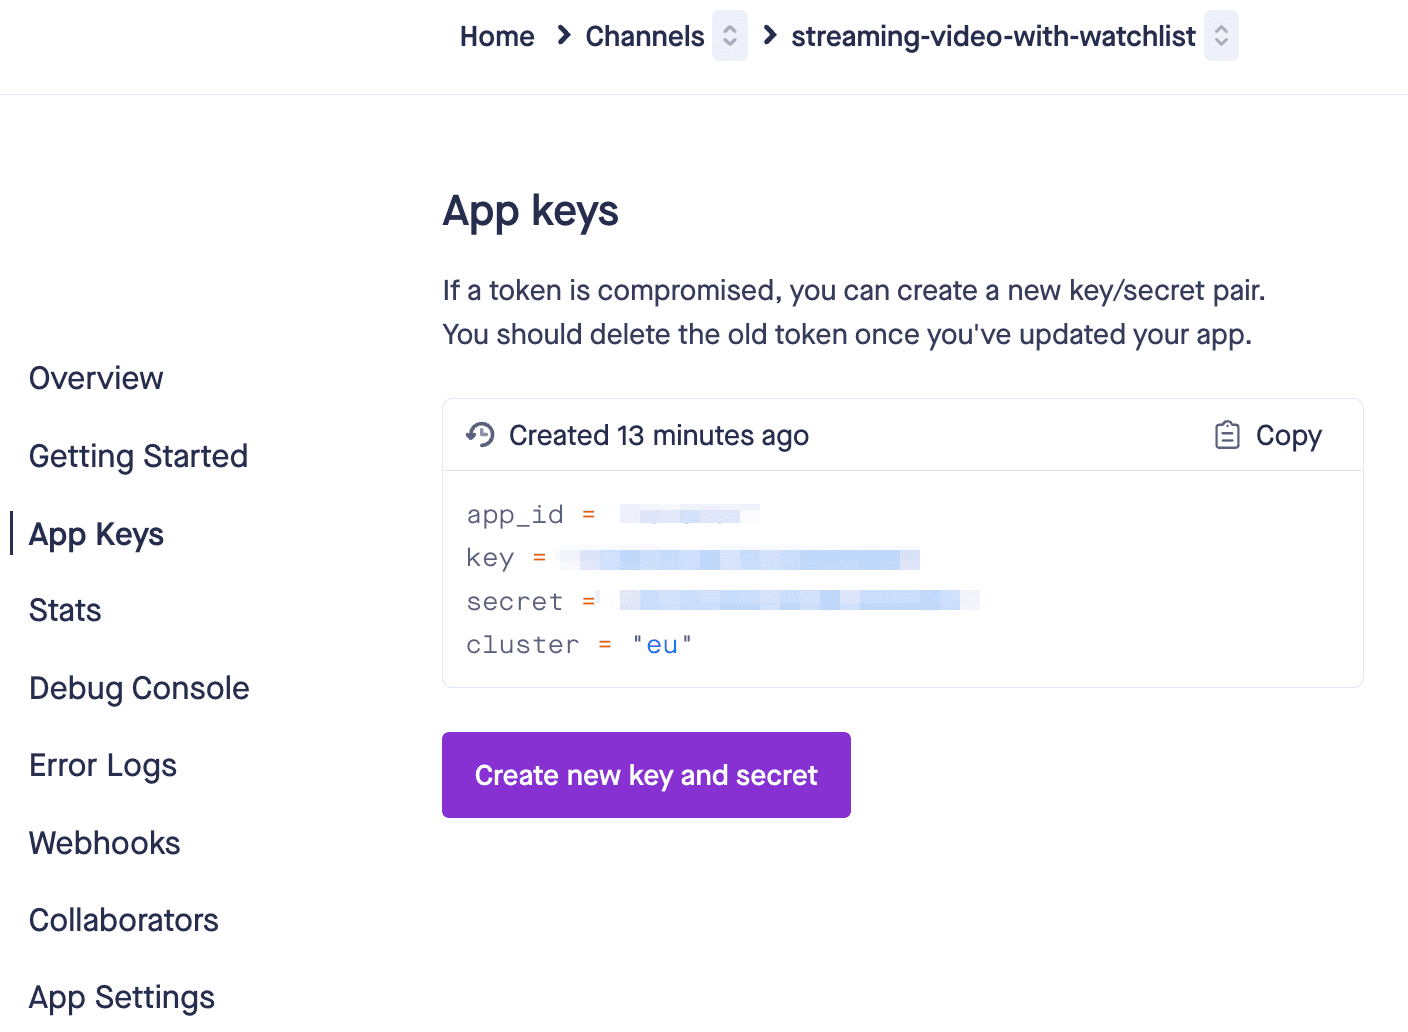
Click App Keys in the left hand menu and copy the information provided (including app_id, key, secret, and cluster) as shown below. Keep the information safe so that you can use it soon.
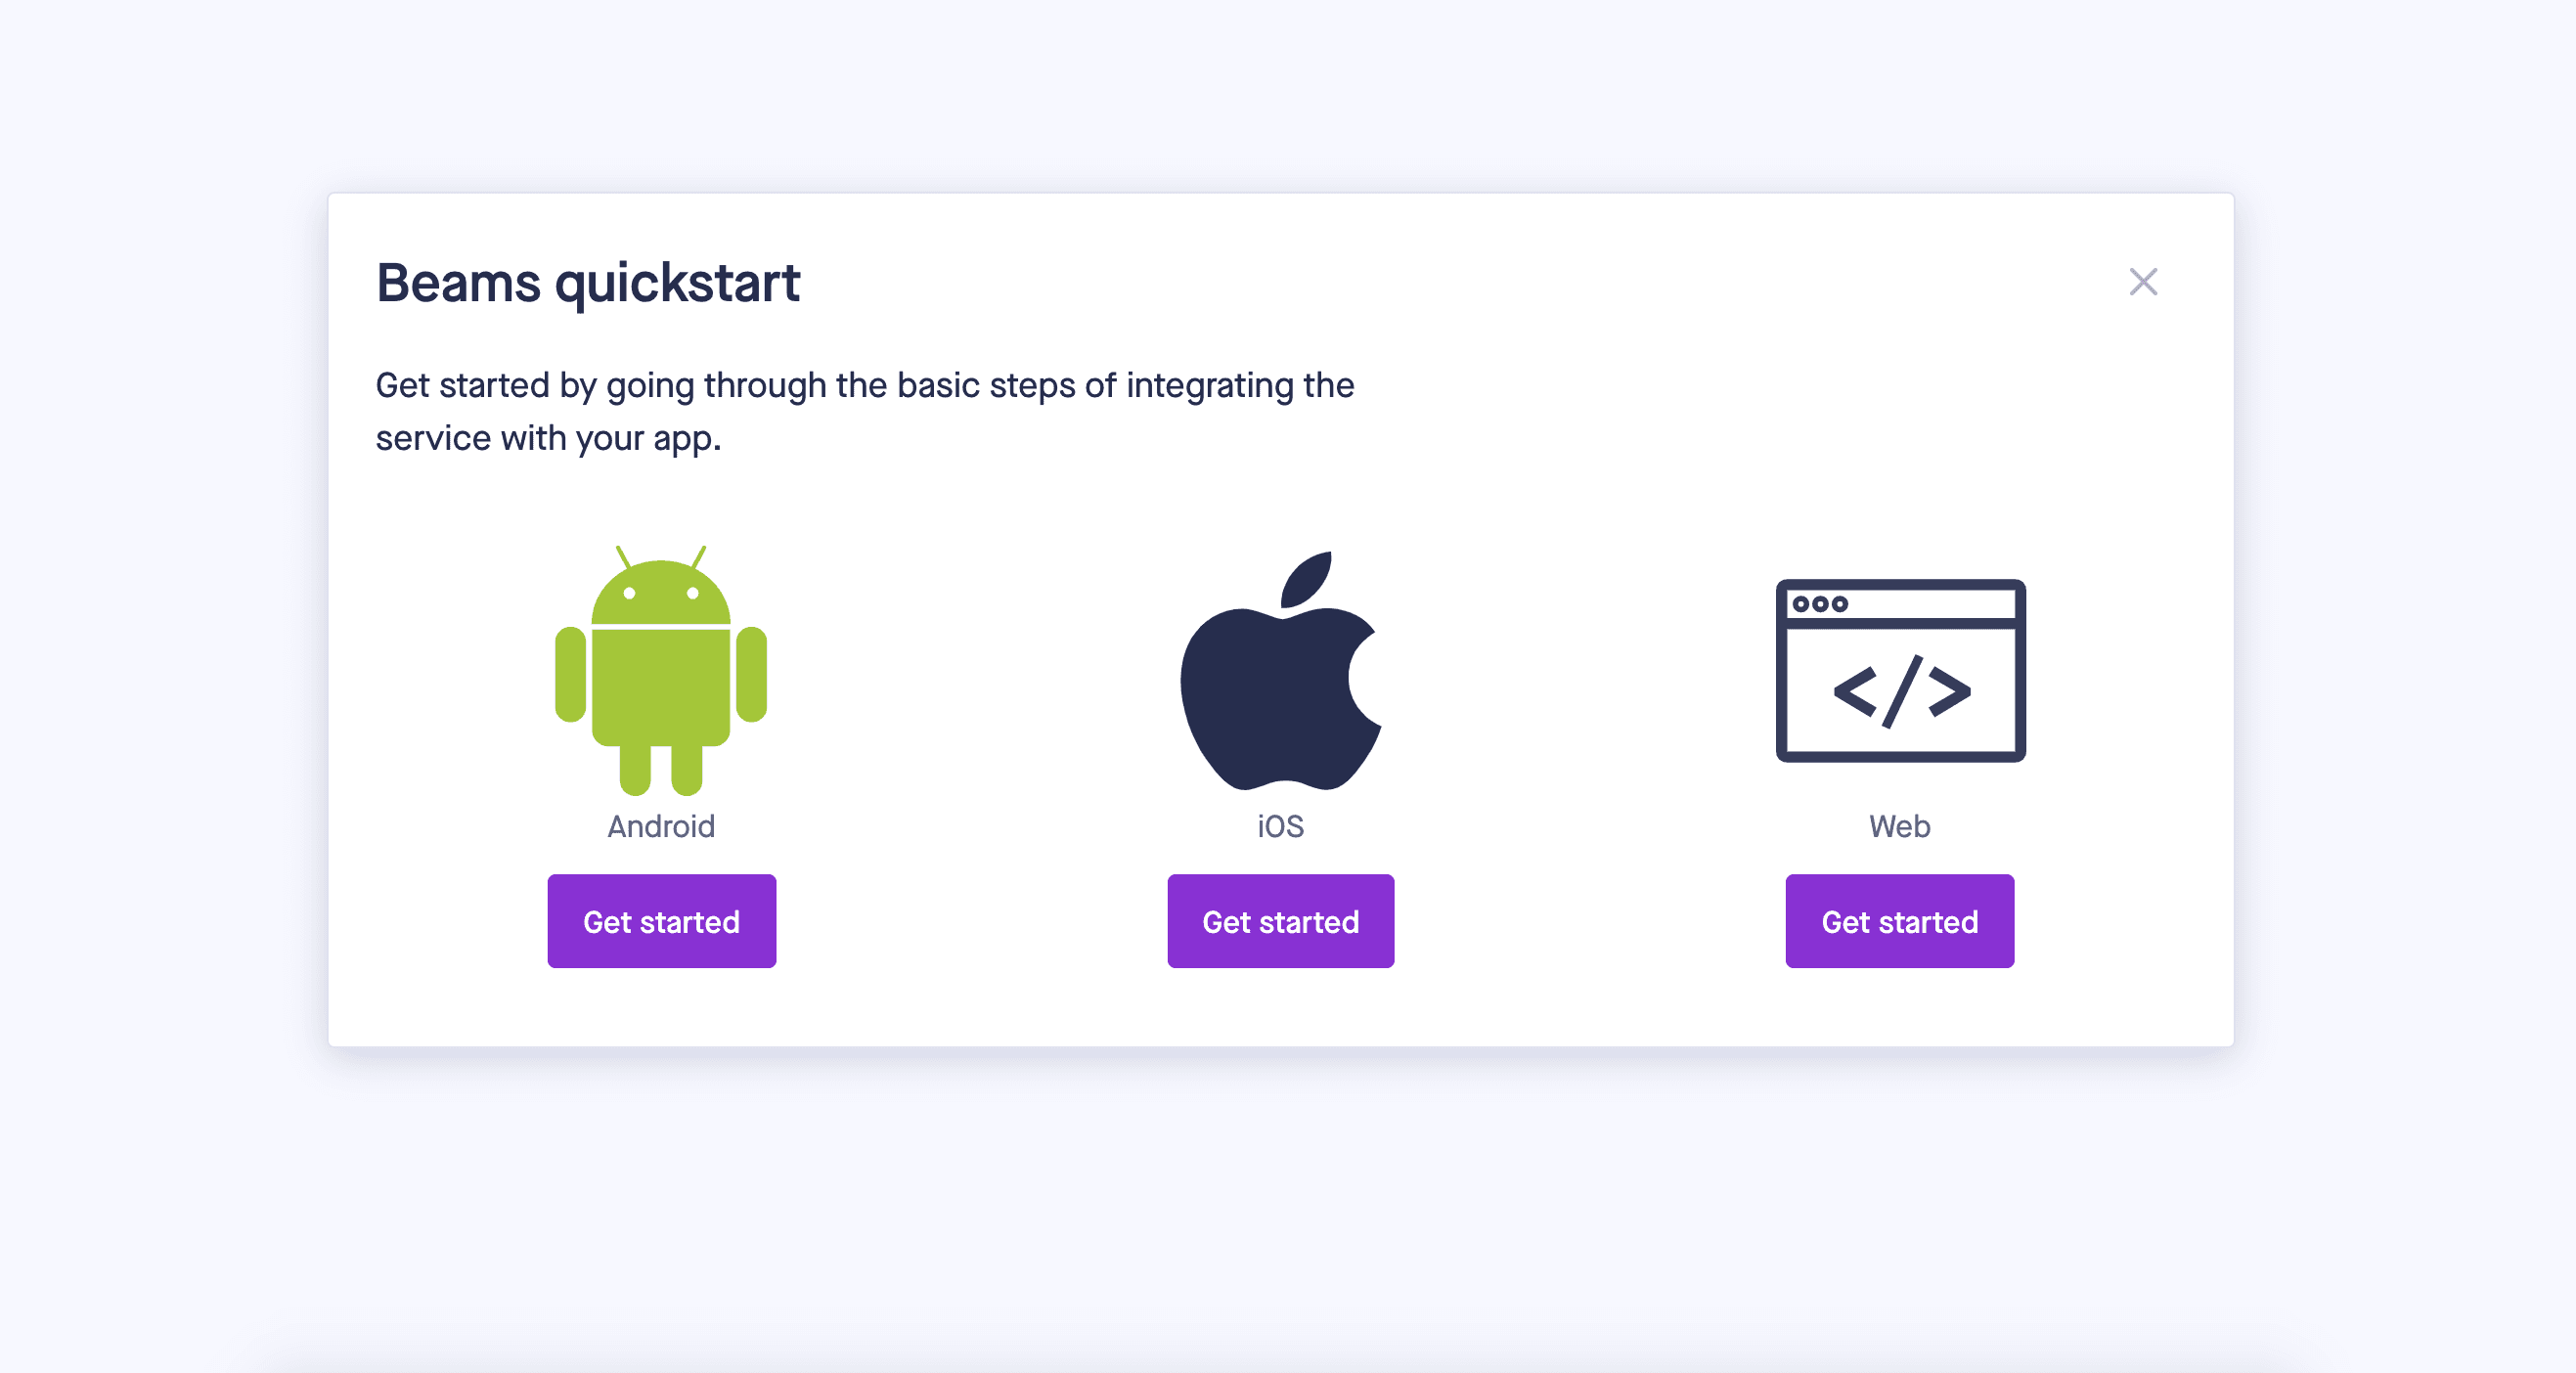
Creating a Beams app
Follow the same steps but this time create a Beams App. Once you have created an instance, it’s time to select your preferred option from Android, iOS and Web. We're going to select Web, of course, since we are writing a web application.
Go through the 4-step Quick Start guide that is displayed. These steps include creating a Service Worker, installing the SDK and registering your first web device.
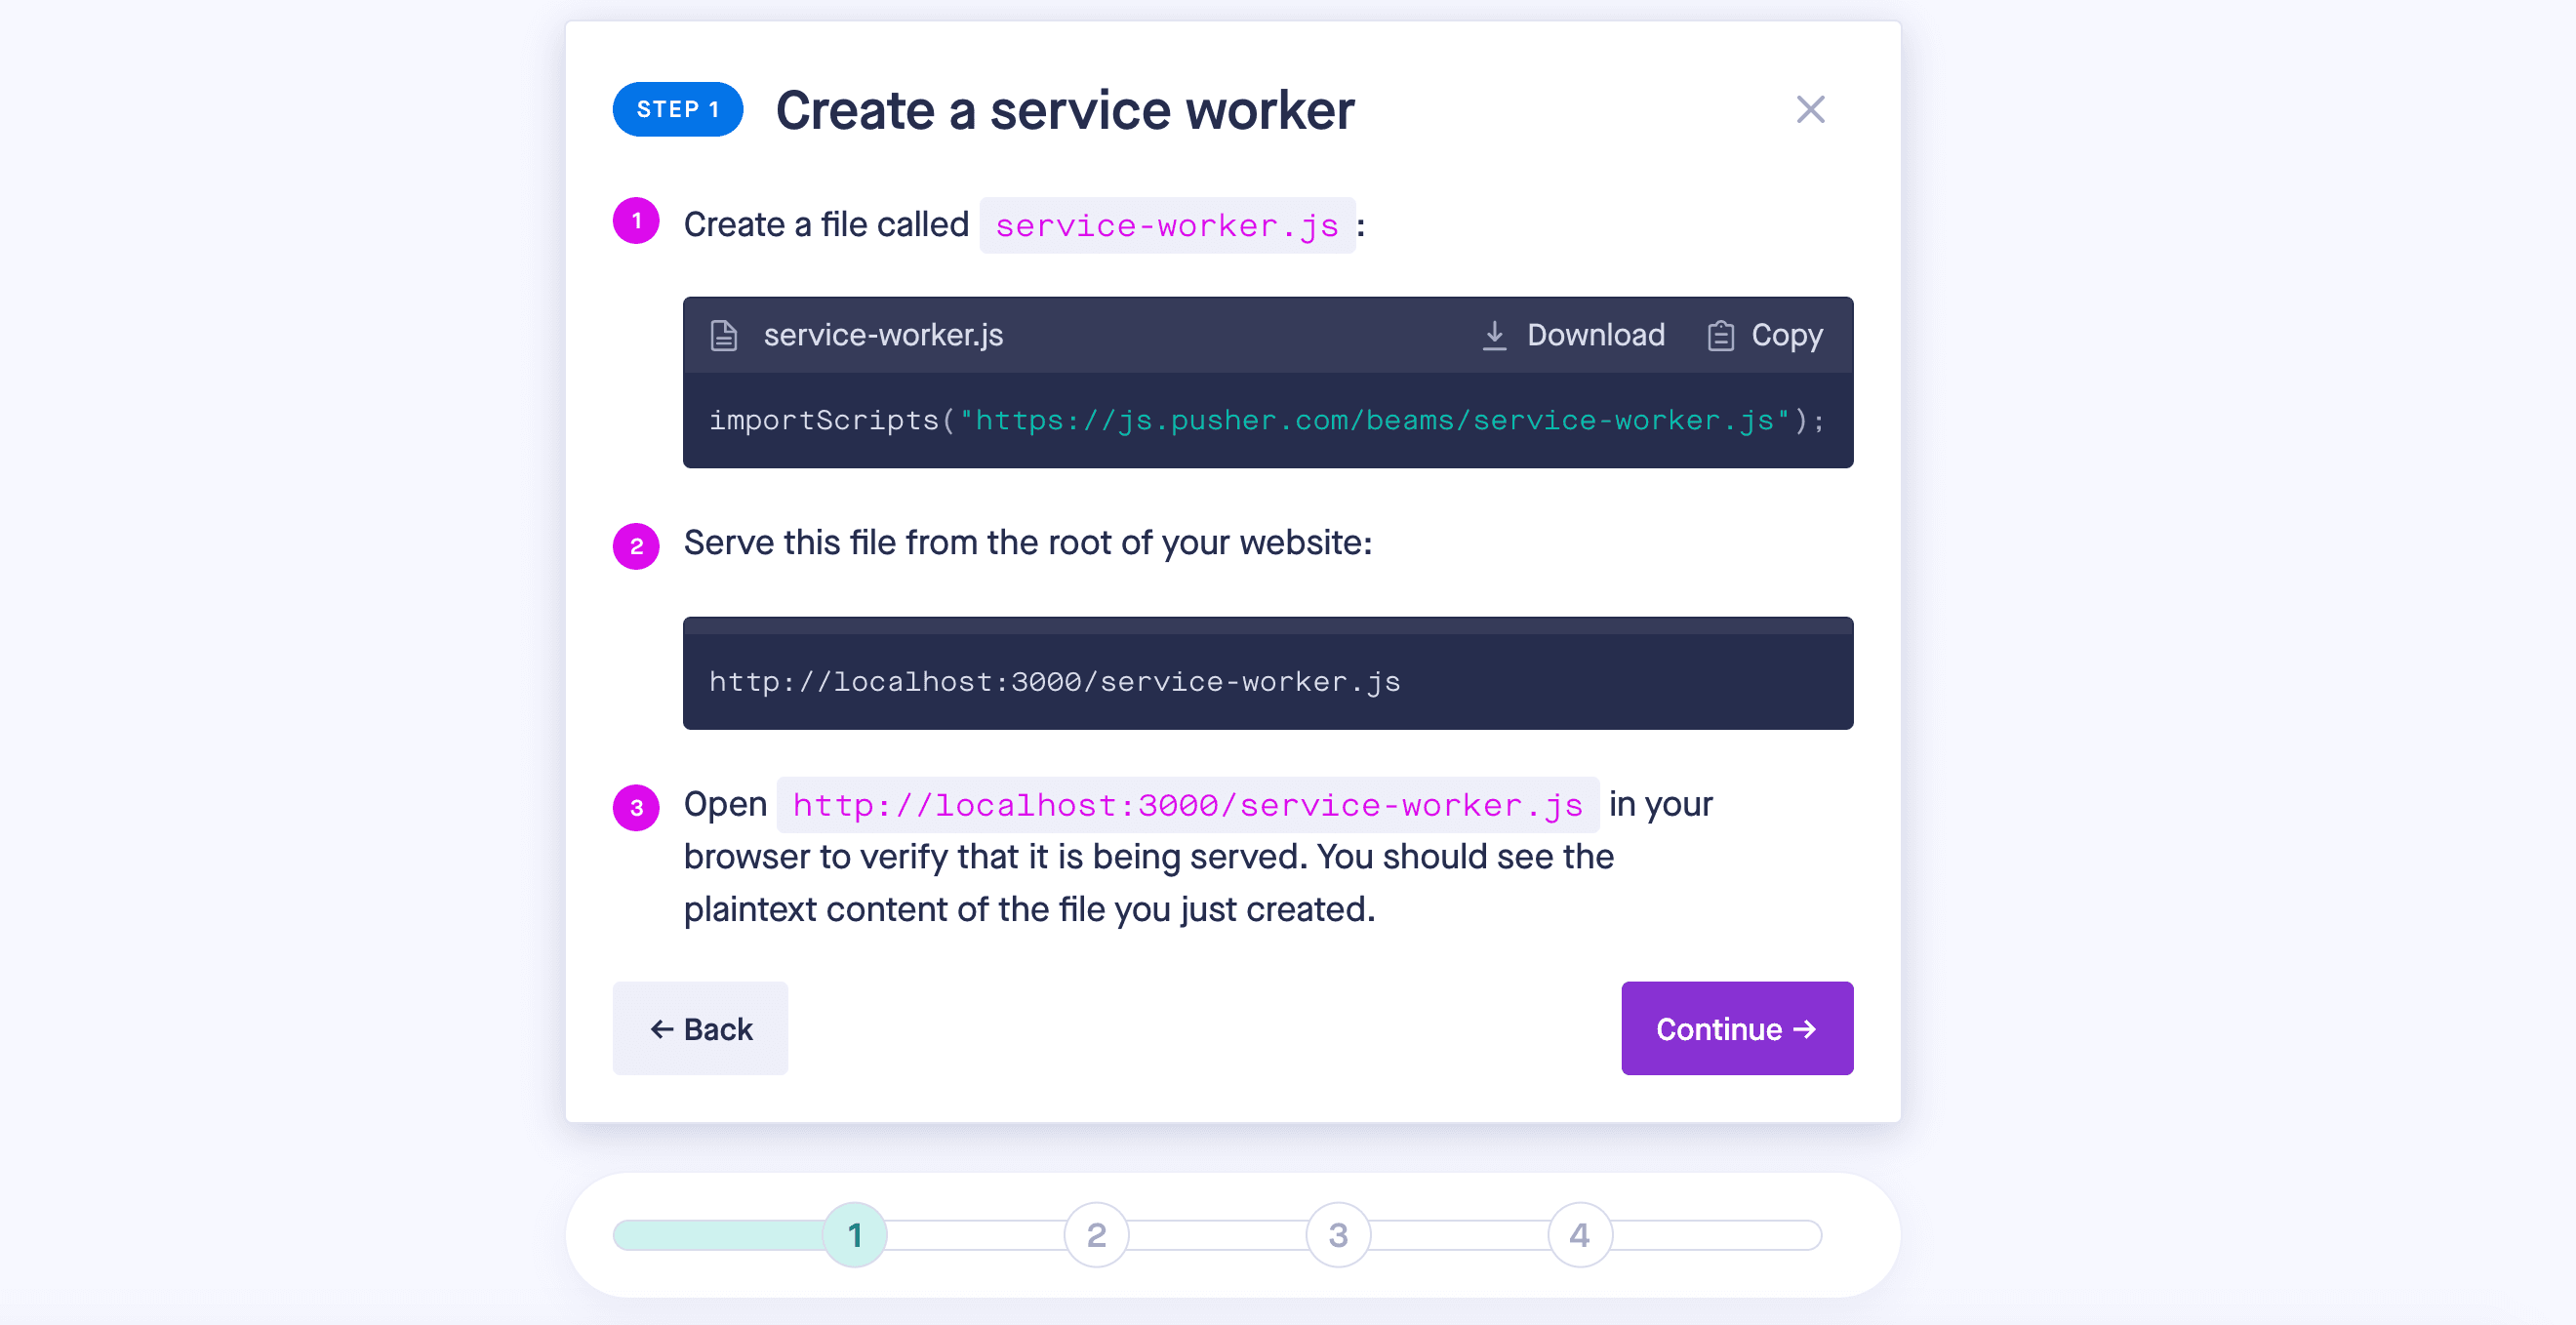
Creating a Service Worker
Following the steps shown below, create a service-worker.js in the public folder and make sure it registers before proceeding to write your code.
The service worker file is run separately from the web pages in the background. It is the main reason developers can create interactions like push notifications which we will be using in this tutorial and for background sync.
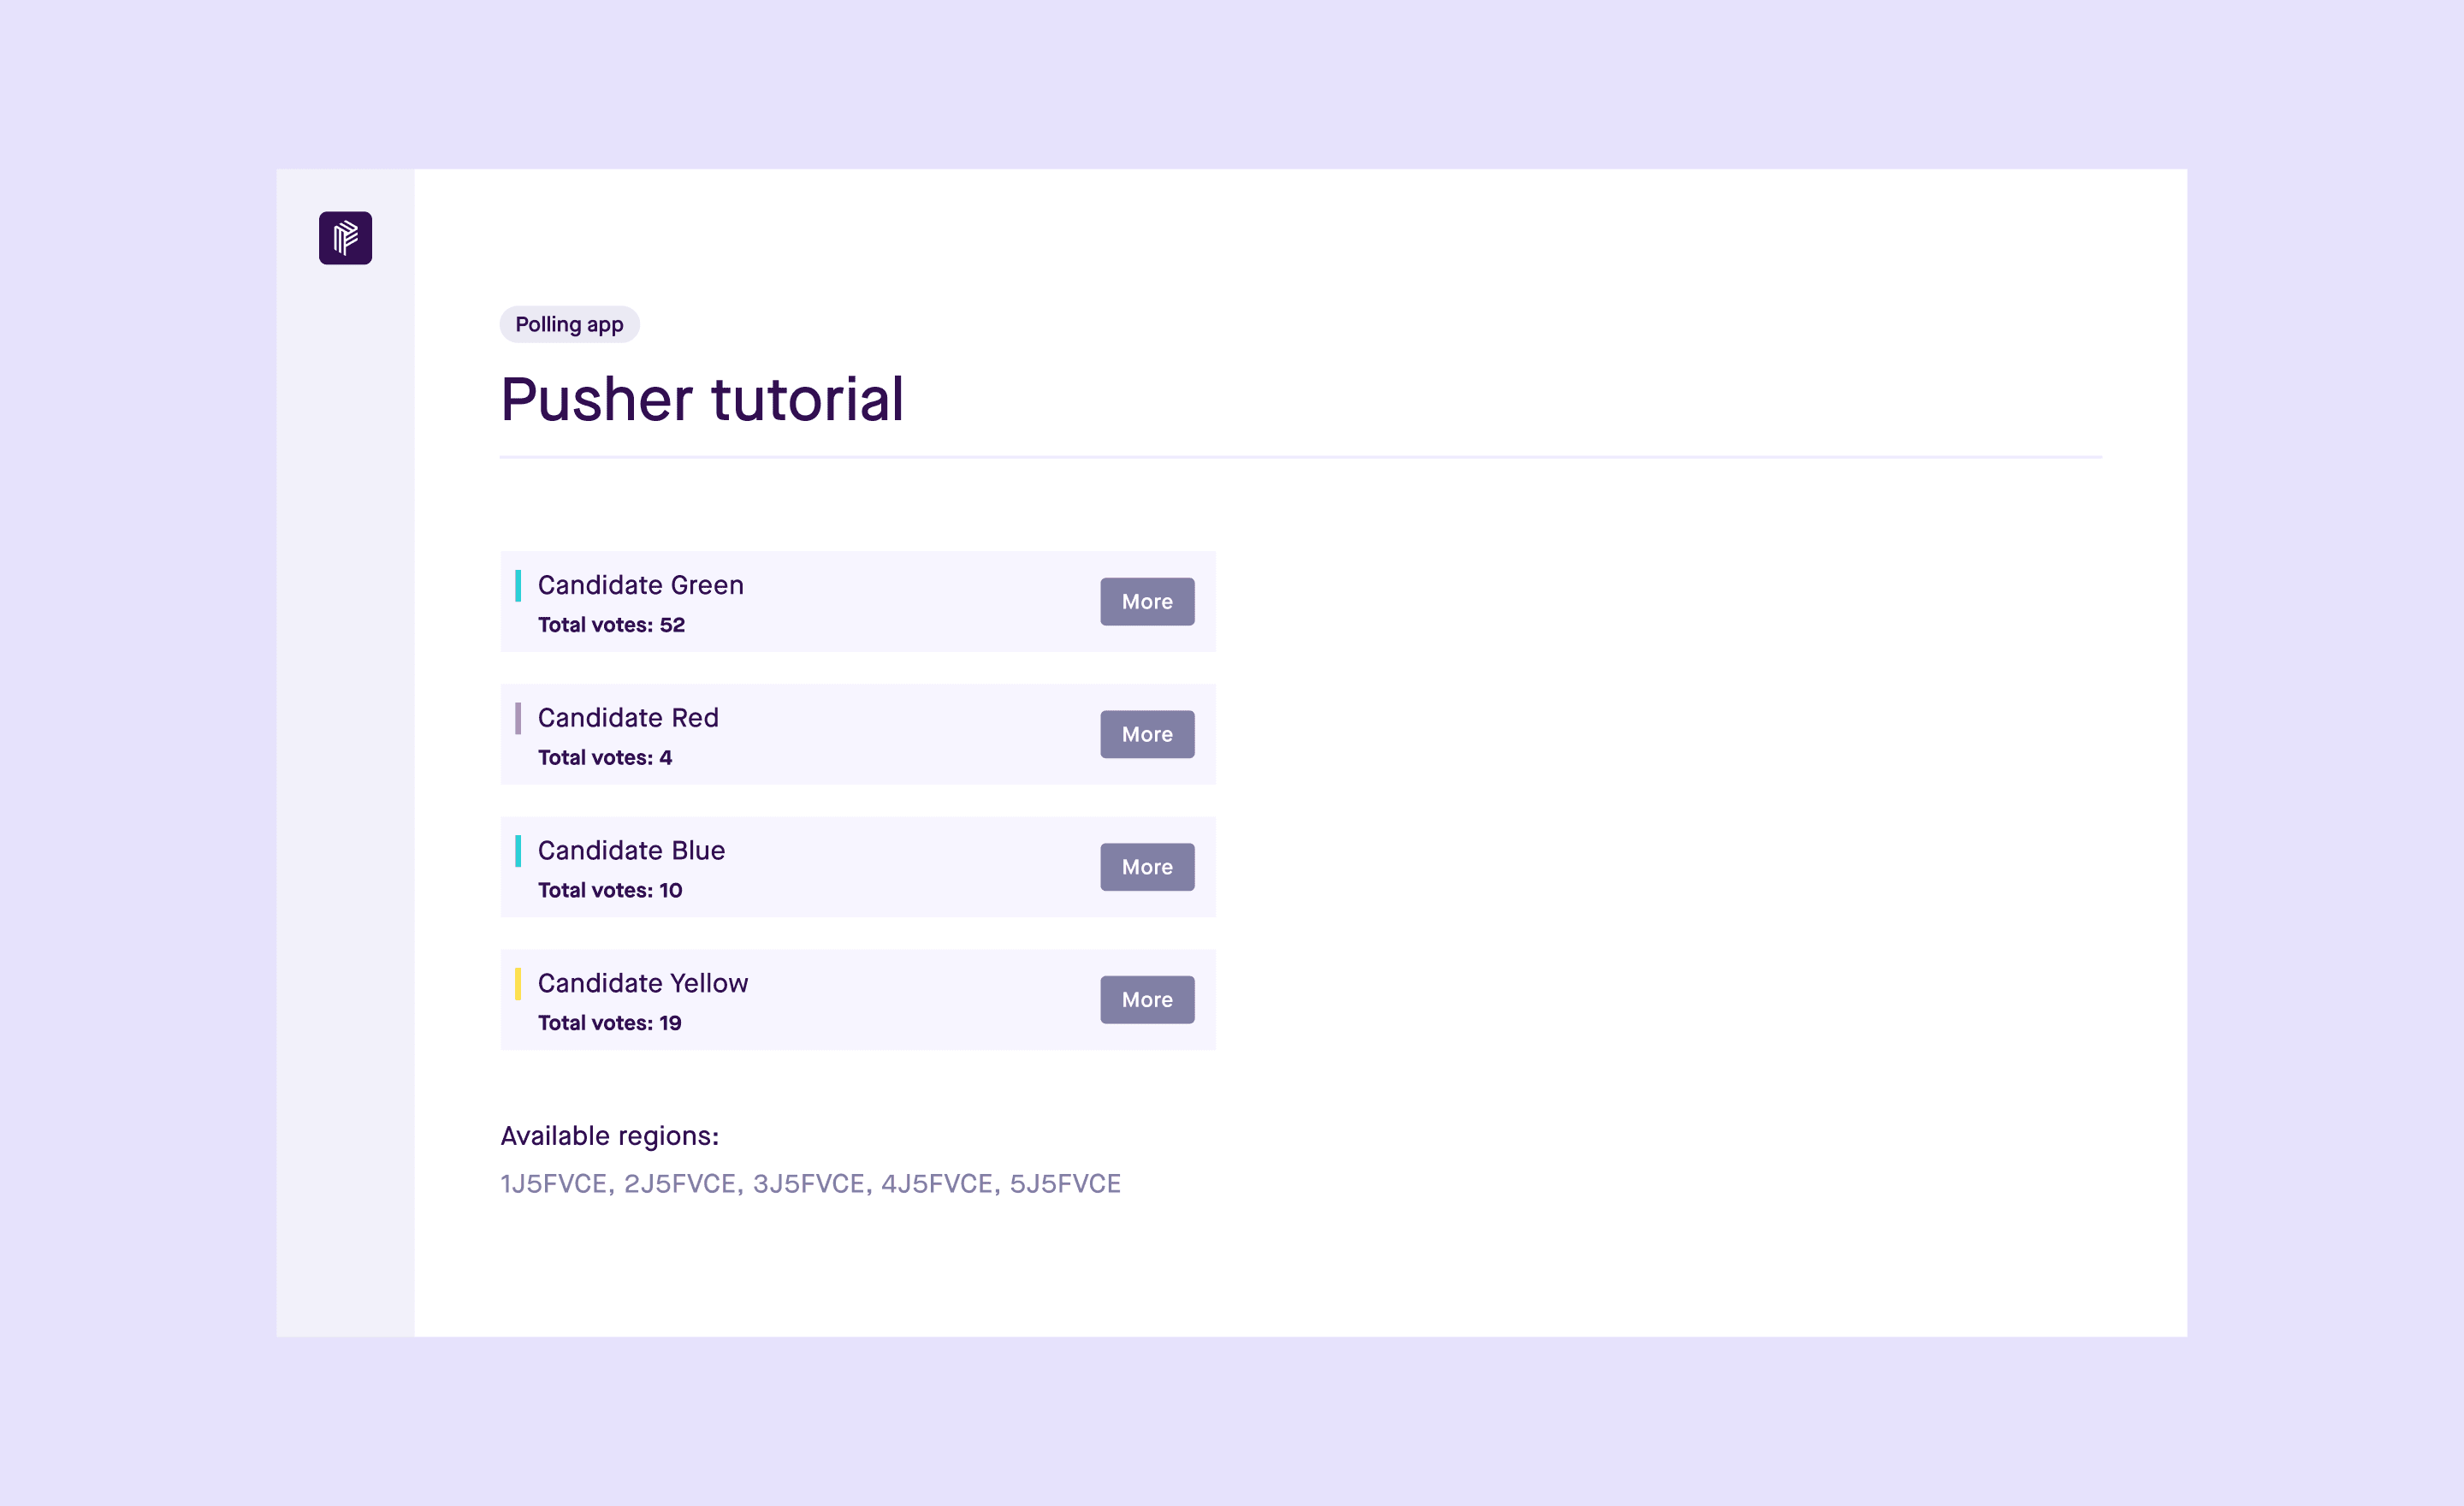
Building the realtime poll results app
Frontend
Navigate to the src folder and create the userComponent folder. This folder will house all the components we will use. Under userComponent, create the following components:
- States component which will show the general states of the votes for all candidates (red, yellow, blue and green)
- State component which will show the state for a candidate
- A modal component which will show the details of voting events happening at different regions for each candidate
- A header
- A footer
The structure of the folder once all components are created should look like the following:
˅ src
˅ userComponent
> footer
> header
> modal
> state
> states
Now, let’s edit our App.js file. First, import Pusher and Pusher web notification modules and create a functional component.
To use Pusher, you need to create a new instance of the class "Pusher" and subscribe to a channel. The channel is then bound to an event, so that when an event is fired (i.e when a vote is cast), an action can be performed in the front end.
1const pusher = new Pusher(Key, { 2 cluster: cluster 3 }); 4const channel = pusher.subscribe(‘votes’); 5channel.bind(‘vote-event’, function(data) { 6 return data 7 });
For the web notification, the Pusher push notification client class is called with the instance_ID you generated earlier when creating your Beams app in the Pusher dashboard.
Subscribe the user’s device to an event:
1const beamsClient = new PusherPushNotifications.Client({ 2 instanceId: instanceId, 3 }) 4beamsClient.start() 5.then(() => beamsClient.addDeviceInterest(‘votes’)) 6.then(() => { 7 8});
The code can be combined together as below:
1import * as PusherPushNotifications from “@pusher/push-notifications-web” 2import Pusher from ‘pusher-js’; 3function App(){ 4 const pusher = new Pusher("APP_KEY", { 5 cluster: "APP_CLUSTER" 6 }); 7 const channel = pusher.subscribe(‘votes’); 8 channel.bind(‘vote-event’, function(data) { 9 return data 10 }); 11 const beamsClient = new PusherPushNotifications.Client({ 12 instanceId: INSTANCE_ID, 13 }) 14 beamsClient.start() 15 .then(() => beamsClient.addDeviceInterest(‘votes’)) 16 .then(() => { 17 18 }); 19return ( 20 <div> 21 <div style={{display:”flex”, justifyContent:”space-around”}}><States data= 22 {data} /></div> 23 </div> 24); 25 26} 27export default App;
The States Component
The states component will be in the index.js file inside the state folder we created earlier. This functional component provides the current state of votes for all the candidates. This is written as:
1Import State from “../state/index” 2Import states from “./states” 3Export default function States (props) { 4 return ( 5 <main style={{display:"flex", flexWrap:"wrap", justifyContent:"space- around", width:"80%"}}> 6 {states.map((state, i) =>{ 7 return <State index={i} key={i} src={state.src} desc={state.desc} data= {props.data} /> 8 })} 9 </main> 10 ) 11}
The states data is located in a states file. It is an array written as:
1const states = [ 2 { 3 id:"1", 4 name: 'Green', 5 src:"https://via.placeholder.com/150", 6 }, 7 { 8 id:"2", 9 name: 'Red', 10 src:"https://via.placeholder.com/150", 11 }, 12 { 13 id:"3", 14 name: 'Yellow', 15 src:"https://via.placeholder.com/150", 16 }, 17 { 18 id:"4", 19 name: 'Blue', 20 src:"https://via.placeholder.com/150", 21 22 } 23] 24 25export default states
The State Component
The State component provides details about each candidate:
1import { useState } from "react" 2 3import Modal from "../modal/index" 4export default function State(props) { 5 console.log(props) 6 const [display, setDisplay] = useState('none') 7 return ( 8 <main style={{ width:"50%", marginBottom:"15px", marginTop:"5px"}}> 9 <div className=""> 10 <div> 11 <img src={props.src} alt=""/> 12 </div> 13 <div> 14 <p>{props.price}</p> 15 <p>Total votes: {props.data.message[props.index + 6]} </p> 16 </div> 17 </div> 18 <div> 19 <button onClick={()=>setDisplay("")}>More</button> 20 {/* <button>bid</button> */} 21 </div> 22 <Modal index={props.index} display={display} regions={props.data.message} src={props.src} setDisplay={setDisplay} /> 23 </main> 24 ) 25}
The Modal Component
The modal component shows what is going on with the idividual regions:
1import { useState } from "react"; 2export default function Modal(props){ 3 // const x = props.status 4 const sampleData = [ 5 [ 1, '1J5FVCE', 0, 0, 0, 0, 0, 0, 0, 0, 'inprogress' ], 6 [ 1, '2J5FVCE', 0, 0, 0, 0, 0, 0, 0, 0, 'inprogress' ], 7 [ 1, '3J5FVCE', 0, 0, 0, 0, 0, 0, 0, 0, 'inprogress' ], 8 [ 1, '4J5FVCE', 0, 0, 0, 0, 0, 0, 0, 0, 'inprogress' ], 9 [ 1, '5J5FVCE', 0, 0, 0, 0, 0, 0, 0, 0, 'inprogress' ], 10 [ 1, '6J5FVCE', 0, 0, 0, 0, 0, 0, 0, 0, 'inprogress' ] 11 ] 12 const regions = [['regx', [0]], ['regx', [0]]] 13 const [reg, updateReg] = useState(sampleData) 14 return ( 15 <main style={{position:"fixed", display: props.display, zIndex:2, backgroundColor:"white", opacity:0.95, color:"white", width:"60%", height: "50%", top:"15%",left:"20%", border:"1px black solid", borderRadius:"5px"}}> 16 <p className="" style={{float:"right", color:"black"}} onClick={()=> props.setDisplay("none")}>X</p> 17 <table style={{textAlign:"center", color:"red", width:"100%"}}> 18 <table> 19 <thead> 20 <tr> 21 <th>Region Name</th> 22 <th>Votes</th> 23 <th>Status</th> 24 </tr> 25 </thead> 26 <tbody> 27 {reg.map((region)=>{ 28 return <tr> 29 <td>{region[1]}</td> 30 <td>{region[props.index + 2]}</td> 31 <td>{region[10]}</td> 32 </tr> 33 })} 34 </tbody> 35</table> 36</table> 37 </main> 38 ) 39}
Server
The server is very straightforward. The “vote cast” is already provided as elements in an array. The general representation is given as:
batchnumber, region, red, green, yellow, blue, redtotalvotes, greentotalvotes, yellowtotalvotes, bluetotalvotes, status]
A setInterval method will be used as a means through which each “vote is cast”.
Our server is written in a Node.js environment. To get started, we’ll create a folder named server. Navigate to the folder in the terminal and run:
npm init
You need to answer all the prompts and install the dependencies needed. That is, pusher-js express @pusher/push-notifications-server. To do this, navigate to the server folder on the terminal and run:
1npm install pusher-js express @pusher/push-notifications-server. 2npm install pusher
Inside the index.js file, you will instantiate a new Pusher class with app_ID, key, secret, cluster, and useTLS passed into the object argument.
1const pusher = new Pusher({ 2 appId: "app_id", 3 key: "key", 4 secret: "secret", 5 cluster: "cluster", 6 useTLS: true 7 });
We're going to use the setInterval method to trigger a “vote” every 60 seconds.
1setInterval(() => { 2 if(i == 5){ 3 i = 0 4 } 5 pusher.trigger(“votes”, “vote-event”, { 6 message: sampleData[i] 7 }).then(console.log).catch(e=> console.log(e)) 8 i++ 9}, 60000);
The complete code on the server should be as below:
1const express = require("express") 2const Pusher = require("pusher") 3const PushNotifications = require('@pusher/push-notifications-server'); 4const generateVotes = require("./votegenerator"); 5const mySampleRegions = [ 6 {regionname: '1', population:2189499, turnoutpercent: 51, totalvotes: 1116644, currentvotes: 0}, 7 {regionname: '2', population:2189499, turnoutpercent: 51, totalvotes: 1116644, currentvotes: 0}, 8 {regionname: '3', population:2189499, turnoutpercent: 51, totalvotes: 1116644, currentvotes: 0}, 9 {regionname: '4', population:2189499, turnoutpercent: 51, totalvotes: 1116644, currentvotes: 0}, 10 {regionname: '5', population:2189499, turnoutpercent: 51, totalvotes: 1116644, currentvotes: 0}, 11 {regionname: '6', population:2189499, turnoutpercent: 51, totalvotes: 1116644, currentvotes: 0}, 12 {regionname: '7', population:2189499, turnoutpercent: 51, totalvotes: 1116644, currentvotes: 0}, 13] 14const sampleData = [ 15 [ 1, '1J5FVCE', 52, 4, 19, 10, 52,4, 19, 10, 'inprogess',1 ], 16 [ 1, '2J5FVCE', 15, 6, 10, 12, 67,10,29,22 , 'inprogess', 2 ], 17 [ 1, '3J5FVCE', 25, 6, 3, 21, 92,16,32,43, 'inprogess' ,3], 18 [ 1, '4J5FVCE', 35, 14, 8, 12,127,30,40,55 , 'inprogess',4 ], 19 [ 1, '5J5FVCE', 4, 16, 8, 21,131,46,48,71 , 'inprogess',5 ], 20 [ 1, '6J5FVCE', 12, 36, 8, 22, 143, 82,56,93, 'completed',6 ] 21] 22const allRegions = [ 23 '1J5FVCE', 24 '2J5FVCE', 25 '3J5FVCE', 26 '4J5FVCE', 27 '5J5FVCE', 28 '6J5FVCE', 29] 30const app = express() 31const pusher = new Pusher({ 32 appId: "1124234", 33 key: "b691171de5f8ac605664", 34 secret: "9b22dfa2b49d99cabeb2", 35 cluster: "mt1", 36 useTLS: true 37 }); 38(async function(){ 39 const votes = await generateVotes() 40 const spliced = votes.splice(0, 35) 41 console.log(spliced[0], votes[4]) 42})() 43var i = 0 44 45setTimeout(() => { 46 if(i == 5){ 47 i = 0 48 } 49 pusher.trigger("my-channel", "my-event", { 50 message: sampleData[0] 51}).then(console.log).catch(e=> console.log(e)) 52 i++ 53}, 50); 54 55let beamsClient = new PushNotifications({ 56 instanceId: instanceid, 57 secretKey: secretKey 58}); 59 60beamsClient.publishToInterests(['hello'], { 61 web: { 62 notification: { 63 title: 'Votes completed', 64 body: 'The election has been completed and the winner is red, 65 } 66 } 67 }).then((publishResponse) => { 68 console.log('Just published:', publishResponse.publishId); 69 }).catch((error) => { 70 console.log('Error:', error); 71 });
Running the App
Now, you can run your app. All you need to do is run npm start in the terminal to start the front end. To start the backend, run node index.js.
It’s that simple and straightforward! Follow this tutorial closely and build your own live poll app using Pusher. You can take a look at the code repository here and check out the demo app.
Find out more about delivering live results with Pusher or read the full case study on how The Washington Post broke realtime records by using WebSockets with Pusher Channels to send 1 million messages per second to global news readers during the 2020 US Presidential Election.


© 2025 Pusher Ltd. All rights reserved.
Pusher Limited is a company registered in England and Wales (No. 07489873) whose registered office is at MessageBird UK Limited, 3 More London Riverside, 4th Floor, London, United Kingdom, SE1 2AQ.