- Products

- Developers
- User stories
- Blog
- Pricing

Build a realtime measuring app with ARKit
Introduction
Augmented reality (AR) is all about modifying our perception of the real world.
Information about our environment and surrounding objects can be overlaid to enhance your current perception of reality. This information can presented to the user in realtime, like in the case of a news feed in a live event.
But the flow of information can also go the other way around. We can send the information resulting from the interaction with the augmented reality experience. In both cases, Pusher can help you with sending and receiving data in realtime.
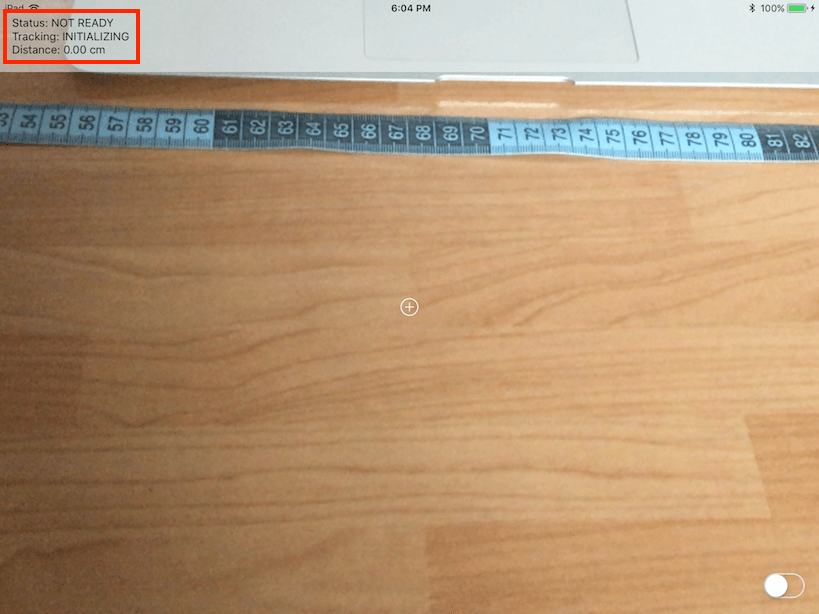
In this tutorial, we’re going to build an ARKit app to make simple measurements. While measuring, the app will create a 3D box with a width equal to the measured size:
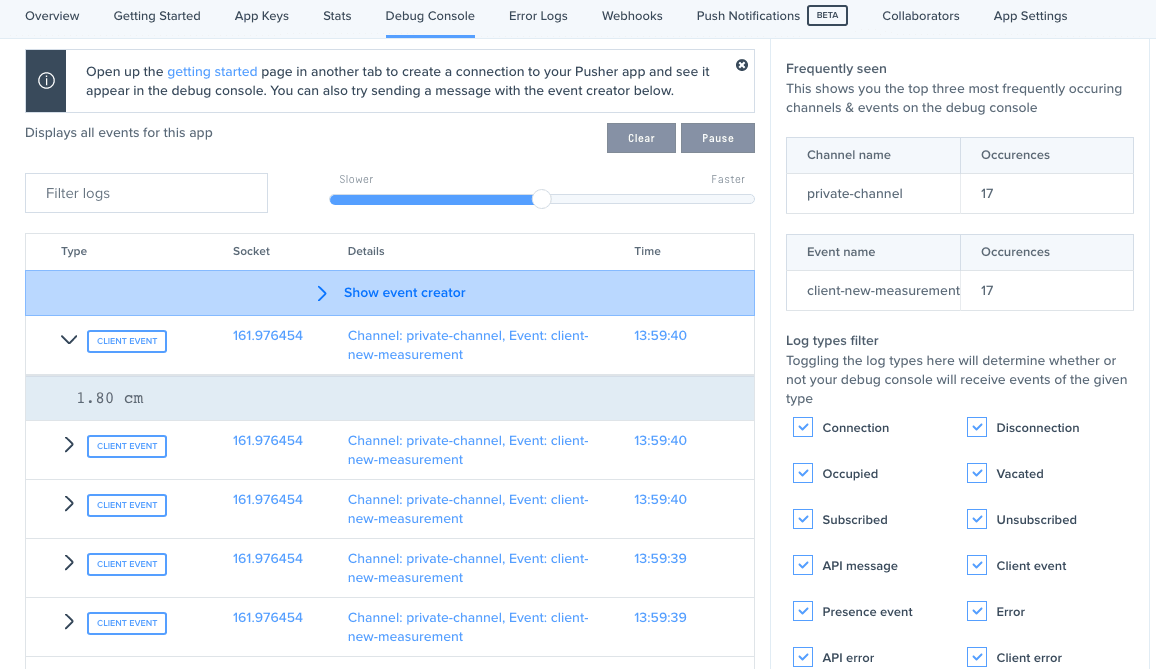
It will also send the measurements in realtime to Pusher:
One note of caution. The measurements are based on the plane detection’s capabilities of ARKit. They are not perfect in some situations, such as in low lighting or when a surface is not entirely flat. The results won’t be completely accurate all the time. They’re close, but they can vary.
For this tutorial, you’ll need:
-
A device with an A9 or later processor (iPhone 6s or better, iPhone SE, any iPad Pro, or the 2017 iPad)
-
Xcode 9 beta 5 (or superior)
-
A free Pusher account
Let’s get started.
Setting up the Xcode project
Open Xcode and create a new Single View App:
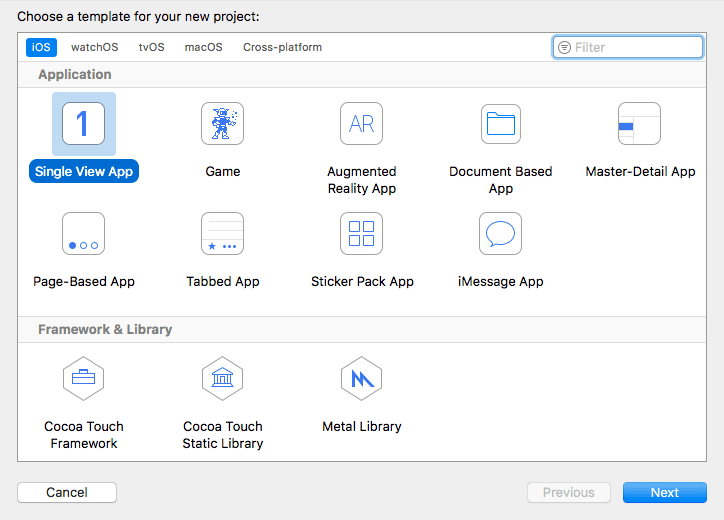
We choose this option because we are going to manually set up an AR view along with other controls.
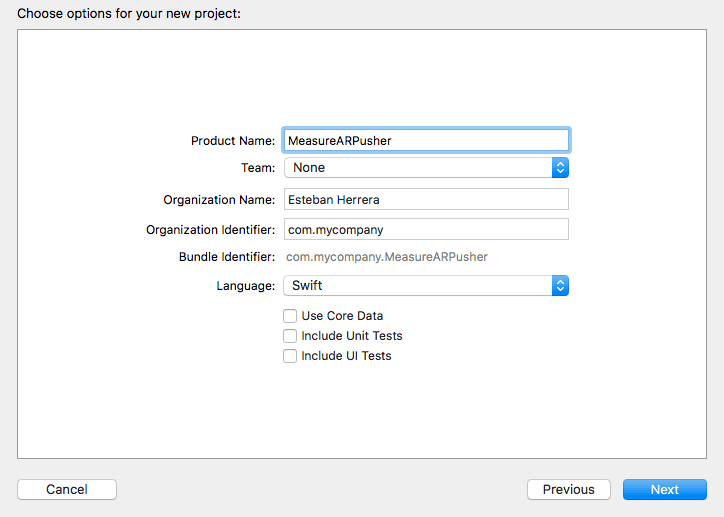
Enter the project information, choosing Swift as the language:
Create the project and close it. We’re going to use CocoaPods to install the project’s dependencies. Open a terminal window and go to the root directory of your project. If you don’t have CocoaPods installed, execute:
sudo gem install cocoapods
Once installed, create the file Podfile with the command:
pod init
Edit this file to set the platform to iOS 11 and add the project dependencies:
1# Uncomment the next line to define a global platform for your project 2 3platform :ios, '11.0' 4 5target 'MeasureARPusher' do 6 7# Comment the next line if you're not using Swift 8# and don't want to use dynamic frameworks 9 10use_frameworks! 11 12# Pods for MeasureARPusher 13 14pod 'PusherSwift', 5.1.0 15 16end
Once you edit Podfile, execute the following command to install the dependencies:
pod install
Now open the Xcode workspace instead of the project file:
open MeasureARPusher.xcworkspace
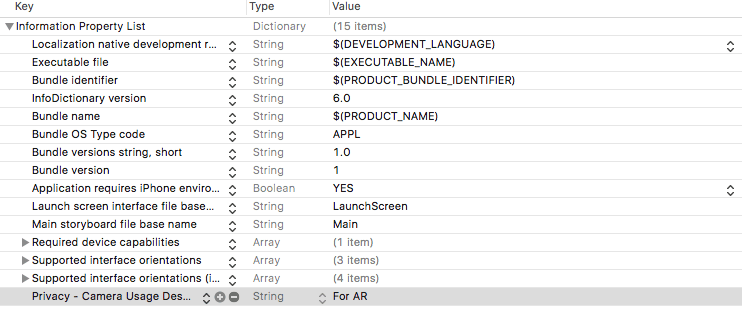
Select the Information Property List. add a row of type Privacy — Camera Usage Description (NSCameraUsageDescription) and give it a description. This is so ARKit can access the camera:
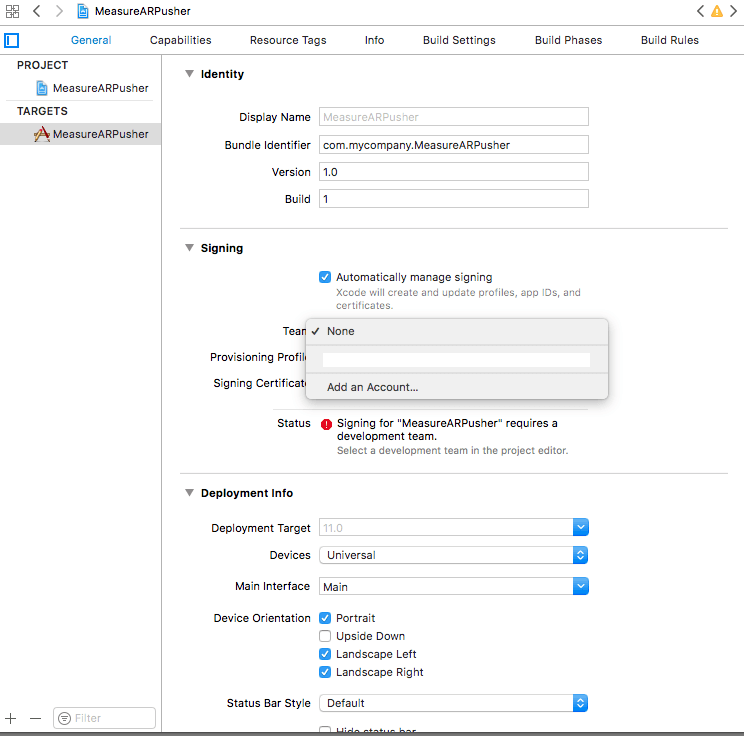
Finally, configure a team so you can run the app on your device:
Now let’s start by building the user interface.
Building the user interface
Go to Main.storyboard and drag an ARKit SceneKit View to the view:
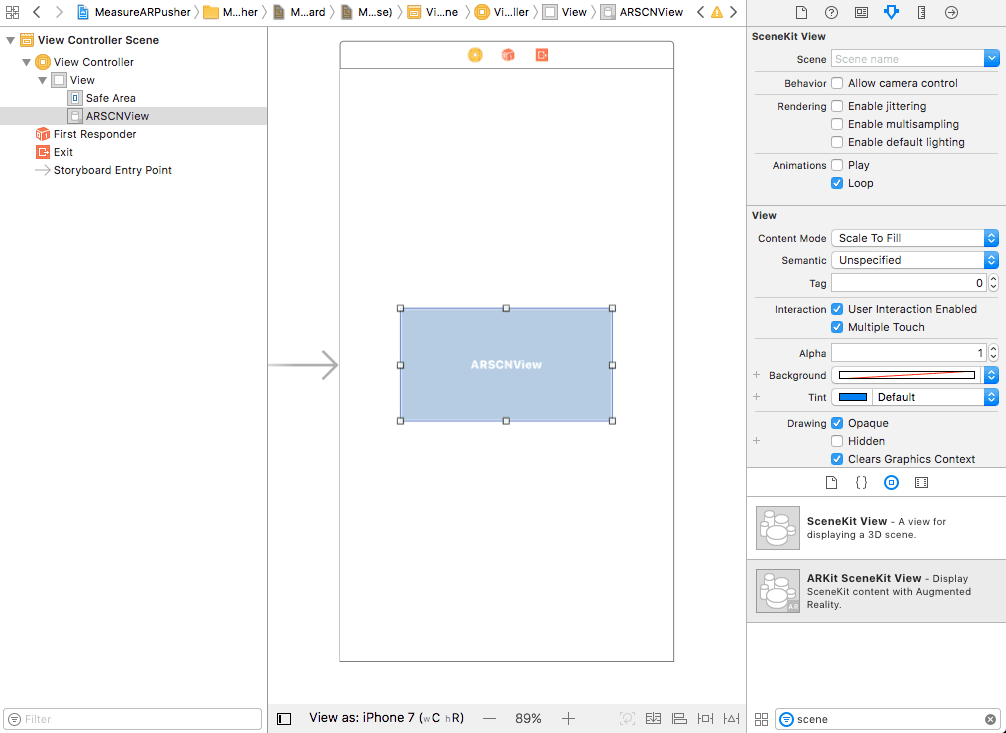
Next, add constraints to all sides of this view so that it fills the entire screen. You do this by pressing the ctrl key while dragging a line to each side and choosing leading, top, trailing, and bottom to the superview, with a value of 0:
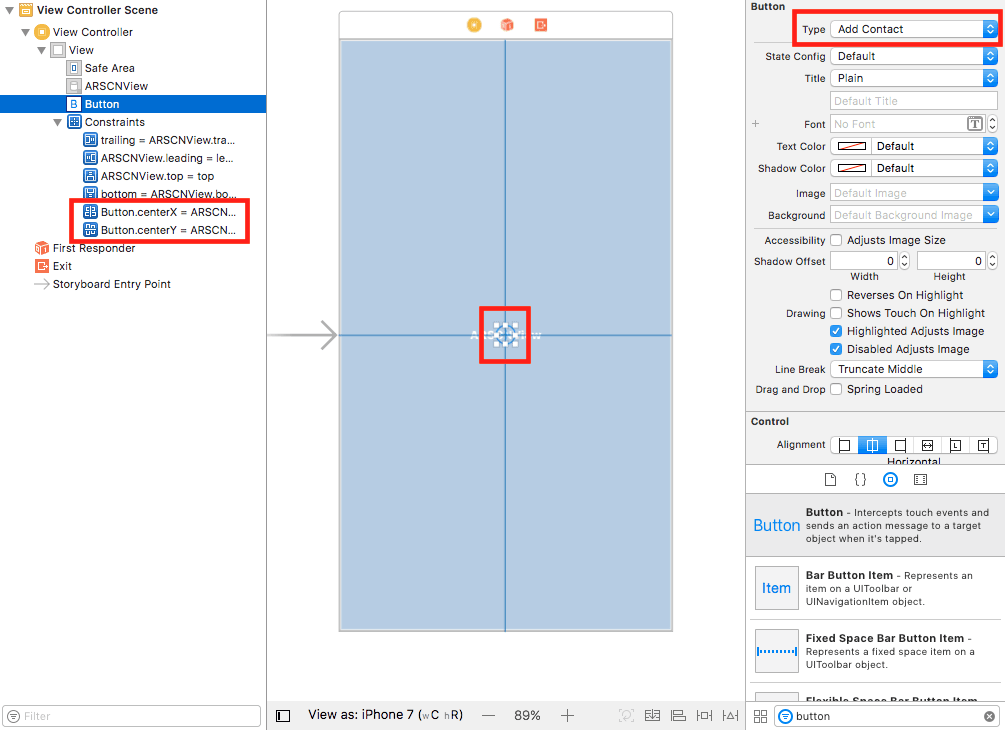
Add a button. Change its type to Add Contact in the Attributes inspector. Give it a white color Tint, and add a vertical and a horizontal constraint to center it in the middle of the screen:
Let’s add a switch to control when the app is in measure mode. Set its initial state to Off in the Attributes inspector. Add a bottom and trailing constraint with a value of -20 to place the control in the bottom-right part of the screen. You may want to place it in the bottom-center or another part of the screen if you prefer:

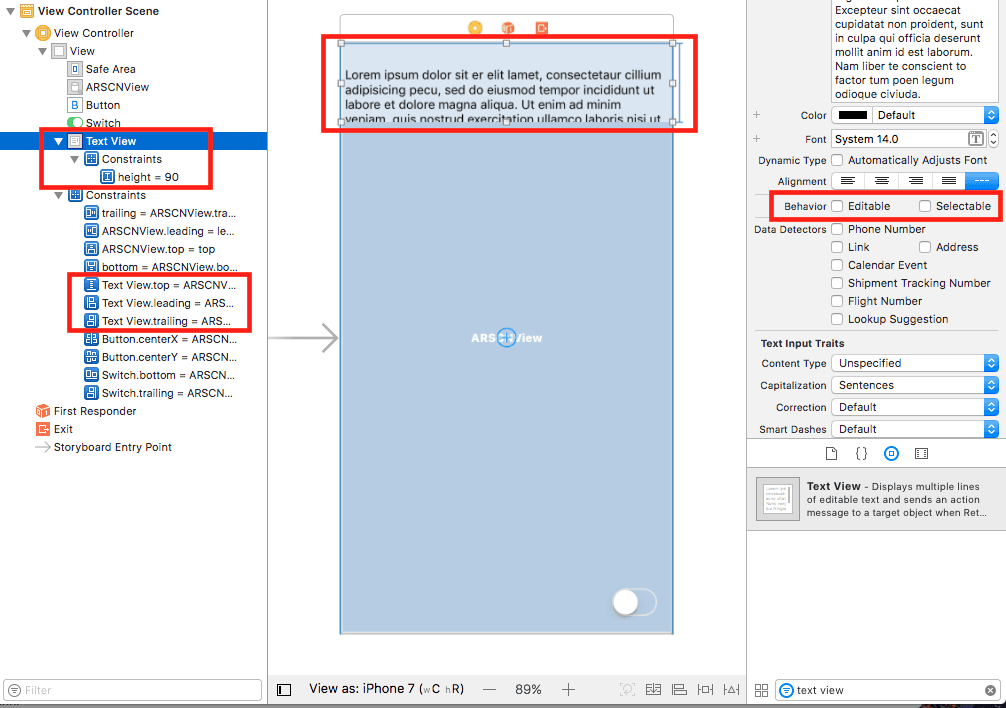
Now add a text view. Disable its Editable and Selectable behaviors in the Attributes inspector*.* Change its background color. I chose a white color with 50% opacity.
Add a height constraint with a value of 90. Add leading, top, and trailing constraints with the value 0 so it remains fixed to the top of the screen:
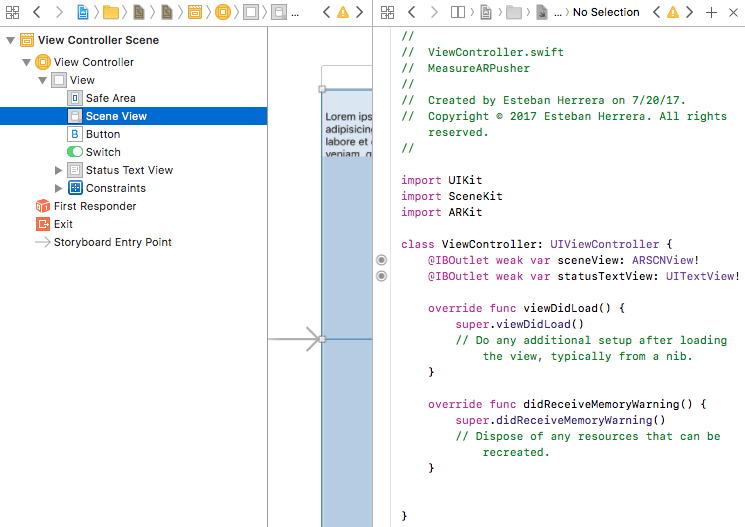
In ViewController.swift, import the SceneKit and ARKit libraries:
1import SceneKit 2import ARKit
Then, create two IBOutlets, one to the scene view and another one to the text view:
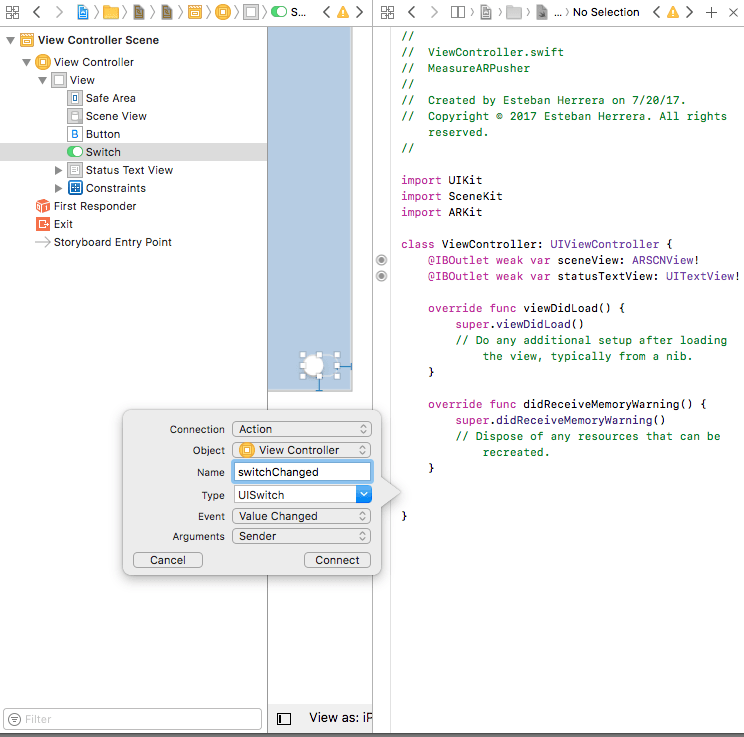
Finally, an action on the switch control for the changeValue event:
And now we’re ready to start coding the app.
Building a measurement app
Let’s start by making ViewController.swift implement ARSCNViewDelegate and defining the variables we’re going to need:
1class ViewController: UIViewController, ARSCNViewDelegate {
2
3 ...
4
5 var box: Box!
6
7 var status: String!
8
9 var startPosition: SCNVector3!
10
11 var distance: Float!
12
13 var trackingState: ARCamera.TrackingState!
14
15 enum Mode {
16
17 case waitingForMeasuring
18
19 case measuring
20
21 }
22
23 ...
24
25}
Where:
-
boxrepresents the 3D box that is going to get drawn when measuring. We’ll review this class later on. For now, create it to eliminate the error. -
statusis a text that tells us if the app is ready or not to take measurements (whether the app has detected planes or not). -
startPositionrepresents the measurement’s start position. -
distanceis the calculated distance from the start to the current position (the measurement itself). -
trackingStateholds the current tracking state of the camera. -
Modeis an enumeration to indicate the possible states of the app.
Let’s add another property to keep track of the state of the app, and do a few things depending on the set value:
1var mode: Mode = .waitingForMeasuring {
2
3 didSet {
4
5 switch mode {
6
7 case .waitingForMeasuring:
8
9 status = "NOT READY"
10
11 case .measuring:
12
13 box.update(
14 minExtents: SCNVector3Zero, maxExtents: SCNVector3Zero)
15
16 box.isHidden = false
17
18 startPosition = nil
19
20 distance = 0.0
21
22 setStatusText()
23
24 }
25
26 }
27
28}
If waitingForMeasuring is set, we’ll assume that the app is not ready. Don’t worry, if it is, the status will change immediately. If the mode is set to measuring, we’ll reset the size of the box. We’ll review the method update later. We’ll show if the box is hidden, reset the startPosition and distance variables, and call the method that displays the value of those variables.
This is the definition of the method setStatusText():
1func setStatusText() {
2
3 var text = "Status: \(status!)\n"
4
5 text += "Tracking: \(getTrackigDescription())\n"
6
7 text += "Distance: \(String(format:"%.2f cm", distance! * 100.0))"
8
9 statusTextView.text = text
10
11}
12
13func getTrackigDescription() -> String {
14
15 var description = ""
16
17 if let t = trackingState {
18
19 switch(t) {
20
21 case .notAvailable:
22
23 description = "TRACKING UNAVAILABLE"
24
25 case .normal:
26
27 description = "TRACKING NORMAL"
28
29 case .limited(let reason):
30
31 switch reason {
32
33 case .excessiveMotion:
34
35 description =
36 "TRACKING LIMITED - Too much camera movement"
37
38 case .insufficientFeatures:
39
40 description =
41 "TRACKING LIMITED - Not enough surface detail"
42
43 case .initializing:
44
45 description = "INITIALIZING"
46
47 }
48
49 }
50
51 }
52
53 return description
54
55}
This method sets the text of the text view to the measure status of READY or NOT READY. It shows a description of the tracking status of the AR camera with the help of the method getTrackingDescription(). And the (last) calculated distance in centimeters. Notice we have to multiply the value by 100.0.
Next, we have the method viewDidLoad(), where we set initial values, among other things:
1override func viewDidLoad() {
2
3 super.viewDidLoad()
4
5
6 // Set the view's delegate
7
8 sceneView.delegate = self
9
10 // Set a padding in the text view
11
12 statusTextView.textContainerInset =
13 UIEdgeInsetsMake(20.0, 10.0, 10.0, 0.0)
14
15 // Instantiate the box and add it to the scene
16
17 box = Box()
18
19 box.isHidden = true;
20
21 sceneView.scene.rootNode.addChildNode(box)
22
23 // Set the initial mode
24
25 mode = .waitingForMeasuring
26
27 // Set the initial distance
28
29 distance = 0.0
30
31 // Display the initial status
32
33 setStatusText()
34
35}
In the method viewWillAppear, create and run a session with plane detection. This is important because the points of the plane will be the elements we’ll use to measure things:
1override func viewWillAppear(_ animated: Bool) {
2
3 super.viewWillAppear(animated)
4
5 // Create a session configuration with plane detection
6
7 let configuration = ARWorldTrackingConfiguration()
8
9 configuration.planeDetection = .horizontal
10
11 // Run the view's session
12
13 sceneView.session.run(configuration)
14
15}
Also, override the method viewWillDisappear to pause the session when necessary:
1override func viewWillDisappear(_ animated: Bool) { 2 3 super.viewWillDisappear(animated) 4 5 // Pause the view's session 6 7 sceneView.session.pause() 8 9}
Use the following method to know when the camera’s tracking state has changed. Save a reference to that state:
1func session(_ session: ARSession, cameraDidChangeTrackingState camera: ARCamera) {
2
3 trackingState = camera.trackingState
4
5}
These methods are part of the callbacks that come with the protocol ARSCNViewDelegate.
Now, here comes the interesting part.
The method:
(void)renderer:(id <SCNSceneRenderer>)renderer updateAtTime:(NSTimeInterval)time
It’s called exactly once per frame, like 60 times per second. So we are going to call another method to use hit-testing to detect a plane we can interact with. When that happens, we’ll change the state from NOT READY to READY.
The implementation looks like this:
1func renderer(_ renderer: SCNSceneRenderer, updateAtTime time: TimeInterval) {
2
3 // Call the method asynchronously to perform
4
5 // this heavy task without slowing down the UI
6
7 DispatchQueue.main.async {
8
9 self.measure()
10
11 }
12
13}
14
15func measure() {
16
17 let screenCenter : CGPoint = CGPoint(
18 x: self.sceneView.bounds.midX, y: self.sceneView.bounds.midY)
19
20 let planeTestResults = sceneView.hitTest(
21 screenCenter, types: [.existingPlaneUsingExtent])
22
23 if let result = planeTestResults.first {
24
25 status = "READY"
26
27 } else {
28
29 status = "NOT READY"
30
31 }
32
33 ...
34
35}
The reference point will always be the center of the screen. That’s why we place that button with the plus sign. We’ll get the screen center coordinates to hit-test against an existing plane. If there’s a result, it means we can start measuring.
There are four types of objects we can find in a search:
-
featurePoints A point automatically identified by ARKit as part of a continuous surface, but without a corresponding anchor.
-
estimatedHorizontalPlane A real-world planar surface detected by the search and without a corresponding anchor. The orientation is perpendicular to gravity.
-
existingPlane A plane anchor already in the scene, without considering the plane’s size.
-
existingPlaneUsingExtent A plane anchor already in the scene, respecting the plane’s limited size.
The easiest option would be to use feature points. They represent notable features detected in the camera image. They are detected quicker than planes and there are more of them.
But, this will give us very unstable results. Feature points are intermediate results of the scene analysis that ARKit uses to perform world tracking. So it’s recommended to do a hit test against existing plane anchors first.
If there’s a hit and the mode is measuring, we need to change the status to *MEASURING. *And extract the position as a vector of three elements (x, y, z) from the transformation matrix of the result:
1func measure() {
2
3 ...
4
5 if let result = planeTestResults.first {
6
7 status = "READY"
8
9 if mode == .measuring {
10
11 status = "MEASURING"
12
13 let worldPosition = SCNVector3Make(
14 result.worldTransform.columns.3.x,
15 result.worldTransform.columns.3.y,
16 result.worldTransform.columns.3.z
17 )
18
19 ...
20
21 }
22
23 } ...
24
25}
If startPosition is nil (the first measure), we use worldPosition to set its value as well as the box position:
1func measure() {
2
3 ...
4
5 if let result = planeTestResults.first {
6
7 status = "READY"
8
9 if mode == .measuring {
10
11 ...
12
13 let worldPosition = SCNVector3Make(
14 result.worldTransform.columns.3.x,
15 result.worldTransform.columns.3.y,
16 result.worldTransform.columns.3.z
17 )
18
19 if startPosition == nil {
20
21 startPosition = worldPosition
22
23 box.position = worldPosition
24
25 }
26
27 ...
28
29 }
30
31 } ...
32
33}
We can calculate the distance between startPosition and worldPosition (the actual position) in a 3D space using the Pythagorean theorem and resize the box accordingly:
1func measure() {
2
3 ...
4
5 if let result = planeTestResults.first {
6
7 status = "READY"
8
9 if mode == .measuring {
10
11 ...
12
13 distance = calculateDistance(
14 from: startPosition!, to: worldPosition
15 )
16
17
18 box.resizeTo(extent: distance)
19
20 ...
21
22 }
23
24 } ...
25
26}
27
28func calculateDistance(from: SCNVector3, to: SCNVector3) -> Float {
29
30 let x = from.x - to.x
31
32 let y = from.y - to.y
33
34 let z = from.z - to.z
35
36 return sqrtf( (x * x) + (y * y) + (z * z))
37
38}
But the math is not done yet. We won’t be measuring straight lines all the time. To take measures in all directions and have the 3D box to follow, we need to take into account the rotation in the Y-axis.
We can get the angle (in radians) between two vectors using atan2 in this way:
1func measure() {
2
3 ...
4
5 if let result = planeTestResults.first {
6
7 status = "READY"
8
9 if mode == .measuring {
10
11 ...
12
13 let angleInRadians = calculateAngleInRadians(
14 from: startPosition!, to: worldPosition
15 )
16
17 box.rotation = SCNVector4(x: 0, y: 1, z: 0,
18 w: -(angleInRadians + Float.pi)
19 )
20
21 }
22
23 } ...
24
25}
26
27...
28
29func calculateAngleInRadians(from: SCNVector3, to: SCNVector3) -> Float {
30
31 let x = from.x - to.x
32
33 let z = from.z - to.z
34
35 return atan2(z, x)
36
37}
However, the atan2 function returns an angle from 0º to +/- 180º. Since we’re dealing with radians, we have to add the value of PI for normalization (PI in radians equals to 180º).
Also, notice that the rotation property of the 3D box takes a vector of four elements. The three first components are the axis (we need to rotate on the Y-axis). The fourth one is the rotation in radians.
Let’s not forget the action for the switch control. It just changes the mode according to its state:
1@IBAction func switchChanged(_ sender: UISwitch) {
2
3 if sender.isOn {
4
5 mode = .measuring
6
7 } else {
8
9 mode = .waitingForMeasuring
10
11 }
12
13}
For the 3D box, if you haven’t already, create the class extending from SCNNode:
1import SceneKit 2 3class Box: SCNNode { 4 5}
Let’s also define two static functions outside the class that will help us add and subtract two vectors:
1class Box: SCNNode {
2
3}
4
5func + (left: SCNVector3, right: SCNVector3) -> SCNVector3 {
6
7 return SCNVector3Make(
8 left.x + right.x, left.y + right.y, left.z + right.z
9 )
10
11}
12
13func - (left: SCNVector3, right: SCNVector3) -> SCNVector3 {
14
15 return SCNVector3Make(
16 left.x - right.x, left.y - right.y, left.z - right.z
17 )
18
19}
Add the required constructors:
1class Box: SCNNode { 2 3 override init() { 4 5 super.init() 6 7 } 8 9 required init?(coder aDecoder: NSCoder) { 10 11 fatalError("init(coder:) has not been implemented") 12 13 } 14 15}
Let’s add a lazy variable so it’s initialized until the first time it is used. It will hold a reference to the 3D box (SCNBox) inside a node of type SCNNode:
1class Box: SCNNode {
2
3 lazy var box: SCNNode = makeBox()
4
5 ...
6
7 func makeBox() -> SCNNode {
8
9 let box = SCNBox(
10 width: 0.01, height: 0.01, length: 0.01, chamferRadius: 0
11 )
12
13 return convertToNode(geometry: box)
14
15 }
16
17 func convertToNode(geometry: SCNGeometry) -> SCNNode {
18
19 for material in geometry.materials {
20
21 material.lightingModel = .constant
22
23 material.diffuse.contents = UIColor.white
24
25 material.isDoubleSided = false
26
27 }
28
29 let node = SCNNode(geometry: geometry)
30
31 self.addChildNode(node)
32
33 return node
34
35 }
36
37}
In theory, we could use any primitive shape derived from SCNGeometry. But in practice, SCNBox is easier to use because we can define its X, Y, and Z-axis dimensions by setting its width, height, and length properties. In this case, we use small values so the box is shown with a good size.
Also, notice we’re assigning a uniform white color to the box. You can use textures or configure the material in other ways to give it a more polished look.
In the resizeTo method, we get elements of the bounding box of the node and set the X-axis to the distance provided:
1func resizeTo(extent: Float) {
2
3 var (min, max) = boundingBox
4
5 max.x = extent
6
7 update(minExtents: min, maxExtents: max)
8
9}
The update method takes the min and the modified max element to update the width of the box and the position of the node:
1func update(minExtents: SCNVector3, maxExtents: SCNVector3) {
2
3 guard let scnBox = box.geometry as? SCNBox else {
4
5 fatalError("Geometry is not SCNBox")
6
7 }
8
9 // Normalize the bounds so that min is always < max
10
11 let absMin = SCNVector3(
12 x: min(minExtents.x, maxExtents.x),
13 y: min(minExtents.y, maxExtents.y),
14 z: min(minExtents.z, maxExtents.z)
15 )
16
17 let absMax = SCNVector3(
18 x: max(minExtents.x, maxExtents.x),
19 y: max(minExtents.y, maxExtents.y),
20 z: max(minExtents.z, maxExtents.z)
21 )
22
23 // Set the new bounding box
24
25 boundingBox = (absMin, absMax)
26
27 // Calculate the size vector
28
29 let size = absMax - absMin
30
31 // Take the absolute distance
32
33 let absDistance = CGFloat(abs(size.x))
34
35 // The new width of the box is the absolute distance
36
37 scnBox.width = absDistance
38
39 // Give it a offset of half the new size so they box remains fixed
40
41 let offset = size.x * 0.5
42
43 // Create a new vector with the min position
44 // of the new bounding box
45
46 let vector = SCNVector3(x: absMin.x, y: absMin.y, z: absMin.z)
47
48 // And set the new position of the node with the offset
49
50 box.position = vector + SCNVector3(x: offset, y: 0, z: 0)
51
52}
At this point, you’ll have a working AR measurement app. But let’s add the Pusher library to publish those measurements in realtime.
Sending out the measured data with Pusher
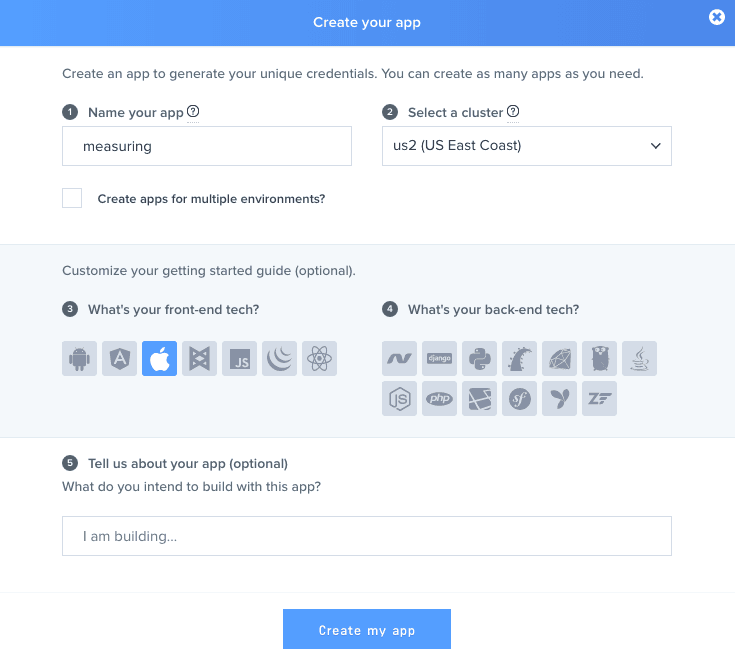
If you haven’t already, create a free account at Pusher. Go to your Dashboard and create an app. Choosing a name, the cluster closest to you location, and iOS as your front-end technology:
This will give you some sample code to get started:
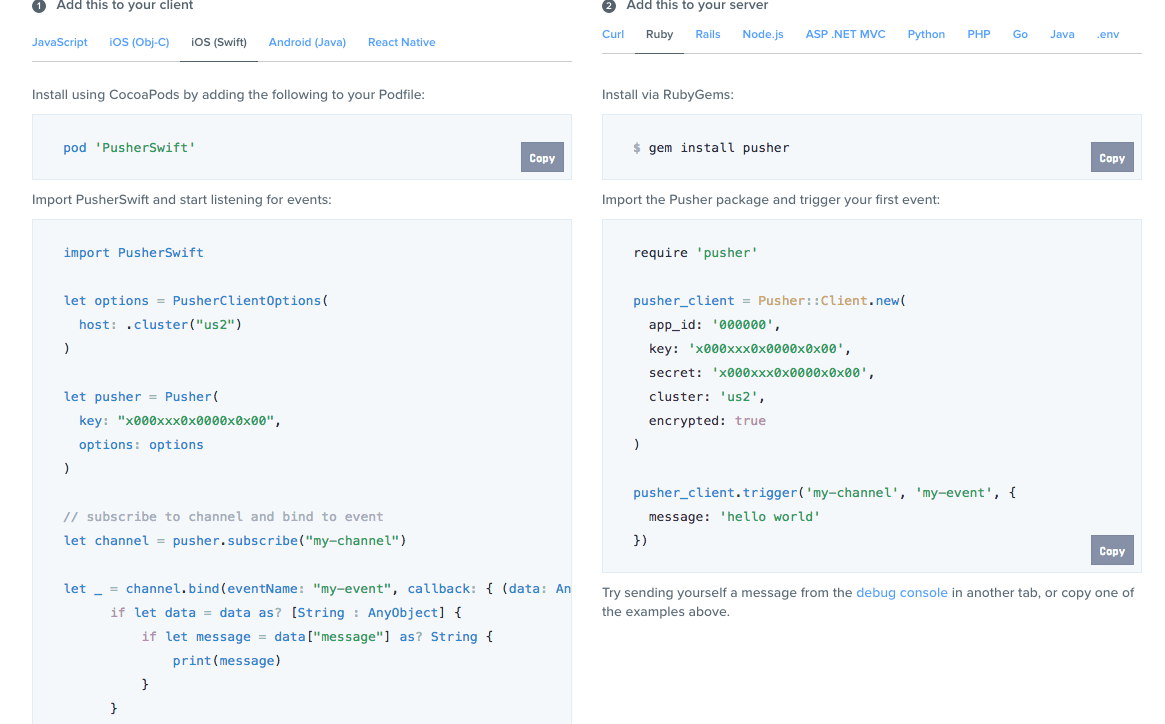
Save your key, secret and cluster values, as we’ll need them later.
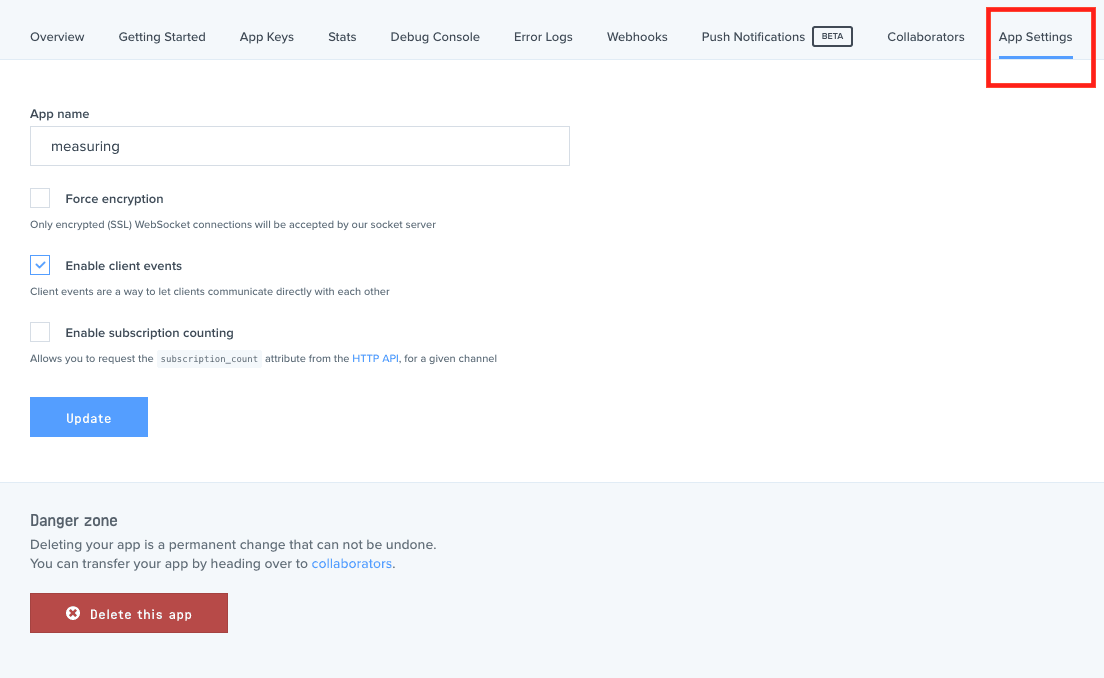
Finally, go to the App Setting tab, check the option Enable client events and click on Update:
What we are going to do is publish a client event to send the calculated measure in realtime.
Events are the primary way of packaging messages in Pusher. Not all these events need to go to a web server for validation or persistence when using Pusher.
In some cases, like in this app, events can be sent directly from the client to Pusher, and from there, to all the other clients connected to the channel. However, there are some things we need to take into account:
-
Client events must be enabled for the application (like we did).
-
The user must be subscribed to the channel that the event is being triggered on.
-
Client events must be prefixed by client-.
-
Don’t publish more than 10 messages per second per client (connection). Any events triggered above this rate limit will be rejected.
In ViewController, let’s import the Pusher library and instantiate the object. We’ll define a variable for the channel and another variable to control the rate of the triggered events:
1...
2
3import PusherSwift
4
5class ViewController: UIViewController, ARSCNViewDelegate {
6
7 ...
8
9 let pusher = Pusher(
10
11 key: "<YOUR_PUSHER_APP_KEY>",
12
13 options: PusherClientOptions(
14
15 authMethod: .inline(secret: "<YOUR_PUSHER_APP_SECRET>"),
16
17 host: .cluster("YOUR_PUSHER_APP_CLUSTER")
18
19 )
20
21 )
22
23 var channel: PusherChannel!
24
25 var sendingTime : TimeInterval = 0
26
27 ...
28
29}
We have to use a private authenticated channel for client events. The Pusher Swift library provides the following methods of authentication with the authMethod option:
-
endpoint(authEndpoint:String)The client will make a POST request to the endpoint you specify. -
authRequestBuilder(authRequestBuilder:AuthRequestBuilderProtocol)You specify an object that conforms to the AuthRequestBuilderProtocol. -
inline(secret:String)Your app’s secret so that authentication requests do not need to be made to your authentication endpoint. Instead subscriptions can be authenticated directly inside the library and used for development. -
authorizer(authorizer:Authorizer)You specify an object that conforms to the Authorizer protocol to provide the appropriate auth information. -
noMethodIf you do not need to set an authentication method, this is the default value.
You can learn how to create an authentication endpoint on this page. For simplicity, we are using the inline option that doesn’t require a server for authentication.
In the method viewDidLoad, subscribe to a private channel. Remember to use the private- prefix and connect to Pusher:
1override func viewDidLoad() {
2
3 ...
4
5 // subscribe to channel and connect
6
7 channel = pusher.subscribe("private-channel")
8
9 pusher.connect()
10
11}
Let’s also add to the class a function to send a client event. Remember to use the client- prefix:
1func sendPusherEvent() {
2
3 channel.trigger(eventName: "client-new-measurement",
4 data: String(format: "%.2f cm", distance * 100.0)
5 )
6
7}
Remember that the method renderer and the measure function is executed once per frame. Ideally, this is 60 times per second. To limit the number of client events sent to Pusher, we are going to use the TimeInterval parameter of the renderer method. This tells us the time at which the scene is updated.
Modify the method measure to pass the parameter as its argument:
1func renderer(_ renderer: SCNSceneRenderer, updateAtTime time: TimeInterval) {
2
3 // Call the method asynchronously to perform
4
5 // this heavy task without slowing down the UI
6
7 DispatchQueue.main.async {
8
9 self.measure(time: time)
10
11 }
12
13}
14
15func measure(time: TimeInterval) {
16
17 ...
18
19}
Now add the following if block after setting the box rotation:
1func measure(time: TimeInterval) {
2
3 ...
4
5 if let result = planeTestResults.first {
6
7 status = "READY"
8
9 if mode == .measuring {
10
11 ...
12
13 box.rotation = SCNVector4(x: 0, y: 1, z: 0,
14 w: -(angleInRadians + Float.pi)
15 )
16
17 // Only send the Pusher event after the specified interval
18
19 if time > sendingTime {
20
21 sendPusherEvent();
22
23 sendingTime = time + TimeInterval(0.2)
24
25 }
26
27 }
28
29 } ...
30
31}
At first run, time will be greater than sendingTime. But then, we add 0.2 seconds (or 200 milliseconds) to time to set the new value of sendingTime. This way, we can be sure that the Pusher event will be executed at most 5 times per second.
However, due to this time difference, the last measure probably won’t be sent. So we can call the sendPusherEvent method when the user finishes measuring:
1@IBAction func switchChanged(_ sender: UISwitch) {
2
3 if sender.isOn {
4
5 mode = .measuring
6
7 } else {
8
9 mode = .waitingForMeasuring
10
11 sendPusherEvent()
12
13 }
14
15}
Of course, we could just send the last measure to Pusher to avoid the issue. But what will be the fun of sending only one value?
Testing the app
Launch the app:
It may take several seconds to initialize and find a plane so the status can change to READY, move around your device slowly and watch for the tracking state of the camera to speed up the process a little bit.
Once it’s READY, you will be able to take measurements and see them in realtime on your device:
And on the Debug console of your Pusher dashboard:
Conclusion
In this tutorial, you have learned how to create a basic measurement app with ARKit and how to use Pusher to send client events from an iOS app.
Tracking the features of the real world is an important part of an augmented reality experience. However, sometimes the results are not accurate because the environment can be difficult to measure. In the ARKit documentation, you can find some tips to improve the AR experience.


© 2025 Pusher Ltd. All rights reserved.
Pusher Limited is a company registered in England and Wales (No. 07489873) whose registered office is at MessageBird UK Limited, 3 More London Riverside, 4th Floor, London, United Kingdom, SE1 2AQ.