- Products

- Developers
- User stories
- Blog
- Pricing

Create a realtime graph using Nest.js
- Introduction
- Introduction
- What exactly is Nest.js
- Prerequisites
- Setting up the project
- Run the application
- Pusher account setup
- Bootstrap the application
- Set up the homepage
- Route for the homepage
- Stylesheet
- Render the chart
- Initialize the chart
- Send the vote request
- Create a controller
- Realtime service
- Register the controller and component
- Listen for Pusher Channel events and update chart
- Conclusion
Introduction
Introduction
One feature that will always make opinion polls stands out and encourage participants, is the fact that their vote counts. Ensuring this can be facilitated by realtime update of points and visualization of data (for example on a chart) depending on choice or votes.
Instant result, live update, realtime apps with less code and many more are some of the promises of Pusher Channels, which it has so far lived up to.
Together in this tutorial, we will build:
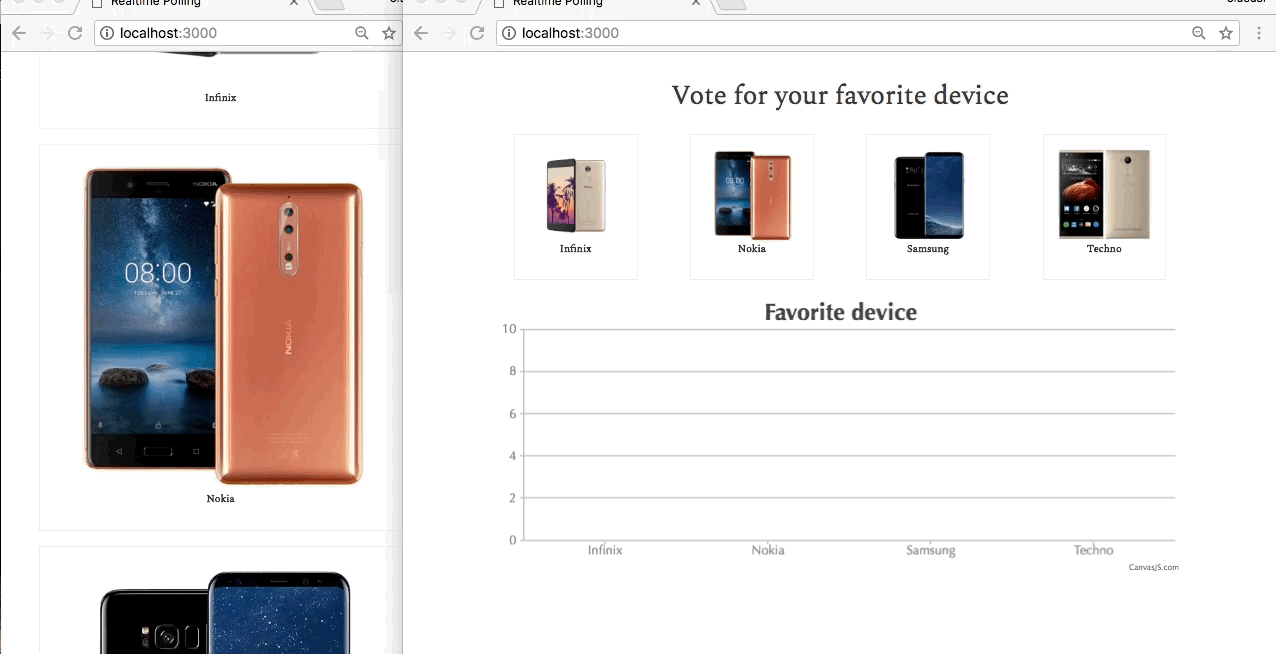
This is a simple but yet an effective demonstration of realtime functionality of a basic human activity. Its an app that allows users to cast votes for their favorite mobile device. It contains two different sections:
- Where users can select a device.
- A chart to display the results as they come in.
This realtime opinion poll will be built using Nest.js and powered by Pusher Channels.
What exactly is Nest.js
Nest.js is a progressive framework for building efficient and scalable server-side applications. Built to take the advantage of modern JavaScript, but still preserves compatibility with pure JavaScript.
Prerequisites
A basic understanding of TypeScript and Node.js will help you get the best out of this tutorial. It is assumed that you already have Node and npm installed. Kindly check Node.js and npm for further instructions and installation steps.
As we proceed in this tutorial, we will make use of some other tools like:
- Pusher: a Node.js client to interact with the Pusher REST API. Create a free sandbox Pusher account or sign in.
- Axios: a promise-based HTTP client that works both in the browser and in a Node.js environment.
- CanvasJS: a responsive HTML5 Charting library for data visualization.
Setting up the project
For the purpose of setting up the project, we’ll run the command below to clone the starter repository from Github. This will create a new project folder named nest-poll-application on our machine. We’ll then proceed by changing directory into the newly created project folder and install all the required dependencies for this application. Open your terminal and run:
1// Clone starter repository 2 $ git clone https://github.com/nestjs/typescript-starter.git nest-poll-application 3 4 // change directory 5 $ cd nest-poll-application 6 7 // install dependencies 8 $ npm install
Run the application
Start the development server with :
$ npm start
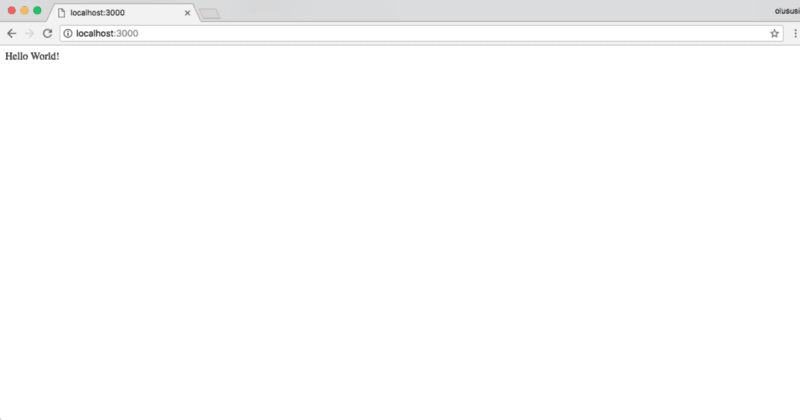
The command above will start the application on the default port used by Nest.js. Open your browser and navigate to http://localhost:3000. You should see a welcome message like what we have below:
Pusher account setup
Head over to Pusher and sign up for a free account. This is important as it is required before you can have access to an API key and easily access all the awesome features offered by Pusher.
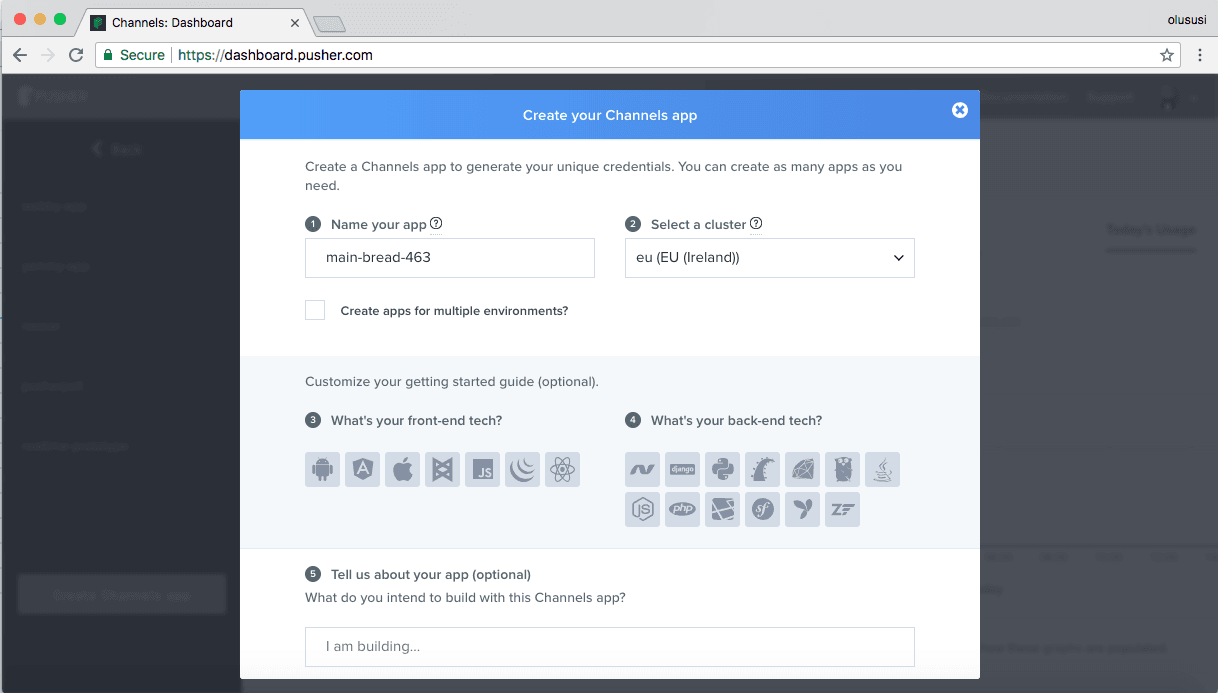
Create a new app by selecting Channels apps on the sidebar and clicking Create Channels app button on the bottom of the sidebar:
Configure an app by providing basic information requested in the form presented. You can also choose the environment you intend to integrate Pusher with for a better setup experience:
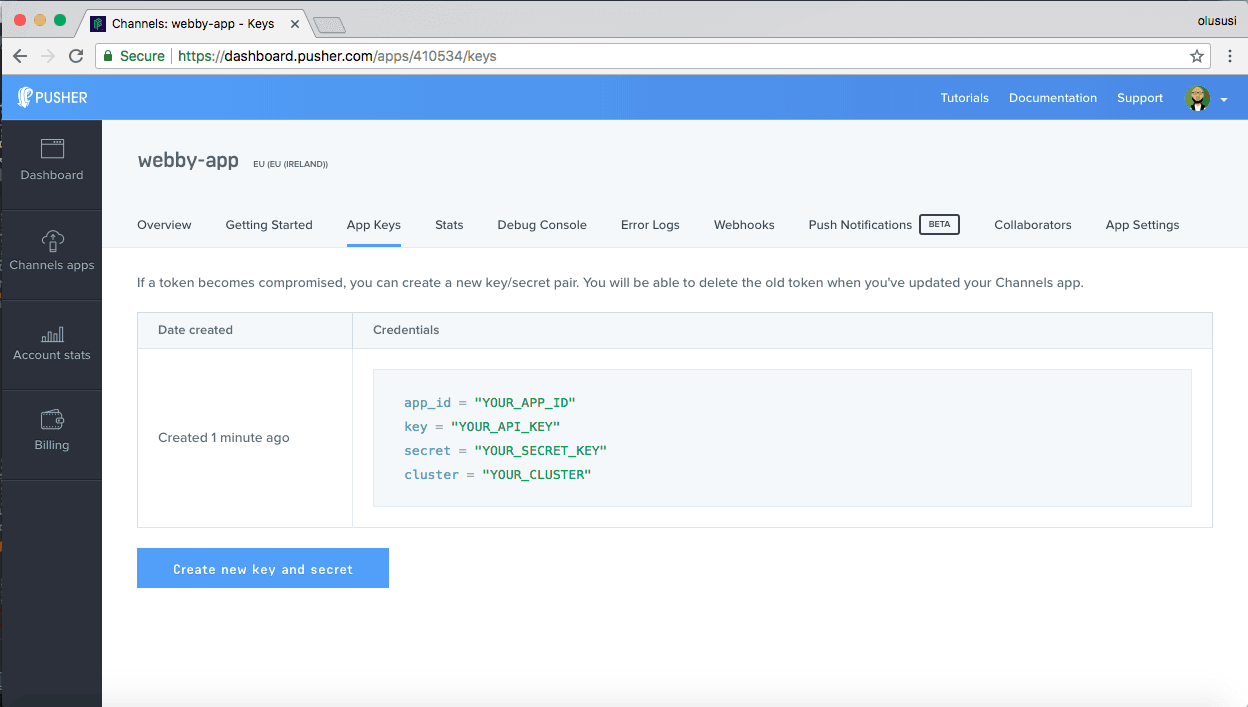
You can retrieve your keys from the App Keys tab:
Bootstrap the application
Under the hood, Nest uses Express library and therefore, favors the popular MVC pattern. In order to create a simple MVC app, we have to install a template engine.
$ npm install ejs --save
Once the installation process is completed, configure the express instance by updating main.ts file with the content below:
1// ./src/main.ts 2 3 import { NestFactory } from '@nestjs/core'; 4 import { AppModule } from './app.module'; 5 6 import * as express from 'express'; 7 import * as path from 'path'; 8 9 async function bootstrap() { 10 const app = await NestFactory.create(AppModule); 11 app.use(express.static(path.join(__dirname, 'public'))); 12 app.set('views', __dirname + '/views'); 13 // set ejs as the view engine 14 app.set('view engine', 'ejs'); 15 await app.listen(3000); 16 } 17 bootstrap();
This is the entry point of the application and necessary for bootstrapping Nest.js apps. I have included the Express and Path modules and set up ejs as the view engine for the application.
Set up the homepage
The views folder will contain all template for this application. Go ahead and create it within the src folder. Once you are done, create a new file named index.ejs right inside the newly created views folder and update the content with:
1// ./src/views/index.js 2 3 <!DOCTYPE html> 4 <html lang="en"> 5 <head> 6 <meta charset="UTF-8"> 7 <meta name="viewport" content="width=device-width, initial-scale=1.0"> 8 <meta http-equiv="X-UA-Compatible" content="ie=edge"> 9 <link rel="stylesheet" href="https://maxcdn.bootstrapcdn.com/bootstrap/3.3.7/css/bootstrap.min.css"> 10 <title>Realtime Polling</title> 11 </head> 12 <body> 13 <div class="main"> 14 <div class="container"> 15 <h1>Vote for your favorite device</h1> 16 <div class="col-md-12"> 17 <div class="row"> 18 <div class="col-md-3"> 19 <div class="poll-device"> 20 <img src="/images/infinix.jpg" alt="" id="Infinix"> 21 <p class="text-center caption">Infinix</p> 22 </div> 23 </div> 24 <div class="col-md-3"> 25 <div class="poll-device"> 26 <img src="/images/nokia.jpg" alt="" id="Nokia"> 27 <p class="text-center caption">Nokia</p> 28 </div> 29 </div> 30 31 <div class="col-md-3"> 32 <div class="poll-device"> 33 <img src="/images/samsung.jpg" alt="" id="Samsung"> 34 <p class="text-center caption">Samsung</p> 35 </div> 36 </div> 37 <div class="col-md-3"> 38 <div class="poll-device"> 39 <img src="/images/techno.jpg" alt="" id="Techno"> 40 <p class="text-center caption">Techno</p> 41 </div> 42 </div> 43 </div> 44 45 <div id="vote-chart-container"></div> 46 </div> 47 </div> 48 </div> 49 <script src="https://code.jquery.com/jquery-3.3.1.js" integrity="sha256-2Kok7MbOyxpgUVvAk/HJ2jigOSYS2auK4Pfzbm7uH60=" crossorigin="anonymous"></script> 50 <script src="https://cdnjs.cloudflare.com/ajax/libs/axios/0.17.1/axios.js"></script> 51 <script src="https://js.pusher.com/4.1/pusher.min.js"></script> 52 <script src="https://cdnjs.cloudflare.com/ajax/libs/canvasjs/1.7.0/canvasjs.min.js"></script> 53 <script src="/vote.js"></script> 54 </body> 55 </html>
This will render the polling screen with images of devices that users will select from. You can download the images here or use your preferred images. To help out with layout we included bootstrap within the header section of the page. And just before the closing tag of the <body> element we included the CDN file for jQuery as it is a requirement for Canvas.js. We also added a CDN file each for Axios and Pusher and finally, we included a custom script named vote.js.
Route for the homepage
The controller layer in Nest.js is responsible for receiving an incoming request and returning the appropriate response to the client. Nest uses a Controller metadata @Controller to map routes to a specific controller. The starter project already contain a controller by default. We will make use of this in order to render the home for this app. Open .src/app.controller.ts and edit as shown below:
1// ./src/app.controller.ts 2 3 import { Get, Controller, Res } from '@nestjs/common'; 4 @Controller() 5 export class AppController { 6 @Get() 7 root(@Res() res) { 8 res.render('index'); 9 } 10 }
This controller will ensure that Nest maps every / route to the index.ejs file.
Stylesheet
Create a new folder called public within the src folder and create a new file named style.css within it. Update it with the content below:
1@import url('https://fonts.googleapis.com/css?family=Spectral'); 2 *, *:before, *:after { 3 box-sizing: border-box; 4 } 5 6 html, body { 7 font-family: 'Spectral', serif; 8 height: 100%; 9 } 10 .main { 11 height: 100%; 12 background-color: #FAFAFA; 13 } 14 .container { 15 padding-top: 20px; 16 padding-bottom: 20px; 17 } 18 h1 { 19 text-align: center; 20 } 21 .caption { 22 font-weight: bold; 23 } 24 25 .poll-device { 26 margin: 20px; 27 padding: 20px; 28 border: 1px solid #EDEDED; 29 transition: background 500mms ease-in-out; 30 } 31 32 .poll-device.selected { 33 background: #EDEDED; 34 } 35 36 .poll-device:hover { 37 background: #EDEDED; 38 cursor: pointer; 39 } 40 41 42 .poll-device img { 43 width: 100%; 44 height: auto; 45 display: block; 46 margin: 0 auto; 47 } 48 49 #vote-chart-container { 50 min-height: 370px; 51 width: 100%; 52 background: #f5f5f5; 53 }
Don’t forget to include this file in index.ejs
1<head> 2 ... 3 <link rel="stylesheet" href="/styles.css"> 4 </head>
Render the chart
We will attach the chart to a div with an id of vote-chart-container, which we have already added to index.ejs:
1// ./src/views/index.ejs 2 3 <div class="main"> 4 <div class="container"> 5 ... 6 // chart will be rendered here 7 <div id="vote-chart-container"></div> 8 .. 9 </div> 10 </div>
Initialize the chart
Initialize the chart with a default dataset. Because this is a simple example, we won’t bother with persisted data, rather we can just start at empty(zero). So create a new file named vote.js and save it in the public folder. Then proceed to add the content below to initialize the chart:
1// ./src/public/vote.js 2 3 let dataPoints = [ 4 {label: 'Infinix', y:0}, 5 {label: 'Nokia', y:0}, 6 {label: 'Samsung', y:0}, 7 {label: 'Techno', y:0} 8 ] 9 10 const chartContainer = document.querySelector('#vote-chart-container'); 11 12 if (chartContainer) { 13 const chart = new CanvasJS.Chart('vote-chart-container', { 14 animationEnabled: true, 15 theme: 'theme1', 16 title: { 17 text: 'Favorite device' 18 }, 19 data: [ 20 { 21 type: 'column', 22 dataPoints: dataPoints 23 } 24 ] 25 }); 26 27 chart.render(); 28 29 // Here, we will configure pusher, subscribe to event and update chart 30 ... 31 }
- The
dataPointsarray is the data source for the chart. The objects in the array have a uniform structure oflabel, which stores the frameworks andywhich stores the points. - We check if the
chartContainerexists before creating the chart. - We use the
Chartconstructor function to create a chart by passing the configuration for the chart which includes the data. The chart is rendered by callingrender()on constructor function instance.
Send the vote request
When a voter clicks on a device, we want to identify the item that was selected and trigger an HTTP request to send their vote request to the server.
1// ./src/public/vote.js 2 3 4 const app = { 5 sendToServer(id){ 6 let baseURL = 'http://localhost:3000'; 7 axios.post(`${baseURL}/vote`, {id}) 8 .then( response => console.log('Successful')); 9 }, 10 11 start(){ 12 devices = document.querySelectorAll('.poll-device'); 13 devices.forEach((item, index) => { 14 item.addEventListener('click', (e) => { 15 this.sendToServer(e.target.id); 16 }); 17 }); 18 } 19 }; 20 21 window.addEventListener('load', () => app.start()); 22 23 let dataPoints = [ 24 ... 25 ] 26 27 const chartContainer = document.querySelector('#vote-chart-container'); 28 29 if (chartContainer) { 30 ... 31 }); 32 33 chart.render(); 34 // Here, we will configure pusher, subscribe to event and update chart 35 ... 36 }
Create a controller
Earlier, we already configured the app.controller.ts to render the homepage and display the form for consumers. The next thing we need to do is build the controller that will handle the data posted to the server. Create a new folder named vote in the src folder and create a new file called vote.controller.ts within it. Then update it with the content below:
1// ./src/vote/vote.controller.ts 2 3 import { Controller, Post, Res, Body, HttpStatus } from '@nestjs/common'; 4 import { VoteService } from './vote.service'; 5 6 @Controller('vote') 7 export class VoteController { 8 constructor(private voteService: VoteService){} 9 10 @Post() 11 castVote(@Res() res, @Body() vote) { 12 this.voteService.create(vote); 13 res.status(HttpStatus.OK).send('Voted'); 14 } 15 16 }
This controller handles only the HTTP request and abstract the logic of Pusher to a service. Let’s create the service next.
Realtime service
To enable realtime updates of the votes, we will integrate Pusher. To achieve a realtime two-way functionality, Pusher needs to be installed both on the client side and on the server side. We already included the script for the client side earlier within our index.ejs file. For the server side lets use Node Package Manager to install the library.
$ npm install pusher --save
Once the installation is completed, create a new file within ./src/vote called vote.service.ts and update the content with:
1// ./src/vote/vote.service.ts 2 3 import { Component } from '@nestjs/common'; 4 5 @Component() 6 export class VoteService { 7 create(vote) { 8 const Pusher = require('pusher'); 9 var pusher = new Pusher({ 10 appId: 'APP_ID', 11 key: 'YOUR_API_KEY', 12 secret: 'YOUR_SECRET_KEY', 13 cluster: 'CLUSTER', 14 encrypted: true 15 }); 16 pusher.trigger('poll', 'vote', { 17 points: 10, 18 phone: vote, 19 }); 20 } 21 }
Here we have initialized Pusher with the required credentials so we’ll be able to trigger an event named vote through a poll channel. Don’t forget to replace the APP_ID , YOUR_API_KEY, YOUR_SECRET_KEY and CLUSTER with the appropriate details obtained from your dashboard.
For the payload, we have a JS object. This object contains the points for each vote and the name of the device being voted.
Register the controller and component
At the moment, our application doesn’t recognise the newly created controller and service. Lets change this by editing our module file 'app.module.ts' and put the controller into the 'controller' array and service into 'components' array of the '@Module() decorator respectively.
1// ./src/app.module.ts 2 3 import { VoteService } from './vote/vote.service'; 4 import { VoteController } from './vote/vote.controller'; 5 import { Module } from '@nestjs/common'; 6 import { AppController } from './app.controller'; 7 8 @Module({ 9 imports: [], 10 controllers: [AppController, VoteController], 11 components: [VoteService], 12 }) 13 export class AppModule {}
Listen for Pusher Channel events and update chart
We can now listen for Pusher events and update the chart with the payload sent to the channel we are subscribed to:
1// ./src/public/vote.js 2 ... 3 if (chartContainer) { 4 ... 5 // Here, we will configure pusher, subscribe to event and update chart 6 var pusher = new Pusher('YOUR_API_KEY', { 7 cluster: 'CLUSTER', 8 encrypted: true 9 }); 10 11 var channel = pusher.subscribe('poll'); 12 channel.bind('vote', (data) => { 13 dataPoints = dataPoints.map(x => { 14 if (x.label == data.phone.id) { 15 x.y += data.points; 16 return x; 17 } else { 18 return x; 19 } 20 }); 21 chart.render() 22 }); 23 }
-
We configure Pusher with our credentials by passing the app key and config object as arguments to the Pusher constructor function.
-
The name of our trigger is
poll, so we subscribe to it and listen to itsvoteevent. Hence, when the event is triggered, we update thedataPointsvariable and re-render the chart withrender()
Conclusion
We just built a very simple realtime poll app powered by Pusher. I hope you found this tutorial helpful and will easily applied the knowledge gained here to improve existing project and new ones.
The source code for this demo can be found here on Github.


© 2025 Pusher Ltd. All rights reserved.
Pusher Limited is a company registered in England and Wales (No. 07489873) whose registered office is at MessageBird UK Limited, 3 More London Riverside, 4th Floor, London, United Kingdom, SE1 2AQ.