- Products

- Developers
- User stories
- Blog
- Pricing

Creating a realtime game with React Native
Introduction
In this tutorial, we’ll be implementing the classic game Tic-Tac-Toe with React Native and Pusher Channels. This tutorial assumes that you already have a basic knowledge of React Native.
Prerequisites
- Pusher Account - Create a free sandbox Pusher account or sign in. After creating an account, you can go ahead and create a new Pusher app.
- Android SDK - We’ll be specifically deploying the app as an Android App so you need the Android SDK to run the app on an Android device or emulator.
- A Machine that’s ready for React Native Development - If you don’t already have your machine set up for React Native, you can follow the Getting Started Guide on the official docs. Be sure to follow the instructions in the "Building Projects with Native Code” tab.
- Genymotion or Android Emulator - this is optional, as you can always use a real device for testing.
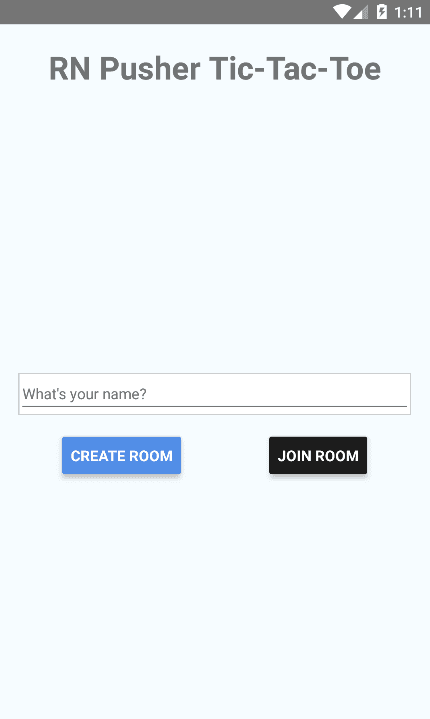
What we’re going to build
Here’s what the app is going to look like by default:
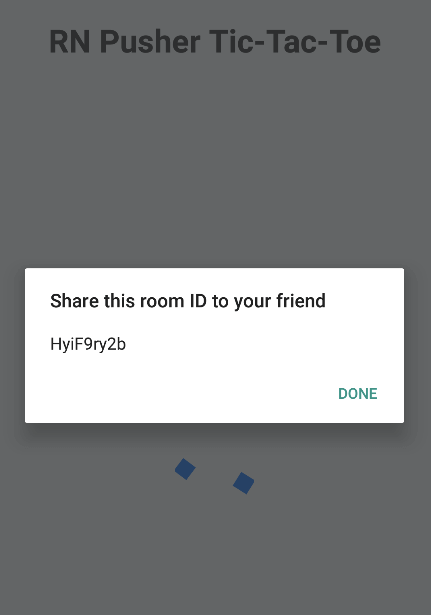
When a user has chosen to create a room, the room ID will be generated by the app. This room ID should be entered by another user so the game can begin. Throughout this tutorial, I’ll be referring to the user other than the current user as the “rival”.
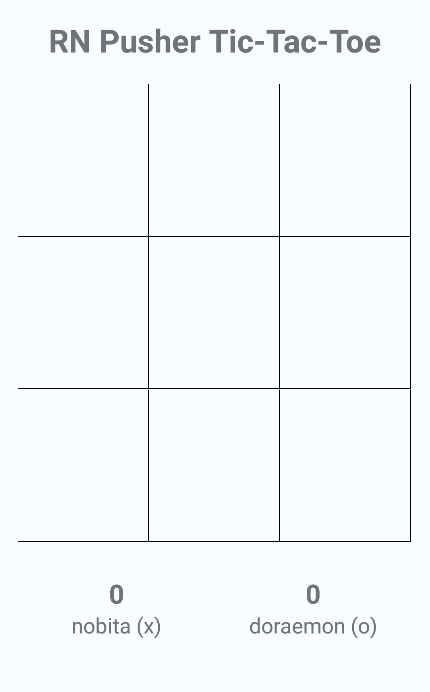
Once someone has joined the room, the Tic-Tac-Toe board will be shown. At this point, any of the players can start the first move.
Once the last move is used to fill the board, an alert will be shown to the room creator asking whether they want to restart the game (empty the board and start over) or end the game. If the room creator has chosen to end the game, the app state will reset and the default screen will be shown.

You can find the full source code of the app in its Github repo.
Coding the server component
The server component authenticates the requests that will come from the app. This is needed because we’ll be using client events to send data from client to client. The server component authenticates the request whenever an app tries to connect using the API key of the app you created earlier. This way you can verify if the request really came from your app.
Start by initializing a package.json file:
npm init
Install the dependencies:
npm install --save express body-parser pusher dotenv
Create a .env file in the same folder as the package.json file and add your Pusher app details:
1APP_ID="YOUR PUSHER APP ID" 2 APP_KEY="YOUR PUSHER APP KEY" 3 APP_SECRET="YOUR PUSHER APP SECRET" 4 APP_CLUSTER="YOUR PUSHER APP CLUSTER"
Create a server.js file and add the following code:
1var express = require('express'); // for running a server 2 var bodyParser = require('body-parser'); // for processing JSON submitted in the request body 3 var Pusher = require('pusher'); // for connecting to Pusher 4 5 require('dotenv').config(); 6 7 var app = express(); 8 app.use(bodyParser.json()); // for parsing JSON strings passed in the request body 9 app.use(bodyParser.urlencoded({ extended: false })); // for parsing URL encoded request body 10 11 var pusher = new Pusher({ // connect to pusher 12 appId: process.env.APP_ID, // load the Pusher app settings from the .env file 13 key: process.env.APP_KEY, 14 secret: process.env.APP_SECRET, 15 cluster: process.env.APP_CLUSTER, 16 }); 17 18 app.get('/', function(req, res){ // for testing if the server is running 19 res.send('everything is good...'); 20 }); 21 22 app.post('/pusher/auth', function(req, res) { // authenticate user's who's trying to connect 23 var socketId = req.body.socket_id; 24 var channel = req.body.channel_name; 25 var auth = pusher.authenticate(socketId, channel); 26 res.send(auth); 27 }); 28 29 var port = process.env.PORT || 5000; 30 app.listen(port);
Here’s what the code above does:
- Line 1 imports
express, a web framework for Node.js which allows us to create a server and respond to specific routes. - Line 2 imports
body-parser, a middleware for parsing the request body so that the data passed in the request body can be accessed like an object. For example, in the/pusher/authroute, this allows us to do the following to access the socket ID from the request body:req.body.socket_id. - Line 3 imports the
pusherpackage. This allows us to communicate with the Pusher app you created earlier in order to authenticate the user (line 25). - Line 5 imports the
dotenvpackage which loads up the config in the.envfile you created earlier. You can see them being accessed as environment variables on lines 12 to 15. - Lines 7 to 9 tells Express to use
body-parserto create two different middleware entries, one for parsing JSON strings and the other for parsing URL encoded strings. Theextendedoption is set tofalsebecause we’re not really expecting rich objects and arrays to be included in the request body. Instead, we’re only expecting plain JSON strings to be passed in the request body. - Lines 18 to 20 are for testing if the server is running, you can access
http://localhost:5000from your browser. If you see the string output “everything is good…” then it works. - Lines 22 to 27 are for processing the authentication requests coming from the app. The authentication request is sent every time a client connects to Pusher from the app that we’ll be creating. Note that the code for authenticating users doesn’t really have any security measures in place. This means anyone can just use your Pusher app if they happen to get a hold of your Pusher app credentials.
Coding the app
Now we’re ready to add the code for the app. First bootstrap a new React Native app:
react-native init RNPusherTicTacToe
Once it’s done, you can now install the dependencies:
npm install --save lodash.range pusher-js react-native-prompt shortid react-native-spinkit@latest
Out of these dependencies, React Native Spinkit has some assets which need to be linked, so execute the following command to link those:
react-native link
Here’s how the packages you’ve just installed are used in the app:
- pusher-js - for using Pusher. This allows us to send messages to channels, and receive messages from channels in real-time.
- react-native-prompt - for showing a prompt box, used for getting user input.
- react-native-spinkit - for showing a spinner while waiting for another player to join the room.
- lodash.range - for generating arrays which has a specific number of items.
- shortid - for generating unique IDs when creating a room.
Now we’re ready to add the code for the app. First, open the index.android.js file and replace the default code with the following:
1import React, { Component } from 'react'; 2 import { 3 AppRegistry 4 } from 'react-native'; 5 6 import Main from './components/Main'; 7 8 export default class RNPusherTicTacToe extends Component { 9 10 render() { 11 return ( 12 <Main /> 13 ); 14 } 15 16 } 17 18 AppRegistry.registerComponent('RNPusherTicTacToe', () => RNPusherTicTacToe);
Make sure that RNPusherTicTacToe matches the name you’ve given to the app when you created it with react-native init.
Next, create a components/Main.js file and add the following:
1import React, { Component } from 'react'; 2 3 import { 4 StyleSheet, 5 Text, 6 View, 7 Button, 8 Alert 9 } from 'react-native'; 10 11 // include the dependencies 12 import Pusher from 'pusher-js/react-native'; 13 import shortid from 'shortid'; 14 import Spinner from 'react-native-spinkit'; 15 16 // include the components 17 import Header from './Header'; 18 import Home from './Home'; // the default screen 19 import Board from './Board'; // the tic-tac-toe board and score UI
Inside the constructor, initialize the state and the functions that will be used throughout the component:
1export default class Main extends Component { 2 3 constructor() { 4 super(); 5 this.state = { 6 username: '', // the name of the user 7 piece: '', // the piece assigned to the user 8 rival_username: '', // the name of the rival player 9 is_playing: false, // whether the user is currently playing or not 10 show_prompt: false, // whether the prompt box for entering the room name is visible 11 is_waiting: false, // whether the user is currently waiting for another player (rival) or not 12 is_room_creator: false // whether the user is the room's creator 13 } 14 15 this.game_channel = null; // the Pusher channel where data regarding the game will be sent 16 this.is_channel_binded = false; // whether a channel has already been binded or not 17 18 this.onChangeUsername = this.onChangeUsername.bind(this); // executes when the value of the username text field changes 19 this.onPressCreateRoom = this.onPressCreateRoom.bind(this); // executes when user creates a room 20 this.onPressJoinRoom = this.onPressJoinRoom.bind(this); // executes when user taps on the join room button 21 this.joinRoom = this.joinRoom.bind(this); // the function for joining a room 22 this.onCancelJoinRoom = this.onCancelJoinRoom.bind(this); // executes when user cancels joining a room 23 this.endGame = this.endGame.bind(this); // the function for ending the game 24 25 } 26 }
Before the component is mounted, connect to Pusher using the credentials you’ve been given when you created the Pusher app:
1componentWillMount() { 2 this.pusher = new Pusher('YOUR PUSHER API KEY', { 3 authEndpoint: 'YOUR AUTH ENDPOINT', 4 cluster: 'YOUR PUSHER APP CLUSTER', 5 encrypted: true 6 }); 7 }
When the component is updated, we need to check whether the user is already waiting for a rival and that a Pusher channel has not been bound to any events yet. If that’s the case, we listen for the client-joined event. When this happens, update the state so that the UI shows the game board. If the user is the room creator, trigger the same event so that the rival (the one who joined the room) is informed that the game can already start.
1componentDidUpdate() { 2 if(this.state.is_waiting && !this.is_channel_binded){ 3 4 this.game_channel.bind('client-joined', (data) => { 5 this.setState({ 6 is_waiting: false, 7 is_playing: true, 8 rival_username: data.username 9 }); 10 11 if(this.state.is_room_creator){ 12 // inform the one who joined the room that the game can begin 13 this.game_channel.trigger('client-joined', { 14 username: this.state.username // send the name of the room creator to the one who joined 15 }); 16 } 17 }); 18 19 this.is_channel_binded = true; 20 } 21 }
In the render method, the Home component is shown by default. It displays the UI for letting the user enter their name, and either join or create a new room. Once a rival joins a room, the game board will be shown. The Spinner component is used as the transition state between the two while waiting for a rival to join a room.
1render() { 2 return ( 3 <View style={styles.container}> 4 <Header title={"RN Pusher Tic-Tac-Toe"} /> 5 6 <Spinner 7 style={styles.spinner} 8 isVisible={this.state.is_waiting} 9 size={75} 10 type={"WanderingCubes"} 11 color={"#549eff"} 12 /> 13 14 { 15 !this.state.is_playing && !this.state.is_waiting && 16 <Home 17 username={this.state.name} 18 onChangeUsername={this.onChangeUsername} 19 onPressCreateRoom={this.onPressCreateRoom} 20 onPressJoinRoom={this.onPressJoinRoom} 21 show_prompt={this.state.show_prompt} 22 onCancelJoinRoom={this.onCancelJoinRoom} 23 /> 24 } 25 26 { 27 this.state.is_playing && 28 <Board 29 channel={this.game_channel} 30 username={this.state.username} 31 piece={this.state.piece} 32 rival_username={this.state.rival_username} 33 is_room_creator={this.state.is_room_creator} 34 endGame={this.endGame} 35 /> 36 } 37 38 </View> 39 ); 40 }
Here’s the function that’s executed when the text field for entering the user’s name changes:
1onChangeUsername(username) { 2 this.setState({username}); 3 }
When a user taps on the Create Room button, generate a unique ID for the room and subscribe to a new Pusher channel using that ID. Here we’re using a private channel so that we can send messages directly from the app:
1onPressCreateRoom() { 2 3 let room_id = shortid.generate(); // generate a unique ID for the room 4 this.game_channel = this.pusher.subscribe('private-' + room_id); // subscribe to a channel 5 6 // alert the user of the ID that the friend needs to enter 7 Alert.alert( 8 'Share this room ID to your friend', 9 room_id, 10 [ 11 {text: 'Done'}, 12 ], 13 { cancelable: false } 14 ); 15 16 // show loading state while waiting for someone to join the room 17 this.setState({ 18 piece: 'X', // room creator is always X 19 is_waiting: true, 20 is_room_creator: true 21 }); 22 23 }
When a rival taps on the Join Room button, the prompt box is shown:
1onPressJoinRoom() { 2 this.setState({ 3 show_prompt: true 4 }); 5 }
Once the rival joins the room, the following function is executed. The room_id is provided by the prompt box so we simply use it to subscribe to the same channel as the room creator. This allows the two users to communicate directly using this channel. Note that the code below doesn’t handle if a third person happens to join the room. You can add the functionality to check for the number of users in the room if you want. That way the app will reject it if there are already two users in the room.
1joinRoom(room_id) { 2 this.game_channel = this.pusher.subscribe('private-' + room_id); 3 // inform the room creator that a rival has joined 4 this.game_channel.trigger('client-joined', { 5 username: this.state.username 6 }); 7 8 this.setState({ 9 piece: 'O', // the one who joins the room is always O 10 show_prompt: false, 11 is_waiting: true // wait for the room creator to confirm 12 }); 13 }
When the user cancels joining of a room, simply hide the prompt box:
1onCancelJoinRoom() { 2 this.setState({ 3 show_prompt: false 4 }); 5 }
When the room creator decides to end the game, the app is reset back to its default state:
1endGame() { 2 // reset to the default state 3 this.setState({ 4 username: '', 5 piece: '', 6 rival_username: '', 7 is_playing: false, 8 show_prompt: false, 9 is_waiting: false, 10 is_room_creator: false 11 }); 12 // reset the game channel 13 this.game_channel = null; 14 this.is_channel_binded = false; 15 }
Lastly, add the styles:
1const styles = StyleSheet.create({ 2 container: { 3 flex: 1, 4 padding: 20, 5 backgroundColor: '#F5FCFF', 6 }, 7 spinner: { 8 flex: 1, 9 alignSelf: 'center', 10 marginTop: 20, 11 marginBottom: 50 12 } 13 });
Next is the Header component. Create a components/Header.js file and add the following:
1import React, { Component } from 'react'; 2 3 import { 4 StyleSheet, 5 Text, 6 View 7 } from 'react-native'; 8 9 export default class Header extends Component { 10 11 render() { 12 return ( 13 <View style={styles.title_container}> 14 <Text style={styles.title}>{this.props.title}</Text> 15 </View> 16 ); 17 } 18 19 } 20 21 const styles = StyleSheet.create({ 22 title_container: { 23 flex: 1, 24 }, 25 title: { 26 alignSelf: 'center', 27 fontWeight: 'bold', 28 fontSize: 30 29 } 30 });
All this component does is to display the title of the app in the header.
Next, create a components/Home.js file. As mentioned earlier, this is the default component that is shown the first time the user opens the app or when the room creator ends the game.
1import React, { Component } from 'react'; 2 3 import { 4 StyleSheet, 5 Text, 6 View, 7 TextInput, 8 Button 9 } from 'react-native'; 10 11 import Prompt from 'react-native-prompt'; 12 13 export default class Home extends Component { 14 15 render() { 16 17 return ( 18 <View style={styles.content_container}> 19 <View style={styles.input_container}> 20 <TextInput 21 style={styles.text_input} 22 onChangeText={this.props.onChangeUsername} 23 placeholder={"What's your name?"} 24 maxLength={20} 25 value={this.props.username} 26 /> 27 </View> 28 29 <View style={styles.button_container}> 30 <Button 31 onPress={this.props.onPressCreateRoom} 32 title="Create Room" 33 color="#4c87ea" 34 style={styles.button} 35 /> 36 <Button 37 onPress={this.props.onPressJoinRoom} 38 title="Join Room" 39 color="#1C1C1C" 40 style={styles.button} 41 /> 42 </View> 43 44 <Prompt 45 title="Enter Room Name" 46 visible={this.props.show_prompt} 47 onSubmit={this.props.joinRoom} 48 onCancel={this.props.onCancelJoinRoom} 49 /> 50 </View> 51 ); 52 } 53 } 54 55 const styles = StyleSheet.create({ 56 content_container: { 57 flex: 1 58 }, 59 input_container: { 60 marginBottom: 20 61 }, 62 button_container: { 63 flexDirection: 'row', 64 justifyContent: 'space-around', 65 alignItems: 'center' 66 }, 67 text_input: { 68 backgroundColor: '#FFF', 69 height: 40, 70 borderColor: '#CCC', 71 borderWidth: 1 72 }, 73 button: { 74 flex: 1 75 } 76 });
Next, create a components/Board.js file. This component serves as the main meat of the app because it’s where the game happens.
First, include the components and packages that we’ll be needing:
1import React, { Component } from 'react'; 2 3 import { 4 StyleSheet, 5 Text, 6 View, 7 TextInput, 8 Button, 9 TouchableHighlight, 10 Alert 11 } from 'react-native'; 12 13 import range from 'lodash.range';
In the constructor, bind the methods for generating the content for the board (3x3 board). The possible combinations for getting a score are also declared. The ids are used as the IDs for referring to the individual blocks. As you can see, it’s an array which has three arrays in it. Each of these arrays pertains to the rows in the board, and its items pertains to the individual blocks. So when referring to the second column in the first row of the board, you can get the ID for that by using this.ids[0][1]. This will then return 1. The ID will be used later on to determine the scores based on the possible_combinations array.
1export default class Board extends Component { 2 3 constructor() { 4 super(); 5 this.generateRows = this.generateRows.bind(this); // bind the method for generating the rows for the board 6 this.generateBlocks = this.generateBlocks.bind(this); // bind the method for generating individual blocks for each row 7 8 // the possible combinations for getting a score in a 3x3 tic-tac-toe board 9 this.possible_combinations = [ 10 [0, 3, 6], 11 [1, 4, 7], 12 [0, 1, 2], 13 [3, 4, 5], 14 [2, 5, 8], 15 [6, 7, 8], 16 [0, 4, 8], 17 [2, 4, 6] 18 ]; 19 20 // the IDs of the individual blocks 21 this.ids = [ 22 [0, 1, 2], 23 [3, 4, 5], 24 [6, 7, 8] 25 ]; 26 27 // the individual rows 28 this.rows = [ 29 range(3).fill(''), // make an array with 3 elements and set each item to an empty string 30 range(3).fill(''), 31 range(3).fill('') 32 ]; 33 34 this.state = { 35 moves: range(9).fill(''), // the pieces (X or O) used on each block 36 x_score: 0, // score of the room creator 37 o_score: 0 // score of the rival 38 } 39 40 }
Right below the declaration for this.ids is the array which will be used to generate the rows in the board.
Once the component is mounted, we then want to listen for the client-make-move event to happen. This event is triggered every time a user places their piece (either “X” or “O”) on the board. Note that this will only be triggered on the rival and not the user who has sent the event.
1componentDidMount() { 2 this.props.channel.bind('client-make-move', (data) => { 3 let moves = this.state.moves; 4 let id = this.ids[data.row_index][data.index]; // get the ID based on the row index and block index 5 moves[id] = data.piece; // set the piece 6 7 // update the UI 8 this.setState({ 9 moves 10 }); 11 12 this.updateScores.call(this, moves); // update the user scores 13 }); 14 }
Every time a move is made, the updateScores function is executed. This loops through all the possible combinations. It uses the every() method to check whether a specific piece was used on each of the items for a possible combination. For example, if “X” is used for blocks 0, 1, and 2, then 1 point is rewarded to the user who has “X” as their piece.
1updateScores(moves) { 2 3 var pieces = { 4 'X': 0, 5 'O': 0 6 } 7 8 function isInArray(moves, piece, element, index, array){ 9 return moves[element] && moves[element] == piece; // check if there's a piece assigned to a specific block and that piece is the piece we're looking for (either "X" or "O") 10 } 11 12 this.possible_combinations.forEach((p_row) => { 13 if(p_row.every(isInArray.bind(null, moves, 'X'))){ 14 pieces['X'] += 1; 15 }else if(p_row.every(isInArray.bind(null, moves, 'O'))){ 16 pieces['O'] += 1; 17 } 18 }); 19 20 this.setState({ 21 x_score: pieces['X'], 22 o_score: pieces['O'] 23 }); 24 25 }
Here’s the render() method. It uses the generateRows() method to generate the content for the board. Below that is the score display for the two users.
1render() { 2 return ( 3 <View style={styles.board_container}> 4 <View style={styles.board}> 5 {this.generateRows()} 6 </View> 7 8 <View style={styles.scores_container}> 9 <View style={styles.score}> 10 <Text style={styles.user_score}>{this.state.x_score}</Text> 11 <Text style={styles.username}>{this.props.username} (x)</Text> 12 </View> 13 14 <View style={styles.score}> 15 <Text style={styles.user_score}>{this.state.o_score}</Text> 16 <Text style={styles.username}>{this.props.rival_username} (o)</Text> 17 </View> 18 </View> 19 </View> 20 ); 21 }
Here’s the generateRows() method:
1generateRows() { 2 return this.rows.map((row, index) => { 3 return ( 4 <View style={styles.row} key={index}> 5 {this.generateBlocks(row, index)} 6 </View> 7 ); 8 }); 9 }
The generateBlocks() method is used for generating the individual blocks on each row. It uses the TouchableHighlight component to create a view which can be tapped on by the user. Each block displays the piece of the user who first tapped on it. Tapping on a block executes the onMakeMove() method which places the user’s piece on that block.
1generateBlocks(row, row_index) { 2 return row.map((block, index) => { 3 let id = this.ids[row_index][index]; 4 return ( 5 <TouchableHighlight 6 key={index} 7 onPress={this.onMakeMove.bind(this, row_index, index)} 8 underlayColor={"#CCC"} 9 style={styles.block}> 10 <Text style={styles.block_text}> 11 {this.state.moves[id]} 12 </Text> 13 </TouchableHighlight> 14 ); 15 }); 16 }
The onMakeMove() method receives the row_index and the block index. These allow us to get the block id which is used to set the piece on a specific block. After that, the updateScores() is also called to update the user scores. To update the UI of the rival, the details of the move is sent using the client-make-move event.
1onMakeMove(row_index, index) { 2 let moves = this.state.moves; 3 let id = this.ids[row_index][index]; 4 5 if(!moves[id]){ // nobody has occupied the space yet 6 moves[id] = this.props.piece; 7 this.setState({ 8 moves 9 }); 10 11 this.updateScores.call(this, moves); 12 13 // inform the rival that a move is made 14 this.props.channel.trigger('client-make-move', { 15 row_index: row_index, 16 index: index, 17 piece: this.props.piece 18 }); 19 } 20 }
Once the board has been filled up with pieces, ask the room creator if they want to restart or end the game. If the room creator decides to restart the game the board is simply reset to its default state, otherwise the app is reset to its default state (the same as when the app is first opened).
1if(this.props.is_room_creator && moves.indexOf('') == -1){ 2 Alert.alert( 3 "Restart Game", 4 "Do you want to restart the game?", 5 [ 6 { 7 text: "Nope. Let's call it quits.", 8 onPress: () => { 9 this.setState({ 10 moves: range(9).fill(''), 11 x_score: 0, 12 o_score: 0 13 }); 14 this.props.endGame(); 15 }, 16 style: 'cancel' 17 }, 18 { 19 text: 'Heck yeah!', 20 onPress: () => { 21 this.setState({ 22 moves: range(9).fill(''), 23 x_score: 0, 24 o_score: 0 25 }); 26 } 27 }, 28 ], 29 { cancelable: false } 30 ); 31 }
Lastly, add the styles:
1const styles = StyleSheet.create({ 2 board_container: { 3 flex: 9 4 }, 5 board: { 6 flex: 7, 7 flexDirection: 'column' 8 }, 9 row: { 10 flex: 1, 11 flexDirection: 'row', 12 borderBottomWidth: 1, 13 }, 14 block: { 15 flex: 1, 16 borderRightWidth: 1, 17 borderColor: '#000', 18 alignItems: 'center', 19 justifyContent: 'center' 20 }, 21 block_text: { 22 fontSize: 30, 23 fontWeight: 'bold' 24 }, 25 scores_container: { 26 flex: 2, 27 flexDirection: 'row', 28 alignItems: 'center' 29 }, 30 score: { 31 flex: 1, 32 alignItems: 'center' 33 }, 34 user_score: { 35 fontSize: 25, 36 fontWeight: 'bold' 37 }, 38 username: { 39 fontSize: 20 40 } 41 });
Testing the app
Now that you’ve built the app, it’s now time to try it out. The first thing that you need to do is run the server:
node server.js
You can run the app with the following command:
react-native run-android
Be sure that you already have a connected device or an emulator opened when you execute this.
If you’re using either Genymotion or the Android emulator, and you don’t really want to test on a real device, then you can use the browser to simulate the rival.
Once that’s done, run the app and create a new room. Then copy the room ID shown in the alert box.
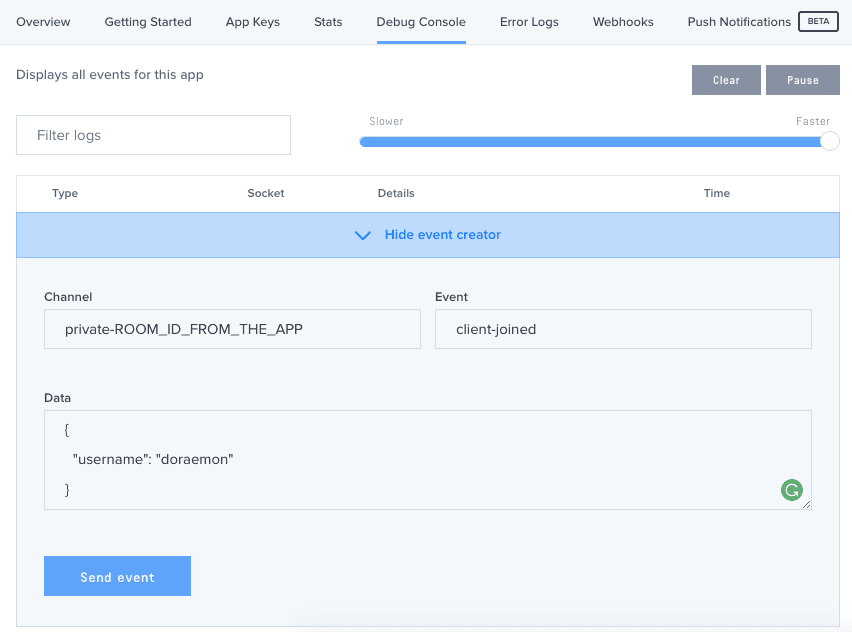
Next, go to your Pusher app’s dashboard and click on the Debug Console tab.
Click on Show event creator and enter private-ROOM_ID for the Channel. Be sure to replace ROOM_ID with the actual ID of the room then set client-joined as the value of the Event. The value for the Data is:
1{ 2 "username": "doraemon" 3 }
Use the screenshot below as a reference:
Once that’s done, click on the Send event button. This should trigger the app to change its UI to the actual game board. To trigger some moves, set the Event name to client-make-move then add the details of the move on the Data field:
1{ 2 "row_index": 0, 3 "index": 0, 4 "piece": "O" 5 }
This will place the “O” piece on the first box in the game board.
From there you can place a different value for the index and row_index to emulate the game play.
Deploying the server
The method I showed you above is great if you only want to test inside your own local network. But what if you want to test it out with your friends outside the network? For that, you could use Now. I’m not going to go into details on how to deploy the server, but you can check out their docs. Now is free to use, the only downside is that your code will be available publicly.
Conclusion
That’s it! In this tutorial you’ve learned how to re-create Tic-Tac-Toe using Pusher. As you have seen, Pusher really makes it easy to implement real-time features in games. While Tic-Tac-Toe is a very simple game, this doesn’t mean that Pusher can only be used in simple games. You can pretty much use Pusher in any real-time game you can think of. You can find the source code for this tutorial on GitHub


© 2025 Pusher Ltd. All rights reserved.
Pusher Limited is a company registered in England and Wales (No. 07489873) whose registered office is at MessageBird UK Limited, 3 More London Riverside, 4th Floor, London, United Kingdom, SE1 2AQ.