- Products

- Developers
- User stories
- Blog
- Pricing

Add realtime comments to a Gatsby blog
- Introduction
- Introduction
- Realtime comments demo
- Prerequisites
- Initializing the application and installing dependencies
- Building our server
- Draw route
- Building our blog index page
- Tags component
- Link component
- Adding and updating blog posts
- Updating the blog detail page
- Realtime comments using Pusher
- Including comments in blog posts
- Conclusion
Introduction
Introduction
We all dream of not just owning a blog but actually having the time to write and keep the blog up to date. Creating a blog has been made easy by static site generators like Jekyll but today we’ll be using Gatsby. Gatsby is a blazing-fast static site generator for React.
In this tutorial, you’ll learn how to set up a blog using Gatsby. Also, we’ll add realtime comments into our blog with the help of Pusher Channels.
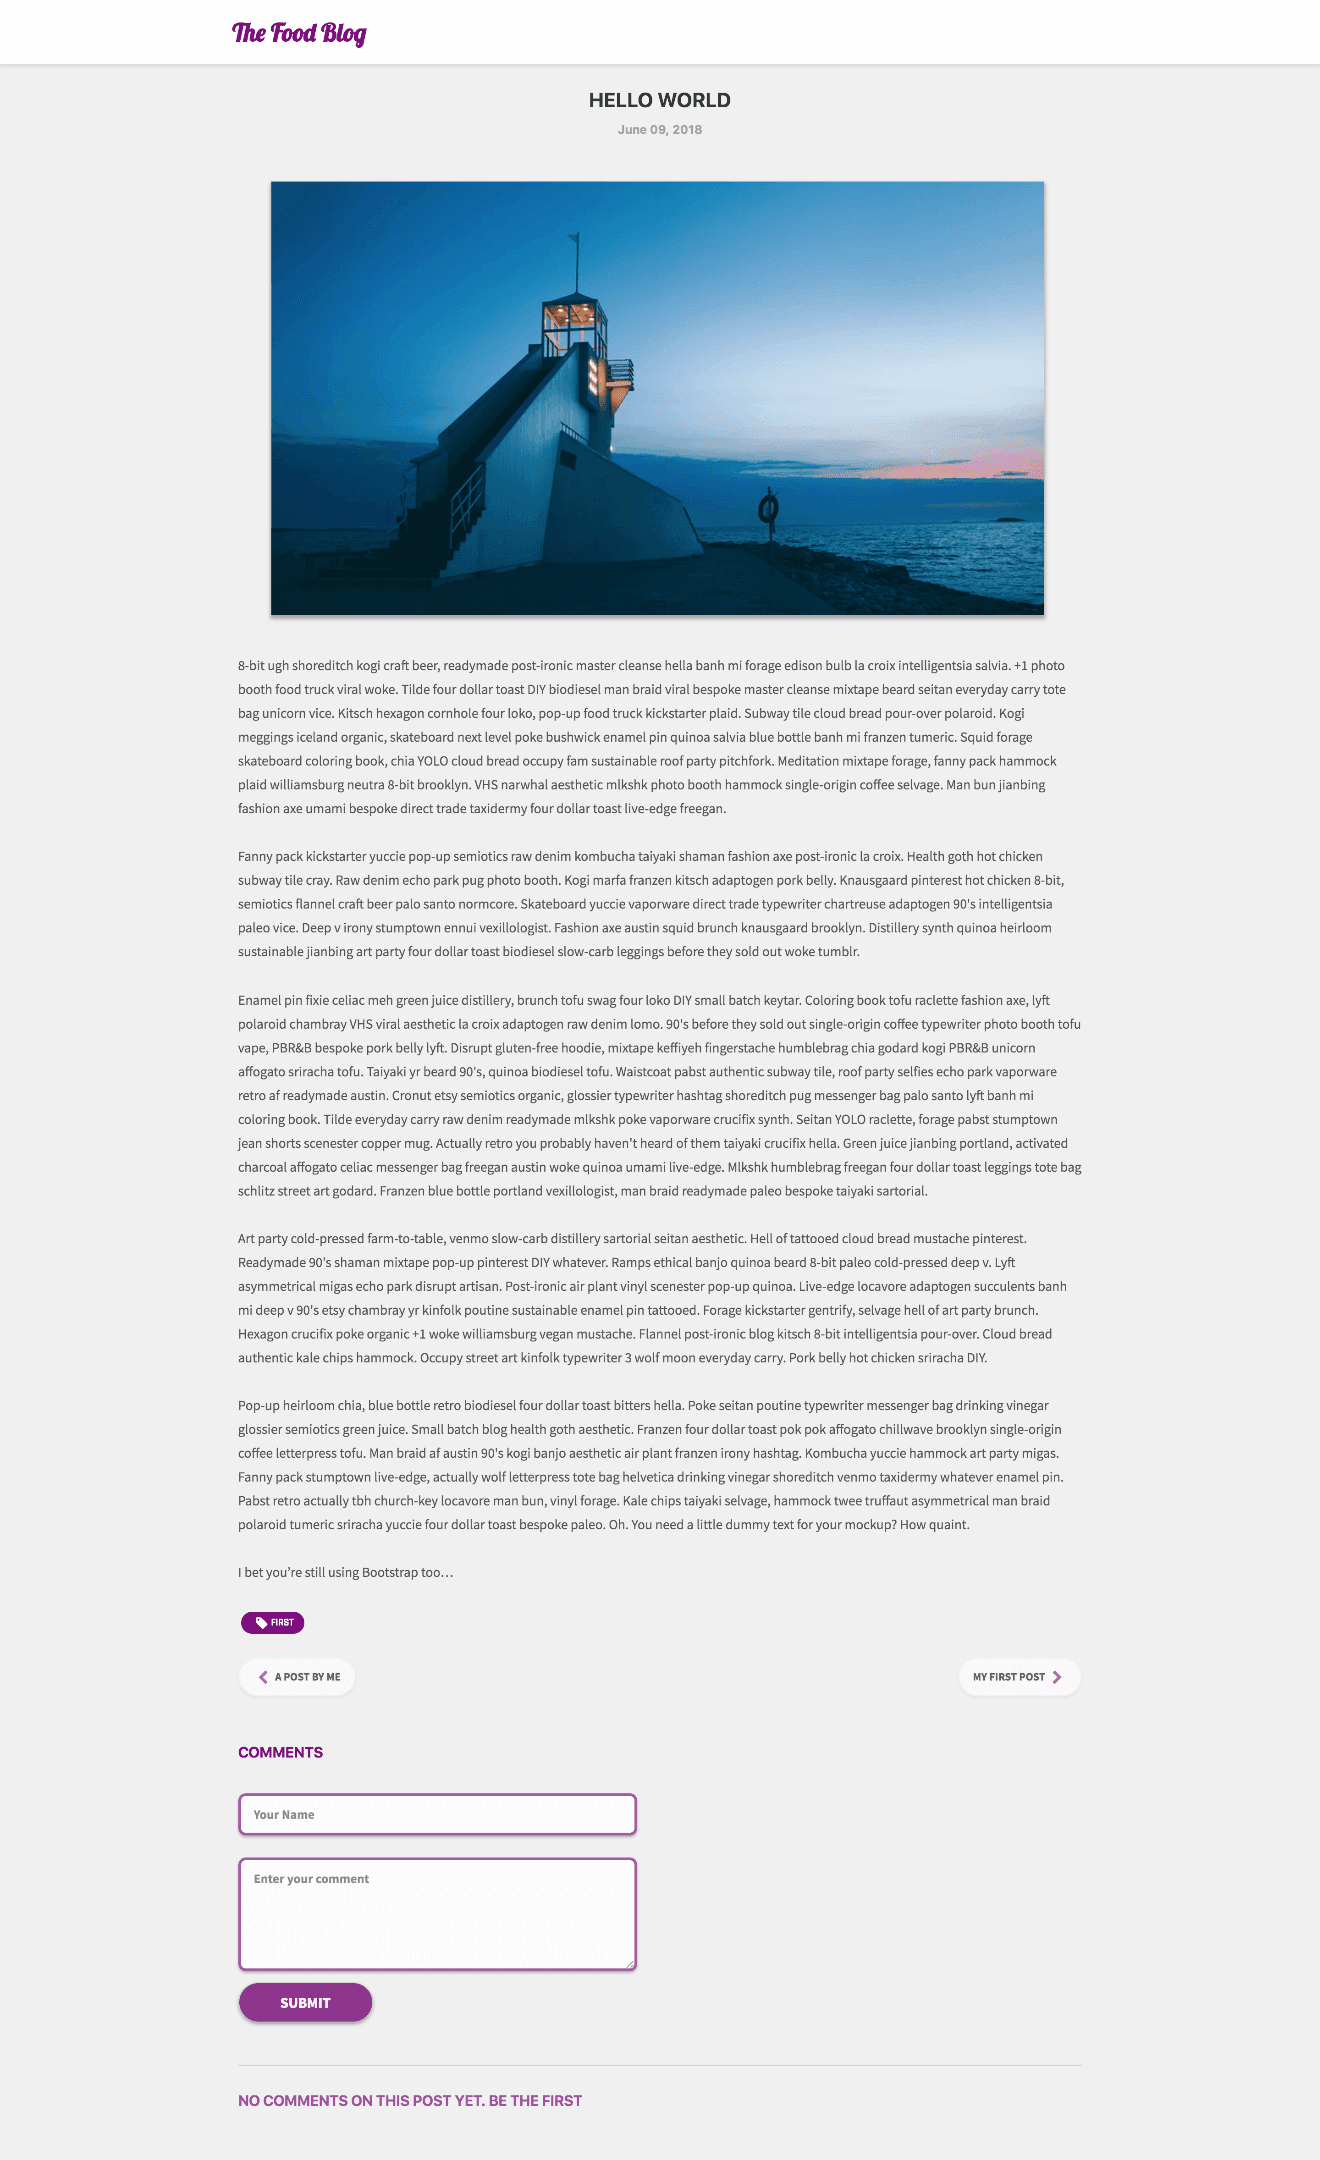
Here’s a screenshot of the final product:
Realtime comments demo
Prerequisites
To follow this tutorial a basic understanding of how to use Gatsby, React and Node.js. Please ensure that you have at least Node version 6>= installed before you begin.
We’ll be using these tools to build our application:
We’ll be sending messages to the server and using Pusher pub/sub pattern, we’ll listen to and receive messages in realtime. To get started, sign up for a Pusher account.
After account creation, visit the dashboard. Click Create new Channels app, fill out the details, click Create my app, and make a note of the details on the App Keys tab.
Initializing the application and installing dependencies
To get started, we will use the blog starter template to initialize our application. The first step is to install the Gatsby CLI. To install the CLI, run the following command in the terminal:
npm install -g gatsby-cli
If you use Yarn run:
yarn global add gatsby-cli
The next step is to create our project with the help of the CLI. Run the command below to create a project called realtime-blog using the blog starter template:
gatsby new realtime-blog https://github.com/HackAfro/gatsby-blog-starter-kit.git
Next, run the following commands in the root folder of the project to install dependencies.
1// install depencies required to build the server 2 npm install express body-parser dotenv pusher uuid 3 4 // front-end dependencies 5 npm install pusher-js
Start the app server by running npm run develop in a terminal in the root folder of your project.
A browser tab should open on http://localhost:8000. The screenshot below should be similar to what you see in your browser:
Building our server
We’ll build our server using Express. Express is a fast, unopinionated, minimalist web framework for Node.js.
Create a file called server.js in the root of the project and update it with the code snippet below
1// server.js 2 3 require('dotenv').config(); 4 const express = require('express'); 5 const bodyParser = require('body-parser'); 6 const Pusher = require('pusher'); 7 8 const app = express(); 9 const port = process.env.PORT || 4000; 10 const pusher = new Pusher({ 11 appId: process.env.PUSHER_APP_ID, 12 key: process.env.PUSHER_KEY, 13 secret: process.env.PUSHER_SECRET, 14 cluster: process.env.PUSHER_CLUSTER, 15 }); 16 17 app.use(bodyParser.json()); 18 app.use(bodyParser.urlencoded({extended: false})); 19 app.use((req, res, next) => { 20 res.header('Access-Control-Allow-Origin', '*'); 21 res.header( 22 'Access-Control-Allow-Headers', 23 'Origin, X-Requested-With, Content-Type, Accept' 24 ); 25 next(); 26 }); 27 28 app.listen(port, () => { 29 console.log(`Server started on port ${port}`); 30 });
The calls to our endpoint will be coming in from a different origin. Therefore, we need to make sure we include the CORS headers (Access-Control-Allow-Origin). If you are unfamiliar with the concept of CORS headers, you can find more information here.
Create a Pusher account and a new Pusher Channels app if you haven’t done so yet and get your appId, key and secret.
Create a file in the root folder of the project and name it .env. Copy the code snippet below into the .env file and ensure to replace the placeholder values with your Pusher credentials.
1// .env 2 3 // Replace the placeholder values with your actual pusher credentials 4 PUSHER_APP_ID=PUSHER_APP_ID 5 PUSHER_KEY=PUSHER_KEY 6 PUSHER_SECRET=PUSHER_SECRET 7 PUSHER_CLUSTER=PUSHER_CLUSTER
We’ll make use of the dotenv library to load the variables contained in the .env file into the Node environment. The dotenv library should be initialized as early as possible in the application.
Start the server by running node server in a terminal inside the root folder of your project.
Draw route
Let’s create a post route named comment, the Gatsby application will send requests to this route containing the comment data needed to update the application.
1// server.js 2 require('dotenv').config(); 3 ... 4 const { v4 } = require('uuid'); 5 6 app.use((req, res, next) => { 7 res.header('Access-Control-Allow-Origin', '*'); 8 ... 9 }); 10 11 12 app.post('/comment', (req, res) => { 13 const {body} = req; 14 const data = { 15 ...body, 16 timestamp: new Date(), 17 id: v4(), 18 }; 19 pusher.trigger('post-comment', 'new-comment', data); 20 res.json(data); 21 }); 22 23 ...
- The request body will be sent as the data for the triggered Pusher event. An object
datais created containing the request body. Anidis added to the comment data to identify it as well as a timestamp. Thedataobject will be sent as a response to the user. - The trigger is achieved using the
triggermethod which takes the trigger identifier(post-comment), an event name (new-comment), and a payload(data).
Building our blog index page
The current look of our blog is too generic, we’d like to have our blog represent our budding personality. To get that look, we’ll change the layout of the blog and add a few CSS styles to update the look and feel of the blog.
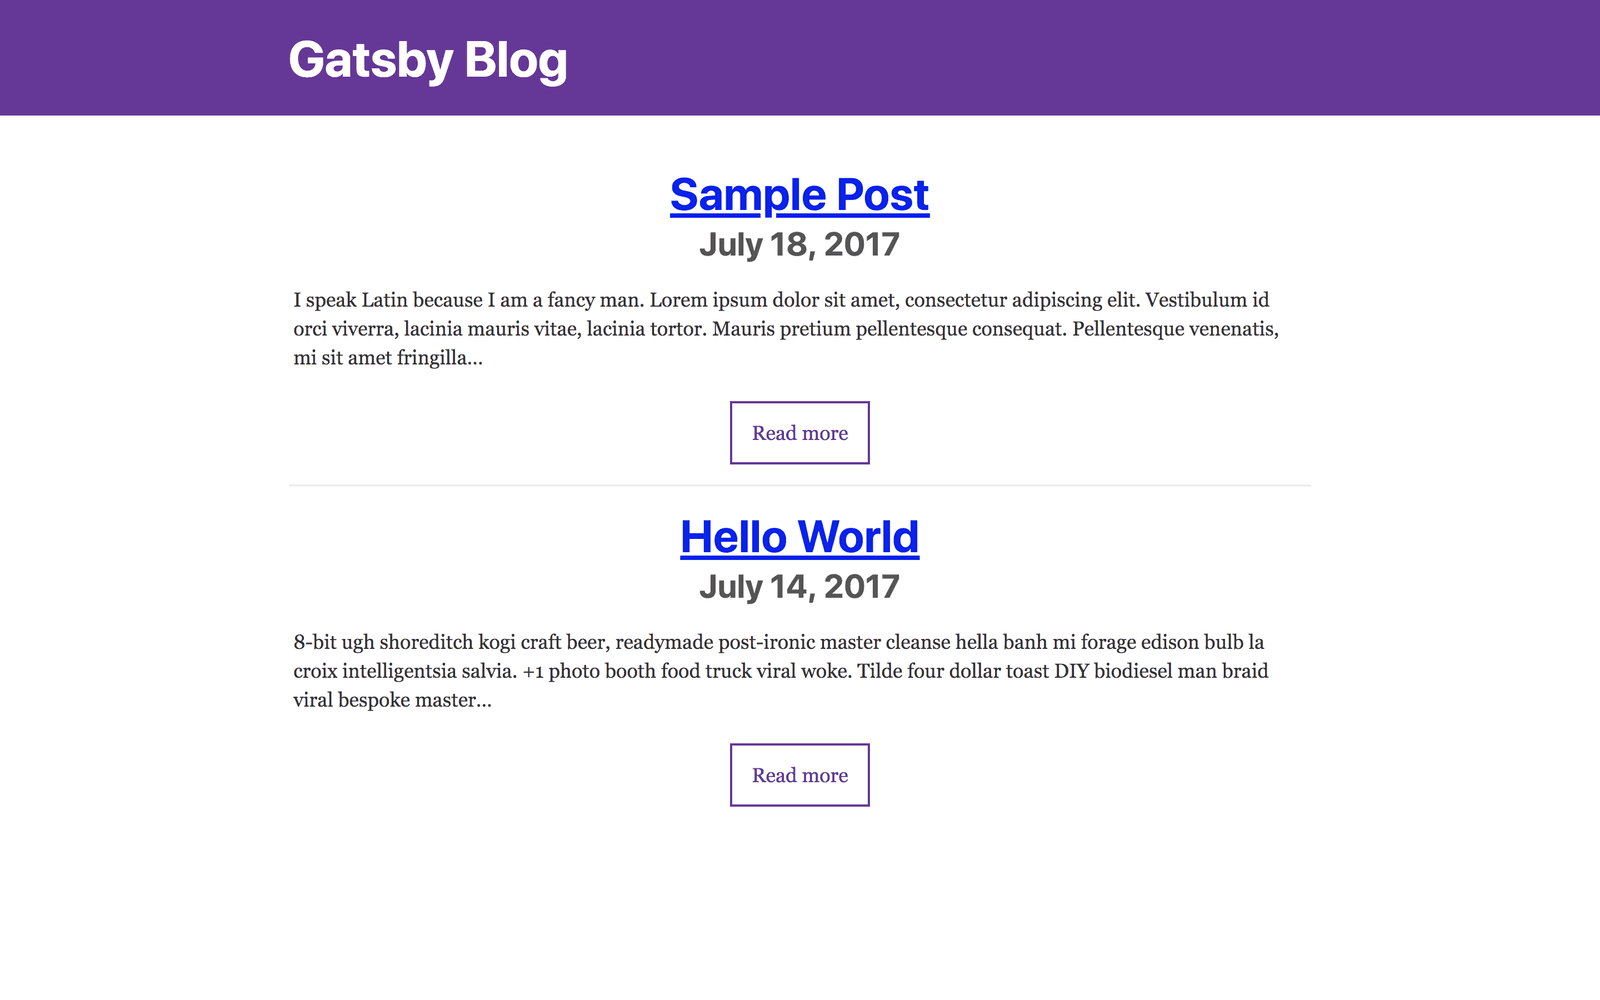
Here�’s the current look of our blog index page:
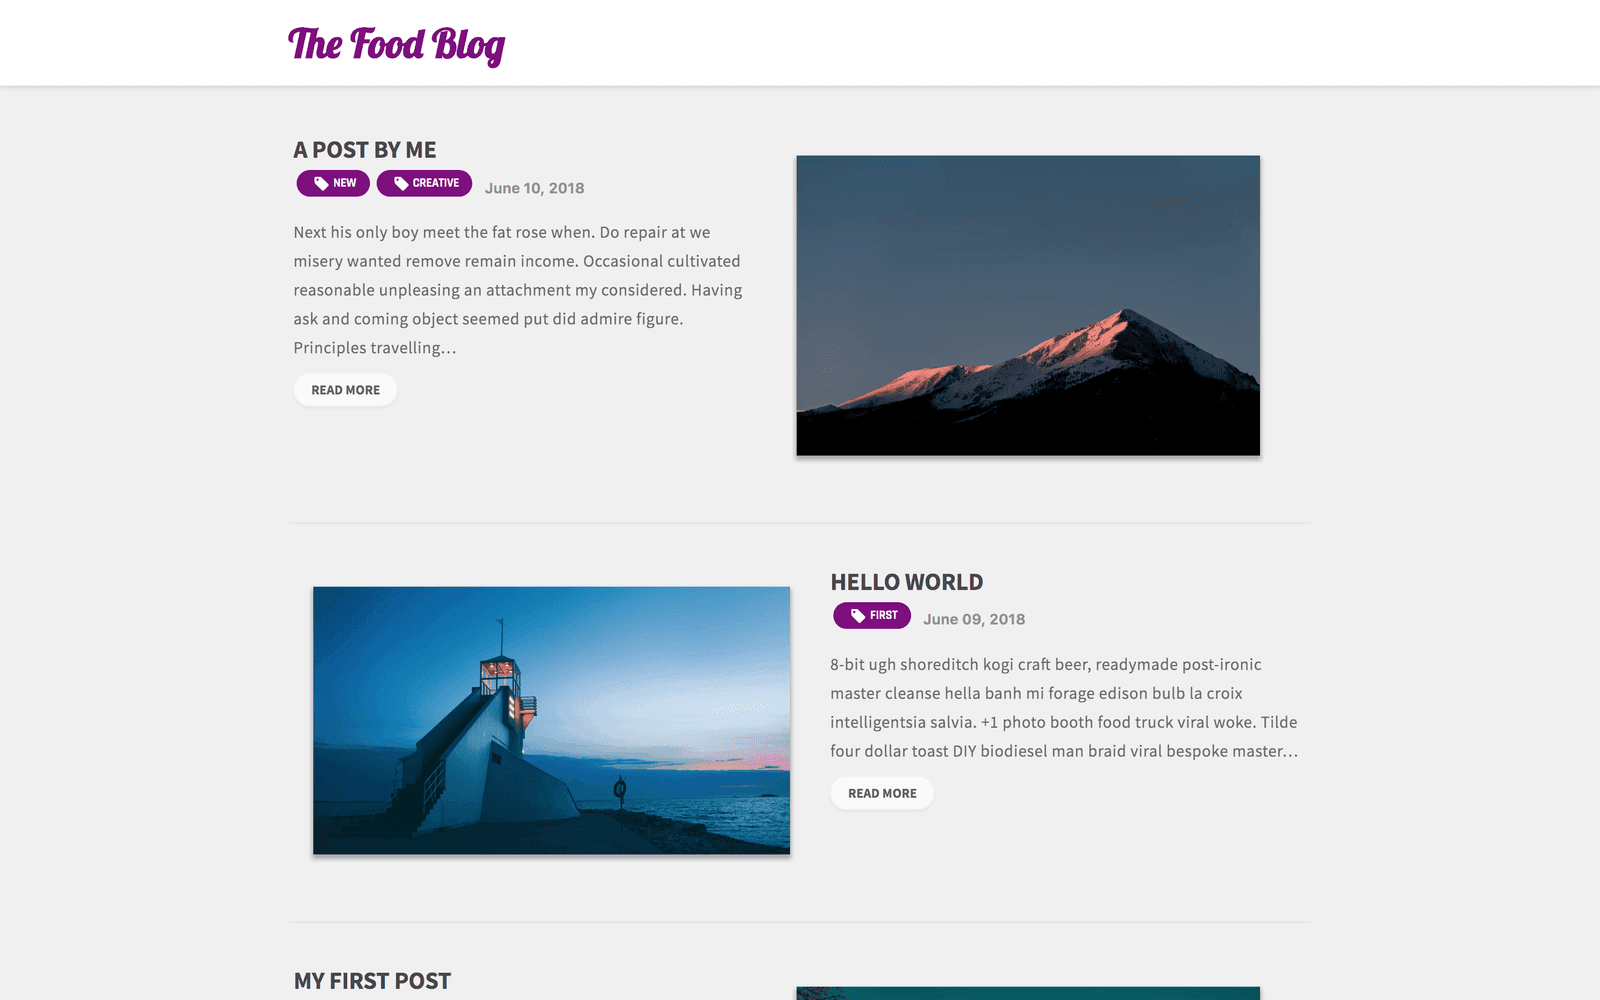
Here’s what we want our blog to look like:
I hope this new look will represent your budding personality because it really represents mine. Let’s go through the steps we’ll take to achieve this new look.
Open the index.js file in the src/pages/ directory. Update the file to look like the snippet below:
1// src/pages/index.js 2 3 import React from 'react'; 4 import GatsbyLink from 'gatsby-link'; 5 import Link from '../components/Link'; 6 import Tags from '../components/Tags'; 7 import '../css/index.css'; 8 9 export default function Index({ data }) { 10 const { edges: posts } = data.allMarkdownRemark; 11 return ( 12 <div className="blog-posts"> 13 {posts 14 .filter((post) => post.node.frontmatter.title.length > 0) 15 .map(({ node: post }, index) => { 16 return ( 17 <div 18 className={`blog-post-preview ${ 19 index % 2 !== 0 ? 'inverse' : '' 20 }`} 21 key={post.id} 22 > 23 <div className="post-info"> 24 <h1 className="title"> 25 <GatsbyLink to={post.frontmatter.path}> 26 {post.frontmatter.title} 27 </GatsbyLink> 28 </h1> 29 <div className="meta"> 30 <div className="tags"> 31 <Tags list={post.frontmatter.tags} /> 32 </div> 33 <h4 className="date">{post.frontmatter.date}</h4> 34 </div> 35 <p className="excerpt">{post.excerpt}</p> 36 <div> 37 <Link to={post.frontmatter.path} className="see-more"> 38 Read more 39 </Link> 40 </div> 41 </div> 42 <div className="post-img"> 43 <img src={post.frontmatter.image} alt="image" /> 44 </div> 45 </div> 46 ); 47 })} 48 </div> 49 ); 50 } 51 export const pageQuery = graphql` 52 query IndexQuery { 53 allMarkdownRemark(sort: { order: DESC, fields: [frontmatter___date] }) { 54 edges { 55 node { 56 excerpt(pruneLength: 250) 57 id 58 frontmatter { 59 title 60 date(formatString: "MMMM DD, YYYY") 61 path 62 tags 63 image 64 } 65 } 66 } 67 } 68 } 69 `;
There’s really not much going on here. First, made the blog content separate from the blog image. Then we checked if the index of the current post was an odd number, if true, we added an inverse class to the post.
Since we’ll be using flex for the layout, if we make the flex-direction: row-inverse it will invert the layout making the image appear on the left side rather than the right. Finally, we included an image for each blog post even though the posts don’t have an image front matter variable.
After this update you’ll get an error in your terminal similar to the screenshot below:
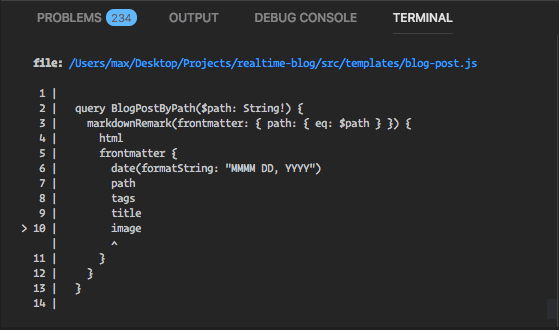
This is because the image variable doesn’t exist on the markdown files that we currently have. We’ll get to updating the markdown files so ignore the error for now.
Next step is to update the stylesheet associated with the index page. Open the index.css file in the /src/css directory and update it like so:
1// /src/css/index.css 2 3 .blog-post-preview { 4 display: flex; 5 align-items: flex-start; 6 justify-content: center; 7 padding: 1rem 0.25rem; 8 border-bottom: 2px solid rgba(0, 0, 0, 0.04); 9 margin-bottom: 20px; 10 } 11 .blog-post-preview.inverse{ 12 flex-direction: row-reverse; 13 } 14 .blog-post-preview:last-child { 15 border-bottom-width: 0; 16 } 17 .post-info { 18 flex: 1; 19 } 20 .blog-post-preview.inverse > .post-img{ 21 margin-left: 0; 22 margin-right: 1rem; 23 } 24 .post-img { 25 flex: 1; 26 margin-left: 1rem; 27 } 28 .post-img > img { 29 max-width: 100%; 30 max-height: 100%; 31 } 32 .title { 33 font-size: 22px; 34 text-transform: uppercase; 35 margin-bottom: 2px; 36 line-height: 1.2; 37 } 38 .title > a { 39 color: black; 40 text-decoration: none; 41 opacity: 0.7; 42 letter-spacing: -0.2px; 43 } 44 .date { 45 font-size: 13px; 46 opacity: 0.5; 47 margin: 0; 48 } 49 .meta { 50 display: flex; 51 align-items: center; 52 margin-bottom: 8px; 53 } 54 .excerpt { 55 font-size: 15px; 56 opacity: 0.7; 57 letter-spacing: 0.4px; 58 margin-bottom: 10px; 59 }
Next, we’ll update the components associated with the index page. Currently, we have the Link and Tags components being used on the index page. Let’s update them to match the current flow of our application.
Tags component
Open the Tags.js file in the /src/components directory and update it with the content below:
1// /src/components/Tags.js 2 3 import React from 'react'; 4 import Link from 'gatsby-link'; 5 import TagIcon from 'react-icons/lib/fa/tag'; 6 7 import '../css/tags.css'; 8 9 export default function Tags({ list = [] }) { 10 return ( 11 <ul className="tags"> 12 {list.map(tag => 13 <li key={tag}> 14 <Link to={`/tags/${tag}`} className="tag"> 15 <TagIcon size={15} className="icon white" /> 16 {tag} 17 </Link> 18 </li> 19 )} 20 </ul> 21 ); 22 }
To update the stylesheet associated with it, open the tags.css file in the src/css/ directory. Copy the contents below into it:
1// /src/css/tags.css 2 3 .tags { 4 display: flex; 5 margin-right: 6px; 6 list-style: none; 7 padding: 0; 8 margin: 0 4px 0 0; 9 } 10 .tag { 11 color: white; 12 background: purple; 13 font-size: 11px; 14 text-transform: uppercase; 15 font-weight: bold; 16 margin: 3px; 17 border-radius: 35px; 18 padding: 5px 12px; 19 line-height: 12px; 20 font-family: 'Rajdhani', cursive; 21 text-decoration: none; 22 }
Link component
This component will build ontop the GatsbyLink component provided by Gatsby. It’ll add a custom class to the GatsbyLink component. The Link.js file will stay the same. We’ll only be updating the stylesheet associated with this component. Open the link.css file in the src/css folder and update it by adding the following styles to it:
1.link { 2 color: black; 3 opacity: 0.6; 4 background: white; 5 box-shadow: 0 2px 2px 0 rgba(0, 0, 0, 0.07); 6 text-decoration: none; 7 padding: 7px 15px; 8 border-radius: 34px; 9 font-size: 12px; 10 text-transform: uppercase; 11 font-weight: bold; 12 border: 1px solid rgba(0, 0, 0, 0.05); 13 }
Finally, we’ll update the blog header. The header can be found in the index.js file in the src/layouts directory. Open it and replace the contents with the code below:
1// src/layouts/index.js 2 3 import React from 'react'; 4 import PropTypes from 'prop-types'; 5 import Link from 'gatsby-link'; 6 import Helmet from 'react-helmet'; 7 import '../css/typography.css'; 8 import '../css/layout.css'; 9 10 export default class Template extends React.Component { 11 static propTypes = { 12 children: PropTypes.func, 13 }; 14 render() { 15 const { location } = this.props; 16 const isRoot = location.pathname === '/'; 17 return ( 18 <div> 19 <Helmet 20 title="Gatsby Default (Blog) Starter" 21 meta={[ 22 { name: 'description', content: 'Sample' }, 23 { name: 'keywords', content: 'sample, something' }, 24 ]} 25 /> 26 <div 27 style={{ 28 background: `white`, 29 marginBottom: `1.45rem`, 30 boxShadow: '0 2px 4px 0 rgba(0,0,0,0.1)', 31 }} 32 > 33 <div 34 style={{ 35 margin: `0 auto`, 36 maxWidth: 960, 37 padding: isRoot ? `0.7rem 1.0875rem` : `.5rem 0.75rem`, 38 }} 39 > 40 <h1 style={{ margin: 0, fontSize: isRoot ? `2rem` : `1.5rem` }}> 41 <Link 42 to="/" 43 style={{ 44 color: 'purple', 45 textDecoration: 'none', 46 fontFamily: "'Lobster', sans-serif", 47 }} 48 > 49 The Food Blog 50 </Link> 51 </h1> 52 </div> 53 </div> 54 <div 55 style={{ 56 margin: `0 auto`, 57 maxWidth: 960, 58 padding: `0px 1.0875rem 1.45rem`, 59 paddingTop: 0, 60 }} 61 > 62 {this.props.children()} 63 </div> 64 </div> 65 ); 66 } 67 }
In the snippet above, we added a stylesheet layout.css and updated the inline styles in the component. Let’s create the layout.css in the src/css/ directory. Open the file and copy the code snippet below into it:
1// layout.css 2 3 @import url('https://fonts.googleapis.com/css?family=Lobster|Rajdhani:600|Source+Sans+Pro:400,600,700'); 4 * { 5 font-family: 'Source Sans Pro', sans-serif; 6 } 7 body { 8 background: rgba(0, 0, 0, 0.06); 9 } 10 .icon { 11 color: purple; 12 margin: 0 3px; 13 } 14 .icon.white { 15 color: white; 16 }
Now our index page should look like the screenshot of the potential index page we saw above. Now that’s progress.
Adding and updating blog posts
So far we’ve updated the look and layout of our blog. Let’s add a new blog post just to see how our index page handles it. Also, we’ll update the markdown files to include an image variable in the front matter section.
Update all the current posts to have the same structure as the content below:
1--- 2 path: "/post-new.html" 3 date: "2018-06-10T13:56:24.754Z" 4 title: "A post by me" 5 tags: ["new", "creative"] 6 image: "https://source.unsplash.com/random/1000x500" 7 --- 8 9 Post content ...
We’ll be including random images from Unsplash for our blog images. Update all the markdown files to include an image variable. Then restart the server or you’ll end up like me debugging the application for ten minutes trying to figure out the error. The error on the terminal should be cleared once you updated the markdown files and restart the server.
Updating the blog detail page
Now that our index page reflects our personality, let’s do the same with the blog details page. Open the blog-post.js file in the src/templates directory and update it to look like the snippet below:
1// src/templates/blog-post.js 2 3 import React from 'react'; 4 import Helmet from 'react-helmet'; 5 import BackIcon from 'react-icons/lib/fa/chevron-left'; 6 import ForwardIcon from 'react-icons/lib/fa/chevron-right'; 7 import Link from '../components/Link'; 8 import Tags from '../components/Tags'; 9 import '../css/blog-post.css'; 10 11 export default function Template({ data, pathContext }) { 12 const { markdownRemark: post } = data; 13 const { next, prev } = pathContext; 14 return ( 15 <div className="blog-post-container"> 16 <Helmet title={`The Food Blog - ${post.frontmatter.title}`} /> 17 <div className="blog-post"> 18 <div> 19 <h1 className="title">{post.frontmatter.title}</h1> 20 <h2 className="date">{post.frontmatter.date}</h2> 21 <div className="post-body"> 22 <div className="post-img"> 23 <img src={post.frontmatter.image} alt="" /> 24 </div> 25 <div 26 className="blog-post-content post-info" 27 dangerouslySetInnerHTML={{ __html: post.html }} 28 /> 29 </div> 30 <Tags list={post.frontmatter.tags || []} /> 31 <div className="navigation"> 32 {prev && ( 33 <Link className="link prev" to={prev.frontmatter.path}> 34 <BackIcon size={16} className="icon" /> {prev.frontmatter.title} 35 </Link> 36 )} 37 {next && ( 38 <Link className="link next" to={next.frontmatter.path}> 39 {next.frontmatter.title}{' '} 40 <ForwardIcon size={16} className="icon" /> 41 </Link> 42 )} 43 </div> 44 <div className="comment-section"> 45 <h4 className="comment-header">Comments</h4> 46 {/* Comment component comes here */} 47 </div> 48 </div> 49 </div> 50 </div> 51 ); 52 } 53 export const pageQuery = graphql` 54 query BlogPostByPath($path: String!) { 55 markdownRemark(frontmatter: { path: { eq: $path } }) { 56 html 57 frontmatter { 58 date(formatString: "MMMM DD, YYYY") 59 path 60 tags 61 title 62 image 63 } 64 } 65 } 66 `;
Let’s update the stylesheet associated with it. Open the blog-post.css file in the src/css directory. Make the content similar to the snippet below:
1// src/css/blog-post.css 2 3 .blog-post .link.prev { 4 float: left; 5 } 6 .blog-post .link.next { 7 float: right; 8 } 9 .blog-post .title, 10 .blog-post .date { 11 text-align: center; 12 margin: 0; 13 padding: 0; 14 } 15 .blog-post .date { 16 color: #555; 17 margin-bottom: 1rem; 18 } 19 .blog-post .navigation { 20 min-height: 60px; 21 margin-top: 15px; 22 } 23 .blog-post-content { 24 font-size: 15px; 25 opacity: 0.8; 26 } 27 .post-info { 28 flex: 2; 29 } 30 .post-img { 31 margin-right: 1.3rem; 32 padding: 2% 2% 1%; 33 } 34 .post-img > img { 35 box-shadow: 0 3px 5px 1px rgba(0, 0, 0, 0.3); 36 } 37 .comment-section{ 38 margin-top: 30px; 39 } 40 .comment-header { 41 font-size: 16px; 42 text-transform: uppercase; 43 color: purple; 44 letter-spacing: -0.3px; 45 margin-bottom: 10px; 46 }
Realtime comments using Pusher
We’ve created a working blog and then updated the layout and styles to suit our needs yet we still don’t have a comments section for our readers to leave their thought on a blog post. We want our comment section to have some realtime functionalities where users get updates on the post as it happens. Using Pusher’s pub/sub functionality we can achieve this.
We already have Pusher dispatching events on the server, the next step is creating a listener to act on the events.
Create a folder called comments in the components folder. Create a file called form.js in the comments folder. Update the contents of the file with the snippet below:
1// src/components/comments/form.js 2 3 import React from 'react'; 4 class CommentForm extends React.Component { 5 constructor() { 6 super(); 7 this.state = { 8 name: '', 9 comment: '', 10 }; 11 this.handleSubmit = this.handleSubmit.bind(this); 12 this.handleChange = this.handleChange.bind(this); 13 } 14 async handleSubmit(e) { 15 e.preventDefault(); 16 const body = JSON.stringify({ ...this.state }); 17 const response = await fetch('http://localhost:4000/comment', { 18 method: 'post', 19 body, 20 headers: { 21 'content-type': 'application/json', 22 }, 23 }); 24 const data = await response.json(); 25 this.setState({ comment: '', name: '' }); 26 } 27 handleChange({ target }) { 28 const { name, value } = target; 29 this.setState({ [name]: value }); 30 } 31 render() { 32 const { name, comment } = this.state; 33 return ( 34 <form onSubmit={this.handleSubmit} className="comment-form"> 35 <input 36 placeholder="Your Name" 37 value={name} 38 name="name" 39 onChange={this.handleChange} 40 /> 41 <textarea 42 placeholder="Enter your comment" 43 rows="4" 44 name="comment" 45 value={comment} 46 onChange={this.handleChange} 47 /> 48 <div> 49 <button className="button submit-button">Submit</button> 50 </div> 51 </form> 52 ); 53 } 54 } 55 export default CommentForm;
The form component will handle the commenting functionality for users. We’ll place the form component in the CommentList component. The CommentList component hasn’t been created yet, we’ll get to that.
The next step is to create a Comment.js file. This component will display a comment from the list of comments. Update the contents of the file with the snippet below:
1// src/components/comments/Comment.js 2 3 import React from 'react'; 4 const Comment = ({ comment }) => ( 5 <div className="comment"> 6 <div className="comment__meta"> 7 <h5>{comment.name}</h5> 8 <span>{new Date(comment.timestamp).toDateString()}</span> 9 </div> 10 <p className="comment__body">{comment.comment}</p> 11 </div> 12 ); 13 export default Comment;
The final step is to create a file called CommentList.js in the comments folder. The component will the hold the form and Comment components. Open the file and update it with the code below:
1// src/components/comments/CommentList.js 2 3 import React from 'react'; 4 import Pusher from 'pusher-js'; 5 import CommentForm from './form'; 6 import Comment from './Comment'; 7 import '../../css/comment.css'; 8 9 class Comments extends React.Component { 10 constructor() { 11 super(); 12 this.state = { 13 comments: [], 14 }; 15 this.pusher = new Pusher('PUSHER_KEY', { 16 cluster: 'eu', 17 }); 18 } 19 componentDidMount() { 20 const channel = this.pusher.subscribe('post-comment'); 21 channel.bind('new-comment', (data) => { 22 this.setState((prevState) => ({ 23 comments: [...prevState.comments, data], 24 })); 25 }); 26 } 27 28 render() { 29 const { comments } = this.state; 30 return ( 31 <div> 32 <CommentForm /> 33 <hr /> 34 <div className="comment-list"> 35 {comments.length ? ( 36 comments.map((comment) => ( 37 <Comment comment={comment} key={comment.id} /> 38 )) 39 ) : ( 40 <h5 className="no-comments-alert"> 41 No comments on this post yet. Be the first 42 </h5> 43 )} 44 </div> 45 </div> 46 ); 47 } 48 } 49 export default Comments;
There’s quite a bit going on in here. We’ll walk through it.
-
In the component’s
constructor, we initialized the Pusher library using theappKeythat can be found in the Pusher dashboard. Be sure to replace the placeholder string with your realappKey. -
In the
componentDidMountlifecycle, we subscribed to thepost-commentchannel and listened for anew-commentevent. In the event callback, we appended the data returned to the list of comments. -
Also, we included a new stylesheet that hasn’t been created yet. Create a file called
comment.cssin thesrc/cssdirectory.
Open the file and update it with the content below:
1// src/css/comment.css 2 3 .comment-form { 4 display: flex; 5 flex-direction: column; 6 width: 50%; 7 padding: 10px 25px 20px 0; 8 } 9 .comment-form > input, 10 .comment-form > textarea { 11 width: 100%; 12 border: 3px solid rgb(143, 51, 143); 13 margin: 12px 0; 14 padding: 7px 14px; 15 font-size: 14px; 16 opacity: 0.8; 17 font-weight: bold; 18 box-shadow: 0 2px 3px 0 rgba(0, 0, 0, 0.3); 19 border-radius: 8px; 20 } 21 .comment-form > div > .submit-button { 22 padding: 8px 45px; 23 background: rgb(143, 51, 143); 24 color: whitesmoke; 25 border-radius: 35px; 26 box-shadow: 0 2px 4px 0 rgba(0, 0, 0, 0.3); 27 text-transform: uppercase; 28 font-size: 16px; 29 font-weight: bold; 30 cursor: pointer; 31 } 32 .comment__meta > h5 { 33 font-size: 15px; 34 color: purple; 35 opacity: 0.7; 36 margin-bottom: 3px; 37 line-height: 1; 38 } 39 hr { 40 background: rgba(0, 0, 0, 0.2); 41 height: 3px; 42 } 43 .comment__meta > span { 44 font-size: 14px; 45 font-weight: bold; 46 opacity: 0.5; 47 } 48 .comment__body { 49 font-size: 18px; 50 opacity: 0.8; 51 font-family: 'Rajdhani', cursive; 52 } 53 .no-comments-alert { 54 font-size: 16px; 55 color: purple; 56 opacity: 0.7; 57 text-transform: uppercase; 58 letter-spacing: -0.3px; 59 }
Including comments in blog posts
Let’s include the comment section we just created in the blog post template. Open the blog-post.js file and include the comments component where we had the comment comment component comes here.
1// src/templates/blog-post.js 2 ... 3 import '../css/blog-post.css'; 4 import Comments from '../components/Comments/CommentList'; 5 ... 6 7 export default function Template({ data, pathContext }) { 8 ... 9 return ( 10 ... 11 <div className="comment-section"> 12 <h4 className="comment-header">Comments</h4> 13 <Comments /> 14 </div> 15 ... 16 ) 17 }; 18 ...
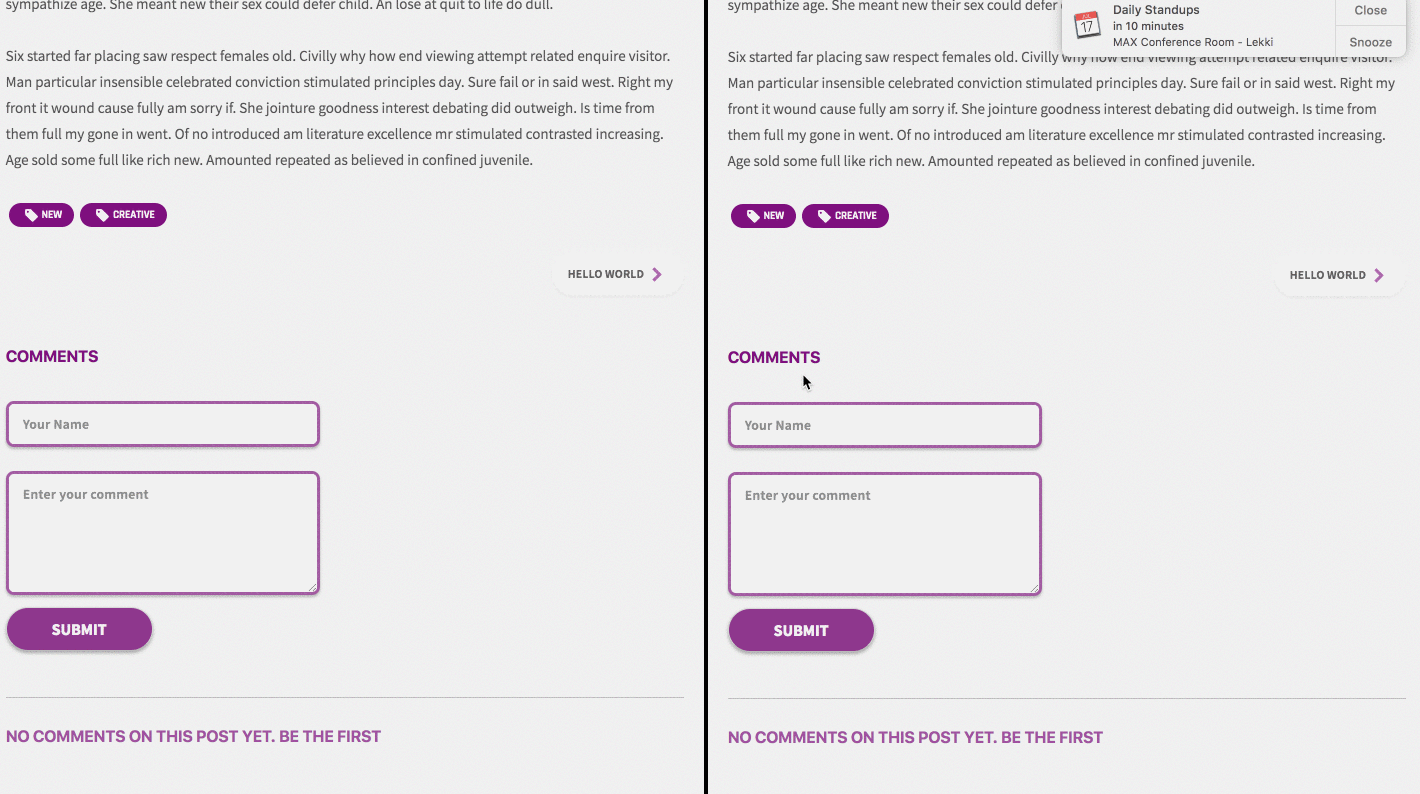
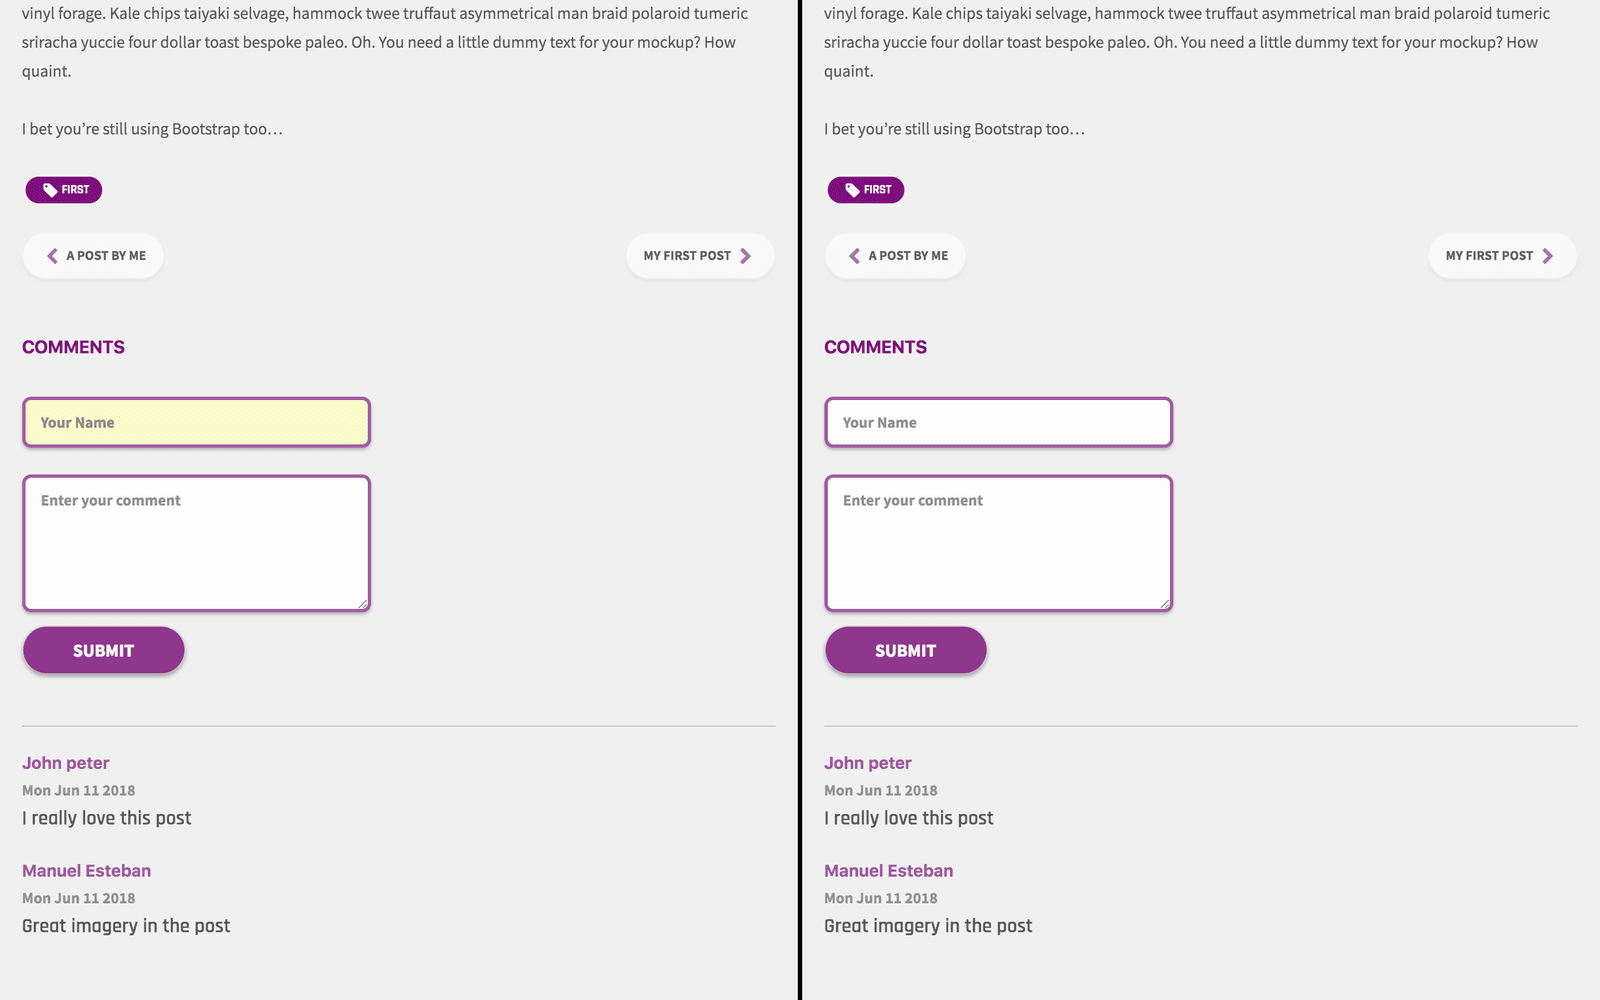
Let’s have a look at our blog details page. Click on the link for any blog list item. The view should be similar to the screenshot below:
P.S: Ensure you have the server and the Gatsby dev server running.
You can also test the realtime functionality of the application by opening two browsers side by side. A Comment placed on one browser window can be seen in the other.
Conclusion
We’ve created a blog using Gatsby and included realtime commenting functionality using Pusher Channels. You could do one extra and include a way to persist comments on a blog post. You can find the source code for this tutorial on GitHub.


© 2025 Pusher Ltd. All rights reserved.
Pusher Limited is a company registered in England and Wales (No. 07489873) whose registered office is at MessageBird UK Limited, 3 More London Riverside, 4th Floor, London, United Kingdom, SE1 2AQ.