- Products

- Developers
- User stories
- Blog
- Pricing

Adding realtime functionality to a blog using Kubeless
- Introduction
- Introduction
- What is a serverless architecture?
- Prerequisites
- Create a Pusher account
- Creating the blog backend
- Setting up Kubeless
- Creating articles
- Persisting articles
- Listing articles
- Getting individual articles
- Creating the blog UI
- Adding realtime functionality to the blog
- Broadcasting articles
- Updating the article list
- Cleaning up
- Summary
Introduction
Introduction
In this article, we are going to examine how to create a simple blog using a serverless architecture, in specific, Kubeless. This will show how we can connect simple handlers together to make everything work, and how we can add new functionality easily to the system without any major upheaval.
What is a serverless architecture?
Serverless development is a relatively recent architectural pattern that separates the business logic from the connectivity and deployment concerns. As a developer, you need only be interested in writing the actual core functionality of your application - for example, the code that will persist a blog post to the data store. You then deploy this small piece of code into the serverless framework and configure it to be triggered by appropriate events. For example, incoming HTTP requests. The framework then takes care of all the orchestration needed to make everything work together correctly.
Prerequisites
This article focuses on the use of Kubeless as a serverless architecture. This needs a functioning Kubernetes system (at least version 1.8) in order for it to work, and it is assumed that this is already available. If not then it can be set up on a local system using Minikube, or the Edge channel of Docker for Desktop. You will also need to install the kubeless CLI as described on the Kubeless Quick Start page.
NOTE: We assume that Kubernetes is already installed and working on your system, and that you are able to work with it to diagnose any system-specific issues that might come up.
NOTE: This article was tested using Kubernetes 1.10 running inside Docker 18.05 on macOS 10.13.5.
NOTE: You don’t need to actually set up kubeless inside your kubernetes cluster. We will cover that later on in this article.
We will be using Node.js to develop the serverless functions and Create React App for the user interface. Whilst there is no need to actually run the functions locally, npm is needed to configure their dependencies, and a full Node.js stack is needed for Create React App to be used, so ensure that these are available for use.
Create a Pusher account
To continue with this tutorial, sign up for a free sandbox Pusher account or sign in.
Then go to the Pusher dashbaord and create a new Channels app instance and save the keys for later on.
Creating the blog backend
Our backend architecture will be created using a series of small functions wired up in the Kubeless system. Our overall architecture will eventually look like this:
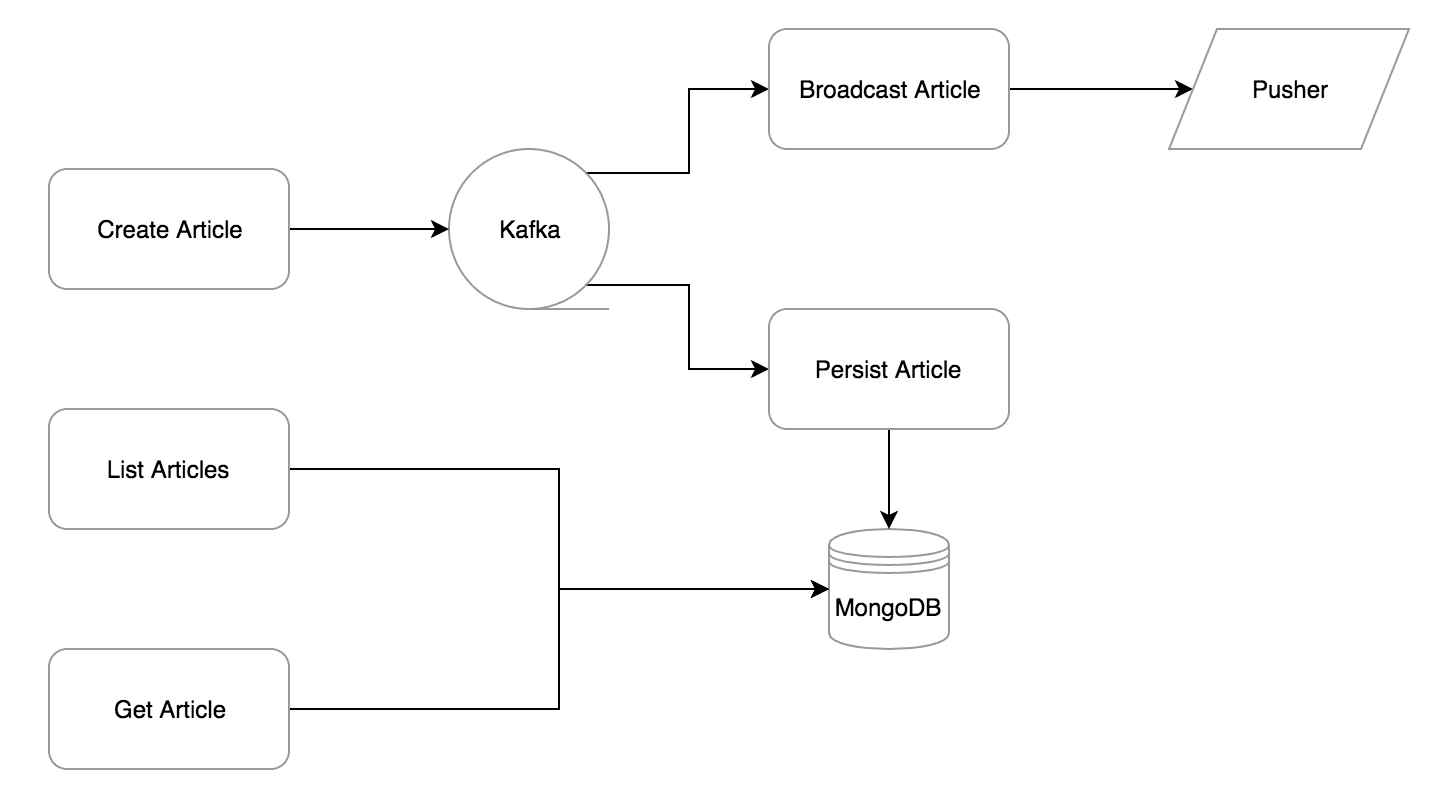
This looks a little daunting at first, but each of the five functions that we are going to write are very simple, and the rest of the system is handled for us by Kubeless.
Setting up Kubeless
Before we can do anything, we need to set up the underlying Kubeless architecture. This includes Kubeless itself, Kafka, MongoDB and Nginx for ingress.
At time of writing this tutorial, the latest version of Kubeless was v1.0.0-alpha.7.
NOTE: Ingress is the setup allowing HTTP calls to come in to the Kubeless infrastructure from outside on clean URLs. There are other alternatives available, but Nginx is easy to work with and does everything we need.
To set up Kubeless itself, we need to execute the following:
1$ kubectl create ns kubeless 2 namespace "kubeless" created 3 4 $ kubectl create -f https://github.com/kubeless/kubeless/releases/download/v1.0.0-alpha.7/kubeless-non-rbac-v1.0.0-alpha.7.yaml 5 serviceaccount "controller-acct" created 6 customresourcedefinition.apiextensions.k8s.io "functions.kubeless.io" created 7 customresourcedefinition.apiextensions.k8s.io "httptriggers.kubeless.io" created 8 customresourcedefinition.apiextensions.k8s.io "cronjobtriggers.kubeless.io" created 9 configmap "kubeless-config" created 10 deployment.apps "kubeless-controller-manager" created
This creates a Kubernetes namespace in which Kubeless will live, and creates the Kubeless resources from the specified resource definition.
We then can set up Kafka in the cluster in a very similar manner:
1$ kubectl create -f https://github.com/kubeless/kubeless/releases/download/v1.0.0-alpha.7/kafka-zookeeper-v1.0.0-alpha.7.yaml 2 customresourcedefinition.apiextensions.k8s.io "kafkatriggers.kubeless.io" created 3 service "broker" created 4 statefulset.apps "kafka" created 5 service "kafka" created 6 service "zoo" created 7 statefulset.apps "zoo" created 8 clusterrole.rbac.authorization.k8s.io "kafka-controller-deployer" created 9 clusterrolebinding.rbac.authorization.k8s.io "kafka-controller-deployer" created 10 service "zookeeper" created 11 deployment.apps "kafka-trigger-controller" created
And the Nginx ingress resources in the same way:
1$ kubectl apply -f https://raw.githubusercontent.com/kubernetes/ingress-nginx/bc59b7ddeee6e252974853f167c299005c600781/deploy/mandatory.yaml 2 namespace "ingress-nginx" created 3 deployment.extensions "default-http-backend" created 4 service "default-http-backend" created 5 configmap "nginx-configuration" created 6 configmap "tcp-services" created 7 configmap "udp-services" created 8 serviceaccount "nginx-ingress-serviceaccount" created 9 clusterrole.rbac.authorization.k8s.io "nginx-ingress-clusterrole" created 10 role.rbac.authorization.k8s.io "nginx-ingress-role" created 11 rolebinding.rbac.authorization.k8s.io "nginx-ingress-role-nisa-binding" created 12 clusterrolebinding.rbac.authorization.k8s.io "nginx-ingress-clusterrole-nisa-binding" created 13 deployment.extensions "nginx-ingress-controller" created 14 15 $ kubectl apply -f https://raw.githubusercontent.com/kubernetes/ingress-nginx/bc59b7ddeee6e252974853f167c299005c600781/deploy/provider/cloud-generic.yaml 16 service "ingress-nginx" created
At the time of writing this tutorial, the current latest release of the ingress-nginx resource files were not working correctly, so this points at the last known commit that did work.
Finally we want to set up MongoDB. There isn’t a convenient kubernetes resource definition for this, so we’ll write our own. Create a new file called mongodb.yml under your project directory as follows:
1apiVersion: v1 2 kind: Service 3 metadata: 4 name: mongo 5 spec: 6 ports: 7 - port: 27017 8 selector: 9 app: mongo 10 clusterIP: None 11 --- 12 apiVersion: apps/v1 # for versions before 1.9.0 use apps/v1beta2 13 kind: Deployment 14 metadata: 15 name: mongo 16 spec: 17 selector: 18 matchLabels: 19 app: mongo 20 strategy: 21 type: Recreate 22 template: 23 metadata: 24 labels: 25 app: mongo 26 spec: 27 containers: 28 - image: mongo:3.2.20 29 name: mongo 30 ports: 31 - containerPort: 27017 32 name: mongo
And then execute it:
1$ kubectl create -f mongodb.yml 2 service "mongo" created 3 deployment.apps "mongo" created
At this point we have all of the infrastructure we need in order to build our application.
Creating articles
Our first handler is the endpoint that will be called to create an article. This will ensure that we have the appropriate values in our request, and put a message onto the Kafka queue for other handlers to deal with.
Firstly, we need to set up a project directory and the dependencies for this:
1$ mkdir create-article 2 $ cd create-article 3 $ npm init -y 4 $ npm install --save uuid kafka-node
The uuid module will be used to generate a new, unique ID for the article, and the kafka-node module is used to produce a new message onto the Kafka queue.
Our actual handler is then written in create-article/index.js as follows:
1const uuid = require('uuid/v4'); 2 const kafka = require('kafka-node'); 3 4 const kafkaClient = new kafka.KafkaClient({kafkaHost: 'kafka.kubeless:9092'}); 5 const kafkaProducer = new kafka.Producer(kafkaClient); 6 7 module.exports = { 8 createArticle: function (event, context) { 9 10 return new Promise((resolve, reject) => { 11 if (!event.data.title) { 12 reject('Missing field: title'); 13 } else if (!event.data.body) { 14 reject('Missing field: body'); 15 } else { 16 resolve({ 17 id: uuid(), 18 created: new Date(), 19 title: event.data.title, 20 body: event.data.body 21 }); 22 } 23 }).then((article) => { 24 return new Promise((resolve, reject) => { 25 kafkaProducer.send([ 26 { topic: 'new-article-topic', messages: JSON.stringify(article), partition: 0 } 27 ], (err, data) => { 28 if (err) { 29 reject(err); 30 } else { 31 resolve(article); 32 } 33 }); 34 }); 35 }).then((article) => { 36 event.extensions.response.statusCode = 201; 37 return article; 38 }).catch((err) => { 39 event.extensions.response.statusCode = 400; 40 return err; 41 }); 42 } 43 }
Note: we’re assuming that Kafka is installed on “kafka.kubeless:9092” and that we’re using a topic called “new-article-topic”. This is the default host and port if using the Kafka that deploys as part of Kubeless, but in a real-life situation you should use Kubernetes Configmaps to configure this location.
Now we need to deploy this into our cluster:
$ kubeless function deploy create-article --runtime nodejs8 --dependencies package.json --handler index.createArticle --from-file index.js
This creates a new serverless handler that will execute the exported function createArticle from the file index.js whenever it is triggered, and which will determine all of the dependencies that this function needs based on package.json.
Then we want to set up an Ingress URL to allow incoming HTTP calls to trigger this function:
$ kubeless trigger http create create-article --function-name create-article --path create --hostname localhost
This means that calls to http://localhost/create **will trigger the function named create-article **- which we’ve just created.
Finally we’ll create the Kafka topic that we are writing to:
$ kubeless topic create new-article-topic
We can test this now as well:
1$ curl http://localhost/create --data '{"title": "My first post", "body": "This is my first post"}' -H "Content-type: application/json" 2 {"id":"6a61513b-06c8-4139-a816-a7188e75728e","created":"2018-07-24T07:14:45.561Z","title":"My first post","body":"This is my first post"}
Persisting articles
Once we can handle the request to create an article, and put the message onto the Kafka topic, we can then handle this message to persist it into the MongoDB store.
Handlers that are triggered by Kafka messages act in the exact same way as HTTP ones, including the fact that they are given an event that looks like an HTTP request. The data of this request is the message from the topic, ready to work with. We can also guarantee the contents of it, since it was put onto the topic by our own code and not by an external party.
Firstly, we need to set up a project directory and the dependencies for this:
1$ mkdir persist-article 2 $ cd persist-article 3 $ npm init -y 4 $ npm install --save mongodb
Our actual handler is then written in persist-article/index.js as follows:
1const MongoClient = require('mongodb').MongoClient; 2 3 module.exports = { 4 persistArticle: function (event, context) { 5 const article = event.data; 6 const post = { 7 "_id": article.id, 8 "created": new Date(article.created), 9 "title": article.title, 10 "body": article.body 11 }; 12 13 return new Promise((resolve, reject) => { 14 15 MongoClient.connect("mongodb://mongo.default:27017", (err, client) => { 16 if (err) { 17 console.log(err); 18 reject(err); 19 } else { 20 const db = client.db('kubeless_blog'); 21 22 db.collection('posts').insert(post, (err, result) => { 23 client.close(); 24 25 if (err) { 26 console.log(err); 27 reject(err); 28 } else { 29 resolve(post); 30 } 31 }); 32 } 33 }); 34 }); 35 36 } 37 }
NOTE: We’re assuming that MongoDB is installed on “mongo.default:27017” and that we’re using a database called “kubeless_blog”. This is the default host and port if using the MongoDB that deploys as part of the earlier deployment resource, but in a real-life situation you should use Kubernetes Configmaps to configure this.
Now we need to deploy this into our cluster:
$ kubeless function deploy persist-article --runtime nodejs8 --dependencies package.json --handler index.persistArticle --from-file index.js
This creates a new serverless handler that will execute the exported function persistArticle from the file index.js whenever it is triggered, and which will determine all of the dependencies that this function needs based on package.json.
Then we want to set up an Ingress URL to allow incoming Kafka messages on our topic to trigger this function:
$ kubeless trigger kafka create persist-article --function-selector created-by=kubeless,function=persist-article --trigger-topic new-article-topic
At this point, we have a setup where all successful calls to our first handler will put messages onto the Kafka topic, and then our second handler will read and process them to write into our MongoDB database.
Listing articles
Now that we can get articles into our system, we need to get them out again. The first part of this is a handler to get a list of all articles.
Firstly, we need to set up a project directory and the dependencies for this:
1$ mkdir list-articles 2 $ cd list-articles 3 $ npm init -y 4 $ npm install --save mongodb
Our actual handler is then written in list-articles/index.js as follows:
1const MongoClient = require('mongodb').MongoClient; 2 3 module.exports = { 4 listArticles: function (event, context) { 5 return new Promise((resolve, reject) => { 6 7 MongoClient.connect('mongodb://mongo.default:27017', (err, client) => { 8 if (err) { 9 console.log(err); 10 reject(err); 11 } else { 12 const db = client.db('kubeless_blog'); 13 14 db.collection('posts') 15 .find({}) 16 .sort({created: -1}) 17 .project({'_id': 1, 'title': 1, 'created': 1}) 18 .toArray((err, docs) => { 19 client.close(); 20 21 if (err) { 22 console.log(err); 23 reject(err); 24 } else { 25 resolve(docs.map((doc) => { 26 return { 27 id: doc['_id'], 28 title: doc.title, 29 created: doc.created 30 }; 31 })); 32 } 33 }); 34 } 35 }); 36 }); 37 38 } 39 }
This gets every article, with no pagination or filtering, and returns them in order so that the most recent ones are first. It also only returns the title of each article, not the entire text.
Now we need to deploy this into our cluster:
$ kubeless function deploy list-articles --runtime nodejs8 --dependencies package.json --handler index.listArticles --from-file index.js
This creates a new serverless handler that will execute the exported function listArticles from the file index.js whenever it is triggered, and which will determine all of the dependencies that this function needs based on package.json.
Then we want to set up an Ingress URL to allow incoming HTTP calls to trigger this function:
$ kubeless trigger http create list-articles --function-name list-articles --path list --hostname localhost
This means that calls to http://localhost/list **will trigger the function named list-articles **- which we’ve just created.
Getting individual articles
Finally, we need to be able to get an individual article out so that we can display it.
Firstly, we need to set up a project directory and the dependencies for this:
1$ mkdir get-article 2 $ cd get-article 3 $ npm init -y 4 $ npm install --save mongodb
Our actual handler is then written in get-article/index.js as follows:
1const MongoClient = require('mongodb').MongoClient; 2 3 module.exports = { 4 getArticle: function (event, context) { 5 const url = event.extensions.request.url; 6 const id = url.substring(1); 7 8 return new Promise((resolve, reject) => { 9 10 MongoClient.connect('mongodb://mongo.default:27017', (err, client) => { 11 if (err) { 12 console.log(err); 13 reject(err); 14 } else { 15 const db = client.db('kubeless_blog'); 16 17 db.collection('posts') 18 .findOne({'_id': id}, (err, doc) => { 19 client.close(); 20 21 if (err) { 22 console.log(err); 23 reject(err); 24 } else { 25 if (doc) { 26 resolve({ 27 id: doc['_id'], 28 created: doc.created, 29 title: doc.title, 30 body: doc.body 31 }); 32 } else { 33 event.extensions.response.statusCode = 404; 34 resolve(); 35 } 36 } 37 }); 38 } 39 }); 40 }); 41 42 } 43 }
This expects to be called with a URL containing the article ID, and then retrieves that article from the MongoDB store and returns it. If there is no matching article then an HTTP 404 is returned instead.
Now we need to deploy this into our cluster:
$ kubeless function deploy get-article --runtime nodejs8 --dependencies package.json --handler index.getArticle --from-file index.js
This creates a new serverless handler that will execute the exported function getArticles from the file index.js whenever it is triggered, and which will determine all of the dependencies that this function needs based on package.json.
Then we want to set up an Ingress URL to allow incoming HTTP calls to trigger this function:
$ kubeless trigger http create get-article --function-name get-article --path get --hostname localhost
Note: the ingress mechanism does prefix matching, not exact matching. This means that the above actually matches any calls that start with “/get”, such as “/get/123”.
This means that calls to http://localhost/get/123 will trigger the function named get-article - which we’ve just created.
Creating the blog UI
Now that we have our backend functionality, we need a UI to actually drive it. This will be a React application, using Semantic UI for some structure and styling.
Firstly we’ll create a new application using the Create React App tool:
$ create-react-app ui
Then we’ll add some dependencies that we need:
$ npm install --save axios semantic-ui-react semantic-ui-css
We can now start up the UI, and it will automatically update as we make changes to it:
$ npm start
Our UI is going to consist of two different parts - the list of articles, and the actual article that we’re looking at.
Firstly, let’s create a component to represent the article list. For this, create a file called src/ArticleList.js as follows:
1import React from 'react'; 2 import { List } from 'semantic-ui-react'; 3 import axios from 'axios'; 4 export class ArticleList extends React.Component { 5 state = { 6 articles: [] 7 }; 8 _showArticle = this._handleShowArticle.bind(this); 9 loadList() { 10 axios.get('http://localhost/list') 11 .then((response) => { 12 this.setState({ 13 articles: response.data 14 }); 15 }); 16 } 17 _handleShowArticle(article) { 18 this.props.showArticle(article.id); 19 } 20 componentDidMount() { 21 this.loadList(); 22 } 23 render() { 24 const articleEntries = this.state.articles.map((article) => { 25 return ( 26 <List.Item key={article.id} onClick={() => this._showArticle(article)}> 27 <List.Content> 28 <List.Header as='a'>{article.title}</List.Header> 29 <List.Description as='a'>{article.created}</List.Description> 30 </List.Content> 31 </List.Item> 32 ); 33 }); 34 return ( 35 <List divided relaxed> 36 {articleEntries} 37 <List.Item onClick={this.props.newArticle}> 38 <List.Content> 39 <List.Header as='a'>New Article</List.Header> 40 </List.Content> 41 </List.Item> 42 </List> 43 ); 44 } 45 }
Note: This gets the list of articles from http://localhost/list, which corresponds to the handler we defined above.
Next we want a component to display a given article. For this, create a new file called src/Article.js as follows:
1import React from 'react'; 2 import { Card, Loader } from 'semantic-ui-react'; 3 import axios from 'axios'; 4 export class Article extends React.Component { 5 state = { 6 article: undefined 7 }; 8 componentDidMount() { 9 const id = this.props.id; 10 axios.get(`http://localhost/get/${id}`) 11 .then((response) => { 12 this.setState({ 13 article: response.data 14 }); 15 }); 16 } 17 render() { 18 const { article } = this.state; 19 if (!article) { 20 return <Loader />; 21 } 22 return ( 23 <Card fluid> 24 <Card.Content header={article.title} /> 25 <Card.Content description={article.body} /> 26 <Card.Content extra> 27 {article.created} 28 </Card.Content> 29 </Card> 30 ); 31 } 32 }
Note: This gets the article from http://localhost/get, which corresponds to the handler we defined above.
Finally, we want a component to create a new article. This will be in src/NewArticle.js as follows:
1import React from 'react'; 2 import { Form, Button, Message } from 'semantic-ui-react'; 3 import axios from 'axios'; 4 export class NewArticle extends React.Component { 5 state = { 6 title: '', 7 body: '' 8 }; 9 _changeTitle = this._handleChangeTitle.bind(this); 10 _changeBody = this._handleChangeBody.bind(this); 11 _postArticle = this._handlePostArticle.bind(this); 12 _handleChangeTitle(e) { 13 this.setState({ 14 title: e.target.value 15 }); 16 } 17 _handleChangeBody(e) { 18 this.setState({ 19 body: e.target.value 20 }); 21 } 22 _handlePostArticle() { 23 const { title, body } = this.state; 24 axios({ 25 method: 'post', 26 url: 'http://localhost/create', 27 data: { 28 title, 29 body 30 }, 31 headers: { 32 'content-type': 'application/json' 33 } 34 }) 35 .then(() => { 36 this.setState({ 37 title: '', 38 body: '', 39 success: true, 40 error: undefined 41 }); 42 }, (e) => { 43 this.setState({ 44 success: false, 45 error: e.response.data 46 }); 47 }); 48 } 49 render() { 50 let message; 51 if (this.state.success) { 52 message = <Message positive>Article posted successfully</Message>; 53 } else if (this.state.error) { 54 message = <Message error>{this.state.error}</Message> 55 } 56 return ( 57 <Form error={this.state.error} success={this.state.success}> 58 {message} 59 <Form.Field> 60 <label>Title</label> 61 <input placeholder='Title' value={this.state.title} onChange={this._changeTitle} autoFocus /> 62 </Form.Field> 63 <Form.Field> 64 <label>Article</label> 65 <textarea placeholder="Article" value={this.state.body} onChange={this._changeBody} /> 66 </Form.Field> 67 <Button type='submit' onClick={this._postArticle} >Post Article</Button> 68 </Form> 69 ); 70 } 71 }
Note: This creates the article by POSTing to http://localhost/create, which corresponds to the handler we defined above.
Now that we’ve got these components, we need to tie these together. This is done by replacing the existing src/App.js to read as follows:
1import React, { Component } from 'react'; 2 import 'semantic-ui-css/semantic.min.css'; 3 import { Grid, Header, Container } from 'semantic-ui-react'; 4 import { ArticleList } from './ArticleList'; 5 import { Article } from './Article'; 6 import { NewArticle } from './NewArticle'; 7 class App extends Component { 8 state = { 9 currentArticle: undefined 10 }; 11 _newArticle = this._handleNewArticle.bind(this); 12 _showArticle = this._handleShowArticle.bind(this); 13 _handleShowArticle(article) { 14 this.setState({ 15 currentArticle: article 16 }); 17 } 18 _handleNewArticle() { 19 this.setState({ 20 currentArticle: undefined 21 }); 22 } 23 render() { 24 let body; 25 if (this.state.currentArticle) { 26 body = <Article id={this.state.currentArticle} /> 27 } else { 28 body = <NewArticle />; 29 } 30 return ( 31 <Container> 32 <Grid> 33 <Grid.Row> 34 <Grid.Column> 35 <Header as="h2"> 36 Kubeless Blog 37 </Header> 38 </Grid.Column> 39 </Grid.Row> 40 <Grid.Row> 41 <Grid.Column width={12}> 42 { body } 43 </Grid.Column> 44 <Grid.Column width={4}> 45 <ArticleList showArticle={this._showArticle} newArticle={this._newArticle} /> 46 </Grid.Column> 47 </Grid.Row> 48 </Grid> 49 </Container> 50 ); 51 } 52 } 53 export default App;
At this point, we can use the UI to read and post articles:
Adding realtime functionality to the blog
Currently, we can post articles to the blog and read ones that are posted. What we don’t get is any indication that a post has been made without refreshing the page. This can be achieved by adding Pusher in to the mix.
We are going to add a new handler into our Kubeless system that reacts to the same Kafka messages that are used to persist the messages, and which will trigger Pusher to indicate that a new post has been made.
Broadcasting articles
Our new handler is going to react every time a new article is created, in the exact same way as the persist-article handler from above.
Firstly, we need to set up a project directory and the dependencies for this:
1$ mkdir broadcast-article 2 $ cd broadcast-article 3 $ npm init -y 4 $ npm install --save pusher
Our actual handler is then written in broadcast-article/index.js as follows:
1const Pusher = require('pusher'); 2 3 const pusher = new Pusher({ 4 appId: 'PUSHER_APP_ID', 5 key: 'PUSHER_KEY', 6 secret: 'PUSHER_SECRET', 7 cluster: 'PUSHER_CLUSTER', 8 encrypted: true 9 }); 10 11 12 module.exports = { 13 broadcastArticle: function (event, context) { 14 const article = event.data; 15 const post = { 16 "_id": article.id, 17 "created": new Date(article.created), 18 "title": article.title, 19 "body": article.body 20 }; 21 22 pusher.trigger('posts', 'new-post', post); 23 } 24 }
Note: we’re hard-coding the Pusher credentials here, which need to be updated to match those you obtained earlier. In a real-life situation you should use Kubernetes Configmaps to configure this.
Now we need to deploy this into our cluster:
$ kubeless function deploy broadcast-article --runtime nodejs8 --dependencies package.json --handler index.broadcastArticle --from-file index.js
This creates a new serverless handler that will execute the exported function broadcastArticle from the file index.js whenever it is triggered, and which will determine all of the dependencies that this function needs based on package.json.
Then we want to set up an Ingress URL to allow incoming Kafka messages on our topic to trigger this function:
$ kubeless trigger kafka create broadcast-article --function-selector created-by=kubeless,function=broadcast-article --trigger-topic new-article-topic
This is the exact same topic as was used before, so every message that triggers the persist-article handler will also trigger the broadcast-article one.
Updating the article list
Now that we’re broadcasting events whenever articles are posted, we can automatically update the UI based on this. For this we want to listen to the Pusher events and react to them.
Firstly, we need our Pusher dependency. From inside the UI project:
$ npm install --save pusher-js
Then we need to update src/ArticleList.js to listen for the events and react accordingly. Firstly add the following to the top of the file:
1import Pusher from 'pusher-js'; 2 3 const pusher = new Pusher('PUSHER_APP_KEY', { 4 cluster: 'PUSHER_CLUSTER', 5 encrypted: true 6 });
Note: make sure you update this to include the App Key and Cluster from your Pusher Application you created earlier. These should exactly match those used in the
broadcast-articlehandler.
Finally, add the following to the componentDidMount method:
1pusher.subscribe('posts').bind('new-post', () => { 2 this.loadList(); 3 });
This will react to the new-post event that we are broadcasting by loading the full list of articles again. This means that whenever anyone posts an article, all active browsers will be told about it and get their article list updated.
Restart your UI and we can see that the posts now appear automatically:
Cleaning up
One thing that needs to be considered with a serverless application is deployment, and tearing it down if needed. We are actually running a large number of components here: five serverless functions, Kafka, Zookeeper, MongoDB, Nginx and the Kubeless framework itself. Each of these needs to be managed, and shut down, individually and correctly otherwise you leave bits hanging around.
Cleaning up this application can be done as follows if needed:
1# Broadcast Article Handler 2 kubeless trigger kafka delete broadcast-article 3 kubeless function delete broadcast-article 4 5 # Get Article Handler 6 kubeless trigger http delete get-article 7 kubeless function delete get-article 8 9 # List Articles Handler 10 kubeless trigger http delete list-articles 11 kubeless function delete list-articles 12 13 # Persist Article Handler 14 kubeless trigger kafka delete persist-article 15 kubeless topic delete new-article-topic 16 kubeless function delete persist-article 17 18 # Create Article Handler 19 kubeless trigger http delete create-article 20 kubeless function delete create-article 21 22 # Nginx Ingress 23 kubectl delete -f https://raw.githubusercontent.com/kubernetes/ingress-nginx/master/deploy/provider/cloud-generic.yaml 24 kubectl delete -f https://raw.githubusercontent.com/kubernetes/ingress-nginx/master/deploy/mandatory.yaml 25 26 # MongoDB 27 kubectl delete -f mongodb.yml 28 29 # Kafka 30 kubectl delete -f https://github.com/kubeless/kubeless/releases/download/v1.0.0-alpha.7/kafka-zookeeper-v1.0.0-alpha.7.yaml 31 32 # Kubeless 33 kubectl delete -f https://github.com/kubeless/kubeless/releases/download/v1.0.0-alpha.7/kubeless-non-rbac-v1.0.0-alpha.7.yaml 34 kubectl delete ns kubeless
Summary
This article shows a brief introduction to using Kubeless to build a simple application, and then extending it by adding new functionality. We can easily see how adding this new functionality can be done later on, with no impact to the rest of the service.
Whilst not shown here, there’s no reason that all of these handlers need to be written by the same team, or even in the same language. Serverless architectures, in the same way as Microservices, thrive on a disjoint ecosystem where each component is developed in the way that makes the most sense for that one component, rather than forcing a single language on the entire application.
The full source code for this can be seen on GitHub.


© 2026 Pusher Ltd. All rights reserved.
Pusher Limited is a company registered in England and Wales (No. 07489873) whose registered office is at MessageBird UK Limited, 3 More London Riverside, 4th Floor, London, United Kingdom, SE1 2AQ.