- Products

- Developers
- User stories
- Blog
- Pricing

Creating a realtime attendance app with React Native and BLE
Introduction
In this tutorial, we'll be using React Native to create the attendance app on Android, Bleno for implementing Bluetooth Low Energy, and Pusher for notifying connected devices on realtime.
Prerequisites
You'll need the following in order to follow along with this tutorial:
- IoT Device - you'll need an IoT device which has a network and BLE (Bluetooth Low Energy) module. The device should be connected to the internet in order for Pusher to work. In this tutorial, I'll be using a Raspberry Pi 3 because of its Node.js support.
- Mobile Device - you'll be testing the app on a real device because of the need for bluetooth. But if your machine has bluetooth capabilities and your emulator has access to it, then you can use it as well.
- React Native development environment - as this is a React Native tutorial, I'll be assuming that you have already setup your machine for React Native development. If not, you can follow the installation instructions on the official docs. Be sure to select the Building Projects with Native Code tab because the Quickstart one uses Expo. It is great for local development but if you need certain device features such as Bluetooth, you need to start with the native method so you can immediately run the app on a device.
- A Pusher account and Channels app - create a free sandbox Pusher account or sign in and go to the dashboard.
What You'll Create
The app will have two components: client and server. The client is the Android app that will be created using React Native, and the server is the BLE server which is responsible for processing requests from the Android app.
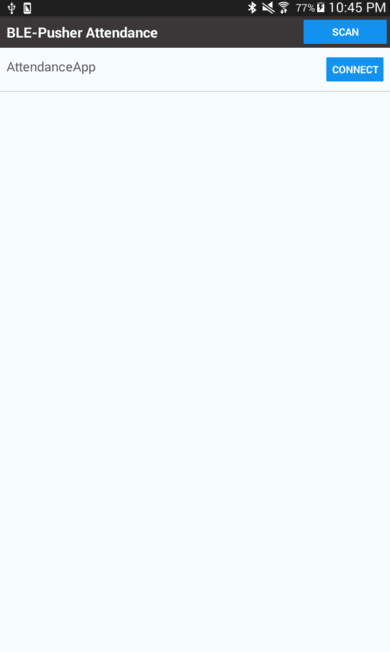
The Android app is going to allow the user to scan for nearby peripherals. Once the scan is complete, it will list out the peripherals that it found:
The user can then connect to the peripheral. Once connected, the peripheral will send the list of attendees (if any) via Pusher:
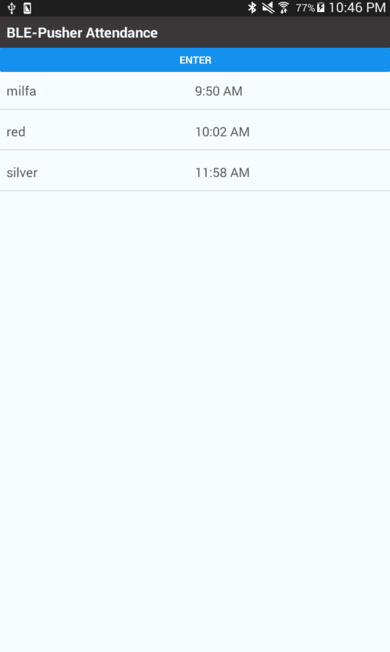
The user can then press on the enter button. This will open a prompt which will ask for the user's full name:
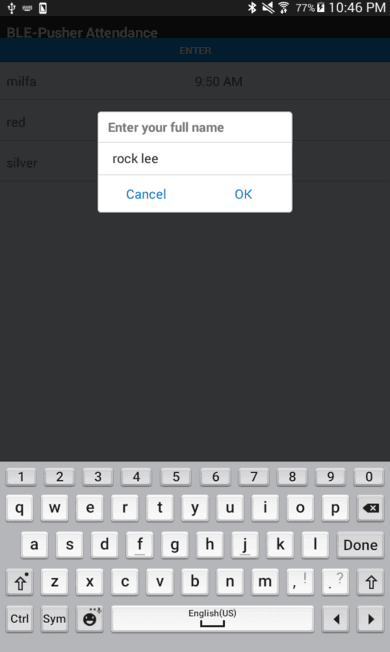
Once the user has entered their name, it will be sent to the peripheral, and the peripheral will send out the name of the user to all users subscribed to a specific channel via Pusher.

You can find the full source code of this app on its Github repo.
Creating the App
Now you’re ready to create the app. You’re going to code the server component first and then the client app.
Server Component
Start by installing the dependencies of Bleno:
sudo apt-get install bluetooth bluez libbluetooth-dev libudev-dev
If your IoT device is not using a linux-based operating system, you can check the official documentation for instructions on how to install the dependencies.
Once you’ve installed the dependencies for Bleno, you can now create a new project:
npm init
Next, install the dependencies of the server:
npm install bleno pusher dateformat dotenv --save
Create an attendance.js file and import the packages you’ve just installed:
1var bleno = require('bleno'); // for implementing BLE peripheral 2 var Pusher = require('pusher'); // for pushing real-time updates to clients 3 var dateFormat = require('dateformat'); // for formatting dates 4 5 require('dotenv').config(); // for loading .env file
Initialize Pusher:
1var pusher = new Pusher({ 2 appId: process.env.APP_ID, 3 key: process.env.APP_KEY, 4 secret: process.env.APP_SECRET, 5 cluster: process.env.APP_CLUSTER, 6 encrypted: true 7 });
Note that for this to work you have to create a .env inside the same folder where you have the attendance.js file and then add your pusher config:
1APP_ID="YOUR PUSHER APP ID" 2 APP_KEY="YOUR PUSHER APP KEY" 3 APP_SECRET="YOUR PUSHER APP SECRET" 4 APP_CLUSTER="YOUR PUSHER APP CLUSTER"
Add some default attendees to ensure that Pusher is properly sending the data when someone connects to the peripheral:
1var time_format = 'h:MM TT'; 2 var attendees = [ 3 { 4 id: 1, 5 full_name: 'milfa', 6 time_entered: dateFormat(new Date(1505901033110), time_format) 7 }, 8 { 9 id: 2, 10 full_name: 'red', 11 time_entered: dateFormat(new Date(1505901733110), time_format) 12 }, 13 { 14 id: 3, 15 full_name: 'silver', 16 time_entered: dateFormat(new Date(1505908733110), time_format) 17 } 18 ];
Next, listen for when the state of the BLE peripheral changes. It has to be poweredOn before it can start advertising its services:
1const BASE_UUID = '-5659-402b-aeb3-d2f7dcd1b999'; 2 const PERIPHERAL_ID = '0000'; 3 const PRIMARY_SERVICE_ID = '0100'; 4 5 var primary_service_uuid = PERIPHERAL_ID + PRIMARY_SERVICE_ID + BASE_UUID; 6 var ps_characteristic_uuid = PERIPHERAL_ID + '0300' + BASE_UUID; 7 8 var settings = { 9 service_id: primary_service_uuid, 10 characteristic_id: ps_characteristic_uuid 11 }; 12 13 bleno.on('stateChange', function(state){ 14 if(state === 'poweredOn'){ 15 bleno.startAdvertising('AttendanceApp', [settings.service_id]); 16 }else{ 17 bleno.stopAdvertising(); 18 } 19 });
For those of you who don’t have experience in constructing UUIDs, the quickest way to do it is by using a tool like the Online UUID Generator. That will generate a new UUID every time you reload the page. That is where I got the value for the BASE_UUID. The last 24 characters (excluding the hyphens) serves as the BASE_UUID, and the first 8 characters is the combination of the peripheral ID and the service or characteristic ID. Notice that I’ve used 0100 for the service ID, and 0300 for the characteristic ID to make them unique.
For more information regarding how to generate UUIDs, and BLE advertising in general, I recommend you to read A BLE Advertising Primer.
Once the service advertisement is started, create a new service that will respond to write requests from the client app:
1bleno.on('advertisingStart', function(error){ 2 if(error){ 3 console.log('something went wrong while trying to start advertisement of services'); 4 }else{ 5 console.log('started..'); 6 bleno.setServices([ 7 new bleno.PrimaryService({ // create a service 8 uuid : settings.service_id, 9 characteristics : [ 10 new bleno.Characteristic({ // add a characteristic to the service 11 value : null, 12 uuid : settings.characteristic_id, 13 properties : ['write'], 14 onWriteRequest : function(data, offset, withoutResponse, callback){ 15 16 // next: add code for processing write request 17 } 18 }) 19 ] 20 }) 21 ]); 22 } 23 });
Once a write request is received, you first need to convert the data to a string. The data isn’t being sent in one go from the client. This is due to the limitation that only 20 bytes of data can be written to a peripheral at any given time. This means that if the data that you’re sending is more than 20 bytes, the client converts it into a byte array and sends the individual chunks to the peripheral one by one until it has sent the whole data. Bleno abstracts this part away, so you don’t have to deal with each individual chunk.
1var attendee = JSON.parse(data.toString()); 2 attendee.time_entered = dateFormat(new Date(), time_format); 3 attendees.push(attendee); 4 console.log(attendees); 5 6 pusher.trigger('attendance-channel', 'attendance-event', attendee); // send the new attendee's data to all clients 7 8 callback(this.RESULT_SUCCESS); // tell the client that the request has succeeded
Once the peripheral accepts a new connection from a client, send the details of all the attendees. This way, the new person knows the people who are currently in the room:
1bleno.on('accept', function(clientAddress){ 2 console.log('client address: ', clientAddress); 3 var data = { 4 is_attendees: true, 5 attendees: attendees 6 }; 7 pusher.trigger('attendance-channel', 'attendance-event', data); 8 });
Client Component
Now you’re ready to create the Android app. First, bootstrap a new React Native project:
react-native init BLEPusherAttendance
Next, install the dependencies:
npm install --save react-native-ble-manager random-id convert-string bytes-counter react-native-spinkit@latest react-native-prompt pusher-js
Once everything is installed, you need to link the resources to the app:
react-native link
This step is needed for the BLE Manager and Spinkit packages to work correctly.
The app requires some permissions in order for it to work. Add the following on the app/src/main/AndroidManifest.xml file, right after the default permissions (INTERNET and SYSTEM_ALERT_WINDOW):
1<uses-permission android:name="android.permission.BLUETOOTH"/> 2 <uses-permission android:name="android.permission.BLUETOOTH_ADMIN"/> 3 <uses-permission android:name="android.permission.ACCESS_COARSE_LOCATION" /> 4 <uses-permission android:name="android.permission.ACCESS_NETWORK_STATE"/>
For a detailed information on what each permission does, check out the Android documentation.
Next, include the built-in React Native components that you will be using:
1import React, { Component } from 'react'; 2 import { 3 AppRegistry, 4 Platform, 5 PermissionsAndroid, // for checking if certain android permissions are enabled 6 StyleSheet, 7 Text, 8 View, 9 NativeEventEmitter, // for emitting events for the BLE manager 10 NativeModules, // for getting an instance of the BLE manager module 11 Button, 12 ToastAndroid, // for showing notification if there's a new attendee 13 FlatList, // for creating lists 14 Alert 15 } from 'react-native';
Also import the packages you’ve installed earlier:
1import BleManager from 'react-native-ble-manager'; // for talking to BLE peripherals 2 const BleManagerModule = NativeModules.BleManager; 3 const bleManagerEmitter = new NativeEventEmitter(BleManagerModule); // create an event emitter for the BLE Manager module 4 5 import { stringToBytes } from 'convert-string'; // for converting string to byte array 6 import RandomId from 'random-id'; // for generating random user ID 7 import bytesCounter from 'bytes-counter'; // for getting the number of bytes in a string 8 import Pusher from 'pusher-js/react-native'; // for using Pusher inside React Native 9 import Spinner from 'react-native-spinkit'; // for showing a spinner when loading something 10 import Prompt from 'react-native-prompt'; // for showing an input prompt 11 12 // next: create main component
On the main component’s constructor, initialize the state values that you’ll be using throughout the app:
1export default class pusherBLEAttendance extends Component { 2 3 constructor() { 4 super(); 5 this.state = { 6 is_scanning: false, // whether the app is currently scanning for peripherals or not 7 peripherals: null, // the peripherals detected 8 connected_peripheral: null, // the currently connected peripheral 9 user_id: null, // the ID of the current user 10 attendees: null, // the attendees currently synced with the app 11 promptVisible: false, // whether the prompt for the user's name is visible or not 12 has_attended: false // whether the current user has already attended 13 } 14 15 this.peripherals = []; // temporary storage for the detected peripherals 16 17 this.startScan = this.startScan.bind(this); // function for scanning for peripherals 18 this.openBox = this.openBox.bind(this); // function for opening the prompt box 19 } 20 21 // next: add code componentWillMount() 22 }
Before the component is mounted, check if bluetooth is enabled and alert the user that they need to enable bluetooth on their device if not. After that, you can initialize the BLE module. Note that it’s not required to initialize the module once you’re sure that bluetooth is enabled. This is because bluetooth is only used once the user scans for peripherals.
1componentWillMount() { 2 BleManager.enableBluetooth() 3 .then(() => { 4 console.log('Bluetooth is already enabled'); 5 }) 6 .catch((error) => { 7 Alert.alert('You need to enable bluetooth to use this app.'); 8 }); 9 10 // initialize the BLE module 11 BleManager.start({showAlert: false}) 12 .then(() => { 13 console.log('Module initialized'); 14 }); 15 16 // next: add code for checking coarse location 17 }
For Android devices using API version 23 and above (Android 6.0 and above), you need to check whether the COARSE_LOCATION permission is enabled, and alert the user if it’s not. COARSE_LOCATION is used to access the user’s approximate location. This is required by the BLE Manager package.
1if(Platform.OS === 'android' && Platform.Version >= 23){ 2 PermissionsAndroid.check(PermissionsAndroid.PERMISSIONS.ACCESS_COARSE_LOCATION).then((result) => { 3 if(!result){ 4 PermissionsAndroid.requestPermission(PermissionsAndroid.PERMISSIONS.ACCESS_COARSE_LOCATION).then((result) => { 5 if(!result){ 6 Alert.alert('You need to give access to coarse location to use this app.'); 7 } 8 }); 9 } 10 }); 11 }
Once the component is mounted, you can now listen for when a peripheral is discovered. Note that this event only gets triggered while the peripheral scan is ongoing. Later on, you’ll see how the scan can be started. Also note that the callback function can be triggered multiple times for the same peripheral. That’s why you have to check if it’s already stored in the array before pushing.
1componentDidMount() { 2 3 bleManagerEmitter.addListener('BleManagerDiscoverPeripheral', (peripheral) => { 4 5 var peripherals = this.peripherals; // get the peripherals 6 // check if the peripheral already exists 7 var el = peripherals.filter((el) => { 8 return el.id === peripheral.id; 9 }); 10 11 if(!el.length){ 12 peripherals.push({ 13 id: peripheral.id, // mac address of the peripheral 14 name: peripheral.name // descriptive name given to the peripheral 15 }); 16 this.peripherals = peripherals; // update the array of peripherals 17 } 18 }); 19 // next: add code for listening for when the peripheral scan has stopped 20 }
Next, listen for when the scan has stopped. This is where you update the state with the peripherals that were found:
1bleManagerEmitter.addListener( 2 'BleManagerStopScan', 3 () => { 4 console.log('scan stopped'); 5 if(this.peripherals.length == 0){ 6 Alert.alert('Nothing found', "Sorry, no peripherals were found"); 7 } 8 this.setState({ 9 is_scanning: false, 10 peripherals: this.peripherals 11 }); 12 } 13 ); 14 // next: add code for binding to Pusher events
Next, initialize the Pusher client and subscribe to the same channel that you used in the server component earlier. Once the attendance-event is triggered, it can either be the server has sent the array of attendees (sent to the one who just joined) or a single attendee (sent to all the other people in the room).
1var pusher = new Pusher('YOUR PUSHER APP KEY', { 2 cluster: 'YOUR PUSHER APP CLUSTER', 3 encrypted: true 4 }); 5 6 var channel = pusher.subscribe('attendance-channel'); 7 channel.bind('attendance-event', (data) => { 8 if(data.is_attendees){ 9 this.setState({ 10 attendees: data.attendees 11 }); 12 }else{ 13 ToastAndroid.show(`${data.full_name} just entered the room!`, ToastAndroid.LONG); 14 this.setState({ 15 attendees: [...this.state.attendees, data] 16 }); 17 } 18 });
The startScan() function is executed when the user presses on the Scan button. This uses the BLE manager’s scan method. It accepts an array of the service UUIDs as the first argument. Here, we didn’t include it. Even though, more often than not, you already know which service UUIDs your app should connect to. There’s really no particular reason for this, aside from demonstrating that the app can actually detect other peripherals and not just the one you created earlier. The second argument is the number of seconds in which to scan for peripherals.
1startScan() { 2 this.peripherals = []; 3 this.setState({ 4 is_scanning: true 5 }); 6 7 BleManager.scan([], 2) 8 .then(() => { 9 console.log('scan started'); 10 }); 11 12 }
Once the scanning has stopped, the user will have the option to connect to any of the peripherals that were detected. Each peripheral has a corresponding Connect button which the user can press. This will, in turn, execute the connect() function which attempts to connect to the peripheral. Once connected, you have to retrieve the services from the peripheral so that the app becomes aware of the services that are available. Even though we already know the service UUID, you can’t really do anything to it unless the app is aware of it.
1connect(peripheral_id) { 2 BleManager.connect(peripheral_id) 3 .then(() => { 4 this.setState({ 5 connected_peripheral: peripheral_id 6 }); 7 8 Alert.alert('Connected!', 'You are now connected to the peripheral.'); 9 10 // retrieve the services advertised by this peripheral 11 BleManager.retrieveServices(peripheral_id) 12 .then((peripheralInfo) => { 13 console.log('Peripheral info:', peripheralInfo); 14 } 15 ); 16 }) 17 .catch((error) => { 18 Alert.alert("Err..", 'Something went wrong while trying to connect.'); 19 }); 20 21 }
Once the user has connected to the peripheral, the UI is updated to show an Attend button and a list of attendees. When the user presses on the Attend button, a prompt shows up and lets the user enter their full name. Once entered, the following function is executed:
1attend(value) { 2 3 let user_id = RandomId(15); 4 5 this.setState({ 6 user_id: user_id 7 }); 8 9 let me = { 10 id: user_id, 11 full_name: value 12 }; 13 14 let str = JSON.stringify(me); // convert the object to a string 15 let bytes = bytesCounter.count(str); // count the number of bytes 16 let data = stringToBytes(str); // convert the string to a byte array 17 18 // construct the UUIDs the same way it was constructed in the server component earlier 19 const BASE_UUID = '-5659-402b-aeb3-d2f7dcd1b999'; 20 const PERIPHERAL_ID = '0000'; 21 const PRIMARY_SERVICE_ID = '0100'; 22 23 let primary_service_uuid = PERIPHERAL_ID + PRIMARY_SERVICE_ID + BASE_UUID; // the service UUID 24 let ps_characteristic_uuid = PERIPHERAL_ID + '0300' + BASE_UUID; // the characteristic ID to write on 25 26 // write the attendees info to the characteristic 27 BleManager.write(this.state.connected_peripheral, primary_service_uuid, ps_characteristic_uuid, data, bytes) 28 .then(() => { 29 30 this.setState({ 31 has_attended: true 32 }); 33 // disconnect to the peripheral 34 BleManager.disconnect(this.state.connected_peripheral) 35 .then(() => { 36 Alert.alert('Attended', 'You have successfully attended the event, please disable bluetooth.'); 37 }) 38 .catch((error) => { 39 Alert.alert('Error disconnecting', "You have successfully attended the event but there's a problem disconnecting to the peripheral, please disable bluetooth to force disconnection."); 40 }); 41 42 }) 43 .catch((error) => { 44 Alert.alert('Error attending', "Something went wrong while trying to attend. Please try again."); 45 }); 46 }
From the code above, you can see that this creates an object containing the user’s details. The object is converted to a string and lastly to a byte array. This is done so that the data can be sent in chunks. As mentioned earlier in the server component, only 20 bytes of data can be written to a BLE peripheral at any given time. Byte arrays can be sent in chunks so it’s the perfect data type for dealing with this limit. We’re also getting the number of bytes so the write() function knows how much data it needs to send.
Once a response is returned, immediately disconnect from the peripheral. This is because the peripheral can only cater to a limited number of devices at the same time.
The openBox() function is responsible for setting the visibility of the prompt for entering the user’s full name:
1openBox() { 2 this.setState({ 3 promptVisible: true 4 }); 5 }
Here’s the code for rendering each individual list item. This caters to both peripheral list and attendees list.
1renderItem({item}) { 2 if(item.full_name){ 3 return ( 4 <View style={styles.list_item} key={item.id}> 5 <Text style={styles.list_item_text}>{item.full_name}</Text> 6 <Text style={styles.list_item_text}>{item.time_entered}</Text> 7 </View> 8 ); 9 } 10 11 return ( 12 <View style={styles.list_item} key={item.id}> 13 <Text style={styles.list_item_text}>{item.name}</Text> 14 <Button 15 title="Connect" 16 color="#1491ee" 17 style={styles.list_item_button} 18 onPress={this.connect.bind(this, item.id)} /> 19 </View> 20 ); 21 }
Here’s the render() function. Note that it conditionally hides and shows different elements based on which step of the attendance process the user is currently at. For example, if the user has connected to a peripheral, the scan button and list of peripherals are no longer shown.
1render() { 2 return ( 3 <View style={styles.container}> 4 <View style={styles.header}> 5 <View style={styles.app_title}> 6 <Text style={styles.header_text}>BLE-Pusher Attendance</Text> 7 </View> 8 <View style={styles.header_button_container}> 9 { 10 !this.state.connected_peripheral && 11 <Button 12 title="Scan" 13 color="#1491ee" 14 onPress={this.startScan} /> 15 } 16 </View> 17 </View> 18 19 <View style={styles.body}> 20 21 <Spinner 22 size={50} 23 type={"WanderingCubes"} 24 color={"#6097FC"} 25 isVisible={this.state.is_scanning} 26 style={styles.spinner} 27 /> 28 29 { 30 !this.state.connected_peripheral && 31 <FlatList 32 data={this.state.peripherals} 33 renderItem={this.renderItem.bind(this)} 34 /> 35 } 36 37 { 38 this.state.attendees && 39 <View style={styles.attendees_container}> 40 <Prompt 41 title="Enter your full name" 42 placeholder="e.g. Son Goku" 43 visible={this.state.promptVisible} 44 onCancel={() => { 45 this.setState({ 46 promptVisible: false 47 }); 48 } 49 } 50 onSubmit={ (value) => { 51 this.setState({ 52 promptVisible: false 53 }); 54 this.attend.call(this, value); 55 } 56 }/> 57 { 58 !this.state.has_attended && 59 <Button 60 title="Enter" 61 color="#1491ee" 62 onPress={this.openBox} /> 63 } 64 <FlatList 65 data={this.state.attendees} 66 renderItem={this.renderItem.bind(this)} 67 /> 68 </View> 69 } 70 71 </View> 72 </View> 73 ); 74 }
Add the styles:
1const styles = StyleSheet.create({ 2 container: { 3 flex: 1, 4 alignSelf: 'stretch', 5 backgroundColor: '#F5FCFF', 6 }, 7 header: { 8 flex: 1, 9 backgroundColor: '#3B3738', 10 flexDirection: 'row' 11 }, 12 app_title: { 13 flex: 7, 14 padding: 10 15 }, 16 header_button_container: { 17 flex: 2, 18 justifyContent: 'center', 19 paddingRight: 5 20 }, 21 header_text: { 22 fontSize: 20, 23 color: '#FFF', 24 fontWeight: 'bold' 25 }, 26 body: { 27 flex: 19 28 }, 29 list_item: { 30 paddingLeft: 10, 31 paddingRight: 10, 32 paddingTop: 15, 33 paddingBottom: 15, 34 marginBottom: 5, 35 borderBottomWidth: 1, 36 borderBottomColor: '#ccc', 37 flex: 1, 38 flexDirection: 'row' 39 }, 40 list_item_text: { 41 flex: 8, 42 color: '#575757', 43 fontSize: 18 44 }, 45 list_item_button: { 46 flex: 2 47 }, 48 spinner: { 49 alignSelf: 'center', 50 marginTop: 30 51 }, 52 attendees_container: { 53 flex: 1 54 } 55 });
Lastly, register the component as the main one so that it gets rendered:
AppRegistry.registerComponent('pusherBLEAttendance', () => pusherBLEAttendance);
Running the App
Login to your IoT device and start the server:
node attendance.js
After that, run the app on your computer:
react-native run-android
Don’t forget to update the dev settings in the app to connect to your computer’s internal IP address. You can trigger the app settings to open using the following command. Make sure your mobile device is connected to your computer before doing so.
adb shell input keyevent 82
Select dev settings and find the menu for the debug server. Enter your computer’s internal IP address, as well as the port in which the React Native server is running. Here’s an example:
192.168.254.104:8081
Once the app is running, try going through the whole attendance process and see if it works.
Conclusion
In this tutorial, you've learned how to use Pusher's realtime capabilities with an IoT device to create an attendance app. There are many more possibilities for this technology. For example, you can create a game which allows users in the same room to compete with each other.


© 2026 Pusher Ltd. All rights reserved.
Pusher Limited is a company registered in England and Wales (No. 07489873) whose registered office is at MessageBird UK Limited, 3 More London Riverside, 4th Floor, London, United Kingdom, SE1 2AQ.