- Products

- Developers
- User stories
- Blog
- Pricing

Accepting payments in React Native
Introduction
In this tutorial, we’ll be looking at how to accept payments within a React Native app.
An important aspect when creating an app or website is the ability to accept payments from its customers. Platforms such as the web, Android, and iOS already have well-supported APIs for payment gateways such as Stripe. But what about cross-platform frameworks like React Native?
Prerequisites
Basic knowledge of React Native is required. Although we’ll be using a bit of PHP, it’s optional because the code will be self-explanatory.
Development environment
You need to have PHP and MySQL installed on your machine. The easiest way to get the development environment is through Laravel Homestead. If you’re on Mac, you can get up and running even faster with Laravel Valet.
You also need a MySQL database manager for creating the database:
- DBeaver - Windows, Linux, Mac
- Sequel Pro - Mac only
You also need to have an ngrok account for exposing the server to the internet.
Developer accounts
We will be using Stripe to process payments, so a Stripe account is required.
Optionally, you will also need to have the following if you want to use Google Pay and Apple Pay in production:
- Google Play developer console account - you can actually use the Tipsi-Stripe library without a developer account if you use the test environment. But if you want to use it in production, you’ll need to have a Google Play developer console account which can accept payments.
- Apple developer account - you need this if you want to use Apple Pay with Tipsi-Stripe. At the time of writing this tutorial, there are only a handful of countries in which Sandbox testing for Apple Pay is supported. This means you’ll have to use real credit cards for testing if you’re not living in one of those countries. As this tutorial won’t be covering how to set up Apple Pay on your developer account, be sure to read the Getting Started with Apple Pay guide.
Package versions
The following package versions are used in the app:
- React Native 0.57.8
- Tipsi-stripe 6.1.2
While the following are used in the backend:
- Lumen framework 5.7
- Stripe PHP 6.28
To ensure compatibility, start with the versions above before upgrading to the latest versions.
App overview
We’ll create a simple app which displays a product to be bought. The user can then pay for it with the credit card they have added to their Google Account. We will use Google Pay as a means for accepting the payment, and Stripe for processing it. If you’ve previously worked with Stripe for the web, the process is pretty much the same. Tipsi-Stripe provides a way to use either Google Pay, Apple Pay, or its custom React component for accepting the payment details. You will then use any of these methods to generate the token which you will submit to the app’s backend. This token allows you to charge the card added by the user.
Here’s what the app will look like:

You can find the source code on this GitHub repo.
Building the app
Start by creating a new React Native project and installing the dependencies:
1react-native init RNPay 2 cd RNPay 3 yarn add tipsi-stripe react-native-config axios 4 react-native link
Once that’s done, add the config for enabling the Google Wallet API in the android/app/src/main/AndroidManifest.xml file. This allows you to use Google Pay within the app:
1<application> 2 <meta-data 3 android:name="com.google.android.gms.wallet.api.enabled" 4 android:value="true" /> 5 </application>
Next, update the android/app/build.gradle file and add the path to React Native Config:
`apply from: project(':react-native-config').projectDir.getPath() + "/dotenv.gradle"`
For iOS, please refer to the documentation:
Next, create a .env file at the root of the project directory and add your Stripe publishable key. If you’re testing, this can be the test credentials provided by Stripe. You can find your API keys here. Be sure to toggle Viewing Test Data if you want your test credentials:
STRIPE_PUBLISHABLE_KEY=YOUR_STRIPE_PUBLISHABLE_KEY
Once that’s done, you’re now ready to work on the code. Start by opening the App.js file and add the following:
1import React, { Component } from 'react'; 2 import { View, Alert } from 'react-native'; 3 4 import stripe from 'tipsi-stripe'; 5 import Config from 'react-native-config'; 6 7 import ItemBox from './src/components/ItemBox'; 8 import pay from './src/helpers/pay'; 9 10 stripe.setOptions({ 11 publishableKey: Config.STRIPE_PUBLISHABLE_KEY, 12 androidPayMode: 'test', // test || production 13 });
The most important part in the above code is the setting of the options for Stripe. The publishableKey is basically the same key as the one you put on your JavaScript files when working on the web. androidPayMode is the mode to be used by Google Pay. test means that the requirements for using it won’t be as tight as when you’re on production. For example, the app doesn’t need to be uploaded in the Google Play Store. Your Google Play console developer account also don’t need to have Google Pay enabled. In fact, you don’t even need a developer account in order to try it out. You can find more info about it here.
Next, initialize the data to be used throughout the app. This includes the user’s access token which is used for authenticating the user’s request when we hit the endpoint for creating a charge. To simplify things we’re simply going to hardcode an existing access token that’s already in the database. I’ll show you how to create the database later on when we get to the backend:
1export default class App extends Component { 2 3 constructor(props) { 4 super(props); 5 this.access_token = "AN EXISTING USER'S ACCESS TOKEN FROM YOUR DB"; 6 this.currency_code = 'USD'; // the currency to be used for processing the transaction 7 // item data 8 this.item = { 9 title: 'Loop 720', 10 price: 1, 11 image: require('./src/images/loop720.jpg') 12 }; 13 } 14 15 state = { 16 isPaying: false, // whether the user is currently paying for something 17 canPay: false // whether the user's device has the ability to pay using Google Pay 18 } 19 20 // next: add componentDidMount 21 } 22 23 const styles = { 24 container: { 25 flex: 1, 26 justifyContent: 'center', 27 alignItems: 'center', 28 backgroundColor: '#FFF', 29 } 30 };
Next, we check if the user’s device can make payments with Google Pay:
1async componentDidMount() { 2 const device_supported = await stripe.deviceSupportsAndroidPay(); 3 const can_make_android_pay_payments = await stripe.canMakeAndroidPayPayments(); 4 5 if (device_supported && can_make_android_pay_payments) { 6 this.setState({ 7 canPay: true 8 }); 9 } 10 }
For the app’s UI we’re simply going to render a single item:
1render() { 2 return ( 3 <View style={styles.container}> 4 <ItemBox 5 {...this.item} 6 canPay={this.state.canPay} 7 isPaying={this.state.isPaying} 8 payAction={this.payItem} /> 9 </View> 10 ); 11 }
Here’s the code for the ItemBox component:
1// src/components/ItemBox.js 2 import React, { Component } from 'react'; 3 import { View, Text, Button, ActivityIndicator, Image } from 'react-native'; 4 5 const ItemBox = ({ title, price, image, canPay, isPaying, payAction }) => { 6 7 return ( 8 <View> 9 <Image 10 style={styles.image} 11 source={image} /> 12 13 <View style={styles.textContainer}> 14 <Text style={styles.title}>{title}</Text> 15 </View> 16 17 <View style={styles.textContainer}> 18 <Text style={styles.price}>${price.toFixed(2)}</Text> 19 </View> 20 21 { 22 isPaying && 23 <ActivityIndicator size="large" color="#0000ff" /> 24 } 25 26 <View style={styles.buttonContainer}> 27 { 28 canPay && !isPaying && 29 <Button 30 onPress={payAction} 31 title="Buy Now" 32 color="#841584" 33 /> 34 } 35 36 { 37 !canPay && 38 <View style={styles.alertContainer}> 39 <Text style={styles.errorText}>Can't accept payments</Text> 40 </View> 41 } 42 </View> 43 44 </View> 45 ); 46 47 } 48 49 export default ItemBox; 50 51 const styles = { 52 image: { 53 width: 170, 54 height: 150 55 }, 56 textContainer: { 57 alignItems: 'center' 58 }, 59 title: { 60 fontSize: 20 61 }, 62 price: { 63 fontSize: 23, 64 fontWeight: 'bold' 65 }, 66 buttonContainer: { 67 margin: 10 68 }, 69 alertContainer: { 70 width: 150 71 }, 72 errorText: { 73 color: 'red' 74 } 75 };
Back to the App.js file, add the function for paying for the item. This gets executed when the Buy Now button from the ItemBox component is clicked:
1// App.js 2 payItem = async () => { 3 4 this.setState({ 5 isPaying: true // show loader instead of the button 6 }); 7 8 const token = await stripe.paymentRequestWithNativePay({ 9 total_price: this.item.price.toFixed(2), 10 currency_code: this.currency_code, 11 line_items: [ 12 { 13 currency_code: this.currency_code, 14 description: this.item.title, 15 total_price: this.item.price.toFixed(2), 16 unit_price: this.item.price.toFixed(2), 17 quantity: '1', 18 } 19 ] 20 }); 21 22 // next: add code for committing the charge into the server 23 }
If you want to capture shipping information, you need to set the shipping_address_required option and set its value to true. Optionally, you can also set the shipping_countries to an array of country codes to limit the countries you want to ship to:
shipping_countries: ['US', 'PH', 'SG']
Here’s what the value of token looks like when the request is successful:
1{ 2 "card":{ 3 "currency":null, 4 "fingerprint":"xxxxxxxxxx", 5 "funding":"credit", 6 "addressZip":null, 7 "brand":"MasterCard", 8 "cardId":"card_xxxxxxxxxxx", 9 "number":null, 10 "addressState":null, 11 "country":"US", 12 "cvc":null, 13 "expMonth":7, 14 "addressLine1":null, 15 "expYear":3040, 16 "addressCountry":null, 17 "name":"Wern Ancheta", 18 "last4":"11xx", 19 "addressLine2":null, 20 "addressCity":null 21 }, 22 "created":1546997773000, 23 "used":false, 24 "extra":{ 25 "shippingContact":{ 26 "postalCode":"2500", 27 "name":"Wern Ancheta", 28 "locality":"San Juan", 29 "countryCode":"PH", 30 "administrativeArea":"La Union", 31 "address1":"Forest street" 32 }, 33 "billingContact":{ 34 35 } 36 }, 37 "livemode":false, 38 "tokenId":"tok_xxxxxxxx" 39 }
For more examples, please refer to the example folder in Tipsi-Stripe’s GitHub repo. And for more info on how to use them, check out the following:
- paymentRequestWithNativePay (Android) - uses Android Pay for accepting payments.
- paymentRequestWithNativePay (iOS) - uses Apple Pay for accepting payments.
- paymentRequestWithCardForm - a ready-made React form for accepting payments.
- PaymentCardTextField - use this if you want full control over the styling of the card field.
Do note that if you plan on using the paymentRequestWithNativePay method, you have to first determine the platform the app is running on because the options you need to pass to the method will differ based on the platform. This is one advantage of the paymentRequestWithCardForm because of its platform-agnostic API.
Next, send the request for creating a charge to the server:
1const response = await pay(this.item.price, this.item.title, this.access_token, token.tokenId); 2 if (response) { 3 Alert.alert("Done!", "Payment successful"); 4 } else { 5 Alert.alert("Error occurred", "Something went wrong while processing payment. Please try again."); 6 } 7 8 this.setState({ 9 isPaying: false // show the Buy Now button again 10 });
Next, create a src/helpers/pay.js file and add the following. This sends a POST request to the server which includes the relevant details for the payment transaction:
1import axios from 'axios'; 2 3 const endpoint = 'https://YOUR_NGROK_URL/charge'; 4 5 const pay = async (amount, description, access_token, token_id) => { 6 const data = { 7 'amount': amount, 8 'description': description, 9 'access_token': access_token, 10 'token_id': token_id // the token generated by Stripe 11 }; 12 13 const headers = { 14 'Content-Type': 'application/json', 15 }; 16 17 let response = false; 18 try { 19 let response_data = await axios.post(endpoint, data, { headers }); 20 return true; 21 } catch (e) { 22 console.log('server error: ', e); 23 } 24 25 return response; 26 } 27 28 export default pay;
In the above code, we’re only sending four pieces of data to the server. But you can actually send more if you like. Note that you can actually fetch the same data returned by stripe.paymentRequestWithNativePay method call in the server by making a request to the Stripe API. This means you don’t actually need to submit things like the shipping address or the customer’s name in your request. So most likely, the additional data you submit here will be specific to your application.
Add the backend code
This part assumes that you’ve already set up your machine with either Laravel Homestead or Laravel Valet. This will give you the composer command which is used below to generate a new Lumen project:
composer create-project --prefer-dist laravel/lumen RNPayBackend
If you can’t run composer globally, be sure to move it to your local bin folder or add it to your PATH.
Next, navigate inside the generated RNPayBackend directory and add the database config:
1DB_CONNECTION=mysql 2 DB_HOST=127.0.0.1 3 DB_PORT=3306 4 DB_DATABASE=rnpay 5 DB_USERNAME=your_username 6 DB_PASSWORD=your_password
The above config assumes that you have already created a database using a database manager of your choice. So be sure to create one with the same name as the value given to DB_DATABASE.
Also, add your Stripe secret key to the .env file:
STRIPE_SECRET_KEY=YOUR_STRIPE_SECRET_KEY
Next, create a new database migration file. These files allow you to write some code for updating the database structure:
php artisan make:migration create_users_table
Navigate inside the database/migrations directory and you will see the generated file. Add the following code to it:
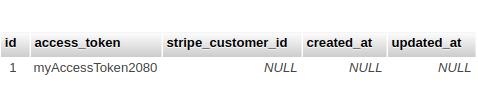
1<?php 2 use Illuminate\Support\Facades\Schema; 3 use Illuminate\Database\Schema\Blueprint; 4 use Illuminate\Database\Migrations\Migration; 5 6 class CreateUsersTable extends Migration 7 { 8 public function up() 9 { 10 Schema::create('users', function (Blueprint $table) { 11 $table->increments('id'); 12 $table->string('access_token'); // the user's access token 13 $table->string('stripe_customer_id')->nullable(); 14 $table->timestamps(); // created_at and updated_at timestamp fields 15 }); 16 } 17 18 public function down() 19 { 20 Schema::dropIfExists('users'); 21 } 22 }
Migrate the database using the new file. This creates a users table with the fields you specified above:
php artisan migrate
Next, access the database using a MySQL database manager and add a dummy data in the users table. Leave the stripe_customer_id as blank and copy the access_token to the App.js file.
Next, install the Stripe PHP library:
composer require stripe/stripe-php
While that’s doing its thing, update the bootstrap/app.php file and uncomment the following line. This enables us to use Facades. In simple terms, Facades are easy to remember class names which allow us to access underlying functionality such as logging or fetching data from the database:
$app->withFacades();
Next, add the route for processing payments to the routes/web.php file. This is the endpoint that we’re hitting in the app earlier. This uses a controller to process the request:
$router->post('/charge', 'PaymentController@createCharge');
Create the controller at app/Http/Controllers/PaymentController.php and add the following:
1<?php 2 3 namespace App\Http\Controllers; 4 use DB; // for talking to the database 5 use Illuminate\Support\Facades\Log; // for logging 6 use Illuminate\Http\Request; // for getting request data 7 8 class PaymentController extends Controller 9 { 10 11 public function __construct() { 12 \Stripe\Stripe::setApiKey(getenv('STRIPE_SECRET_KEY')); 13 } 14 15 // next: add code for creating a charge 16 }
In the above code, we’ve added a __construct method. This sets the Stripe API key that we’re going to use. This gets executed everytime any of the methods in the PaymentController gets called.
Next, add the method for creating a charge. This gets executed every time a POST request is made to the /charge route. Here we pass the data which came from the app to Stripe’s API method for creating a charge. If the charge is successful, we return the success response to the app:
1public function createCharge(Request $request) { 2 3 // get the data that was passed from the app 4 $amount = (int) $request->input('amount') * 100; // amount should be in cents 5 $description = $request->input('description'); 6 $access_token = $request->input('access_token'); 7 $token = $request->input('token_id'); 8 9 // get the Stripe customer ID based on the access token 10 $user = DB::table('users') 11 ->where('access_token', $access_token) 12 ->select('id', 'stripe_customer_id') 13 ->first(); 14 15 // construct the data required by Stripe for creating a charge 16 $payment = [ 17 'amount' => $amount, 18 'currency' => 'usd', 19 'description' => $description, 20 'customer' => $user->stripe_customer_id 21 ]; 22 23 if (empty($user->stripe_customer_id)) { 24 // next: add code for creating a Stripe customer 25 } 26 27 try { 28 $charge = \Stripe\Charge::create($payment); 29 return ['status' => 'ok']; // if the charge was successful 30 } catch (\Exception $e) { 31 Log::info("Cannot create charge for Stripe customer: " . $user->id); 32 } 33 34 return ['status' => 'not_ok']; // if the charge wasn't successful 35 }
If there’s no Stripe customer ID associated with the user, it means that a Stripe customer hasn’t been created for the user yet. So to associate a customer with the provided payment info, we need to make a separate request to the Stripe API to create a customer. This is a necessary step for associating a payment from a specific customer. Even though the Stripe API allows you to just pass the $token_id when creating a charge, it isn’t really recommended. Especially if you expect to receive payments from the same person in the future:
1try { 2 $customer = \Stripe\Customer::create([ 3 "source" => $token // the payment token received from the app 4 ]); 5 6 // update the user to include the Stripe customer ID 7 DB::table('users') 8 ->where('access_token', $access_token) 9 ->update([ 10 'stripe_customer_id' => $customer->id 11 ]); 12 13 $payment['customer'] = $customer->id; // assign the ID of the newly created customer to the payment 14 } catch (\Exception $e) { 15 Log::info("Cannot create Stripe customer for user: " . $user->id); 16 }
Lastly, expose the server to the internet using ngrok. If you use Laravel Valet, first you have to change the default top-level domain to be the same as the one we’re using:
valet domain test
Next, navigate to the root of RNPayBackend and execute valet park. This will register rnpaybackend.test on your local host which you can then expose it using ngrok:
ngrok http -host-header=rewrite rnpaybackend.test:80
If you used Laravel Homestead, you can log in to your Homestead machine via vagrant ssh and run share rnpay.test. This will use ngrok to expose the server.
Once that’s done, you can update the src/helpers/pay.js file in the app with the HTTPS URL from ngrok.
At this point, the app should be fully functional. Go ahead and run it:
react-native run-android
Conclusion
In this tutorial, we learned how to use the Tipsi-Stripe library and the Lumen PHP framework to accept payments within a React Native app.
You can find the full source code on this GitHub repo.


© 2026 Pusher Ltd. All rights reserved.
Pusher Limited is a company registered in England and Wales (No. 07489873) whose registered office is at MessageBird UK Limited, 3 More London Riverside, 4th Floor, London, United Kingdom, SE1 2AQ.