- Products

- Developers
- User stories
- Blog
- Pricing

Send push notifications in a social network Android app - Part 1
Introduction
Note: This is part 1 of a 2 part tutorial. You can find part 2 here.
Introduction
Push notifications are the frontline interaction between a user and their connections within a social network, updating them when something has happened so they can pick up where they left off.
Push notifications for social networks include updates like hearts or comments on Instagram posts, dating matches on Tinder, or host-guest communication on Airbnb.
Setting up push notifications can be confusing and time-consuming. However, with Pusher Beams API, the process is a lot easier and faster.
In this article, we are going to build a simple Android application for event management, where users can express interest in a registered event. In part 2, we will then extend this application to send and receive push notifications whenever anything happens with these events.
Prerequisites
In order to follow along, you will need some experience with the Kotlin programming language, which we are going to use for both the backend and frontend of our application.
You will also need appropriate IDEs. We suggest IntelliJ IDEA and Android Studio.
Building the backend
The backend of our system is responsible for storing and providing the event details, and for triggering our push notifications anytime anything changes with them. We are going to build this in Kotlin using the Spring Boot framework, as this is a very quick way to get going for server-side Kotlin applications.
Head over to https://start.spring.io/ to create our project structure. We need to specify that we are building a Gradle project with Kotlin and Spring Boot 2.0.0 (Or newer if available at the time of reading), and we need to include the “Web” components:
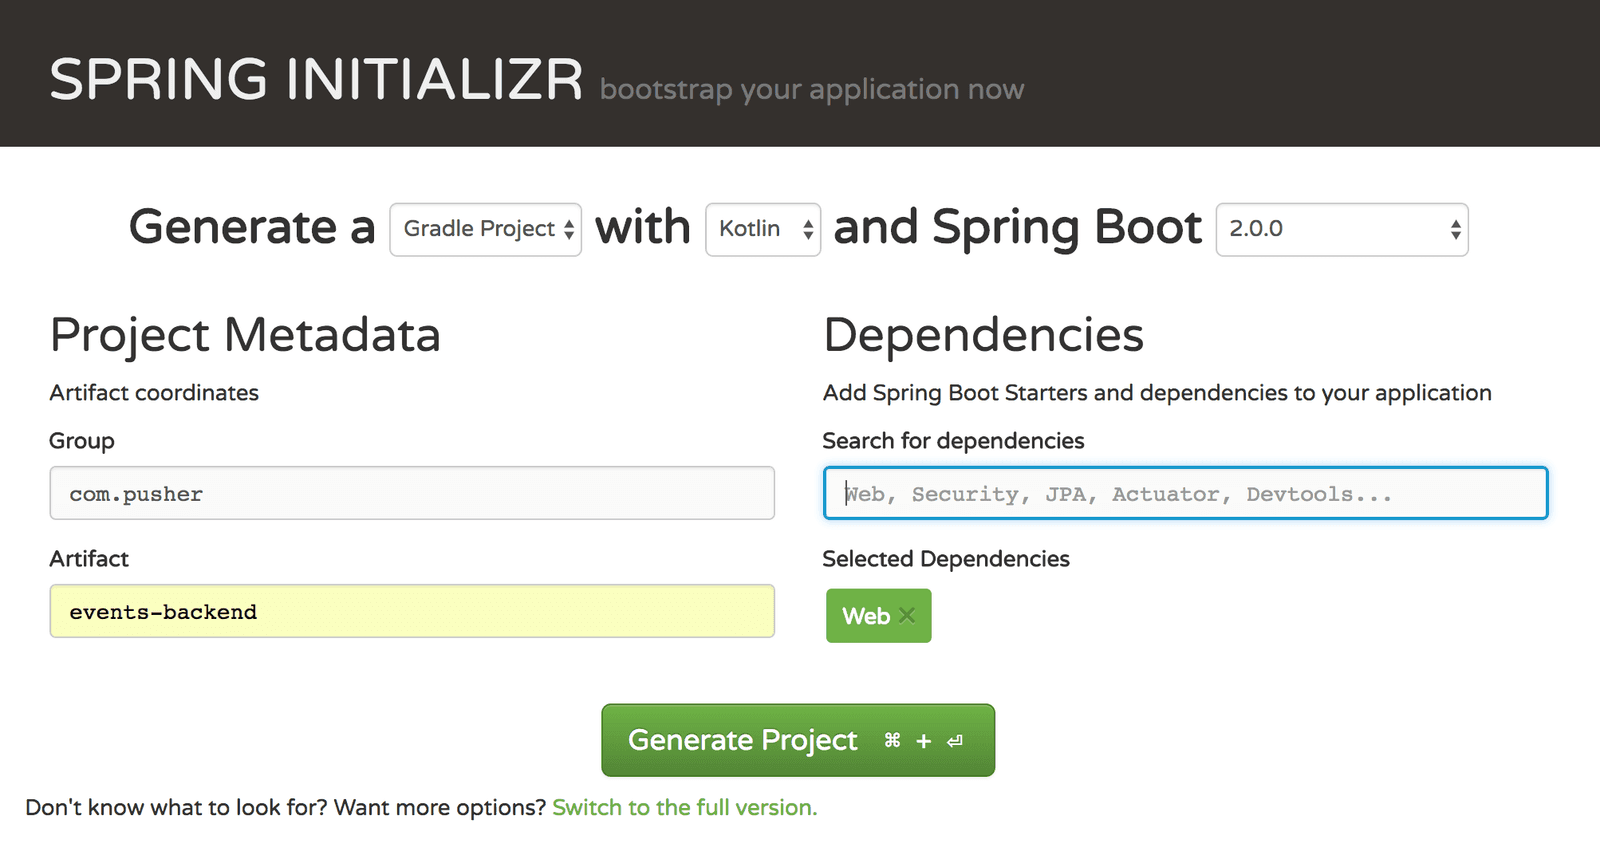
The Generate Project button will give you a zip file containing our application structure. Unpack this somewhere. At any time, you can execute ./gradlew bootRun to build and start your backend server running.
Firstly though, we need to add some dependencies. Open up the build.gradle file and add the following to the dependencies section:
runtime 'com.fasterxml.jackson.module:jackson-module-kotlin:2.9.2'
This is the Jackson module needed for serialising and deserialising Kotlin classes into JSON.
Now, build the project. This will ensure that all of the dependencies are downloaded and made available and that everything compiles and builds correctly:
1$ ./gradlew build 2 3 BUILD SUCCESSFUL in 1s 4 5 actionable tasks: 5 up-to-date
Users and Friends APIs
Any Social Networking Application will need to have mechanisms to manage users and friends. In this example, we are not going to support creating new users or adding and removing friends. Instead, we are simply going to have a read-only API to support the rest of the application.
Note: we’re not going to be building a UI for the backend so we will have to interact with this using a REST client such as Postman.
The endpoints that we need are:
- GET /users/{id}
- GET /users/{id}/friends
Firstly, let’s create a class to represent the API payloads. We’re going to use the exact same class for both User and Friend, with the only difference being that the endpoint for listing friends returns a list of User classes instead of just one.
When the jackson-module-kotlin dependency is included Spring automatically supports marshalling Kotlin Data classes to and from JSON, so all we need is to define this class:
1data class User( 2 val id: String?, 3 val name: String 4 )
Next we need the Controller to work with this data:
1@RestController 2 @RequestMapping("/users") 3 class UserController { 4 private val users = mutableListOf( 5 User(id = "john", name = "John"), 6 User(id = "paul", name = "Paul"), 7 User(id = "george", name = "George"), 8 User(id = "ringo", name = "Ringo") 9 ) 10 11 private val friends = mapOf( 12 "john" to listOf("paul", "george", "ringo"), 13 "paul" to listOf("john", "george", "ringo"), 14 "george" to listOf("john", "paul", "ringo"), 15 "ringo" to listOf("john", "paul", "george") 16 ) 17 18 @RequestMapping("/{id}") 19 fun getUser(@PathVariable("id") id: String) = 20 users.find { it.id == id } 21 ?.let { ResponseEntity.ok(it) } 22 ?: ResponseEntity.notFound().build() 23 24 @RequestMapping("/{id}/friends") 25 fun getFriends(@PathVariable("id") id: String) = 26 friends[id]?.map {friendId -> users.find { user -> user.id == friendId } } 27 ?.filterNotNull() 28 ?.let { ResponseEntity.ok(it) } 29 ?: ResponseEntity.notFound().build() 30 }
Note: there is absolutely no effort put into authentication or authorization of this API. If you do this for real you will need to address that concern, but for our example application this is good enough.
In order to keep this simple, we’ve used a simple in-memory list inside of the controller for the data, and we’ve stored the API payload objects directly. In reality this would come from the database and would go through some translation layer to convert the DAO objects into the API objects - since it is unlikely they will be exactly the same structure - but for the sake of simplicity this gives us what we need.
As long as this is in the same package or a child package of the one containing your main Application class then Spring will automatically find it - because of the @RestController annotation - and make it available. This then gives us most of the API functionality that we wanted straight away.
Events APIs
We now need some endpoints for interacting with events.
The endpoints that we need are:
- GET /events - To list all of the events that are known.
- GET /events/{id} - To get the details of a single event.
- POST /events - To create a new event.
- PUT /events/{id} - To update an existing event.
- DELETE /events/{id} - To delete an event.
- GET /events/{id}/interest - To get all of the users interested in an event.
- PUT /events/{id}/interest/{user} - To register interest in an event.
- DELETE /events/{id}/interest/{user} - To unregister interest in an event.
- POST /events/{id}/share - To share the event with another user
Note: Registering and unregistering interest in an event is done by providing the User ID in the URL. In reality the system would know which user you are by the authentication details provided, but since we aren’t implementing authentication we’ve got to do something else instead.
This seems like a lot, but we’re not going to do anything complicated with them. Instead, as before, we’re going to use a simple list to contain the events, and the event data will directly be the API payload.
Firstly, let's create our Event API payload. Create a new class called Event as follows:
1data class Event( 2 val id: String?, 3 val name: String, 4 val description: String, 5 val start: Instant 6 )
Next we need the Controller to work with this data:
1@RestController 2 @RequestMapping("/events") 3 class EventController { 4 private val events = mutableListOf( 5 Event( 6 id = "xmas", 7 name = "Christmas", 8 description = "It's the most wonderful time of the year", 9 start = Instant.parse("2018-12-25T00:00:00Z") 10 ) 11 ) 12 13 @RequestMapping 14 fun getEvents() = events 15 16 @RequestMapping("/{id}") 17 fun getEvent(@PathVariable("id") id: String) = 18 events.find { it.id == id } 19 ?.let { ResponseEntity.ok(it) } 20 ?: ResponseEntity.notFound().build() 21 22 @RequestMapping(method = [RequestMethod.POST]) 23 fun createEvent(@RequestBody event: Event): Event { 24 val newEvent = Event( 25 id = UUID.randomUUID().toString(), 26 name = event.name, 27 description = event.description, 28 start = event.start 29 ) 30 events.add(newEvent) 31 return newEvent 32 } 33 34 @RequestMapping(value = ["/{id}"], method = [RequestMethod.DELETE]) 35 fun deleteEvent(@PathVariable("id") id: String) { 36 events.removeIf { it.id == id } 37 } 38 39 @RequestMapping(value = ["/{id}"], method = [RequestMethod.PUT]) 40 fun updateEvent(@PathVariable("id") id: String, @RequestBody event: Event): ResponseEntity<Event>? { 41 return if (events.removeIf { it.id == id }) { 42 val newEvent = Event( 43 id = id, 44 name = event.name, 45 description = event.description, 46 start = event.start 47 ) 48 events.add(newEvent) 49 ResponseEntity.ok(newEvent) 50 } else { 51 ResponseEntity.notFound().build() 52 } 53 } 54 55 @RequestMapping(value = ["/{id}/share"], method = [RequestMethod.POST]) 56 fun shareEvent(@PathVariable("id") event: String, @RequestBody friends: List<String>) { 57 } 58 }
Note that there’s no functionality here for sharing events. That is because the only thing it does is to send push notifications, which will be covered in the second article.
Next we want a controller to allow users to show interest in events. This is going to be based on simple in-memory data types again for simplicity sake. Add the following to the same Controller class:
1private val interest: MutableMap<String, MutableSet<String>> = mutableMapOf() 2 3 @RequestMapping("/{id}/interest") 4 fun getInterest(@PathVariable("id") event: String) = 5 interest.getOrElse(event) { 6 mutableSetOf() 7 } 8 9 @RequestMapping(value = ["/{id}/interest/{user}"], method = [RequestMethod.PUT]) 10 fun registerInterest(@PathVariable("id") event: String, @PathVariable("user") user: String) { 11 val eventInterest = interest.getOrPut(event) { 12 mutableSetOf() 13 } 14 15 eventInterest.add(user) 16 } 17 18 @RequestMapping(value = ["/{id}/interest/{user}"], method = [RequestMethod.DELETE]) 19 fun unregisterInterest(@PathVariable("id") event: String, @PathVariable("user") user: String) { 20 val eventInterest = interest.getOrPut(event) { 21 mutableSetOf() 22 } 23 24 eventInterest.remove(user) 25 }
At this point, all of our API methods can be called and will work exactly as expected. You can use a tool like cURL or Postman to test them out for yourselves.
Building the Android application
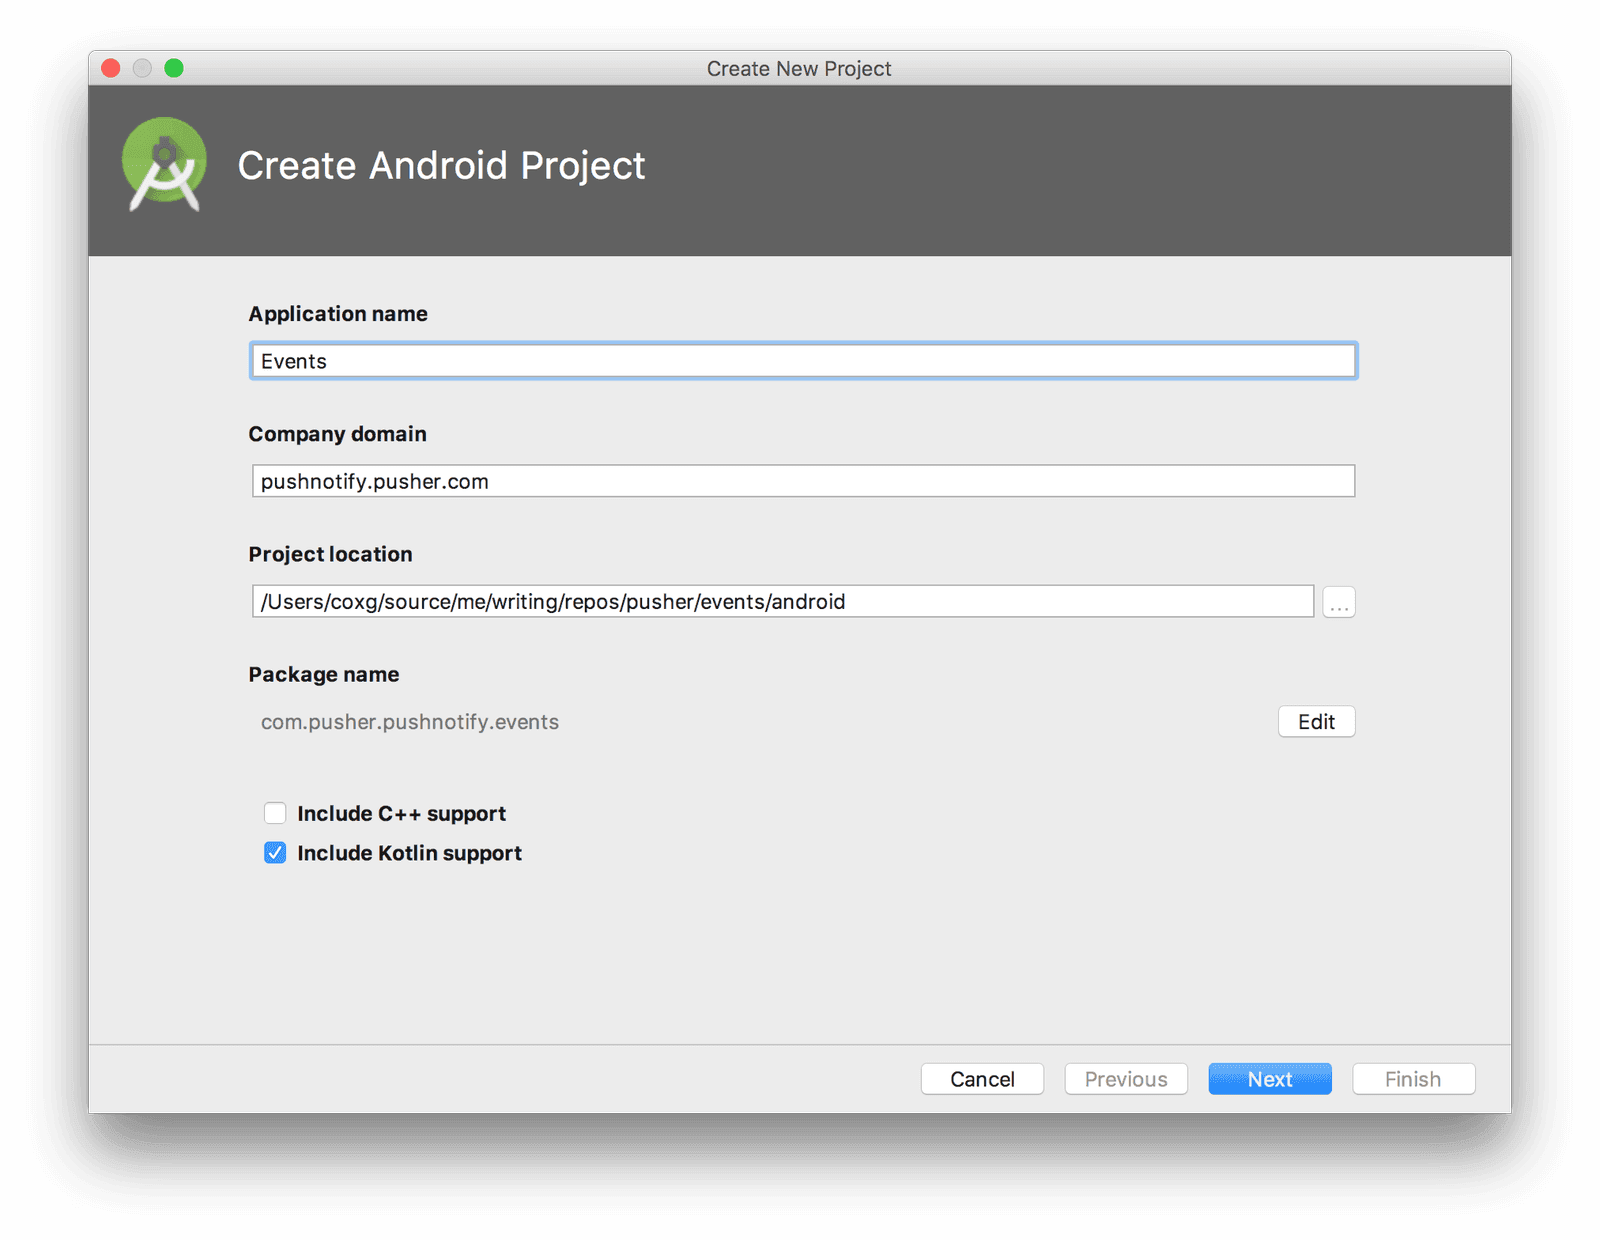
The frontend Android application will also be built in Kotlin, using Android Studio. To start, open up Android Studio and create a new project, entering some appropriate details and ensuring that you select the Include Kotlin support option.
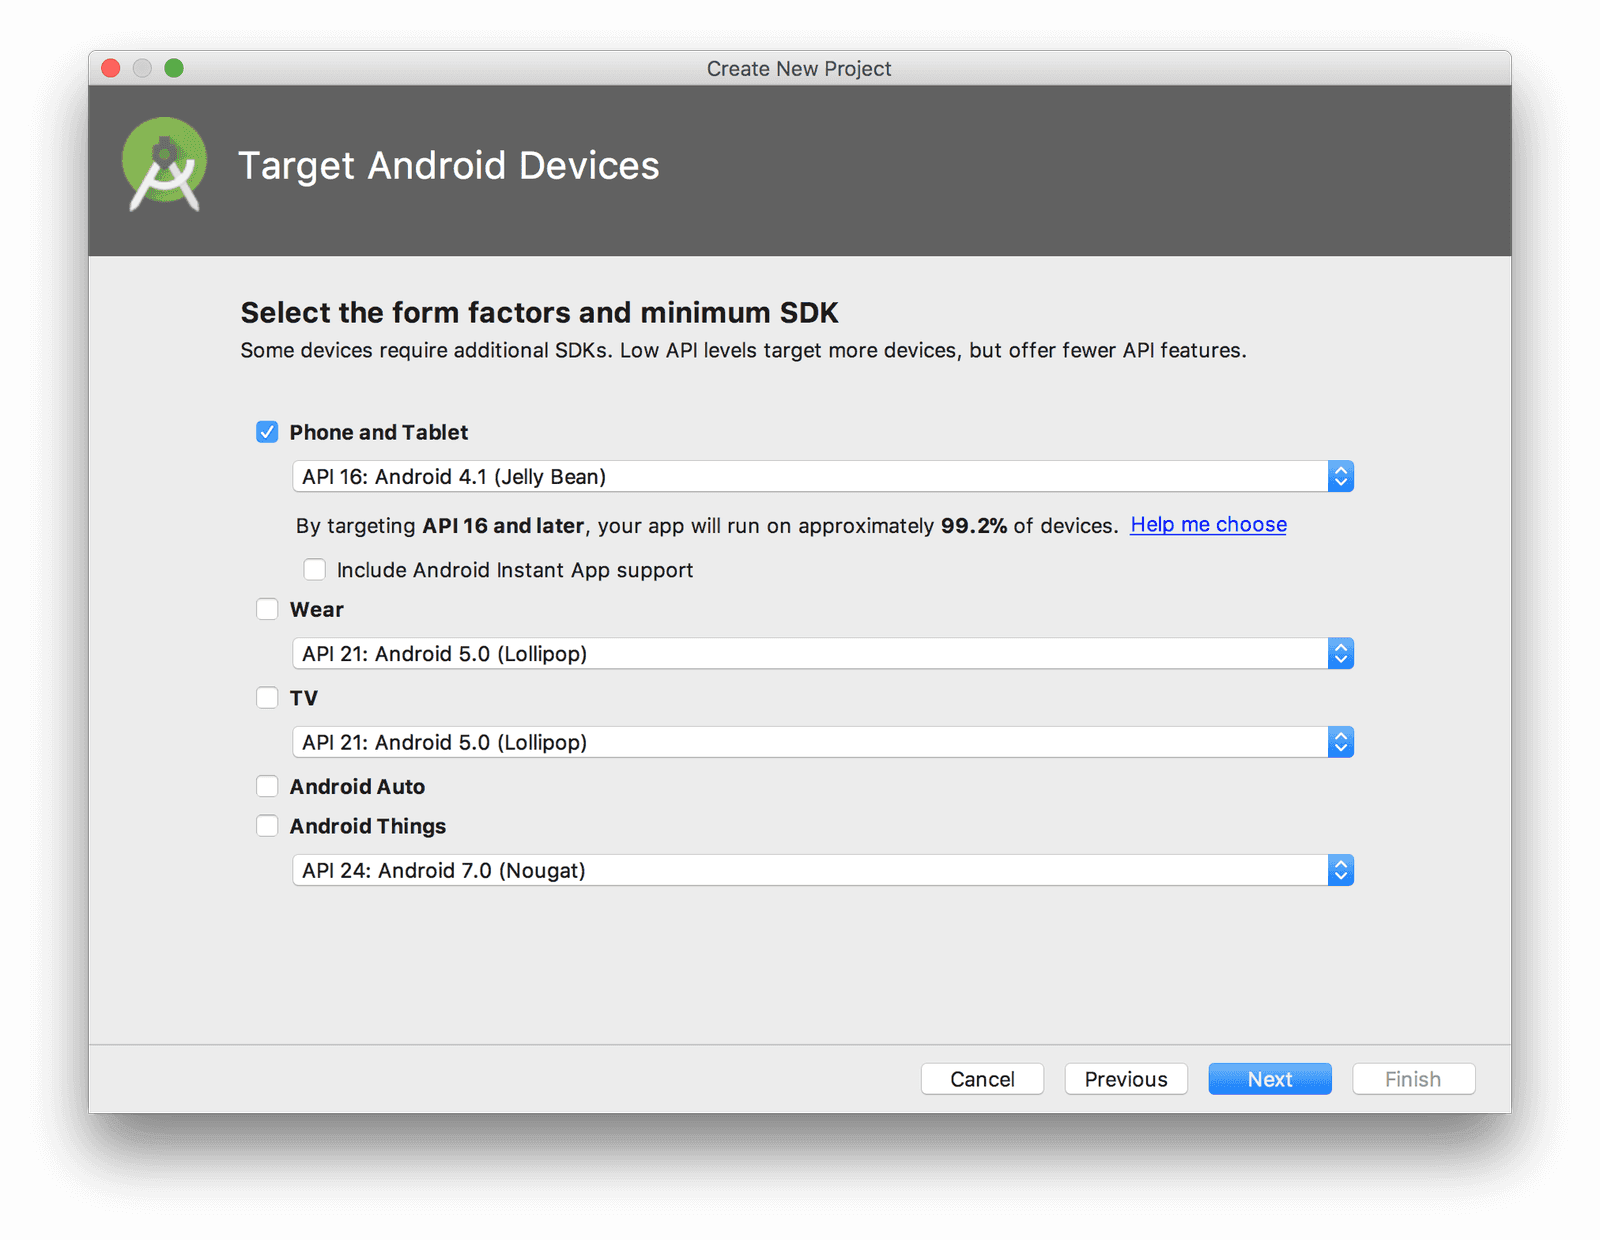
Then on the next screen, ensure that you select support for Phone and Tablet using at least API 16:
Ensure that an Empty Activity is selected:
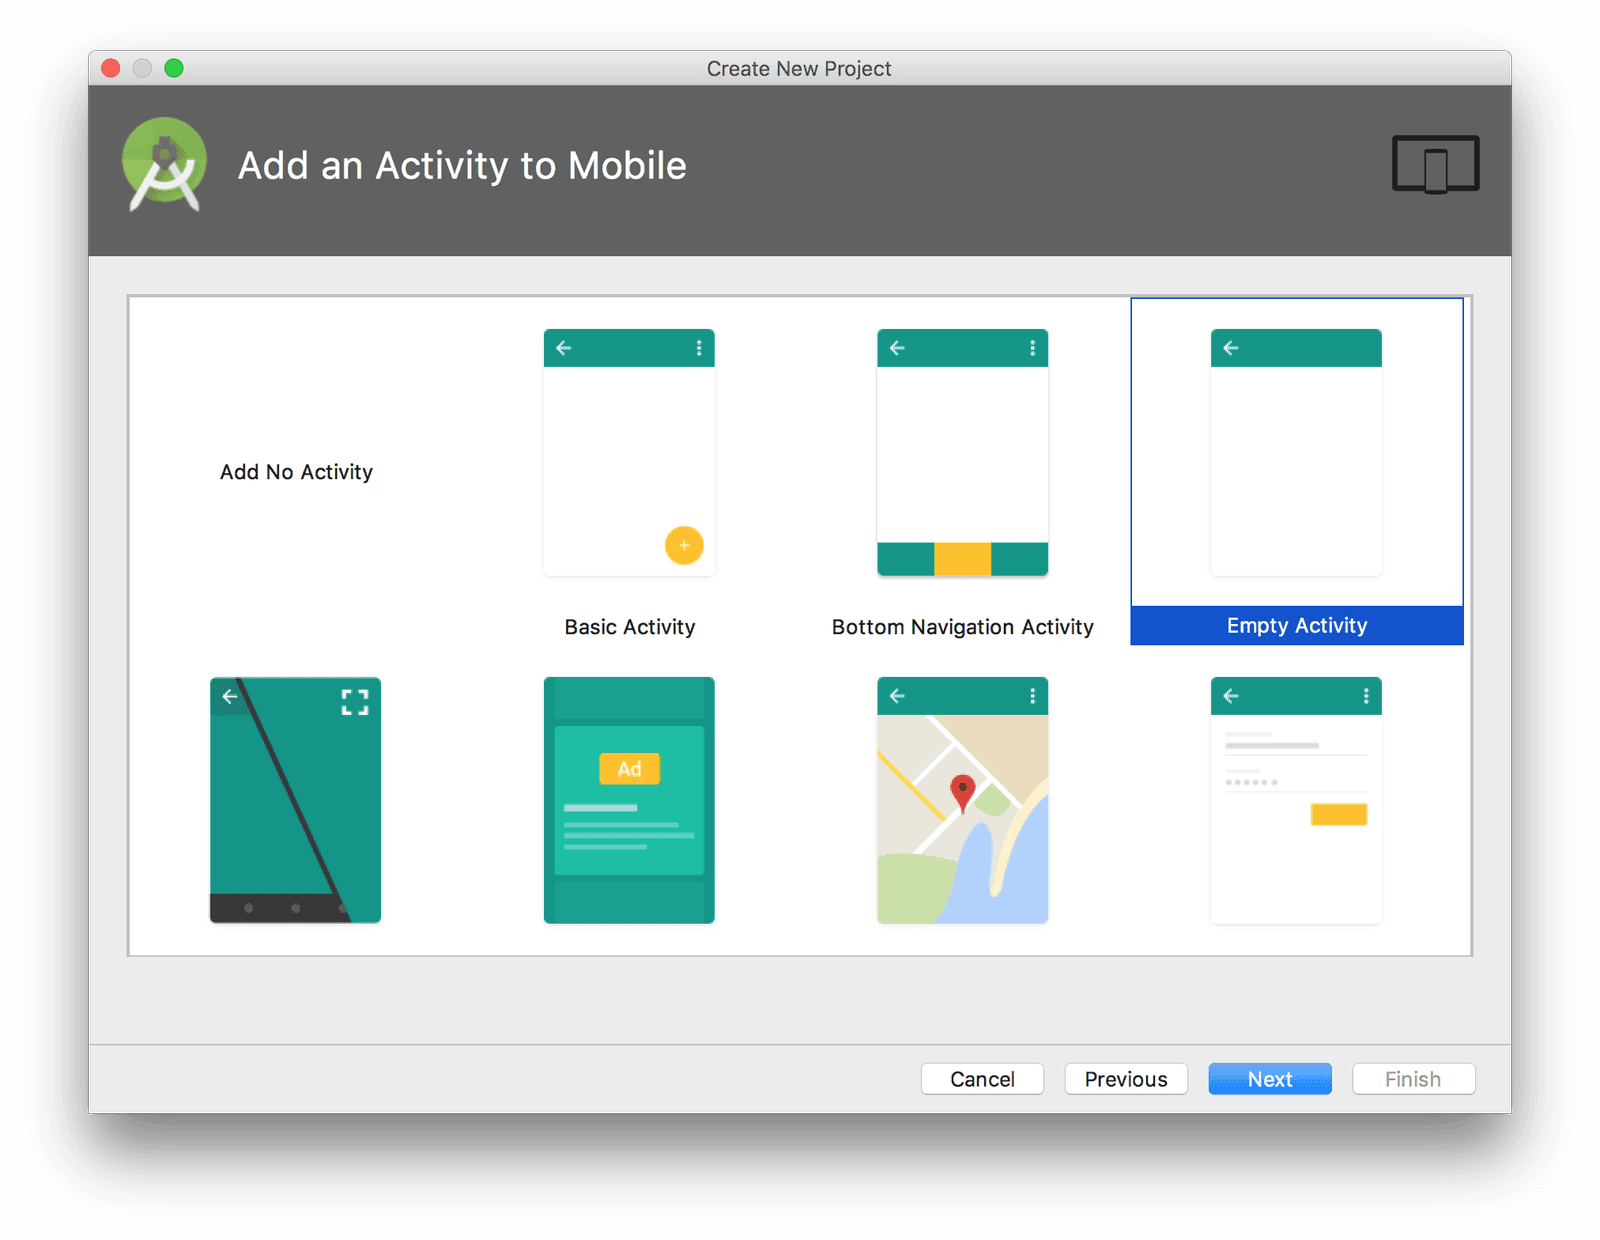
And change the Activity Name to “LoginActivity”:

Then add the following to the dependencies section of the App level build.gradle:
1compile 'com.loopj.android:android-async-http:1.4.9' 2 compile 'com.google.code.gson:gson:2.2.4'
Finally, we need to add some permissions to our application. Open up the AndroidManifest.xml file and add the following immediately before the <application> tag:
<uses-permission android:name="android.permission.INTERNET"/>
Remembering the logged in user
For the application to work, we need to know which user we have logged in as. We are going to do this by extending the standard Application class to add our own data value for the username.
To do this, first create a new class called EventsApplication as follows:
1class EventsApplication : Application() { 2 var username: String? = null 3 }
Then update the AndroidManifest.xml file to reference it:
1<application 2 android:name=".EventsApplication"
From now on, any of our Activity classes will see this.application as being the same instance of EventsApplication, and any changes we make to EventsApplication.username will persist between activities.
User login screen
The first thing we want to create in our Android application is the User Login screen. For our application, this is a trivial case of entering a username. Remember that we are not implementing authentication or authorization so we are are not going to request passwords, and we are not going to remember which user you are logged in as.
Update activity_login.xml to contain the following:
1<?xml version="1.0" encoding="utf-8"?> 2 <LinearLayout xmlns:android="http://schemas.android.com/apk/res/android" 3 xmlns:app="http://schemas.android.com/apk/res-auto" 4 xmlns:tools="http://schemas.android.com/tools" 5 android:layout_width="match_parent" 6 android:layout_height="match_parent" 7 android:gravity="center_vertical|fill_horizontal" 8 android:orientation="vertical" 9 tools:layout_editor_absoluteX="8dp" 10 tools:layout_editor_absoluteY="8dp"> 11 12 <TextView 13 android:id="@+id/userNameLabel" 14 android:layout_width="match_parent" 15 android:layout_height="wrap_content" 16 android:text="Username:" /> 17 18 <EditText 19 android:id="@+id/userNameInput" 20 android:layout_width="match_parent" 21 android:layout_height="wrap_content" 22 android:ems="10" 23 android:inputType="textVisiblePassword" /> 24 25 <Button 26 android:id="@+id/loginButton" 27 android:layout_width="match_parent" 28 android:layout_height="wrap_content" 29 android:text="Login" 30 android:onClick="onClickLogin" /> 31 </LinearLayout>
Notice that we have an entry in the Button for android:onClick. This sets us up to have a handler for clicking on the button straight away, so let’s make use of this.
Add the following to LoginActivity:
1fun onClickLogin(v: View) { 2 val usernameInput = findViewById<EditText>(R.id.userNameInput) 3 val username = usernameInput.text.toString() 4 if (username.isBlank()) { 5 Toast.makeText(this, "No username entered!", Toast.LENGTH_LONG).show() 6 } else { 7 (this.application as EventsApplication).username = username 8 startActivity(Intent(this, EventsListActivity::class.java)) 9 } 10 }
In the case that a username was not entered, we display a Toast message informing the user of this fact. If they have, we store it onto our EventsApplication class and transition to the EventsListActivity that we are about to write.
Listing events
Once we have logged in, we can show the list of events in the system. For this, we will create a new Activity containing the list of events.
Create a new resource layout file called activity_eventslist.xml as follows:
1<?xml version="1.0" encoding="utf-8"?> 2 <LinearLayout xmlns:android="http://schemas.android.com/apk/res/android" 3 android:orientation="vertical" 4 android:layout_width="match_parent" 5 android:layout_height="match_parent" 6 android:background="#fff"> 7 <ScrollView 8 android:layout_width="match_parent" 9 android:layout_height="wrap_content"> 10 <LinearLayout 11 android:layout_width="match_parent" 12 android:layout_height="wrap_content" 13 android:orientation="vertical"> 14 15 <TableLayout 16 android:layout_marginTop="10dp" 17 android:id="@+id/table_layout" 18 android:layout_width="match_parent" 19 android:layout_height="wrap_content"> 20 21 <TableRow 22 android:layout_height="wrap_content" 23 android:layout_width="match_parent" 24 android:id="@+id/table_row1" 25 android:padding="10dp"> 26 27 <TextView 28 android:id="@+id/name" 29 android:fontFamily="serif" 30 android:layout_height="wrap_content" 31 android:layout_width="match_parent" 32 android:layout_weight="1" 33 android:textColor="#000" 34 android:text="Name"/> 35 <TextView 36 android:id="@+id/date" 37 android:textColor="#000" 38 android:fontFamily="serif" 39 android:layout_height="wrap_content" 40 android:layout_width="match_parent" 41 android:layout_weight="1" 42 android:text="Date"/> 43 44 </TableRow> 45 <View 46 android:layout_height="3dip" 47 android:layout_width="match_parent" 48 android:background="#ff0000"/> 49 </TableLayout> 50 51 <ListView 52 android:id="@+id/records_view" 53 android:layout_width="match_parent" 54 android:layout_height="500dp" 55 android:layout_marginTop="16dp"> 56 </ListView> 57 </LinearLayout> 58 </ScrollView> 59 </LinearLayout>
This layout gives us a table layout to represent our header and a list view in which we are going to render the individual events that are currently available.
Next create a new class called EventsListActivity as follows:
1class EventsListActivity : AppCompatActivity() { 2 override fun onCreate(savedInstanceState: Bundle?) { 3 super.onCreate(savedInstanceState) 4 setContentView(R.layout.activity_eventslist) 5 } 6 }
And finally add an entry to AndroidManifest.xml inside the application tag to register the new Activity:
<activity android:name=".EventsListActivity" />
Now we want to populate our list view from our backend data. The first thing we need is a class to represent the data in each row. Create a new class called Event as follows:
1data class Event( 2 val id: String, 3 val name: String, 4 val description: String, 5 val start: String 6 )
You will notice that this is almost the same as the equivalent class in the backend. The differences are that the ID is not nullable because every event is guaranteed to have an ID here; and the start time is a string, because Android runs on Java 6 and the Instant class is not available here.
Now we need a means to convert the Event data into a record to display in our list view. For this, create a new EventAdapter class:
1class EventAdapter(private val recordContext: Context) : BaseAdapter() { 2 var records: List<Event> = listOf() 3 set(value) { 4 field = value 5 notifyDataSetChanged() 6 } 7 8 override fun getView(i: Int, view: View?, viewGroup: ViewGroup): View { 9 val theView = if (view == null) { 10 val recordInflator = recordContext.getSystemService(Activity.LAYOUT_INFLATER_SERVICE) as LayoutInflater 11 12 val theView = recordInflator.inflate(R.layout.record, null) 13 val newEventViewHolder = EventViewHolder( 14 theView.findViewById(R.id.event_name), 15 theView.findViewById(R.id.event_date) 16 ) 17 theView.tag = newEventViewHolder 18 19 theView 20 } else { 21 view 22 } 23 24 val eventViewHolder = theView.tag as EventViewHolder 25 26 val event = getItem(i) 27 eventViewHolder.nameView.text = event.name 28 eventViewHolder.dateView.text = event.start 29 eventViewHolder.id = event.id 30 31 return theView 32 } 33 34 override fun getItem(i: Int) = records[i] 35 36 override fun getItemId(i: Int) = 1L 37 38 override fun getCount() = records.size 39 } 40 41 data class EventViewHolder( 42 val nameView: TextView, 43 val dateView: TextView 44 ) { 45 var id: String? = null 46 }
Amongst other things, this is responsible for creating and populating a new view that we will describe soon. This view is then populated with data from the appropriate event object, as held by our new EventViewHolder class.
Next we need to describe our view. For this, create a new layout file called event.xml as follows:
1<?xml version="1.0" encoding="utf-8"?> 2 <LinearLayout xmlns:android="http://schemas.android.com/apk/res/android" 3 android:orientation="horizontal" android:layout_width="match_parent" 4 android:layout_height="match_parent"> 5 <TextView 6 android:id="@+id/event_name" 7 android:fontFamily="serif" 8 android:layout_height="wrap_content" 9 android:layout_width="match_parent" 10 android:layout_weight="1" 11 android:textColor="#000" 12 android:text="Name"/> 13 <TextView 14 android:id="@+id/event_date" 15 android:textColor="#000" 16 android:fontFamily="serif" 17 android:layout_height="wrap_content" 18 android:layout_width="match_parent" 19 android:layout_weight="1" 20 android:text="Date"/> 21 </LinearLayout>
Now we want to retrieve the list of events from our backend service. For this article we will do this on startup for simplicity. Open up EventsListActivity, and add the following. Firstly we need a constant to define the URL to retrieve the events from:
private val EVENTS_ENDPOINT = "http://10.0.2.2:8080/events"
Note: The IP Address “10.0.2.2” is used when running on an Android emulator to refer to the host machine. In reality this should be the correct address of the backend server.
Next add a new field to the EventsListActivity class:
private lateinit var recordAdapter: EventAdapter
Create a new function to refresh the events list:
1private fun refreshEventsList() { 2 val client = AsyncHttpClient() 3 client.get(EVENTS_ENDPOINT, object : JsonHttpResponseHandler() { 4 override fun onSuccess(statusCode: Int, headers: Array<out Header>, response: JSONArray) { 5 super.onSuccess(statusCode, headers, response) 6 runOnUiThread { 7 val events = IntRange(0, response.length() - 1) 8 .map { index -> response.getJSONObject(index) } 9 .map { obj -> 10 Event( 11 id = obj.getString("id"), 12 name = obj.getString("name"), 13 description = obj.getString("description"), 14 start = obj.getString("start") 15 ) 16 } 17 18 recordAdapter.records = events 19 } 20 } 21 }) 22 }
Now add this to the onCreate method:
1recordAdapter = EventAdapter(this) 2 val recordsView = findViewById<View>(R.id.records_view) as ListView 3 recordsView.setAdapter(recordAdapter) 4 5 refreshEventsList()
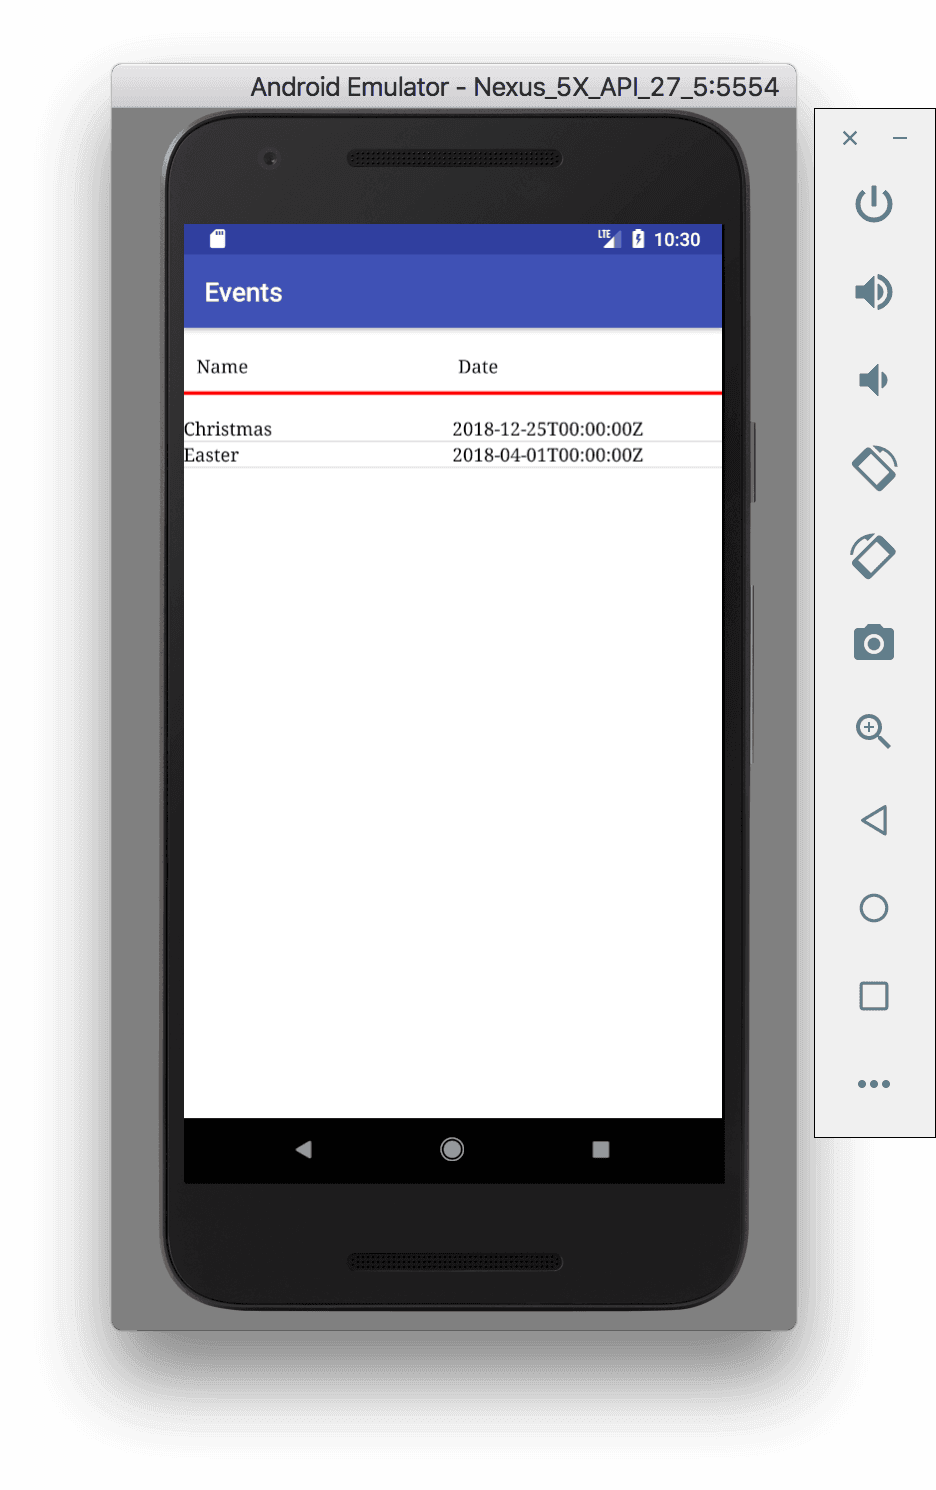
At this point, running the Android application would show the list of events as they are in the backend server, displaying the event name and start time in the list.
The next thing we want is to add a menu to this screen. That will act as our route to creating new events, and to allowing the user to manually reload the events list (as a stand-in for automatically refreshing the list).
Create a new resource file eventslist.xml under res/menu:
1<?xml version="1.0" encoding="utf-8"?> 2 <menu xmlns:app="http://schemas.android.com/apk/res-auto" 3 xmlns:android="http://schemas.android.com/apk/res/android"> 4 5 <item 6 android:icon="@android:drawable/ic_input_add" 7 android:title="New Event" 8 app:showAsAction="ifRoom" 9 android:onClick="onClickNewEvent" /> 10 <item 11 android:icon="@android:drawable/ic_popup_sync" 12 android:title="Refresh" 13 app:showAsAction="ifRoom" 14 android:onClick="onClickRefresh" /> 15 </menu>
Then update the EventsListActivity class to inflate this menu:
1override fun onCreateOptionsMenu(menu: Menu?): Boolean { 2 menuInflater.inflate(R.menu.eventslist, menu) 3 return true 4 }
We also need to add handlers for our menu items:
1fun onClickNewEvent(v: MenuItem) { 2 startActivity(Intent(this, CreateEventsActivity::class.java)) 3 } 4 5 fun onClickRefresh(v: MenuItem) { 6 refreshEventsList() 7 }
The onClickRefresh handler uses our already existing refreshEventsList method, and the onClickNewEvent handler will start an as-yet-unwritten activity.
Creating new events
Next we want the ability to create new events in the system. This will be a simple form allowing the user to enter a name, description and start time for the event, and will then send this to the backend.
Create a new resource layout file called activity_createevent.xml as follows:
1<?xml version="1.0" encoding="utf-8"?> 2 <LinearLayout xmlns:android="http://schemas.android.com/apk/res/android" 3 xmlns:app="http://schemas.android.com/apk/res-auto" 4 xmlns:tools="http://schemas.android.com/tools" 5 android:layout_width="match_parent" 6 android:layout_height="match_parent" 7 android:gravity="center_vertical|fill_horizontal" 8 android:orientation="vertical" 9 tools:layout_editor_absoluteX="8dp" 10 tools:layout_editor_absoluteY="8dp"> 11 12 <TextView 13 android:id="@+id/nameLabel" 14 android:layout_width="match_parent" 15 android:layout_height="wrap_content" 16 android:text="Event Name:" /> 17 18 <EditText 19 android:id="@+id/nameInput" 20 android:layout_width="match_parent" 21 android:layout_height="wrap_content" 22 android:ems="10" 23 android:inputType="textCapWords|textAutoCorrect" /> 24 25 <TextView 26 android:id="@+id/descriptionLabel" 27 android:layout_width="match_parent" 28 android:layout_height="wrap_content" 29 android:text="Description:" /> 30 31 <EditText 32 android:id="@+id/descriptionInput" 33 android:layout_width="match_parent" 34 android:layout_height="wrap_content" 35 android:ems="10" 36 android:inputType="textCapSentences|textAutoCorrect|textAutoComplete" /> 37 38 <TextView 39 android:id="@+id/startLabel" 40 android:layout_width="match_parent" 41 android:layout_height="wrap_content" 42 android:text="Start Time:" /> 43 44 <EditText 45 android:id="@+id/startInput" 46 android:layout_width="match_parent" 47 android:layout_height="wrap_content" 48 android:ems="10" /> 49 50 <Button 51 android:id="@+id/createButton" 52 android:layout_width="match_parent" 53 android:layout_height="wrap_content" 54 android:onClick="onClickCreate" 55 android:text="Create Event" /> 56 </LinearLayout>
This layout gives us a very simple form and a button that will be used to actually create the event.
Note: it does require us to enter the start time in the very specific format, which is not good user experience. Adding a Date/Time picker is left as an exercise to the reader.
Next create a new class called CreateEventsActivity as follows:
1class CreateEventsActivity : AppCompatActivity() { 2 override fun onCreate(savedInstanceState: Bundle?) { 3 super.onCreate(savedInstanceState) 4 setContentView(R.layout.activity_createevent) 5 } 6 7 fun onClickCreate(v: View) { 8 } 9 }
And finally add an entry to AndroidManifest.xml inside the application tag to register the new Activity:
<activity android:name=".CreateEventsActivity" android:windowSoftInputMode="adjustResize"/>
Note the new
android:windowSoftInputModeattribute. This tells Android to resize the activity whenever the keyboard is displayed, rather than displaying the keyboard over the top of it.
Now we just need to actually create the event. Open up CreateEventsActivity, and add the following. Firstly we need a constant to define the URL to send the event details to:
private val EVENTS_ENDPOINT = "http://10.0.2.2:8080/events"
Then we need to implement our onClickCreate method:
1fun onClickCreate(v: View) { 2 val nameInput = findViewById<EditText>(R.id.nameInput) 3 val descriptionInput = findViewById<EditText>(R.id.descriptionInput) 4 val startInput = findViewById<EditText>(R.id.startInput) 5 6 val name = nameInput.text.toString() 7 val description = descriptionInput.text.toString() 8 val start = startInput.text.toString() 9 10 if (name.isBlank()) { 11 Toast.makeText(this, "No event name entered!", Toast.LENGTH_LONG).show() 12 } else if (start.isBlank()) { 13 Toast.makeText(this, "No start time entered!", Toast.LENGTH_LONG).show() 14 } else { 15 val transitionIntent = Intent(this, EventsListActivity::class.java) 16 17 val client = AsyncHttpClient() 18 val request = JSONObject(mapOf( 19 "name" to name, 20 "description" to description, 21 "start" to start 22 )) 23 client.post(applicationContext, EVENTS_ENDPOINT, StringEntity(request.toString()), "application/json", object : JsonHttpResponseHandler() { 24 override fun onSuccess(statusCode: Int, headers: Array<out Header>, response: JSONObject) { 25 startActivity(transitionIntent) 26 } 27 }) 28 } 29 }
This will send the appropriate HTTP Request to our server, providing the event details, and then - on a successful response - direct the user back to the Events List. By the time our user gets there, the event will have been created and it will automatically appear in the list.
Viewing event details
The final part of the UI is to be able to see the full details of an event, rather than just the list. This will include the description, the number of users that are interested, and whether or not the current user is on the list. It will also give the ability to register or remove interest in the event.
Create a new resource layout file called activity_viewevent.xml as follows:
1<?xml version="1.0" encoding="utf-8"?> 2 <LinearLayout xmlns:android="http://schemas.android.com/apk/res/android" 3 xmlns:app="http://schemas.android.com/apk/res-auto" 4 xmlns:tools="http://schemas.android.com/tools" 5 android:layout_width="match_parent" 6 android:layout_height="match_parent" 7 android:gravity="center_vertical|fill_horizontal" 8 android:orientation="vertical" 9 tools:layout_editor_absoluteX="8dp" 10 tools:layout_editor_absoluteY="8dp"> 11 12 <TextView 13 android:id="@+id/nameLabel" 14 android:layout_width="match_parent" 15 android:layout_height="wrap_content" 16 android:text="Event Name:" /> 17 18 <TextView 19 android:id="@+id/nameValue" 20 android:layout_width="match_parent" 21 android:layout_height="wrap_content" 22 android:text="" /> 23 24 <TextView 25 android:id="@+id/descriptionLabel" 26 android:layout_width="match_parent" 27 android:layout_height="wrap_content" 28 android:text="Description:" /> 29 30 <TextView 31 android:id="@+id/descriptionValue" 32 android:layout_width="match_parent" 33 android:layout_height="wrap_content" 34 android:text="" /> 35 36 <TextView 37 android:id="@+id/startLabel" 38 android:layout_width="match_parent" 39 android:layout_height="wrap_content" 40 android:text="Start Time:" /> 41 42 <TextView 43 android:id="@+id/startValue" 44 android:layout_width="match_parent" 45 android:layout_height="wrap_content" 46 android:text="" /> 47 48 <TextView 49 android:id="@+id/numberInterestLabel" 50 android:layout_width="match_parent" 51 android:layout_height="wrap_content" 52 android:text="No. of Interested Users:" /> 53 54 <TextView 55 android:id="@+id/numberInterestValue" 56 android:layout_width="match_parent" 57 android:layout_height="wrap_content" 58 android:text="" /> 59 60 <Button 61 android:id="@+id/interestedButton" 62 android:layout_width="match_parent" 63 android:layout_height="wrap_content" 64 android:onClick="onClickInterested" 65 android:text="Interested" /> 66 67 <Button 68 android:id="@+id/disinterestedButton" 69 android:layout_width="match_parent" 70 android:layout_height="wrap_content" 71 android:onClick="onClickDisinterested" 72 android:text="Not Interested" /> 73 </LinearLayout>
Next create a new class called ViewEventActivity as follows:
1class ViewEventActivity : AppCompatActivity() { 2 private lateinit var eventId: String 3 4 override fun onCreate(savedInstanceState: Bundle?) { 5 super.onCreate(savedInstanceState) 6 setContentView(R.layout.activity_viewevent) 7 eventId = intent.getStringExtra("event") 8 9 refreshEventDetails() 10 } 11 12 private fun refreshEventDetails() { 13 Log.v("ViewEvent", eventId) 14 } 15 16 fun onClickInterested(v: View?) { 17 } 18 19 fun onClickDisinterested(v: View) { 20 } 21 }
And register it in the AndroidManifest.xml file:
<activity android:name=".ViewEventActivity" />
Then we need to be able to get to this new activity by clicking on an event in the list. Update EventsListActivity.
Firstly, add a superclass of AdapterView.OnItemClickListener and then implement it by adding the following method:
1override fun onItemClick(parent: AdapterView<*>, view: View, position: Int, id: Long) { 2 val eventViewHolder = view.tag as EventViewHolder 3 val intent = Intent(this, ViewEventActivity::class.java) 4 intent.putExtra("event", eventViewHolder.id) 5 startActivity(intent) 6 }
Then register this by adding the following to onCreate:
recordsView.onItemClickListener = this
We are using this to pass some extra data in the Intent to display an Activity - namely the ID of the event that is being displayed. We can now use that to load the event data and display it to the user.
For that, let�’s implement the refreshEventDetails method of ViewEventActivity.
1private fun refreshEventDetails() { 2 val client = AsyncHttpClient() 3 client.get(EVENTS_ENDPOINT + eventId, object : JsonHttpResponseHandler() { 4 override fun onSuccess(statusCode: Int, headers: Array<out Header>, response: JSONObject) { 5 super.onSuccess(statusCode, headers, response) 6 7 val nameDisplay = findViewById<TextView>(R.id.nameValue) 8 val descriptionDisplay = findViewById<TextView>(R.id.descriptionValue) 9 val startDisplay = findViewById<TextView>(R.id.startValue) 10 11 val name = response.getString("name") 12 val description = response.getString("description") 13 val start = response.getString("start") 14 15 runOnUiThread { 16 nameDisplay.text = name 17 descriptionDisplay.text = description 18 startDisplay.text = start 19 } 20 } 21 }) 22 23 client.get(EVENTS_ENDPOINT + eventId + "/interest", object : JsonHttpResponseHandler() { 24 override fun onSuccess(statusCode: Int, headers: Array<out Header>, response: JSONArray) { 25 super.onSuccess(statusCode, headers, response) 26 27 val numberInterestedDisplay = findViewById<TextView>(R.id.numberInterestValue) 28 val interestedButton = findViewById<Button>(R.id.interestedButton) 29 val notInterestedButton = findViewById<Button>(R.id.disinterestedButton) 30 31 val numberInterested = response.length().toString() 32 val imInterested = IntRange(0, response.length() - 1) 33 .map { index -> response.getString(index) } 34 .contains((application as EventsApplication).username) 35 36 runOnUiThread { 37 numberInterestedDisplay.text = numberInterested 38 39 if (imInterested) { 40 interestedButton.visibility = View.GONE 41 notInterestedButton.visibility = View.VISIBLE 42 } else { 43 interestedButton.visibility = View.VISIBLE 44 notInterestedButton.visibility = View.GONE 45 } 46 } 47 } 48 }) 49 }
This is a busy method, but essentially it is making two API calls - the first to get the event details, the second to get the list of people interested in the event - and then updating the UI to display these details.
Finally, let’s allow the user to express interest in the event. This is done by implementing the onClickInterested and onClickDisinterested buttons:
1fun onClickInterested(v: View?) { 2 val client = AsyncHttpClient() 3 val username = (application as EventsApplication).username 4 5 client.put(EVENTS_ENDPOINT + eventId + "/interest/" + username, object : AsyncHttpResponseHandler() { 6 override fun onSuccess(statusCode: Int, headers: Array<out Header>?, responseBody: ByteArray?) { 7 runOnUiThread { 8 refreshEventDetails() 9 } 10 } 11 12 override fun onFailure(statusCode: Int, headers: Array<out Header>?, responseBody: ByteArray?, error: Throwable?) { 13 runOnUiThread { 14 refreshEventDetails() 15 } 16 } 17 }) 18 } 19 20 fun onClickDisinterested(v: View) { 21 val client = AsyncHttpClient() 22 val username = (application as EventsApplication).username 23 24 client.delete(EVENTS_ENDPOINT + eventId + "/interest/" + username, object : AsyncHttpResponseHandler() { 25 override fun onSuccess(statusCode: Int, headers: Array<out Header>?, responseBody: ByteArray?) { 26 runOnUiThread { 27 refreshEventDetails() 28 } 29 } 30 31 override fun onFailure(statusCode: Int, headers: Array<out Header>?, responseBody: ByteArray?, error: Throwable?) { 32 runOnUiThread { 33 refreshEventDetails() 34 } 35 } 36 }) 37 }
We do no handling of the response at all here, simply using the callback to refresh the view details. This is far from ideal but is good enough for now.
At this point, you can click on the buttons and see the interest levels changing.
Sharing an event with friends
The last part of our UI is to be able to share an event with friends. This will use a dialog from the View Event page and send the request to our server, which will in turn broadcast it on to the appropriate users.
Firstly, we want a dialog to display to the user allowing them to select the friends to share the event with. Create a new ShareEventDialog class:
1class ShareEventDialog : DialogFragment() { 2 private val EVENTS_ENDPOINT = "http://10.0.2.2:8080/events/" 3 4 lateinit var event: String 5 lateinit var friends: List<Friend> 6 7 override fun onCreateDialog(savedInstanceState: Bundle?): Dialog { 8 val names = friends.map { it.name } 9 val selected = mutableSetOf<String>() 10 return AlertDialog.Builder(activity) 11 .setTitle("Share") 12 .setMultiChoiceItems(names.toTypedArray(), null) { dialog, which, isChecked -> 13 val friend = friends[which] 14 if (isChecked) { 15 selected.add(friend.id) 16 } else { 17 selected.remove(friend.id) 18 } 19 } 20 .setPositiveButton("Share") { dialog, which -> 21 Log.v("ShareEventDialog", "Sharing with: " + selected) 22 val client = AsyncHttpClient() 23 val request = JSONArray(selected) 24 25 client.post(null,EVENTS_ENDPOINT + event + "/share", StringEntity(request.toString()), "application/json", 26 object : JsonHttpResponseHandler() { 27 28 }) 29 } 30 .setNegativeButton("Cancel") { dialog, which -> } 31 .create() 32 } 33 }
This does all of the work of displaying our dialog and sending the request to the server on success.
Next, we want to create a menu with the Share button on it. For this, create a new menu resource called view.xml as follows:
1<?xml version="1.0" encoding="utf-8"?> 2 <menu xmlns:app="http://schemas.android.com/apk/res-auto" 3 xmlns:android="http://schemas.android.com/apk/res/android"> 4 5 <item 6 android:icon="@android:drawable/ic_menu_share" 7 android:title="Share" 8 app:showAsAction="ifRoom" 9 android:onClick="onClickShare" /> 10 </menu>
Then we need to actually display it. Add the following to ViewEventActivity:
1override fun onCreateOptionsMenu(menu: Menu?): Boolean { 2 menuInflater.inflate(R.menu.view, menu) 3 return true 4 }
And we need to implement the onClickShare method.
We need to obtain our list of friends from the API that we can share with. We’ll create a Friend class to represent each friend:
1data class Friend( 2 val id: String, 3 val name: String 4 )
Then obtain the actual list of friends. Add the following field to ViewEventActivity:
private val USERS_ENDPOINT = "http://10.0.2.2:8080/users/"
And then an implementation of onClickShare:
1fun onClickShare(v: MenuItem) { 2 val client = AsyncHttpClient() 3 client.get(USERS_ENDPOINT + (application as EventsApplication).username + "/friends", object : JsonHttpResponseHandler() { 4 override fun onSuccess(statusCode: Int, headers: Array<out Header>?, response: JSONArray) { 5 super.onSuccess(statusCode, headers, response) 6 7 val friends = IntRange(0, response.length() - 1) 8 .map { index -> response.getJSONObject(index) } 9 .map { obj -> 10 Friend( 11 id = obj.getString("id"), 12 name = obj.getString("name") 13 ) 14 } 15 16 runOnUiThread { 17 val dialog = ShareEventDialog() 18 dialog.event = eventId 19 dialog.friends = friends 20 dialog.show(supportFragmentManager, "ShareEventDialog") 21 } 22 } 23 }) 24 }

Conclusion
So far, we have a very simple application that can be used as a basic social events platform.
The full source for the entire application is available on Github.
This is part 1 of a 2 part tutorial. You can find part 2 here.


© 2025 Pusher Ltd. All rights reserved.
Pusher Limited is a company registered in England and Wales (No. 07489873) whose registered office is at MessageBird UK Limited, 3 More London Riverside, 4th Floor, London, United Kingdom, SE1 2AQ.