- Products

- Developers
- User stories
- Blog
- Pricing

Add push notifications to your web app with Node.js and service workers
Introduction
In this tutorial, you’ll learn how to use service workers and the web-push library to provide push notifications in the browser. You’ll learn how to subscribe the user for push messaging and how to deliver rich notifications in the browser.
Push notifications have a place in many web apps to day. They help re-engage users and draw their attention to new activity that occurs in your web application.
Prerequisites
You need basic knowledge of HTML, CSS, JavaScript and Node. You also need a modern web browser that supports service workers (the latest editions of Chrome or Firefox will suffice). Lastly, you need to have Node.js (version 6 or later) and npm installed on your computer. You can view installation instructions here.
Getting started
The first thing you need to do is launch the terminal program on your computer and create a new directory for this project. Then run npm init -y from within your project to initialize a new Node project.
The next step is to install the dependencies which we’ll be making use of for this project. Run the command below to install them all in one step:
npm install dotenv body-parser express web-push -S
Here’s what each one does:
- dotenv: Loads environmental variables from a
.envfile toprocess.env. - express: Web application framework for Node.
- body-parser: Middleware for parsing incoming request bodies.
- web-push: Web Push library for Node.js.
Generate VAPID Keys
The web-push library relies on a set of VAPID keys to work. VAPID keys are a pair of public and private keys which is used to restrict the validity of a push subscription to a specific application server, and also to identify the server that is sending the push notifications.
You can generate the VAPID key pair by running the command below from the root of your project directory:
./node_modules/.bin/web-push generate-vapid-keys
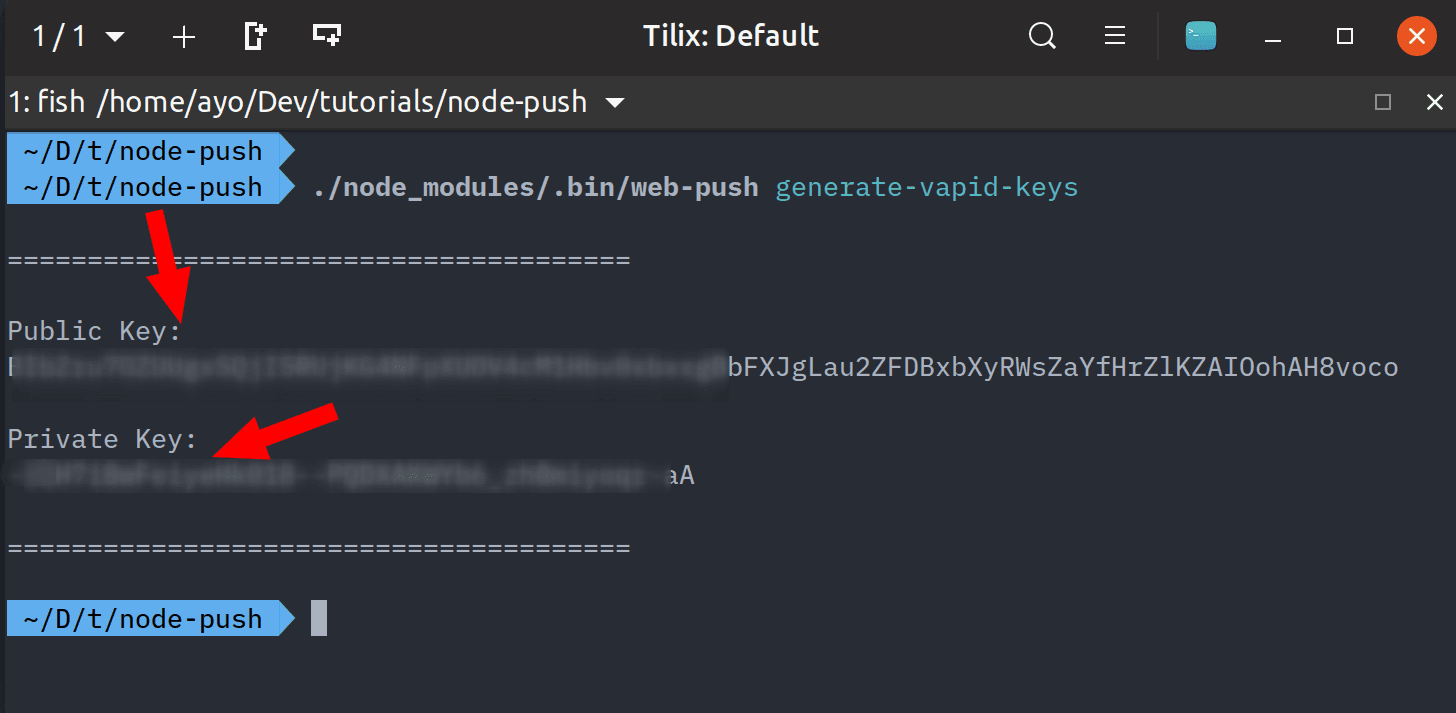
Copy the public and private key and paste them into a new variables.env file in the root of your project directory as shown below:
1// variables.env 2 PORT=5000 3 PUBLIC_VAPID_KEY=<your public key> 4 PRIVATE_VAPID_KEY=<your private key>
Set up the server
Create a new server.js file in your project directory. Open it up in your text editor and paste the following code into it:
1// server.js 2 require('dotenv').config({ path: 'variables.env' }); 3 4 const express = require('express'); 5 const webPush = require('web-push'); 6 const bodyParser = require('body-parser'); 7 const path = require('path'); 8 9 const app = express(); 10 11 app.use(bodyParser.json()); 12 13 app.use(express.static(path.join(__dirname, 'client'))); 14 15 const publicVapidKey = process.env.PUBLIC_VAPID_KEY; 16 const privateVapidKey = process.env.PRIVATE_VAPID_KEY; 17 18 webPush.setVapidDetails('mailto:test@example.com', publicVapidKey, privateVapidKey); 19 20 app.post('/subscribe', (req, res) => { 21 const subscription = req.body 22 23 res.status(201).json({}); 24 25 const payload = JSON.stringify({ 26 title: 'Push notifications with Service Workers', 27 }); 28 29 webPush.sendNotification(subscription, payload) 30 .catch(error => console.error(error)); 31 }); 32 33 app.set('port', process.env.PORT || 5000); 34 const server = app.listen(app.get('port'), () => { 35 console.log(`Express running → PORT ${server.address().port}`); 36 });
We are able to access our public and private VAPID keys on process.env thanks to our use of the dotenv package. We then call the setVapidDetails() method which takes an email address for our website as well as the public/private key pair we generated earlier. The /subscribe route at the bottom is we’re triggering the push notification event to the service worker.
That’s all we need to do on the server side. You can start the server by running node server.js in the terminal. A message will be printed on the screen informing you that the server was started successfully.
Set up the client
Create a new client directory within your project directory. This is where all our static files will be kept. Create the following files from within the client directory by running the command below:
touch index.html style.css main.js sw.js
Open the index.html file in your text editor and paste in the following code:
1// client/index.html 2 3 <!DOCTYPE html> 4 <html lang="en"> 5 <head> 6 <meta charset="UTF-8"> 7 <meta name="viewport" content="width=device-width, initial-scale=1.0"> 8 <meta http-equiv="X-UA-Compatible" content="ie=edge"> 9 <title>Push Notifications using Node.js and Web Push</title> 10 <link rel="icon" type="image/png" href="https://d2cy1obokpvee9.cloudfront.net/manifest/favicon-196x196.png" sizes="196x196" class="next-head"> 11 <link rel="stylesheet" href="style.css"> 12 </head> 13 <body> 14 <header> 15 <h1>Web Push Notifications Demo</h1> 16 </header> 17 18 <div class="buttons"> 19 <button class="trigger-push">Trigger Push Notification</button> 20 </div> 21 22 <script src="main.js"></script> 23 </body> 24 </html>
Let’s go ahead and add the styles for this page in style.css:
1// client/style.css 2 3 html { 4 box-sizing: border-box; 5 } 6 7 *, *::before, *::after { 8 box-sizing: inherit; 9 margin: 0; 10 padding: 0; 11 } 12 13 body { 14 font-family: "Roboto", "HelveticaNeue", "Helvetica Neue", Helvetica, Arial, sans-serif; 15 } 16 17 header { 18 width: 100%; 19 height: 300px; 20 display: flex; 21 justify-content: center; 22 align-items: center; 23 background-color: #33154F; 24 color: #11D771; 25 margin-bottom: 30px; 26 } 27 28 .buttons { 29 text-align: center; 30 } 31 32 button { 33 display: inline-block; 34 height: 38px; 35 padding: 0 30px; 36 color: #fff; 37 text-align: center; 38 font-size: 11px; 39 font-weight: 600; 40 line-height: 38px; 41 letter-spacing: .1rem; 42 text-transform: uppercase; 43 text-decoration: none; 44 white-space: nowrap; 45 background-color: transparent; 46 border-radius: 4px; 47 border: 1px solid #bbb; 48 cursor: pointer; 49 box-sizing: border-box; 50 } 51 52 button:hover { 53 outline: 0; 54 } 55 56 .trigger-push { 57 background-color: #073525; 58 border: 1px solid #073525; 59 }
Now, let’s write the main logic for in the main.js file. Open it up and paste the following code inside:
1// client/main.js 2 3 function urlBase64ToUint8Array(base64String) { 4 const padding = '='.repeat((4 - base64String.length % 4) % 4); 5 const base64 = (base64String + padding) 6 .replace(/-/g, '+') 7 .replace(/_/g, '/'); 8 9 const rawData = window.atob(base64); 10 const outputArray = new Uint8Array(rawData.length); 11 12 for (let i = 0; i < rawData.length; ++i) { 13 outputArray[i] = rawData.charCodeAt(i); 14 } 15 return outputArray; 16 } 17 18 const publicVapidKey = '<your public vapid key>'; 19 20 const triggerPush = document.querySelector('.trigger-push'); 21 22 async function triggerPushNotification() { 23 if ('serviceWorker' in navigator) { 24 const register = await navigator.serviceWorker.register('/sw.js', { 25 scope: '/' 26 }); 27 28 const subscription = await register.pushManager.subscribe({ 29 userVisibleOnly: true, 30 applicationServerKey: urlBase64ToUint8Array(publicVapidKey), 31 }); 32 33 await fetch('/subscribe', { 34 method: 'POST', 35 body: JSON.stringify(subscription), 36 headers: { 37 'Content-Type': 'application/json', 38 }, 39 }); 40 } else { 41 console.error('Service workers are not supported in this browser'); 42 } 43 } 44 45 triggerPush.addEventListener('click', () => { 46 triggerPushNotification().catch(error => console.error(error)); 47 });
As you can see, the code is straightforward to understand. Once the triggerPush button is clicked, we register the service worker file sw.js, and create a subscription which then prompts the user to allow notifications for the current page. When using your public VAPID key in your web app, you'll need to convert the URL safe base64 string to a Uint8Array to pass into the subscribe call, which you can do by passing the key to the urlBase64ToUint8Array() function as shown above. Don’t forget to replace <your public vapid key> with the appropriate value from your VAPID credentials.
The request to the /subscribe route we created earlier subsequently triggers a new push event. Now, we need to listen for this event on the service worker and show a notification to the user each time this event is triggered.
Open up sw.js and change it to look like this:
1// client/sw.js 2 3 self.addEventListener('push', event => { 4 const data = event.data.json(); 5 6 self.registration.showNotification(data.title, { 7 body: 'Yay it works!', 8 }); 9 });
When a push event is received, the event listener above will be invoked, and we create a notification by calling showNotification() on our registration. This method expects a title and and options object. The title is grabbed off the event payload, and we’ve set the body of the notification using the body property in the options object.
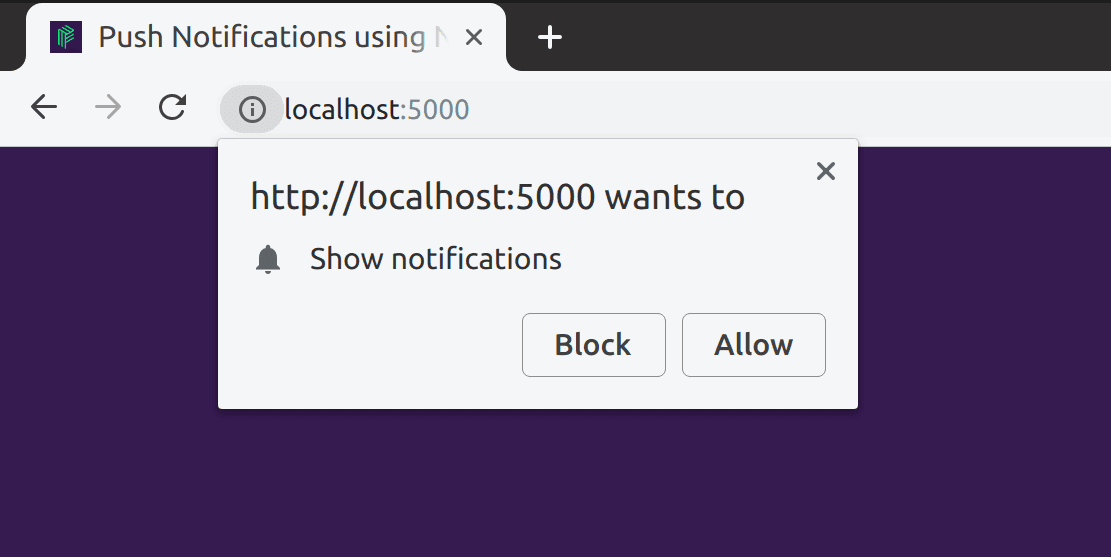
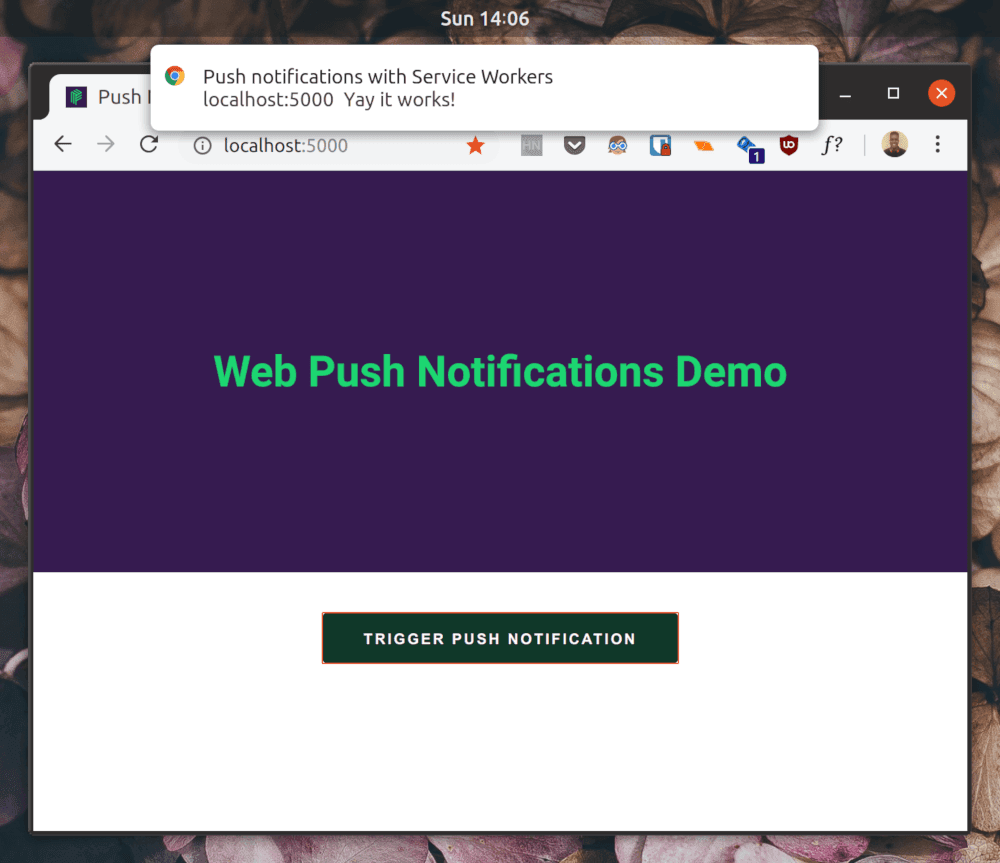
To test if it’s working, open up http://localhost:5000 in your browser and click the button on the page. Once you accept the prompt that allows notifications to be displayed, you should see a new notification somewhere on your screen depending on how your operating system handles notifications.
Wrap up
This tutorial has shown you how to get up and running with push notifications on the web using service workers and Web Push. You can grab the complete source code in this GitHub repository.
If you’re interested in deploying push notifications to an Android or iOS app, you can check out Beams by Pusher which takes the hassle out of managing device tokens and interacting with Apple and Google's messaging services and is built to scale.


© 2026 Pusher Ltd. All rights reserved.
Pusher Limited is a company registered in England and Wales (No. 07489873) whose registered office is at MessageBird UK Limited, 3 More London Riverside, 4th Floor, London, United Kingdom, SE1 2AQ.