- Products

- Developers
- User stories
- Blog
- Pricing

Send push notifications to an iOS app with Python and AWS Lambda
Introduction
Introduction
Pusher Beams allows you to customize push notifications you send to your devices via a server. However it can be expensive to run a server 24 hours a day 7 days a week and we may only need to send notifications every so often. This is where AWS Lambda can help. Lambda functions are serverless and work on a pay as you go model (with a generous free tier). This means that you only pay for when you use the function. We’re going to explore how we can setup Pusher Beams on an iOS client using an AWS Lambda function running Python to trigger the notifications.
Prerequisites
- A free AWS account.
- A free Pusher account. You can create one here.
- Python 3.7.x installed on your local machine. Download here.
- Xcode 10+
- MacOS
- An iOS device for testing notifications.
- An understanding of iOS development and Xcode environment.
- CocoaPods - Install instructions here.
You will also need to have pip installed for installing Python dependencies. Run the following commands in a terminal:
1$ sudo easy_install pip3 2 $ brew install pipenv
Create your Lambda function
Creating a Pusher Beams instance
Log in or create your Pusher account to access the dashboard and create a Beams instance.
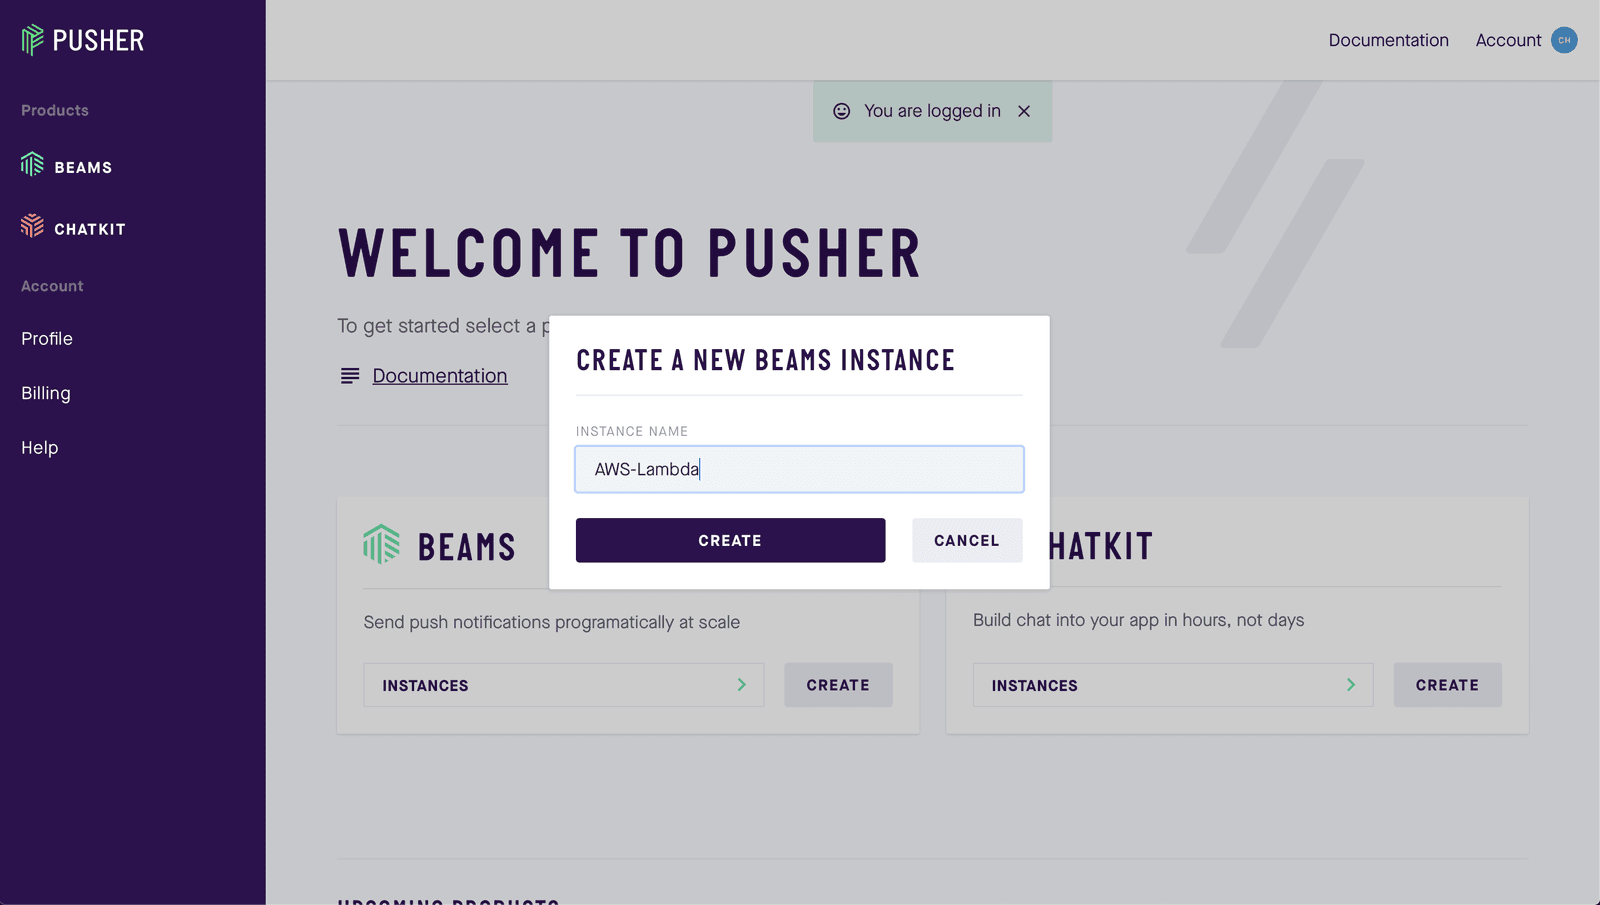
Complete step one of the iOS setup guide, by providing your APNS key and team ID and clicking Continue. We will pick up the remainder later on in this tutorial. Press the X to exit the setup guide and you will be returned to your dashboard for that instance. Scroll to the bottom of the page and you will find your Pusher Beams instance ID and secret key, make note of these you will need them later.
Writing our function
We will need to install our packages and write our function on our local machine before we can upload it to a Lambda function. Create a new working directory on your local machine and within run the following command in your terminal working directory:
1$ pipenv install pusher_push_notifications 2 $ pipenv install requests
These commands will install our Pusher notifications dependency within our local directory. It also sets up a virtual environment for our project. Next create a new file called index.py and open it in your favorite text editor and add the following code:
1// index.py 2 from pusher_push_notifications import PushNotifications 3 import requests 4 5 def lambda_handler(event, context): 6 beams_client = PushNotifications( 7 instance_id='YOUR_INSTANCE_ID', 8 secret_key='YOUR_SECRET_KEY', 9 ) 10 11 response = beams_client.publish_to_interests(interests=['hello'], 12 publish_body={ 13 'apns': { 14 'aps': { 15 'alert': { 16 'title': event['title'], 17 'body': event['message'] 18 }, 19 }, 20 }, 21 }, 22 ) 23 print(response['publishId'])
This code will be used by our Lambda function later on to publish notifications to devices that are registered for the hello interest. We use the event['title'] and event['message'] to form part of the message. We’ll look at this in more detail when we come to test our integration. Remember to replace YOUR_INSTANCE_ID and YOUR_SECRET_KEY with the credentials from your Pusher Beams console.
Next we need to compress the directory we have been working in and make a .zip such that we can upload our code and dependencies to our function later on. Download the Make file from the source code repository here and put it in your working directory. Run the command:
$ make build
This will create a zip file called Python.zip with all the dependencies packaged within it.
Creating a Lambda function
Log in or create an account to access your AWS console. Once you are logged in use the search bar to find Lambda and select it from the list.
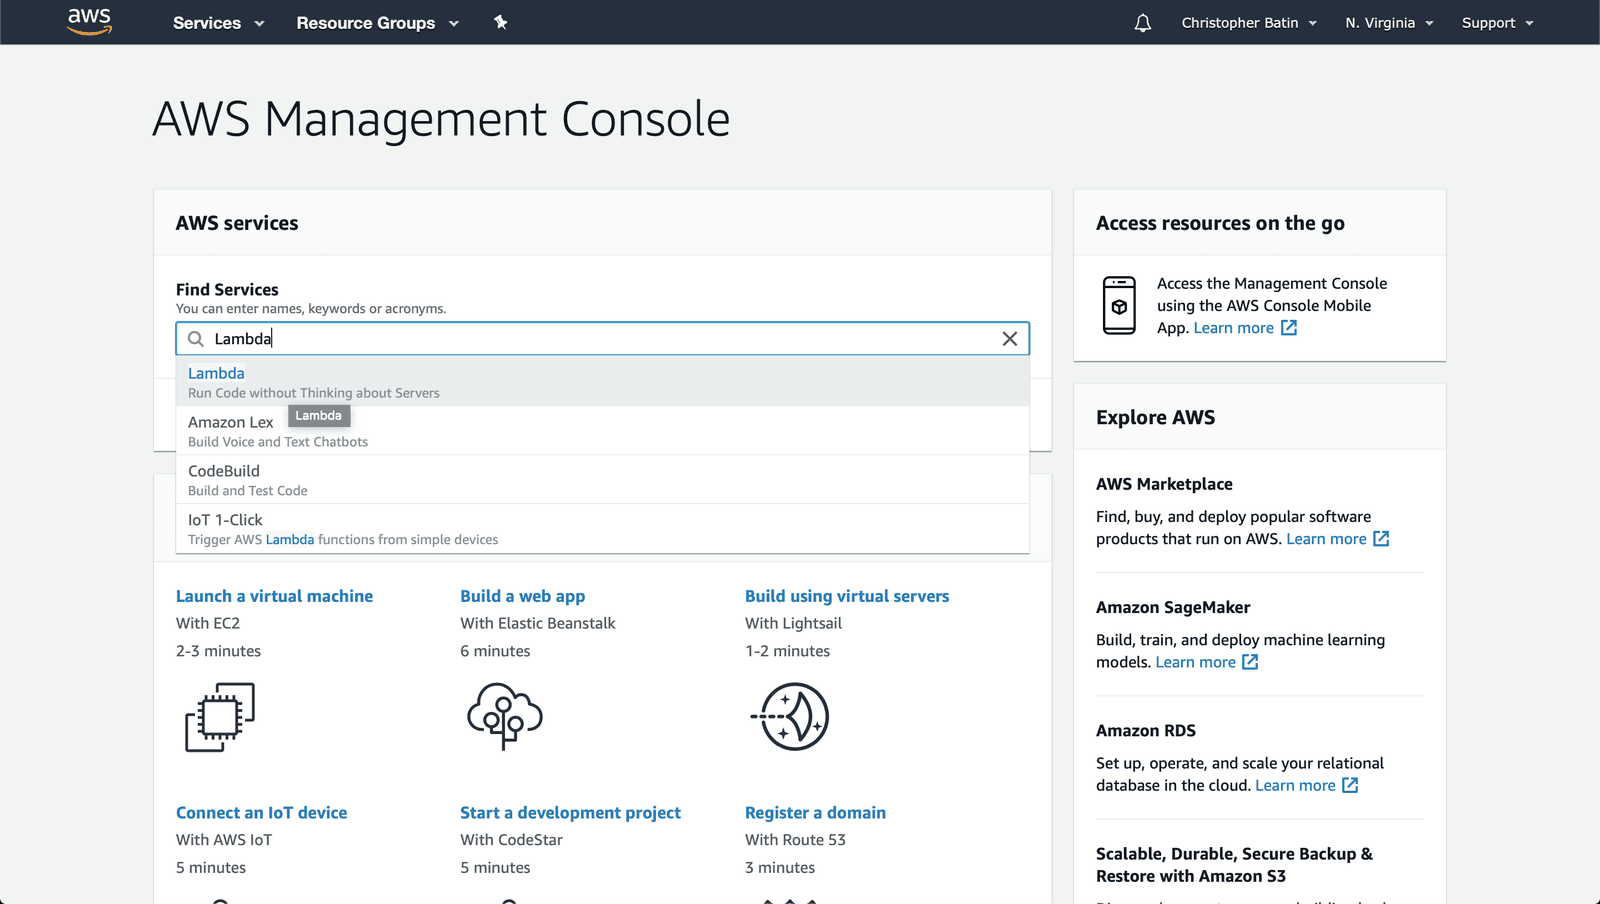
Note: Set your AWS region to N. Virginia in the top right if it is not already.
You should be redirected to the Lambda service and see an option Create Function, select this. Choose the Author from Scratch option at the top of the next page. This will provide us a basic “hello world” template we can use to create our function. Complete the basic setup as shown in the image below.
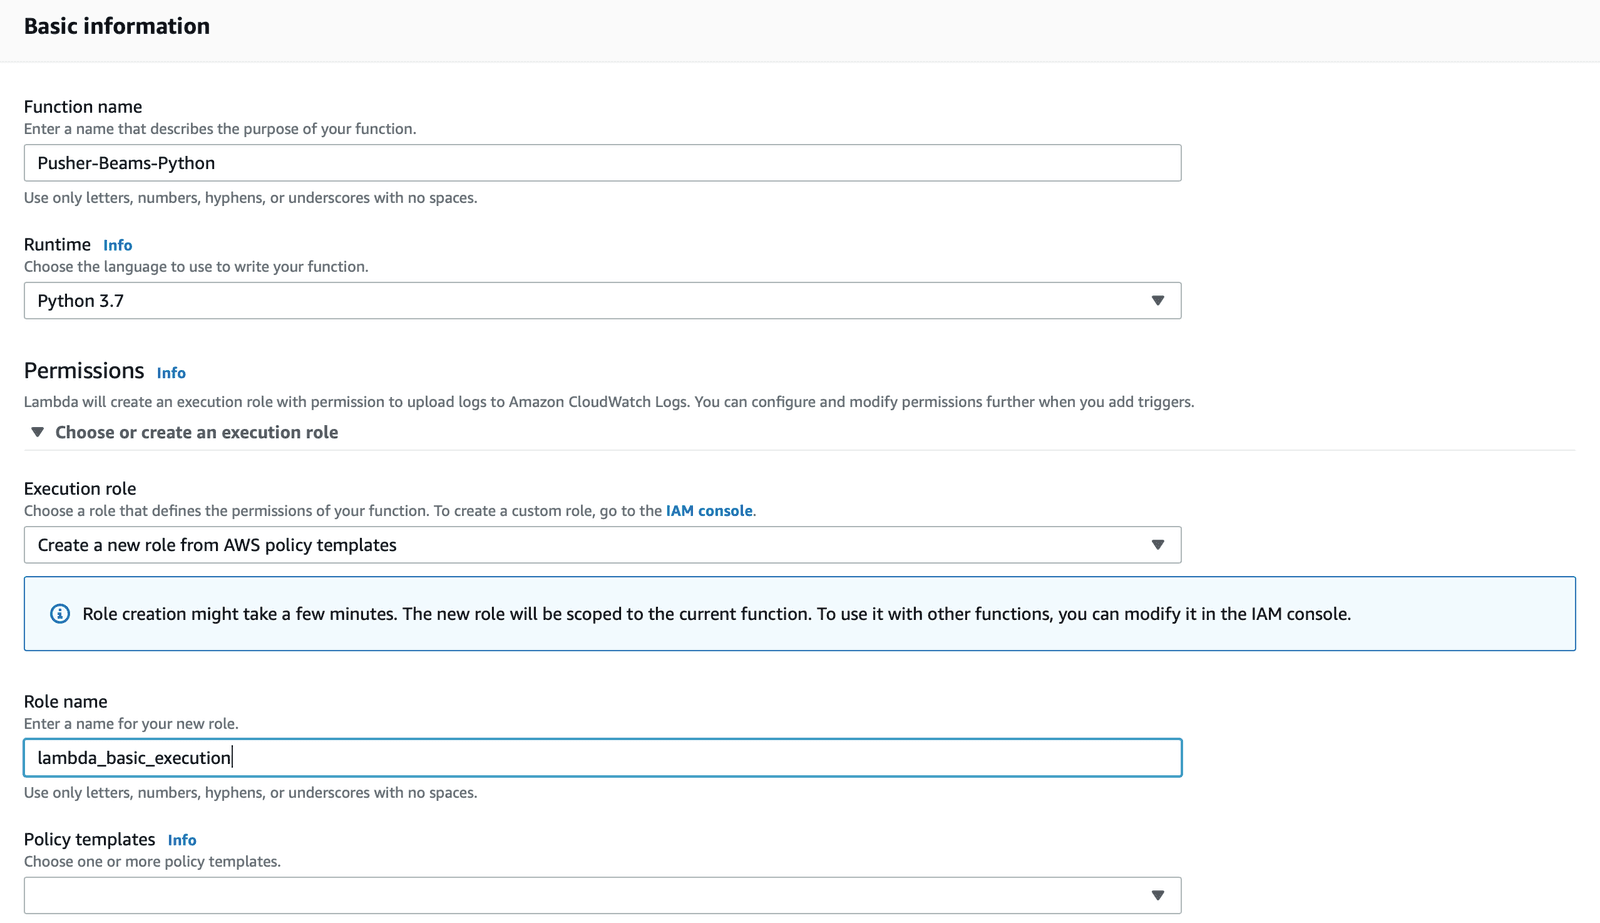
- Function name - Name this whatever you want for example “Pusher-Beams-Python”.
- Runtime - We will be using Python 3.7 so select this from the drop down list.
- Execution role - Select Create a new role from AWS policy templates. If you already have a role you would rather use you can select Use an existing role.
- Role name - You can name this anything you like for example “lambda_basic_execution”.
- Policy templates - You can leave this blank.
Once complete select the Create function button at the bottom of the page. You should be redirected to your Lambda function console once it has been created. We can ignore the Designer section of the console. This area allows us to tie together different AWS services, you may wish to use this with a production function such that it can be accessed from the wider internet. However, we will just be using the test service for the purpose of this tutorial.
Now we need to upload our code. In the Function code section select the Upload a .zip file from the Code entry type dropdown menu. Use the Upload button to search your local machine for the Python.zip we created earlier. Finally change the Handler to be index.lambda_handler, this will allow AWS Lambda to find our function within our folder. If everything looks like the below image click Save in the top right.

Create your iOS application
Now that we have created our Lambda function, we need to have a user that has actually registered for notifications and signed up for the hello interest so we can test out our implementation. We’re going to create a very basic app that doesn’t actually show anything to the user except for the notification on the lock screen.
Project setup
Create a new Single View App using Xcode and name it something like LambdaPush. Once the project is created we need to install the Beams SDK. Open the terminal and go to the working directory of the newly created project and run the following command.
$ pod init
Open the newly created Podfile and add the following pod:
pod 'PushNotifications'
In the terminal run:
$ pod install
Make sure you close your Xcode project and reopen the newly created Xcode Workspace before continuing. Within your project capabilities make sure you have switched on the Push Notifications capability. Also turn on the Background Modes capability and tick the box for Remote Notifications.
Open your AppDelegate.swift file and replace its contents with the following. Remembering to replace YOUR_INSTANCE_ID with your Pusher Beams instance ID.
1// AppDelegate.swift
2 import UIKit
3 import PushNotifications
4
5 @UIApplicationMain
6 class AppDelegate: UIResponder, UIApplicationDelegate {
7 var window: UIWindow?
8 let pushNotifications = PushNotifications.shared
9
10 func application(_ application: UIApplication, didFinishLaunchingWithOptions launchOptions: [UIApplication.LaunchOptionsKey: Any]?) -> Bool {
11 self.pushNotifications.start(instanceId: "YOUR_INSTANCE_ID")
12 self.pushNotifications.registerForRemoteNotifications()
13 try? self.pushNotifications.subscribe(interest: "hello")
14
15 return true
16 }
17
18 func application(_ application: UIApplication, didRegisterForRemoteNotificationsWithDeviceToken deviceToken: Data) {
19 self.pushNotifications.registerDeviceToken(deviceToken)
20 }
21
22 func application(_ application: UIApplication, didReceiveRemoteNotification userInfo: [AnyHashable: Any], fetchCompletionHandler completionHandler: @escaping (UIBackgroundFetchResult) -> Void) {
23 self.pushNotifications.handleNotification(userInfo: userInfo)
24 }
25 }
You can now run the application on your iOS device and accept to receive notifications. The SDK will then manage registering our interest in hello. Remember to replace YOUR_INSTANCE_ID with your instance ID credential from your Pusher Beams console.
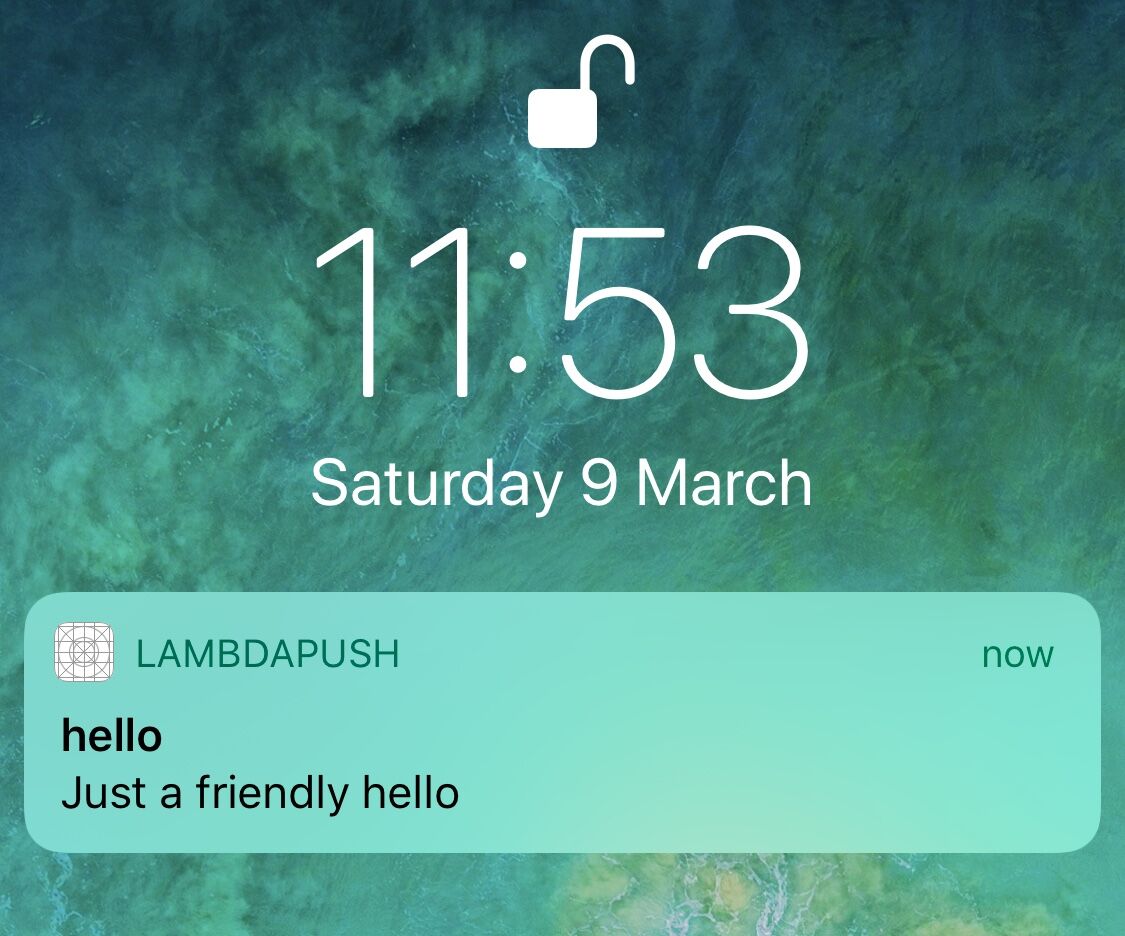
Testing our implementation
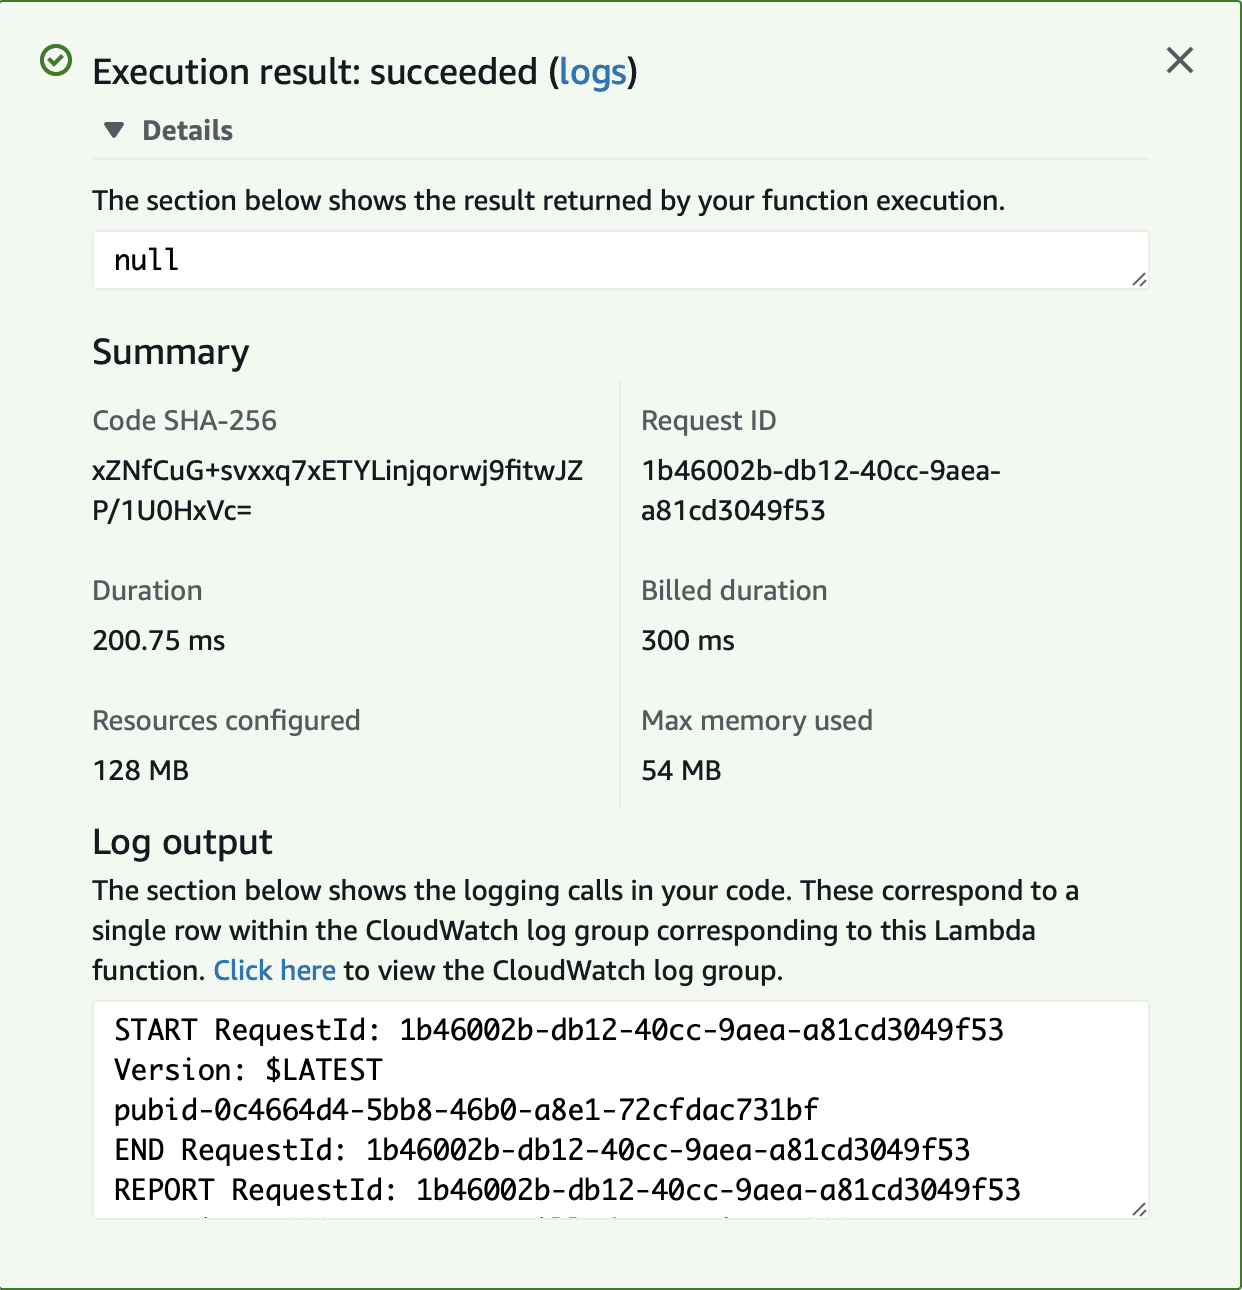
Return to your Lambda function console. In the top right select the Test button. We need to configure a test option. Create a new test event like the below image. Notice how our keys in the JSON object are title and message. These are the event keys we were using in our code to provide the title and body for the push notification.

Once you are done press the Create button at the bottom. The dialog box will close and the test HelloTest should be selected in the dropdown menu by the Test button, Press Test. If everything has worked as expected you should receive a push to your device and a similar log output from your Lambda console.
Conclusion
We’ve learnt how to create an AWS Lambda function using NodeJS that can publish a push notification using Pusher Beams to an iOS device. The source code for this tutorial can be found here.


© 2026 Pusher Ltd. All rights reserved.
Pusher Limited is a company registered in England and Wales (No. 07489873) whose registered office is at MessageBird UK Limited, 3 More London Riverside, 4th Floor, London, United Kingdom, SE1 2AQ.