- Products

- Developers
- User stories
- Blog
- Pricing

Build a polling web app with Next.js
Introduction
Polls are a good way of capturing popular opinions from people within a limited set of options. We'll set out on a quest to find out the most popular household pet. Dogs, cats or hamsters.
Like all polls, we'll want to see the results in realtime and we'll call this app "PET WARS: The polls awakening".
At the end of this, users should be able to cast their votes and see the results change as other users cast theirs too.
Prerequisite
Kindly ensure you have Node, Npm or Yarn installed on your machine before moving past this section. This will be needed for running and managing the dependencies needed by our application. Also, no knowledge of React is required, but a basic understanding of JavaScript may be helpful.
- Next.js: this is a framework for developing server-side rendered applications, just as you would with PHP, but this time with React.
- Pusher: this is a framework that allows you to build realtime applications with its easy to use pub/sub messaging API.
- Chart.js: this is a library that makes plotting charts pretty easy. More specifically, we'll be using react-chartjs2 which is a simple wrapper to make this easier to use in React.js applications.
App structure
We'll start by setting up our Next.js application. The easiest way to go about this is to clone the nextjs-javascript-starter repo. Run:
git clone https://github.com/Robophil/nextjs-javascript-starter.git pet-wars
This will clone the starter pack into a directory called pet-wars. Our app directory will look like this.
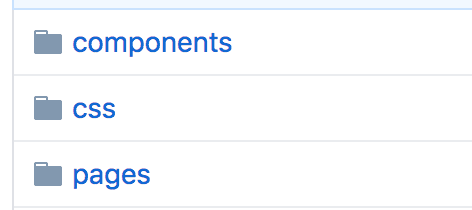
- components: any Next.js component we'll create will go here.
- css: styles for our components and pages would go here.
- pages: any
.jsfile in this directory would be served as a page. So any page we'll want to create would go here.
Install dependencies
To install the dependencies needed by our app, run:
1# enter app directory 2 cd pet-wars 3 4 # install dependencies from nextjs-javascript-starter 5 yarn 6 # OR 7 npm install 8 9 # add client-side dependencies 10 yarn add react-chartjs-2 chart.js axios pusher-js 11 # OR 12 npm install --save react-chartjs-2 chart.js axios pusher-js 13 14 # add server-side dependencies 15 yarn add cors express pusher body-parser 16 # OR 17 npm install -save cors express pusher body-parser
Now we have all dependencies needed by our app installed.
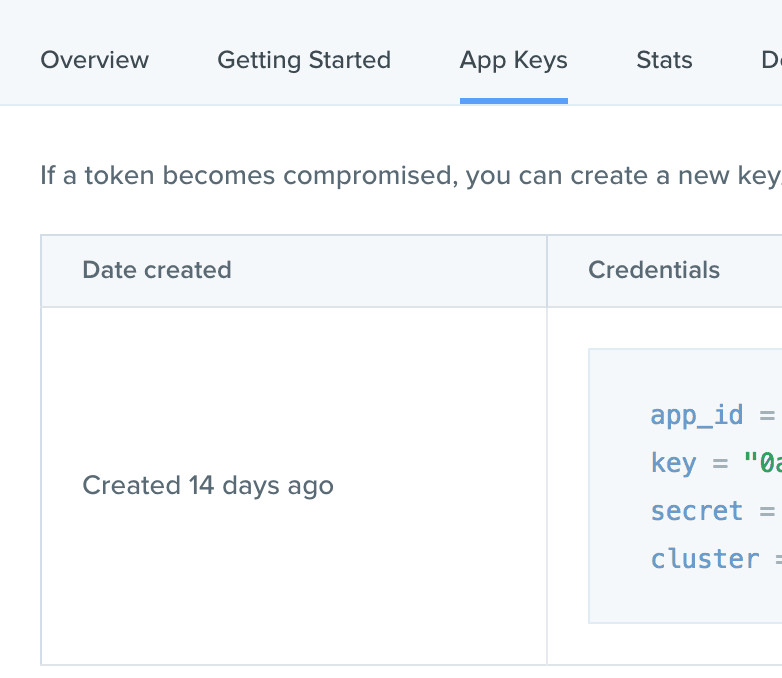
Getting our Pusher credentials
If you don't have a Pusher account already, kindly create one here. Once you have an account, simply head down to you dashboard and create an app. Once that is done, click on App Keys and note your credentials. We'll be needing them in a bit.
Now that we have all dependencies and credentials needed to build our application, let's get building!
Create the chart component
We'll need to display the results of the polls as they happen to users using a bar chart. Start by creating the file Chart.js in the components directory.
1// components/Chart.js 2 import React from 'react' 3 import { Bar } from 'react-chartjs-2' 4 5 export default class Chart extends React.Component { 6 render () { 7 return ( 8 <Bar 9 data={parseData(this.props.data)} 10 width={50} 11 height={100} 12 options={options} 13 /> 14 ) 15 } 16 } 17``` 18 19The first two lines import our dependencies. In our `render` method, we declare the `Bar` component and pass in required props. 20 21The `parseData` method is responsible for passing in the styles and configuration needed by the `Bar` component. The `data` parameter it receives is an array of poll values to be displayed on the graph. 22Copy the code block below and paste after line 5. 23 24``` javascript 25 const parseData = data => ({ 26 labels: ['Dogs %', 'Cats %', 'Hamsters %'], 27 datasets: [ 28 { 29 label: 'The polls awakening', 30 backgroundColor: [ 31 'rgba(255, 99, 132, 0.2)', 32 'rgba(54, 162, 235, 0.2)', 33 'rgba(255, 206, 86, 0.2)' 34 ], 35 borderColor: [ 36 'rgba(255, 99, 132, 0.2)', 37 'rgba(54, 162, 235, 0.2)', 38 'rgba(255, 206, 86, 0.2)' 39 ], 40 borderWidth: 5, 41 hoverBackgroundColor: 'rgba(255,99,132,0.4)', 42 hoverBorderColor: 'rgba(255,99,132,1)', 43 data 44 } 45 ] 46 }) 47 48 const options = { 49 scales: { 50 yAxes: [{ 51 ticks: { 52 beginAtZero: true 53 } 54 }] 55 }, 56 maintainAspectRatio: false 57 } 58``` 59## Creating the voting component 60 61Like any good poll, users need to be able to cast their votes easily. We'll be building a `Vote-buttons` component. When the user votes for their selected candidate, the result will be sent to the server and other users will receive updates. Start by creating the file `Vote-buttons.js` in the component directory. 62 63``` javascript 64 // components/Vote-buttons.js 65 import React from 'react' 66 import '../css/vote-buttons.css' 67 68 export default class VoteButtons extends React.Component { 69 render () { 70 return ( 71 <div className={'vote-button-group'}> 72 <button className={'vote-button'} onClick={() => this.props.handleVote({vote: 'dogs'})}>Vote Dogs</button> 73 74 <button className={'vote-button'} onClick={() => this.props.handleVote({vote: 'cats'})}>Vote Cats</button> 75 76 <button className={'vote-button'} onClick={() => this.props.handleVote({vote: 'hamsters'})}>Vote Hamsters</button> 77 </div> 78 ) 79 } 80 } 81``` 82 83This simply creates three buttons that accept an `onClick` event that would send the votes down to the server. 84 85 86## Styling the button component 87 88We want our buttons to sit on the same line right beneath the bar chart. Simply create the file `vote-buttons.css` in the CSS directory and add the following: 89 90 91``` css 92 /* css/vote-buttons.css */ 93 .vote-button-group { 94 display: flex; 95 width: 100%; 96 } 97 98 button.vote-button { 99 flex-direction: row; 100 flex: 1; 101 margin: 20px; 102 height: 40px; 103 border-radius: 5%; 104 } 105``` 106 107## Creating the index page 108 109Any `.js` file created in the `pages` directory becomes a page that can be served by `Next.js`. We already have a `index.js` file in our page directory. Replace the content with the following below 110 111``` javascript 112 // pages/index.js 113 import React from 'react' 114 import axios from 'axios' 115 import Pusher from 'pusher-js' 116 import Chart from '../components/Chart' 117 import VoteButtons from '../components/Vote-buttons' 118 119 var pusher = new Pusher('app_key', { 120 cluster: 'cluster', 121 encrypted: true 122 }) 123 const channel = pusher.subscribe('pet-wars') 124 125 export default class Index extends React.Component { 126 constructor (props) { 127 super(props) 128 this.state = { 129 data: [0, 0, 0] 130 } 131 } 132 133 render () { 134 return ( 135 <div> 136 <Chart data={this.state.data} /> 137 <VoteButtons handleVote={this.handleVote.bind(this)} /> 138 </div> 139 ) 140 } 141 } 142``` 143 144We start by importing our dependencies which include the components we just created. We’ll also initialize Pusher ****with our credentials and subscribe to the channel `pet-wars`. Replace `app_key` with your app key gotten from your Pusher dashboard. At the bottom of the page, we’ll render our `Chart` component with the `VoteButtons` component right below it. 145 146Still, in our `pages/index.js` file, we want our application to receive changes update when voting happen elsewhere. So we subscribe our app to listen for updates once the component has mounted. The `handleVote` method simply submits votes made for any pet to the server. 147 148Copy the code block below and paste on line 21. 149 150``` javascript 151 componentDidMount () { 152 this.receiveUpdateFromPusher() 153 } 154 155 receiveUpdateFromPusher () { 156 channel.bind('new-votes', data => { 157 this.setState({ 158 data 159 }) 160 }) 161 console.log('app subscription to event successful') 162 } 163 164 handleVote (data) { 165 axios.post('http://localhost:8080/vote', data) 166 .then(res => { 167 console.log('received by server') 168 }) 169 .catch(error => { 170 throw error 171 }) 172 } 173``` 174 175## Create our simple server 176 177Votes made are sent to the server and dispersed to all users using Pusher. First, we need to build the route where votes will be sent to. Start by creating the file `server.js` in your root directory. 178 179Here, Express is initialized with some middleware and our application started on port `8080`. Pusher is also initialized with its credentials which can be gotten from the dashboard. The function `getPercentage` turns the cast votes to a percentage. 180 181``` javascript 182 // server.js 183 const express = require('express') 184 const app = express() 185 const bodyParser = require('body-parser') 186 const cors = require('cors') 187 const Pusher = require('pusher') 188 189 app.use(cors()) 190 app.use(bodyParser.urlencoded({ extended: true })) 191 app.use(bodyParser.json()) 192 193 const port = process.env.PORT || 8080 194 195 const pusher = new Pusher({ 196 appId: 'app_id', 197 key: 'key', 198 secret: 'secret', 199 cluster: 'cluster', 200 encrypted: true 201 }) 202 203 let dogs = 0 204 let cats = 0 205 let hamsters = 0 206 207 const getPercentage = value => (value * 100) / (dogs + cats + hamsters) 208 209 app.listen(port, function () { 210 console.log('Node app is running at localhost:' + port) 211 }) 212``` 213 214Next, we create the endpoint where votes will be sent to. If the vote is for a dog, the count is increased and we update the channel `pet-wars` with the event `new-votes`. Before the values are published, the method `getPercentage` is called to transform the vote counts to a percentage. 215 216Copy the code block below and paste on line 25. 217 218``` javascript 219 app.post('/vote', function (req, res) { 220 const {vote} = req.body 221 if (vote === 'dogs') { 222 dogs++ 223 } 224 if (vote === 'cats') { 225 cats++ 226 } 227 if (vote === 'hamsters') { 228 hamsters++ 229 } 230 pusher.trigger('pet-wars', 'new-votes', [getPercentage(dogs), getPercentage(cats), getPercentage(hamsters)]) 231 res.sendStatus(200) 232 }) 233``` 234 235## Test our application 236 237For convenience, update the `script` field of our `package.json` file with the snippet below. Also update the `name` field, changing it's value from `nextjs-javascript-starter` to `pet-wars`. 238 239``` javascript 240 "scripts": { 241 "client": "next", 242 "server": "node server.js" 243 } 244``` 245This would allow us to start both our Next.js app and our api server by running the following. 246 247``` 248 # start next.js app 249 yarn run client 250 251 # start api server 252 yarn run server 253``` 254Your app will be running on http://localhost:3000. Open it in as many browser tabs as possible and cast your votes. Watch it update in one tab as votes are cast in another tab. 255 256## Conclusion 257 258We've been able to build a realtime polling app for finding out the favourite household pets between dogs, cats and hamsters. We learnt how to use Pusher to publish and subscribe to an event in a Next.js application. 259The complete source code can be found [here](https://github.com/Robophil/pet-wars).


© 2025 Pusher Ltd. All rights reserved.
Pusher Limited is a company registered in England and Wales (No. 07489873) whose registered office is at MessageBird UK Limited, 3 More London Riverside, 4th Floor, London, United Kingdom, SE1 2AQ.