- Products

- Developers
- User stories
- Blog
- Pricing

Understanding Node.js by building command line apps
Introduction
In this tutorial, I’ll be showing how to build command line applications using Node.js.
JavaScript is very popular for building all kinds of applications, from frontend applications to backend and mobile applications. The language keeps evolving and now you can build command line applications or control hardware devices like drones with JavaScript.
Prerequisites
This tutorial assumes the following:
- Node.js and NPM installed on your computer
- Basic knowledge of JavaScript and Node.js
What we’ll be building
In this tutorial, we’ll be learning how to build simple command line application. We’ll be building a command line weather application using Node.js. With our command line weather application, we’ll be able to get the current weather in any city in the world. We’ll also be able to get a forecast for any specified city using a different command line parameters.
Getting started
Let’s start by setting up our project and installing dependencies:
1$ mkdir weatherCLI 2 $ cd weatherCLI 3 $ npm init -y
This will create an empty directory called weatherCLI that will hold all our project files.
After our project directory has been created, we change the directory to the project directory and initialize our project. A package.json file will be created and now we can proceed to install our project dependencies:
$ npm install commander node-fetch --save
Commander is a Node.js library that makes writing command line applications easy. We’ll be leveraging the library to build our command line application. node-fetch is also a light-weight module that allows us make requests to external services to fetch data. We’ll use it to fetch weather data from APIXU.
Obtaining API keys
To obtain our API keys, we need an account on APIXU. Once you’ve created an account, login to the dashboard to find your API key that looks like 4a8****3e``*e248ac1*****``04.
Building the command line app
First, let’s create our project files. Create a src directory, and within it, create two files:
$ touch src/index.js src/commands.js
Once the files are created, we’ll go ahead to create our commands for the app by adding the code below inside src/commands.js:
1// src/commands.js 2 3 const fetch = require("node-fetch"); 4 const APIXU_KEY = "<YOUR APIXU KEY>";
We import the node-fetch library, then we create an APIXU_KEY variable, which holds our API key.
Next, we’ll go ahead to create two functions: fetchNow() to fetch the current weather for any specified city and weatherForecast() to fetch the forecast of any specified city likewise:
1// src/commands.js 2 3 const fetchNow = async (city) => { 4 const response = await fetch(`https://api.apixu.com/v1/current.json?key=${APIXU_KEY}&q=${city}`); 5 const data = await response.json(); 6 7 const now = { 8 location: data.location.name, 9 country: data.location.country, 10 longitude: data.location.lon, 11 latitude: data.location.lat, 12 temparature: data.current.temp_c, 13 condition: data.current.condition.text 14 } 15 16 console.log(now) 17 };
The fetchNow function is an asynchronous function that will return a Promise. It takes the passed city as a parameter in order to make the complete API request. The await operator can only be used inside an asynchronous function and it returns the fulfilled value of the Promise, or the value itself if it's not a Promise.
The now object holds just the necessary information we need from the data returned from the API request. The same thing applies to the weatherForecast function:
1// src/commands.js 2 3 const weatherForecast = async (city) => { 4 const response = await fetch(`https://api.apixu.com/v1/forecast.json?key=${APIXU_KEY}&q=${city}`); 5 6 const data = await response.json(); 7 8 console.log(data.forecast) 9 };
After defining all functions, we need to export them so they can be used in our command line program:
1// src/commands.js 2 3 module.exports = { 4 fetchNow, 5 weatherForecast 6 };
Our main application file src/index.js will hold the main application logic. Add the code below inside src/index.js:
1// src/index.js 2 3 const program = require('commander'); 4 const { fetchNow, weatherForecast } = require('./commands');
We import the commander library and also the defined functions from src/commands.js. After the dependencies have been imported, we’ll define our program parameters:
1// src/index.js 2 3 program 4 .version('0.0.1') 5 .description('Command line Weather Application') 6 7 program 8 .command("now <city>") 9 .alias('n') 10 .description('see the current weather in the specified city') 11 .action(city => fetchNow(city)); 12 13 program 14 .command("forecast <city>") 15 .alias('f') 16 .description('see the weather forcast of a specified city') 17 .action(city => weatherForecast(city));
Let’s go over what each piece of the code above does:
.versionallows us define the current version of our command line application.commanddefines how the parameter should be passed to the program with any extra arguments.aliasdefines an alternative short form parameter that can be passed to the program instead of typing a longer one..descriptionis the description of the alias.actionwill call whatever function is passed to it. The action runs the functions and displays whatever is returned from the function. The action is also responsible for handling interactions with the user if the command line application is an interactive application.
In order to read all parameters and arguments passed to our program, we have to parse the inputs after the program command. Add the snippet below as the last line inside weatherCLI.js:
1// src/index.js 2 3 program.parse(process.argv)
Running and testing the CLI application
To run and test our application, run the command below:
$ node src/index.js now lagos
It will return the current weather in Lagos as in the image below:

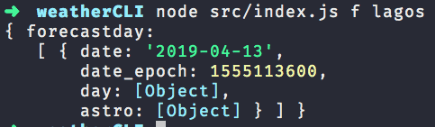
To fetch the weather forecast for Lagos, run:
$ node src/index.js f lagos
Also, we can run additional commands as below:
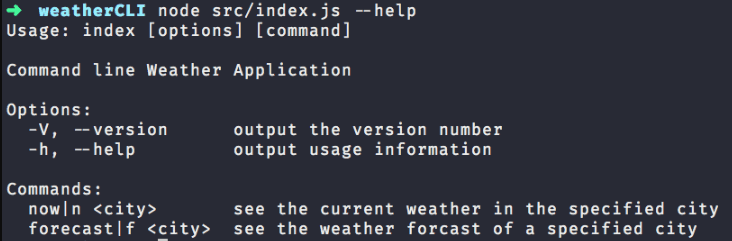
$ node src/index.js --help
This will return the application usage menu.
$ node src/index.js --version
This will return the application version as specified earlier in src/index.js.

Conclusion
From the tutorial, we can see how easy it is to create command line applications using the Node.js Commander library. We’ve been able to create a command line application that can display the current weather of any city in the world using the APIXU. You can work more on the display formats so the displayed data looks interesting to users and also add a network loader while the application is fetching the weather reports.
The complete code for this tutorial is available on GitHub.


© 2026 Pusher Ltd. All rights reserved.
Pusher Limited is a company registered in England and Wales (No. 07489873) whose registered office is at MessageBird UK Limited, 3 More London Riverside, 4th Floor, London, United Kingdom, SE1 2AQ.