- Products

- Developers
- User stories
- Blog
- Pricing

Solving microservice problems using Channels
Introduction
Microservices are awesome, I love microservices, so much so I’ve written a book about them, they’re great at providing flexibility to an otherwise stiff architecture (one that would have a big part in “2001: A Space Odyssey” if you know what I mean).
That being said, microservices are also challenging, they’re challenging at not being magical implementations that simply work out of the box for all situations. They’re challenging at making you think when implementing your own microservices-based architecture to make sure, you have the required support structure for them to do their job as expected. In this article I’m going to share some tips and tricks to help you get there and make the most out of your architecture.
Common problems with microservices
Like with any other architectural pattern, Microservices aren’t the silver bullet to solve all problems. In fact, there are two particular challenges that they can’t solve by themselves (at least not without a massive amount of extra work done by the development team) and they are:
- Handling a variable increase in traffic
- Being able to communicate downtime to other services (especially relevant when other services depend on them).
Let’s analyze the classical example of a microservices-based architecture:
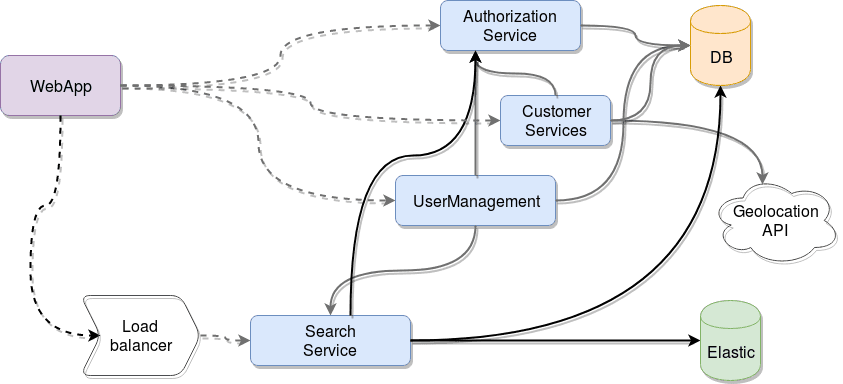
Nothing really strange there, just a group of microservices working together to serve the needs of the web-app client application. And at first glance, there is nothing wrong with that design, everything seems to be correctly planned until, of course, your traffic increases, and now suddenly your search service starts receiving 300% more requests than before. You have a couple of options:
- You can vertically scale your search service server, increasing its processing power, or its memory, to name a few examples. That’ll probably get you out of the woods for the time being.
- You can horizontally scale your service. You already have your load balancer in place, so it should be relatively effortless. As long as your API is stateless, you can simply duplicate and evenly distribute the load between all servers. There, problem solved!
You can like one solution more than the other, but the reality in both cases is that you solved an immediate problem, but potentially caused a bunch of others you didn’t even consider. Look at the following image, which represents the aforementioned horizontal scaling solution:
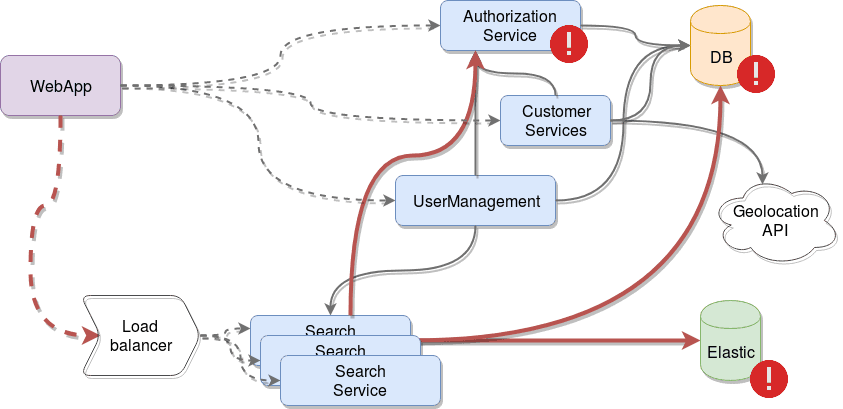
Here is the real problem and the reason for this article: you removed your bottleneck but without noticing you overloaded the next stage in the data flow, the authorization service, your database and your Elastic instance are now getting 300% more requests as well, are they ready for that kind of load?
Maybe you even killed the authorization service, due to the increase in traffic, so now everything that depends on it, will also fail, because there is no way to notify them that something is wrong.
And for both cases, a possible solution would be to add a buffer-like structure between services, something like that should allow you to:
- Hold messages between services for a time, for the cases when services go down and there is no one to consume them.
- Allow the receiving end of messages to consume them as fast as they can, without being overwhelmed.
- Use this channel as a heart beat channel as well, allowing services to send notifications of activity to other, interested, services.
So, with that being said, let’s look at how Pusher Channels can help us solve these problems.
Channels to the rescue
Pusher Channels is an amazing infrastructure as a service product, which will provide the required pub/sub mechanics we’ll need for our buffer-like structure. The best part of this, is that since it’s a managed service, you don’t need to worry about the intricacies of scaling it when needed, making sure it’s always up and not losing messages, and so on.
For this particular use case, we will use some of the features of Channels, but just to get an idea of everything you can do with it, here are some of its most impressive capabilities:
- Pub/sub messaging. It provides a very easy-to-use and flexible event based API to subscribe, send and react to messages received.
- Access control / authentication. You also have access to private channels, which require authentication and authorization to access them.
- Live users lists. Building on top of private channels, you can get the list of subscribed users, simplifying your job when it comes to creating features such as “Who’s online” lists.
- Integration. You can integrate your data flow with external tools such as Slack and Datadog in order to provide metrics or notifications to your developers.
Another very positive aspect about Pusher’s Channels, is that they provide libraries for several languages such as PHP, Node, Ruby, Java and even Android and iOS (with Swift and Objective-C)! For our particular examples, as you might've guessed from the title of this article, I’m going to be using Node, but you can extrapolate to whatever language you feel like using from their documentation. We’re going to look at both problems and see a little bit of code showing a possible implementation of the solutions. Feel free to use the code on your own projects if you think it’ll help!
Increased traffic
Let’s first take a look at this scenario in order to avoid overloading your own services by simply removing a bottleneck. To simplify the case and make sure it’s clear enough, let’s lower the number of microservices involved to just three, you can see below how the architecture would change from one scenario to the other.
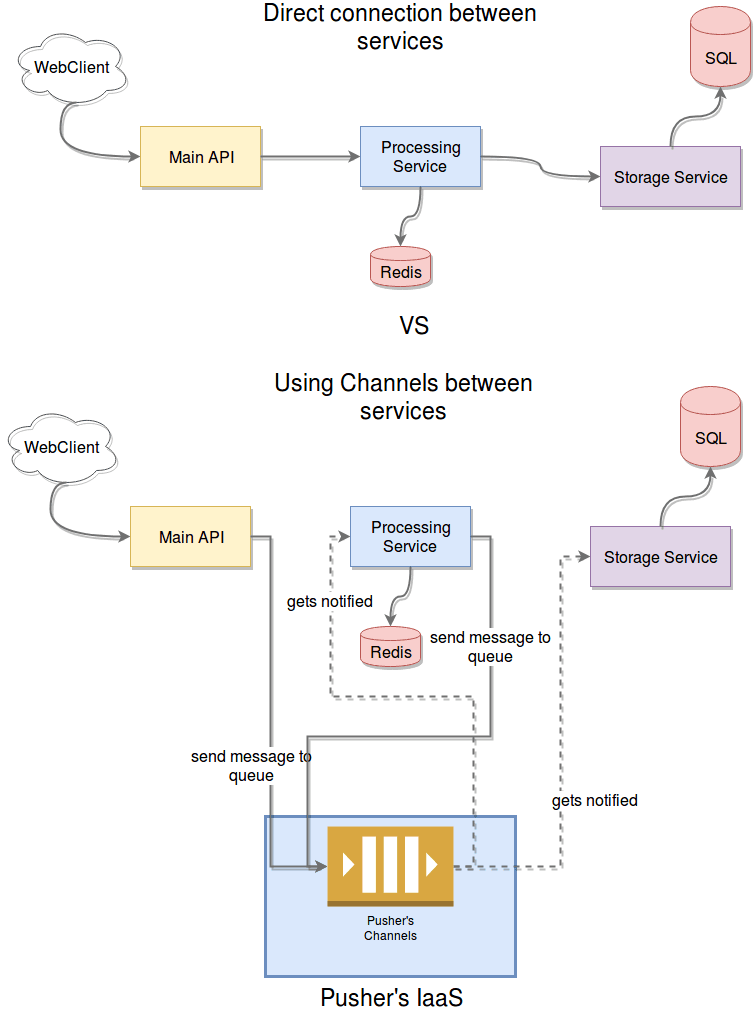
The change is quite straightforward, but the benefits are substantial as already mentioned. The best part? All you need to add to your existing code is the lines required to publish and subscribe to channels, that’s it. Let’s take a look at that now:
1const PusherServer = require('pusher'); 2 const PusherClient = require('pusher-js'); 3 const express = require('express'); 4 const router = express.Router(); 5 const config = require("config"); 6 7 const pusherServer = new PusherServer(config.get('pusher.config')); 8 const pusherClient = new PusherClient(config.get('pusher.config.key'), { 9 cluster: config.get('pusher.config.cluster') 10 }) 11 12 /* POST main api for a processing job. */ 13 router.post('/', function(req, res, next) { 14 15 //code require to receive the message, parse it 16 //and maybe validate the data? 17 //then communicate with the processing service through Channels 18 pusherServer.trigger('main-channel', 'message', { 19 "message": //... information for other services 20 }); 21 22 res.send(/* the response */); 23 }); 24 25 function messageHandler(data) { 26 ///your logic to handle new messsages 27 } 28 29 module.exports = function () { 30 const channel = pusherClient.subscribe('main-channel') 31 channel.bind('message', messageHandler) 32 return router; 33 }
The above code is not functional, basically because you need to fill in the part for your own microservice, but thinking about the example we’re trying to provide, here is the gist of it:
- As you’ve probably figured out by reading it, it’s an example of an endpoint in an Express-based application.
- Endpoints in this example add a few extra lines to post messages into the “main-channel”. This is meant to communicate whatever information is required to other services. Keeping up with the diagram from above, it would be a message to the processing service. This is done using the server library (installed with
npm install pusher) - Any received message will be handled by the
messageHandlerfunction, which should have some sort of logic to make sure only the relevant messages are processed and the rest are ignored. In order to listen for new messages, you’ll need Pusher’s client library, which you can install withnpm install pusher-js.
This code sets up a very simple, yet powerful, message-based communication between services, essentially overwriting whatever REST interface you could’ve configure with Express. In essence, your service would end up having two interfaces, REST for client applications and Channels-based for other, internal microservices.
As an added note, the config object passed to the Pusher constructor can contain the following items (among others, check Pusher docs for more details):
- App ID: the ID of the application you’ve created in Pusher’s website. In order to use their API, you’ll have to create a new app. This will grant you access to stats for your application, amongst other great things.
- Key: key provided to you once you’ve signed up on Pusher’s site.
- Secret: just like with the key, this secret code is provided to you once you’ve signed up.
- Cluster: the identifier of the cluster your application was create on, by default it’ll be “mt1”.
As you can see, the API is very straightforward and easy to use. There is more to it, of course, and you can read all about it on the official documentation, but the above example should be more than enough to get you started in the right direction.
Uptime notifications
The logic for solving this problem with Channels would be something similar to the previous one in the sense that we’ll make use of the pub/sub mechanics to broadcast specific messages. These messages, known as heart beats will be published periodically into a specific channel.
We’ll have one “heart beats” channel for each service. This should provide a clean way of linking services with each other. Basically if you subscribe a service to a heart beats channel, you’re linking that service to the one publishing into that channel.
We will, however, have to handle the reaction to the lack of heart beats locally though, since that behavior will depend on each service’s internal logic.
1const PusherServer = require('pusher') 2 const PusherClient = require("pusher-js") 3 const config = require("config") 4 5 6 const pusherServer = new PusherServer(config.get('pusher.config')); 7 const pusherClient = new PusherClient(config.get('pusher.config.key'), { 8 cluster: config.get('pusher.config.cluster') 9 }) 10 11 const HB_TIMEOUT = 10100; 12 let TIMEOUTS = {} 13 14 // your routes definition goes here... 15 16 function sendHeartBeat(modId) { 17 console.log("Sending hearbeat: ", Date.now()) 18 pusherServer.trigger(modId + '-hb', 'heartbeat', { 19 "message": { 20 "timestamp": Date.now(), 21 "payload": ""///other data goes here 22 } 23 }, null, (err, req, resp) => { 24 if(err) console.log("Error:: ", err) 25 }) 26 } 27 28 function handleHearbeat(serviceName) { 29 30 return function () { 31 ///your logic to handle hearbeats 32 33 clearTimeout(TIMEOUTS[serviceName]) //reset the timeout in case we actually get a hearbeat before it's up 34 console.log("Hearbeat received from Module '" + serviceName + "' at: ", Date.now()) 35 TIMEOUTS[serviceName] = setTimeout(heartBeatNotReceived, HB_TIMEOUT, serviceName) 36 } 37 38 } 39 40 function heartBeatNotReceived(serviceName) { 41 console.log("WARNING: Module ='" + serviceName + "'= has not sent a heartbeat recently...") 42 } 43 44 45 module.exports = function(modId, linkedServices) { 46 47 48 linkedServices.forEach((serviceName) => { 49 let channel = pusherClient.subscribe(serviceName + '-hb') 50 channel.bind('heartbeat', handleHearbeat(serviceName)) 51 }) 52 53 setInterval(sendHeartBeat, 10000, modId); //send one every 10 seconds 54 55 }
This is a very simple example of how you can leverage Pusher’s Channels to extend your own modules or microservices and have them talk to each other. You can simply require this file (provided you have the required modules listed at the beginning) and do something like:
1const serviceLinker = require("/path/to/file.js") 2 3 serviceLinker('myServiceName', [/* list of services this one depends on...*/])
And that’s it, now your service will start sending heartbeats automatically and will also be able to react to heartbeats sent by others (and the lack of them as well).
If you’re feeling a little crazy, you could even extend this concept, and use the same channel but different event types to distribute other type of application-relevant information amongst services, such as metrics, like number of requests per second, or free memory and disk space.
Conclusion
Hopefully by this point, I’ve been able to convince you that having a buffer-like structure as part of your microservices-based architecture can be beneficial in several ways. And the best part, is that adding it into an existing setup is not that complicated!
That’s it! Thanks for reading. You can find the code in the GitHub repo here. See you on the next one!


© 2026 Pusher Ltd. All rights reserved.
Pusher Limited is a company registered in England and Wales (No. 07489873) whose registered office is at MessageBird UK Limited, 3 More London Riverside, 4th Floor, London, United Kingdom, SE1 2AQ.