- Products

- Developers
- User stories
- Blog
- Pricing

Create a two-player memory game with React Native
Introduction
In this tutorial, we’ll build a realtime memory game app with React Native and Pusher Channels.
Prerequisites
Basic knowledge of React Native is required.
To easily test the app on multiple devices, we’ll be using Expo to create it. Be sure to install their Android or iOS client apps. Log in to your Expo account on both the CLI and client apps. Create one if you don’t have it already.
These are the package versions used in creating the app:
- Node 8.3.0
- Yarn 1.7.0
- Expo CLI 2.1.2
- Expo SDK 30.0.0
- Pusher account and Pusher Channels app. Create a free sandbox Pusher account or sign in. Then go to the dashboard and create a Channels app.
Lastly, you also need a ngrok account. We’ll use it to create a Pusher Chanels app instance and expose the local Pusher server to the internet.
App overview
We’re going to build a two-player memory game app.
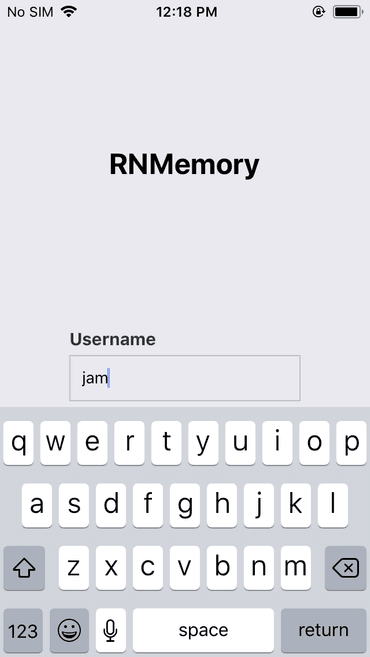
When they open the app, users will be greeted by a login screen where they have to enter their username:
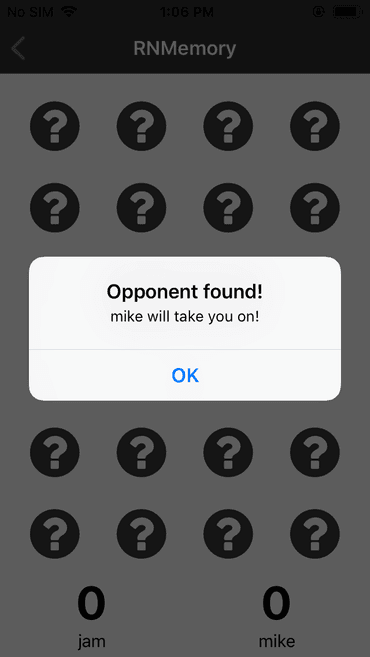
When a user logs in, the app’s server component will pick two random users and they’re the ones who will play.
Once an opponent is found, both users are automatically navigated to the Game screen. By default, there will be a lot of question mark icons, these represent the cards that haven’t been opened yet:
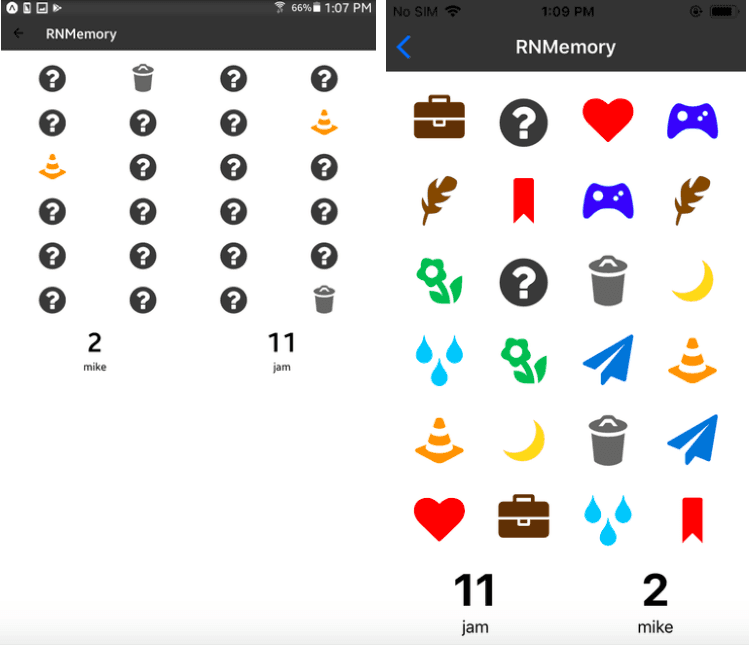
To play the game, users have to click on each one to reveal its content. Users can reveal the content of up to two cards before both of them closes. Once a user has selected a pair, they will stay open for the rest of the game.
Here’s what the screen looks like while the two players are playing the game:
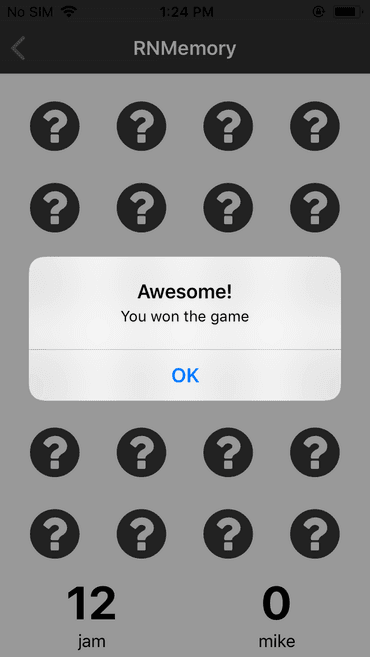
When one of the players accumulates the maximum score (in this case it’s 12), both players are notified that one of them already won and the UI is reset:
You can view the app’s source code in this GitHub repo.
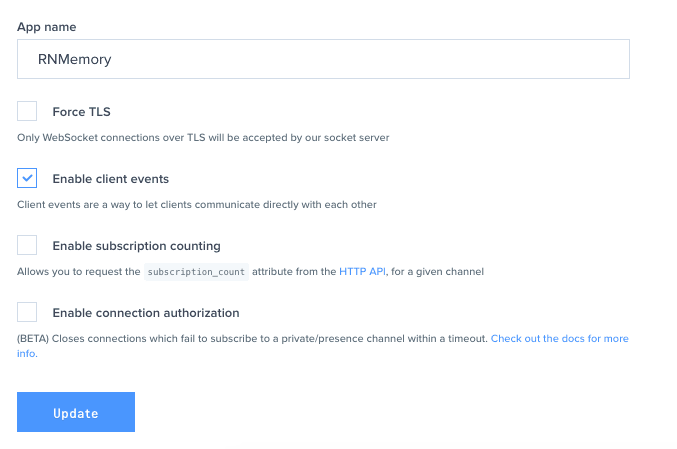
Create a Pusher app
You need to create a Pusher app instance so you can use Pusher’s services.
On your Pusher account dashboard, create a new Pusher app and check the Enable client events in the app settings. This allows us to emit events directly from the app:
Clone the starter project
So that we can focus on the main parts of the app, clone the app’s GitHub repo and switch to the starter branch:
1git clone https://github.com/anchetaWern/RNMemory 2 cd RNMemory 3 git checkout starter
The starter branch contains all the screens of the app (Login and Game screen), helper functions, and the UI components that we will be using. The app screens and the server component are where we will do most of the work.
Next, install all the packages the app and the server depend on:
1yarn install 2 cd server 3 npm install
Starter project tour
Before we proceed to actually code the app, let’s first take a quick look at the files and folders that are already available in the starter project:
app/screens- this is where the app’s screens are stored. We only have two screens: Login and Game. Only a starter template with minimum output is available in the starter branch.app/helpers- this is where the app’s helper functions are stored. In this case, we only have theshuffleArray.jsfile. It’s used to arrange the items in the array in random order. This is very useful for changing the location of the cards that need to be guessed in the screen.app/data- this is where hard-coded data is stored. In this case, we only have thecards.jsfile which contains the definition for the unique cards that the app uses. We’re using Expo’s vector icons so the file contains thenameof the icon, thesrc(for example, FontAwesome), and thecolorwe want to apply to it.app/components- this is where the UI components of the app are stored. In this case, we only have theCard.jswhich renders the individual cards, andScore.jswhich renders the score and name of the user.server- this is where we will add the code for the server component of the app. Currently, it only has the.envfile which contains the placeholder for Pusher app credentials.
Build the app
We’re now ready to start building the app. I encourage you to start running the app even if the code is still not complete. This allows you to visualize what the code does as we’re adding it:
expo start
Login screen
In the Login screen, start by importing all the packages we need:
1// app/screens/Login.js 2 import React, { Component } from "react"; 3 import { 4 View, 5 Text, 6 TextInput, 7 Button, 8 Alert, 9 ActivityIndicator 10 } from "react-native"; 11 12 import Pusher from "pusher-js/react-native"; 13 14 // next: initialize state
Next, initialize the state and the user’s channel:
1state = { 2 username: "", 3 is_loading: false 4 }; 5 6 constructor(props) { 7 super(props); 8 this.pusher = null; // variable for storing the Pusher reference 9 this.my_channel = null; // variable for storing the channel assigned to this user 10 } 11 12 // next: add render function
Inside the render function, return the UI for the Login screen. In this case, we’re only asking the user’s username. The login button is visible by default, but it gets hidden in place of the activity indicator when the user clicks on it. It stays that way until such time that an opponent is found:
1render() { 2 return ( 3 <View style={styles.container}> 4 <View style={styles.topContent}> 5 <Text style={styles.bigText}>RNMemory</Text> 6 </View> 7 8 <View style={styles.mainContent}> 9 <Text style={styles.label}>Username</Text> 10 <TextInput 11 style={styles.text_field} 12 onChangeText={username => { 13 this.setState({ username }); 14 }} 15 value={this.state.username} 16 placeholder="Enter your username" 17 /> 18 19 {!this.state.is_loading && ( 20 <Button onPress={this.login} title="Enter" color="#0064e1" /> 21 )} 22 23 {this.state.is_loading && ( 24 <ActivityIndicator size="large" color="#0000ff" /> 25 )} 26 </View> 27 </View> 28 ); 29 }
When the login button is clicked, the login function gets executed. This will connect the user to Pusher and subscribe them in their own unique channel. Subscribing the user to their own channel allows us to:
- Send data to them once an opponent is found.
- While the game is ongoing, we use it to receive updates of the opponent’s score.
- When the current user wins, we use it to send an update to the opponent that they lose.
Here’s the code:
1login = () => { 2 let username = this.state.username; 3 4 if (username) { 5 this.setState({ 6 is_loading: true // hide's login button and shows activity indicator 7 }); 8 9 // connect to Pusher: 10 this.pusher = new Pusher("YOUR_PUSHER_API_KEY", { 11 authEndpoint: "YOUR_NGROK_URL/pusher/auth", 12 cluster: "YOUR_PUSHER_APP_CLUSTER", 13 encrypted: true, 14 auth: { 15 params: { username: username } 16 } 17 }); 18 19 this.my_channel = this.pusher.subscribe(`private-user-${username}`); // subscribe to user's unique channel 20 21 // subscription error occurred 22 this.my_channel.bind("pusher:subscription_error", status => { 23 Alert.alert('Error', 'Subscription error occurred. Please restart the app'); 24 }); 25 26 // subscription to their own channel succeeded 27 this.my_channel.bind("pusher:subscription_succeeded", data => { 28 console.log("subscription ok: ", data); 29 30 // next: add code for listening when opponent is found 31 }); 32 } 33 };
Don’t forget to add your Pusher App ID when connecting to Pusher. As for the authEndpoint, we’ll add it later once we run ngrok.
Next, add the code for listening for the opponent-found event. This event is emitted from the server once two random users are matched. Both players are notified when that happens, and it will automatically navigate the user to Game screen:
1this.my_channel.bind("opponent-found", data => { 2 console.log("opponent found: ", data); 3 4 // determine who the opponent is, player one or player two? 5 let opponent = 6 username == data.player_one ? data.player_two : data.player_one; 7 8 Alert.alert("Opponent found!", `${opponent} will take you on!`); 9 10 this.setState({ 11 is_loading: false, 12 username: "" 13 }); 14 15 // navigate to the game screen 16 this.props.navigation.navigate("Game", { 17 pusher: this.pusher, // Pusher connection 18 username: username, // current user's username 19 opponent: opponent, // opponent's username 20 my_channel: this.my_channel // current user's channel 21 }); 22 });
Game screen
We now move on to the Game screen. Start by importing the packages, helpers, data, and components we need:
1// app/screens/Game.js 2 import React, { Component } from "react"; 3 import { View, Text, Button, FlatList, Alert } from "react-native"; 4 import { FontAwesome, Entypo } from "@expo/vector-icons"; // the icon sources that the cards will use 5 6 import Score from "../components/Score"; 7 import Card from "../components/Card"; 8 9 import shuffleArray from "../helpers/shuffleArray"; // function for re-ordering the cards to be guessed 10 11 import cards_data from "../data/cards"; // the unique card config 12 13 // next: initialize state
Next, initialize the state:
1state = { 2 current_selection: [], // for storing the currently selected pairs. This always resets back to zero once two are selected 3 selected_pairs: [], // the pairs that had already been opened 4 score: 0, // current user's score 5 opponent_score: 0 // opponent's score 6 }; 7 8 // next: add the constructor
Next, add the constructor. This is where we add initial values for the Pusher channels and generate the cards, which will be rendered on the screen:
1constructor(props) { 2 super(props); 3 4 this.pusher = null; // Pusher connection 5 this.my_channel = null; // current user's Pusher channel 6 this.opponent_channel = null; // opponent's Pusher channel 7 this.username = null; // current user's username 8 this.opponent = null; // opponent's username 9 10 let sources = { 11 fontawesome: FontAwesome, 12 entypo: Entypo 13 }; 14 15 let clone = JSON.parse(JSON.stringify(cards_data)); // create a copy of the cards data 16 17 this.cards = cards_data.concat(clone); // append the copy to its original 18 19 // add a unique ID to each of the card 20 this.cards.map(obj => { 21 let id = Math.random() 22 .toString(36) 23 .substring(7); 24 obj.id = id; 25 obj.src = sources[obj.src]; 26 obj.is_open = false; 27 }); 28 29 this.cards = shuffleArray(this.cards); // arrange the cards in random order 30 } 31 32 // next: add componentDidMount
Once the component is mounted, we pick up the navigation params that were passed from the Login screen earlier. This allows us to listen for events emitted by the opponent, and emit events from our own channel:
1componentDidMount() { 2 const { navigation } = this.props; 3 4 // get Pusher connection and user's channel from the navigation param 5 this.pusher = navigation.getParam("pusher"); 6 this.my_channel = navigation.getParam("my_channel"); 7 8 this.username = navigation.getParam("username"); 9 this.opponent = navigation.getParam("opponent"); 10 11 // update the state with the cards generated inside the constructor earlier 12 this.setState({ 13 cards: this.cards 14 }); 15 16 if (this.opponent) { 17 // subscribe to the opponent's channel 18 this.opponent_channel = this.pusher.subscribe( 19 `private-user-${this.opponent}` 20 ); 21 this.opponent_channel.bind("pusher:subscription_error", status => { 22 Alert.alert('Subscription error', 'Please restart the app'); 23 }); 24 25 this.opponent_channel.bind("pusher:subscription_succeeded", data => { 26 console.log("opponent subscription ok: ", data); 27 28 // opponent's score is incremented 29 this.opponent_channel.bind("client-opponent-scored", data => { 30 this.setState({ 31 opponent_score: data.score 32 }); 33 }); 34 35 // opponent won the game 36 this.opponent_channel.bind("client-opponent-won", data => { 37 Alert.alert("You lose", `${data.username} won the game`); 38 this.resetCards(); // close all the cards and reset the score 39 }); 40 }); 41 } 42 }
In the code above, we’re listening for the client-opponent-scored event and the client-opponent-won event. The former allows the user to get updated of their opponent’s score. This is emitted by their opponent every time they open a matching pair. The latter allows the user to get updated when their opponent wins the game. When this happens, we call the resetCards method to reset the UI. This allows both users to restart the game if they want.
Next, we render the Game screen. Here, we use a FlatList to render all the cards. Below it, we use the Score component to render the username and score for both users:
1render() { 2 let contents = this.state.cards; 3 4 return ( 5 <View style={styles.container}> 6 <View style={styles.body}> 7 <FlatList 8 data={contents} 9 renderItem={this.renderCard} 10 numColumns={4} 11 keyExtractor={item => item.id} 12 columnWrapperStyle={styles.flatlistRow} 13 /> 14 </View> 15 <View style={styles.bottomContent}> 16 <Score score={this.state.score} username={this.username} /> 17 <Score score={this.state.opponent_score} username={this.opponent} /> 18 </View> 19 </View> 20 ); 21 }
The renderCard function renders each individual card. This is where we use the Card component to render each card. We pass in the data which determines how the card will look like as props. The clickCard prop is where we pass the function to be executed when the card is clicked:
1renderCard = ({ item }) => { 2 return ( 3 <Card 4 key={item.id} 5 src={item.src} 6 name={item.name} 7 color={item.color} 8 is_open={item.is_open} 9 clickCard={this.clickCard.bind(this, item.id)} 10 /> 11 ); 12 };
Here’s the clickCard function. This is where we process the card opened by the user. We only process cards that aren’t already guessed by the user and is not already opened. If both conditions are true, we add the card to the array of currently selected cards (selected_pairs):
1clickCard = id => { 2 let selected_pairs = [...this.state.selected_pairs]; // array containing the card pairs that had already been guessed by the user 3 let current_selection = this.state.current_selection; // array containing the currently selected cards 4 let score = this.state.score; // the user's current score 5 6 // get the index of the card clicked by the user 7 let index = this.state.cards.findIndex(card => { 8 return card.id == id; 9 }); 10 11 let cards = [...this.state.cards]; // an array containing the cards rendered on the screen 12 13 if ( 14 cards[index].is_open == false && 15 selected_pairs.indexOf(cards[index].name) === -1 16 ) { // only process the cards that isn't currently open and is not a part of the one's that have already been guessed by the user 17 cards[index].is_open = true; // open the card 18 19 // add the card in the current selection 20 current_selection.push({ 21 index: index, 22 name: cards[index].name 23 }); 24 25 // next: add code for checking if there are already two cards opened 26 } 27 }; 28 29 // next: add code for resetting cards
Once the user has already picked a pair of cards, we check whether their names are the same. If it does, we increment the user’s score by one and notify the opponent by emitting an event in the current user’s channel. This works because we’ve set up the current user to listen for events emitted from their opponent’s channel. So anytime we trigger an event on our own channel, the opponent gets notified. Once the current user accumulates the maximum score, we reset the UI and notify the opponent. On the other hand, if the pair selected by the user isn’t the same, we update the state to close the cards:
1if (current_selection.length == 2) { 2 if (current_selection[0].name == current_selection[1].name) { 3 score += 1; 4 selected_pairs.push(cards[index].name); 5 6 // notify the opponent that their opponent have scored 7 this.my_channel.trigger("client-opponent-scored", { 8 username: this.username, 9 score: score 10 }); 11 12 // all pairs have been opened 13 if (score == 12) { 14 // notify the user that they won 15 score = 0; 16 Alert.alert("Awesome!", "You won the game"); 17 // notify the opponent that they lose 18 this.my_channel.trigger("client-opponent-won", { 19 username: this.username 20 }); 21 22 this.resetCards(); // reset the UI 23 } 24 } else { 25 cards[current_selection[0].index].is_open = false; // close the first card from the selected pair 26 27 // close the second card from the selected pair after half a second 28 setTimeout(() => { 29 cards[index].is_open = false; 30 this.setState({ 31 cards: cards 32 }); 33 }, 500); 34 } 35 36 current_selection = []; // reset the current selection 37 } 38 39 // update the state 40 this.setState({ 41 score: score, 42 cards: cards, 43 current_selection: current_selection 44 });
Lastly, the resetCards function is where we reset the UI so the users can resume the game if they want to:
1resetCards = () => { 2 // close all cards 3 let cards = this.cards.map(obj => { 4 obj.is_open = false; 5 return obj; 6 }); 7 8 // re-shuffle the cards 9 cards = shuffleArray(cards); 10 11 // update the state to reset the UI 12 this.setState({ 13 current_selection: [], 14 selected_pairs: [], 15 cards: cards, 16 score: 0, 17 opponent_score: 0 18 }); 19 };
Server component
Now we’re ready to add the server component. This is where we add the code for authenticating users as well as matching them so they can start playing the game.
Create a server.js file inside the server folder and start importing the packages we need and initialize them:
1var express = require("express"); 2 var bodyParser = require("body-parser"); 3 var Pusher = require("pusher"); // for authenticating users and emitting events from this server 4 5 var app = express(); // for setting up the server 6 app.use(bodyParser.json()); // for parsing request body into JSON 7 app.use(bodyParser.urlencoded({ extended: false })); // for parsing URL encoded data in the request body 8 9 require("dotenv").config(); // for getting the environment variables
Next, initialize the array of users. This is where we will store the usernames of the users who log in to the app:
var users = [];
Next, initialize the Pusher connection using the credentials from the .env file:
1var pusher = new Pusher({ 2 appId: process.env.APP_ID, 3 key: process.env.APP_KEY, 4 secret: process.env.APP_SECRET, 5 cluster: process.env.APP_CLUSTER 6 });
If you haven’t done so already, this is a good chance to update the server/.env file with your Pusher app instance credentials:
1APP_ID=YOUR_PUSHER_APP_ID 2 APP_KEY=YOUR_PUSHER_APP_KEY 3 APP_SECRET=YOUR_PUSHER_APP_SECRET 4 APP_CLUSTER=YOUR_PUSHER_APP_CLUSTER 5 PORT=3000
Next, add a route for checking if the server is running. Try to access this later at http://localhost:3000 on your browser once the server is running:
1app.get("/", function(req, res) { 2 res.send("all green..."); 3 });
Next, add the function for returning a random integer (from zero) that’s not greater than the max passed as an argument:
1function randomArrayIndex(max) { 2 return Math.floor(Math.random() * max); 3 }
Next, add the route which receives the Pusher authentication request. From the login code of the app/screens/Login.js file earlier, we added the username in auth.params. This is what we’re accessing in the request body. A username should be unique so we first check if it already exists before processing the request further. If it doesn’t yet exist, we push it to the users array. Once there are at least two users, we pick two random users from there. Those two users will be the ones who will partake in the game. We trigger the opponent-found event on each of the user’s channel. The event contains the username of the two users. This allowed us to determine which of the users is the opponent and which is the current user from the app/screens/Game.js file earlier. Once that’s done, we authenticate the two users and return the authentication token as the response:
1app.post("/pusher/auth", function(req, res) { 2 var username = req.body.username; // get the username passed as an additional param 3 4 if (users.indexOf(username) === -1) { 5 users.push(username); 6 7 if (users.length >= 2) { 8 var player_one_index = randomArrayIndex(users.length); 9 var player_one = users.splice(player_one_index, 1)[0]; // pick a random user and remove them from the array 10 11 var player_two_index = randomArrayIndex(users.length); 12 var player_two = users.splice(player_two_index, 1)[0]; // pick a random user and remove them from the array 13 14 // trigger a message to player one and player two on their own channels 15 pusher.trigger( 16 ["private-user-" + player_one, "private-user-" + player_two], 17 "opponent-found", 18 { 19 player_one: player_one, 20 player_two: player_two 21 } 22 ); 23 } 24 25 // authenticate the user 26 var socketId = req.body.socket_id; 27 var channel = req.body.channel_name; 28 var auth = pusher.authenticate(socketId, channel); 29 30 res.send(auth); // return the auth token 31 } else { 32 res.status(400); 33 } 34 });
Lastly, serve it on the port you’ve specified in your server/.env file:
1var port = process.env.PORT || 5000; 2 app.listen(port);
Run the app
At this point, we should be ready to run the server and expose it to the internet.
Execute the following inside the server directory to run the server:
node server.js
Next, navigate to where you downloaded the ngrok executable file and execute the following:
./ngrok http 3000
Try if the server is running correctly by accessing the https URL returned by ngrok on your browser. If it says “all green…”, the next step is to add the ngrok URL to your app/screens/Login.js file:
1this.pusher = new Pusher("YOUR PUSHER APP ID", { 2 authEndpoint: "YOUR_NGROK_URL/pusher/auth", 3 cluster: "YOUR PUSHER APP CLUSTER", 4 encrypted: true, 5 auth: { 6 params: { username: username } 7 } 8 });
Once that’s done, the app should work fully:
expo start
Conclusion
That’s it! In this tutorial, we created a two-player memory game with React Native and Pusher. Along the way, you learned how to use Pusher in React Native. Specifically, you learned how to emit events from both the server and the client side.
You can view the app’s source code in this GitHub repo.


© 2025 Pusher Ltd. All rights reserved.
Pusher Limited is a company registered in England and Wales (No. 07489873) whose registered office is at MessageBird UK Limited, 3 More London Riverside, 4th Floor, London, United Kingdom, SE1 2AQ.