- Products

- Developers
- User stories
- Blog
- Pricing

Create a two-player maze game with React Native
Introduction
In this tutorial, we will create a two-player maze game with React Native and Pusher.
Prerequisites
Basic knowledge of React Native is required.
We’ll be using the following package versions. If you encounter any issues getting the app to work, try using the following:
- Yarn 1.13.0
- React Native 0.58.4
- Pusher account and Channels apps. Create a free sandbox Pusher account or sign in. Then go to the dashboard and create a Channels instance.
We’ll also be using ngrok to expose the Pusher auth server to the internet.
App overview
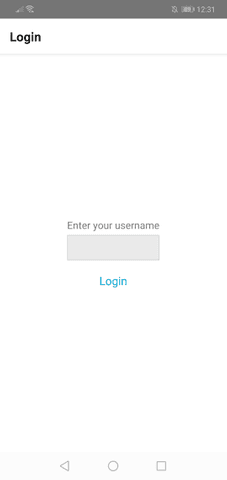
As mentioned earlier, we will create a maze game in which two players have to navigate. When the app starts, they will be greeted with a login screen. This is where they enter a unique username and wait for an opponent:
Once there are two players, a Pusher event is manually triggered by accessing a specific route of the app’s server component. This event informs both users that an opponent is found. This serves as the cue for the app to automatically navigate to the game screen where the maze will be generated.
After that, the event for starting the game is also manually triggered. Once the app receives that, it will inform the players that they can start navigating the maze. The first player to reach the goal wins the game.
Here’s what the app looks like. The black square is the goal, the pink circle is the current player, and the blue circle is their opponent:

You can view the code on this GitHub repo.
Building the app
Start by cloning the repo:
1git clone https://github.com/anchetaWern/RNMaze.git 2 cd RNMaze
Next, switch to the starter branch and install the dependencies:
1git checkout starter 2 yarn
This branch has the styling and navigation already set up so we don’t have to go through them in this tutorial.
Next, update the .env file with your Pusher app credentials:
1PUSHER_APP_KEY="YOUR PUSHER APP KEY" 2 PUSHER_APP_CLUSTER="YOUR PUSHER APP CLUSTER"
Login screen
Let’s start by adding the code for the login screen:
1// src/screens/Login.js 2 import React, { Component } from "react"; 3 import { View, Text, TextInput, TouchableOpacity, Alert } from "react-native"; 4 5 import Pusher from "pusher-js/react-native"; 6 import Config from "react-native-config"; // for reading the .env file 7 8 const pusher_app_key = Config.PUSHER_APP_KEY; 9 const pusher_app_cluster = Config.PUSHER_APP_CLUSTER; 10 const base_url = "YOUR HTTPS NGROK URL"; 11 12 class LoginScreen extends Component { 13 static navigationOptions = { 14 title: "Login" 15 }; 16 17 state = { 18 username: "", 19 enteredGame: false 20 }; 21 22 constructor(props) { 23 super(props); 24 this.pusher = null; 25 this.myChannel = null; // the current user's Pusher channel 26 this.opponentChannel = null; // the opponent's Pusher channel 27 } 28 29 // next: add render() 30 }
Next, render the UI for the login screen. This asks for the user’s username so they can log in:
1render() { 2 return ( 3 <View style={styles.wrapper}> 4 <View style={styles.container}> 5 <View style={styles.main}> 6 <View> 7 <Text style={styles.label}>Enter your username</Text> 8 <TextInput 9 style={styles.textInput} 10 onChangeText={username => this.setState({ username })} 11 value={this.state.username} 12 /> 13 </View> 14 15 {!this.state.enteredGame && ( 16 <TouchableOpacity onPress={this.enterGame}> 17 <View style={styles.button}> 18 <Text style={styles.buttonText}>Login</Text> 19 </View> 20 </TouchableOpacity> 21 )} 22 23 {this.state.enteredGame && ( 24 <Text style={styles.loadingText}>Loading...</Text> 25 )} 26 </View> 27 </View> 28 </View> 29 ); 30 }
Once the Login button is clicked, the enterGame function is executed. This authenticates the user with Pusher via an auth endpoint in the app’s server component (we’ll create this later). From the prerequisites section, one of the requirements is that your Pusher app instance needs to have client events enabled. This authentication step is a required step for using the client events feature. This allows us to trigger events directly from the app itself:
1enterGame = async () => { 2 const myUsername = this.state.username; 3 4 if (myUsername) { 5 this.setState({ 6 enteredGame: true // show login activity indicator 7 }); 8 9 this.pusher = new Pusher(pusher_app_key, { 10 authEndpoint: `${base_url}/pusher/auth`, 11 cluster: pusher_app_cluster, 12 auth: { 13 params: { username: myUsername } 14 }, 15 encrypted: true 16 }); 17 18 // next: add code for subscribing the user to their own channel 19 20 } 21 };
Next, subscribe the user to their own channel. The username they entered is used for this. This channel is what’s used by their opponent to pass messages to them in realtime:
1this.myChannel = this.pusher.subscribe(`private-user-${myUsername}`); 2 this.myChannel.bind("pusher:subscription_error", status => { 3 Alert.alert( 4 "Error", 5 "Subscription error occurred. Please restart the app" 6 ); 7 }); 8 9 // next: add code for when subscription succeeds
When the subscription succeeds, we wait for the opponent-found event to get triggered by the server. When this happens, we determine who among the players is the first player (Player One) and assign the ball color based on that. From here, we also subscribe to the opponent’s channel. Once it succeeds, we navigate to the game screen with a few data we’re going to need:
1this.myChannel.bind("pusher:subscription_succeeded", () => { 2 3 this.myChannel.bind("opponent-found", data => { 4 const opponentUsername = 5 myUsername == data.player_one ? data.player_two : data.player_one; 6 7 const isPlayerOne = myUsername == data.player_one ? true : false; 8 9 const ballColor = (isPlayerOne) ? 'pink' : 'blue'; // pink ball always goes to the first player 10 11 Alert.alert("Opponent found!", `Use the ${ballColor} ball`); 12 13 this.opponentChannel = this.pusher.subscribe( 14 `private-user-${opponentUsername}` 15 ); 16 this.opponentChannel.bind("pusher:subscription_error", data => { 17 console.log("Error subscribing to opponent's channel: ", data); 18 }); 19 20 this.opponentChannel.bind("pusher:subscription_succeeded", () => { 21 this.props.navigation.navigate("Game", { 22 pusher: this.pusher, 23 isPlayerOne: isPlayerOne, 24 myUsername: myUsername, 25 myChannel: this.myChannel, 26 opponentUsername: opponentUsername, 27 opponentChannel: this.opponentChannel 28 }); 29 }); 30 31 this.setState({ 32 username: "", 33 enteredGame: false // hides the login activity indicator 34 }); 35 }); 36 });
Game screen
Now we’re ready to add the code for the Game screen. Start by importing the packages, components, and helpers we need:
1// src/screens/Game.js 2 import React, { PureComponent } from "react"; 3 import { View, Text, Alert, ActivityIndicator } from "react-native"; 4 5 import Matter from "matter-js"; // physics engine, collision detection 6 import { GameEngine } from "react-native-game-engine"; // rendering game objects 7 8 import Circle from '../components/Circle'; // renderer for the balls 9 import Rectangle from '../components/Rectangle'; // renderer for the maze walls 10 11 import CreateMaze from '../helpers/CreateMaze'; // for generating the maze 12 import GetRandomPoint from '../helpers/GetRandomPoint'; // for getting a random point in the grid 13 14 // the hardcoded width and height contraints of the app 15 import dimensions from '../data/constants'; 16 const { width, height } = dimensions;
Next, create the constants file (src/data/constants.js) we used above:
1const constants = { 2 width: 360, 3 height: 686.67 4 } 5 6 export default constants;
Next, go back to the game screen (src/screens/Game.js) and initialize the physics settings for the ball as well as the goal size:
1const BALL_SIZE = Math.floor(width * .02); 2 const ballSettings = { 3 inertia: 0, 4 friction: 0, 5 frictionStatic: 0, 6 frictionAir: 0, 7 restitution: 0, 8 density: 1 9 }; 10 11 const GOAL_SIZE = Math.floor(width * .04);
You can find what each of the ball settings does here.
Next, create the maze. As you’ll see later, this generates a composite body which makes up the walls of the maze:
1const GRID_X = 15; // the number of cells in the X axis 2 const GRID_Y = 18; // the number of cells in the Y axis 3 4 const maze = CreateMaze(GRID_X, GRID_Y);
Next, create the Game component. Inside the constructor, get the navigation params that were passed earlier from the Login screen:
1export default class Game extends PureComponent { 2 3 static navigationOptions = { 4 header: null 5 }; 6 7 state = { 8 isMazeReady: false, // whether to show the maze or not 9 isGameFinished: false // whether someone has already reached the goal or not 10 } 11 12 constructor(props) { 13 super(props); 14 15 const { navigation } = this.props; 16 17 this.pusher = navigation.getParam('pusher'); 18 this.myUsername = navigation.getParam('myUsername'); 19 this.opponentUsername = navigation.getParam('opponentUsername'); 20 21 this.myChannel = navigation.getParam('myChannel'); 22 this.opponentChannel = navigation.getParam('opponentChannel'); 23 this.isPlayerOne = navigation.getParam('isPlayerOne'); 24 25 // next: add code for adding the entities 26 } 27 }
Next, we need to construct the object containing the entities to be rendered by the React Native Game Engine. In this game, there are four entities we need to render, three of them are physical (two balls, one goal), while the other is logical (physics). Since there is a need to mirror the objects (and their positions) in both player instances, we first generate the objects in player one’s instance. Once the objects are generated, we send the object’s position to player two via Pusher:
1this.entities = {}; 2 3 if (this.isPlayerOne) { 4 const ballOneStartPoint = GetRandomPoint(GRID_X, GRID_Y); // generate a random point to put the pink ball 5 const ballTwoStartPoint = GetRandomPoint(GRID_X, GRID_Y); // generate a random point to put the blue ball 6 7 const ballOne = this._createBall(ballOneStartPoint, 'ballOne'); // create the pink ball (for player one) 8 const ballTwo = this._createBall(ballTwoStartPoint, 'ballTwo'); // create the blue ball (for player two) 9 10 this.myBall = ballOne; 11 this.myBallName = 'ballOne'; 12 this.opponentBall = ballTwo; 13 this.opponentBallName = 'ballTwo'; 14 15 const goalPoint = GetRandomPoint(GRID_X, GRID_Y); // generate a random goal point 16 const goal = this._createGoal(goalPoint); // create the goal box 17 18 const { engine, world } = this._addObjectsToWorld(maze, ballOne, ballTwo, goal); // add all the objects to the world 19 20 this.entities = this._getEntities(engine, world, maze, ballOne, ballTwo, goal); // get the entities of the game 21 22 this._setupPositionUpdater(); // call the interval timer for updating the opponent of the current user's ball position 23 this._setupGoalListener(engine); // setup the sensor for listening if a ball has touched the goal 24 25 // send the position of the generated objects to player two 26 this.opponentChannel.trigger('client-generated-objects', { 27 ballOneStartPoint, 28 ballTwoStartPoint, 29 goalPoint 30 }); 31 }
If the second player is the one who’s logged in, the following event is triggered. This contains the positions for the two balls and the goal. Using this data, we construct player two’s world:
1this.myChannel.bind('client-generated-objects', ({ ballOneStartPoint, ballTwoStartPoint, goalPoint }) => { 2 3 const ballOne = this._createBall(ballOneStartPoint, 'ballOne'); 4 const ballTwo = this._createBall(ballTwoStartPoint, 'ballTwo'); 5 const goal = this._createGoal(goalPoint); 6 7 this.myBall = ballTwo; 8 this.myBallName = 'ballTwo'; 9 this.opponentBall = ballOne; 10 this.opponentBallName = 'ballOne'; 11 12 const { engine, world } = this._addObjectsToWorld(maze, ballOne, ballTwo, goal); 13 14 this.entities = this._getEntities(engine, world, maze, ballOne, ballTwo, goal); 15 16 this._setupPositionUpdater(); 17 this._setupGoalListener(engine); 18 });
Next, we add physics to the world. By default, MatterJS applies gravity to the world. We don’t really want that so we set the gravity to zero for both X and Y axis:
1this.physics = (entities, { time }) => { 2 let engine = entities["physics"].engine; 3 engine.world.gravity = { 4 x: 0, 5 y: 0 6 }; 7 Matter.Engine.update(engine, time.delta); 8 return entities; 9 }; 10 11 // next: add this.moveBall
Next, we add the system for moving the ball. This filters move events. This event is triggered when the user moves their finger across the screen. Note that this listens for that event on the entire screen so the user doesn’t actually need to place their finger directly on top of the ball in order to move it. As you can see, this function specifically targets this.myBall. this.myBall.position contains the current position of the ball, while move.delta contains the data on how much the finger was moved across the screen. We add that up to the ball’s current position in order to move it to that direction:
1this.moveBall = (entities, { touches }) => { 2 let move = touches.find(x => x.type === "move"); 3 if (move) { 4 // move.delta.pageX is negative if moving fingers to the left 5 // move.delta.pageX is negative if moving fingers to the top 6 const newPosition = { 7 x: this.myBall.position.x + move.delta.pageX, 8 y: this.myBall.position.y + move.delta.pageY 9 }; 10 Matter.Body.setPosition(this.myBall, newPosition); 11 } 12 13 return entities; 14 }; 15 16 // next: listen for the start-game event
Next, listen for the event for starting the game. All we do here is show an alert and update the state so it shows the generated maze instead of the activity indicator:
1this.myChannel.bind('start-game', () => { 2 Alert.alert('Game Start!', 'You may now navigate towards the black square.'); 3 this.setState({ 4 isMazeReady: true 5 }); 6 }); 7 // next: listen for client-moved-ball
Next, listen for the event for moving the opponent’s ball:
1this.myChannel.bind('client-moved-ball', ({ positionX, positionY }) => { 2 Matter.Body.setPosition(this.opponentBall, { 3 x: positionX, 4 y: positionY 5 }); 6 });
That’s pretty much all there is to it for the Game screen. Let’s now go over the functions we used for constructing the world.
First is the function for creating a ball. This accepts the ball’s start point and the name you want to assign to it. The name is very important here because it’s what we use to determine which ball touched the goal:
1constructor(props) { 2 // ... 3 } 4 5 _createBall = (startPoint, name) => { 6 const ball = Matter.Bodies.circle( 7 startPoint.x, 8 startPoint.y, 9 BALL_SIZE, 10 { 11 ...ballSettings, 12 label: name 13 } 14 ); 15 return ball; 16 }
Next is the function for creating the goal box. Not unlike the ball, we don’t need to add a whole lot of physics settings to the goal. That’s because it only acts as a sensor. It gets rendered to the world, but it doesn’t actually interact or affect the rest of it (For example, the ball shouldn’t bounce if it touches it, nor does it move because of the force applied by the ball). The key setting here is isSensor: true:
1_createGoal = (goalPoint) => { 2 const goal = Matter.Bodies.rectangle(goalPoint.x, goalPoint.y, GOAL_SIZE, GOAL_SIZE, { 3 isStatic: true, 4 isSensor: true, 5 label: 'goal' 6 }); 7 return goal; 8 }
Next is the function for adding the objects to the world. Aside from the two balls and the goal, we also need to add the maze that we generated earlier:
1_addObjectsToWorld = (maze, ballOne, ballTwo, goal) => { 2 const engine = Matter.Engine.create({ enableSleeping: false }); // enableSleeping tells the engine to stop updating and collision checking bodies that have come to rest 3 const world = engine.world; 4 5 Matter.World.add(world, [ 6 maze, ballOne, ballTwo, goal 7 ]); 8 9 return { 10 engine, 11 world 12 } 13 }
Next is the _getEntities function. This is responsible for constructing the entities object that we need to pass to the React Native Game Engine. This includes the physics, the two balls, the goal, and the maze walls. All of these objects (except for the physics), requires the body and renderer. All the other options are simply passed as a prop to the renderer to customize its style (bgColor, size, borderColor):
1_getEntities = (engine, world, maze, ballOne, ballTwo, goal) => { 2 const entities = { 3 physics: { 4 engine, 5 world 6 }, 7 playerOneBall: { 8 body: ballOne, 9 bgColor: '#FF5877', 10 borderColor: '#FFC1C1', 11 renderer: Circle 12 }, 13 playerTwoBall: { 14 body: ballTwo, 15 bgColor: '#458ad0', 16 borderColor: '#56a4f3', 17 renderer: Circle 18 }, 19 goalBox: { 20 body: goal, 21 size: [GOAL_SIZE, GOAL_SIZE], 22 color: '#414448', 23 renderer: Rectangle 24 } 25 }; 26 27 const walls = Matter.Composite.allBodies(maze); // get the children of the composite body 28 walls.forEach((body, index) => { 29 30 const { min, max } = body.bounds; 31 const width = max.x - min.x; 32 const height = max.y - min.y; 33 34 Object.assign(entities, { 35 ['wall_' + index]: { 36 body: body, 37 size: [width, height], 38 color: '#fbb050', 39 renderer: Rectangle 40 } 41 }); 42 }); 43 44 return entities; 45 }
The _setupPositionUpdater function triggers the event for updating the current user’s ball position on their opponent’s side. We can actually do this inside the system for moving the ball (this.moveBall) but that gets called multiple times over a span of a few milliseconds so it’s not really recommended. Also, make sure to only execute it if no one has reached the goal yet:
1_setupPositionUpdater = () => { 2 setInterval(() => { 3 if (!this.state.isGameFinished) { // nobody has reached the goal yet 4 this.opponentChannel.trigger('client-moved-ball', { 5 positionX: this.myBall.position.x, 6 positionY: this.myBall.position.y 7 }); 8 } 9 }, 1000); 10 }
The _setupGoalListener is responsible for listening for collision events. These collision events are triggered from the engine so we’re attaching the listener to the engine itself. collisionStart gets fired at the very beginning of a collision. This provides data on the bodies which collided. The first body (bodyA) always contain the body which initiated the collision. In this case, it’s always one of the two balls. bodyB, on the other hand, contains the body which receives the collision. In this case, it’s the goal box. But since the goal box is set as a sensor (isSensor: true), it won’t actually affect the ball in any way. It will only register that it collided with the ball:
1_setupGoalListener = (engine) => { 2 3 Matter.Events.on(engine, "collisionStart", event => { 4 var pairs = event.pairs; 5 6 var objA = pairs[0].bodyA.label; 7 var objB = pairs[0].bodyB.label; 8 9 if (objA == this.myBallName && objB == 'goal') { 10 Alert.alert("You won", "And that's awesome!"); 11 this.setState({ 12 isGameFinished: true 13 }); 14 } else if (objA == this.opponentBallName && objB == 'goal') { 15 Alert.alert("You lose", "And that sucks!"); 16 this.setState({ 17 isGameFinished: true 18 }); 19 } 20 }); 21 }
Lastly, render the UI:
1render() { 2 if (this.state.isMazeReady) { 3 return ( 4 <GameEngine 5 systems={[this.physics, this.moveBall]} 6 entities={this.entities} 7 > 8 </GameEngine> 9 ); 10 } 11 12 return <ActivityIndicator size="large" color="#0064e1" />; 13 }
Circle component
Here’s the code for the Circle component:
1// src/components/Circle.js 2 import React from "react"; 3 import { View, Dimensions } from "react-native"; 4 import dimensions from '../data/constants'; 5 const { width, height } = dimensions; 6 7 const BODY_DIAMETER = Math.floor(width * .02); 8 const BORDER_WIDTH = 2; 9 10 const Circle = ({ body, bgColor, borderColor }) => { 11 const { position } = body; 12 13 const x = position.x; 14 const y = position.y; 15 return <View style={[styles.head, { 16 left: x, 17 top: y, 18 backgroundColor: bgColor, 19 borderColor: borderColor 20 }]} />; 21 22 }; 23 24 export default Circle; 25 26 const styles = { 27 head: { 28 borderWidth: BORDER_WIDTH, 29 width: BODY_DIAMETER, 30 height: BODY_DIAMETER, 31 position: "absolute", 32 borderRadius: BODY_DIAMETER * 2 33 } 34 };
Rectangle component
Here’s the code for the Rectangle component:
1// src/components/Rectangle.js 2 import React from "react"; 3 import { View } from "react-native"; 4 5 const Rectangle = ({ body, size, color }) => { 6 const width = size[0]; 7 const height = size[1]; 8 9 const x = body.position.x - width / 2; 10 const y = body.position.y - height / 2; 11 12 return ( 13 <View 14 style={{ 15 position: "absolute", 16 left: x, 17 top: y, 18 width: width, 19 height: height, 20 backgroundColor: color 21 }} 22 /> 23 ); 24 }; 25 26 export default Rectangle;
CreateMaze helper
The CreateMaze helper is really the main meat of this app because it’s the one which generates the maze that the players have to navigate. There are lots of maze generation algorithms out there. This helper uses the recursive backtracking algorithm. Here’s the way it works:
- Create a grid.
- Choose a random cell within the grid. In this case, we’re selecting the very first cell in the grid to start with.
- Check if there are any cells you can visit from the current cell.
- If there is, then:
- Pick a random neighbor.
- Put the neighbor on the stack.
- Mark the path from the current cell to the neighbor.
- If there are no more cells you can go to, mark the cell as “visited” and pop it out of the stack. The cell you’ve gone to prior to the cell that was popped out is now the current cell.
- Repeat steps 3 to 5 until all the cells in the grid have been visited or popped out of the stack.
Now that you have a general idea of how we’re going to implement this, it’s time to proceed with the code. Start by importing the things we need:
1// src/helpers/CreateMaze.js 2 import Matter from 'matter-js'; 3 4 import GetRandomNumber from './GetRandomNumber'; 5 6 import dimensions from '../data/constants'; 7 const { width, height } = dimensions; 8 9 // convenience variables: 10 const TOP = 'T'; 11 const BOTTOM = 'B'; 12 const RIGHT = 'R'; 13 const LEFT = 'L';
Next, we represent the grid using an array. The CreateMaze class accepts the number of cells in the X and Y axis for its constructor. By default, it’s going to generate a 15x18 grid. this.grid contains a two-dimensional array of null values. This will be filled later with the directions in which a path is carved on each row in the grid:
1const CreateMaze = (gridX = 15, gridY = 18) => { 2 3 this.width = gridX; 4 this.height = gridY; 5 6 this.blockWidth = Math.floor(width / this.width); // 24 7 this.blockHeight = Math.floor(height / this.height); // 38 8 9 this.grid = new Array(this.height) 10 for (var i = 0; i < this.grid.length; i++) { 11 this.grid[i] = new Array(this.width); 12 } 13 14 // next: initialize the composite body 15 16 }
Next, initialize the composite body for containing the maze:
1const wallOpts = { 2 isStatic: true, 3 }; 4 5 this.matter = Matter.Composite.create(wallOpts);
Next, start carving the path. We’re going to start at the very first cell for this one, but you can pretty much start anywhere. Just remember that the grid is only 15x18 so you can only pick numbers between 0 to 14 for the X axis, and numbers between 0 to 17 for the Y axis:
this.carvePathFrom(0, 0, this.grid);
carvePathFrom is a recursive function. It will call itself recursively until it has visited all the cells in the grid. It works by randomly picking which direction to go to first from the current cell. It then loops through those directions to determine if they can be visited or not. As you learned earlier, a cell can be visited if it can be accessed from the current cell and that it hasn’t already been visited. The getDirectionX and getDirectionY function checks if the next cell in the X or Y axis can be visited:
1carvePathFrom = (x, y, grid) => { 2 3 const directions = [TOP, BOTTOM, RIGHT, LEFT] 4 .sort(f => 0.5 - GetRandomNumber()); // whichever direction is closest to the random number is first in the list. 5 6 directions.forEach(dir => { 7 const nX = x + this.getDirectionX(dir); 8 const nY = y + this.getDirectionY(dir); 9 const xNeighborOK = nX >= 0 && nX < this.width; 10 const yNeighborOK = nY >= 0 && nY < this.height; 11 12 // next: check if cell can be visited 13 }); 14 }
Only when both these functions return either 0 or 1, and that the next cell hasn’t already been visited will it proceed to call itself again. Don’t forget to put the visited direction into the grid. This will tell the function that the specific cell has already been visited. We also need to add the direction opposite to the current direction as the next path:
1if (xNeighborOK && yNeighborOK && grid\[nY\][nX] == undefined) { 2 grid\[y\][x] = grid\[y\][x] || dir; 3 grid\[nY\][nX] = grid\[nY\][nX] || this.getOpposite(dir); 4 this.carvePathFrom(nX, nY, grid); 5 }
Here are the variables we used in the above function:
1const LEFT = 'L'; 2 3 // add these: 4 const directionX = { 5 'T': 0, // neutral because were moving in the X axs 6 'B': 0, 7 'R': 1, // +1 because were moving forward (we started at 0,0 so we move from left to right) 8 'L': -1 // -1 because were moving backward 9 }; 10 11 const directionY = { 12 'T': -1, // -1 because were moving backward 13 'B': 1, // +1 because were moving forward (we started at 0,0 so we move from top to bottom) 14 'R': 0, // neutral because were moving in the Y axis 15 'L': 0 16 }; 17 18 // opposite directions 19 const op = { 20 'T': BOTTOM, // top's opposite is bottom 21 'B': TOP, 22 'R': LEFT, 23 'L': RIGHT 24 };
And here are the functions:
1this.matter = Matter.Composite.create(wallOpts); 2 3 // add these: 4 getDirectionX = (dir) => { 5 return directionX[dir]; 6 } 7 8 getDirectionY = (dir) => { 9 return directionY[dir]; 10 } 11 12 getOpposite = (dir) => { 13 return op[dir]; 14 }
Now that we have the grid and the path in place, the next step is to construct the walls:
1this.carvePathFrom(0, 0, this.grid); 2 3 // add these: 4 for (var i = 0; i < this.grid.length; i++) { // rows 5 for (var j = 0; j < this.grid[i].length; j++) { // columns 6 Matter.Composite.add(this.matter, this.generateWall(j, i)); 7 } 8 }
The generateWall function accepts the cell’s address in the X and Y axis. The first one is always going to be 0,0 since that’s the very first cell we visited. From there, we figure out which part of the cell do we draw the walls. We do that by checking if the current cell we are in isn’t part of the path. gridPoint is the cell we’re currently iterating over and it contains the direction of the path to be visited from there (either T, L, B or R). For example, if we’re visiting 0,0 and it contains B as part of the path then only the top, right, and left walls will be generated. Aside from that, we also need to consider the opposite. The getPointInDirection is key for that. This function is responsible for returning the direction (either T, L, B or R) of the next cell to visit, but it only does so if the address to the next cell in the given direction is greater than 0. So it’s just checking if we’ve actually moved forward in that specific direction:
1generateWall = (x, y) => { 2 const walls = Matter.Composite.create({ isStatic: true }); 3 const gridPoint = this.grid\[y\][x]; 4 const opts = { 5 isStatic: true 6 }; 7 8 const wallThickness = 5; // how thick the wall is in pixels 9 10 const topPoint = this.getPointInDirection(x, y, TOP); 11 if (gridPoint !== TOP && topPoint !== this.getOpposite(TOP)) { 12 Matter.Composite.add(walls, Matter.Bodies.rectangle(this.blockWidth / 2, 0, this.blockWidth, wallThickness, opts)); 13 } 14 const bottomPoint = this.getPointInDirection(x, y, BOTTOM); 15 if (gridPoint !== BOTTOM && bottomPoint !== this.getOpposite(BOTTOM)) { 16 Matter.Composite.add(walls, Matter.Bodies.rectangle(this.blockWidth / 2, this.blockHeight, this.blockWidth, wallThickness, opts)); 17 } 18 const leftPoint = this.getPointInDirection(x, y, LEFT); 19 if (gridPoint !== LEFT && leftPoint !== this.getOpposite(LEFT)) { 20 Matter.Composite.add(walls, Matter.Bodies.rectangle(0, this.blockHeight / 2, wallThickness, this.blockHeight + wallThickness, opts)); 21 } 22 const rightPoint = this.getPointInDirection(x, y, RIGHT); 23 if (gridPoint !== RIGHT && rightPoint !== this.getOpposite(RIGHT)) { 24 Matter.Composite.add(walls, Matter.Bodies.rectangle(this.blockWidth, this.blockHeight / 2, wallThickness, this.blockHeight + wallThickness, opts)); 25 } 26 27 // next: create vector 28 }
The final step before we return the walls is to actually put the walls in their proper position. In the code above, all we did was create Rectangle bodies and add it to the composite body. We haven’t actually specified the correct position for them (which cells they need to be added to). That’s where the Vector class comes in. We use it to change the position of the walls so that they’re on the cells where they need to be. For this, we simply multiply the cell address with the width or height of each cell in order to get their proper position. Then we use the translate method to actually move the walls to that position:
1const translate = Matter.Vector.create(x * this.blockWidth, y * this.blockHeight); 2 Matter.Composite.translate(walls, translate); 3 4 return walls;
Here’s the getPointInDirection function:
1getOpposite = (dir) => { 2 // ... 3 } 4 5 getPointInDirection = (x, y, dir) => { 6 const newXPoint = x + this.getDirectionX(dir); 7 const newYPoint = y + this.getDirectionY(dir); 8 9 if (newXPoint < 0 || newXPoint >= this.width) { 10 return; 11 } 12 13 if (newYPoint < 0 || newYPoint >= this.height) { 14 return; 15 } 16 17 return this.grid\[newYPoint\][newXPoint]; 18 }
GetRandomPoint helper
Here’s the code for getting a random point within the grid:
1// src/helpers/GetRandomNumber.js 2 import dimensions from '../data/constants'; 3 const { width, height } = dimensions; 4 import GetRandomNumber from './GetRandomNumber'; 5 6 const GetRandomPoint = (gridX, gridY) => { 7 const gridXPart = (width / gridX); 8 const gridYPart = (height / gridY); 9 const x = Math.floor(GetRandomNumber() * gridX); 10 const y = Math.floor(GetRandomNumber() * gridY); 11 12 return { 13 x: x * gridXPart + gridXPart / 2, 14 y: y * gridYPart + gridYPart / 2 15 } 16 } 17 18 export default GetRandomPoint;
GetRandomNumber helper
Here’s the code for generating random numbers:
1// src/helpers/GetRandomNumber.js 2 var seed = 1; 3 const GetRandomNumber = () => { 4 var x = Math.sin(seed++) * 10000; 5 return x - Math.floor(x); 6 } 7 8 export default GetRandomNumber;
Server
Now we’re ready to work with the server. Start by navigating to the app’s server directory and install the dependencies:
1cd server 2 yarn
Next, update the .env file with your Pusher credentials:
1APP_ID="YOUR PUSHER APP ID" 2 APP_KEY="YOUR PUSHER APP KEY" 3 APP_SECRET="YOUR PUSHER APP SECRET" 4 APP_CLUSTER="YOUR PUSHER APP CLUSTER"
Next, create a server.js file and add the following. This sets up the server and Pusher:
1var express = require("express"); 2 var bodyParser = require("body-parser"); 3 var Pusher = require("pusher"); 4 5 require("dotenv").config(); 6 7 var app = express(); 8 app.use(bodyParser.json()); 9 app.use(bodyParser.urlencoded({ extended: false })); 10 11 // setup Pusher 12 var pusher = new Pusher({ 13 appId: process.env.APP_ID, 14 key: process.env.APP_KEY, 15 secret: process.env.APP_SECRET, 16 cluster: process.env.APP_CLUSTER 17 });
Next, add the route for authenticating users with Pusher:
1var users = []; // for storing the users who logs in 2 3 app.post("/pusher/auth", function(req, res) { 4 var socketId = req.body.socket_id; 5 var channel = req.body.channel_name; 6 var username = req.body.username; 7 8 users.push(username); 9 console.log(username + " logged in"); 10 11 var auth = pusher.authenticate(socketId, channel); 12 res.send(auth); 13 });
Next, add the route for triggering the event that an opponent was found:
1app.get("/opponent-found", function(req, res) { 2 var unique_users = users.filter((value, index, self) => { 3 return self.indexOf(value) === index; 4 }); 5 6 var player_one = unique_users[0]; 7 var player_two = unique_users[1]; 8 9 console.log("opponent found: " + player_one + " and " + player_two); 10 11 pusher.trigger( 12 ["private-user-" + player_one, "private-user-" + player_two], 13 "opponent-found", 14 { 15 player_one: player_one, 16 player_two: player_two 17 } 18 ); 19 20 res.send("opponent found!"); 21 });
Next, add the route for triggering the event for starting the game:
1app.get("/start-game", function(req, res) { 2 var unique_users = users.filter((value, index, self) => { 3 return self.indexOf(value) === index; 4 }); 5 6 var player_one = unique_users[0]; 7 var player_two = unique_users[1]; 8 9 console.log("start game: " + player_one + " and " + player_two); 10 11 pusher.trigger( 12 ["private-user-" + player_one, "private-user-" + player_two], 13 "start-game", 14 { 15 start: true 16 } 17 ); 18 19 users = []; 20 21 res.send("start game!"); 22 });
Lastly, run the server on port 5000:
1var port = process.env.PORT || 5000; 2 app.listen(port);
Running the app
Start by running the server:
1cd server 2 node server 3 ./ngrok http 5000
Next, update the the login screen with the ngrok URL:
1// src/screens/Login.js 2 const base_url = "YOUR NGROK HTTPS URL";
Finally, run the app:
react-native run-android
Since this app requires two players, I recommend that you set up the development server on one or two of the devices (or emulator). That way, you don’t need to physically connect the device to their computer (they only need to be connected to the same WI-FI network). This also helps avoid the confusion of where the React Native CLI will deploy the app if two devices are connected at the same time.
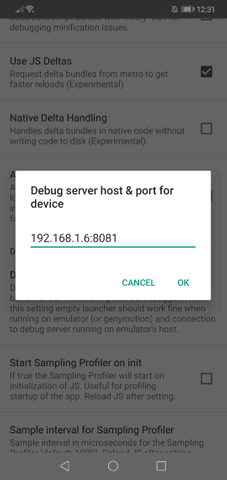
The screen above can be accessed by shaking the device (or executing adb shell input keyevent 82 in the terminal), select Dev Settings, and select Debug server host & port for device. Then enter your computer’s internal IP address in the box. The default port where the bundler runs is 8081.
Here’s the workflow I use for running the app:
- Connect device A and run the app.
- Set up development server on device A.
- Disconnect device A.
- Repeat the above steps for the next device.
- Log in user on device A.
- Log in user on device B.
- Access
http://localhost:5000/opponent-foundon your browser. - Dismiss the alerts that show up in the app.
- Access
http://localhost:5000/start-gameon your browser. - Dismiss the alert and start navigating the maze on both devices. The position of each ball should be updated every 500 milliseconds. Once a player finds their way to the goal, both players are notified.
Conclusion
In this tutorial, you learned how to construct a maze using MatterJS. By using Pusher, we were able to update the position of each player within the maze in realtime.
But as you’ve seen, the game we created isn’t really production-ready. If you’re looking for a challenge, here are a few things that need additional work:
- Automate Pusher events - automate the events for informing the players that an opponent was found, and the event for starting the game. As you’ve seen, we’re manually triggering these events by accessing a specific server route.
- Remove the dimension constraint - the game is limited to a certain dimension. This means that if the player is on a tablet or a phone with a larger screen or smaller screen than those dimensions, then it won’t really look good. For smaller screens, it will also end up hindering the functionality because the maze will be bigger than the screen.
- Generate random mazes - even though we have a random number generator, it doesn’t really generate a random maze. It’s set up that way because of the need to have the same maze generated for both players.
- Generate random points that make sense - the app generates random points within the grid for the starting point of each player as well as the goal. So it also becomes a game of luck because the goal might be nearer to another player.
- Prevent the players from cheating - there’s a long time MatterJS issue which allows objects to pass through walls if they have sufficient velocity. The app isn’t really an exception because if you swipe your finger fast enough, the ball can actually pass through the walls. One way to solve this is to change the game setup. The player will now have to change the device orientation in order to move the ball (using the device’s gyroscope). You can use the React Native Sensors package to implement this. This should prevent the ball from gaining too much velocity because the walls are usually tightly packed. Another solution would be to detect collisions between the ball and the walls, such that it immediately set the ball’s velocity to a safe one.
- Add a basic game loop - once a player wins, the game ends there. It would be good to have a basic game loop. Such that the app will ask the players if they want to continue playing the game after it finishes. If they answer “yes”, then a new maze will be generated and the game will start all over again.
Once you’ve implemented the above improvements, the game is basically ready for the app store.
You can find the code for this app on its GitHub repo.


© 2026 Pusher Ltd. All rights reserved.
Pusher Limited is a company registered in England and Wales (No. 07489873) whose registered office is at MessageBird UK Limited, 3 More London Riverside, 4th Floor, London, United Kingdom, SE1 2AQ.