- Products

- Developers
- User stories
- Blog
- Pricing

Build a live poll app with Ionic
Introduction
Introduction
An electronic polling system allows users cast their votes with ease without the hassle and stress of visiting a polling booth. This makes it easily accessible as it can be used by users anywhere in the world. Adding realtime functionality to the application improves the user experience as votes are seen in realtime.
We’ll build a realtime polling application using Pusher Channels, Node, and Ionic.
Using our application, users will get to vote for their favorite soccer player in the English Premier League.
Here’s a demo of the final product:
We’ll send our votes to the server and with the help of Pusher Channels, update our polls in realtime.
Prerequisites
To follow this tutorial a basic understanding of Angular, Ionic and Node.js is required. Please ensure that you have Node and npm installed before you begin.
If you have no prior knowledge of Ionic, kindly follow the tutorial here. Come back and finish the tutorial when you’re done.
We’ll be using these tools to build out our application:
- Express
- Node
- Pusher Channels. Sign up for a free account.
- Ionic
Setup and folder structure
To get started, we will use the CLI (command line interface) provided by the Ionic team to initialize our project.
First, install the CLI by running npm install -g ionic cordova. NPM is a package manager used for installing packages. It will be available on your PC if you have Node installed.
To create a new Ionic App using the CLI, open a terminal and run:
ionic start pollApp blank
The command is merely telling the CLI to create a new app called pollApp and it should make use of the blank starter template. While the setup is running you might get a prompt "Would you like to integrate your new app with Cordova to target native iOS and Android?". If you want to start running or testing the application on a mobile device or emulator as you build, then choose yes by typing Y and pressing Enter on your keyboard, else type N and continue. You might get another prompt "If you would like to integrate ionic pro ?" , we wouldn’t be needing that in this tutorial so just type N and if you would like extend the project into production with your team choose Y.
Open the newly created pollApp. Your folder structure should look something like this:
1pollApp / 2 node_modules / 3 src / 4 app / 5 assets / 6 pages / 7 home / 8 home.html 9 home.ts 10 home.scss
Open a terminal inside the app folder and start the application by running:
ionic serve
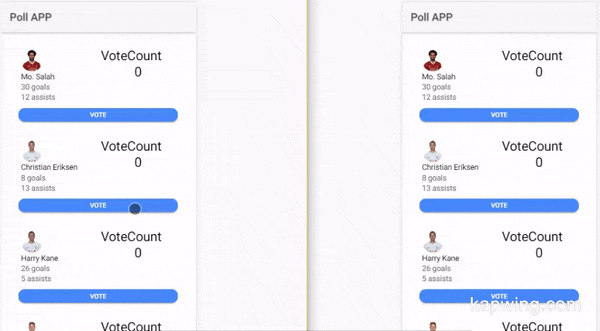
Automatically your default browser should open, and you should see the screenshot below if everything went well.

Building our server
Now that we have our Ionic application running let’s build our server.
To do this, we’ll need to install Express. Express is a fast, unopinionated, minimalist web framework for Node.js. We’ll use this to receive requests from our Ionic application.
Run npm install express on a terminal inside the root folder of your project to install Express.
Create a file called server.js in the root of the project and update it with the code snippet below:
1//pollApp/server.js 2 3 require('dotenv').config(); 4 const express = require('express'); 5 const bodyParser = require('body-parser'); 6 const Pusher = require('pusher'); 7 8 const app = express(); 9 const port = process.env.PORT || 4000; 10 const pusher = new Pusher({ 11 appId: process.env.PUSHER_APP_ID, 12 key: process.env.PUSHER_KEY, 13 secret: process.env.PUSHER_SECRET, 14 cluster: process.env.CLUSTER, 15 encrypted: true, 16 }); 17 18 app.use(bodyParser.json()); 19 app.use(bodyParser.urlencoded({ extended: false })); 20 app.use((req, res, next) => { 21 res.header('Access-Control-Allow-Origin', '*'); 22 res.header( 23 'Access-Control-Allow-Headers', 24 'Origin, X-Requested-With, Content-Type, Accept' 25 ); 26 next(); 27 }); 28 29 app.listen(port, () => { 30 console.log(`Server started on port ${port}`); 31 });
We referenced three packages that we are yet to install, body-parser, pusher and dotenv. Install these packages by running this code in your terminal:
npm i body-parser pusher dotenv
The body-parser package is used to parse incoming request bodies in a middleware before your handlers, available under the req.body property.
The calls to our endpoint will be coming in from a different origin. Therefore we need to make sure we include the CORS headers (Access-Control-Allow-Origin). If you are unfamiliar with the concept of CORS headers, you can find more information here.
This is a standard Node application configuration, nothing specific to our app.
Also, you’ll notice that we installed Pusher Channels library as a dependency. To get started with Pusher Channels, sign up for a free Pusher account and go to the dashboard to create a Channels app instance. Then get your appId, key and secret.
The last package, dotenv is a zero-dependency module that loads environment variables from a .env file into process.env.
We use this package to make sure we don’t add sensitive information like our appId and secret directly into our code. To get these values loaded into our environment, we'll create a .env file in the root of our project.
Your .env file should look something like the snippet below. We’ll add our Pusher Channels appId, key and secret provided here.
1// pollApp/.env 2 PUSHER_APP_ID=<APP_ID> 3 PUSHER_KEY=<PUSHER_KEY> 4 PUSHER_SECRET=<PUSHER_SECRET> 5 CLUSTER=<CLUSTER>
If you noticed, we added the dotenv package at the start of our file. This is done because we need to make the variables available throughout the file.
Please ensure you replace the following placeholder values above with your unique Pusher appId, key and secret from your Pusher dashboard.
Send votes
To enable users send requests to the server, we’ll create a route to handle incoming requests. Update your server.js file with the code below:
1// pollApp/server.js 2 require('dotenv').config(); 3 ... 4 app.post('/vote', (req, res) => { 5 const { body } = req; 6 const { player } = body; 7 pusher.trigger('vote-channel', 'vote', { 8 player, 9 }); 10 res.json({ player }); 11 }); 12 13 ...
We created a POST /vote route which, when hit, triggers a Pusher event.
We used object destructuring to get the body of the request and also the player info sent by the user.
The trigger is achieved using the trigger``() method which takes the trigger identifier (vote-channel), an event name (vote), and a payload.
The payload can be any value, but in this case, we have a JS object. This object contains the name of the player being voted for.
We still go ahead to respond with an object containing the voted player string so we can update the frontend with the data.
Building the app UI
Open home.html and replace it with the content below:
1//../src/pages/home/home.html 2 3 <ion-header> 4 <ion-navbar> 5 <ion-title> 6 Poll APP 7 </ion-title> 8 </ion-navbar> 9 </ion-header> 10 <ion-content padding> 11 <ion-list no-lines> 12 <ion-item *ngFor="let player of playerData"> 13 <ion-row> 14 <ion-col col-6> 15 <ion-avatar> 16 <img [src]="player.image" [alt]="player.name" [ngClass]="getVoteClasses(player.shortName)"> 17 <h4>{{player.name}}</h4> 18 <p>{{player.goals}} goals</p> 19 <p>{{player.assists}} assists</p> 20 </ion-avatar> 21 </ion-col> 22 <ion-col col-6> 23 <h1>VoteCount</h1> 24 <h1 text-center>{{voteCount[player.shortName]}}</h1> 25 </ion-col> 26 </ion-row> 27 <button ion-button full round (click)="sendVotes(player)">Vote</button> 28 </ion-item> 29 </ion-list> 30 </ion-content>
In the code snippet above, we looped through playerData``[] to create a view based on the player’s information.
There are some undefined variables in the code snippet above, don’t panic yet, we’ll define them in our home.ts file below.
Home.ts
In the HTML snippet, we referred to some variables that weren’t yet defined. We’ll create the variables here with the logic behind our application, and import the HttpClient service.
1// ../src/pages/home/home.ts 2 import { HttpClient } from '@angular/common/http'; 3 import { Component } from '@angular/core'; 4 import { NavController } from 'ionic-angular'; 5 6 @Component({ 7 selector: 'page-home', 8 templateUrl: 'home.html' 9 }) 10 export class HomePage { 11 constructor(public navCtrl: NavController, public http : HttpClient) { 12 } 13 event: string = 'vote'; 14 vote: string = ''; 15 ifVoted : boolean = false; 16 voteCount = { 17 salah: 0, 18 kane: 0, 19 eriksen: 0, 20 kevin: 0, 21 }; 22 playerData = [ 23 { 24 name: 'Mo. Salah', 25 goals: 30, 26 assists: 12, 27 shortName: 'salah', 28 image: 'https://platform-static-files.s3.amazonaws.com/premierleague/photos/players/250x250/p118748.png' 29 }, 30 { 31 name: 'Christian Eriksen', 32 goals: 8, 33 assists: 13, 34 shortName: 'eriksen', 35 image: 'https://platform-static-files.s3.amazonaws.com/premierleague/photos/players/250x250/p80607.png', 36 }, 37 { 38 name: 'Harry Kane', 39 goals: 26, 40 assists: 5, 41 shortName: 'kane', 42 image: 43 'https://platform-static-files.s3.amazonaws.com/premierleague/photos/players/40x40/p78830.png', 44 }, 45 { 46 name: "Kevin De'bruyne", 47 goals: 10, 48 assists: 17, 49 shortName: 'kevin', 50 image: 'https://platform-static-files.s3.amazonaws.com/premierleague/photos/players/40x40/p61366.png', 51 }, 52 ]; 53 sendVotes(player){ 54 this.http.post('http://localhost:4000/vote', { player }).subscribe((res : any) => { 55 this.vote = res.player; 56 this.ifVoted = true; 57 }) 58 } 59 getVoteClasses(player){ 60 return { 61 elect : this.ifVoted && this.vote === player, 62 lost : this.ifVoted && this.vote !== player 63 } 64 } 65 ionViewDidLoad(){} 66 }
send``Votes``(): this method makes use of the native HttpClient service to make requests to our server. It sends the name of the player being voted for in a POST request to the server. When a response is returned, it sets the voted property to true signifying that the user has placed a vote. Also, it sets the vote property to the name of the player being voted.
getVoteClasses``(): this method sets classNames on each player element based on if a player was voted for or not.
To make use of the HttpClient service, we’ll need to import the HttpClientModule into the app.module.ts file. Update your app module file as follows:
1// src/app/app.module.ts 2 3 import { BrowserModule } from '@angular/platform-browser'; 4 import { ErrorHandler, NgModule } from '@angular/core'; 5 import { IonicApp, IonicErrorHandler, IonicModule } from 'ionic-angular'; 6 import { SplashScreen } from '@ionic-native/splash-screen'; 7 import { StatusBar } from '@ionic-native/status-bar'; 8 import { HttpClientModule } from '@angular/common/http'; 9 import { MyApp } from './app.component'; 10 import { HomePage } from '../pages/home/home'; 11 @NgModule({ 12 declarations: [ 13 MyApp, 14 HomePage 15 ], 16 imports: [ 17 BrowserModule, 18 IonicModule.forRoot(MyApp), 19 HttpClientModule 20 ], 21 bootstrap: [IonicApp], 22 ....
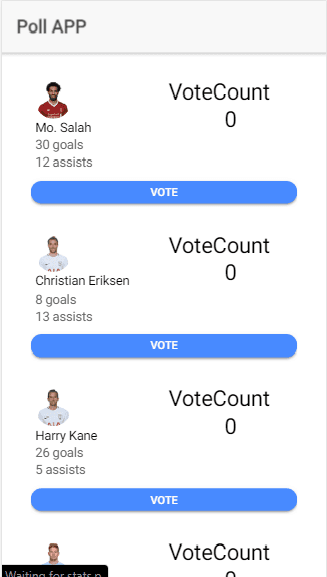
By now our application should look like this:
Introducing Pusher Channels
So far we have an application that enables users to cast votes, but we have no way of keeping track of how others voted in realtime. We also have no way of visualizing the polling data. To solve both of these problems, we’ll include the Pusher Channels library.
Open index.html file in the src folder of the project and paste the cdn into it:
1... 2 3 <script src="https://js.pusher.com/4.1/pusher.min.js"></script> 4 <!-- add to homescreen for ios --> 5 ...
Now that Pusher Channels has been made available in our project, we’ll create a Pusher Provider to be used in our application. The Ionic CLI can aid in the provider creation. Open a terminal in your project’s root folder and run the following command:
ionic generate provider pusher-service
This command simply tells the CLI to generate a provider named pusher. Now open the pusher-service.ts file and update it with the code below:
1// ../src/providers/pusher-service/pusher-service.ts 2 3 import { HttpClient } from '@angular/common/http'; 4 import { Injectable } from '@angular/core'; 5 declare const Pusher: any; 6 @Injectable() 7 export class PusherServiceProvider { 8 channel; 9 constructor(public http: HttpClient) { 10 var pusher = new Pusher('<PUSHER_KEY>', { 11 cluster: 'eu', 12 encrypted: true, 13 }); 14 this.channel = pusher.subscribe('vote-channel'); 15 } 16 public init(){ 17 return this.channel; 18 } 19 }
First, we initialize Pusher in the constructor.
The init() method returns the Pusher property we created.
Ensure you replace the PUSHER_KEY string with your actual Pusher key.
To make the provider available in the application, import it into the app.``module.ts file.
1// ../src/app/app.module.ts 2 3 import { PusherServiceProvider } from '../providers/pusher-service/pusher-service'; 4 .... 5 providers: [ 6 StatusBar, 7 SplashScreen, 8 {provide: ErrorHandler, useClass: IonicErrorHandler}, 9 PusherServiceProvider 10 ] 11 ....
We’ll make use of this provider in our home page, by binding to the vote event and increment the votes of the voted player returned in the event. This will be done in the ionViewDidLoad lifecycle.
1// ../src/pages/home/home.ts 2 3 import { PusherServiceProvider } from '../../providers/pusher-service/pusher-service'; 4 5 constructor(public navCtrl: NavController, public http : HttpClient, private pusher : PusherServiceProvider) {} 6 7 ... 8 9 ionViewDidLoad(){ 10 const channel = this.pusher.init(); 11 channel.bind(this.event, ({ player }) => { 12 this.voteCount[player.shortName] += 1 13 }); 14 }
At this point, your application should have realtime updates when votes are placed. Ensure that the server is running alongside the Ionic development server. If not, run node server and ionic serve in two separate terminals. Both terminals should be opened in the root folder of your project.
Testing on Mobile Devices
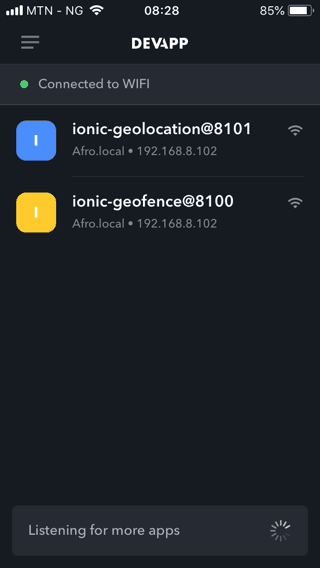
To test the application on your mobile device, download the IonicDevApp on your mobile device. Make sure your computer and your mobile device are connected to the same network. When you open the IonicDevApp, you should see Ionic apps running on your network listed.
Note: Both the server(
node server), ngrok for proxying our server and the Ionic dev server(ionic serve) must be running to get the application working. Run the commands in separate terminal sessions if you haven’t done so already.
To view the application, click on it and you should see a similar view to what was in the browser. Sending messages to the server might have worked in the browser but localhost doesn’t exist on your phone, so we’ll need to create a proxy to be able to send messages from mobile.
You can also run the following code in your terminal if the above method doesn’t work for you.
ionic cordova run <target_platform>
target_platform: eitheriosorandroid
Using Ngrok as a proxy
To create a proxy for our server, we’ll download Ngrok. Visit the download page on the Ngrok website. Download the client for your OS. Unzip it and run the following command in the folder where Ngrok can be found:
./ngrok http 4000
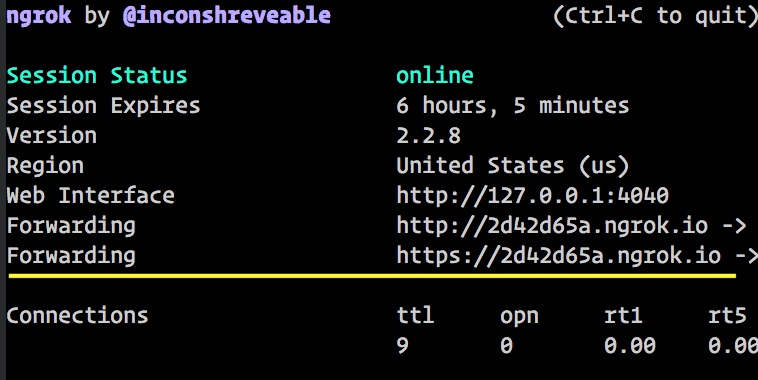
Copy the forwarding url with https and place it in the home.ts file that previously had http://localhost:4000/``vote. Please do not copy mine from the screenshot above.
1// src/pages/home/home.ts 2 ... 3 @Component({ 4 selector: 'page-home', 5 templateUrl: 'home.html' 6 }) 7 export class HomePage { 8 ... 9 sendVotes(player){ 10 this.http.post('<NGROK_URL>/vote', { player }).subscribe((res : any) => { 11 this.vote = res.player; 12 this.ifVoted = true; 13 }); 14 } 15 ... 16 } 17 ...
Ensure to include the forwarding URL you copied where the placeholder string is
Now you should be seeing realtime update of the votes, both on the phone and the browser.
NOTE: Both the server(
node server), ngrok for proxying our server and the Ionic dev server(ionic serve) must be running to get the application working. Run the commands in separate terminal sessions if you haven’t done so already.
To build your application to deploy on either the AppStore or PlayStore, follow the instructions found here.
Conclusion
Using Pusher Channels, we’ve built out an application using the pub/sub pattern without having to set up a WebSocket server. This shows how powerful Pusher Channels is and how easy it is to set up. You can find the demo for this article on GitHub.


© 2026 Pusher Ltd. All rights reserved.
Pusher Limited is a company registered in England and Wales (No. 07489873) whose registered office is at MessageBird UK Limited, 3 More London Riverside, 4th Floor, London, United Kingdom, SE1 2AQ.