- Products

- Developers
- User stories
- Blog
- Pricing

How to build a realtime application with Node.js and RethinkDB
Introduction
In this tutorial, we’ll explore RethinkDB, a database system that was built with realtime functionality in mind. We’ll build a social app that pairs RethinkDB with Pusher Channels to bring an improved experience to users. Let’s go!
In traditional web apps, database systems were used as “dumb” data stores—they only held data (usually textual or binary) for you and gave it back when you asked nicely. But over time, database systems have become more and more powerful. They can hold data in a wide range of formats and perform actions on (or with) the data.
Prerequisites
- Node.js 8.10.0 or higher
- RethinkDB 2.3.6 or higher. Get it here.
- A Pusher account. Create a free sandbox Pusher account or sign in.
Setting up
We’ll start by using the express application generator:
1# if you don't already have it installed 2 npm install express-generator -g 3 4 # create a new express app with view engine set to Handlebars (hbs) 5 express --view=hbs rethinkdb-pusher-nodejs-demo 6 cd rethinkdb-pusher-nodejs-demo && npm install
Then we’ll add our dependencies:
npm install dotenv rethinkdb pusher
We'll use dotenv to load sensitive data (our Pusher app credentials) from a .env file. The rethinkdb and pusher libraries are the Node.js clients for communicating with RethinkDB and Pusher’s realtime APIs respectively.
What is RethinkDB?
RethinkDB is an open-source database built for realtime applications. It aims to improve application performance and simplify the developer experience by pushing data to the app, rather than having it poll the database for changes. RethinkDB is built to do this in an efficient and scalable way.
RethinkDB is a NoSQL database, so it stores its data as JSON documents. However, it incorporates concepts from SQL (such as its query language, Rethink Query Language, or ReQL) to create an even better experience for its users. RethinkDB is used by thousands of developers, including NASA and Social Radar.
We’ll build an application where people can create posts and all posts can be seen in realtime on the home page without having to reload the page. Our application will rely on RethinkDB to inform us of new posts in the database and use Pusher Channels to push these changes to the frontend. Let’s get started.
Building the feed
The feed (the home page) will show a list of all posts, with the newest first. Let’s set up the route and view for this page. In the route, we retrieve all posts from the database and pass them to the view. Replace the code in routes/index.js with this:
1// routes/index.js 2 const router = require('express').Router(); 3 const r = require('rethinkdb'); 4 5 let connection; 6 r.connect({host: 'localhost', port: 28015, db: 'test'}) 7 .then(conn => { 8 connection = conn; 9 }); 10 11 /* Render the feed. */ 12 router.get('/', async (req, res, next) => { 13 const posts = await r.table('posts').orderBy(r.desc('date')).run(connection) 14 .then(cursor => cursor.toArray()); 15 res.render('index', { posts }); 16 }); 17 18 module.exports = router;
Let’s walk through what’s going on here. We’re connecting to our database via the RethinkDB client (r). Then, in the home route, we retrieve all posts from the database. In ReQL, we can do this by calling table(). We want the results to have the newest posts first, so we add orderBy(r.desc('date')). This query will return all the documents in the table as a cursor. RethinkDB uses a cursor because it allows for easy pagination of large tables. We convert this cursor to an array of the documents by calling cursor.toArray(), then we render them on the frontend.
Now we’ll create the view where we render the posts. We’ll use Bootstrap for some quick styling. Put the following code in your views/layout.hbs (the base layout):
1<!-- views/layout.hbs --> 2 <!DOCTYPE html> 3 <html> 4 <head> 5 <title>{{title}}</title> 6 <link rel="stylesheet" href="https://maxcdn.bootstrapcdn.com/bootstrap/4.0.0/css/bootstrap.min.css" integrity="sha384-Gn5384xqQ1aoWXA+058RXPxPg6fy4IWvTNh0E263XmFcJlSAwiGgFAW/dAiS6JXm" crossorigin="anonymous"> 7 <body> 8 {{{body}}} 9 </body> 10 </html>
Then, in the file views/index.hbs:
1<!-- views/index.hbs --> 2 <div class="container-fluid text-center" id="posts-list"> 3 4 {{#each posts }} 5 <div class="card"> 6 <div class="card-body"> 7 <h5 class="card-title">{{ this.title }}</h5> 8 <h6 class="card-subtitle mb-2 text-muted">{{ this.date }}</h6> 9 <p class="card-text">{{ this.content }}</p> 10 </div> 11 </div> 12 {{/each}} 13 14 </div>
One more thing. Replace the contents of your app.js with the following:
1// app.js 2 require('dotenv').config(); 3 const express = require('express'); 4 const path = require('path'); 5 const logger = require('morgan'); 6 7 const app = express(); 8 9 // view engine setup 10 app.set('views', path.join(__dirname, 'views')); 11 app.set('view engine', 'hbs'); 12 13 app.use(logger('dev')); 14 app.use(express.urlencoded({ extended: false })); 15 16 app.use('/', require('./routes/index')); 17 18 // error handler 19 app.use((err, req, res, next) => { 20 res.locals.message = err.message; 21 res.locals.error = err; 22 23 // render the error page 24 res.status(err.status || 500); 25 res.render('error'); 26 }); 27 28 module.exports = app;
Creating a post
Next, we’ll make it possible for a user to create a post. Let’s add the necessary routes. Open up your route file (routes/index.js) and replace the last line (module.exports = router) with the following:
1// routes/index.js 2 3 /* Show the view to create a new post. */ 4 router.get('/new', (req, res, next) => { 5 res.render('new'); 6 }); 7 8 /* Save a new post to the database */ 9 router.post('/new', async (req, res, next) => { 10 const post = { 11 title: req.body.title, 12 content: req.body.content, 13 date: new Date(), 14 }; 15 r.table('posts').insert(post).run(connection) 16 .then(() => res.redirect('/')); 17 }); 18 19 module.exports = router;
Here we’re creating two routes. The first route will render the form for creating new posts when you visit /new in your browser. The second route is where the form submits to. Within this route, we pull data from the request and create a new post in the database. With RethinkDB, this is as easy as calling insert(post). For each post, we store a title, content and the date it was created.
Next up, create the file views/new.hbs with the following contents:
1<!-- views/new.hbs --> 2 3 <div class="container-fluid text-center mt-5"> 4 <h4>Create Post</h4> 5 <form method="post" action="/new"> 6 7 <div class="form-group"> 8 <label>Title 9 <input type="text" class="form-control" name="title"> 10 </label> 11 </div> 12 13 <div class="form-group"> 14 <label>Content 15 <textarea class="form-control" name="content" rows="3"></textarea> 16 </label> 17 </div> 18 19 <button type="submit" class="btn btn-primary">Publish post</button> 20 </form> 21 </div>
At this point, you can take the app for a spin to be sure it works as expected. Here’s what you need to do:
- Start your RethinkDB server by following the instructions for your operating system here.
- RethinkDB comes with an included web interface where you can explore your database and modify or query data. After starting the server, you should be able to access this UI at http://localhost:8080.
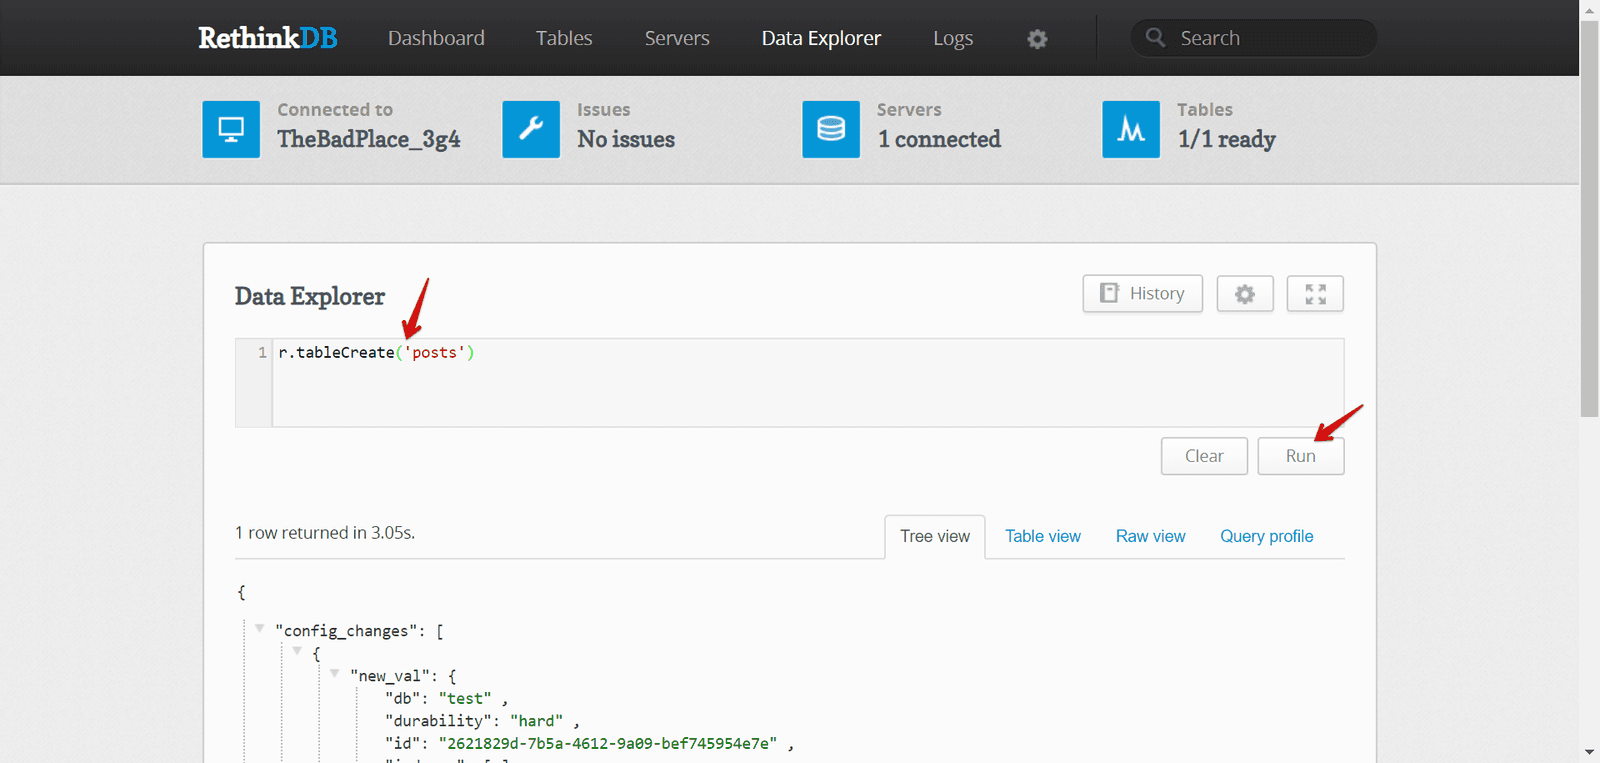
- You can run queries and commands from the Data Explorer tab. We’ll test it out by creating our
poststable. Enter the commandr.tableCreate('posts')in the text box and click the Run button. The result of the query will be shown in the lower pane, as shown in the screenshot below.
- Start your Express app by running this terminal command in its directory:
npm start
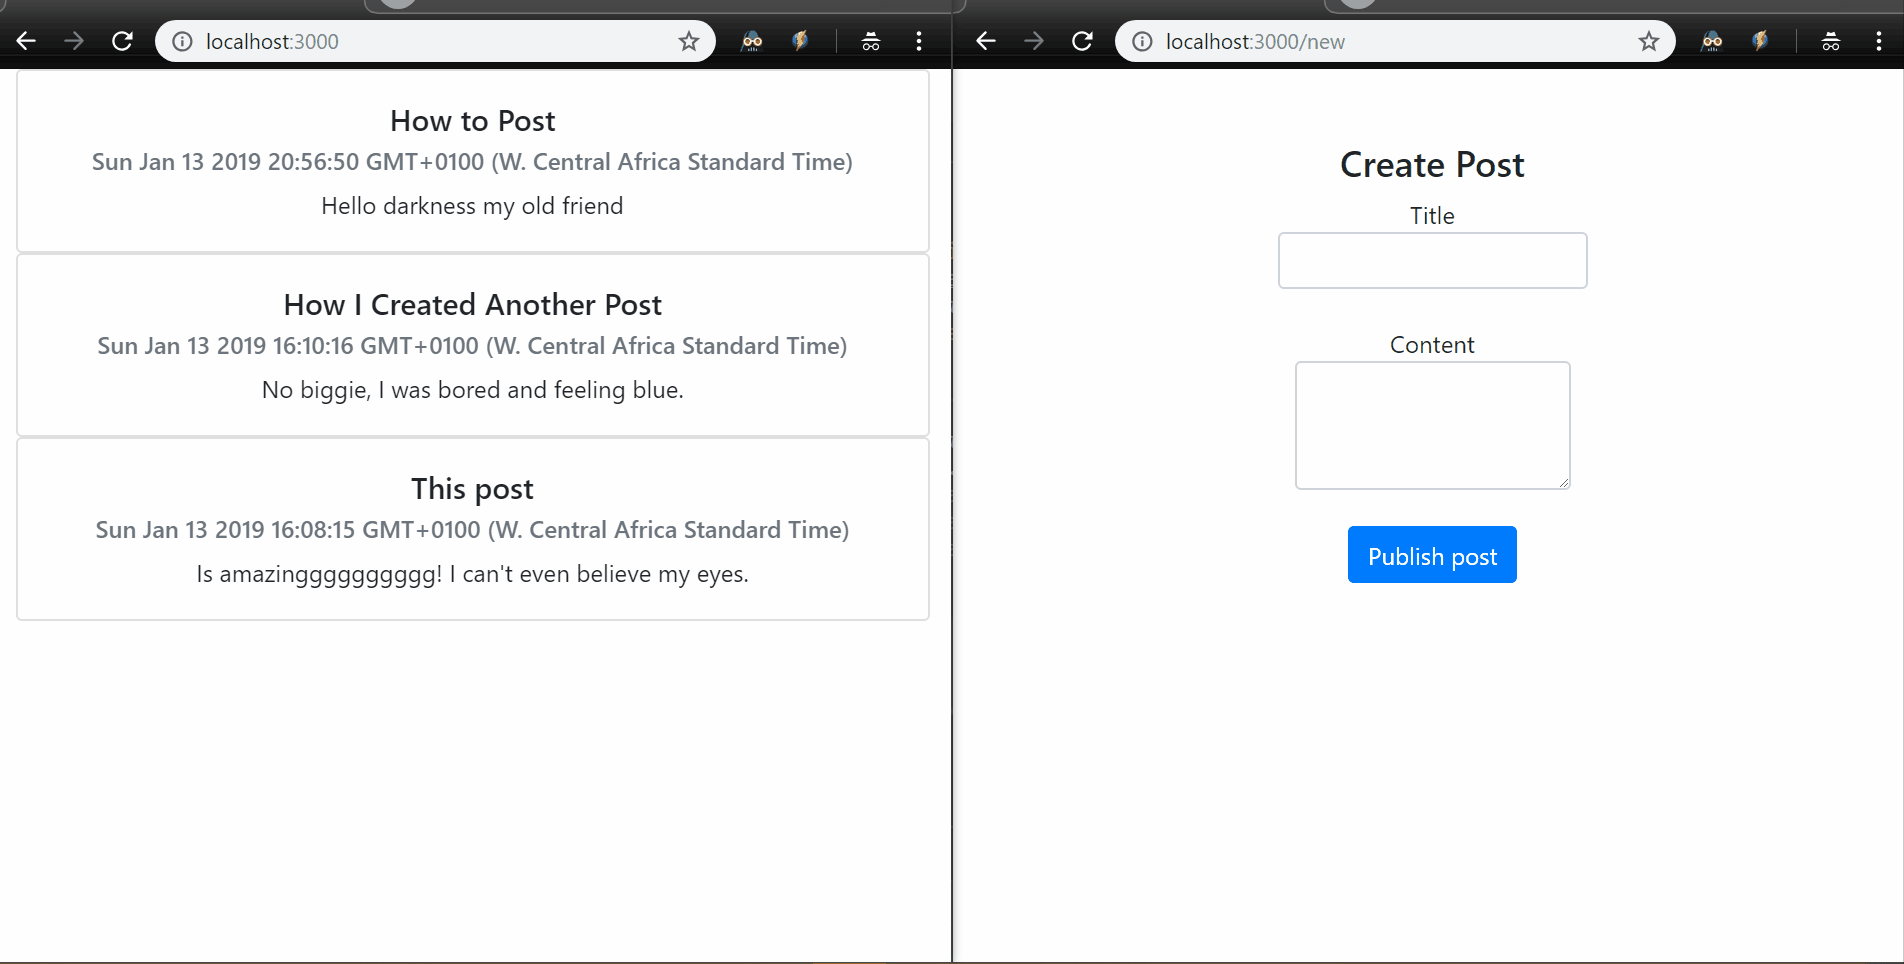
- Visit your app on http://localhost:3000. You should see a blank page because our database is currently empty. Visit http://localhost:3000/new to create a new post. Create a couple of posts, and when you reload the home page, you should see your posts sorted from newest to oldest.
Now that we’ve verified the app works, let’s make it realtime.
Going realtime with RethinkDB changefeeds
RethinkDB has a useful feature called changefeeds that makes it well-suited for realtime applications. Using changefeeds, we can ask RethinkDB to notify us when there are any changes to the database. We can even specify a query (such as “all items in Food category and with price greater than 500 dollars”), and RethinkDB will watch for changes to the result set.
We’ll add changefeeds to our app so the server gets notified of any new posts. Note that since RethinkDB is a database system, it can’t talk directly to the frontend. It can only send the changes to our servers, then we can have the server send the changes to the frontend via a service like Pusher.
To add changefeeds to our app, we need to make a small change to our routes/index.js. Replace this snippet (where we connect to the RethinkDB server):
1let connection; 2 r.connect({host: 'localhost', port: 28015, db: 'test'}) 3 .then(conn => { 4 connection = conn; 5 });
with this:
1let connection; 2 r.connect({host: 'localhost', port: 28015, db: 'test'}) 3 .then(conn => { 4 connection = conn; 5 return r.table('posts').changes().run(connection); 6 }).then(cursor => { 7 cursor.each((err, row) => { 8 if (err) throw err; 9 const post = row.new_val; 10 console.log(post); 11 // publish row to the frontend 12 }); 13 });
We’re still connecting to the server as before, but this time, after the connection is established, we set up a changefeed by using the changes() method, telling RethinkDB to notify us of any changes to the data in the posts table. Once again, changes are returned as a cursor, which has keys new_val and old_val. For now, we simply log the new document to the console.
Our backend is realtime now. Let’s make our frontend realtime too.
Going realtime with Pusher Channels
First, let’s get our credentials set up. Log in to your Pusher dashboard and retrieve your app credentials from the App Keys tab. Then create a .env file in your project and add your credentials to it:
1# .env 2 3 PUSHER_APP_ID=your-app-id 4 PUSHER_APP_KEY=your-app-key 5 PUSHER_APP_SECRET=your-app-secret 6 PUSHER_APP_CLUSTER=your-app-cluster
Now, we’ll modify our app to push changes to the frontend when notifications come in from RethinkDB. Modify your routes/index.js so it looks like this:
1// routes/index.js 2 3 const router = require('express').Router(); 4 const r = require('rethinkdb'); 5 const Pusher = require('pusher'); 6 const pusher = new Pusher({ 7 appId: process.env.PUSHER_APP_ID, 8 key: process.env.PUSHER_APP_KEY, 9 secret: process.env.PUSHER_APP_SECRET, 10 cluster: process.env.PUSHER_APP_CLUSTER 11 }); 12 13 let connection; 14 r.connect({host: 'localhost', port: 28015, db: 'test'}) 15 .then(conn => { 16 connection = conn; 17 return r.table('posts').changes().run(connection); 18 }).then(cursor => { 19 cursor.each((err, row) => { 20 if (err) throw err; 21 const post = row.new_val; 22 pusher.trigger('post-events', 'new-post', { post }, (err) => console.log(err)); 23 }); 24 }); 25 26 /* Render the feed. */ 27 router.get('/', async (req, res, next) => { 28 const posts = await r.table('posts').orderBy(r.desc('date')).run(connection) 29 .then(cursor => cursor.toArray()); 30 res.render('index', { posts, appKey: process.env.PUSHER_APP_KEY }); 31 }); 32 33 /* Show the view to create a new post. */ 34 router.get('/new', (req, res, next) => { 35 res.render('new'); 36 }); 37 38 /* Save a new post to the database */ 39 router.post('/new', async (req, res, next) => { 40 const post = { 41 title: req.body.title, 42 content: req.body.content, 43 date: new Date(), 44 }; 45 r.table('posts').insert(post).run(connection) 46 .then(() => res.redirect('/')); 47 }); 48 49 module.exports = router;
The final step is to update our frontend to add the newly created post to the list when it receives the event via Pusher. Add the following code to the end of your views/index.hbs:
1<!-- views/index.hbs --> 2 3 <script src="https://js.pusher.com/4.3/pusher.min.js"></script> 4 <script> 5 // Enable pusher logging 6 Pusher.logToConsole = true; 7 const pusher = new Pusher("{{ appKey }}", { 8 cluster: 'eu' 9 }); 10 const channel = pusher.subscribe('post-events'); 11 channel.bind('new-post', (data) => { 12 const postsList = document.getElementById('posts-list'); 13 postsList.insertBefore(createPostCard(data.post), postsList.firstChild); 14 }); 15 16 function createPostCard(post) { 17 let cardElement = document.querySelector('.card'); 18 let newCard = cardElement.cloneNode(true); 19 newCard.querySelector('.card-title').innerText = post.title; 20 // we wrap the date here and call toString() 21 // because RethinkDB returns it in a different format for changefeeds 22 newCard.querySelector('.card-subtitle').innerText = new Date(post.date).toString(); 23 newCard.querySelector('.card-text').innerText = post.content; 24 return newCard; 25 } 26 </script>
All done! Now our app is ready.
Make sure your RethinkDB server is running. Start the app by running npm start. If you had it running earlier, be sure to exit and restart it. Tinker with the app as before, creating new posts at http://localhost:3000/new. This time, leave the homepage (http://localhost:3000) open in another tab. You should see your posts showing up in realtime on the feed, as in the GIF below:
Conclusion
In this tutorial, we’ve explored RethinkDB, a database system built for realtime applications. Without RethinkDB’s native changefeeds functionality, we’d have to spend time writing code that listens for any database inserts and dispatches events, introducing a lot of complexity. When paired with Pusher, RethinkDB allows us to deliver pleasant realtime experiences to our users. It’s a great choice worth checking out if you’re building a realtime application. You can visit the RethinkDB docs for more, and check out the source code of the completed application on GitHub.


© 2026 Pusher Ltd. All rights reserved.
Pusher Limited is a company registered in England and Wales (No. 07489873) whose registered office is at MessageBird UK Limited, 3 More London Riverside, 4th Floor, London, United Kingdom, SE1 2AQ.