- Products

- Developers
- User stories
- Blog
- Pricing

How to transform live location data into user friendly updates with Pusher Serverless Functions
- Introduction
- Prerequisites
- Implementation steps
- Step 1 - Set up the project
- Project walkthrough
- Using appropriate Channel and Event names
- Emitting a GPS location
- Display the transformed event on the web page
- Step 2 - Creating a Function
- Step 3 - Adding the code for the function
- Step 4 - Deploying the function
- Step 5 - Testing the function
- Step 6 - Using configuration variables
- Conclusion
Introduction
This tutorial will show you how to create a realtime location update system for a food delivery service. We’ll use Pusher Channels to deliver live location data, and Pusher Serverless Functions to transform that data into a user-friendly format which indicates where the delivery driver is.
Prerequisites
- All code written in this tutorial will be in JavaScript and we’ll be making use of the Pusher JavaScript SDK as well so prior JS knowledge will be helpful.
- Basic knowledge of what Pusher, channels, and events are.
- A new Pusher project.
- A simple frontend to view the live updates.
- Pusher CLI - You need this installed to create and manage the Function we’ll be creating.
- A Pusher Function - This will transform the GPS location data into a human-friendly text.
- Node and npm - Since we’ll be working in a JavaScript environment on the server.
Implementation steps
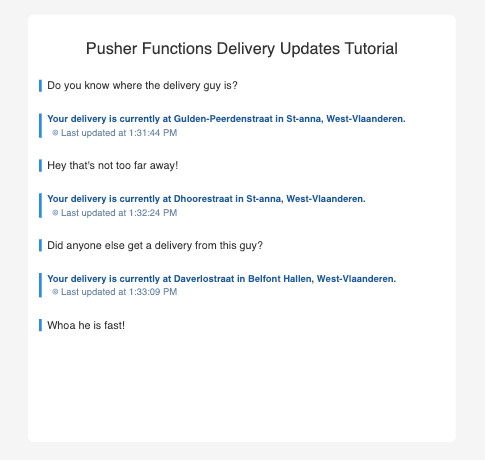
Here’s what our demo app looks like:
Step 1 - Set up the project
1. Sign in to Pusher or if you don’t have an account, sign up.
NOTE:
The Pusher sandbox plan is free and fully featured. It comes with 200,000 messages per day and 100 concurrent connections. This plan is more than sufficient for this tutorial.
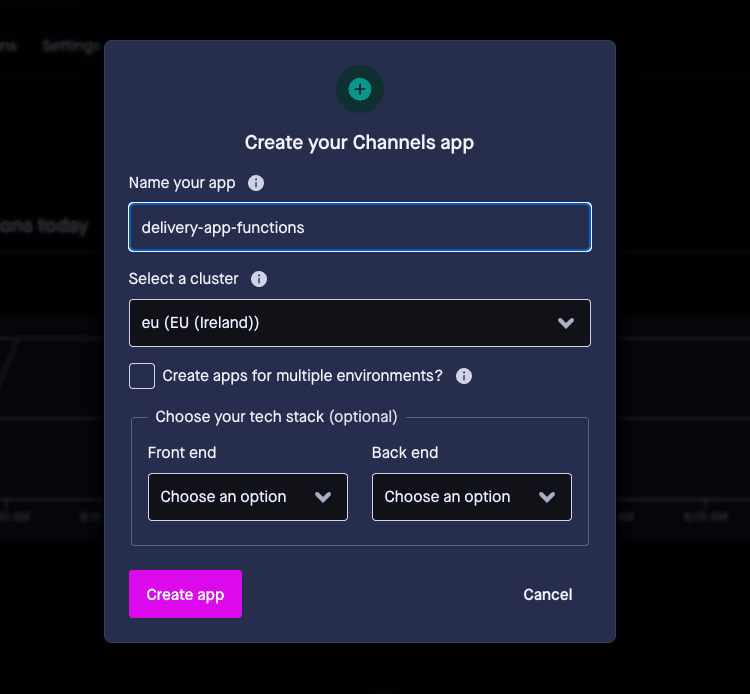
2. Since we’re making use of a Channels feature, create a new Channels app (this one is called delivery-app-functions) from the Pusher dashboard:
3. With the app created, we can set up the project code. Clone the starter template from Github as that comes with structure and styling to help us get started faster.
IMPORTANT:
Make sure to runnpm installafter cloning the project
Project walkthrough
This template comes with:
- Scaffolding for both the front-end and server
- Helper functions to render events on the frontend
Let’s take some time to go through the relevant project files:
src/frontend/index.html— Scaffolding for the UI as well as imports for the Pusher JavaScript library and links to CSS and JavaScript filessrc/frontend/index.js— Contains our Pusher client instance as well as logic to subscribe to a channel,my-channeland render anymy-eventmessages triggered from the serversrc/frontend/style.css— Styling to make the UI look prettysrc/server/index.js— Contains our Pusher server instance as well as logic for triggering themy-eventevent on themy-channelchannelsrc/data.js— Some dummy GPS coordinates to be used in our function later
IMPORTANT:
Make sure to replace any API keys in the source code (you can get this from the “App Keys” section in your Pusher dashboard.
Let’s test that the app works at this stage. We’ll do this in two steps.
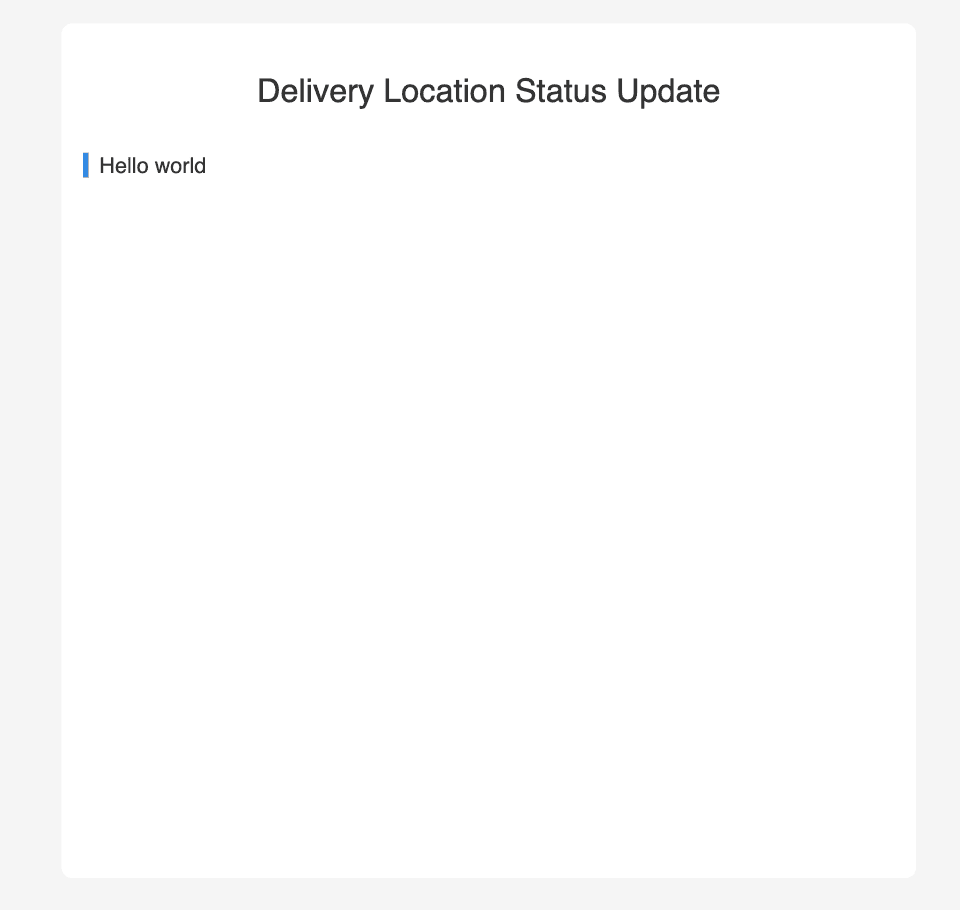
Open the src/frontend/index.html file in your browser
Open a terminal in the root of the project and run node src/server/index.js
A “Hello world” message should be rendered on the web page. If you run into any issues at this point, ensure that you followed all steps above and if you’re still running into issues, please drop a message in our Discord channel.
With the scaffolding out of the way, let’s go ahead and implement the functionality. To recap, we want to do the following:
- Emit GPS coordinates on the server (this is where our delivery currently is).
- Use a Pusher Function to transform the raw coordinates into human-readable text (Street and city names).
- Display the transformed event on the web page.
Go through the template src/server/index.js to see how to emit an event on the server if you don’t already know how. We already also have logic to render events on the web page. However, we need to make some adjustments to Step 1, and then we'll write our function in Step 2.
Using appropriate Channel and Event names
We’re currently using the default my-channel and my-event Channel and Event names. It’s recommended that you use more descriptive words to communicate what the Channel and Event are doing for future reference.
Now rename the following in the src/frontend/index.js and src/server/index.js files:
- Rename any instances of
my-channelwithdelivery-channel - Rename any instances of
my-eventwithlocation-update-event
Try triggering an event by running node src/server/index.js in the terminal to ensure that the frontend is still receiving and displaying events. If it’s not, double-check that the channel and event names are consistent.
Emitting a GPS location
We’re currently emitting an object containing the message, Hello world. This should be a GPS coordinate object instead so let’s go ahead and modify the event data.
Open the src/server/index.js file and make the following changes:
1const Pusher = require("pusher"); 2require("dotenv").config(); 3const LOCATIONS = require("../data"); // Import the dummy location data 4 5const pusher = ... // remains unchanged 6 7pusher.trigger("delivery-channel", "location-update-event", { 8 message: LOCATIONS.LOCATION_DAVERLOSTRAAT, // You can use any of the three locations 9});
As the comments say, we’re basically sending a location object as the event data rather than the “Hello World” string. You can open the src/data.js file to see what the location data looks like.
Display the transformed event on the web page
Now trigger the event like before with node src/server/index.js and the web page should now look like this:
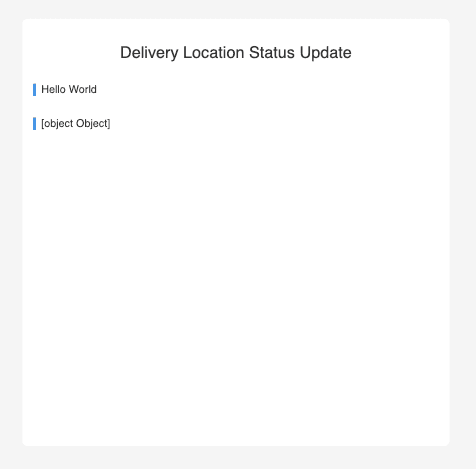
Notice how the message is displayed as [object Object]? This is because we’re trying to render an object directly on the web page as the location data isn’t being transformed yet.
Let’s fix this by creating a Function that will run every time a location-update-event is triggered. With this function, we’ll be able to transform the event data before it gets published to the clients subscribed to the channel.
Step 2 - Creating a Function
Pusher Functions allow us to access/transform event data before it is published to any subscribed clients. It comes in two flavors—synchronous and asynchronous—depending on the kind of action you want to perform on the event data.
Synchronous functions — Allow you to transform the event data before it is published to clients. An event is triggered → the function acts on it → the clients receive the event. Example use cases could be profanity detection, language translation, message transformations, etc.
Asynchronous functions — Allow you to perform actions with the event data without blocking the clients from receiving the events. An event is triggered → the clients receive the event → the function does something with the event. Example use cases include logging, webhook integrations, live polling, etc.
In our case, we want to transform the event before it gets to the clients so we’ll be creating a synchronous function.
This function will be named transform-gps-data-event and will be:
- Invoked on every
location-update-eventon thedelivery-channel - Receive GPS coordinates in the form of latitudes and longitudes
- Call an external API to transform these coordinates into street names
- Return the transformed response to the clients
NOTE:
Before we begin, ensure that you have the Pusher CLI installed and that you’re logged in to the same Pusher account with the app we created earlier. Run the commandpusher loginin the terminal and follow the instructions to log into your account.
Step 3 - Adding the code for the function
- Create a new folder
src/transform-gps-data-event - Create two files:
src/transform-gps-data-event/index.jssrc/transform-gps-data-event/enrich-geodata.js
- Copy the contents of
enrich-geodata.jsfrom here. - Open the
src/transform-gps-data-event/index.jsfile and let’s fill it in.
1// src/transform-gps-data-event/index.js 2const enrichGeodata = require("./enrich-geodata"); // To enrich the GPS data 3 4// Pusher Functions require an exports.handler declaration 5exports.handler = async function (pusher) { 6 const data = pusher.data // the event data 7 8 try { 9 if (!data || !data.message.latitude || !data.message.longitude) { 10 return pusher.ok(data) // don't process unexpected messages 11 } 12 13 const { latitude, longitude } = data.message 14 const POSITION_STACK_API_ACCESS_KEY = "<YOUR_API_KEY>"; 15 const enrichedData = await enrichGeodata({ 16 latitude, 17 longitude, 18 accessKey: POSITION_STACK_API_ACCESS_KEY 19 }) 20 const currentTime = new Date().toLocaleTimeString() 21 22 const transformedData = ` 23 <p>Your delivery is currently at ${enrichedData.street} in ${ 24 enrichedData.neighbourhood 25 }, ${enrichedData.region}.</p> 26 27 ${ 28 enrichedData.map_url 29 ? `<p>View the map here: <a href="${enrichedData.map_url}">${enrichedData.label}</a></p>` 30 : "" 31 } 32 33 <p>Last updated at ${currentTime}</p> 34 ` 35 36 return pusher.ok(transformedData) 37 } catch (error) { 38 return pusher.ok(data) 39 } 40}
NOTE:
Grab a free access key from PositionStack and replace the value of thePOSITION_STACK_API_ACCESS_KEYwith it. It’s important to create a new key just for this tutorial and nowhere else as we’ll be uploading this to the cloud insecurely.
The function itself is quite simple. Every function receives a pusher object that contains the event name, channel, and data.
From this object, we extract the latitude and longitude which we then feed into an API that enriches the data with extra information like street name, neighbourhood, region, etc. Then we build an HTML string with this new information and then pass it on to the client to be rendered on the browser.
Notice that we’re adding error handling to simply pass through the data if something goes wrong. A better solution would be to log it somewhere and pass on an error message but we won’t focus on that for now.
Step 4 - Deploying the function
Currently, Pusher Functions must be managed using the Pusher CLI, so it’s essential that you have it set up.
Open your terminal and use the following command to create the function.
1pusher channels apps functions create ./src/transform-gps-data-event \ 2 --app-id <YOUR_APP_ID> \ 3 --name "transform-gps-data-event" \ 4 --events "location-update-event" \ 5 --mode synchronous
NOTE:
Replace<YOUR_APP_ID>with your actual app ID.
If successful, you should get a created function transform-gps-data-event message on your terminal.
You can view all functions attached to an app by running pusher channels apps functions list --app-id <YOUR_APP_ID>. You should see our newly created function show up.
Additionally, you can update and delete a function as well as view function logs for debugging purposes.
Step 5 - Testing the function
With our function deployed, we can go ahead and test it out. Like before, we will simply trigger an event from the server. However, we expect the raw GPS coordinates to be transformed into a meaningful message.
Go ahead and run node src/server/index.js in your terminal while the src/frontend/index.html page is open in the browser. You should get a similar result as in the example below.
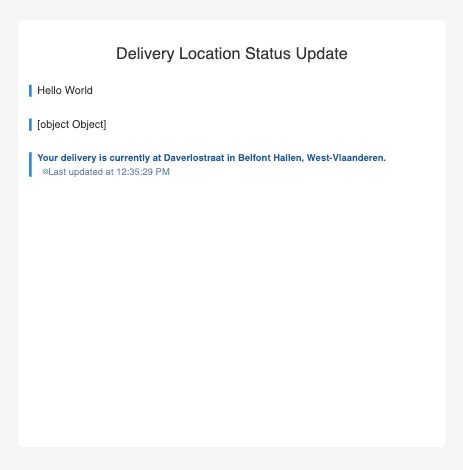
Without changing anything else, we were able to use a synchronous function to transform the event data into well-formatted HTML text.
We’re not done though. There is a glaring security flaw that we need to address in our code so far. We’re exposing sensitive information in the form of an API key, specifically the POSITION_STACK_API_ACCESS_KEY in transform-gps-data-event/index.js.
Step 6 -
Thankfully, Pusher Functions allow you to securely manage sensitive information using “config variables”. Think of it like a .env file that lives in the server and we can store things like secrets, keys, etc inside using the Pusher CLI.
- We can add a new config variable by running the following command:
1pusher channels apps functions configs create \ 2 --name POSITION_STACK_API_ACCESS_KEY \ 3 --description "API key for PositionStack" \ 4 --content "<ADD YOUR API KEY HERE>" \ 5 --app-id "<ADD YOUR APP ID HERE>" \ 6 --type "secret"
2. With our config variable added, let’s go ahead and modify our function to read from there instead of the hardcoded key.
1// src/transform-gps-data-event/index.js 2... 3 const POSITION_STACK_API_ACCESS_KEY = await pusher.getConfig( 4 "POSITION_STACK_API_ACCESS_KEY" 5 ) 6...
3. Update the deployed function.
pusher channels apps functions update "transform-gps-data-event" ./src/transform-gps-data-event --app-id <YOUR_APP_ID>
4. Ensure the function still works by triggering an event with the src/frontend/index.html page open in the browser.
node src/server/index.js
Find the code for this project here.
Conclusion
Pusher Serverless Functions offer you a way to interact with real-time data and respond programmatically to real-time events without the need for managing your own infrastructure.
The practical example we built in this tutorial can extend to numerous applications. The core of what we did today is message transformation, which can easily be adapted to serve any business logic use case.
You can take this further by trying an asynchronous function implementation, having a function respond to multiple events, or triggering multiple functions with a single event.
Our docs are your best resource for learning more about Pusher Functions and the other features Pusher provide to enable you to build real-time applications. Want to share what you built? Get in touch with us on our Discord channel.


© 2026 Pusher Ltd. All rights reserved.
Pusher Limited is a company registered in England and Wales (No. 07489873) whose registered office is at MessageBird UK Limited, 3 More London Riverside, 4th Floor, London, United Kingdom, SE1 2AQ.