Build a live voting app with Ionic
Introduction
Data visualization is viewed by many disciplines as a modern equivalent of visual communication. It involves the creation and study of the visual representation of data.
An important advantage of data visualization is how it enables users to more effectively see connections as they are occurring between operating conditions and business performance. Adding realtime functionality using Pusher Channels improves this experience as data changes are witnessed in realtime.
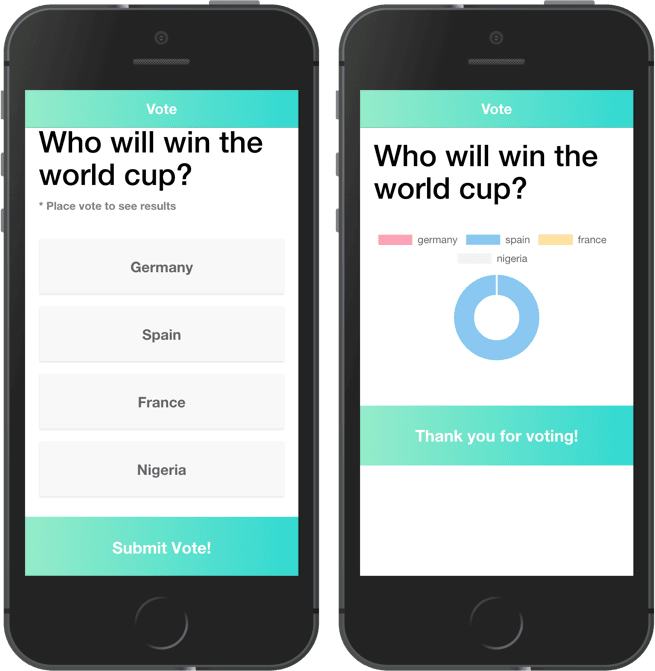
We’ll be creating an application that will present data about how football fans predict who wins the current running World Cup. Using our application, users will complete a poll and then see the data from the polls in realtime.
Here’s a screenshot of the final product:
Prerequisites
To follow this tutorial a basic understanding of Angular, Ionic and Node.js is required. Please ensure that you have Node and npm installed before you begin.
If you have no prior knowledge of Ionic, kindly follow the tutorial here. Come back and finish the tutorial when you’re done.
We’ll be using these tools to build our application:
We’ll be sending data to the server and using the Pusher Channels pub/sub pattern, we’ll listen to and receive data in realtime.
To get started with Pusher Channels, sign up for a free Pusher account. Then go to the dashboard and create a new Channels app. Then get your app keys.
Let’s build!
Setup and folder structure
We’ll initialize our project using the Ionic CLI (command line interface). First, install the CLI by running npm install -g ionic in your terminal. NPM is a package manager used for installing packages. It will be available on your PC if you have Node installed.
To create a new Ionic project called chat-app using the CLI, open a terminal and run:
ionic start ionic-polls blank
The command is simply telling the CLI to create a new project called ionic-polls without a template.
Follow the prompt and integrate your app with Cordova to target IOS and Android.
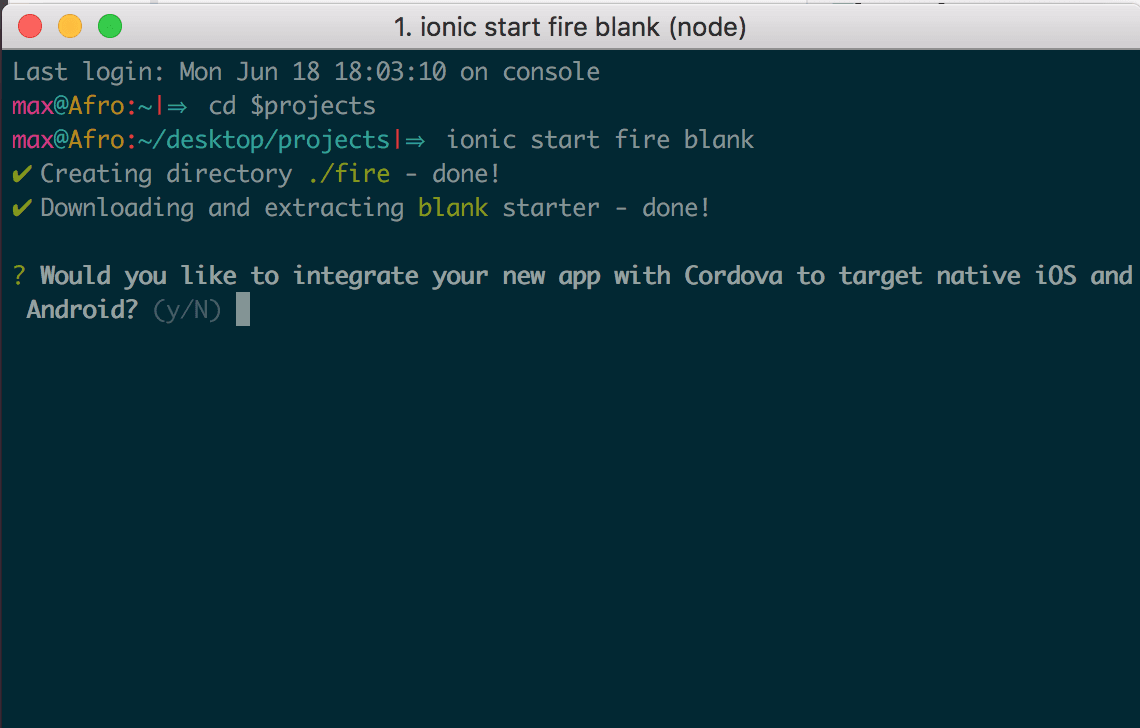
Type Y to integrate Cordova into the application. The next prompt will ask if you want to integrate Ionic pro into the application. If you have a pro account type Y and N if you don’t.
The Ionic team provides three ready made starter templates. You can check out the rest of the templates here.
Open the newly created folder, your folder structure should look something like this:
1chat-app/ 2 resources/ 3 node_modules/ 4 src/ 5 app/ 6 app.component.html 7 app.module.ts 8 app.scss 9 ...
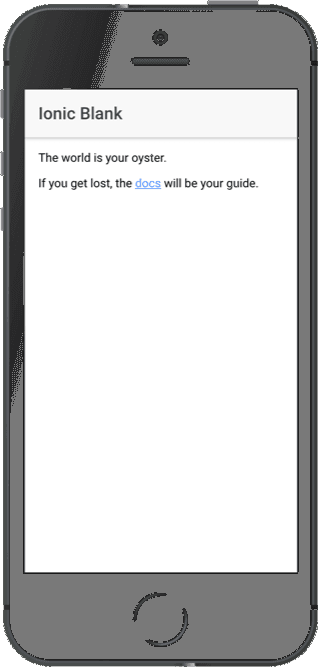
Open a terminal inside the project folder and start the application by running ionic serve. A browser window should pop up and you should see a page like this.
Installing dependencies
Next, run the following commands in the root folder of the project to install dependencies.
1// install depencies required to build the server 2 npm install express body-parser dotenv pusher 3 4 // front-end dependencies 5 npm install ng2-charts pusher-js
Start the Ionic development server by running ionic serve in a terminal in the root folder of your project.
Building our server
We’ll build our server using Express. Express is a fast, unopinionated, minimalist web framework for Node.js.
Create a file called server.js in the root of the project and update it with the code snippet below
1// server.js 2 3 require('dotenv').config(); 4 const express = require('express'); 5 const bodyParser = require('body-parser'); 6 const Pusher = require('pusher'); 7 8 const app = express(); 9 const port = process.env.PORT || 4000; 10 const pusher = new Pusher({ 11 appId: process.env.PUSHER_APP_ID, 12 key: process.env.PUSHER_KEY, 13 secret: process.env.PUSHER_SECRET, 14 cluster: process.env.PUSHER_CLUSTER, 15 }); 16 17 app.use(bodyParser.json()); 18 app.use(bodyParser.urlencoded({extended: false})); 19 app.use((req, res, next) => { 20 res.header('Access-Control-Allow-Origin', '*'); 21 res.header( 22 'Access-Control-Allow-Headers', 23 'Origin, X-Requested-With, Content-Type, Accept' 24 ); 25 next(); 26 }); 27 28 app.listen(port, () => { 29 console.log(`Server started on port ${port}`); 30 });
The calls to our endpoint will be coming in from a different origin. Therefore, we need to make sure we include the CORS headers (Access-Control-Allow-Origin). If you are unfamiliar with the concept of CORS headers, you can find more information here.
This is a standard Node application configuration, nothing specific to our app.
Create a Pusher account and a new Pusher Channels app if you haven’t done so yet and get your appId, key and secret. Create a file in the root folder of the project and name it .env. Copy the the following snippet into the .env file and ensure to replace the placeholder values with your Pusher credentials.
1// .env 2 3 // Replace the placeholder values with your actual pusher credentials 4 PUSHER_APP_ID=PUSHER_APP_ID 5 PUSHER_KEY=PUSHER_KEY 6 PUSHER_SECRET=PUSHER_SECRET 7 PUSHER_CLUSTER=PUSHER_CLUSTER
We’ll make use of the dotenv library to load the variables contained in the .env file into the Node environment. The dotenv library should be initalized as early as possible in the application.
Sending votes
To let users send requests to the server, we’ll create a route to handle incoming requests. Update your server.js file with the code below.
1// server.js 2 require('dotenv').config(); 3 ... 4 5 app.use((req, res, next) => { 6 res.header('Access-Control-Allow-Origin', '*'); 7 ... 8 }); 9 10 11 app.post('/vote', (req, res) => { 12 const {body} = req; 13 const data = { 14 ...body, 15 // set the selected property of the body to true 16 selected: true, 17 }; 18 // trigger a new-entry event on the vote-channel 19 pusher.trigger('vote-channel', 'new-entry', data); 20 res.json(data); 21 }); 22 23 ...
- We added a POST route(
/vote) to handle incoming requests. - Using object destructuring, we got the body of the request.
- The trigger is achieved using the
triggermethod which takes the trigger identifier(vote-channel), an event name (new-entry), and a payload. - The payload being sent contains the body of the request sent in. The
selectedproperty of the payload is set totrue.
Start the server by running node server in a terminal in the root folder of your project.
Home view
The home view of the project will house both the polling area and the area where the data is visualized. We’ll present the user with options and a submit button to place vote.
Open the home.html file and replace it with the content below. The home.html file is in the src/pages/home/ directory.
1<!-- src/pages/home/home.html --> 2 3 <ion-header> 4 <ion-navbar> 5 <ion-title> 6 Vote 7 </ion-title> 8 </ion-navbar> 9 </ion-header> 10 <ion-content> 11 <div padding> 12 <h1 class="header">Who will win the world cup?</h1> 13 <p class="sub-header">* Place vote to see results</p> 14 </div> 15 <div class="vote-area" *ngIf="!voted"> 16 <div class="options"> 17 <button ion-button full class="option" color="light" [ngClass]="{active: selectedOption === option}" *ngFor="let option of optionsArray" 18 (click)="selectOption(option)">{{options[option].name}}</button> 19 </div> 20 <div> 21 <button ion-button block class="submit" (click)="vote()">Submit Vote!</button> 22 </div> 23 </div> 24 <div class="result-area" *ngIf="voted"> 25 <!-- Charts area --> 26 </div> 27 </ion-content>
- In the code snippet above, we looped through
optionsArrayto create a view based on the player’s information. - The
votemethod will make use of theHttpClientto send the user’s selection as a request to the server. - An option is active if the current
selectedOptionis equal to the option’s name.
Variables used will be defined in the component’s TypeScript file.
Styling
Replace the contents of home.scss with the following:
1// src/pages/home/home.scss 2 3 page-home { 4 .toolbar-background { 5 background: #1cd8d2; /* fallback for old browsers */ 6 background: linear-gradient(to right, #93edc7, #1cd8d2); 7 } 8 .toolbar-title { 9 color: white; 10 } 11 .header { 12 font-size: 35px; 13 line-height: 1.1; 14 } 15 .sub-header{ 16 margin: 0; 17 opacity: 0.5; 18 font-size: 13px; 19 font-weight: bold; 20 } 21 .options { 22 margin-top: 1.5rem; 23 padding: 0 17px 5px; 24 .option { 25 margin: 15px 0; 26 padding-top: 32px; 27 padding-bottom: 32px; 28 opacity: 0.6; 29 font-size: 17px; 30 font-weight: bold; 31 box-shadow: 0 1px 1px 0 rgba(0, 0, 0, 0.2); 32 &.active { 33 border-left-width: 5px; 34 border-left-style: solid; 35 border-image: linear-gradient(to right, #93edc7, #1cd8d2) 1 100%; 36 box-shadow: 0 2px 2px 0 rgba(0, 0, 0, 0.2); 37 opacity: 0.9; 38 } 39 } 40 } 41 .submit { 42 background: #1cd8d2; /* fallback for old browsers */ 43 background: linear-gradient(to right, #93edc7, #1cd8d2); 44 border-radius: 0; 45 padding-top: 35px; 46 padding-bottom: 35px; 47 margin-bottom: 0; 48 font-size: 19px; 49 font-weight: bold; 50 } 51 .response{ 52 @extend .submit; 53 margin-top: 5rem; 54 } 55 }
These styles are meant to add a bit of life to our application. It also helps distinguish between states during application use.
Home component
In the HTML snippet, we made reference to some variables that weren’t yet defined, we’ll create the variables here with the logic behind our application.
1// src/pages/home/home.ts 2 3 import { Component, OnInit } from '@angular/core'; 4 import { NavController } from 'ionic-angular'; 5 import { HttpClient } from '@angular/common/http'; 6 7 @Component({ 8 selector: 'page-home', 9 templateUrl: 'home.html', 10 }) 11 export class HomePage implements OnInit { 12 constructor( 13 public navCtrl: NavController, 14 private http: HttpClient, 15 ) {} 16 options = { 17 germany: { name: 'Germany', votes: 0 }, 18 spain: { name: 'Spain', votes: 0 }, 19 france: { name: 'France', votes: 0 }, 20 nigeria: { name: 'Nigeria', votes: 0 }, 21 }; 22 optionsArray = Object.keys(this.options); 23 chartData = this.optionsArray.map((val) => this.options[val].votes); 24 selectedOption = ''; 25 chartType = 'doughnut'; 26 voted = false; 27 selectOption(option) { 28 this.selectedOption = this.selectedOption !== option ? option : ''; 29 } 30 computeData(option) { 31 this.options = { 32 ...this.options, 33 [option]: { 34 ...this.options[option], 35 votes: ++this.options[option].votes, 36 }, 37 }; 38 this.chartData = this.optionsArray.map((val) => this.options[val].votes); 39 } 40 vote() { 41 if (this.selectedOption) { 42 this.http 43 .post('http://localhost:4000/vote', { option: this.selectedOption }) 44 .subscribe((res) => { 45 this.voted = true; 46 }); 47 } 48 } 49 ngOnInit() { 50 51 } 52 }
vote: this method makes use of the native HttpClient service to make requests to our server. A request is sent, only if the user has made a selection. When a response is returned the voted property is set to true.
computeData: when a response is returned, this function takes the option and increments the votes for the selected option.
selectOption: this method will be used to set the selectedOption property to the option param passed it.
To make use of the HttpClient service, we’ll need to import the HttpClientModule into the app.module.ts file. Update your app module file as follows:
1// src/app/app.module.ts 2 3 ... 4 import { HomePage } from '../pages/home/home'; 5 import {HttpClient, HttpClientModule} from '@angular/common/http'; 6 7 @NgModule({ 8 ... 9 imports: [ 10 ... 11 HttpClientModule, 12 ], 13 ... 14 providers: [ 15 ... 16 HttpClient 17 ] 18 }) 19 export class AppModule {}
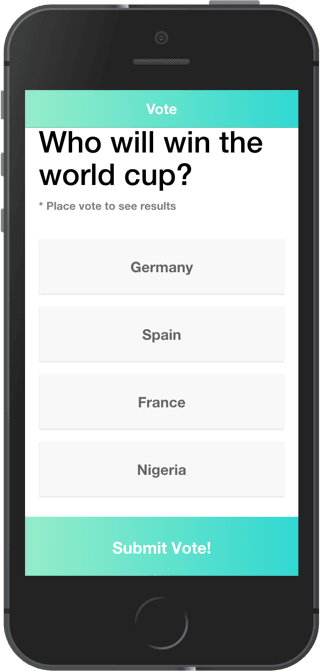
Let’s check how our application looks at this point. Make sure the server(node server) and Ionic dev server(ionic serve) are both running.
Introducing Pusher Channels
So far we have an application that allows users be a part of the polling process but data updates aren’t happening in realtime. Let’s create a provider that will make it easier to include Pusher Channels in our components.
We’ll create a Pusher provider to be used application wide. The Ionic CLI can aid in the provider creation. Open a terminal in your project’s root folder and run the following command.
ionic generate provider pusher
This command simply tells the CLI to generate a service named pusher. Now open the pusher.ts file in the src/providers/pusher/ directory and update it with the code below.
1// src/providers/pusher/pusher.ts 2 3 import { Injectable } from '@angular/core'; 4 import Pusher from 'pusher-js'; 5 6 @Injectable() 7 export class PusherProvider { 8 constructor() { 9 const pusher = new Pusher('PUSHER_KEY', { 10 cluster: 'PUSHER_CLUSTER', 11 }); 12 this.channel = pusher.subscribe('vote-channel'); 13 } 14 channel; 15 public init() { 16 return this.channel; 17 } 18 }
- First, we initialize Pusher in the constructor.
- The
initmethod returns the Pusher property we created.
NOTE: Ensure you replace the
PUSHER_KEYandPUSHER_CLUSTERstring with your actual credentials.
To make the service available application wide, import it into the app.module.ts file.
1// app.module.ts 2 ... 3 import {HttpClient, HttpClientModule} from '@angular/common/http'; 4 import { PusherProvider } from '../providers/pusher/pusher'; 5 6 @NgModule({ 7 ... 8 providers: [ 9 ... 10 PusherProvider, 11 ] 12 }) 13 export class AppModule {}
The next step is to include the provider in the home.ts file. Using the PusherProvider, we’ll listen for vote events from the server and update our app in real time according to votes placed by users.
Open the home.ts file and update the ngOnInit lifecycle to listen for Pusher events.
1// src/pages/home/home.ts 2 ... 3 import { PusherProvider } from '../../providers/pusher/pusher'; 4 5 @Component({ 6 selector: 'page-home', 7 templateUrl: 'home.html', 8 }) 9 export class HomePage implements OnInit { 10 constructor( 11 ... 12 private pusher: PusherProvider 13 ) {} 14 ... 15 16 ngOnInit() { 17 const channel = this.pusher.init(); 18 channel.bind('new-entry', (data) => { 19 this.computeData(data.option); 20 }); 21 }
Now our application should receive vote updates in realtime. Let’s include a chart component to visualize the data in the application.
Charts component
To visualize the data in our application, we’ll be making use of ng2-charts to create charts and present the data in a graphical format. Let’s make use of the components provided by the ng2-charts library. Update the home.html file to include the canvas provided by ng2-charts.
Open the home.html file and update it with the contents below:
1// src/pages/home/home.html 2 3 ... 4 5 <ion-content> 6 ... 7 <div class="result-area" *ngIf="voted"> 8 <canvas baseChart [data]="chartData" [labels]="optionsArray" [chartType]="chartType"></canvas> 9 <div ion-button block class="response">Thank you for voting!</div> 10 </div> 11 </ion-content>
To make use of the ng2-charts package, we’ll have to import the ChartsModule into our module file.
Update the app.module.ts file like so:
1// src/app/app.module.ts 2 ... 3 import {HttpClient, HttpClientModule} from '@angular/common/http'; 4 import {ChartsModule} from 'ng2-charts'; 5 6 @NgModule({ 7 ... 8 imports: [ 9 ... 10 HttpClientModule, 11 ChartsModule 12 ], 13 ... 14 }) 15 ...
At this point, your application should have realtime updates when votes are placed. Ensure that the server is running alongside the Ionic development server. If not, run node server and ionic serve in two separate terminals. Both terminals should be opened in the root folder of your project.
To test the realtime functionality of the application, open two browsers side-by-side and engage the application. Data updates should be in realtime.
Testing on mobile devices
To test the application on your mobile device, download the IonicDevApp on your mobile device. Make sure your computer and your mobile device are connected to the same network. When you open the IonicDevApp, you should see Ionic apps running on your network listed.
NOTE: Both the server(
node server), ngrok for proxying our server and the Ionic dev server(ionic serve) must be running to get the application working. Run the commands in separate terminal sessions if you haven’t done so already.
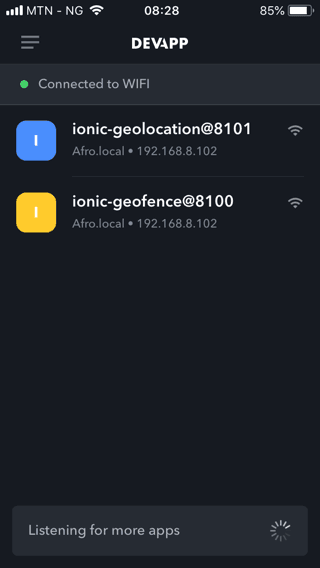
To view the application, click on it and you should see a similar view to what was in the browser. Sending messages to the server might have worked in the browser but localhost doesn’t exist on your phone, so we’ll need to create a proxy to be able to send messages from mobile.
Using Ngrok as a proxy
To create a proxy for our server, we’ll download Ngrok. Visit the download page on the Ngrok website. Download the client for your OS. Unzip it and run the following command in the folder where Ngrok can be found:
./ngrok http 4000
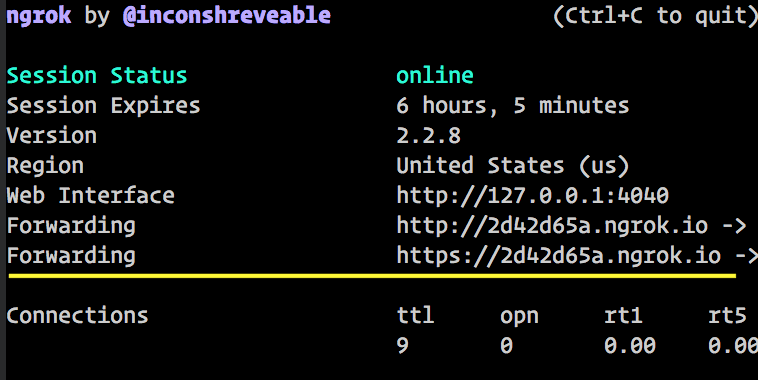
Copy the forwarding url with https and place it in the home.ts file that previously had http://localhost:4000/vote. Please do not copy mine from the screenshot above.
1// src/pages/home/home.ts 2 ... 3 export class ChatComponent implements OnInit { 4 ... 5 vote() { 6 ... 7 this.http 8 .post('<NGROK_URL>/vote', data) 9 .subscribe((res) => { 10 this.voted = true; 11 }); 12 } 13 ... 14 } 15 ...
NOTE: Ensure to include the forwarding URL you copied where the placeholder string is
Now you should be receiving messages sent from the phone on the browser. Preferably you can test it with two mobile devices connected to the same network.

NOTE: Both the server(
node server), ngrok for proxying our server and the Ionic dev server(ionic serve) must be running to get the application working. Run the commands in separate terminal sessions if you haven’t done so already.
To build your application to deploy on either the AppStore or PlayStore, follow the instructions found here.
Conclusion
Using Pusher Channels, we’ve built out an application using the pub/sub pattern to receive realtime updates. With the help of Chart.js, our data was well presented using charts. You can check out the repo containing the demo on GitHub.