- Products

- Developers
- User stories
- Blog
- Pricing

Build live comments using Swift
Introduction
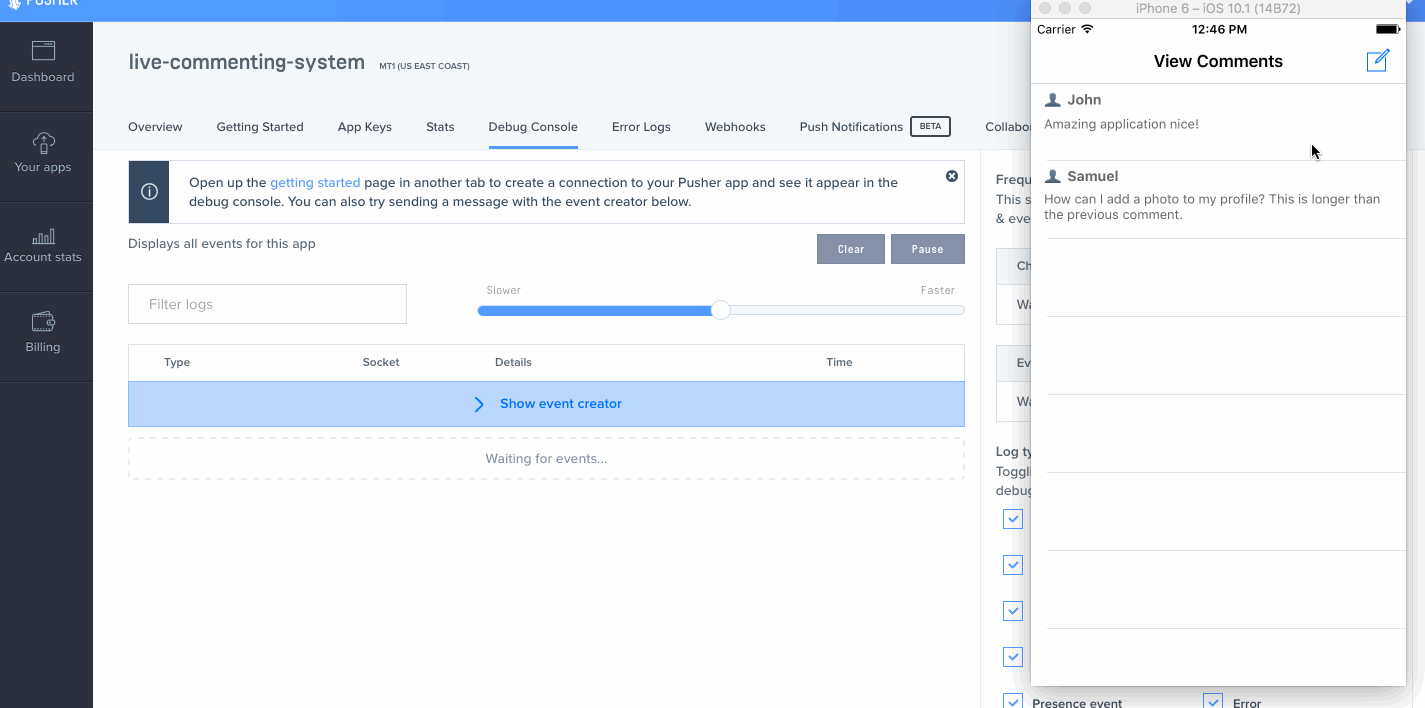
Many applications come with a section where users can comment on the item they are previewing. When a comment is posted, while you are looking at this item, the best UX is to see the comment immediately as it is made by the user. In this tutorial we will demonstrate how we can achieve a live commenting feature using Pusher on an iOS application.
We will be building a gallery viewing application with comments. You can add your own comment to the item and it will be available instantly to other users looking at the item. For the sake of brevity, we will be building a very basic application and focusing more on the implementation than the design. When we are done, we should be able to achieve something like what's shown below:
Setting up our XCode project
Create a new project on XCode and call it whatever you want. We will name ours "showcaze". You can simply follow the wizard XCode provides. Select the single page application as the base template. Once you are done with this, you will need to prepare the dependencies to be used by the application.
The easiest way install dependencies is by using CocoaPods. If you don’t have CocoaPods installed you can install them via RubyGems.
gem install cocoapods
Then configure CocoaPods in our application. First initialise the project by running this command in the top-level directory of your XCode project:
pod init
This will create a file called Podfile. Open it in your text editor, and make sure to add the following lines specifying your application's dependencies:
1# Uncomment the next line to define a global platform for your project 2platform :ios, '8.0' 3 4target 'showcaze' do 5 # Comment the next line if you're not using Swift and don't want to use dynamic frameworks 6 use_frameworks! 7 8 # Pods for showcaze 9 pod 'PusherSwift', '~> 4.0' 10 pod 'Alamofire', '~> 4.4' 11end
And then run pod install to download and install the dependencies. When cocoapods asks you to, close XCode. Now open the project_name.xcworkspace file in the root of your project, in my case, the showcaze.xcworkspace file. This should launch XCode.
Note: Because we are using the latest version of XCode which contains Swift 3, we are using specific dependency versions that are compatible with it. You might need to use a lower dependency version tag depending on your XCode and Swift version.
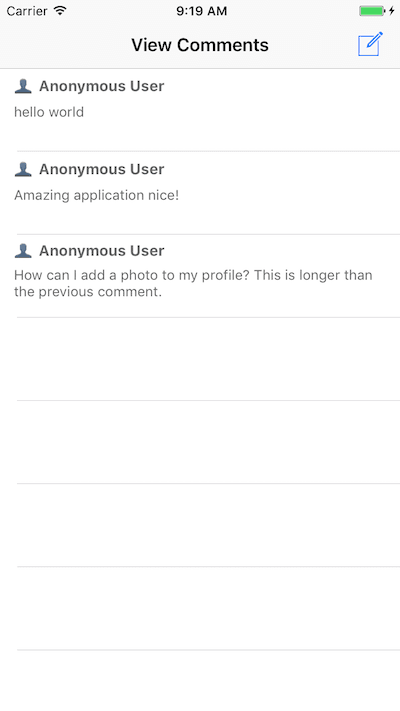
Creating our status updates list view
We want to display the available comments and then allow people to add comments to this list. When we are done we want to have a simple view just like this.
Open the Main storyboard and delete the current View Controller scene. Drag a new UITableViewController into the scene. Create a CommentsTableViewController and associate the newly created View Controller scene with it. Finally, while the view controller is selected in the storyboard, from XCode toolbar click Editor > Embed In > Navigation Controller.
After this, you should add the labels as needed to the prototype cell, add a reuse identifier and create a CommentTableViewCell class and make it the custom class for the prototype table cell.
This is the source of the CommentTableViewCell:
1import UIKit 2 3class CommentTableViewCell: UITableViewCell { 4 @IBOutlet weak var username: UILabel! 5 @IBOutlet weak var comment: UITextView! 6}
Note there are two
@IBOutlets in the class. You need to create the cell label and text view thenControl + Dragthem to theCommentTableViewCellclass to create IBOutlets.
This is the source of the CommentsTableViewController:
1import UIKit 2import Alamofire 3import PusherSwift 4 5class CommentsTableViewController: UITableViewController { 6 7 let MESSAGES_ENDPOINT = "https://live-commenting-ios.herokuapp.com/" 8 9 var pusher: Pusher! 10 11 var comments = [ 12 ["username": "John", "comment": "Amazing application nice!"], 13 ["username": "Samuel", "comment": "How can I add a photo to my profile? This is longer than the previous comment."] 14 ] 15 16 override func viewDidLoad() { 17 super.viewDidLoad() 18 19 tableView.rowHeight = 78; 20 navigationItem.title = "View Comments" 21 22 listenForNewComments() 23 addComposeButtonToNavigationBar() 24 } 25 26 27 private func listenForNewComments() -> Void { 28 pusher = Pusher(key: "PUSHER_API_KEY") 29 let channel = pusher.subscribe("comments") 30 let _ = channel.bind(eventName: "new_comment", callback: { (data: Any?) -> Void in 31 if let data = data as? [String: AnyObject] { 32 let comment = ["username":"Anonymous", "comment": (data["text"] as! String)] 33 34 self.comments.insert(comment, at: 0) 35 36 self.tableView.beginUpdates() 37 self.tableView.insertRows(at: [IndexPath(row: 0, section: 0)], with: .automatic) 38 self.tableView.endUpdates() 39 } 40 }) 41 pusher.connect() 42 } 43 44 private func addComposeButtonToNavigationBar() -> Void { 45 let button = UIBarButtonItem(barButtonSystemItem: .compose, 46 target: self, 47 action: #selector(buttonTapped)) 48 navigationItem.setRightBarButton(button, animated: false) 49 } 50 51 func buttonTapped() -> Void { 52 let alert = UIAlertController(title: "Post", 53 message: "Enter a comment and see it inserted in real time using Pusher", 54 preferredStyle: .alert) 55 56 alert.addTextField { (textField) in 57 textField.text = nil 58 textField.placeholder = "Enter comment" 59 } 60 61 alert.addAction(UIAlertAction(title: "Add Comment", style: .default, handler: { [weak alert] (_) in 62 let textField = alert?.textFields![0] 63 64 if (textField?.hasText)! { 65 self.postComment(comment: (textField?.text)!) 66 } 67 })) 68 69 alert.addAction(UIAlertAction(title: "Cancel", style: UIAlertActionStyle.cancel, handler: nil)) 70 71 self.present(alert, animated: true, completion: nil) 72 } 73 74 private func postComment(comment: String) -> Void { 75 Alamofire.request(MESSAGES_ENDPOINT, method: .post, parameters: ["comment": comment]) 76 .validate() 77 .responseJSON { response in 78 switch response.result { 79 case .success: 80 print("Posted successfully") 81 case .failure(let error): 82 print(error) 83 } 84 } 85 } 86 87 88 // MARK: - Table view data source 89 90 override func numberOfSections(in tableView: UITableView) -> Int { 91 return 1 92 } 93 94 override func tableView(_ tableView: UITableView, numberOfRowsInSection section: Int) -> Int { 95 return comments.count 96 } 97 98 override func tableView(_ tableView: UITableView, cellForRowAt indexPath: IndexPath) -> UITableViewCell { 99 let cell = tableView.dequeueReusableCell(withIdentifier: "CommentCell", for: indexPath) as! CommentTableViewCell 100 101 cell.username?.text = "? " + (comments[indexPath.row]["username"] ?? "Anonymous") 102 cell.comment?.text = comments[indexPath.row]["comment"] 103 104 return cell 105 } 106}
To highlight some important parts of the code, lets break a few down.
1private func listenForNewComments() -> Void { 2 pusher = Pusher(key: "PUSHER_API_KEY") 3 let channel = pusher.subscribe("comments") 4 let _ = channel.bind(eventName: "new_comment", callback: { (data: Any?) -> Void in 5 if let data = data as? [String: AnyObject] { 6 let text = data["text"] as! String 7 self.comments.insert(text, at: 0) 8 self.tableView.beginUpdates() 9 self.tableView.insertRows(at: [IndexPath(row: 0, section: 0)], with: .automatic) 10 self.tableView.endUpdates() 11 } 12 }) 13 pusher.connect() 14 }
This function basically initialises the Pusher Swift SDK, subscribes to a channel's comments, listens for an event new_comment and then fires a callback when that event is triggered from anywhere. In the callback, the text is appended to the top of the table data, then the tableView is updated with the new row.
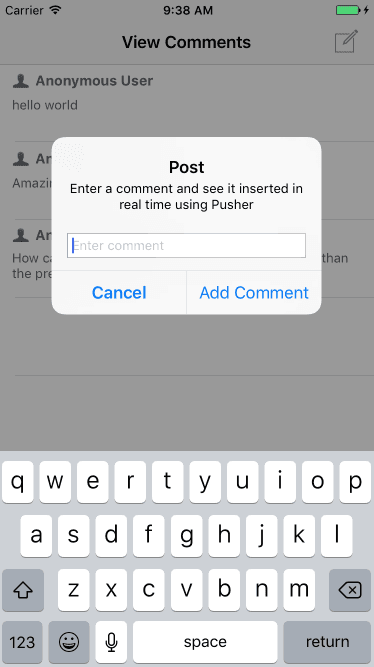
1private func addComposeButtonToNavigationBar() -> Void { 2 let button = UIBarButtonItem(barButtonSystemItem: .compose, 3 target: self, 4 action: #selector(buttonTapped)) 5 navigationItem.setRightBarButton(button, animated: false) 6 } 7 8 func buttonTapped() -> Void { 9 let alert = UIAlertController(title: "Post", 10 message: "Enter a comment and see it inserted in real time using Pusher", 11 preferredStyle: .alert) 12 13 alert.addTextField { (textField) in 14 textField.text = nil 15 textField.placeholder = "Enter comment" 16 } 17 18 alert.addAction(UIAlertAction(title: "Add Comment", style: .default, handler: { [weak alert] (_) in 19 let textField = alert?.textFields![0] 20 21 if (textField?.hasText)! { 22 self.postComment(comment: (textField?.text)!) 23 } 24 })) 25 26 alert.addAction(UIAlertAction(title: "Cancel", style: UIAlertActionStyle.cancel, handler: nil)) 27 28 self.present(alert, animated: true, completion: nil) 29 }
This block simply adds a compose button at the right of the navigation bar. It fires a buttonTapped callback when the button is well tapped. The buttonTap callback launches an alert view controller with a text field where the comment text is supposed to be entered in.
Connecting to Pusher
Create a new Pusher account (it's free) if you do not already have one. Create a new application and retrieve your keys. This is the key you will use above. When you have your keys, you can plug it above and also below in the back-end service.
Building the backend
Now that we have our application subscribed to the Pusher event and also posting comments, we will have to build a backend to support it. For the backend, I have made a simple PHP script. It will be uploaded as a part of the repository. You will need to host somewhere if you wish to use the demo, we have chosen Heroku for this.
Here is our simple PHP script:
1<?php 2// 3require('vendor/autoload.php'); 4 5$comment = $_POST['comment'] ?? false; 6 7if ($comment) { 8 $status = "success"; 9 10 $options = ['encrypted' => true]; 11 12 $pusher = new Pusher('PUSHER_API_KEY', 'PUSHER_API_SECRET', 'PUSHER_APP_ID', $options); 13 14 $pusher->trigger('comments', 'new_comment', ['text' => $comment]); 15} else { 16 $status = "failure"; 17} 18 19header('Content-Type: application/json'); 20echo json_encode(["result" => $status]);
Heres the composer.json file to install dependencies:
1{ 2 "require": { 3 "pusher/pusher-php-server": "^2.6" 4 }, 5 "require-dev": { 6 "heroku/heroku-buildpack-php": "*" 7 } 8}
The dev dependency is only useful if you are deploying the test script to Heroku, and here's the Procfile if you are:
web: vendor/bin/heroku-php-apache2 ./
Now that we have the server running, whenever you make a comment on the application, it will be sent to Pusher and then the page will be updated with it.
Conclusion
Now we have built a live commenting feature for your iOS app. Hopefully, you have learnt a thing or two on how to use the Pusher iOS Swift SDK to make realtime updates to your iOS application. If you have done something great on your own, leave a comment below and share it with us.


© 2026 Pusher Ltd. All rights reserved.
Pusher Limited is a company registered in England and Wales (No. 07489873) whose registered office is at MessageBird UK Limited, 3 More London Riverside, 4th Floor, London, United Kingdom, SE1 2AQ.