Live comments and ratings using sentiment analysis and Angular
Introduction
Introduction
Sentiment analysis is a way to evaluate written or spoken language to determine if the expression is favorable, unfavorable, or neutral, and to what degree. You can read up about it here.
Live comments offer a realtime comment experience that doesn’t require a page refresh. You see comments when they’re posted.
Using Angular, you can extend the template language with your components and use a wide array of existing components. With Pusher Channels we can enable realtime messaging in the chat using Pushers pub/sub pattern.
We’ll be building a live comments application using Pusher, Angular and the sentiment library for emoji suggestions based on the context of messages received.
Using our application, admin users can view how videos are rated based on the analysis of the messages sent in the live comments section.
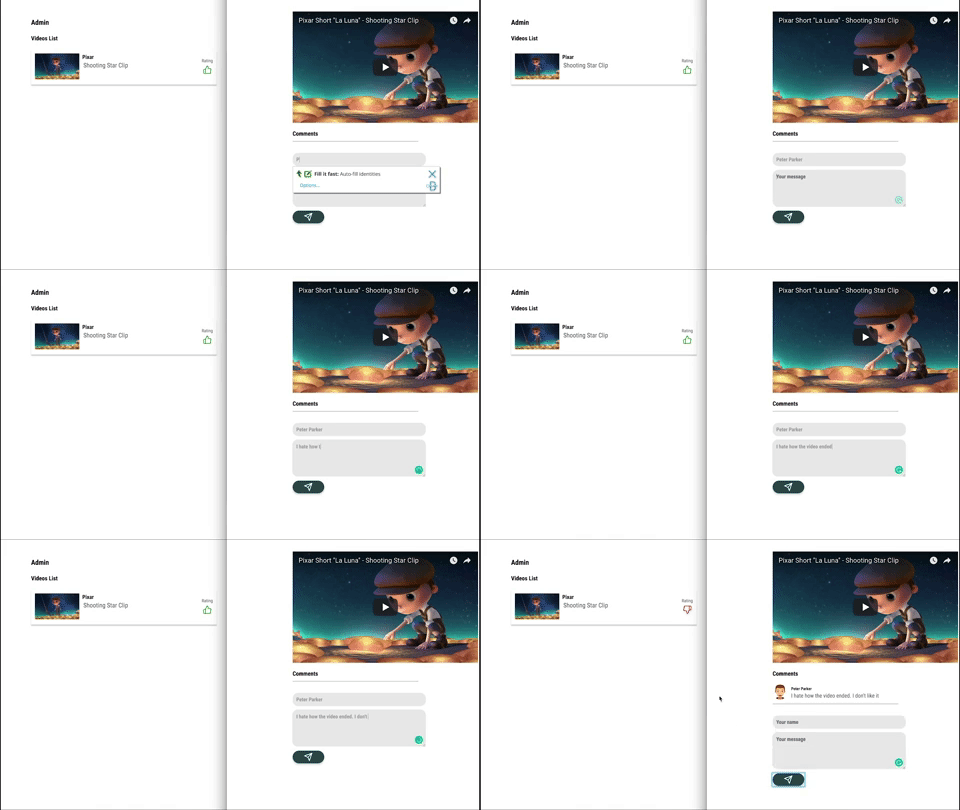
Here’s a demo of the final product:
Prerequisites
To follow this tutorial a basic understanding of Angular and Node.js is required. Please ensure that you have Node and npm installed before you begin.
We’ll be using these tools to build out our application:
We’ll be sending messages to the server, then using the Pusher’ pub/sub pattern, we’ll listen and receive messages in realtime. Create a free sandbox Pusher account or sign in. Then visit the dashboard. Click Create new Channels app, fill out the details, click Create my app, and make a note of the details on the App Keys tab.
Let’s build!
Setup and folder structure
Using the Angular CLI (command line interface) provided by the Angular team, we’ll initialize our project. To initialize the project, first, install the CLI by running npm install @angular/cli in your terminal. NPM is a package manager used for installing packages. It will be available on your PC if you have Node installed.
To create a new Angular project using the CLI, open a terminal and run:
ng new angular-live-comments --style=scss --routing
The command tells the CLI to create a new project called angular-live-comments, use the CSS pre-processor SCSS rather than CSS for styling and set up routing for the application.
Open the newly created folder angular-live-comments, your folder structure should be identical to this:
1angular-live-comments/ 2 e2e/ 3 node_modules/ 4 src/ 5 app/ 6 app.component.html 7 app.component.ts 8 app.component.css 9 ...
Open a terminal inside the project folder and start the application by running ng serve or npm start. Open your browser and visit http://localhost:4200. What you see should be identical to the screenshot below.
Building our server
Now that we have our Angular application running, let’s build out a part of our server.
To do this we’ll need to install Express. Express is a fast, unopinionated, minimalist web framework for Node.js. We’ll use this to receive requests from our Angular application.
To install express, run npm install express in a terminal in the root folder of your project.
Create a file called server.js in the root of the project and update it with the code snippet below
1// server.js 2 3 require('dotenv').config(); 4 const express = require('express'); 5 const bodyParser = require('body-parser'); 6 7 const app = express(); 8 const port = process.env.PORT || 4000; 9 10 app.use(bodyParser.json()); 11 app.use(bodyParser.urlencoded({ extended: false })); 12 app.use((req, res, next) => { 13 res.header('Access-Control-Allow-Origin', '*'); 14 res.header( 15 'Access-Control-Allow-Headers', 16 'Origin, X-Requested-With, Content-Type, Accept' 17 ); 18 next(); 19 }); 20 21 app.listen(port, () => { 22 console.log(`Server started on port ${port}`); 23 });
We referenced three packages that haven’t been installed, body-parser, pusher and dotenv. Install these packages by running the following command in your terminal.
npm i body-parser pusher dotenv
- body-parser is a package used to parse incoming request bodies in a middleware before your handlers, available under the
req.bodyproperty. - dotenv is a zero-dependency module that loads environment variables from a
.envfile into[process.env](https://nodejs.org/docs/latest/api/process.html#process_process_env). This package is used to avoid adding sensitive information like theappIdandsecretinto our codebase directly. - The dotenv package will load the variables provided in our
.envfile into our environment. - CORS: The calls to our endpoint will be coming in from a different origin. Therefore we need to make sure we include the CORS headers (
Access-Control-Allow-Origin). If you are unfamiliar with the concept of CORS headers, you can find more information here.
The dotenv library should always be initialized at the start of our file because we need to load the variables as early as possible to make them available throughout the application.
We also installed the Pusher library as a dependency. Follow the steps above to create a Pusher account if you haven’t done so already
Let’s create a .env file to load the variables we’ll be needing into the Node environment. Create the file in the root folder of your project and update it with the code below.
1// .env 2 3 PUSHER_APP_ID=APP_ID 4 PUSHER_KEY=PUSHER_KEY 5 PUSHER_SECRET=PUSHER_SECRET
Please ensure you replace the placeholder values above with your Pusher appId, key and secret.
This is a standard Node application configuration, nothing specific to our app.
Sending messages
To enable users to send and receive messages, we’ll create a route to handle incoming requests. Update your server.js file with the code below.
1// server.js 2 3 require('dotenv').config(); 4 const express = require('express'); 5 const bodyParser = require('body-parser'); 6 const Pusher = require('pusher'); 7 8 const pusher = new Pusher({ 9 appId: process.env.PUSHER_APP_ID, 10 key: process.env.PUSHER_KEY, 11 secret: process.env.PUSHER_SECRET, 12 cluster: 'eu', 13 encrypted: true, 14 }); 15 16 ... 17 18 app.use((req, res, next) => { 19 res.header('Access-Control-Allow-Origin', '*'); 20 res.header( 21 'Access-Control-Allow-Headers', 22 'Origin, X-Requested-With, Content-Type, Accept' 23 ); 24 next(); 25 }); 26 27 app.post('/messages', (req, res) => { 28 const { body } = req; 29 const { text, name } = body; 30 const data = { 31 text, 32 name, 33 timeStamp: new Date(), 34 }; 35 36 try { 37 pusher.trigger(['chat', 'rate'], 'message', data); 38 } catch (e) {} 39 res.json(data); 40 }); 41 42 ...
- We created a
POST /messagesroute which, when hit, triggers a Pusher event. - We used object destructuring to get the body of the request, we also got the
textandnamein the request body sent by the user. - The
dataobject contains thetextandnamesent by the user. It also includes a timestamp. - The
triggermethod which takes a trigger identifier, we included a list of channels because we wish to dispatch the event across two channels(chat,rate). - The trigger function also takes a second argument, the event name (
message), and a payload(data). - We still go ahead to respond with an object containing the
datavariable we created.
Sentiment analysis
Sentiment analysis uses data mining processes and techniques to extract and capture data for analysis in order to discern the subjective opinion of a document or collection of documents, like blog posts, reviews, news articles and social media feeds like tweets and status updates. - Technopedia
Using sentiment analysis, we’ll analyze the messages sent to determine the attitude of the sender. With the data gotten from the analysis, we’ll determine the emojis to suggest to the user.
We’ll use the Sentiment JavaScript library for analysis. To install this library, open a terminal in the root folder of your project and run the following command.
npm install sentiment
We’ll update our POST /messages route to include analysis of the messages being sent in. Update your server.js with the code below.
1// server.js 2 require('dotenv').config(); 3 const express = require('express'); 4 const bodyParser = require('body-parser'); 5 const Pusher = require('pusher'); 6 7 const Sentiment = require('sentiment'); 8 const sentiment = new Sentiment(); 9 10 ... 11 12 app.post('/messages', (req, res) => { 13 const { body } = req; 14 const { text, name } = body; 15 const result = sentiment.analyze(text); 16 const comparative = result.comparative; 17 18 const data = { 19 text, 20 name, 21 timeStamp: new Date(), 22 score: result.score, 23 }; 24 try { 25 pusher.trigger(['chat', 'rate'], 'message', data); 26 } catch (e) {} 27 res.json(data); 28 }); 29 30 ...
- Include the sentiment library in the project.
result: here, we analyze the message sent in by the user to determine the context of the message.comparative: this is the comparative score gotten after analyzing the message.- A new property (
score) is added to the response data containing the message’s score after analysis.
You can now start the server by running node server.js in a terminal in the root folder of the project.
Chat view
Let’s begin to build out our chat interface. We’ll create a chat component to hold the chat interface. We’ll create this using the CLI. Run ng generate component chat in a terminal in the root folder of your project.
Update the recently created files as follows:
1// chat.component.html 2 3 <div> 4 <div class="input-area"> 5 <form (submit)="sendMessage()" name="messageForm" #messageForm="ngForm"> 6 <div> 7 <input type="text" placeholder="Your name" name="name" id="name" [(ngModel)]="message.name"> 8 <textarea type="text" placeholder="Your message" name="message" id="message" [(ngModel)]="message.text" rows="5"></textarea> 9 </div> 10 <button> 11 <span data-feather="send"></span> 12 </button> 13 </form> 14 </div> 15 </div>
In the code snippet above:
- We have a form containing an input element, a textarea and a submit button.
- We are using an icon-set called feather-icons in our project. To include feather-icons in your project, simply add the cdn link in your
index.htmlfile.
1// index.html 2 ... 3 <script src="https://unpkg.com/feather-icons/dist/feather.min.js"></script> 4 </body> 5 ...
Open the chat.component.ts file and update with the code below:
1// chat.component.ts 2 3 import { Component, OnInit, Output, EventEmitter } from '@angular/core'; 4 import { HttpClient } from '@angular/common/http'; 5 declare const feather: any; 6 export interface Message { 7 text: string; 8 name: string; 9 } 10 @Component({ 11 selector: 'app-chat', 12 templateUrl: './chat.component.html', 13 styleUrls: ['./chat.component.scss'], 14 }) 15 export class ChatComponent implements OnInit { 16 constructor(private http: HttpClient) {} 17 @Output() onSendMessage: EventEmitter<Message> = new EventEmitter(); 18 message = { 19 name: '', 20 text: '', 21 }; 22 sendMessage() { 23 if (this.message.text !== '' && this.message.name !== '') { 24 this.http 25 .post(`http://localhost:4000/messages`, this.message) 26 .subscribe((res: Message) => { 27 this.onSendMessage.emit(res); 28 this.message = { 29 name: '', 30 text: '', 31 }; 32 }); 33 } 34 } 35 ngOnInit() { 36 feather.replace(); 37 } 38 }
sendMessage: this method uses the native HttpClient to make requests to the server. The POST method takes a URL and the request body as parameters. We then append the data returned to the array of messages.
In the ngOnInit lifecycle, we initialize [feather](https://feathericons.com), our chosen icon set.
To make use of the HttpClient service, we’ll need to import the HttpClientModule into the app.module.ts file. Also to make use of form-related directives, we’ll need to import the FormsModule. Update your app module file as follows:
1// app.module.ts 2 ... 3 import { ChatComponent } from './chat/chat.component'; 4 import {HttpClientModule} from '@angular/common/http'; 5 import {FormsModule} from "@angular/forms"; 6 7 @NgModule({ 8 declarations: [AppComponent, ChatComponent], 9 imports: [BrowserModule, AppRoutingModule, HttpClientModule, FormsModule], 10 providers: [], 11 bootstrap: [AppComponent], 12 }) 13 ...
Styling
Open the chat.component.scss file and update it with the following styles below:
1// chat.component.scss 2 3 %input { 4 width: 100%; 5 border: none; 6 background: rgba(0, 0, 0, 0.08); 7 padding: 10px; 8 color: rgba(0, 0, 0, 0.3); 9 font-size: 14px; 10 font-weight: bold; 11 font-family: 'Roboto Condensed', sans-serif; 12 border-radius: 15px; 13 &:focus{ 14 outline: none; 15 } 16 } 17 .input-area { 18 width: 100%; 19 form { 20 display: flex; 21 flex-direction: column; 22 div { 23 display: flex; 24 flex-direction: column; 25 max-width: 450px; 26 input { 27 @extend %input; 28 margin: 0 0 10px 0; 29 } 30 textarea { 31 @extend %input; 32 } 33 } 34 button { 35 width: 25%; 36 border: none; 37 background: darkslategray; 38 color: white; 39 display: flex; 40 justify-content: center; 41 align-items: center; 42 cursor: pointer; 43 margin-top: 10px; 44 padding: 5px 20px; 45 border-radius: 27px; 46 box-shadow: 0 4px 8px 0 rgba(0, 0, 0, 0.12), 47 0 2px 4px 0 rgba(0, 0, 0, 0.08); 48 } 49 } 50 }
Home view
Let’s create the home component, this will house (pun intended) our chat component, video and list of messages. Run ng generate component home in a terminal in the root folder of your project.
Open the home.component.html file and replace the contents with the snippet below.
1// home.component.html 2 3 <div> 4 <div class="video"> 5 <iframe width="500" height="300" src="https://www.youtube.com/embed/7CVtTOpgSyY" frameborder="0" allow="autoplay; encrypted-media" 6 allowfullscreen></iframe> 7 </div> 8 <div class="messages"> 9 <h4>Messages</h4> 10 <div class="message" *ngFor="let message of messages"> 11 <div class="pic"> 12 <img src="/assets/man.svg" alt="profile-img"> 13 </div> 14 <div class="message-text"> 15 <span>{{message.name}}</span> 16 <p>{{message.text}}</p> 17 </div> 18 </div> 19 </div> 20 <app-chat></app-chat> 21 </div>
NOTE: you can find the assets used throughout the article in the GitHub repo.
Open the home.component.ts file and update it with the following snippet:
1// home.component.ts 2 3 import { Component, OnInit } from '@angular/core'; 4 import { Message } from '../chat/chat.component'; 5 6 @Component({ 7 selector: 'app-home', 8 templateUrl: './home.component.html', 9 styleUrls: ['./home.component.scss'], 10 }) 11 12 export class HomeComponent implements OnInit { 13 constructor() {} 14 messages: Array<Message> = []; 15 ngOnInit() { 16 } 17 }
Styling
Open the home.component.scss file and update it with the styles below:
1.video { 2 width: 500px; 3 height: 300px; 4 background: rgba(0, 0, 0, 0.2); 5 margin-bottom: 20px; 6 } 7 .messages { 8 margin-bottom: 30px; 9 border-bottom: 2px solid rgba(0, 0, 0, 0.2); 10 max-width: 500px; 11 h4 { 12 margin: 10px 0; 13 } 14 .message { 15 display: flex; 16 .pic { 17 display: flex; 18 align-items: center; 19 img { 20 height: 40px; 21 width: 40px; 22 border-radius: 50%; 23 } 24 } 25 .message-text { 26 padding: 10px; 27 span { 28 font-size: 11px; 29 opacity: 0.8; 30 font-weight: bold; 31 } 32 p { 33 font-size: 15px; 34 opacity: 0.6; 35 margin: 2px 0; 36 } 37 } 38 } 39 }
Introducing Pusher
So far we have an application that allows users send in comments, but these comments are only visible to the sender. We’ll include the Pusher library in our application to enable realtime features like seeing comments as they come in without having to refresh the page.
Open a terminal in the root folder of the project and install the package by running the following command:
npm install pusher-js
We’ll add the library as a third party script to be loaded by Angular CLI. CLI config is always stored in the .angular-cli.json file. Modify the scripts property to include the link to pusher.min.js.
1// .angular-cli.json 2 ... 3 4 "scripts": [ 5 "../node_modules/pusher-js/dist/web/pusher.min.js" 6 ] 7 ...
Now that Pusher has been made available in our project, we’ll create a Pusher service to be used application wide. The Angular CLI can aid in the service creation. Open a terminal in your project’s root folder and run the following command.
ng generate service pusher
This command simply tells the CLI to generate a service named pusher. Now open the pusher.service.ts file and update it with the code below.
1// pusher.service.ts 2 3 import { Injectable } from '@angular/core'; 4 declare const Pusher: any; 5 @Injectable() 6 export class PusherService { 7 constructor() { 8 // Replace this with your pusher key 9 this.pusher = new Pusher('<PUSHER_KEY>', { 10 cluster: 'eu', 11 encrypted: true, 12 }); 13 } 14 pusher; 15 public init(channel) { 16 return this.pusher.subscribe(channel); 17 } 18 }
- First, we initialize Pusher in the constructor.
- The
initsubscribes to the channel passed as a parameter.
NOTE: ensure you replace the
PUSHER_KEYstring with your actual Pusher key.
To make the service available application wide, import it into the module file.
1// app.module.ts 2 ... 3 import { HttpClientModule } from '@angular/common/http'; 4 import {PusherService} from './pusher.service'; 5 6 @NgModule({ 7 .... 8 providers: [PusherService], 9 .... 10 })
We’ll make use of this service in our component, by binding to the message event and appending the returned message into the list of messages. This will be done in the ngOnInit lifecycle in the home.component.ts file.
1// home.component.ts 2 import { Component, OnInit } from '@angular/core'; 3 import { Message } from '../chat/chat.component'; 4 import { PusherService } from '../pusher.service'; 5 ... 6 7 constructor(private pusher: PusherService){} 8 messages: Array<Message> = []; 9 10 ngOnInit() { 11 const channel = this.pusher.init('chat'); 12 channel.bind('message', (data) => { 13 this.messages = this.messages.concat(data); 14 }); 15 } 16 }
Routing
To enable routing between the home and admin page, we’ll define routes for each component in the app-routing.module.ts file.
1// app-routing.module.ts 2 3 import { NgModule } from '@angular/core'; 4 import { Routes, RouterModule } from '@angular/router'; 5 import { HomeComponent } from './home/home.component'; 6 7 const routes: Routes = [ 8 { 9 component: HomeComponent, 10 path: '', 11 }, 12 ]; 13 14 @NgModule({ 15 imports: [RouterModule.forRoot(routes)], 16 exports: [RouterModule], 17 }) 18 19 export class AppRoutingModule {}
routes: previously, the routes variable was an empty array, but we’ve updated it to include two objects containing our route component and path.
Next we’ll replace all the contents in your app.component.html file leaving just the router-outlet. Your app.component.html file should look like the snippet below:
1// app.component.html 2 3 <div class="main"> 4 <router-outlet></router-outlet> 5 </div>
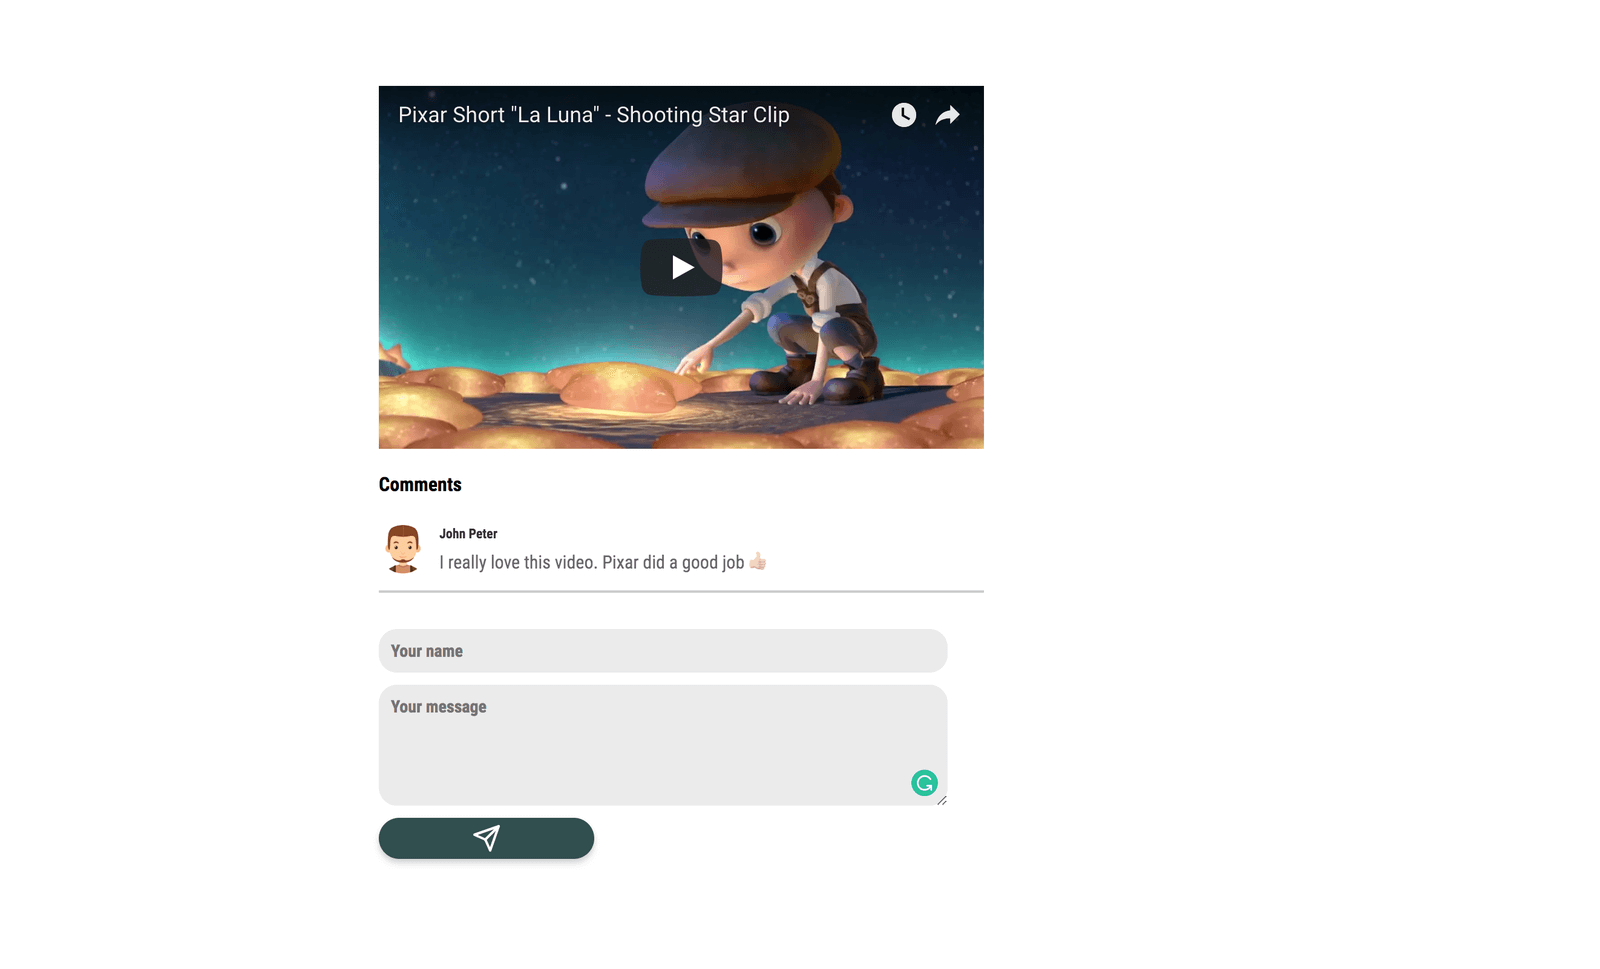
Let’s have a look at what our home page looks like after the updates. Navigate to http://localhost:4200
Admin page
Whenever we post a video, we want to be able to tell how the video was perceived by users using their comments on the video. Sentiment analysis is used to achieve this. All comments under the video will be analyzed to determine the user’s attitude towards the video. All videos posted will be rated based on the tone of every comment posted.
If the comments under a video are mostly negative, the video will get a simple thumbs down(👎🏼) and a thumbs up(👍🏼) if the comments are positive.
To create the admin page, run ng generate component admin in a terminal in the root folder of your project.
Replace the contents of the admin.component.html file with the snippet below.
1// admin.component.html 2 3 <div class="admin"> 4 <h3>Admin</h3> 5 <div> 6 <h4>Videos List</h4> 7 <div class="video"> 8 <div class="vid-thumbnail"> 9 <img src="/assets/vid-thumbnail.png" alt="video thumbnail"> 10 </div> 11 <div class="vid-desc"> 12 <span>Pixar</span> 13 <p>Shooting Star Clip</p> 14 </div> 15 <div class="vid-rating"> 16 <span class="header"> 17 Rating 18 </span> 19 <div [hidden]="rating < 1"> 20 <span data-feather="thumbs-up" class="positive"></span> 21 </div> 22 <div [hidden]="rating >= 1"> 23 <span data-feather="thumbs-down" class="negative"></span> 24 </div> 25 </div> 26 </div> 27 </div> 28 </div>
NOTE: all assets used are available in the repo here.
We have the thumbs up and thumbs down icons, we display thumbs up if the rating is one and above. Thumbs down is displayed when the video rating is below one. The rating property will be defined in the admin.component.ts file below.
Styling
Add the styles below to the admin.component.scss file.
1// admin.component.scss 2 3 .admin { 4 width: 500px; 5 .video { 6 display: flex; 7 box-shadow: 0 3px 3px 0 rgba(0, 0, 0, 0.2); 8 padding: 10px; 9 .vid-thumbnail { 10 flex: 1; 11 img { 12 height: 70px; 13 width: 120px; 14 } 15 } 16 .vid-desc { 17 flex: 4; 18 padding: 0 8px; 19 span { 20 font-size: 15px; 21 font-weight: bold; 22 opacity: 0.8; 23 } 24 p { 25 margin: 3px; 26 font-size: 17px; 27 opacity: 0.6; 28 } 29 } 30 .vid-rating { 31 display: flex; 32 flex-direction: column; 33 align-items: center; 34 justify-content: center; 35 .header{ 36 font-size: 12px; 37 margin: 0 0 5px; 38 opacity: 0.6; 39 } 40 .positive { 41 color: #40a940; 42 } 43 .negative { 44 color: rgb(196, 64, 64); 45 } 46 } 47 } 48 }
Open the admin.component.ts file and update it as so:
1// admin.component.ts 2 3 import { Component, OnInit } from '@angular/core'; 4 import { PusherService } from '../pusher.service'; 5 6 declare const feather: any; 7 8 @Component({ 9 selector: 'app-admin', 10 templateUrl: './admin.component.html', 11 styleUrls: ['./admin.component.scss'], 12 }) 13 14 export class AdminComponent implements OnInit { 15 constructor(private pusher: PusherService) {} 16 rating = 1; 17 18 ngOnInit() { 19 feather.replace(); 20 const channel = this.pusher.init('rate'); 21 channel.bind('message', (data) => { 22 this.rating += data.score; 23 }); 24 } 25 }
rating: starting out, every video has a rating of 1.- In the
ngOnInitlifecycle, we initialize feather and subscribe to theratechannel. We then listen for amessageevent. In the callback, thescoreproperty of the data returned is added to theratingproperty.
Now let’s define the route for the admin page. Open the app-routing.module.ts file and update the routes array like so:
1// app-routing.module.ts 2 import { NgModule } from '@angular/core'; 3 import { Routes, RouterModule } from '@angular/router'; 4 import { HomeComponent } from './home/home.component'; 5 import { AdminComponent } from './admin/admin.component'; 6 7 const routes: Routes = [ 8 { 9 component: HomeComponent, 10 path: '', 11 }, 12 { 13 component: AdminComponent, 14 path: 'admin', 15 }, 16 ]; 17 ...
Navigate to http://localhost:4200/admin to view the admin page. Here’s a screenshot of what it looks like:
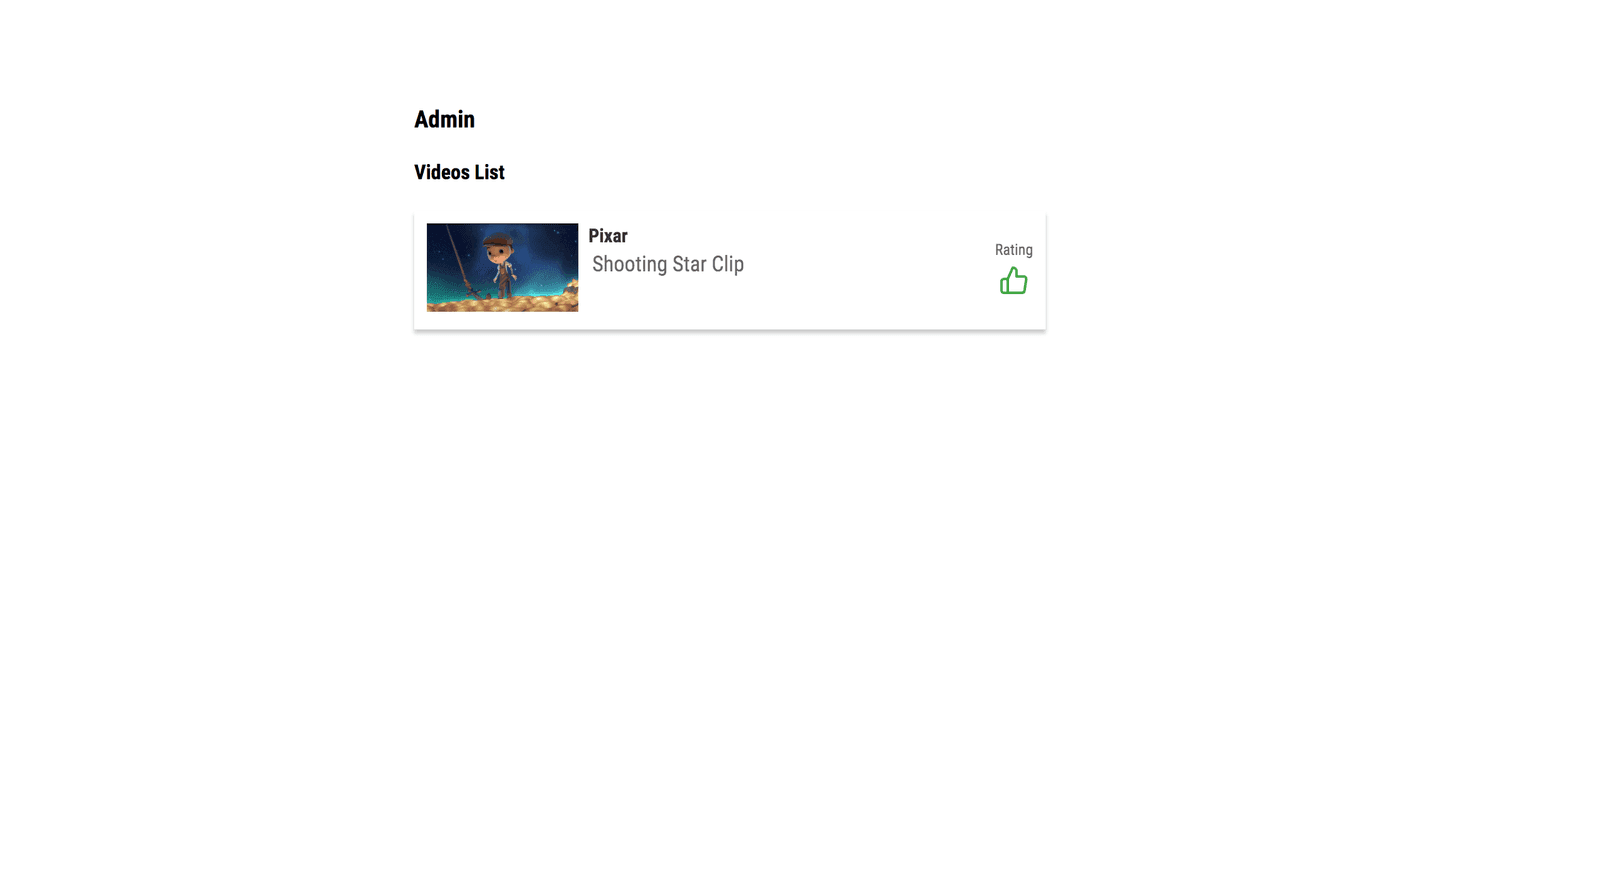
There’s not much going on here, but now our admin page rates videos in realtime whenever there’s a new comment.
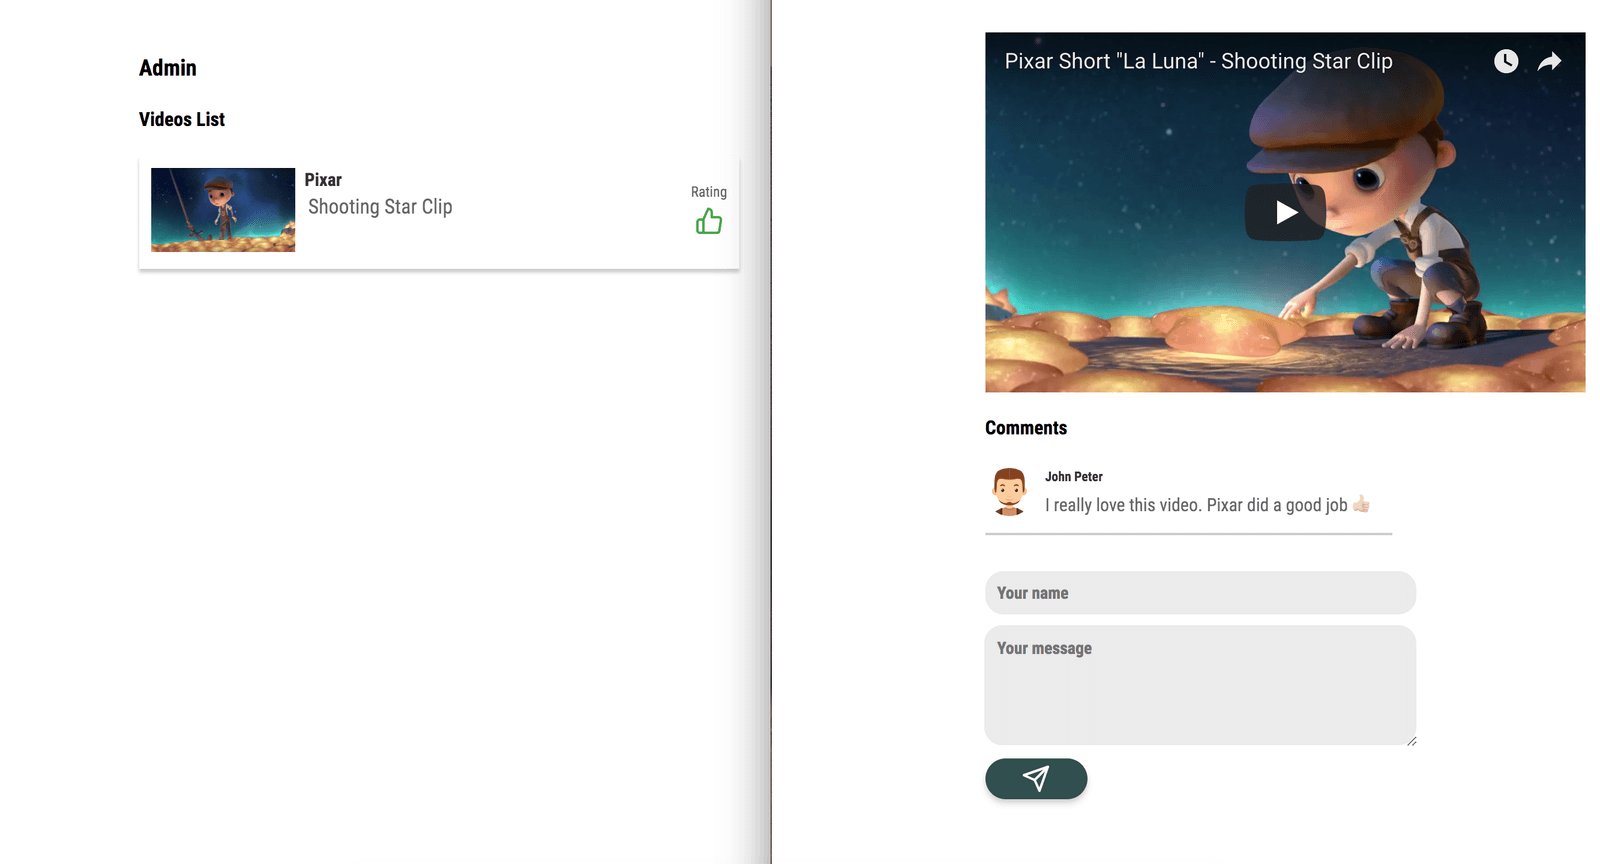
Here’s a screenshot of both pages side by side.
Conclusion
Using the sentiment analysis library, we can rate videos on our site by analyzing the comments posted under the videos. Using Pusher Channels, we were able to implement live comments functionality in our application. You can view the source code for the demo here.