- Products

- Developers
- User stories
- Blog
- Pricing

Create a live commenting system with Adonis.js and Vue.js
- Introduction
- Introduction
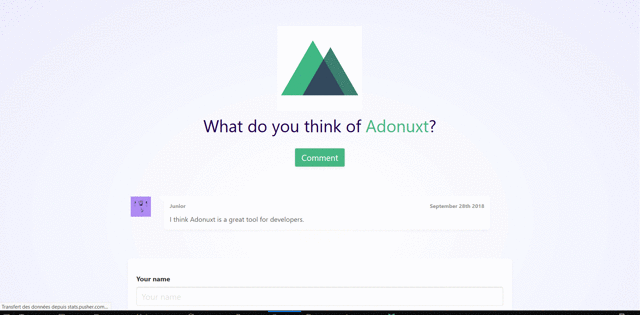
- Demo
- Prerequisites
- Set up our Adonis.js project
- Set up Pusher and install other dependencies
- Set up our build workflow
- Build our comment model and migration
- Define routes and create the controller
- Emit event with Pusher channels
- Set up Vuex store
- Create our state
- Create our getters
- Create our mutations
- Create our actions
- Set up our store with Vue
- Building Vue components
- Create the Comment.vue component
- Create the Comments.vue component
- Create the New-Comment.vue component
- Finalize the app
- Conclusion
Introduction
Introduction
In this tutorial, we’ll see how to build a live commenting system using Adonis.js on the backend, Vue.js to dynamise our views and Pusher to add the realtime commenting feature in our app. As users submit comments, they will be added and viewed instantly.
Pages that force you to reload them to view new comments can be annoying for users, especially since they don't even know if their even is reply to your comment yet. This poor user experience can cause users to abandon your site.
Demo
Here is the final result of our app:
Prerequisites
In order to follow this tutorial, knowledge of Javascript and Node.js is required. You should also have the following installed on your machine:
Set up our Adonis.js project
Before any step we should install Adonis.js on our local machine if this is not done yet. Open your terminal and run this command in order to do so:
1# if you don't have Adonis CLI installed on your machine. 2 npm install -g @adonisjs/cli 3 4 # Create a new adonis app and move into the app directory 5 $ adonis new adonis-comments-pusher && cd adonis-comments-pusher
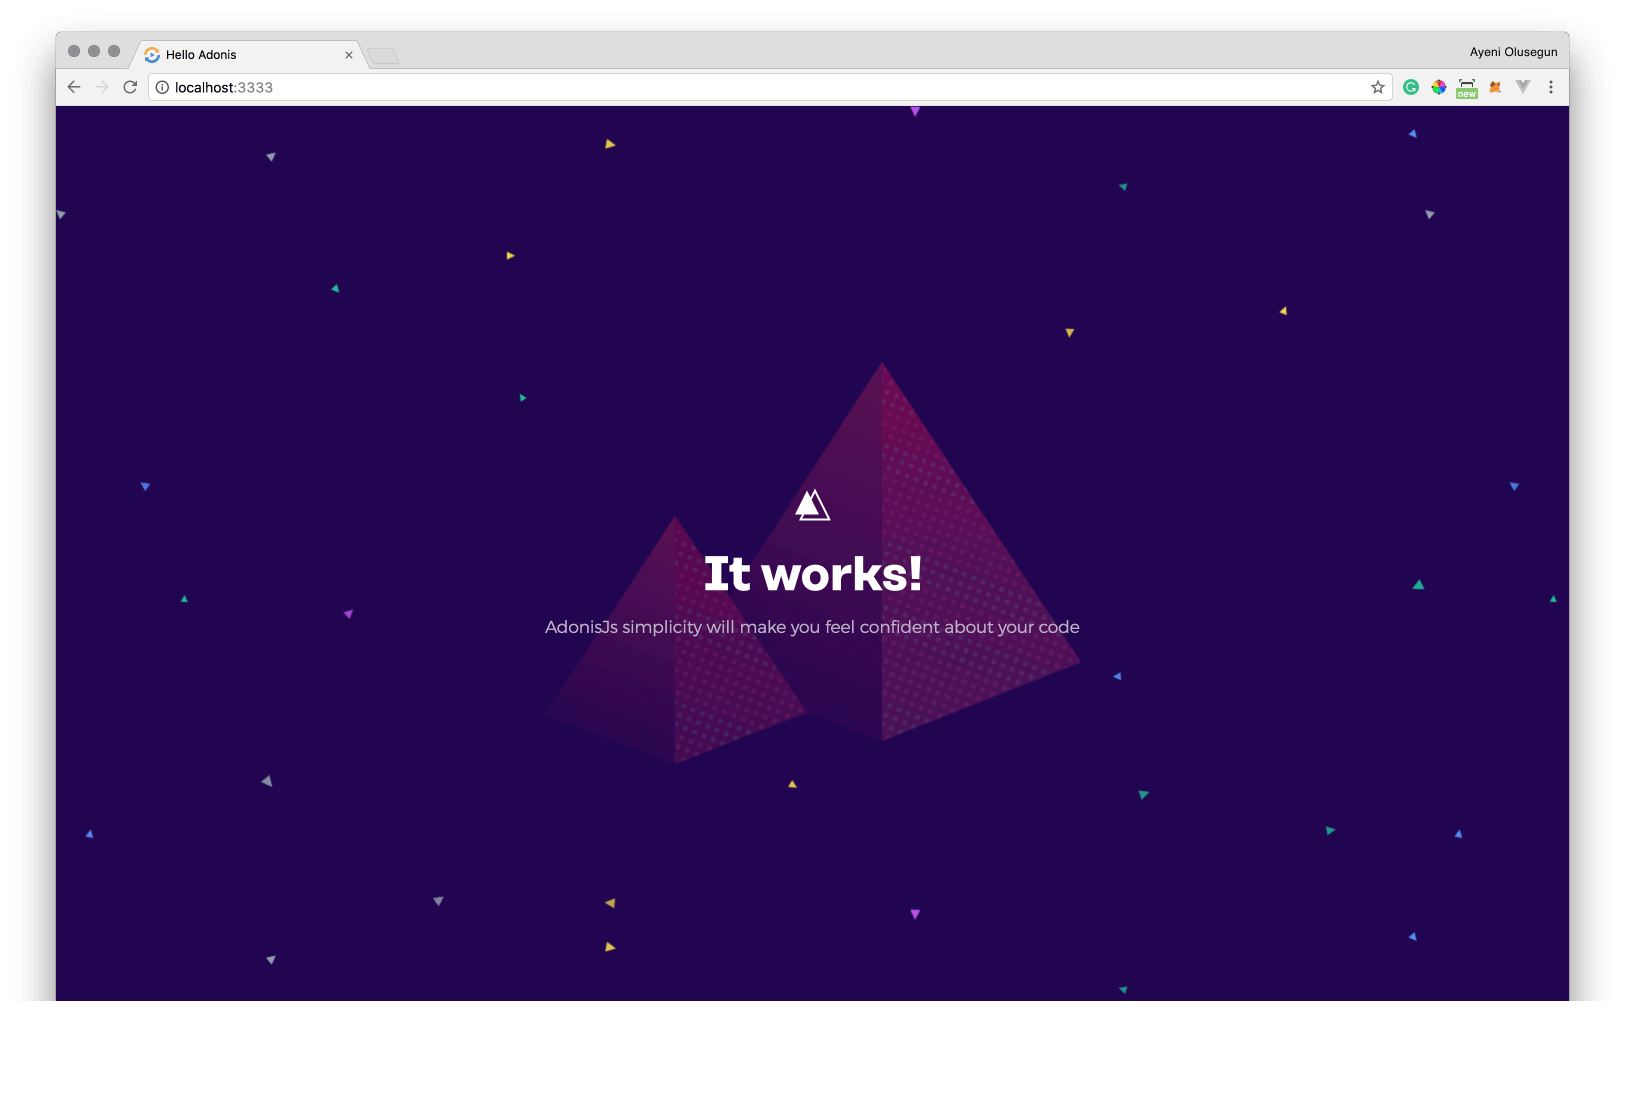
Now start the server and test if everything is working fine:
1adonis serve --dev 2 3 2018-09-23T12:25:30.326Z - info: serving app on http://127.0.0.1:3333
If the steps above were successful, open your browser and make a request to : http://127.0.0.1:3333.
You should see the following:
Set up Pusher and install other dependencies
Head over to Pusher and create an account or sign in if you already have a account.
Next, create a new Pusher app instance. This registration provides credentials which can be used to communicate with the created Pusher instance. Copy the App ID, Key, Secret, and Cluster from the App Keys section and put them in the .env file located at you project root:
1//.env 2 PUSHER_APP_KEY=<APP_KEY> 3 PUSHER_APP_SECRET=<APP_SECRET> 4 PUSHER_APP_ID=<APP_ID> 5 PUSHER_APP_CLUSTER=<APP_CLUSTER>
We’ll use these keys further in this tutorial to link Pusher with our Adonis project.
Next, we need to install the Pusher SDK as well as other dependencies we’ll need to build our app. We won’t use the Pusher SDK directly but instead use a Pusher provider for Adonis. This provider enables us to use easily the Pusher SDK with the Adonis.js ecosystem. But we should first install the Pusher SDK by running this command:
1#if you want to use npm 2 npm install pusher 3 4 #or if you prefer Yarn 5 yarn add pusher
Now, you can install the Pusher provider for Adonis with this command:
1#if you want to use npm 2 npm install adonis-pusher 3 4 #or if you prefer Yarn 5 yarn add adonis-pusher
You will need to add the provider to AdonisJS at start/app.js:
1const providers = [ 2 ... 3 'adonis-pusher/providers/Pusher' 4 ]
Last, let’s install other dependencies that we’ll use to build our app.
Run this command in your terminal:
1#if you want to use npm 2 npm install vue vuex axios laravel-mix pusher-js mysql cross-env 3 4 #or if you prefer Yarn 5 yarn add vue vuex axios laravel-mix pusher-js mysql cross-env
Dependencies we will use:
vueandvuexrespectively to build the frontend of our app and manage our data store,axiosto make HTTP requests to our API endpoints- laravel-mix to provide a clean, fluent API for defining basic webpack build steps
pusher-jsto listen to events emitted from our servermysql, Node.js driver for MySQL to set up our database as this app will use MySQL for storagecross-envto run scripts that set and use environment variables across platforms
Set up our build workflow
We’ll use laravel-mix to build and compile our application assets in a fluent way. But first we must tell our app to use it for that purpose. Open your package.json file and paste the following in the scripts section:
1"asset-dev": "cross-env NODE_ENV=development node_modules/webpack/bin/webpack.js --progress --hide-modules --config=node_modules/laravel-mix/setup/webpack.config.js", 2 "asset-watch": "cross-env NODE_ENV=development node_modules/webpack/bin/webpack.js --watch --progress --hide-modules --config=node_modules/laravel-mix/setup/webpack.config.js", 3 "asset-watch-poll": "npm run watch -- --watch-poll", 4 "asset-hot": "cross-env NODE_ENV=development node_modules/webpack-dev-server/bin/webpack-dev-server.js --inline --hot --config=node_modules/laravel-mix/setup/webpack.config.js", 5 "asset-prod": "cross-env NODE_ENV=production node_modules/webpack/bin/webpack.js --no-progress --hide-modules --config=node_modules/laravel-mix/setup/webpack.config.js"
After that create a webpack.mix.js file at the root of your project and paste this code:
1const mix = require('laravel-mix'); 2 3 mix.setPublicPath('public'); 4 /* 5 |-------------------------------------------------------------------------- 6 | Mix Asset Management 7 |-------------------------------------------------------------------------- 8 | 9 | Mix provides a clean, fluent API for defining some Webpack build steps 10 | for your Laravel application. By default, we are compiling the Sass 11 | file for your application, as well as bundling up your JS files. 12 | 13 */ 14 15 mix.js('resources/assets/js/app.js', 'public/js')
The code above builds, compiles and bundles all our javascript code into a single js file created automatically in public/js directory.
Now create this file assets/js/bootstrap.js and paste this code inside:
1window._ = require('lodash'); 2 3 window.axios = require('axios'); 4 5 window.axios.defaults.headers.common['X-Requested-With'] = 'XMLHttpRequest'; 6 window.axios.defaults.headers.post['Content-Type'] = 'application/x-www-form-urlencoded'; 7 window.axios.defaults.headers.common.crossDomain = true; 8 window.axios.defaults.baseURL = '/api'; 9 10 let token = document.head.querySelector('meta[name="csrf-token"]'); 11 12 if (token) { 13 window.axios.defaults.headers.common['X-CSRF-TOKEN'] = token.content; 14 } else { 15 console.error('CSRF token not found: https://adonisjs.com/docs/4.1/csrf'); 16 } 17 18 window.Pusher = require('pusher-js');
You will notice we require dependencies to build our app. We also globally registered some headers to the axios library in order to handle some security issues and to tackle in a proper way our API endpoints. These headers enable respectively ajax request, define Content-Type for our post requests, CORS and register the CSRF token.
Next, create this file: assets/js/app.js and paste the following inside:
require('./bootstrap')
When we import our bootstrap.js file , laravel-mix will compile our app.js file.
Our app is now ready to use laravel-mix for building and compiling our assets. By running this command: npm run asset-dev you should see a public/js/app.js file after the build process. Great!
Build our comment model and migration
First we need to set up our database, we’ll use a MySQL database for storage in this tutorial. Open your .env file and update the database section with your own identifiers:
1DB_CONNECTION=mysql 2 DB_HOST=127.0.0.1 3 DB_PORT=3306 4 DB_USER=your_database_user 5 DB_PASSWORD=your_dtabase_password 6 DB_DATABASE=your_database_name
Next, open your terminal and run the command below to generate our Comment model as well as its corresponding controller and migration file which will be used to build the schema for our comments table:
adonis make:model Comment -mc
Inside your product migration file, copy and paste this code:
1//../database/migrations/*_comment_schema.js 2 'use strict' 3 4 const Schema = use('Schema') 5 6 class CommentSchema extends Schema { 7 up() { 8 this.create('comments', (table) => { 9 table.increments() 10 table.string('content') 11 table.integer('author') 12 table.timestamps() 13 }) 14 } 15 16 down() { 17 this.drop('comments') 18 } 19 } 20 21 module.exports = CommentSchema
Our comment schema is pretty straightforward. You can see we defined our comments table fields as:
- content: to hold the comment text
- author: to contain the author’s name
The increments() will create an id field with Auto Increment and set it as Primary key. The timestamps() will create the created_at and updated_at fields respectively.
Now if your run this command: adonis migration:run in your terminal it will create a comments table in your database.
Define routes and create the controller
In this part of the tutorial, we’ll create our routes and define controller functions responsible for handling our HTTP requests.
We’ll create three basic routes for our application, one for rendering our app view, one for fetching comments from the database and the last one for storing comments into the database.
Go to the start/routes.js file and replace the content with:
1const Route = use('Route') 2 3 Route.get('/', 'CommentController.index') 4 5 Route.group(() => { 6 Route.get('/comments', 'CommentController.fetchComments') 7 Route.post('/comments', 'CommentController.store') 8 }).prefix('api')
This block pulls in Route service provider.
Routes defining in Adonis is similar to the Laravel methodology and you should not have any problems if you have worked with Laravel. We prefixed two of our routes with api to help remind us that they are api endpoints.
Next let’s create our controller functions. Open your CommentController.js file and paste the following:
1'use strict' 2 3 const Comment = use('App/Models/Comment') 4 const Event = use('Event') 5 6 class CommentController { 7 8 async index({view}) { 9 return view.render('comment') 10 } 11 12 async fetchComments({request, response}) { 13 let comments = await Comment.all() 14 return response.json(comments) 15 } 16 17 async store({request, response}) { 18 try { 19 let comment = await Comment.create(request.all()) 20 21 Event.fire('new::comment', comment.toJSON()) 22 return response.json("ok") 23 } catch (e) { 24 console.log(e) 25 } 26 27 } 28 29 } 30 31 module.exports = CommentController
The first lines import Event service provider and the Comment model.
You can notice three functions in the code above:
indexrenders thecomment.edgefile(that we’ll create later in this tutorial) in theresources/viewsdirectory (which is where views are stored in Adonis).fetchCommentsfetches comments from our database and returns them in a JSON formatstorecreates a newCommentinstance with the request queries. We also fire an event namednew::commentwith the new instance in a JSON format. We can listen to this event and manipulate the data it carries.
Emit event with Pusher channels
Create a filename event.js in the start directory. In this file we’ll create an event which will be fired every time we need to send a message via Pusher channels, and as it happens a posted comment via Pusher channels.
1//events.js 2 3 const Pusher = use('Pusher') 4 const Event = use('Event'); 5 const Env = use('Env'); 6 7 // set up Pusher 8 let pusher = new Pusher({ 9 appId: Env.get('PUSHER_APP_ID'), 10 key: Env.get('PUSHER_APP_KEY'), 11 secret: Env.get('PUSHER_APP_SECRET'), 12 cluster: Env.get('PUSHER_APP_CLUSTER'), 13 encrypted: false 14 }); 15 16 //fire new event 17 Event.when('new::comment', async (comment) => { 18 pusher.trigger('comment-channel', 'new-comment', { 19 comment 20 }) 21 });
We need to pull in the Event, Pusher (using the adonis-pusher package we installed earlier) and Env service providers.
Next, we registered a listener for the new::comment event, after which we initialize and configure Pusher. This event was registered in the CommentController.store function we created above to handle comment creation.
When we are done with the pusher configuration, we trigger a new-comment event on the comment-channel with the trigger method.
Set up Vuex store
We’ll be using the Vuex library to centralize our data and control the way it is mutated throughout our application.
Create our state
Vuex state is a single object that contains all our application data. So let’s create ../resources/js/store/state.js and paste this code inside:
1let state = { 2 comments: [] 3 } 4 export default state
The comments key is an array responsible to store our database comments.
Create our getters
With help of getters we can compute derived based on our data store state. Create ../resources/js/store/getters.js and paste this code inside
1let getters = { 2 comments: state => { 3 return state.comments 4 } 5 } 6 7 export default getters
Create our mutations
Mutations allow us to perform some changes on our data. Create ../resources/js/store/mutations.js and paste this piece of code inside:
1let mutations = { 2 GET_COMMENTS(state, comments) { 3 state.comments = comments 4 }, 5 ADD_COMMENT(state, comment) { 6 state.comments = [...state.comments, comment] 7 } 8 } 9 10 export default mutations
Our mutations object has 2 functions:
GET_COMMENTSis responsible for getting our comments data from a database or webserver.ADD_COMMENTis responsible for adding a new comment to our comments array using the ES6 spread operator.
Create our actions
Vuex actions allow us to perform asynchronous operations over our data. Create the file ../resources/js/store/actions.js and paste the following code:
1let actions = { 2 ADD_COMMENT({commit}, comment) { 3 4 return new Promise((resolve, reject) => { 5 axios.post(`/comments`, comment) 6 .then(response => { 7 resolve(response) 8 }).catch(err => { 9 reject(err) 10 }) 11 }) 12 13 }, 14 15 GET_COMMENTS({commit}) { 16 axios.get('/comments') 17 .then(res => { 18 { 19 commit('GET_COMMENTS', res.data) 20 } 21 }) 22 .catch(err => { 23 console.log(err) 24 }) 25 } 26 } 27 28 export default actions
We have defined two actions and each of them is responsible for a single operation, either comments post or comments fetch. They both perform asynchronous calls to our API routes.
-
ADD_COMMENTsends a post request to our/api/commentswith the new comment to create and returns a new promise (later in this tutorial we’ll handle the returned promise). This action is dispatched whenever a user submits a comment. -
GET_COMMENTSmakes a get request to ourapi/commentsendpoint to get our database comments and commits the request result withGET_COMMENTSmutation.
Set up our store with Vue
Create the file ../resources/assets/js/store/index.js and paste this code inside:
1import Vue from 'vue' 2 import Vuex from 'vuex' 3 import actions from './actions' 4 import mutations from './mutations' 5 import getters from './getters' 6 import state from "./state"; 7 8 Vue.use(Vuex); 9 10 export default new Vuex.Store({ 11 state, 12 mutations, 13 getters, 14 actions 15 })
Next, we will export our store and add it to the Vue instance.
Add this code to your ../resouces/js/app.js file.
1require('./bootstrap') 2 3 window.Vue = require('vue'); 4 5 import store from './store/index' 6 7 Vue.component('comment', require('./components/Comment')); 8 Vue.component('comments', require('./components/Comments')) 9 Vue.component('new-comment', require('./components/NewComment')) 10 11 const app = new Vue({ 12 el: '#app', 13 store 14 });
The code above globally registers three Vue components, Comment.vue ,Comments.vue and NewComment.vue that we’ll build in the next part of this tutorial.
Building Vue components
We’ll build three Vue components for our app, the Comment.vue component, the Comments.vue and the NewComment.vue component, each of them responsible for a single functionality.
Create the Comment.vue component
The Comment.vue component is responsible for encapsulating details about a single comment instance from the database and rendering it in a proper and styled way.
Paste the following inside your Comment.vue component.
1//../resources/assets/js/components/Comment.vue 2 3 <template> 4 <li class="comment-wrapper animate slideInLeft "> 5 <div class="profile"> 6 <img :src="avatar" alt=""></div> 7 <div class="msg has-shadow"> 8 <div class="msg-body"><p class="name">{{comment.author}} <span class="date">{{posted_at}}</span></p> 9 <p class="content">{{comment.content}}</p></div> 10 </div> 11 </li> 12 </template> 13 14 <script> 15 export default { 16 name: "Comment", 17 props: ['comment'], 18 computed: { 19 posted_at() { 20 return moment(this.comment.created_at).format('MMMM Do YYYY') 21 }, 22 avatar() { 23 return `https://api.adorable.io/avatars/48/${this.comment.author}@adorable.io.png` 24 } 25 } 26 } 27 </script> 28 29 <style lang="scss" scoped> 30 .comment-wrapper { 31 list-style: none; 32 text-align: left; 33 overflow: hidden; 34 margin-bottom: 2em; 35 padding: .4em; 36 37 .profile { 38 width: 80px; 39 float: left; 40 } 41 42 .msg-body { 43 padding: .8em; 44 color: #666; 45 line-height: 1.5; 46 } 47 48 .msg { 49 width: 86%; 50 float: left; 51 background-color: #fff; 52 border-radius: 0 5px 5px 5px; 53 position: relative; 54 &::after { 55 content: " "; 56 position: absolute; 57 left: -13px; 58 top: 0; 59 border: 14px solid transparent; 60 border-top-color: #fff; 61 } 62 } 63 64 .date { 65 float: right; 66 } 67 .name { 68 margin: 0; 69 color: #999; 70 font-weight: 700; 71 font-size: .8em; 72 } 73 74 p:last-child { 75 margin-top: .6em; 76 margin-bottom: 0; 77 } 78 . 79 } 80 81 82 </style>
Our Comment.vue component takes a comment property whose details we simply render in the component body. We also defined two computed properties, posted_at to parse the Moment.js library with the comment posted date, and avatar to generate an avatar for the comment author using this API.
In the style block we’ve defined some styles to our comment component in order to make things look more beautiful.
Create the Comments.vue component
This component will render comment items from the database.
Create your Comments.vue component and paste this code inside:
1../resources/assets/js/components/Comments.vue 2 3 <template> 4 <div class="container"> 5 <ul class="comment-list"> 6 <Comment :key="comment.id" v-for="comment in comments" :comment="comment"></Comment> 7 </ul> 8 </div> 9 </template> 10 11 <script> 12 import {mapGetters} from 'vuex' 13 import Comment from './Comment' 14 15 export default { 16 name: "Comments", 17 components: {Comment}, 18 mounted() { 19 this.$store.dispatch('GET_COMMENTS') 20 21 //use your own credentials you get from Pusher 22 let pusher = new Pusher(YOUR_PUSHER_APP_ID, { 23 cluster: YOUR_PUSHER_CLUSTER, 24 encrypted: false 25 }); 26 27 //Subscribe to the channel we specified in our Adonis Application 28 let channel = pusher.subscribe('comment-channel') 29 30 channel.bind('new-comment', (data) => { 31 this.$store.commit('ADD_COMMENT', data.comment) 32 }) 33 }, 34 computed: { 35 ...mapGetters([ 36 'comments' 37 ]) 38 } 39 } 40 </script> 41 42 <style scoped> 43 .comment-list { 44 padding: 1em 0; 45 margin-bottom: 15px; 46 } 47 48 </style>
In the template section of this code, we loop through our comments array and render for each loop iteration a Comment.vue component imported with the current comment iterated as a property.
In the mounted hook function we dispatched the GET_COMMENTS action. The action defined above sends a get request to our database to fetch posted comments. Then, we initialized a Pusher instance using the credentials obtained earlier when creating our Pusher app. Next, we subscribed to the comment-channel and listened to the new-comment event in order to commit the ADD_COMMENT mutation with the new comment pulled in by the event.
We also used the Vuex helper function …mapGetters() to access our comments state as computed property. In this component we also defined some styles to beautify our interface in the style block.
Create the New-Comment.vue component
Our third component is responsible for displaying a form to our users for comment posting. It should also send a request to our database when a user submits his comment. Let’s create the New-Comment.vue component, copy and paste this code inside:
1<template> 2 <div id="commentForm" class="box has-shadow has-background-white"> 3 4 <form @keyup.enter="postComment"> 5 <div class="field has-margin-top"> 6 7 <div class="field has-margin-top"> 8 <label class="label">Your name</label> 9 <div class="control"> 10 <input type="text" placeholder="Your name" class="input is-medium" v-model="comment.author"> 11 </div> 12 13 </div> 14 <div class="field has-margin-top"> 15 <label class="label">Your comment</label> 16 <div class="control"> 17 <textarea 18 style="height:100px;" 19 name="comment" 20 class="input is-medium" autocomplete="true" v-model="comment.content" 21 placeholder="lorem ipsum"></textarea> 22 </div> 23 24 </div> 25 <div class="control has-margin-top"> 26 <button style="background-color: #47b784" :class="{'is-loading': submit}" 27 class="button has-shadow is-medium has-text-white" 28 :disabled="!isValid" 29 @click.prevent="postComment" 30 type="submit"> Submit 31 </button> 32 </div> 33 </div> 34 </form> 35 <br> 36 </div> 37 </template> 38 39 <script> 40 export default { 41 name: "NewComment", 42 data() { 43 return { 44 submit: false, 45 comment: { 46 content: '', 47 author: '', 48 } 49 } 50 }, 51 methods: { 52 postComment() { 53 this.submit = true; 54 this.$store.dispatch('ADD_COMMENT', this.comment) 55 .then(response => { 56 this.submit = false; 57 if (response.data === 'ok') 58 console.log('success') 59 }).catch(err => { 60 this.submit = false 61 }) 62 63 }, 64 }, 65 computed: { 66 isValid() { 67 return this.comment.content !== '' && this.comment.author !== '' 68 } 69 } 70 } 71 </script> 72 73 <style scoped> 74 .has-margin-top { 75 margin-top: 15px; 76 } 77 78 </style>
We bind our comment data to our comment content and author name fields using the Vue.js v-model directive. We handled the form submission with the postComment function inside which we dispatch the ADD_COMMENT mutation with the comment data entered by the user. We also defined isValid as a computed property that we use to disable the submit button if the two required fields are empty.
Finalize the app
Now, let’s create our comment.edge file which contains our three Vue.js components. Run this command: adonis make:view comment to create the file. Then paste this code inside:
1<!DOCTYPE html> 2 <html lang="en"> 3 <head> 4 <meta charset="UTF-8"/> 5 <title>Realtime search with Adonis and Pusher</title> 6 <meta name="csrf-token" content="{{csrfToken}}"> 7 8 <meta name="viewport" 9 content="width=device-width, user-scalable=no, initial-scale=1.0, maximum-scale=1.0, minimum-scale=1.0"> 10 11 <!-- Bootstrap core CSS --> 12 <link rel="stylesheet" href="https://cdnjs.cloudflare.com/ajax/libs/bulma/0.7.1/css/bulma.min.css"/> 13 <link rel="stylesheet" href="https://cdnjs.cloudflare.com/ajax/libs/animate.css/3.5.2/animate.min.css"/> 14 15 <style> 16 html { 17 background: radial-gradient(ellipse at center, #fff 0, #ededfd 100%); 18 } 19 20 #app { 21 width: 60%; 22 margin: 4rem auto; 23 } 24 25 .container { 26 margin: 0 auto; 27 position: relative; 28 width: unset; 29 } 30 31 .question-wrapper { 32 text-align: center; 33 } 34 35 .has-shadow { 36 box-shadow: 0 4px 8px -2px rgba(0, 0, 0, 0.05) !important; 37 } 38 39 </style> 40 </head> 41 <body> 42 43 44 <div id="app"> 45 46 <div class="container"> 47 48 <div class="question-wrapper"> 49 <img width="200" src="{{ assetsUrl('images/adonuxt.png') }}" alt=""> 50 <h5 class="is-size-2" style="color: #220052;"> 51 What do you think about <span style="color: #47b784;">Adonuxt</span>?</h5> 52 <br> 53 <a href="#commentForm" class="button is-medium has-shadow has-text-white" style="background-color: #47b784">Comment</a> 54 </div> 55 56 <br><br> 57 <comments></comments> 58 <new-comment></new-comment> 59 </div> 60 61 </div> 62 {{ script('js/app.js') }} 63 64 </body> 65 </html>
We are almost done! Now open your terminal and run npm run asset-dev to build your app. This can take a few seconds. After this step, run adonis serve --dev and open your browser to localhost:3333 to see your app working. Try posting a new comment! You should see your comment added in realtime 😎.
Conclusion
In this tutorial, we have covered how to create a live commenting system using Adonis.js, Vue.js and Pusher. You can get the full source code here.


© 2026 Pusher Ltd. All rights reserved.
Pusher Limited is a company registered in England and Wales (No. 07489873) whose registered office is at MessageBird UK Limited, 3 More London Riverside, 4th Floor, London, United Kingdom, SE1 2AQ.